
Chapter 2. Android’s development environment
This chapter covers
- Introducing the Android SDK
- Exploring the development environment
- Building an Android application in Eclipse
- Debugging applications in the Android emulator
Building upon the foundational information presented in the first chapter, we pick up the pace by introducing the Android development environment used to construct the applications in the balance of the book. If you haven’t installed the development tools, refer to appendix A for a step-by-step guide to downloading and installing the tools.
This chapter introduces the Android development tool chain, the software tools required to build Android applications, and serves as your hands-on guide to creating, testing, and even debugging applications. When you’ve completed this chapter, you’ll be familiar with using Eclipse and the Android Development Tools (ADT) plug-in for Eclipse, navigating the Android SDK, running Android applications in the emulator, and stepping line-by-line through a sample application that you’ll construct in this chapter: a simple tip calculator.
Android developers spend a significant amount of time working with the Android emulator to debug their applications. This chapter goes into detail about creating and building projects, defining Android virtual devices (emulators), setting up run configurations, and running and debugging applications on an instance of the Android emulator. If you’ve never constructed an Android application, please don’t skip this chapter; mastering the basics demonstrated here will aide your learning throughout the rest of the book.
When embracing a new platform, the first task for a developer is gaining an understanding of the SDK and its components. Let’s start by examining the core components of the Android SDK, then transition into using the SDK’s tools to build and debug an application.
2.1. Introducing the Android SDK
The Android SDK is a freely available download from the Android website. The first thing you should do before going any further in this chapter is make sure you have the Android SDK installed, along with Eclipse and the Android plug-in for Eclipse, also known as the Android Development Tools, or simply as the ADT. The Android SDK is required to build Android applications, and Eclipse is the preferred development environment for this book. You can download the Android SDK from http://developer.android.com/sdk/index.html.
Tip
The Android download page has instructions for installing the SDK, or you can refer to appendix A of this book for detailed information on installing the required development tools.
As in any development environment, becoming familiar with the class structures is helpful, so having the documentation at hand as a reference is a good idea. The Android SDK includes HTML-based documentation, which primarily consists of Javadoc-formatted pages that describe the available packages and classes. The Android SDK documentation is in the /doc directory under your SDK installation. Because of the rapidly changing nature of this new platform, you might want to keep an eye out for any changes to the SDK. The most up-to-date Android SDK documentation is available at http://developer.android.com/reference/packages.html.
Android’s Java environment can be broken down into a handful of key sections. When you understand the contents in each of these sections, the Javadoc reference material that ships with the SDK becomes a real tool and not just a pile of seemingly unrelated material. You might recall that Android isn’t a strictly Java ME software environment, but there’s some commonality between the Android platforms and other Java development platforms. The next few sections review some of the Java packages (core and optional) in the Android SDK and where you can use them. The remaining chapters provide a deeper look into using many of these programming topics.
2.1.1. Core Android packages
If you’ve ever developed in Java, you’ll recognize many familiar Java packages for core functionality. These packages provide basic computational support for things such as string management, input/output controls, math, and more. The following list contains some of the Java packages included in the Android SDK:
- java.lang— Core Java language classes
- java.io— Input/output capabilities
- java.net— Network connections
- java.text— Text-handling utilities
- java.math— Math and number-manipulation classes
- javax.net— Network classes
- javax.security— Security-related classes
- javax.xml— DOM-based XML classes
- org.apache.*— HTTP-related classes
- org.xml— SAX-based XML classes
Additional Java classes are also included. Generally speaking, this book won’t focus much on the core Java packages listed here, because our primary concern is Android development. With that in mind, let’s look at the Android-specific functionality found in the Android SDK.
Android-specific packages are easy to identify because they start with android in the package name. Some of the more important packages are:
- android.app— Android application model access
- android.bluetooth— Android’s Bluetooth functionality
- android.content— Accessing and publishing data in Android
- android.net— Contains the Uri class, used for accessing content
- android.gesture— Create, recognize, load, and save gestures
- android.graphics— Graphics primitives
- android.location— Location-based services (such as GPS)
- android.opengl— OpenGL classes
- android.os— System-level access to the Android environment
- android.provider— ContentProvider-related classes
- android.telephony— Telephony capability access, including support for both Code Division Multiple Access (CDMA) and Global System for Mobile communication (GSM) devices
- android.text— Text layout
- android.util— Collection of utilities for logging and text manipulation, including XML
- android.view— UI elements
- android.webkit— Browser functionality
- android.widget— More UI elements
Some of these packages are core to Android application development, including android.app, android.view, and android.content. Other packages are used to varying degrees, depending on the type of applications that you’re constructing.
2.1.2. Optional packages
Not every Android device has the same hardware and mobile connectivity capabilities, so you can consider some elements of the Android SDK as optional. Some devices support these features, and others don’t. It’s important that an application degrade gracefully if a feature isn’t available on a specific handset. Java packages that you should pay special attention to include those that rely on specific, underlying hardware and network characteristics, such as location-based services (including GPS) and wireless technologies such as Bluetooth and Wi-Fi (802.11).
This quick introduction to the Android SDK’s programming interfaces is just that—quick and at-a-glance. Upcoming chapters go into the class libraries in further detail, exercising specific classes as you learn about various topics such as UIs, graphics, location-based services, telephony, and more. For now, the focus is on the tools required to compile and run (or build) Android applications.
Before you build an Android application, let’s examine how the Android SDK and its components fit into the Eclipse environment.
2.2. Exploring the development environment
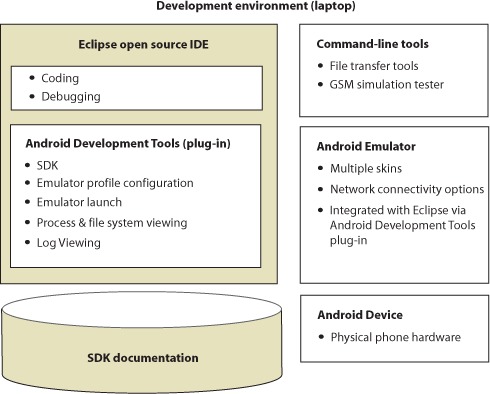
After you install the Android SDK and the ADT plug-in for Eclipse, you’re ready to explore the development environment. Figure 2.1 depicts the typical Android development environment, including both real hardware and the useful Android emulator. Although Eclipse isn’t the exclusive tool required for Android development, it can play a big role in Android development, not only because it provides a rich Java compilation and debugging environment, but also because with the ADT plug-in, you can manage and control virtually all aspects of testing your Android applications directly from the Eclipse IDE.
Figure 2.1. The development environment for building Android applications, including the popular open source Eclipse IDE
The following list describes key features of the Eclipse environment as it pertains to Android application development:
- A rich Java development environment, including Java source compilation, class auto-completion, and integrated Javadoc
- Source-level debugging
- AVD management and launch
- The Dalvik Debug Monitor Server (DDMS)
- Thread and heap views
- Emulator filesystem management
- Data and voice network control
- Emulator control
- System and application logging
Eclipse supports the concept of perspectives, where the layout of the screen has a set of related windows and tools. The windows and tools included in an Eclipse perspective are known as views. When developing Android applications, there are two Eclipse perspectives of primary interest to us: the Java perspective and the DDMS perspective. Beyond those two, the Debug perspective is also available and useful when you’re debugging an Android application; we’ll talk about the Debug perspective in section 2.5. To switch between the available perspectives in Eclipse, use the Open Perspective menu, under the Window menu in the Eclipse IDE.
Let’s examine the features of the Java and DDMS perspectives and how you can leverage them for Android development.
2.2.1. The Java perspective
The Java perspective is where you’ll spend most of your time while developing Android applications. The Java perspective boasts a number of convenient views for assisting in the development process. The Package Explorer view allows you to see the Java projects in your Eclipse workspace. Figure 2.2 shows the Package Explorer listing some of the sample projects for this book.
Figure 2.2. The Package Explorer allows you to browse the elements of your Android projects.

The Java perspective is where you’ll edit your Java source code. Every time you save your source file, it’s automatically compiled by Eclipse’s Java development tools (JDT) in the background. You don’t need to worry about the specifics of the JDT; the important thing to know is that it’s functioning in the background to make your Java experience as seamless and painless as possible. If there’s an error in your source code, the details will show up in the Problems view of the Java perspective. Figure 2.3 has an intentional error in the source code to demonstrate the Problems view. You can also put your mouse over the red x to the left of the line containing the error for a tool-tip explanation of the problem.
Figure 2.3. The Problems view shows any errors in your source code.

One powerful feature of the Java perspective in Eclipse is the integration between the source code and the Javadoc view. The Javadoc view updates automatically to provide any available documentation about a currently selected Java class or method, as shown in figure 2.4. In this figure, the Javadoc view displays information about the Activity class.
Figure 2.4. The Javadoc view provides context-sensitive documentation, in this case for the Activity class.

Tips
This chapter scratches the surface in introducing the powerful Eclipse environment. To learn more about Eclipse, you might consider reading Eclipse in Action: A Guide for Java Developers, by David Gallardo, Ed Burnette, and Robert McGovern, published by Manning and available online at http://www.manning.com/.
It’s easy to get the views in the current perspective into a layout that isn’t what you really want. If this occurs, you have a couple of choices to restore the perspective to a more useful state. You can use the Show View menu under the Window menu to display a specific view or you can select the Reset Perspective menu to restore the perspective to its default settings.
In addition to the JDT, which compiles Java source files, the ADT automatically compiles Android-specific files such as layout and resource files. You’ll learn more about the underlying tools later in this chapter and again in chapter 3, but now it’s time to have a look at the Android-specific perspective in the DDMS.
2.2.2. The DDMS perspective
The DDMS perspective provides a dashboard-like view into the heart of a running Android device, or in this example, a running Android emulator. Figure 2.5 shows the emulator running the chapter 2 sample application.
Figure 2.5. DDMS perspective with an application running in the Android emulator
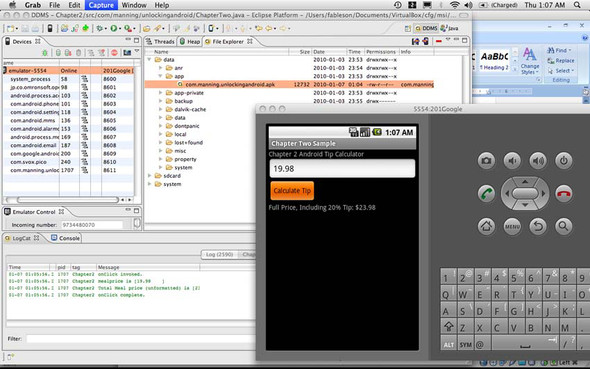
We’ll walk through the details of the application, including how to build the application and how to start it running in the Android emulator, but first let’s see what there is to learn from the DDMS with regard to our discussion about the tools available for Android development.
The Devices view in figure 2.5 shows a single emulator session, titled emulator-tcp-5554. The title indicates that there’s a connection to the Android emulator at TCP/IP port 5554. Within this emulator session, five processes are running. The one of interest to us is com.manning.unlockingandroid, which has the process ID 1707.
Tip
Unless you’re testing a peer-to-peer application, you’ll typically have only a single Android emulator session running at a time although it is possible to have multiple instances of the Android emulator running concurrently on a single development machine. You might also have a physical Android device connected to your development machine—the DDMS interface is the same.
Logging is an essential tool in software development, which brings us to the LogCat view of the DDMS perspective. This view provides a glimpse at system and application logging taking place in the Android emulator. In figure 2.5, a filter has been set up for looking at entries with a tag value of Chapter2. Using a filter on the LogCat is a helpful practice, because it can reduce the noise of all the logging entries and let you focus on your own application’s entries. In this case, four entries in the list match our filter criteria. We’ll look at the source code soon to see how you get your messages into the log. Note that these log entries have a column showing the process ID, or PID, of the application contributing the log entry. As expected, the PID for our log entries is 616, matching our running application instance in the emulator.
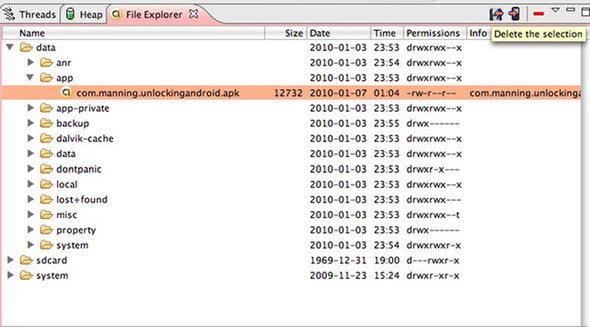
The File Explorer view is shown in the upper right of figure 2.5. User applications—the ones you and I write—are deployed with a file extension of .apk and stored in the /data/app directory of the Android device. The File Explorer view also permits filesystem operations such as copying files to and from the Android emulator, as well as removing files from the emulator’s filesystem. Figure 2.6 shows the process of deleting a user application from the /data/app directory.
Figure 2.6. Delete applications from the emulator by highlighting the application file and clicking the Delete button.
Obviously, being able to casually browse the filesystem of your mobile phone is a great convenience. This feature is nice to have for mobile development, where you’re often relying on cryptic pop-up messages to help you along in the application development and debugging process. With easy access to the filesystem, you can work with files and readily copy them to and from your development computer platform as necessary.
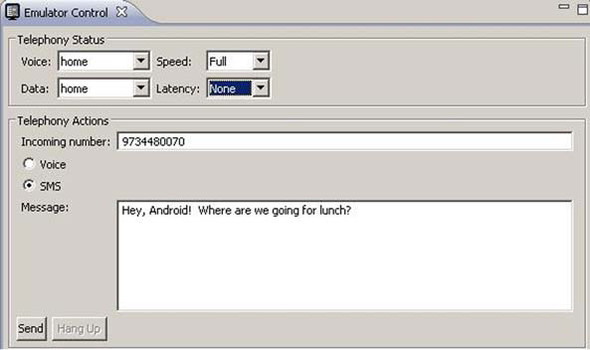
In addition to exploring a running application, the DDMS perspective provides tools for controlling the emulated environment. For example, the Emulator Control view lets you test connectivity characteristics for both voice and data networks, such as simulating a phone call or receiving an incoming Short Message Service (SMS). Figure 2.7 demonstrates sending an SMS message to the Android emulator.
Figure 2.7. Sending a test SMS to the Android emulator
The DDMS provides a lot of visibility into, and control over, the Android emulator, and is a handy tool for evaluating your Android applications. Before we move on to building and testing Android applications, it’s helpful to understand what’s happening behind the scenes and what’s enabling the functionality of the DDMS.
2.2.3. Command-line tools
The Android SDK ships with a collection of command-line tools, which are located in the tools subdirectory of your Android SDK installation. Eclipse and the ADT provide a great deal of control over the Android development environment, but sometimes it’s nice to exercise greater control, particularly when considering the power and convenience that scripting can bring to a development platform. Next, we’re going to explore two of the command-line tools found in the Android SDK.
Tip
It’s a good idea to add the tools directory to your search path. For example, if your Android SDK is installed to c:softwaregoogleandroidsdk, you can add the Android SDK to your path by performing the following operation in a command window on your Windows computer:
set path=%path%;c:softwaregoogleandroidsdk ools;
Or use the following command for Mac OS X and Linux:
export PATH=$PATH:/path_to_Android_SDK_directory/tools
Android Asset Packaging Tool
You might be wondering just how files such as the layout file main.xml get processed and exactly where the R.java file comes from. Who zips up the application file for you into the apk file? Well, you might have already guessed the answer from the heading of this section—it’s the Android Asset Packaging Tool, or as it’s called from the command line, aapt. This versatile tool combines the functionality of pkzip or jar along with an Android-specific resource compiler. Depending on the command-line options you provide to it, aapt wears a number of hats and assists with your design-time Android development tasks. To learn the functionality available in aapt, run it from the command line with no arguments. A detailed usage message is written to the screen.
Whereas aapt helps with design-time tasks, another tool, the Android Debug Bridge, assists you at runtime to interact with the Android emulator.
Android Debug Bridge
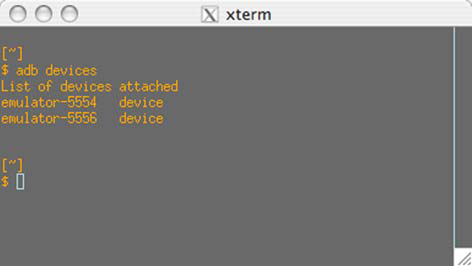
The Android Debug Bridge (adb) utility permits you to interact with the Android emulator directly from the command line or script. Have you ever wished you could navigate the filesystem on your smartphone? Now you can with the adb! The adb works as a client/server TCP-based application. Although a couple of background processes run on the development machine and the emulator to enable your functionality, the important thing to understand is that when you run adb, you get access to a running instance of the Android emulator. Here are a couple of examples of using adb. First, let’s look to see if we have any available Android emulator sessions running:
adb devices<return>
This command returns a list of available Android emulators; figure 2.8 demonstrates adb locating two running emulator sessions.
Figure 2.8. The adb tool provides interaction at runtime with the Android emulator.
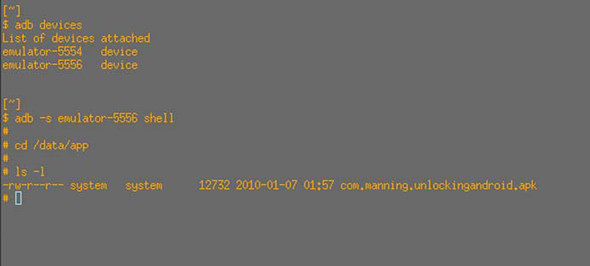
Let’s connect to the first Android emulator session and see if your application is installed. You connect to a device or emulator with the syntax adb shell. You would connect this way if you had a single Android emulator session active, but because two emulators are running, you need to specify the serial number, or identifier, to connect to the appropriate session:
adb –s "serialnumber" shell
Figure 2.9 shows off the Android filesystem and demonstrates looking for a specific installed application, namely our chapter2 sample application, which you’ll build in section 2.3.
Figure 2.9. Using the shell command of the adb, you can browse Android’s filesystem.
Using the shell can be handy when you want to remove a specific file from the emulator’s filesystem, kill a process, or generally interact with the operating environment of the Android emulator. If you download an application from the internet, for example, you can use the adb command to install the application:
adb [-s serialnumber] shell install someapplication.apk
This command installs the application named someapplication to the Android emulator. The file is copied to the /data/app directory and is accessible from the Android application launcher. Similarly, if you want to remove an application, you can run adb to remove an application from the Android emulator. If you want to remove the com.manning.unlockingandroid.apk sample application from a running emulator’s filesystem, for example, you can execute the following command from a terminal or Windows command window:
adb shell rm /data/app/com.manning.unlockingandroid.apk
You certainly don’t need to master the command-line tools in the Android SDK to develop applications in Android, but understanding what’s available and where to look for capabilities is a good skill to have in your toolbox. If you need assistance with either the aapt or adb command, enter the command at the terminal, and a fairly verbose usage/help page is displayed. You can find additional information about the tools in the Android SDK documentation.
Tip
The Android filesystem is a Linux filesystem. Though the adb shell command doesn’t provide a rich shell programming environment, as you find on a Linux or Mac OS X system, basic commands such as ls, ps, kill, and rm are available. If you’re new to Linux, you might benefit from learning some basic shell commands.
Telnet
One other tool you’ll want to make sure you’re familiar with is telnet. Telnet allows you to connect to a remote system with a character-based UI. In this case, the remote system you connect to is the Android emulator’s console. You can connect to it with the following command:
telnet localhost 5554
In this case, localhost represents your local development computer where the Android emulator has been started, because the Android emulator relies on your computer’s loopback IP address of 127.0.0.1. Why port 5554? Recall that when we employed adb to find running emulator instances, the output of that command included a name with a number at the end. The first Android emulator can generally be found at IP port 5554.
Note
In early versions of the Android SDK, the emulator ran at port 5555 and the Android console—where we could connect via Telnet—ran at 5554, or one number less than the number shown in DDMS. If you’re having difficulty identifying which port number to connect on, be sure run netstat on your development machine to assist in finding the port number. Note that a physical device listens at port 5037.
Using a telnet connection to the emulator provides a command-line means for configuring the emulator while it’s running and for testing telephony features such as calls and text messages.
So far you’ve learned about the Eclipse environment and some of the command-line elements of the Android tool chain. At this point, it’s time to create your own Android application to exercise this development environment.
2.3. Building an Android application in Eclipse
Eclipse provides a comprehensive environment for Android developers to create applications. In this section, we’ll demonstrate how to build a basic Android application, step-by-step. You’ll learn how to define a simple UI, provide code logic to support it, and create the deployment file used by all Android applications: AndroidManifest.xml. Our goal in this section is to get a simple application under your belt. We’ll leave more complex applications for later chapters; our focus is on exercising the development tools and providing a concise, yet complete reference.
Building an Android application isn’t much different from creating other types of Java applications in the Eclipse IDE. It all starts with choosing File > New and selecting an Android application as the build target.
Like many development environments, Eclipse provides a wizard interface to ease the task of creating a new application. We’ll use the Android Project Wizard to get off to a quick start in building an Android application.
2.3.1. The Android Project Wizard
The most straightforward manner to create an Android application is to use the Android Project Wizard, which is part of the ADT plug-in. The wizard provides a simple means to define the Eclipse project name and location, the Activity name corresponding to the main UI class, and a name for the application. Also of importance is the Java package name under which the application is created. After you create an application, it’s easy to add new classes to the project.
Note
In this example, you’ll create a brand-new project in the Eclipse workspace. You can use this same wizard to import source code from another developer, such as the sample code for this book. Note also that the specific screens have changed over time as the Android tools mature. If you’re following along and have a question about this chapter, be sure to post a question on the Manning Author forum for this book, available online at http://manning.com/ableson.
Figure 2.10 demonstrates the creation of a new project named Chapter2 using the wizard.
Figure 2.10. Using the Android Project Wizard, it’s easy to create an empty Android application, ready for customization.

Tip
You’ll want the package name of your applications to be unique from one application to the next.
Click Finish to create your sample application. At this point, the application compiles and is capable of running on the emulator—no further development steps are required. Of course, what fun would an empty project be? Let’s flesh out this sample application and create an Android tip calculator.
2.3.2. Android sample application code
The Android Application Wizard takes care of a number of important elements in the Android application structure, including the Java source files, the default resource files, and the AndroidManifest.xml file. Looking at the Package Explorer view in Eclipse, you can see all the elements of this application. Here’s a quick description of the elements included in the sample application:
- The src folder contains two Java source files automatically created by the wizard.
- ChapterTwo.java contains the main Activity for the application. You’ll modify this file to add the sample application’s tip calculator functionality.
- R.java contains identifiers for each of the UI resource elements in the application. Never modify this file directly. It automatically regenerates every time a resource is modified; any manual changes you make will be lost the next time the application is built.
- Android.jar contains the Android runtime Java classes. This reference to the android.jar file found in the Android SDK ensures that the Android runtime classes are accessible to your application.
- The res folder contains all the Android resource folders, including:
- Drawables contains image files such as bitmaps and icons. The wizard provides a default Android icon named icon.png.
- Layout contains an XML file called main.xml. This file contains the UI elements for the primary view of your Activity. In this example, you’ll modify this file but you won’t make any significant or special changes—just enough to accomplish the meager UI goals for your tip calculator. We cover UI elements, including Views, in detail in chapter 3. It’s not uncommon for an Android application to have multiple XML files in the Layout section of the resources.
- Values contains the strings.xml file. This file is used for localizing string values, such as the application name and other strings used by your application.
AndroidManifest.xml contains the deployment information for this project. Although AndroidManifest.xml files can become somewhat complex, this chapter’s manifest file can run without modification because no special permissions are required. We’ll visit AndroidManifest.xml a number of times throughout the book as we discuss new features.
Now that you know what’s in the project, let’s review how you’re going to modify the application. Your goal with the Android tip calculator is to permit your user to enter the price of a meal, then tap a button to calculate the total cost of the meal, tip included. To accomplish this, you need to modify two files: ChapterTwo.java and the UI layout file, main.xml. Let’s start with the UI changes by adding a few new elements to the primary View, as shown in the next listing.
Listing 2.1. main.xml contains UI elements
<?xml version="1.0" encoding="utf-8"?>
<LinearLayout xmlns:android="http://schemas.android.com/apk/res/android"
    android:orientation="vertical"
    android:layout_width="fill_parent"
    android:layout_height="fill_parent"
    >
<TextView
    android:layout_width="fill_parent"
    android:layout_height="wrap_content"
    android:text="Chapter 2 Android Tip Calculator"
    />
<EditText
    android:id="@+id/mealprice"
    android:layout_width="fill_parent"
    android:layout_height="wrap_content"
    android:autoText="true"
/>
<Button
android:id="@+id/calculate"
    android:layout_width="wrap_content"
    android:layout_height="wrap_content"
    android:text="Calculate Tip"
    />
<TextView
    android:id="@+id/answer"
    android:layout_width="fill_parent"
    android:layout_height="wrap_content"
    android:text=""
    />

</LinearLayout>
The layout for this application is straightforward. The overall layout is a vertical, linear layout with only four elements; all the UI controls, or widgets, are going to be in a vertical arrangement. A number of layouts are available for Android UI design, which we’ll discuss in greater detail in chapter 3.
A static TextView displays the title of the application. An EditText collects the price of the meal for this tip calculator application. The EditText element has an attribute of type android:id, with a value of mealprice. When a UI element contains the android:id attribute, it permits you to manipulate this element from your code. When the project is built, each element defined in the layout file containing the android:id attribute receives a corresponding identifier in the automatically generated R.java class file. This identifying value is used in the findViewById method, shown in listing 2.2. If a UI element is static, such as the TextView, and doesn’t need to be set or read from our application code, the android:id attribute isn’t required.
A button named calculate is added to the view. Note that this element also has an android:id attribute because we need to capture click events from this UI element. A TextView named answer is provided for displaying the total cost, including tip. Again, this element has an id because you’ll need to update it during runtime.
When you save the file main.xml, it’s processed by the ADT plug-in, compiling the resources and generating an updated R.java file. Try it for yourself. Modify one of the id values in the main.xml file, save the file, and open R.java to have a look at the constants generated there. Remember not to modify the R.java file directly, because if you do, all your changes will be lost! If you conduct this experiment, be sure to change the values back as they’re shown in listing 2.1 to make sure the rest of the project will compile as it should. Provided you haven’t introduced any syntactical errors into your main.xml file, your UI file is complete.
Note
This example is simple, so we jumped right into the XML file to define the UI elements. The ADT also contains an increasingly sophisticated GUI layout tool. With each release of the ADT, these tools have become more and more usable; early versions were, well, early.
Double-click the main.xml file to launch the layout in a graphical form. At the bottom of the file you can switch between the Layout view and the XML view. Figure 2.11 shows the Layout tool.
Figure 2.11. Using the GUI Layout tool provided in the ADT to define the user interface elements of your application

It’s time to turn our attention to the file ChapterTwo.java to implement the tip calculator functionality. ChapterTwo.java is shown in the following listing. We’ve omitted some imports for brevity. You can download the complete source code from the Manning website at http://manning.com/ableson2.
Listing 2.2. ChapterTwo.java implements the tip calculator logic


Let’s examine this sample application. Like all but the most trivial Java applications, this class contains a statement identifying which package it belongs to: com.manning.unlockingandroid. This line containing the package name was generated by the Application Wizard.
We import the com.manning.unlockingandroid.R class to gain access to the definitions used by the UI. This step isn’t required, because the R class is part of the same application package, but it’s helpful to include this import because it makes our code easier to follow. Newcomers to Android always ask how the identifiers in the R class are generated. The short answer is that they’re generated automatically by the ADT! Also note that you’ll learn about some built-in UI elements in the R class later in the book as part of sample applications.
Though a number of imports are necessary to resolve class names in use, most of the import statements have been omitted from listing 2.2 for the sake of brevity. One import that’s shown contains the definition for the java.text.NumberFormat class, which is used to format and parse currency values.
Another import shown is for the android.util.Log class, which is employed to make entries to the log. Calling static methods of the Log class adds entries to the log. You can view entries in the log via the LogCat view of the DDMS perspective. When making entries to the log, it’s helpful to put a consistent identifier on a group of related entries using a common string, commonly referred to as the tag. You can filter on this string value so you don’t have to sift through a mountain of LogCat entries to find your few debugging or informational messages.
Now let’s go through the code in listing 2.2. We connect the UI element containing mealprice to a class-level variable of type EditText ![]() by calling the findViewById method and passing in the identifier for the mealprice, as defined by the automatically generated R class, found in R.java. With this reference, we can access the user’s input and manipulate the meal price data as entered
by the user. Similarly, we connect the UI element for displaying the calculated answer back to the user, again by calling
the findViewById method.
by calling the findViewById method and passing in the identifier for the mealprice, as defined by the automatically generated R class, found in R.java. With this reference, we can access the user’s input and manipulate the meal price data as entered
by the user. Similarly, we connect the UI element for displaying the calculated answer back to the user, again by calling
the findViewById method.
To know when to calculate the tip amount, we need to obtain a reference to the Button so we can add an event listener. We want to know when the button has been clicked. We accomplish this by adding a new OnClickListener method named onClick.
When the onClick method is invoked, we add the first of a few log entries using the static i() method of the Log class ![]() . This method adds an entry to the log with an Information classification. The Log class contains methods for adding entries to the log for different levels, including Verbose, Debug, Information, Warning,
and Error. You can also filter the LogCat based on these levels, in addition to filtering on the process ID and tag value.
. This method adds an entry to the log with an Information classification. The Log class contains methods for adding entries to the log for different levels, including Verbose, Debug, Information, Warning,
and Error. You can also filter the LogCat based on these levels, in addition to filtering on the process ID and tag value.
Now that we have a reference to the mealprice UI element, we can obtain the text entered by our user with the getText() method of the EditText class ![]() . In preparation for formatting the full meal price, we obtain a reference to the static currency formatter.
. In preparation for formatting the full meal price, we obtain a reference to the static currency formatter.
Let’s be somewhat generous and offer a 20 percent tip. Then, using the formatter, let’s format the full meal cost, including
tip. Next, using the setText() method of the TextView UI element named answerfield, we update the UI to tell the user the total meal cost ![]() .
.
Because this code might have a problem with improperly formatted data, it’s a good practice to put code logic into try/catch blocks so that our application behaves when the unexpected occurs ![]() .
.
Additional boilerplate files are in this sample project, but in this chapter we’re concerned only with modifying the application enough to get basic, custom functionality working. You’ll notice that as soon as you save your source files, the Eclipse IDE compiles the project in the background. If there are any errors, they’re listed in the Problems view of the Java perspective; they’re also marked in the left margin with a small red x to draw your attention to them.
Tip
Using the command-line tools found in the Android SDK, you can create batch builds of your applications without using the IDE. This approach is useful for software shops with a specific configuration-management function and a desire to conduct automated builds. In addition to the Android-specific build tools found under the tools subdirectory of your Android SDK installation, you’ll also need JDK version 5.0 or later to complete command-line application builds. Creating sophisticated automated builds of Android applications is beyond the scope of this book, but you can learn more about the topic of build scripts by reading Ant in Action: Second Edition of Java Development with Ant, by Steve Loughran and Erik Hatcher, found at http://www.manning.com/loughran/.
Assuming there are no errors in the source files, your classes and UI files will compile correctly. But what needs to happen before your project can be run and tested in the Android emulator?
2.3.3. Packaging the application
At this point, your application has compiled and is ready to be run on the device. Let’s look more deeply at what happens after the compilation step. You don’t need to perform these steps because the ADTs handle these steps for you, but it’s helpful to understand what’s happening behind the scenes.
Recall that despite the compile-time reliance on Java, Android applications don’t run in a Java VM. Instead, the Android SDK employs the Dalvik VM. For this reason, Java bytecodes created by the Eclipse compiler must be converted to the .dex file format for use in the Android runtime. The Android SDK has tools to perform these steps, but thankfully the ADT takes care of all of this for you transparently.
The Android SDK contains tools that convert the project files into a file ready to run on the Android emulator. Figure 2.12 depicts the generalized flow of source files in the Android build process. If you recall from our earlier discussion of Android SDK tools, the tool used at design time is aapt. Application resource XML files are processed by aapt, with the R.java file created as a result—remember that you need to refer to the R class for UI identifiers when you connect your code to the UI. Java source files are first compiled to class files by your Java environment, typically Eclipse and the JDT. After they’re compiled, they’re then converted to dex files to be ready for use with Android’s Dalvik VM. Surprisingly, the project’s XML files are converted to a binary representation, not to text as you might expect. But the files retain their .xml extension on the device.
Figure 2.12. The ADT employs tools from the Android SDK to convert source files to a package that’s ready to run on an Android device or emulator.

The converted XML files, a compiled form of the nonlayout resources including the Drawables and Values, and the dex file (classes.dex) are packaged by the aapt tool into a file with a naming structure of projectname.apk. The resulting file can be read with a pkzip-compatible reader, such as WinRAR or WinZip, or the Java archiver, jar. Figure 2.13 show this chapter’s sample application in WinRAR.
Figure 2.13. The Android application file format is pzip compatible.

Now you’re finally ready to run your application on the Android emulator! It’s important to become comfortable with working in an emulated environment when you’re doing any serious mobile software development. There are many good reasons for you to have a quality emulator available for development and testing. One simple reason is that having multiple real devices with requisite data plans is an expensive proposition. A single device alone might cost hundreds of dollars. Android continues to gain momentum and is finding its way to multiple carriers with numerous devices and increasingly sophisticated capabilities. Having one of every device is impractical for all but development shops with the largest of budgets. For the rest of us, a device or two and the Android emulator will have to suffice. Let’s focus on the strengths of emulator-based mobile development.
Speaking of testing applications, it’s time to get our tip calculator application running!
2.4. Using the Android emulator
At this point, our sample application, the Android tip calculator, has compiled successfully. Now you want to run your application in the Android emulator. Before you can run an application in the emulator, you have to configure the emulated environment. To do this, you’ll learn how to create an instance of the AVD using the AVD Manager. After you’ve got that sorted out, you’ll define a run configuration in Eclipse, which allows you to run an application in a specific AVD instance.
Tip
If you’ve had any trouble building the sample application, now would be a good time to go back and clear up any syntax errors that are preventing the application from building. In Eclipse, you can easily see errors because they’re marked with a red x next to the project source file and on the offending lines. If you continue to have errors, make sure that your build environment is set up correctly. Refer to appendix A of this book for details on configuring the build environment.
2.4.1. Setting up the emulated environment
Setting up your emulator environment can be broken down into two logical steps. The first is to create an instance of the AVD via the AVD Manager. The second is to define a run configuration in Eclipse, which permits you to run your application in a specific AVD instance. Let’s start with the AVD Manager.
You might hear the words emulator and simulator thrown about interchangeably. Although they have a similar purpose—testing applications without the requirement of real hardware—those words should be used with care.
A simulator tool works by creating a testing environment that behaves as close to 100 percent in the same manner as the real environment, but it’s just an approximation of the real platform. This doesn’t mean that the code targeted for a simulator will run on a real device, because it’s compatible only at the source-code level. Simulator code is often written to be run as a software program running on a desktop computer with Windows DLLs or Linux libraries that mimic the application programming interfaces (APIs) available on the real device. In the build environment, you typically select the CPU type for a target, and that’s often x86/Simulator.
In an emulated environment, the target of your projects is compatible at the binary level. The code you write works on an emulator as well as the real device. Of course, some aspects of the environment differ in terms of how certain functions are implemented on an emulator. For example, a network connection on an emulator runs through your development machine’s network interface card, whereas the network connection on a real phone runs over the wireless connection such as a GPRS, EDGE, or EVDO network. Emulators are preferred because they more reliably prepare you to run your code on real devices. Fortunately, the environment available to Android developers is an emulator, not a simulator.
Managing AVDs
Starting with version 1.6 of the Android SDK, developers have a greater degree of control over the emulated Android environment than in previous releases. The SDK and AVD Manager permit developers to download the specific platforms of interest. For example, you might be targeting devices running version 1.5 and 2.2 of the Android platform, but you might want to add to that list as new versions become available. Figure 2.14 shows the SDK and AVD Manager with a few packages installed.
Figure 2.14. The installed Android packages listed in the AVD and SDK Manager

After you’ve installed the Android platforms that you want, you can define instances of the AVD. To define instances, select which platform you want to run on, select the device characteristics, and then create the AVD, as shown in figure 2.15.
Figure 2.15. Creating a new AVD includes defining characteristics such as SD card storage capacity and screen resolution.

At this point, your AVD is created and available to be started independently. You can also use it as the target of a run configuration. Figure 2.16 shows a representative list of available AVDs on a single development machine.
Figure 2.16. Available AVDs defined. You can set up as many different AVD instances as your requirements demand.
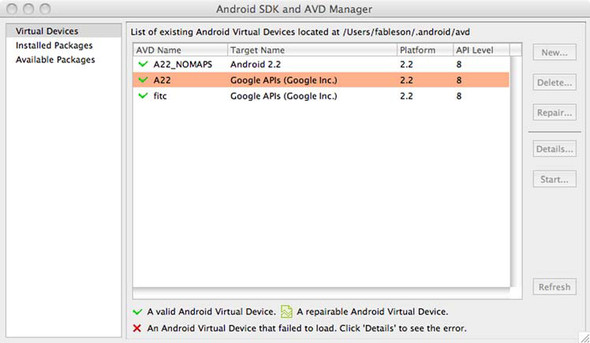
Note
Each release of the Android platform has two versions: one with Google APIs and one without. In Figure 2.16, notice that the first entry, named A22_NOMAPS, has a target of Android 2.2. The second entry, A22, has a target of Google APIs (Google Inc.). The Google version is used when you want to include application functionality such as Google Maps. Using the wrong target version is a common problem encountered by developers new to the Android platform hoping to add mapping functionality to their applications.
Now that you have the platforms downloaded and the AVDs defined, it’s time to wire these things together so you can test and debug your application!
Setting Up Emulator Run Configurations
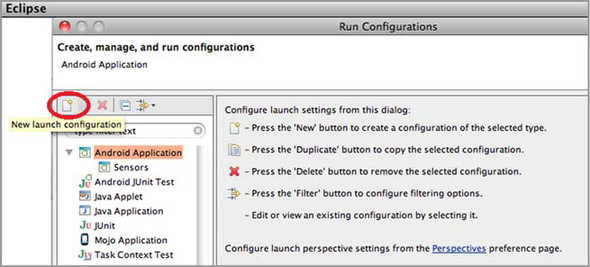
Our approach is to create a new Android emulator profile so you can easily reuse your test environment settings. The starting place is the Open Run Dialog menu in the Eclipse IDE, as shown in figure 2.17. As new releases of Eclipse become available, these screen shots might vary slightly from your personal development environment.
Figure 2.17. Creating a new launch configuration for testing your Android application

You want to create a new launch configuration, as shown in figure 2.18. To begin this process, highlight the Android Application entry in the list to the left, and click the New Launch Configuration button, circled in red in figure 2.18.
Figure 2.18. Create a new run configuration based on the Android template.
Now, give your launch configuration a name that you can readily recognize. You’re going to have quite a few of these launch configurations on the menu, so make the name something unique and easy to identify. The sample is titled Android Tip Calculator, as shown in figure 2.19. The three tabs have options that you can configure. The Android tab lets you select the project and the first Activity in the project to launch.
Figure 2.19. Setting up the Android emulator launch configuration

Use the next tab to select the AVD and network characteristics that you want, as shown in figure 2.20. Additionally, command-line parameters might be passed to the emulator to customize its behavior. For example, you might want to add the parameter wipe-data to erase the device’s persistent storage prior to running your application each time the emulator is launched. To see the available command-line options available, run the Android emulator from a command or terminal window with the option emulator –help.
Figure 2.20. Selecting the AVD to host the application and specify launch parameters.

Use the third tab to put this configuration on the Favorites menu in the Eclipse IDE for easy access, as shown in figure 2.21. You can select Run, Debug, or both. Let’s choose both for this example, because it makes for easier launching when you want to test or debug the application.
Figure 2.21. Adding the run configuration to the toolbar menu

Now that you’ve defined your AVD and created a run configuration in Eclipse, you can test your application in the Android emulator environment.
2.4.2. Testing your application in the emulator
Now you’re finally ready to start the Android emulator to test your tip calculator application. Select the new launch configuration from the Favorites menu, as shown in figure 2.22.
Figure 2.22. Starting this chapter’s sample application, an Android tip calculator.

If the AVD that you choose is already running, the ADT attempts to install the application directly; otherwise, the ADT must first start the AVD, and then install the application. If the application was already running, it’s terminated and the new version replaces the existing copy within the Android storage system.
At this point, the Android tip calculator should now be running in the Android emulator! Go ahead; test it! But wait, what if there’s a problem with the code but you’re not sure where? It’s time to briefly look at debugging an Android application.
2.5. Debugging your application
Debugging an application is a skill no programmer can survive without. Fortunately, debugging an Android application is straightforward under Eclipse. The first step to take is to switch to the Debug perspective in the Eclipse IDE. Remember, you switch from one perspective to another by using the Open Perspective submenu found under the Window menu.
Starting an Android application for debugging is as simple as running the application. Instead of selecting the application from the Favorites Run menu, use the Favorites Debug menu instead. This menu item has a picture of an insect (that is, a bug). Remember, when you set up the launch configuration, you added this configuration to both the Run and the Favorites Debug menus.
The Debug perspective gives you debugging capabilities similar to other development environments, including the ability to single-step into, or over, method calls, and to peer into variables to examine their value. You can set breakpoints by double-clicking in the left margin on the line of interest. Figure 2.23 shows how to step through the Android tip calculator project. The figure also shows the resulting values displayed in the LogCat view. Note that the full meal price, including tip, isn’t displayed on the Android emulator yet, because that line hasn’t yet been reached.
Figure 2.23. The Debug perspective permits you to step line-by-line through an Android application.

Now that we’ve gone through the complete cycle of building an Android application and you have a good foundational understanding of using the Android ADT, you’re ready to move on to digging in and unlocking android application development by learning about each of the fundamental aspects of building Android applications.
2.6. Summary
This chapter introduced the Android SDK and offered a glance at the Android SDK’s Java packages to get you familiar with the contents of the SDK from a class library perspective. We introduced the key development tools for Android application development, including the Eclipse IDE and the ADT plug-in, as well as some of the behind-the-scenes tools available in the SDK.
While you were building the Android tip calculator, this chapter’s sample application, you had the opportunity to navigate between the relevant perspectives in the Eclipse IDE. You used the Java perspective to develop your application, and both the DDMS perspective and the Debug perspective to interact with the Android emulator while your application was running. A working knowledge of the Eclipse IDE’s perspectives will be helpful as you progress to build the sample applications and study the development topics in the remainder of this book.
We discussed the Android emulator and some of its fundamental permutations and characteristics. Employing the Android emulator is a good practice because of the benefits of using emulation for testing and validating mobile software applications in a consistent and cost-effective manner.
From here, the book moves on to dive deeper into the core elements of the Android SDK and Android application development. The next chapter continues this journey with a discussion of the fundamentals of the Android UI.