
Chapter 13. Building Android applications in C
- Building an application in C
- Using dynamic linking
- Building a DayTime Server in C
- Building a Daytime Client in Java
Up to this point, this book has presented a cross section of development topics in an effort to unlock the potential of the Android platform for the purpose of delivering useful, and perhaps even fun, mobile applications. In chapter 12 you built a comprehensive application, building on what we introduced in the prior chapters. As you embark on this chapter, you’re temporarily leaving behind the comforts of working strictly in the Android SDK, Java, and Eclipse. We’ll instead take a close look at the underlying Linux underpinnings of the Android platform—and more specifically, you’ll learn how to build an application in C, without the SDK.
The Android SDK is comprehensive and capable, but there may be times when your application requires something more. This chapter explores the steps required to build applications that run in the Linux foundation layer of Android. To accomplish this, we’re going to use the C programming language. In this chapter, we use the term Android/Linux to refer to the Linux underpinnings of the Android platform. We also use the term Android/Java to refer to a Java application built using the Android SDK and Eclipse.
C language mastery on this platform is powerful because much of the C language development process involves porting existing, open source Linux code to the mobile platforms. This technique has the potential benefit of speeding up development for adding future functionality to Android by leveraging existing code bases. Chapter 19 examines the Android Native Developer’s kit (NDK). Using the NDK, programmers can leverage existing C code and map those routines to applications written in Java. This chapter doesn’t use the NDK, but rather looks at building standalone C applications capable of running on the Android platform.
We demonstrate the specific steps of building an Android/Linux application in C. We begin with a description of the environment and the required tool chain. After an obligatory Hello World–caliber application, you’ll construct a more sophisticated application that implements a DayTime Server. Ultimately any application built for Android/Linux needs to bring value to the user in some form. In an effort to meet this objective, it’s desirable that Android/Java be able to interact in a meaningful manner with our Android/Linux application. To that end, you’ll build a traditional Android application using Java in Eclipse to interact with the Android/Linux server application.
Let’s get started with an examination of the requirements for building your first C application for Android.
13.1. Building Android apps without the SDK
Applications for Android/Linux are markedly different from applications constructed with the Android SDK. Applications built with Eclipse and the context-sensitive Java syntax tools make for a comfortable learning environment. In line with the spirit of Linux development, from here on out all development takes place with command-line tools and nothing more sophisticated than a text editor. Though the Eclipse environment could certainly be leveraged for non-Java development, the focus of this chapter is on core C language[1] coding for Android/Linux. The first place to start is with the cross-compiling tool chain required to build Android/Linux applications.
1 For details on the C programming language start here: http://www.cprogramming.com/.
13.1.1. The C compiler and linker tools
Building applications for Android/Linux requires the use of a cross-compiler tool chain from CodeSourcery. The specific version required is the Sourcery G++ Lite Edition for ARM, found at https://support.codesourcery.com/GNUToolchain/release1479. Once installed, the Sourcery G++ tool chain contributes a number of useful tools to assist you in creating applications targeting Linux on ARM, which is the architecture of the Android platform. The ARM platform is a 32-bit reduced instruction set computer (RISC) processor, used in numerous devices, including smartphones, PDAs, and technology appliances such as low-end routers and disk drive controllers. The Code-Sourcery installation comes with a fairly comprehensive set of PDF documents describing the main components of the tool chain, including the C compiler, the assembler, the linker, and many more tools. A full discussion of these versatile tools is well beyond the scope of this chapter, but three tools in particular are demonstrated in the construction of this chapter’s sample applications. You’ll be using these tools right away, so let’s briefly introduce them in this section.
The first and most important tool introduced is gcc.[2] This tool is the compiler responsible for turning C source files into object files and optionally initiating the link process to build an executable suitable for the Android/Linux target platform. The full name of the gcc compiler for our cross-compilation environment is arm-none-linux-gnueabi-gcc. This tool is invoked from the command line of the development machine. The tool takes command-line arguments of one or more source files, along with zero or more of the numerous available switches.
2 For everything you’d want to know about gcc, go here: http://gcc.gnu.org/.
The linker, arm-none-linux-gnueabi-ld, is responsible for producing an executable application for our target platform. When performing the link step, object code along with routines from one or more library files are combined into a relocatable, executable binary file, compatible with the Android Emulator’s Linux environment. Whereas a simple application may be compiled and linked directly with gcc, the linker is used when creating applications with more than one source file and/or more complex application requirements.
If the linker is responsible for constructing applications from more than one contributing component, the object dump utility is useful for dissecting, or disassembling, an application. The objdump, or arm-none-linux-gnueabi-objdump tool examines an executable application—a binary file—and turns the machine instructions found there into an assembly language listing file, suitable for analysis.
Note
All of the examples in this chapter take place on a Windows XP work-station. It’s also possible to use this tool chain on a Linux development machine. If you are using Linux for your development environment, you may need to modify the build scripts slightly as the path separator is different and the libraries will require a preceeding dot (“.”).
With this brief introduction behind us, let’s build the obligatory Hello Android application to run in the Linux foundation of the Android Emulator.
13.1.2. Building a Hello World application
The first thing we want you to accomplish with your journey into Android/Linux development is to print something to the emulator screen to demonstrate that you’re running something on the platform outside the Android SDK and its Java application environment. There’s no better way to accomplish this feat than by writing a variant of the Hello World application. At this point, there will be little talk of Android activities, views, or resource layouts. Most code samples in this chapter are in the C language. The following listing shows the code for your first Hello Android application.
Listing 13.1. Hello.c
#include <stdio.h>
int main(int argc,char * argv[])
{
      printf("Hello, Android!
");
      return 0;
}
Virtually all C language applications require an #include header file containing function definitions, commonly referred to as prototypes. In this case, the application includes the header file for the standard input and output routines, stdio.h. The standard C language entry point for user code is the function named main. The function returns an integer return code (a value of 0 is returned in this simple example) and takes two arguments. The first, argc, is an integer indicating the number of command-line arguments passed in to the program when invoked. The second, argv, is an array of pointers to null-terminated strings representing each of the command-line arguments. The first argument, argv[0], is always the name of the program executing. This application has but a single useful instruction, printf, which is to write to standard output (the screen) a textual string. The printf function is declared in the header file, stdio.h.
To build this application, you employ the gcc tool:
arm-none-linux-gnueabi-gcc hello.c -static -o hellostatic
You’ll notice a few things about this command-line instruction:
- The compiler is invoked with the full name: arm-none-linux-gnueabi-gcc.
- The source file is named hello.c.
- The –static command-line switch is used to instruct gcc to fully link all required routines and data into the resulting binary application file. In essence, the application is fully standalone and ready to be run on the target Android Emulator without any additional components. An application that’s statically linked tends to be rather large, because so much code and data are included in the executable file. For example, this statically linked application with basically a single line of code weighs in at around 600 KB. Ouch! If this -static switch is omitted, the application is built without any extra routines linked in. In this case, the application will be much smaller, but it’ll rely on finding compatible routines on the target system in order to run. For now, let’s keep things simple and build the sample application in such a manner that all support routines are linked statically.
- The output switch, -o, is used to request that the executable application be assigned the name hellostatic. If this switch isn’t provided, the default application name is a.out.
Now that the application is built, it’s time for you to try it out on the Android Emulator. To do this, you’ll rely on the adb tool introduced in chapter 2.
13.1.3. Installing and running the application
In preparation for installing and running the Hello Android application, let’s take a tour of our build and testing environment. You need to identify four distinct environments and tools and clearly understand them when building applications for Android/Linux: Android Emulator, command-line CodeSourcery tools, adb or DDMS, and adb shell.
The first environment to grasp is the big-picture architecture of the Android Emulator running essentially on top of Linux, as shown in figure 13.1.
Figure 13.1. Android runs atop a Linux kernel.

As presented in the early chapters of this book, there’s a Linux kernel running underneath the pretty, graphical face of Android. There exist device drivers, process lists, and memory management, among other elements of a sophisticated operating system.
As shown in the previous section, you need an environment in which to compile your C code. This is most likely to be a command-prompt window on a Windows machine, or a shell window on a Linux desktop machine, exercising the Code-Sourcery tool chain. This is the second environment you need to be comfortable operating within.
The next requirement is to copy your newly constructed binary executable application to the Android Emulator. You can do so with a call to the adb utility or by using the DDMS view in Eclipse. Both of these tools were demonstrated in chapter 2. Here’s the syntax for copying the executable file to the Android Emulator:
adb push hellostatic /data/ch13/hellostatic
The CodeSourcery tool chain isn’t designed to run on the Android/Linux environment itself, so the development work being done here is considered to be cross-compiling. The figures and example code presented in this chapter were taken from a Windows development environment used by one of the authors. There are a number of long path and directory structures in the Android SDK and the CodeSourcery tools. To help simplify some of the examples and keep certain command-line entries from running over multiple lines, we set up some drive mappings. For example, a drive letter of m: seen in scripts and figures corresponds to the root location of source code examples on the author’s development machine. Likewise, the g: drive points to the currently installed Android SDK on the author’s development machine. Note that this technique may also be used in Linux or Mac OS X environments with a “soft link” (ln) command.
Note a few items about this command:
- The command name is adb. This command takes a number of arguments that guide its behavior. In this case, the subcommand is push, which means to copy a file to the Android Emulator. There’s also a pull option for moving files from the Android Emulator filesystem to the local development machine’s hard drive.
- After the push option, the next argument, hellostatic in this case, represents the local file, stored on the development machine’s hard drive.
- The last argument is the destination directory (and/or filename) for the transferred file. In this sample, you’re copying the hellostatic file from the current working directory to the /data/ch13 directory on the Android Emulator.
Be sure that the desired target directory exists first! You can accomplish this with a mkdir command on the adb shell, described next.
The final tool to become familiar with is the shell option of the adb tool. Using this command, we can interact directly on the Android Emulator’s filesystem with a limited shell environment. To enter this environment (assuming the Android Emulator is already running), execute adb shell from the command line. When invoked, the shell displays the # prompt, just as if you’d made a secure shell (ssh) or telnet connection to a remote Unix-based machine. Figure 13.2 shows these steps in action.
Figure 13.2. The build, copy, run cycle
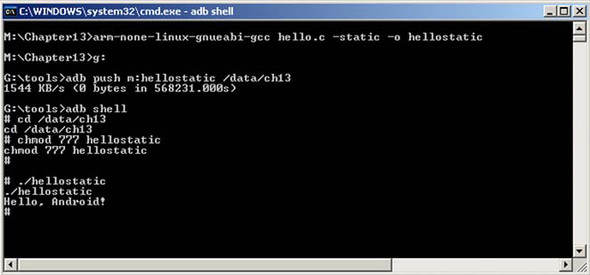
Note the sequence shown in figure 13.2. First the application is built with a call to gcc. Next you push the file over to the Android Emulator. You then connect to the Android Emulator via the adb shell command, which gives you the # prompt, indicating that you’re now in the shell. Next you change directory (cd) to /data/ch13. Remember that this is Linux, so the application by default may not be executable. A call to chmod sets the file’s attributes, tuning on the executable bits and allowing the application to be invoked. Lastly, you invoke the application with a call to ./hellostatic. The search path for executable applications doesn’t by default include the current directory on a Linux system, so you must provide a more properly qualified path, which explains the ./ prefix. Of course, you can see that our application has run successfully because you see the “Hello, Android!” text displayed on the screen.
Congratulations! You have a successful, albeit simple, Android/Linux application running on the Android Emulator. In the next section, we look at streamlining this build process by combining the multiple build operations into a script.
13.1.4. C application build script
In the previous section, we reviewed each step in building and preparing to test our application. Due to the rather tedious nature of executing each of these steps, you likely want to utilize command-line tools when building C applications, as it greatly speeds up the edit, compile, copy, debug cycle. This example with only a single C source file is rather simplistic; when multiple source files must be linked together, the thought of having a build script is appealing. The need for a build script (shown in listing 13.2) is particularly evident where there are numerous source files to compile and link, a situation you’ll encounter later in this chapter.
This listing shows the build script for our Hello Android application.
Listing 13.2. Build script for Hello Android, buildhello.bat
arm-none-linux-gnueabi-gcc hello.c -static -o hellostatic
g:	oolsadb push hellostatic /data/ch13
g:	oolsadb shell "chmod 777 /data/ch13/hellostatic"
A call to arm-none-linux-gnueabi-gcc compiles the source file, hello.c. The file is statically linked against the standard C libraries, and the resulting binary executable file is written out as hellostatic. The file hellostatic is copied to the Android Emulator and placed in the directory /data/ch13. The permissions for this file are changed, permitting execution. Note the use of the adb shell with a quote-delimited command. Once this command executes, the adb application exits and returns to the Windows command prompt.
This example can be extended to perform other build steps or cleanup procedures such as removing temporary test data files on the Android Emulator or any similarly helpful tasks. As you progress, it’ll become clear what commands you need to put into your build script to make the testing process more efficient.
Now that the pressure is off—you’ve successfully written, built, and executed an application in the Android/Linux environment—it’s time to deal with the problematic issue of a simple application requiring such an enormous file size!
13.2. Solving the problem with dynamic linking
That was fun, but who wants a 500+ KB file that only displays something to the screen? Recall that the –static flag links the essentials for running the application, including the input/output routines required for printing a message to the screen. If you’re thinking that there must be a better way, you’re correct; you need to link the application to existing system libraries rather than include all that code in the application’s executable file.
13.2.1. Android system libraries
When an application is built with the –static flag, it’s entirely self-contained, meaning that all the routines it requires are linked directly into the application. This information isn’t new to you; we’ve already discussed this. It has another important implication beyond just the size of the code: it also means that using Android resident code libraries is a bigger challenge. Let’s dig deeper to understand why. To do this, we have to look at the filesystem of Android/Linux.
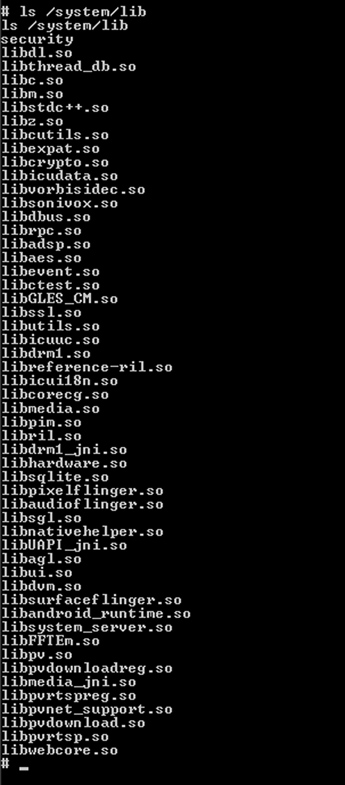
System libraries in Android/Linux are stored in the directory /system/lib. This directory contains important functionality, such as OpenGL, SQLite, C standard routines, Android runtime, UI routines, and much more. Figure 13.3 shows a list of the available libraries in the Android Emulator. In short, everything that’s specific to the Android platform is found in /system/lib, so if you’re going to build an application that has any significant functionality, you can’t rely on the libraries that ship with CodeSourcery alone. You have to write an application that can interact with the Android system libraries. This calls for a side trip to discuss the functionality of the linker application.
Figure 13.3. Available libraries in /system/lib
When you’re building an application that requires the use of the linker, a few things change. First, the gcc command is no longer responsible for invoking the linker. Instead, the –c option is used to inform the tool to simply compile the application and leave the link step to a subsequent build step. Here’s an example:
arm-none-linux-gnueabi-gcc –c hello.c -o hello.o
This command tells the compiler to compile the file hello.c and place the resulting object code into the file hello.o.
This process is repeated for as many source files as necessary for a particular application. For our sample application, you have only this single source file. But to get an executable application, you must employ the services of the linker.
Another important change in the build environment is that you have to get a copy of the Android/Linux libraries. You’re compiling on the Windows platform (or Linux if you prefer), so you need to get access to the Android Emulator’s /system/lib contents in order to properly link against the library files. Just how do you go about this? You use the adb utility, of course! Listing 13.3 shows a Windows batch file used to extract the system libraries from a running instance of the Android Emulator. A few of the libraries are pointed out.
Listing 13.3. pullandroid.bat

Figure 13.4 shows these files now copied over to the development machine.
Figure 13.4. Android libraries pulled to the development machine

Once these files are available on the development machine, you can proceed with the build step using the linker.
13.2.2. Building a dynamically linked application
The name for the linker is arm-none-linux-gnueabi-ld. In most Linux environments, the linker is named simply ld. When you’re using the linker, many command-line options are available to you for controlling the output. There are so many options that we could write an entire book covering no other topic. Our interest in this chapter is writing applications, and we’re taking as streamlined an approach as possible. So although there may be other options that can get the job done, our aim here is to show you how to build an application that gives you as much flexibility as possible to employ the Android system libraries. To that end, the following listing shows the script for building a dynamic version of Hello Android.
Listing 13.4. Build script for dynamically linked Android application
arm-none-linux-gnueabi-gcc -c hello.c -o hello.o
arm-none-linux-gnueabi-ld -entry=main -dynamic-linker /system/bin/linker
  -nostdlib -rpath /system/lib -rpath-link /android/system/lib -L
  /android/system/lib -l android_runtime -l c  -o
  hellodynamic hello.o
g:	oolsadb push hellodynamic /data/ch13
g:	oolsadb shell "chmod 777 /data/ch13/hellodynamic"
This build script passes the –c compiler option when compiling the source file, hello.c. This way, gcc doesn’t attempt to link the application. The link command, arm-none-linux-gnueeabi-ld, has a number of options. These options are more fully described in table 13.1. As in the previous example, adb is used to push the executable file over to the Android Emulator. The permissions are also modified to mark the application as executable.
Table 13.1. Linker options
|
Linker option |
Description |
|---|---|
| -entry=main | Indicates the entry point for the application, in this case, the function named main. |
| -dynamic-linker /system/bin/linker | Tells the application where the dynamic linker application may be found at runtime. The /system/bin/linker path is found on the Android Emulator, not the development environment. |
| -nostdlib | Tells the linker to not include standard C libraries when attempting to resolve code during the link process. |
| -rpath /system/lib | Tells the executable where libraries can be found at runtime. This works in a manner similar to the environment variable LD_LIBRARY_PATH. |
| -rpath-link /android/system/lib | Tells the linker where libraries can be found when linking. For Linux add a dot to the beginning of the line, as in ./android/system/lib. |
| -L /android/system/lib | Tells the linker where libraries can be found. This is the linker import directory. |
| -l android_runtime | Tells the linker that this application requires routines found in the library file libandroid_runtime.so. |
| -l c | Tells the linker that this application requires routines found in the library file libc.so. |
| -o hellodynamic | Requests an output filename of hellodynamic. |
| hello.o | Includes hello.o as an input to the link process. |
If our application required routines from the Open GL or SQLite library, the link command would have additional parameters of –l GLES_CM or –l sqlite, respectively. Leaving those library options off the link command prevents the application from linking properly because certain symbols (functions, data) can’t be found.
So, did it work? The hellodynamic binary is now only 2504 bytes. That’s a great improvement. Figure 13.5 shows a listing of the two Hello Android files for a remarkable comparison. Each program is run: first the static version, then the dynamic version.
Figure 13.5. Hello Android, static and dynamically linked

This looks great, except for one little problem. Note the last line in figure 13.5, which says, “Killed.” Is there a problem with our dynamic version? Let’s look closer.
13.2.3. exit() versus return()
Though our application has successfully linked with the Android system libraries of libc.so and libandroid_runtime.so and can actually run, there are missing pieces that cause the application to not properly execute. When you build an application in this manner, without letting the linker do all its magic of knitting the entire application together, you have to do a bit of housekeeping yourself. Looks like there was something to that 500 KB application after all!
For one thing, if our application’s entry point is the main function, and the main function executes a return statement, just where does it return to? Let’s replace the return statement with an exit() call, as shown in this listing.
Listing 13.5. Add an exit() call
#include <stdio.h>
int main(int argc,char * argv[])
{
      printf("Hello, Android!
");
      exit(0);
      //return 0;
}
Add a call to the function exit(). This should return execution to the OS. Comment out the call to return(). A return call in this location causes a stack underflow because there’s nowhere within this application to return to!
This fixed the problem—no more killed messages! Look at figure 13.6, where you see that the dynamic version of Hello, Android now runs just fine.
Figure 13.6. A better-behaving dynamic version of Hello Android

Unfortunately you’re not finished. It turns out that the application doesn’t properly interact with other libraries, nor does it properly handle the argc and argv[] arguments to the main function. The C library (remember, you’re linking against libc.so) has certain expectations for application structure and stack location. You’re closer but still not quite ready for prime time.
What this application requires is a start routine, which is called by the operating system when the application is invoked. This function in turn calls the application’s main function. This start routine must set up the necessary structures to allow the application to properly interact with the operating system and the core C libraries.
13.2.4. Startup code
You’ve surmised that the sample application is missing the proper startup code, but just what does startup code for an Android/Linux application on ARM look like? Where do you turn to get this kind of information? Let’s look deeper into the bag of CodeSourcery tricks for a clue.
A number of executable applications ship with Android, so pull one of them over to the desktop and see what you can learn. Perhaps you can extract information from that file that can assist in solving this puzzle.
The tool you’re going to use to assist in this effort is the object dump command, arm-none-linux-gnueabi-objdump. This utility has a number of options for tearing apart an ELF (executable and linkable format) file for examination. This is the kind of file structure used by applications in the Android/Linux environment. Using the –d option of the objdump command results in a disassembly of the executable file, showing the assembly language equivalent of the code in each executable section. Our interest is in the first .text section of the disassembly, as this ought to be the entry point of the application. The following listing shows the .text section from the ping program taken from the Android Emulator (via adb pull).
Listing 13.6. Disassembly of ping

The first instruction assigns the value of the stack pointer (sp) to register 0 (r0) ![]() . Next the literal value of 0 is assigned to register r1
. Next the literal value of 0 is assigned to register r1 ![]() . The address counter plus four memory location spaces is stored in registers r2 and r3
. The address counter plus four memory location spaces is stored in registers r2 and r3 ![]() . The b instruction tells the code to branch to a specific address
. The b instruction tells the code to branch to a specific address ![]() . In this case, the address is 0x21c bytes prior to the address of the dlopen function. This value is 9514 in decimal. The next branch is to an address that’s 0x37bc bytes beyond the dlclose label
. In this case, the address is 0x21c bytes prior to the address of the dlopen function. This value is 9514 in decimal. The next branch is to an address that’s 0x37bc bytes beyond the dlclose label ![]() . The next few instructions
. The next few instructions ![]() are conditional operations. The code snippet finishes up with a pair of nop instructions
are conditional operations. The code snippet finishes up with a pair of nop instructions ![]() . Note that the address of each instruction is shown to the left of each line. Each instruction occurs at a 4 byte offset
from its predecessor. Four bytes times 6 bits per byte equals a 32-bit address bus, which makes sense because the ARM processor
family is 32 bit.
. Note that the address of each instruction is shown to the left of each line. Each instruction occurs at a 4 byte offset
from its predecessor. Four bytes times 6 bits per byte equals a 32-bit address bus, which makes sense because the ARM processor
family is 32 bit.
Okay, so that looks different from the rest of the code in this chapter—and just what does it do? Unfortunately, other than some basic interpretation of the op codes used, there’s little to tell you why those instructions are there. After doing research on the internet, we found a better example of this code, shown in this listing.
Listing 13.7. crt.S

The .text directive indicates that this code should be placed in the .text section of the resulting executable ![]() . The global start directive
. The global start directive ![]() makes the start routine visible to the rest of the application and the linker. The start: label
makes the start routine visible to the rest of the application and the linker. The start: label ![]() indicates the first location of the start routine. The mov and add instructions perform some housekeeping
indicates the first location of the start routine. The mov and add instructions perform some housekeeping ![]() with the stack pointer, sp, just as seen in the extracted code from the ping program. Initialization takes place via a branch instruction to call the
__libc_init routine
with the stack pointer, sp, just as seen in the extracted code from the ping program. Initialization takes place via a branch instruction to call the
__libc_init routine ![]() . This routine is found in the library libc.so. When this routine is complete, execution returns to the next instruction,
another branch of the main routine
. This routine is found in the library libc.so. When this routine is complete, execution returns to the next instruction,
another branch of the main routine ![]() . This is the main() routine implemented by our C application. The next instructions
. This is the main() routine implemented by our C application. The next instructions ![]() set up a jump table to the sections required by a C language executable application. A pair of nop instructions round out the table. The sections preinit_array, init_array, fini_array, and .ctors are defined
set up a jump table to the sections required by a C language executable application. A pair of nop instructions round out the table. The sections preinit_array, init_array, fini_array, and .ctors are defined ![]() . Note that it appears that these sections are required and that the values provided are an allowable address range for these sections. The linker takes care
of putting these sections into the resulting executable file. Attempting to run the application without these sections results
in code that crashes.
. Note that it appears that these sections are required and that the values provided are an allowable address range for these sections. The linker takes care
of putting these sections into the resulting executable file. Attempting to run the application without these sections results
in code that crashes.
Note
All credit for this crt.S file belongs to the author of a blog found at http://honeypod.blogspot.com/2007/12/initialize-libc-for-android.html. You can find additional reference material for low-level Android programming information at http://benno.id.au.
Now that you’ve found an adequate startup routine, we’ll show you how to add this routine to your application. The compiler handles the assembly file just like a C language file:
arm-none-linux-gnueabi-gcc -c -o crt0.o crt.S
The resulting object file, crt0.o, is passed to the linker as an input file, just as any other object file would be. Also, the entry switch to the linker must now specify _start rather than main:
arm-none-linux-gnueabi-ld --entry=_start --dynamic-linker /system/bin/linker
     -nostdlib -rpath /android/system/lib -rpath-link /android/system/lib -L
     androidsystemlib -l c -l android_runtime -l sqlite -o hellodynamic
     hello.o crt0.o
At this point, you should feel confident that you can build applications for Android/Linux, so it’s time to build something useful. The next section walks through the construction of a DayTime Server.
13.3. What time is it? The DayTime Server
Although we don’t talk about it much today, Linux systems (and more generically, Unix systems) have a service running that provides the server’s current date and time. This application, known as a DayTime Server, typically runs as a daemon (which means it runs in the background and isn’t connected to a particular shell). For our purposes, we’ll implement a basic DayTime Server for Android/Linux, but we won’t worry about turning it into a background service.
This application helps exercise our interest in developing Android/Linux applications. First and most important, it’s an application of some significance beyond a simple printf statement. Second, once this application is built, you’ll write an Android/Java application to interact with the DayTime Server.
13.3.1. DayTime Server application
Our DayTime Server application has a basic function: the application listens on a TCP port for incoming socket connections. When a connection is made, the application writes a short textual string representation of the date and time via the socket, closes the socket, and returns to listening for a new connection.
In addition to the TCP socket interactions, our application logs requests to a SQLite database. Why? Because we can! The purpose of this application is to demonstrate nontrivial activities in the Android/Linux environment, including the use of the SQLite system library. Let’s get started by examining the DayTime Server application.
13.3.2. daytime.c
The DayTime Server application can be broken into two basic functional parts. The first is the TCP socket server.
Our DayTime Server application binds to TCP port 1024 when looking for new connections. Ordinarily, a daytime service binds to TCP port 13, but Linux has a security feature where only trusted users can bind to any port below 1023. The second feature is the insertion of data into a SQLite database. The following listing shows the code for the DayTime Server application.
Listing 13.8. daytime.c


As with many C language applications, a number of headers ![]() are required, including definitions and prototypes for time functions, SQLite functions, and for TCP sockets. Note that the
sqlite3.h header file isn’t provided in the CodeSourcery tool chain. This file was acquired from a sqlite3 distribution, and
the file was copied into the local directory along with daytime.c. This is why the include file is delimited with quotation
marks rather than <>, which is used for finding include files in the system or compiler path. The htons function is typically implemented in the library named socket (libsocket.so). Android doesn’t provide this library, nor was
this found in any of the system libraries. Therefore htons is defined here as a macro
are required, including definitions and prototypes for time functions, SQLite functions, and for TCP sockets. Note that the
sqlite3.h header file isn’t provided in the CodeSourcery tool chain. This file was acquired from a sqlite3 distribution, and
the file was copied into the local directory along with daytime.c. This is why the include file is delimited with quotation
marks rather than <>, which is used for finding include files in the system or compiler path. The htons function is typically implemented in the library named socket (libsocket.so). Android doesn’t provide this library, nor was
this found in any of the system libraries. Therefore htons is defined here as a macro ![]() . This macro is required to get the network byte ordering correct. When the application is running, you can verify this port
by running netstat –tcp on the command line in the adb shell.
. This macro is required to get the network byte ordering correct. When the application is running, you can verify this port
by running netstat –tcp on the command line in the adb shell.
The standard TCP port for a DayTime Server is port 13. In ![]() , the application is using port 1024 because our application can’t bind to any port numbered 1023 or below. Only system processes
may bind to ports below 1024.
, the application is using port 1024 because our application can’t bind to any port numbered 1023 or below. Only system processes
may bind to ports below 1024.
In the RecordHit function, you see SQLite interaction ![]() . The RecordHit() function is responsible for inserting a record into the SQLite database created for this application.
. The RecordHit() function is responsible for inserting a record into the SQLite database created for this application.
Jumping into the main function, you see the socket functions in use to listen on a socket for incoming connections ![]() . When a connection is accepted
. When a connection is accepted ![]() , the current system time is sent to the calling client. After this, the application makes a record of the transaction by
calling the RecordHit function
, the current system time is sent to the calling client. After this, the application makes a record of the transaction by
calling the RecordHit function ![]() .
.
That’s all the code necessary to implement our Android/Linux DayTime Server application. Let’s look next at the SQLite 3 database interaction in more detail.
13.3.3. The SQLite database
This application employs a simple database structure created with the SQLite 3 application. We interact with SQLite 3 from the adb shell environment, as shown in figure 13.7.
Figure 13.7. Interact with SQLite 3 from the command line in the adb shell.

The purpose of this database is to record data each time the DayTime Server processes an incoming request. From a data perspective, this sample is boring, as it simply records the system time along with the text returned to the client (this text is a ctime-formatted time string). Though somewhat redundant from a data perspective, the purpose is to demonstrate the use of SQLite from our C application, utilizing the Android/Linux resident sqlite3 library, libsqlite.so.
The previous section of code outlined the syntax for inserting a row into the database; this section shows how to interact with the database using the SQLite 3 tool. The sequence shown in figure 13.7 is broken out and explained in the following listing.
Listing 13.9. Interacting with a SQLite database

The SQLite database operates in a similar fashion to other, modern SQL-based environments. In listing 13.9, you see the output from an interactive session where the database for this chapter’s sample application is opened ![]() . A series of commands given at the sqlite> prompt
. A series of commands given at the sqlite> prompt ![]() display the contents of the database in terms of structure. The schema command dumps the DDL (Data Definition Language) for a particular table. In this case, you see the CREATE TABLE instructions for the hits table
display the contents of the database in terms of structure. The schema command dumps the DDL (Data Definition Language) for a particular table. In this case, you see the CREATE TABLE instructions for the hits table ![]() . Viewing the data is simple with the use of the familiar select statement
. Viewing the data is simple with the use of the familiar select statement ![]() .
.
To run the sample code yourself, you’ll want to execute the following command sequence from an adb shell:
cd /data/ch13
sqlite3 daytime_db.db
create table hits (hittime date,hittext text);
.exit
The SQLite database engine is known for its simplicity. This section displayed a simple interaction and just how easy it is to employ. In addition, the SQLite 3 database may be pulled from the Android Emulator and used on the development machine, as shown in figure 13.8.
Figure 13.8. The SQLite database on the development machine

This feature makes Android a compelling platform for mobile data collection applications because syncing data can be as simple as copying a database file that’s compatible across multiple platforms.
13.3.4. Building and running the DayTime Server
To build this application, you need to combine the components of the previous few sections. You know that our application requires a startup component and must also link against multiple libraries. Because the application interacts with the SQLite database, you must link against the sqlite library in addition to the c and android_runtime libraries. The full build script is shown in the next listing.
Listing 13.10. Daytime application build script
arm-none-linux-gnueabi-gcc -c daytime.c
arm-none-linux-gnueabi-gcc -c -o crt0.o crt.S
arm-none-linux-gnueabi-ld --entry=_start --dynamic-linker /system/bin/linker
     -nostdlib -rpath /system/lib -rpath-link androidsystemlib -L
     androidsystemlib -l c -l android_runtime -l sqlite -o daytime
     daytime.o crt0.o
C:softwaregoogle<path to android sdk>	oolsadb
               push daytime /data/ch13
g:	oolsadb shell "chmod 777 /data/ch13/daytime"
The build script begins by compiling the main source file, daytime.c. The next line compiles the crt.S file, which we introduced in listing 13.7 for our C runtime initialization. The linker command contains a number of switches to create the desired application. Note the parameter to the linker to include the sqlite library. Note also the inclusion of both daytime.o and crt0.o object files as inputs to the linker. Both are required to properly construct the DayTime Server application. The input files are found in local (to the development machine) copies of the libraries.adb is employed to push the executable file to the Android Emulator and to modify the permissions, saving a manual step.
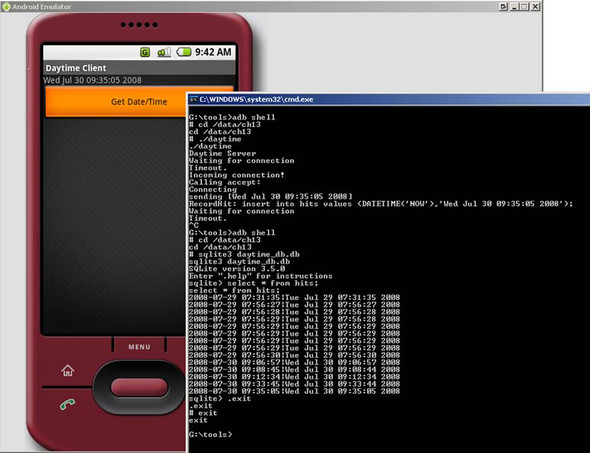
Running the DayTime Server application is the easy and fun part of this exercise. Here’s a rundown of the sequence shown in figure 13.9:
1. Start the shell by running adb shell.
2. Change directories to /data/ch13, where the application resides, previously pushed there with an adb push command.
3. Run the ./daytime application.
4. The application binds to a port and begins listening for an incoming connection.
5. A timeout occurs prior to a connection being made. The application displays the timeout and returns to look for connections again.
6. A connection is detected and subsequently accepted.
Figure 13.9. DayTime Server running in the shell
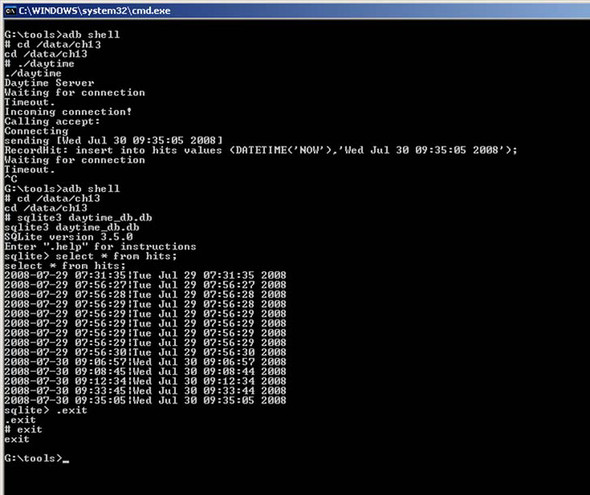
8. A record is inserted into the database with the shown sql statement.
9. You kill the application and restart the shell. Note that this is because you didn’t build a clean way of killing the DayTime Server. A proper version of the application would be to convert it to a daemon, which is beyond the scope of our discussion here.
10. Run sqlite3 to examine the contents of our application’s database.
11. Perform a select against the hits table, where you see the recently inserted record.
You’ve built an Android/Linux application that implements a variant of the traditional DayTime Server application as well as interacts with a SQL database. Not too shabby when you consider that this is a telephone platform! Let’s move on to examine the Android/Java application used to exercise the DayTime Server, our Daytime Client.
13.4. Daytime Client
One of the stated objectives for this chapter is to connect the Java UI to our DayTime Server application. This section demonstrates the construction of a Daytime Client application, which communicates with our DayTime Server via TCP sockets.
13.4.1. Activity
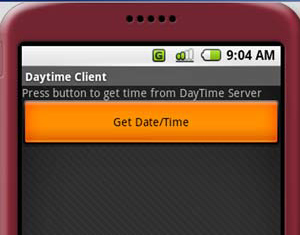
The Daytime Client application has a single Activity, which presents a single Button and a TextView, as shown in figure 13.10.
Figure 13.10. The Daytime Client app
When a user clicks the Button, the Activity initiates the DayTime Server query and replaces the text of the TextView with the information received from the DayTime Server. There’s not much to it, but that’s fine, as all we’re after in this sample is to demonstrate connectivity between the two applications. The following listing shows the onCreate method for this Activity.
Listing 13.11. UI elements of DaytimeClient.java

This application is all about detecting the selection of a button ![]() and initiating an action based on that click. The action is the creation of an instance of the Requester class
and initiating an action based on that click. The action is the creation of an instance of the Requester class ![]() , which we discuss in the next section. You handle the response from the socket server with the assistance of a Handler
, which we discuss in the next section. You handle the response from the socket server with the assistance of a Handler ![]() . The Handler has a single role: updating the UI with textual data stored in the obj member of a Message object.
. The Handler has a single role: updating the UI with textual data stored in the obj member of a Message object.
Although the UI of this application is simple, the more interesting side of this Activity is the interaction with the DayTime Server, which takes place in the Requester class, which we’ll look at next.
13.4.2. Socket Client
The DayTime Server application listens on a TCP port for incoming connections. To request the date and time, the Daytime Client must establish a client socket connection to the DayTime Server. It’s hard to imagine a simpler TCP service than this—open a socket to the server and read data until the socket connection is closed. There’s no additional requirement. Most of the networking examples in this book have focused on a higher-level protocol, HTTP, where the request and response are clearly defined with headers and a specific protocol to observe. In this example, the communications involve a lower-level socket connection, essentially raw, if you will, because there’s no protocol associated with it beyond being a TCP stream (as opposed to UDP). The following listing demonstrates this lower-level socket communication.
Listing 13.12. Requester class implementation

The Requestor ![]() class extends the Thread class by implementing the run method. Communications take place via an instance of the Socket class
class extends the Thread class by implementing the run method. Communications take place via an instance of the Socket class ![]() , which is found in the java.net package. Note the port number being used—1024, just like our socket server! A Message
, which is found in the java.net package. Note the port number being used—1024, just like our socket server! A Message ![]() is used to communicate back to the UI thread. Once the Message object is initialized, it’s sent back to the calling thread
is used to communicate back to the UI thread. Once the Message object is initialized, it’s sent back to the calling thread ![]() .
.
With the Daytime Client now coded, it’s time to test the application. In order for the Daytime Client to access a TCP socket, a special permission entry is required in the AndroidManifest.xml file: <uses-permission android:name="android.permission.INTERNET"></uses-permission>.
13.4.3. Testing the Daytime Client
The first step in testing the Daytime Client is to ensure that the DayTime Server application is running, as described in section 13.3.4. Once you know the DayTime Server is running, you can run the Daytime Client.
Note
If you’re unclear on how to build and run the Daytime Client, refer to chapter 2 for information on properly setting up the Android development environment in Eclipse.
Figure 13.11 demonstrates the Daytime Client running, alongside a view of the DayTime Server. Note how the TextView of the Android application is updated to reflect the date and time sent by the DayTime Server.
Figure 13.11. Testing the Daytime Client
The DayTime Server is exercising both TCP socket functionality and SQLite database record insertions, all running in the Android Emulator. A production-ready Android/Linux application would need to be converted to run as a daemon, which is beyond our aim for this chapter.
13.5. Summary
This chapter hopefully stretched your imagination for the kinds of applications possible with the versatile and open platform of Android. We had the goal of writing an application outside the Android SDK and demonstrating how that kind of application may be leveraged by a standard Android Java application. To write for the Android/Linux layer, we turned to the C programming language.
Developing C language applications for Android/Linux is a cross-platform compilation exercise using the freely available CodeSourcery tool chain. This chapter demonstrated using that toolset in conjunction with the adb utility provided in the Android SDK. The adb utility enabled you to push the application to the Android Emulator for testing, as well as extract the Android system libraries essential for linking the application with the Android resident libraries. You used the adb shell to interact directly with the Android Emulator to run the C application.
Our sample application exercised TCP socket communications. The TCP capability proved to be a ready interface mechanism between the Android/Java layer and the Android/Linux foundation of the environment in the Daytime Client and server applications, respectively. TCP socket communications may also take place from the Android/Linux environment to external, remote systems such as email servers or directory servers, opening up a world of possibilities.
The DayTime Server sample application also demonstrated the use of an Android resident library to manipulate a SQLite database used to store transaction data. The impact of this step shouldn’t be minimized, as it satisfies three important development challenges. The first and most basic accomplishment of this functionality is that we’ve demonstrated linking against, and employing, an Android resident system library. This is significant because it shows how future applications may leverage Android functionality such as Open GL or media services. Second, using a device-resident database that’s also accessible from the Java layer means you have an additional (and persistent) interface mechanism between the Java and Linux environments on the platform. Third, Android is a mobile platform. Anytime there’s a mobile application, the topic of sharing and syncing data bubbles up. We demonstrated in this chapter the ease with which an SQL-capable database was shared between the Android Emulator and a personal computer—and all without complex synchronization programming. Synchronization is a broad topic, but the capability of moving a single file between platforms is a welcome feature. There are only a few comparable solutions in the marketplace for other mobile environments, and that’s after years of market penetration by these other platforms. Android gets it right from the start.
This chapter took a bit of a detour from the regular Android SDK programming environment. It’s time to return to the SDK; in the next chapter you’ll learn about Bluetooth and sensors.