
Chapter 4. Intents and Services
- Asking other programs to do work for you with intents
- Advertising your capabilities with intent filters
- Eavesdropping on other apps with broadcast receivers
- Building Services to provide long-lived background processing
- Offering APIs to external applications through AIDL
You’ve already created some interesting applications that didn’t require a lot of effort to build. In this chapter, we’ll dig deeper into the use of Intent objects and related classes to accomplish tasks. We’ll expand the RestaurantFinder application from chapter 3, and show you how an Intent can carry you from one Activity to another and easily link into outside applications. Next, you’ll create a new weather-reporting application to demonstrate how Android handles background processes through a Service. We’ll wrap up the chapter with an example of using the Android Interface Definition Language (AIDL) to make different applications communicate with one another.
We introduced the Intent in chapter 1. An Intent describes something you want to do, which might be as vague as “Do whatever is appropriate for this URL” or as specific as “Purchase a flight from San Jose to Chicago for $400.” You saw several examples of working with Intent objects in chapter 3. In this chapter, we’ll look more closely at the contents of an Intent and how it matches with an IntentFilter. The RestaurantFinder app will use these concepts to display a variety of screens.
After you complete the RestaurantFinder application, we’ll move on to WeatherReporter. WeatherReporter will use the Yahoo! Weather API to retrieve weather data and alerts and show them to the user. Along the way, you’ll see how an Intent can request work outside your UI by using a BroadcastReceiver and a Service. A BroadcastReceiver catches broadcasts sent to any number of interested receivers. Services also begin with an Intent, but work in background processes rather than UI screens.
Finally, we’ll examine the mechanism for making interprocess communication (IPC) possible using Binder objects and AIDL. Android provides a high-performance way for different processes to pass messages among themselves.
All these mechanisms require the use of Intent objects, so we’ll begin by looking at the details of this class.
4.1. Serving up RestaurantFinder with Intent
The mobile Android architecture looks a lot like the service-oriented architecture (SOA) that’s common in server development. Each Activity can make an Intent call to get something done without knowing exactly who’ll receive that Intent. Developers usually don’t care how a particular task gets performed, only that it’s completed to their requirements. As you complete your RestaurantFinder application, you’ll see that you can request some sophisticated tasks while remaining vague about how those tasks should get done.
Intent requests are late binding; they’re mapped and routed to a component that can handle a specified task at runtime rather than at build or compile time. One Activity tells the platform, “I need a map to Langtry, TX, US,” and another component returns the result. With this approach, individual components are decoupled and can be modified, enhanced, and maintained without requiring changes to a larger application or system.
Let’s look at how to define an Intent in code, how to invoke an Intent within an Activity, and how Android resolves Intent routing with IntentFilter classes. Then we’ll talk about Intents that are built into the platform and that anyone can use.
4.1.1. Defining Intents
Suppose that you want to call a restaurant to make a reservation. When you’re crafting an Intent for this, you need to include two critical pieces of information. An action is a verb describing what you want to do—in this case, to make a phone call. Data is a noun describing the particular thing to request—in this case, the phone number. You describe the data with a Uri object, which we’ll describe more thoroughly in the next section. You can also optionally populate the Intent with other elements that further describe how to handle the request. Table 4.1 lists all the components of an Intent object.
Table 4.1. Intent elements and descriptions
|
Description |
|
|---|---|
| Action | Fully qualified String indicating the action (for example, android.intent.action.DIAL) |
| Category | Describes where and how the Intent can be used, such as from the main Android menu or from the browser |
| Component | Specifies an explicit package and class to use for the Intent, instead of inferring from action, type, and categories |
| Data | Data to work with, expressed as a URI (for example, content://contacts/1) |
| Extras | Extra data to pass to the Intent in the form of a Bundle |
| Type | Specifies an explicit MIME type, such as text/plain or vnd.android.cursor.item/email_v2 |
Intent definitions typically express a combination of action, data, and other attributes, such as category. You combine enough information to describe the task you want done. Android uses the information you provide to resolve exactly which class should fulfill the request.
4.1.2. Implicit and explicit invocation
Android’s loose coupling allows you to write applications that make vague requests. An implicit Intent invocation happens when the platform determines which component should run the Intent. In our example of making a phone call, we don’t particularly care whether the user has the native Android dialer or if they’ve installed a third-party dialing app; we only care that the call gets made. We’ll let Android resolve the Intent using the action, data, and category we defined. We’ll explore this resolution process in detail in the next section.
Other times, you want to use an Intent to accomplish some work, but you want to make sure that you handle it yourself. When you open a review in RestaurantFinder, you don’t want a third party to intercept that request and show its own review instead. In an explicit Intent invocation, your code directly specifies which component should handle the Intent. You perform an explicit invocation by specifying either the Class or ComponentName of the receiver. The ComponentName provides the fully qualified class name, consisting of a String for the package and a String for the class.
To explicitly invoke an Intent, you can use the following form: Intent(Context ctx, Class cls). With this approach, you can short-circuit all the Android Intent-resolution wiring and directly pass in an Activity class reference to handle the Intent. Though this approach is convenient and fast, it also introduces tight coupling that might be a disadvantage later if you want to start using a different Activity.
4.1.3. Adding external links to RestaurantFinder
When we started the RestaurantFinder in listing 3.6, we used Intent objects to move between screens in our application. In the following listing, we finish the Review-Detail Activity by using a new set of implicit Intent objects to link the user to other applications on the phone.
Listing 4.1. Second section of ReviewDetail, demonstrating Intent invocation
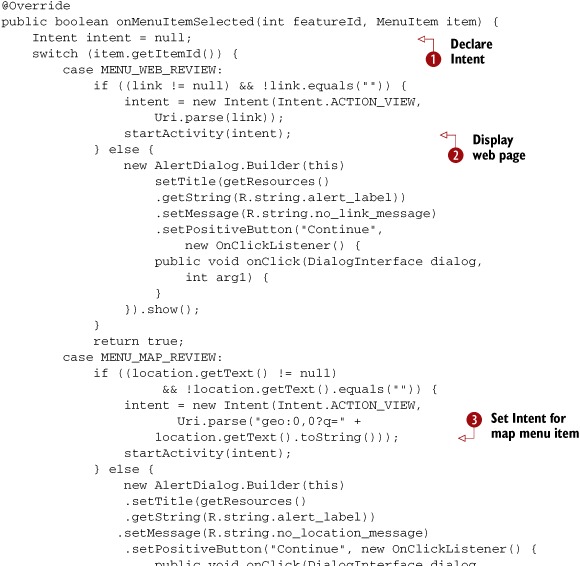

The Review model object contains the address and phone number for a restaurant and a link to the full online review. Using ReviewDetail Activity, the user can open the menu and choose to display a map with directions to the restaurant, call the restaurant, or view the full review in a web browser. To allow all of these actions to take place, ReviewDetail launches built-in Android applications through implicit Intent calls.
In our new code, we initialize an Intent class instance ![]() so it can be used later by the menu cases. If the user selects the MENU_WEB_REVIEW menu button, we create a new instance of the Intent variable by passing in an action and data. For the action, we use the String constant Intent.ACTION_VIEW, which has the value android.app.action.VIEW. You can use either the constant or the value, but sticking to constants helps ensure that you don’t mistype the name. Other
common actions are Intent.ACTION_EDIT, Intent.ACTION_INSERT, and Intent.ACTION_DELETE.
so it can be used later by the menu cases. If the user selects the MENU_WEB_REVIEW menu button, we create a new instance of the Intent variable by passing in an action and data. For the action, we use the String constant Intent.ACTION_VIEW, which has the value android.app.action.VIEW. You can use either the constant or the value, but sticking to constants helps ensure that you don’t mistype the name. Other
common actions are Intent.ACTION_EDIT, Intent.ACTION_INSERT, and Intent.ACTION_DELETE.
For the data component of the Intent, we use Uri.parse(link) to create a Uri. We’ll look at Uri in more detail in the next section; for now, just know that this allows the correct component to answer the startActivity(Intent i) request ![]() and render the resource identified by the Uri. We don’t directly declare any particular Activity or Service for the Intent; we simply say we want to VIEW http://somehost/somepath. Android’s late-binding mechanism will interpret this request at runtime, most likely by launching the device’s built-in
browser.
and render the resource identified by the Uri. We don’t directly declare any particular Activity or Service for the Intent; we simply say we want to VIEW http://somehost/somepath. Android’s late-binding mechanism will interpret this request at runtime, most likely by launching the device’s built-in
browser.
ReviewDetail also handles the MENU_MAP_REVIEW menu item. We initialize the Intent to use Intent.ACTION_VIEW again, but this time with a different type of Uri: "geo:0,0?q=" + street_address ![]() . This combination of VIEW and geo scheme invokes a different Intent, probably the built-in maps application. Finally, when handling MENU_MAP_CALL, we request a phone call using the Intent.ACTION_CALL action and the tel: Uri scheme
. This combination of VIEW and geo scheme invokes a different Intent, probably the built-in maps application. Finally, when handling MENU_MAP_CALL, we request a phone call using the Intent.ACTION_CALL action and the tel: Uri scheme ![]() .
.
Through these simple requests, our RestaurantFinder application uses implicit Intent invocation to allow the user to phone or map the selected restaurant or to view the full review web page. These menu buttons are shown in figure 4.1.
Figure 4.1. Menu buttons on the RestaurantFinder sample application that invoke external applications

Your RestaurantFinder application is now complete. Users can now search for reviews, select a particular review from a list, display a detailed review, and use additional built-in applications to find out more about a selected restaurant.
You’ll learn more about all the built-in apps and action-data pairs in section 4.1.5. Right now, we’re going to focus on the Intent-resolution process and how it routes requests.
4.1.4. Finding your way with Intent
Our RestaurantFinder makes requests to other applications by using Intent invocations, and guides its internal movement by listening for Intent requests. Three types of Android components can register to handle Intent requests: Activity, BroadcastReceiver, and Service. They advertise their capabilities through the <intent-filter> element in the AndroidManifest.xml file.
Android parses each <intent-filter> element into an IntentFilter object. After Android installs an .apk file, it registers the application’s components, including the Intent filters. When the platform has a registry of Intent filters, it can map any Intent requests to the correct, installed Activity, BroadcastReceiver, or Service.
To find the appropriate handler for an Intent, Android inspects the action, data, and categories of the Intent. An <intent-filter> must fulfill the following conditions to be considered:
- The action and category must match.
- If specified, the data type must match, or the combination of data scheme and authority and path must match.
Let’s look at these components in more detail.
Actions and Categories
Each individual IntentFilter can specify zero or more actions and zero or more categories. If the action isn’t specified in the IntentFilter, it’ll match any Intent; otherwise, it’ll match only if the Intent has the same action.
An IntentFilter with no categories will match only an Intent with no categories; otherwise, an IntentFilter must have at least what the Intent specifies. For example, if an IntentFilter supports both the HOME and the ALTERNATIVE categories, it’ll match an Intent for either HOME or CATEGORY. But if the IntentFilter doesn’t provide any categories, it won’t match HOME or CATEGORY.
You can work with action and category without specifying any data. We used this technique in the ReviewList Activity you built in chapter 3. In that example, we defined the IntentFilter in the manifest XML, as shown in the following listing.
Listing 4.2. Manifest declaration of ReviewList Activity with <intent-filter>
<activity android:name="ReviewList" android:label="@string/app_name">
  <intent-filter>
    <category android:name="android.intent.category.DEFAULT" />
    <action android:name="com.msi.manning.restaurant.VIEW_LIST" />
  </intent-filter>
</activity>
To match the filter declared in this listing, we used the following Intent in code, where Constants.INTENT_ACTION_VIEW_LIST is the String "com.msi.manning.restaurant.VIEW_LIST":
Intent intent = new Intent(Constants.INTENT_ACTION_VIEW_LIST);
startActivity(intent);
Data
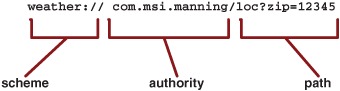
After Android has determined that the action and category match, it inspects the Intent data. The data can be either an explicit MIME type or a combination of scheme, authority, and path. The Uri shown in figure 4.2 is an example of using scheme, authority, and path.
Figure 4.2. The portions of a URI that are used in Android, showing scheme, authority, and path
The following example shows what using an explicit MIME type within a Uri looks like:
audio/mpeg
IntentFilter classes describe what combination of type, scheme, authority, and path they accept. Android follows a detailed process to determine whether an Intent matches:
1. If a scheme is present and type is not present, Intents with any type will match.
2. If a type is present and scheme is not present, Intents with any scheme will match.
3. If neither a scheme nor a type is present, only Intents with neither scheme nor type will match.
4. If an authority is specified, a scheme must also be specified.
5. If a path is specified, a scheme and an authority must also be specified.
Most matches are straightforward, but as you can see, it can get complicated. Think of Intent and IntentFilter as separate pieces of the same puzzle. When you call an Intent in an Android application, the system resolves the Activity, Service, or BroadcastReceiver to handle your request through this resolution process using the actions, categories, and data provided. The system searches all the pieces of the puzzle it has until it finds one that meshes with the Intent you’ve provided, and then it snaps those pieces together to make the late-binding connection.
Figure 4.3 shows an example of how a match occurs. This example defines an IntentFilter with an action and a combination of a scheme and an authority. It doesn’t specify a path, so any path will match. The figure also shows an example of an Intent with a Uri that matches this filter.
Figure 4.3. Example Intent and IntentFilter matching using a filter defined in XML

If multiple IntentFilter classes match the provided Intent, the platform chooses which one will handle the Intent. For a user-visible action like an Activity, Android usually presents the user with a pop-up menu that lets him select which Intent should handle it. For nonvisible actions like a broadcast, Android considers the declared priority of each IntentFilter and gives him an ordered chance to handle the Intent.
4.1.5. Taking advantage of Android-provided activities
In addition to the examples in our RestaurantFinder application, Android ships with a useful set of core applications that allow access via the formats shown in table 4.2. Using the actions and URIs shown in table 4.2, you can hook into the built-in maps application, phone application, or browser application. By experimenting with these, you can get a feel for how Intent resolution works in Android.
Table 4.2. Common Android application Intent action and Uri combinations
|
Action |
Uri |
Description |
|---|---|---|
| Intent.ACTION_CALL | tel:phone_number | Opens the phone application and calls the specified number |
| Intent.ACTION_DIAL | tel:phone_number | Opens the phone application and dials (but doesn’t call) the specified number |
| Intent.ACTION_DIAL | voicemail: | Opens the phone application and dials (but doesn’t call) the voicemail number |
| Intent.ACTION_VIEW | geo:latitude,longitude | Opens the maps application to the specified latitude and longitude |
| Intent.ACTION_VIEW | geo:0,0?q=street+address | Opens the maps application to the specified address |
| Intent.ACTION_VIEW | http://web_address | Opens the browser application to the specified URL |
| Intent.ACTION_VIEW | https://web_address | Opens the browser application to the specified secure URL |
| Intent.ACTION_WEB_SEARCH | plain_text | Opens the browser application and uses Google Search |
With a handle on the basics of Intent resolution and a quick look at built-in Intents out of the way, we can move on to a new sample application: WeatherReporter.
4.2. Checking the weather with a custom URI
WeatherReporter, the next sample application you’ll build, uses the Yahoo! Weather API to retrieve weather data, and displays it to the user. This application can also optionally alert users of severe weather for certain locations, based on either the current location of the device or on a specified postal code.
Within this project, you’ll see how you can define a custom URI and register it with a matching Intent filter to allow any other application to invoke a weather report through an Intent. Defining and publishing an Intent in this way allows other applications to easily use your application. When your WeatherReporter application is complete, the main screen will look like figure 4.4.
Figure 4.4. The WeatherReporter application, showing the weather forecast for the current location

4.2.1. Offering a custom URI
Let’s look more deeply into how to define Intent filters in XML. The manifest for WeatherReporter is shown in the following listing.
Listing 4.3. The Android manifest file for the WeatherReporter application


In the WeatherReporter manifest, we define three activities ![]() . The first two don’t include an <intent-filter>, so they can only be explicitly invoked from within this application. The ReportViewDetail Activity has multiple <intent-filter> tags defined for it, including one denoting it as the MAIN LAUNCHER, and one with the weather://com.msi.manning scheme and authority. Our application supports this custom URI to provide weather access.
. The first two don’t include an <intent-filter>, so they can only be explicitly invoked from within this application. The ReportViewDetail Activity has multiple <intent-filter> tags defined for it, including one denoting it as the MAIN LAUNCHER, and one with the weather://com.msi.manning scheme and authority. Our application supports this custom URI to provide weather access.
You can use any combination of scheme, authority, and path, as shown in listing 4.3, or you can use an explicit MIME type. You’ll find out more about MIME types and how they’re processed in chapter 5, where we’ll look at how to work with data sources and use an Android concept known as a ContentProvider.
After we define these activities, we use the <receiver> element in the manifest file to refer to a BroadcastReceiver class ![]() . We’ll examine BroadcastReceiver more closely in section 4.3, but for now know that an <intent-filter> associates this receiver with an Intent—in this case, for the BOOT_COMPLETED action. This filter tells the platform to invoke the WeatherAlertServiceReceiver class after it completes the boot up sequence.
. We’ll examine BroadcastReceiver more closely in section 4.3, but for now know that an <intent-filter> associates this receiver with an Intent—in this case, for the BOOT_COMPLETED action. This filter tells the platform to invoke the WeatherAlertServiceReceiver class after it completes the boot up sequence.
We also define a Service ![]() . You’ll see how this Service is built, and how it polls for severe weather alerts in the background, in section 4.3. Finally, our manifest includes a set of required permissions
. You’ll see how this Service is built, and how it polls for severe weather alerts in the background, in section 4.3. Finally, our manifest includes a set of required permissions ![]() .
.
4.2.2. Inspecting a custom Uri
With the foundation for our sample application in place via the manifest, Android will launch WeatherReporter when it encounters a request that uses our custom Uri. As usual, it’ll invoke the onStart method of the main Activity WeatherReporter will use. The following listing shows our implementation, where we parse data from the Uri and use it to display a weather report.
Listing 4.4. onStart method of the ReportViewDetail Activity
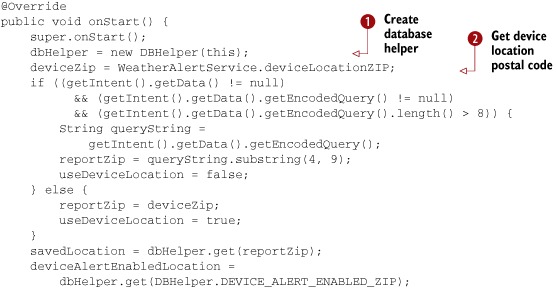

You can get the complete ReportViewDetail Activity from the source code download for this chapter. In the onStart method shown in this listing, we focus on parsing data from the Uri passed in as part of the Intent that invokes the Activity.
First, we establish a database helper object ![]() . This object will be used to query a local SQLite database that stores user-specified location data. We’ll show more about
how data is handled, and the details of this helper class, in chapter 5.
. This object will be used to query a local SQLite database that stores user-specified location data. We’ll show more about
how data is handled, and the details of this helper class, in chapter 5.
In this method, we also obtain the postal code of the current device location from a LocationManager in the WeatherAlertService class ![]() . We want to use the location of the device as the default weather report location. As the user travels with the phone, this
location will automatically update. We’ll cover location and Location-Manager in chapter 11.
. We want to use the location of the device as the default weather report location. As the user travels with the phone, this
location will automatically update. We’ll cover location and Location-Manager in chapter 11.
After obtaining the device location, we move on to the key aspect of obtaining Uri data from an Intent. We check to see whether our Intent provided specific data; if so, we parse the Uri passed in to obtain the queryString and embedded postal code to use for the user’s specified location. If this location is present, we use it; if not, we default to the device location postal code.
After determining the postal code to use, we set the status of the check box that indicates whether to enable alerts ![]() . We have two kinds of alerts: one for the device location and another for the user’s specified saved locations.
. We have two kinds of alerts: one for the device location and another for the user’s specified saved locations.
Finally, we call the loadReport method, which makes the call out to the Yahoo! Weather API[1] to obtain data; then we use a Handler to send a Message to update the needed UI View elements.
1 For more on the Yahoo! Weather API, go here: http://developer.yahoo.com/weather/.
Remember that this Activity registered in the manifest to receive weather://com.msi.manning intents. Any application can invoke this Activity without knowing any details other than the URI. This separation of responsibilities enables late binding. After invocation, we check the URI to see what our caller wanted.
You’ve now seen the manifest and pertinent details of the main Activity class for the WeatherReporter application we’ll build in the next few sections. We’ve also discussed how Intent and IntentFilter classes work together to wire up calls between components. Next, we’ll take a look at some of the built-in Android applications that accept external Intent requests. These requests enable you to launch activities by simply passing in the correct URI.
4.3. Checking the weather with broadcast receivers
So far you’ve seen how to use an Intent to communicate within your app and to issue a request that another component will handle. You can also send an Intent to any interested receiver. When you do, you aren’t requesting the execution of a specific task, but instead you’re letting everyone know about something interesting that has happened. Android already sends these broadcasts for several reasons, such as when an incoming phone call or text message is received. In this section, we’ll look at how events are broadcast and how they’re captured using a BroadcastReceiver.
We’ll continue to work through the WeatherReporter sample application we began in section 4.2. The WeatherReporter application will display alerts to the user when severe weather is forecast for the user’s indicated location. We’ll need a background process that checks the weather and sends any needed alerts. This is where the Android Service concept will come into play. We need to start the Service when the device boots, so we’ll listen for the boot through an Intent broadcast.
4.3.1. Broadcasting Intent
As you’ve seen, Intent objects let you move from Activity to Activity in an Android application, or from one application to another. Intents can also broadcast events to any configured receiver using one of several methods available from the Context class, as shown in table 4.3.
Table 4.3. Methods for broadcasting intents
|
Method |
Description |
|---|---|
| sendBroadcast(Intent intent) | Simple form for broadcasting an Intent. |
| sendBroadcast(Intent intent, String receiverPermission) | Broadcasts an Intent with a permission String that receivers must declare in order to receive the broadcast. |
| sendOrderedBroadcast(Intent intent, String receiverPermission) | Broadcasts an Intent call to the receivers one-by-one serially, stopping after a receiver consumes the message. |
| sendOrderedBroadcast(Intent intent, String receiverPermission, BroadcastReceiver resultReceiver, Handler scheduler, int initialCode, String initialData, Bundle initialExtras) | Broadcasts an Intent and gets a response back through the provided BroadcastReceiver. All receivers can append data that will be returned in the BroadcastReceiver. When you use this method, the receivers are called serially. |
| sendStickyBroadcast(Intent intent) | Broadcasts an Intent that remains a short time after broadcast so that receivers can retrieve data. Applications using this method must declare the BROADCAST_STICKY permission. |
When you broadcast Intents, you send an event into the background. A broadcast Intent doesn’t invoke an Activity, so your current screen usually remains in the foreground.
You can also optionally specify a permission when you broadcast an Intent. Only receivers who’ve declared that permission will receive the broadcast; all others will remain unaware of it. You can use this mechanism to ensure that only certain trusted applications can listen in on what your app does. You can review permission declarations in chapter 1.
Broadcasting an Intent is fairly straightforward; you use the Context object to send it, and interested receivers catch it. Android provides a set of platform-related Intent broadcasts that use this approach. In certain situations, such as when the time zone on the platform changes, when the device completes booting, or when a package is added or removed, the system broadcasts an event using an Intent. Table 4.4 shows some of the specific Intent broadcasts the platform provides.
Table 4.4. Broadcast actions provided by the Android platform
|
Action |
Description |
|---|---|
| ACTION_BATTERY_CHANGED | Sent when the battery charge level or charging state changes |
| ACTION_BOOT_COMPLETED | Sent when the platform completes booting |
| ACTION_PACKAGE_ADDED | Sent when a package is added to the platform |
| ACTION_PACKAGE_REMOVED | Sent when a package is removed from the platform |
| ACTION_TIME_CHANGED | Sent when the user changes the time on the device |
| ACTION_TIME_TICK | Sent every minute to indicate that time is ticking |
| ACTION_TIMEZONE_CHANGED | Sent when the user changes the time zone on the device |
To register to receive an Intent broadcast, you implement a BroadcastReceiver. You’ll make your own implementation to catch the platform-provided BOOT_COMPLETED Intent to start the weather alert service.
4.3.2. Creating a receiver
Because the weather alert Service you’re going to create should always run in the background, you need a way to start it when the platform boots. To do this, you’ll create a BroadcastReceiver that listens for the BOOT_COMPLETED Intent broadcast.
The BroadcastReceiver base class provides a series of methods that lets you get and set a result code, result data (in the form of a String), and an extra Bundle. It also defines a lifecycle-related method to run when the appropriate Intent is received.
You can associate a BroadcastReceiver with an IntentFilter in code or in the manifest XML file. We declared this for the WeatherReporter manifest in listing 4.3, where we associated the BOOT_COMPLETED broadcast with the WeatherAlertServiceReceiver class. This class is shown in the following listing.
Listing 4.5. The WeatherAlertServiceReceiver BroadcastReceiver class
public class WeatherAlertServiceReceiver extends BroadcastReceiver {
    @Override
    public void onReceive(Context context, Intent intent) {
        if (intent.getAction().equals(Intent.ACTION_BOOT_COMPLETED)) {
            context.startService(new Intent(context,
                WeatherAlertService.class));
        }
    }
}
When you create your own Intent broadcast receiver, you extend the BroadcastReceiver class and implement the abstract onReceive(Context c, Intent i) method. In our implementation, we start the WeatherAlertService. This Service class, which we’ll create next, is started using the Context.startService(Intent i, Bundle b) method.
Keep in mind that receiver class instances have a short and focused lifecycle. After completing the onReceive(Context c, Intent i) method, the instance and process that invoked the receiver are no longer needed and might be killed by the system. For this reason, you can’t perform any asynchronous operations in a BroadcastReceiver, such as starting a thread or showing a dialog. Instead, you can start a Service, as we’ve done in listing 4.5, and use it to do work.
Our receiver has started the WeatherAlertService, which will run in the background and warn users of severe weather in the forecast with a Notification-based alert. Let’s look more deeply into the concept of an Android Service.
4.4. Building a background weather service
In a basic Android application, you create Activity classes and move from screen to screen using Intent calls, as we’ve done in previous chapters. This approach works for the canonical Android screen-to-screen foreground application, but it doesn’t work for cases like ours where we want to always listen for changes in the weather, even if the user doesn’t currently have our app open. For this, we need a Service.
In this section, we’ll implement the WeatherAlertService we launched in listing 4.4. This Service sends an alert to the user when it learns of severe weather in a specified location. This alert will display over any application, in the form of a Notification, if severe weather is detected. Figure 4.5 shows the notification we’ll send.
Figure 4.5. Warning from a background application about severe weather

A background task is typically a process that doesn’t involve direct user interaction or any type of UI. This process perfectly describes checking for severe weather. After a Service is started, it runs until it’s explicitly stopped or the system kills it. The WeatherAlertService background task, which starts when the device boots via the BroadcastReceiver from listing 4.5, is shown in the following listing.
Listing 4.6. WeatherAlertService class, used to register locations and send alerts
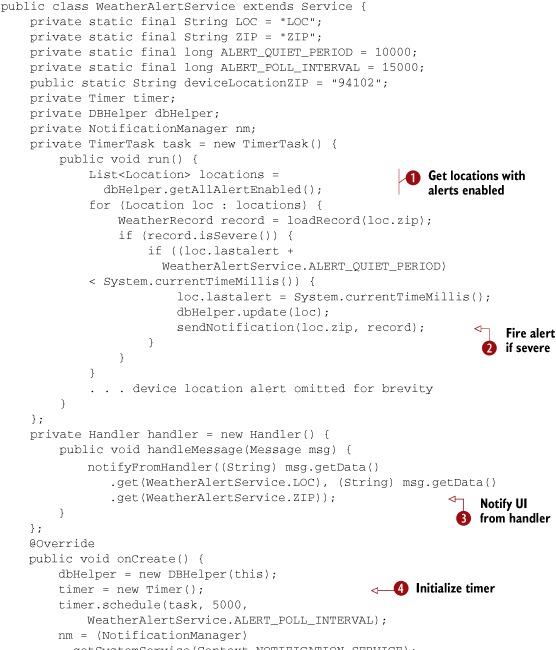

WeatherAlertService extends Service. We create a service in a way that’s similar to how we’ve created activities and broadcast receivers: extend the base class, implement the abstract methods, and override the lifecycle methods as needed.
After the initial class declaration, we define several member variables. First come constants that describe our intervals for polling for severe weather and a quiet period. We’ve set a low threshold for polling during development—severe weather alerts will spam the emulator often because of this setting. In production, we’d limit this to check every few hours.
Next, our TimerTask variable will let us periodically poll the weather. Each time the task runs, it gets all the user’s saved locations through
a database call ![]() . We’ll examine the specifics of using an Android database in chapter 5.
. We’ll examine the specifics of using an Android database in chapter 5.
When we have the saved locations, we parse each one and load the weather report. If the report shows severe weather in the
forecast, we update the time of the last alert field and call a helper method to initiate sending a Notification ![]() . After we process the user’s saved locations, we get the device’s alert location from the database using a postal code designation.
If the user has requested alerts for his current location, we repeat the process of polling and sending an alert for the device’s
current location as well. You can see more details on Android location-related facilities in chapter 11.
. After we process the user’s saved locations, we get the device’s alert location from the database using a postal code designation.
If the user has requested alerts for his current location, we repeat the process of polling and sending an alert for the device’s
current location as well. You can see more details on Android location-related facilities in chapter 11.
After defining our TimerTask, we create a Handler member variable. This variable will receive a Message object that’s fired from a non-UI thread. In this case, after receiving the Message, our Handler calls a helper method that instantiates and displays a Notification ![]() .
.
Next, we override the Service lifecycle methods, starting with onCreate. Here comes the meat of our Service: a Timer ![]() that we configure to repeatedly fire. For as long as the Service continues to run, the timer will allow us to update weather information. After onCreate, we see onDestroy, where we clean up our database connection
that we configure to repeatedly fire. For as long as the Service continues to run, the timer will allow us to update weather information. After onCreate, we see onDestroy, where we clean up our database connection ![]() . Service classes provide these lifecycle methods so you can control how resources are allocated and deallocated, similar to Activity classes.
. Service classes provide these lifecycle methods so you can control how resources are allocated and deallocated, similar to Activity classes.
After the lifecycle-related methods, we implement the required onBind method. This method returns an IBinder, which other components that call into Service methods will use for communication. The WeatherAlertService performs only a background task; it doesn’t support binding, and so it returns a null for onBind. We’ll add binding and interprocess communication (IPC) in section 4.5.
Next, we implement our helper methods. First, loadRecord calls out to the Yahoo! Weather API via YWeatherFetcher. (We’ll cover networking tasks, similar to those this class performs, in chapter 6.) Then sendNotification configures a Message with location details to activate the Handler we declared earlier. Last of all, you see the notifyFromHandler method. This method fires off a Notification with Intent objects that will call back into the WeatherReporter Activity if the user clicks on the Notification ![]() .
.
Now that we’ve discussed the purpose of services and you’ve created a Service class and started one via a BroadcastReceiver, we can start looking at how other developers can interact with your Service.
Our sample application starts a Service and leaves it running in the background. Our service is designed to have a minimal footprint, but Android best practices discourage long-running services. Services that run continually and constantly use the network or perform CPU-intensive tasks will eat up the device’s battery life and might slow down other operations. Even worse, because they run in the background, the user won’t know what applications are to blame for her device’s poor performance. The OS will eventually kill running services if it needs to acquire additional memory, but otherwise won’t interfere with poorly designed services. If your use case no longer requires the service, you should stop it. If you do require a long-running service, you might want to give the user the option of whether to use it.
4.5. Communicating with the WeatherAlertService from other apps
In Android, each application runs within its own process. Other applications can’t directly call methods on your weather alert service, because the applications are in different sandboxes. You’ve already seen how applications can invoke one another by using an Intent. Suppose, though, that you wanted to learn something specific from a particular application, like check the weather in a particular region. This type of granular information isn’t readily available through simple Intent communication, but fortunately Android provides a new solution: IPC through a bound service.
We’ll illustrate bound services by expanding our weather alert with a remotable interface using AIDL, and then we’ll connect to that interface through a proxy that we’ll expose using a new Service. Along the way, we’ll explore the IBinder and Binder classes Android uses to pass messages and types during IPC.
4.5.1. Android Interface Definition Language
If you want to allow other developers to use your weather features, you need to give them information about the methods you provide, but you might not want to share your application’s source code. Android lets you specify your IPC features by using an interface definition language (IDL) to create AIDL files. These files generate a Java interface and an inner Stub class that you can use to create a remotely accessible object, and that your consumers can use to invoke your methods.
AIDL files allow you to define your package, imports, and methods with return types and parameters. Our weather AIDL, which we place in the same package as the .java files, is shown in the following listing.
Listing 4.7. IWeatherReporter.aidl remote IDL file
package com.msi.manning.weather;

interface IWeatherReporter
{
    String getWeatherFor(in String zip);
    void addLocation(in String zip, in String city, in String region);
}
You define the package and interface in AIDL as you would in a regular Java file. Similarly, if you require any imports, you’d list them above the interface declaration. When you define methods, you must specify a directional tag for all nonprimitive types. The possible directions are in, out, and inout. The platform uses this directional tag to generate the necessary code for marshaling and unmarshaling instances of your interface across IPC boundaries.
Our interface IWeatherReporter includes methods to look up the current weather from the service, or to add a new location to the service. Other developers could use these features to provide other front-end applications that use our back-end service.
Only certain types of data are allowed in AIDL, as shown in table 4.5. Types that require an import must always list that import, even if they’re in the same package as your .aidl file.
Table 4.5. Android IDL allowed types
|
Type |
Description |
Import required |
|---|---|---|
| Java primitives | boolean, byte, short, int, float, double, long, char. | No |
| String | java.lang.String. | No |
| CharSequence | java.lang.CharSequence. | No |
| List | Can be generic; all types used in collection must be allowed by IDL. Ultimately provided as an ArrayList. | No |
| Map | Can be generic, all types used in collection must be one allowed by IDL. Ultimately provided as a HashMap. | No |
| Other AIDL interfaces | Any other AIDL-generated interface type. | Yes |
| Parcelable objects | Objects that implement the Android Parcelable interface, described in section 4.5.2. | Yes |
After you’ve defined your interface methods with return types and parameters, you then invoke the aidl tool included in your Android SDK installation to generate a Java interface that represents your AIDL specification. If you use the Eclipse plug-in, it’ll automatically invoke the aidl tool for you, placing the generated files in the appropriate package in your project’s gen folder.
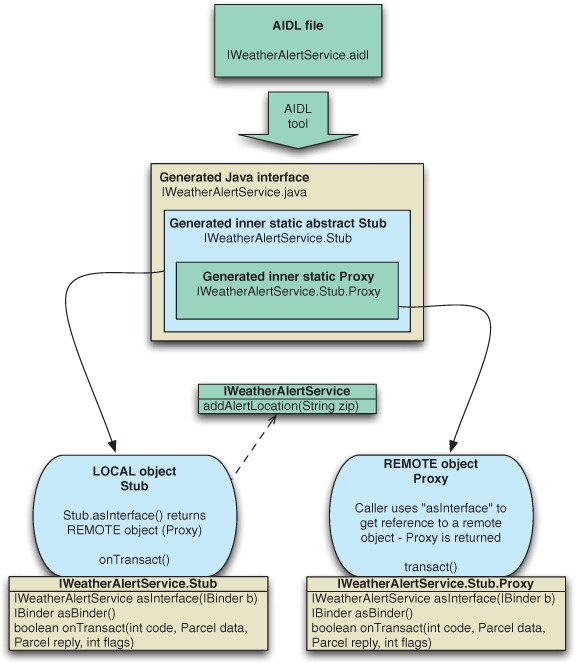
The interface generated through AIDL includes an inner static abstract class named Stub that extends Binder and implements the outer class interface. This Stub class represents the local side of your remotable interface. Stub also includes an asInterface(IBinder binder) method that returns a remote version of your interface type. Callers can use this method to get a handle to the remote object and use it to invoke remote methods. The AIDL process generates a Proxy class (another inner class, this time inside Stub) that connects all these components and returns to callers from the asInterface method. Figure 4.6 depicts this IPC local/remote relationship. After all the required files are generated, create a concrete class that extends from Stub and implements your interface. Then, expose this interface to callers through a Service. We’ll be doing that soon, but first, let’s take a quick look under the hood and see how these generated files work.
Figure 4.6. Diagram of the Android AIDL process
4.5.2. Binder and Parcelable
The IBinder interface is the base of the remoting protocol in Android. As we discussed in the previous section, you don’t implement this interface directly; rather, you typically use AIDL to generate an interface that contains a Stub Binder implementation.
The IBinder.transact() method and corresponding Binder.onTransact() method form the backbone of the remoting process. Each method you define using AIDL is handled synchronously through the transaction process, enabling the same semantics as if the method were local.
All the objects you pass in and out through the interface methods that you define using AIDL use the transact process. These objects must be Parcelable in order to be able to be placed inside a Parcel and moved across the local/remote process barrier in the Binder transaction methods.
The only time you need to worry about something being Parcelable is when you want to send a custom object through Android IPC. If you use only the default allowable types in your interface definition files—primitives, String, CharSequence, List, and Map—AIDL automatically handles everything.
The Android documentation describes what methods you need to implement to create a Parcelable class. Remember to create a .aidl file for each Parcelable inter-face. These .aidl files are different from those you use to define Binder classes themselves; these shouldn’t be generated from the aidl tool.
Caution
When you’re considering creating your own Parcelable types, make sure you actually need them. Passing complex objects across the IPC boundary in an embedded environment is an expensive and tedious operation; you should avoid doing it, if possible.
4.5.3. Exposing a remote interface
Now that you’ve defined the features you want to expose from your weather app, you need to actually implement that functionality and make it available to external callers. Android calls this publishing the interface.
To publish a remote interface, you create a class that extends Service and returns an IBinder through the onBind(Intent intent) method. Clients will use that IBinder to access a particular remote object. As we discussed in section 4.5.2, you can use the AIDL-generated Stub class, which itself extends Binder, to extend from and return an implementation of a remotable interface. This process is shown in the following listing, where we implement and publish the IWeatherReporter service we created in the previous section.
Listing 4.8. Implementing a weather service that publishes a remotable object

Our concrete instance of the generated AIDL Java interface must return an IBinder to any caller that binds to this Service. We create an implementation by extending the Stub class that the aidl tool generated ![]() . Recall that this Stub class implements the AIDL interface and extends Binder. After we’ve defined our IBinder, we can create and return it from the onBind method
. Recall that this Stub class implements the AIDL interface and extends Binder. After we’ve defined our IBinder, we can create and return it from the onBind method ![]() .
.
Within the stub itself, we write whatever code is necessary to provide the features advertised by our interface. You can access any other classes within your application. In this example, our service has extended WeatherAlertService so we can more easily access the weather functions we’ve already written, like the loadRecord method.
You’ll need to define this new WeatherReporterService in your application’s manifest, in the same way you define any other service. If you want to bind to the service only from within your own application, no other steps are necessary. But if you want to allow binding from another application, you must provide some extra information within AndroidManifest.xml, as shown in the following listing.
Listing 4.9. Exporting a service for other applications to access
<service android:name=".service.WeatherReporterService"
 android:exported="true">
   <intent-filter>
       <action android:name=
 "com.msi.manning.weather.IWeatherReporter"/>
    </intent-filter>
</service>
To allow external applications to find our Service, we instruct Android to export this service declaration. Exporting the declaration allows other applications to launch the Service, a prerequisite for binding with it. The actual launch will happen through an intent-filter that we define. In this example, the caller must know the full name of the action, but any <intent-filter> we discussed earlier in the chapter can be substituted, such as filtering by scheme or by type.
Now that you’ve seen how a caller can get a reference to a remotable object, we’ll finish that connection by binding to a Service from an Activity.
4.5.4. Binding to a Service
Let’s switch hats and pretend that, instead of writing a weather service, we’re another company that wants to integrate weather functions into our own app. Our app will let the user enter a ZIP code and either look up the current weather for that location or save it to the WeatherReporter application’s list of saved locations. We’ve received the .aidl file and learned the name of the Service. We generate our own interface from that .aidl file, but before we can call the remote methods, we’ll need to first bind with the service.
When an Activity class binds to a Service using the Context.bindService (Intent i, ServiceConnection connection, int flags) method, the ServiceConnection object that we pass in will send several callbacks from the Service back to the Activity. The callback onServiceConnected (ComponentName className, IBinder binder) lets you know when the binding process completes. The platform automatically injects the IBinder returned from the service’s onBind method into this callback, where you can save it for future calls. The following listing shows an Activity that binds to our weather reporting service and invokes remote methods on it. You can see the complete source code for this project in the chapter downloads.
Listing 4.10. Binding to a Service within an Activity
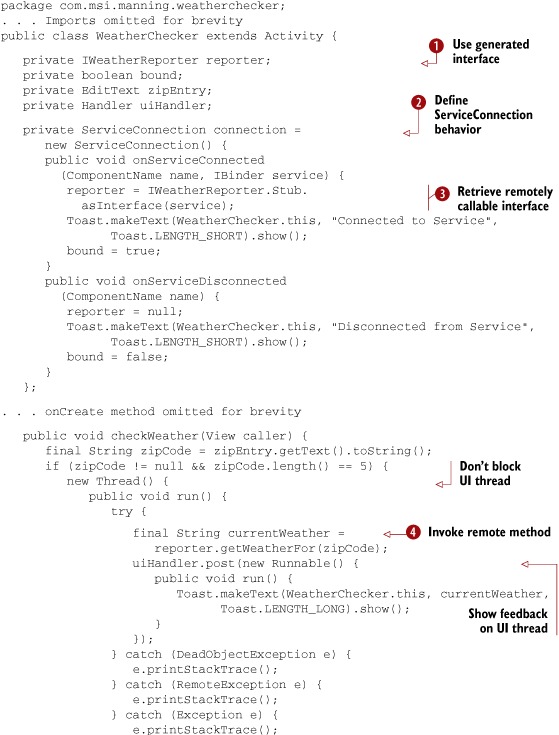
In order to use the remotable IWeatherReporter we defined in AIDL, we declare a variable with this type ![]() . We also define a boolean to keep track of the current state of the binding. Keeping track of the current state will prevent us from rebinding to the
service if our application is suspended and resumed.
. We also define a boolean to keep track of the current state of the binding. Keeping track of the current state will prevent us from rebinding to the
service if our application is suspended and resumed.
We use the ServiceConnection object ![]() to bind and unbind using Context methods. After a Service is bound, the platform notifies us through the onService-Connected callback. This callback returns the remote IBinder reference, which we assign to the remotable type
to bind and unbind using Context methods. After a Service is bound, the platform notifies us through the onService-Connected callback. This callback returns the remote IBinder reference, which we assign to the remotable type ![]() so we can invoke it later. Next, a similar onService-Disconnected callback will fire when a Service is unbound.
so we can invoke it later. Next, a similar onService-Disconnected callback will fire when a Service is unbound.
After we’ve established a connection, we can use the AIDL-generated interface to perform the operations it defines ![]() . When we call getWeatherFor (or later, addLocation), Android will dispatch our invocation across the process boundary, where the service we created in listing 4.8 will execute the methods. The return values will be sent back across the process boundary and arrive as shown at
. When we call getWeatherFor (or later, addLocation), Android will dispatch our invocation across the process boundary, where the service we created in listing 4.8 will execute the methods. The return values will be sent back across the process boundary and arrive as shown at ![]() . This sequence can take a long time, so you should avoid calling remote methods from the UI thread.
. This sequence can take a long time, so you should avoid calling remote methods from the UI thread.
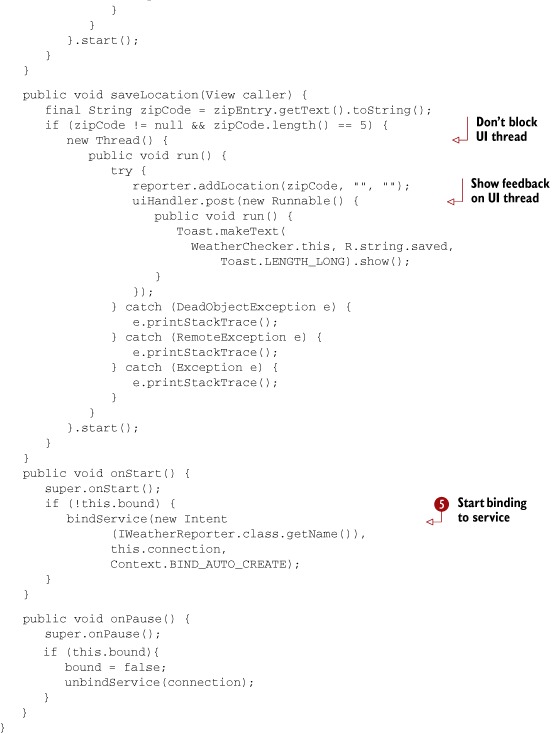
In onStart, we establish the binding using bindService ![]() ; later, in onPause, we use unbindService. The system can choose to clean up a Service that’s been bound but not started. You should always unbind an unused Service so the device can reclaim its resources and perform better. Let’s look more closely at the difference between starting and
binding a service.
; later, in onPause, we use unbindService. The system can choose to clean up a Service that’s been bound but not started. You should always unbind an unused Service so the device can reclaim its resources and perform better. Let’s look more closely at the difference between starting and
binding a service.
4.5.5. Starting versus binding
Services serve two purposes in Android, and you can use them in two different ways:
- Starting— Context.startService(Intent service, Bundle b)
- Binding— Context.bindService(Intent service, ServiceConnection c, int flag)
Starting a Service tells the platform to launch it in the background and keep it running, without any particular connection to any other Activity or application. You used the WeatherAlertService in this manner to run in the background and issue severe weather alerts.
Binding to a Service, as you did with WeatherReporterService, gave you a handle to a remote object, which let you call the service’s exported methods from an Activity. Because every Android application runs in its own process, using a bound Service lets you pass data between processes.
The actual process of marshaling and unmarshaling remotable objects across process boundaries is complicated. Fortunately, you don’t have to deal with all the internals, because Android handles all the complexity through AIDL. Instead, you can stick to a simple recipe that will enable you to create and use remotable objects:
1. Define your interface using AIDL, in the form of a .aidl file; see listing 4.7.
2. Generate a Java interface for your .aidl file. This happens automatically in Eclipse.
3. Extend from the generated .Stub class and implement your interface methods; see listing 4.8.
4. Expose your interface to clients through a Service and the Service onBind(Intent i) method; see listing 4.8.
5. If you want to make your service available to other applications, export the Service in your manifest; see listing 4.9.
6. Client applications will bind to your Service with a ServiceConnection to get a handle to the remotable object; see listing 4.10.
As we discussed earlier in the chapter, services running in the background can have a detrimental impact on overall device performance. To mitigate these problems, Android enforces a special lifecycle for services, which we’re going to discuss now.
4.5.6. Service lifecycle
We want our weather alerting service to constantly lurk in the background, letting us know of potential dangers. On the other hand, we want our weather reporting service to run only while another application actually needs it. Services follow their own well-defined process phases, similar to those followed by an Activity or an Application. A Service will follow a different lifecycle, depending on whether you start it, bind it, or both.
Service-Started Lifecycle
If you start a Service by calling Context.startService(Intent service, Bundle b), as shown in listing 4.5, it runs in the background whether or not anything binds to it. If the service hasn’t been created, the Service onCreate() method is called. The onStart(int id, Bundle args) method is called each time someone tries to start the service, whether or not it’s already running. Additional instances of the Service won’t be created.
The Service will continue to run in the background until someone explicitly stops it with the Context.stopService() method or when the Service calls its own stopSelf() method. You should also keep in mind that the platform might kill services if resources are running low, so your application needs to be able to react accordingly. You can choose to restart the service automatically, fall back to a more limited feature set without it, or take some other appropriate action.
Service-Bound Lifecycle
If an Activity binds a Service by calling Context.bindService(Intent service, ServiceConnection connection, int flags), as shown in listing 4.10, it’ll run as long as the connection is open. An Activity establishes the connection using the Context and is also responsible for closing it.
When a Service is only bound in this manner and not also started, its onCreate() method is invoked, but onStart(int id, Bundle args) is not used. In these cases, the platform can stop and clean up the Service after it’s unbound.
Service-Started and Service-Bound Lifecycle
If a Service is both started and bound, it’ll keep running in the background, much like in the started lifecycle. In this case, both onStart(int id, Bundle args) and onCreate() are called.
Cleaning Up When a Service Stops
When a Service stops, its onDestroy() method is invoked. Inside onDestroy(), every Service should perform final cleanup, stopping any spawned threads, terminating network connections, stopping services it had started, and so on.
And that’s it! From birth to death, from invocation to dismissal, you’ve learned how to wrangle an Android Service. They might seem complex, but they offer extremely powerful capabilities that can go far beyond what a single foregrounded application can offer.
4.6. Summary
In this chapter, we covered a broad swath of Android territory. We first focused on the Intent component, seeing how it works, how it resolves using Intent-Filter objects, and how to take advantage of built-in platform-provided Intent handlers. We also looked at the differences between explicit Intent invocation and implicit Intent invocation, and the reasons you might choose one type over another. Along the way, you completed the RestaurantFinder sample application, and with just a bit more code, you drastically expanded the usefulness of that app by tapping into preloaded Android applications.
After we covered the Intent class, we moved on to a new sample application, WeatherReporter. You saw how a BroadcastReceiver could respond to notifications sent by the platform or other applications. You used the receiver to listen for a boot event and start the Service. The Service sends notification alerts from the background when it learns of severe weather events. You also saw another flavor of Service, one that provides communication between different processes. Our other weather service offered an API that third-party developers could use to leverage the low-level network and storage capabilities of our weather application. We covered the difference between starting and binding services, and you saw the moving parts behind the Android IPC system, which uses the AIDL to standardize communication between applications.
By seeing all these components interact in several complete examples, you now understand the fundamentals behind Android Intents and Services. In the next chapter, you’ll see how to make services and other applications more useful by using persistent storage. We’ll look at the various options Android provides for retrieving and storing data, including preferences, the file system, databases, and how to create a custom ContentProvider.