
Chapter 14. Bluetooth and sensors
- Connecting to a Bluetooth peripheral
- Interacting with the SensorManager
- Building and running the SenseBot application
The majority of the material presented in this book is concerned with employing various capabilities of the Android SDK. At this point, however, you’re going to see how to take advantage of an Android device’s hardware. Specifically, we’ll look at connecting an Android device to remote devices via a Bluetooth wireless connection, as well as reading and interpreting values from a hardware-based orientation sensor. This chapter combines these two hardware-related topics in a sample program that exercises control over a robot constructed from the popular LEGO Mind-storms NXT. The Mindstorms NXT robot supports a communications protocol known as “Direct Commands,”[1] allowing it to be controlled by a remote device. This is the one chapter of the book where you’ll want to have access to a physical Android device with version 2 or later of the operating system—the simulator alone isn’t adequate for exercising the Bluetooth and sensor functionality.
1 To learn more about Direct Commands for the Lego Mindstorm, start here: http://mindstorms.lego.com/en-us/support/files/default.aspx.
The code accompanying this chapter is organized into an Android application named SenseBot. SenseBot is a moderately complex example of using Android to manipulate an external object. Android’s orientation sensor permits the user to “drive” the robot by simply holding the phone in a particular direction, not unlike a Nintendo Wii or other advanced gaming system. Tilt the phone forward and the robot drives forward. Tilt it backward and the robot reverses direction. Tilting to the left or right causes the robot to spin in the respective direction. With each interpreted sensor motion, the SenseBot application uses Bluetooth to send commands to the robot causing the appropriate physical behavior. The LEGO NXT comes equipped with a built-in command set that permits low-level operations such as direct motor control. The motions of the Android device are interpreted, converted to commands, and transmitted via Bluetooth to the robot.
In addition to basic Bluetooth communications and Sensor management, the code demonstrates the use of a dynamically created BroadcastReceiver employed to handle Bluetooth-related connection events.
The topic of Bluetooth communications is much broader and deeper than we can hope to cover in a single chapter. Likewise, there are at least half a dozen hardware sensors available on the Android platform, yet this chapter demonstrates the use of only one. If you’re looking for textbook-like coverage of these two topics, we encourage you to look at the online documentation or perhaps another text on the subject. The aim of this chapter is to explore Bluetooth and sensor functionality on the Android platform in the context of a functional (and fun) application. If you take the time to follow along and build this application and have access to a LEGO Mindstorms NXT robot, I promise that you’ll get hooked on “driving” your robot with your phone. Also, a version of the application is available for download from the Android market.
14.1. Exploring Android’s Bluetooth capabilities
The first thing that comes to mind with the term Bluetooth is wireless headsets. Also known as a hands-free, in many parts of the world these wireless wonders are required by law for operating your telephone while driving a vehicle. In actuality, the hands-free device is only one of many uses for the versatile Bluetooth technology.
Bluetooth is a wireless communications protocol similar to WiFi but constrained to usage scenarios for short-range applications reaching a range of approximately 10 meters. In addition to providing functionality as a hands-free microphone and speaker for your cell phone, Bluetooth also enables peer-to-peer network access, object exchange, cable replacement, and advanced audio/media capabilities.
Like any other protocol standard, Bluetooth has its own “stack” of layers, each of which implements distinct capabilities and features of the protocol. This chapter doesn’t spend time dissecting these layers, as the Bluetooth stack is well covered in other places. Rather, this chapter demonstrates the approach for establishing a data connection between two peers. The specific Bluetooth “profile” employed here is the RFCOMM[2] cable replacement profile.
2 To learn more about RFCOMM, look at http://www.bluetooth.com.
In this section you’ll learn how to establish a connection between Android and your remote device via the android.bluetooth package. Given how the Android platform permits only encrypted connections, your two communicating devices must first be paired or bonded, which will subsequently allow you to connect without a further confirmation or security prompt. Then, in order to know that you’ve connected to a Bluetooth device, you must register for two events: ACTION_ACL_CONNECTED and ACTION_ACL_DISCONNECTED. And finally, your Android application will need to have BLUETOOTH permission as defined in the AndroidManifest.xml file. Let’s get started.
14.1.1. Replacing cables
Today, connecting to the internet to exchange emails or browse the web is an everyday experience for most Android users. With your phone you can connect to computers on the other side of the planet and beyond, but how can you communicate with something in the same room? In the not-so-distant past we programmed interfaces between computers and peripherals across a serial cable, often described as an RS232 interface. In a few short years, the RS232 serial cable has become a museum piece, having been replaced by the more capable USB and with the Bluetooth Serial Port Profile.
In the same way that USB can be used for many different applications, the Bluetooth wireless protocol also may be deployed in a variety of manners. The Bluetooth capability of interest to us is the cable replacement functionality of the Serial Port Profile (SPP), which is sometimes referred to as RFCOMM. The RF stands for radio frequency, aka “wireless.” The COMM stands for communications port, harkening back to its roots as a point-to-point connection-based streaming protocol.
14.1.2. Primary and secondary roles and sockets
The Bluetooth protocol works in a fashion similar to other communications environments where there’s a primary (or master) device that initiates communications with one or more secondary (or slave) devices. Android is versatile in that it may be either a primary or a secondary device in a Bluetooth connection.
Regardless of how a connection is established—as a primary or a secondary Bluetooth device—an Android application exchanges data through a socket interface. That’s right; the familiar networking paradigm of a socket and its associated input stream and output stream is employed for Bluetooth connectivity as well. So once you get past the scaffolding of connecting two Bluetooth devices together in a communications session, you can be less concerned with the underlying details and can simply view the remote device as an application on the other side of a socket. This is much like the relationship between a web browser and a remote server that exchange data over a TCP socket.
To access the Bluetooth environment on an Android device, you need to dig into the android.bluetooth package, which first appeared in Android version 2.0. Though most Android devices prior to version 2 were capable of Bluetooth hands-free operation, it wasn’t until version 2 that Android applications could leverage the underlying Bluetooth hardware as discussed in this chapter. Table 14.1 shows the major Java classes used by Bluetooth-enabled Android applications.
Table 14.1. Bluetooth classes
|
Class |
Comment |
|---|---|
| BluetoothAdapter | This class represents the local Android device’s Bluetooth hardware and interface constructs. Everything begins with the BluetoothAdapter. |
| BluetoothClass | The BluetoothClass provides a convenient means of accessing constant values related to Bluetooth communications and operations. |
| BluetoothDevice | Any remote device is represented as a BluetoothDevice. |
| BluetoothSocket | The BluetoothSocket is used for exchanging data. On a more practical note, a primary device initiates a socket connection with a secondary device by first creating a BluetoothSocket. The example code in this chapter demonstrates this technique. |
| BluetoothServerSocket | A Bluetooth secondary device listens for a primary device to connect through a BluetoothServerSocket in much the same way that a web server awaits a TCP socket connection from a browser. Once connected, a BluetoothSocket is established for the ongoing communication. |
This chapter demonstrates the use of the BluetoothAdapter, the BluetoothDevice class, and the BluetoothSocket. The next section shows how an Android device goes about connecting to another Bluetooth-enabled device.
Note
For the examples in this chapter, the Android device acts as the primary device and a LEGO Mindstorms NXT controller acts as a secondary Bluetooth device.
14.1.3. Trusting a device
Although the broader Bluetooth specification allows for both encrypted and unencrypted communications between peer devices, the Android platform permits only encrypted connections. In essence, this means that the two communicating devices must first be paired, or bonded. This is the somewhat annoying step of telling each device that the other is trusted. Despite the annoyance factor and the fact that virtually every Bluetooth device on the planet uses its default security pin code of 0000 or 1234, the security aspects of Bluetooth do have their value—sort of.
Devices are paired either through the “settings” screens of the various peers or on demand the first time a connection is requested. This section walks through the steps of pairing an Android device[3] with a LEGO robot controller module.
3 Join the Talk Android forums to learn more about the types of Android hardware: http://www.talkandroid.com/android-forums/android-hardware/.
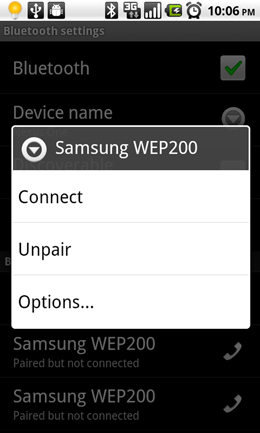
Figure 14.1 shows a portion of the Bluetooth settings screen from my Nexus One device running Android 2.2.
Figure 14.1. Bluetooth settings screen

From this screen you can see that the following is true:
- Bluetooth is enabled.
- This device name is Nexus One.
- This device isn’t currently discoverable. This means that other Bluetooth devices won’t see this phone during a “scan.” Practically speaking, this means that the phone ignores discovery packets that it detects. There’s a button used to initiate a manual scan for nearby Bluetooth devices.
- You can initiate a scan for nearby Bluetooth devices by pressing the Scan for Devices button.
- There are three devices that this phone has previously paired with but aren’t currently connected:
- NXT—the LEGO robot
- Two instances of a Samsung hands-free device. This isn’t a mistake—there are two distinct devices paired with this phone. (This author “solved” his problem of frequently lost hands-free devices by buying a handful of them via eBay, hence the multiple device pairings!)
A long click on one of the entries in the Bluetooth devices list presents options for further operations, with the specific choices depending on the device. For example, selecting one of the Samsung entries presents the options shown in figure 14.2.
Figure 14.2. Options for a paired device
In order to pair with a device, you need to first scan for it. Once it’s been added to the list, you can select it to initiate the pairing. Figure 14.3 shows the LEGO robot controller prompting for a PIN after a pairing request.
Figure 14.3. LEGO controller prompts for a PIN
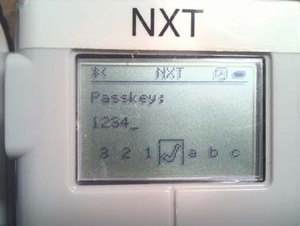
This PIN value will then be compared to what the user enters on the phone, as shown in figure 14.4.
Figure 14.4. Pairing with the LEGO robot

At this point, your phone and the LEGO robot controller are paired. Moving forward, you’ll be able to connect to this device without a further confirmation or security prompt.
14.1.4. Connecting to a remote device
Connecting to a paired, or bonded, device involves a two-step process:
- Get a list of paired devices from the Bluetooth hardware/software stack.
- Initiate an RFCOMM connection to the target device. The following listing demonstrates a basic approach to establishing an RFCOMM, or Serial Port Profile connection, between paired devices.
Listing 14.1. Initiating a connection to a BluetoothDevice

All Bluetooth[4] activities begin with the BluetoothAdapter ![]() . With a reference to the adapter, you can obtain a list of already-paired devices
. With a reference to the adapter, you can obtain a list of already-paired devices ![]() . You look through this list
. You look through this list ![]() for a specific device name
for a specific device name ![]() that corresponds to the name of your robot. This name may be hard-coded, as is done in this sample application; entered by
the user at runtime; or even selected from a more sophisticated “choose” dialog. One way or another, the aim is to identify
which BluetoothDevice you need and then initiate a connection, as done here with a call to the function named connectToRobot
that corresponds to the name of your robot. This name may be hard-coded, as is done in this sample application; entered by
the user at runtime; or even selected from a more sophisticated “choose” dialog. One way or another, the aim is to identify
which BluetoothDevice you need and then initiate a connection, as done here with a call to the function named connectToRobot ![]() . It’s a good practice to catch exceptions
. It’s a good practice to catch exceptions ![]() , particularly when dealing with remote physical devices that may not be in range or may have powered down. To connect to
the remote device across the Serial Port Profile, use the createRfComSocketToServiceRecord method of the BluetoothDevice class. The UUID string shown in the code is the identifier for the Serial Port Profile
, particularly when dealing with remote physical devices that may not be in range or may have powered down. To connect to
the remote device across the Serial Port Profile, use the createRfComSocketToServiceRecord method of the BluetoothDevice class. The UUID string shown in the code is the identifier for the Serial Port Profile ![]() . Once you have a BluetoothSocket available, you call the connect method
. Once you have a BluetoothSocket available, you call the connect method ![]() .
.
4 See the Google documentation for more details about Bluetooth and Android: http://developer.android.com/guide/topics/wireless/bluetooth.html.
At this point you’ve found the device of interest and attempted a connection request. Did it work? How do you know? You could make an assumption about the connection status and wait for an error to tell you otherwise. Perhaps that isn’t the best approach. There must be a better way—and there is, but it involves working with Intents.
14.1.5. Capturing Bluetooth events
To verify that you’ve successfully connected to a BluetoothDevice, you must register for a couple of Bluetooth-related events: ACTION_ACL_CONNECTED and ACTION_ACL_DISCONNECTED. When these events occur, you know that you have a good connection, or you’ve lost a connection, respectively. So, how can you use these events in conjunction with your previously created socket? The following listing demonstrates a technique for creating a BroadcastReceiver directly in the Activity and registering for the events of interest.
Listing 14.2. Monitoring the Bluetooth connection

To monitor for specific broadcasted events, you need to employ a BroadcastReceiver. Ordinarily you’d do this with a separate
class, but this application requires a more tightly integrated UI, so you take an alternative approach. Typically BroadcastReceivers
are defined in the AndroidManifest.xml file, but in this case you only want notification under a specific set of circumstances.
This code defines an Activity-scoped BroadcastReceiver named btMonitor ![]() . In the onCreate method, the setupBTMonitor method
. In the onCreate method, the setupBTMonitor method ![]() is invoked to create the BroadcastReceiver
is invoked to create the BroadcastReceiver ![]() along with the implementation of the onReceive method
along with the implementation of the onReceive method ![]() . Whenever a broadcasted Intent is available for this BroadcastReceiver, the onReceive method is invoked. In this implementation, you’re concerned with the connect and disconnect of a Bluetooth peer. When the
devices are connected, the handleConnected method
. Whenever a broadcasted Intent is available for this BroadcastReceiver, the onReceive method is invoked. In this implementation, you’re concerned with the connect and disconnect of a Bluetooth peer. When the
devices are connected, the handleConnected method ![]() is invoked. Similarly when the remove device disconnects, the handleDisconnected method
is invoked. Similarly when the remove device disconnects, the handleDisconnected method ![]() is called to perform the appropriate housekeeping operations.
is called to perform the appropriate housekeeping operations.
With the device now connected, you need to perform some housekeeping to handle things such as setting up the socket’s input and output streams. The next listing shows an abbreviated version of the handleConnected method showing the Bluetooth relevant portions.
Listing 14.3. The handleConnected method

When the handleConnected method is invoked, a valid Bluetooth socket connection has been established, so you need to set up the input and output streams
![]() . With these streams established, data communications between the Android device and the LEGO robot may now begin. As you’ll
see later in this chapter, you only want to process sensor events if you’re connected to a robot, so you set a flag
. With these streams established, data communications between the Android device and the LEGO robot may now begin. As you’ll
see later in this chapter, you only want to process sensor events if you’re connected to a robot, so you set a flag ![]() letting the application know the status of the connection. You swap the visibility of a pair of Buttons
letting the application know the status of the connection. You swap the visibility of a pair of Buttons ![]() —one is used for connecting to the robot and the other for disconnecting. In the event that an error occurs during this step,
you want to clean up by closing down the streams
—one is used for connecting to the robot and the other for disconnecting. In the event that an error occurs during this step,
you want to clean up by closing down the streams ![]() and initiating a disconnect request
and initiating a disconnect request ![]() .
.
The code for disconnecting a socket is simply this:
socket.close();
To perform most Bluetooth operations with Android, there’s one important item that must be established: permissions!
14.1.6. Bluetooth permissions
Working with a paired device peer isn’t the only place where permissions come into play. In order to exercise the Bluetooth APIs, an Android application must have the BLUETOOTH permission defined in the AndroidManifest.xml file:
<uses-permission android:name="android.permission.BLUETOOTH"></uses-
     permission>
The balance of the Bluetooth communications code is presented in the third section of this chapter, where we discuss in more depth the code that comprises the SenseBot application. Before jumping into the fun of coding and running the robot application, let’s look at the SensorManager and show how you can put Android’s sensors to work for you to drive a robot.
14.2. Interacting with the SensorManager
Android exposes the physical hardware sensors via a class known as the SensorManager. The SensorManager class is similar to the BluetoothAdapter class in that all related activities rely on having a reference to SensorManager. The SensorManager class is part of the android.hardware package. In this section, you’ll learn how to read values from the orientation sensor, which you must learn to do before you build the SenseBot application.
Table 14.2 lists the major classes associated with the SensorManager.
Table 14.2. Sensor-related classes
|
Class |
Comment |
|---|---|
| SensorManager | Primary interface to the various sensors present in the hardware |
| Sensor | Represents a particular sensor |
| SensorEvent | Represents the readings from a sensor |
| SensorEventListener | This interface used to receive SensorEvents in near real time |
Working with the SensorManager class is simple. The first requirement is to obtain a reference:
SensorManager sManager = (SensorManager)
     getSystemService(Context.SENSOR_SERVICE);
Once you’ve obtained a valid reference, you can use this variable throughout the application to interact with the sensors themselves. For example, the SenseBot application utilizes the orientation sensor. To get a reference to this sensor, call the getDefaultSensor() method of SensorManager:
Sensor orientationSensor =
     sManager.getDefaultSensor(Sensor.TYPE_ORIENTATION);
We only use the orientation sensor in this chapter, but Android offers many more sensors. Let’s look at the available sensor types as of Android 2.2.
14.2.1. Types of sensors
Android supports the sensor types listed in table 14.3.
Table 14.3. Android’s common sensors
| Sensor.TYPE_ACCELEROMETER | Measures acceleration in three dimensions |
| Sensor.TYPE_GYROSCOPE | Gyroscope |
| Sensor.TYPE_LIGHT | Ambient light sensor |
| Sensor.TYPE_MAGNETIC_FIELD | Measures magnetic field compass |
| Sensor.TYPE_ORIENTATION | Measures orientation in three dimensions |
| Sensor.TYPE_PRESSURE | Measures pressure |
| Sensor.TYPE_PROXIMITY | Measures distance the phone is away from another object, such as your ear |
| Sensor.TYPE_TEMPERATURE | Measures ambient temperature |
Each sensor instance can provide a handful of useful and interesting attributes, including:
- Name of sensor
- Power consumption in mA
- Resolution
- Maximum range
- Vendor
- Version
The orientation sensor on a Nexus One shows the following characteristics:
- Name: AK8973 Orientation Sensor
- Power draw: 7.0 mA
- Resolution 1.0 degree
- Max range 360 degrees
Now that you have a feel for how to gain access to a sensor through SensorManager, let’s explore reading values from a sensor.
14.2.2. Reading sensor values
You read a value from a sensor by implementing the SensorEventListener interface. SensorEvent instances are sent to a method named onSensorChanged(). The SensorEvent class contains four fields, as you can see in table 14.4.
Table 14.4. SensorEvent’s fields
|
Field |
Comment |
|---|---|
| accuracy | This integer field represents the sensor’s view of the accuracy of this reading. |
| Sensor | This is a reference to the sensor that created this SensorEvent. |
| timestamp | This is a nanosecond-based timestamp representing when the event occurred. This field can be helpful when you’re correlating multiple events. |
| values[3] | The values from the sensor are provided as an array of floats with three values. The units and precision of the values vary by sensor. |
The SensorEventListener receives these events each time the corresponding sensor values change. The following listing shows a slimmed-down version of the onSensor-Changed method for the SenseBot application.
Listing 14.4. Our slimmed-down version of onSensorChanged
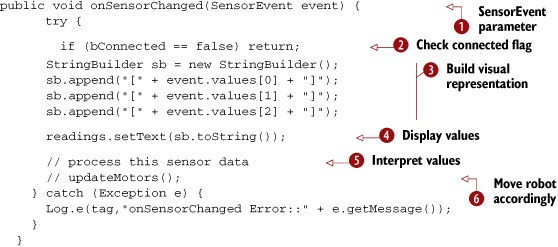
Each time a SensorEvent ![]() is available, it’s passed to the onSensorChanged method. The first thing the code does is a safety check to make sure you have a good connection to the robot
is available, it’s passed to the onSensorChanged method. The first thing the code does is a safety check to make sure you have a good connection to the robot ![]() . If there’s no connection, you ignore the data. Each of the three values is extracted and formatted
. If there’s no connection, you ignore the data. Each of the three values is extracted and formatted ![]() for display in a simple TextView widget
for display in a simple TextView widget ![]() . The values are interpreted
. The values are interpreted ![]() and the appropriate instructions are passed to control the robot’s motors
and the appropriate instructions are passed to control the robot’s motors ![]() . The logic for the interpretation and interaction with the robot’s hardware is provided later in this chapter.
. The logic for the interpretation and interaction with the robot’s hardware is provided later in this chapter.
An application must register its SensorEventListener in order to receive these notifications. There’s a prescribed manner in performing this registration process, which is up next.
14.2.3. Enabling and disabling sensors
The SensorEventListener interface receives messages only when it’s registered. SensorManager provides two bookend-type functions that permit an application to register for a particular sensor’s events. In the context of the SenseBot application, you’re only interested in receiving orientation sensor events when the Android device is connected to the robot via Bluetooth. As such, you’ll implement the registration code inside the previously introduced handleConnected method. The following listing shows the new code to be added to the handleConnected method.
Listing 14.5. Sensor registration code

The registerListener method of the SensorManager takes three arguments in order to marshal sensor data to an application. The first argument is to an implementation instance
of SensorEventListener, which is in this case our class itself, SenseBot.this ![]() . The second argument is an instance of the sensor of interest. Here you’re interested in tracking values for the orientation
sensor
. The second argument is an instance of the sensor of interest. Here you’re interested in tracking values for the orientation
sensor ![]() . The rate at which the sensor data is updated is variable and is specified by the programmer as the third parameter. In this
case you use the value SensorManager.SENSOR_DELAY_UI
. The rate at which the sensor data is updated is variable and is specified by the programmer as the third parameter. In this
case you use the value SensorManager.SENSOR_DELAY_UI ![]() , which is a good general-purpose value. Use faster values for games or other real-time–oriented applications.
, which is a good general-purpose value. Use faster values for games or other real-time–oriented applications.
If you recall, the orientation sensor has a draw of 7 mA. To conserve power and battery life, you should be mindful to turn off the sensor when it’s not required. In the SenseBot application, there are two places where this takes place. The first is in the handleDisconnected method—when you lose connection to the robot, you needn’t take any further readings from the sensor. The more generic place to add this “unregister” functionality is in the onStop Activity lifecycle method.
Regardless of where the code is called, a SensorEventListener is unregistered with a simple call to the unregisterListener method of SensorManager:
sManager.unregisterListener(SenseBot.this);
Note that this call unregisters all sensors for this SensorEventListener in the event that your application registered more than one sensor type.
At this point you know how to both connect to the robot and read values from the orientation sensor. It’s time to put all this knowledge together and build the SenseBot application!
14.3. Building the SenseBot application
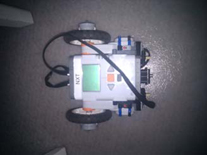
The SenseBot application has a simple premise—you want to drive a LEGO Mind-storms NXT[5] robot by changing the orientation of the Android phone. There are no attached wires—all the communication is done via Bluetooth and the orientation of the phone alone should dictate how the robot moves. Furthermore, though the LEGO robot is programmable, you utilize only the built-in capabilities of the robot to manipulate individual motors. The benefit of this approach is that this program will work on virtually any LEGO robot built, regardless of the skill of the robot programmer. The only requirements of the robot are that the motors be connected to output ports B and C, which is the common manner of constructing LEGO NXT robots. Figure 14.5 shows the robot with a simple two-motor design.
5 If you have a future engineer or scientist in the making, check out First Lego League: http://www.first-legoleague.org/.
Figure 14.5. Simple LEGO NXT robot with motors connected to B and C ports
The robot can move forward and backward, spin to the left, and spin to the right. To drive the robot, you tilt the phone forward or backward, turn it on its side to the left, and turn it on its side to the right, respectively.
Although the robot is controlled entirely by the motion of the phone, you still have to create a useful and intuitive UI. In fact, the UI has a nontrivial role in the development of this application.
14.3.1. User interface
The UI for this application is simple but must be also intuitive for the user. You want to show the user what’s happening to provide positive feedback on how to use the application. Additionally, you’re dealing with a mechanical robot that may not function properly at all times. The robot may perform an unexpected action—therefore it’s desirable that you have the ability to compare the robot’s movement to the visual indicators you provide to the user. To that end, you need to indicate to the user the state of the motors at all times while the Android device is connected to the robot. Figure 14.6 shows the default user interface prior to connecting to a robot.
Figure 14.6. Waiting to connect to a robot
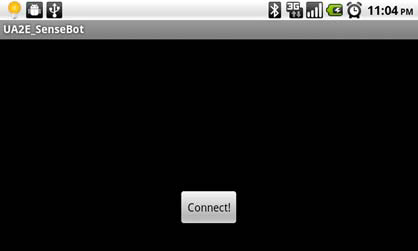
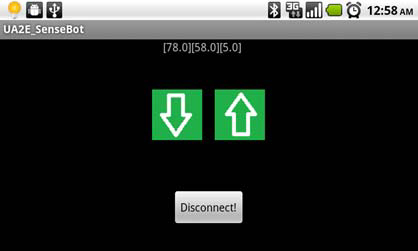
Clicking the Connect button initiates the connection sequence with a call to the findRobot method shown earlier in section 1.1.4. Once connected to the robot, you need to hide the Connect button and provide a means of disconnecting from the robot by displaying a Disconnect button. In addition, you want to indicate the state of the motors and display the sensor readings. Figure 14.7 shows the application after it has connected and with the motors in the stopped condition.
Figure 14.7. Connected to the robot with the motors stopped

Note
The motor indicators on the screen are the values specified by the application and correlate to motor control instructions sent to the robot. They aren’t measured values read from the robot.
If the robot’s motors are moving while the screen indicates that they’re both stopped, there’s a problem either with the command sent by the robot or with the robot itself. Figure 14.8 is a screenshot taken from the application when guiding the robot to move backward.
Figure 14.8. Both motors are moving backward.

Figure 14.9 shows the application instructing the robot to spin to the left. To accomplish this, we’ve the left motor turning backward and the right motor turning forward.
Figure 14.9. Spinning to the left
Lastly, when the application disconnects from the robot (when you either click the Disconnect button or power off the robot), the application detects the Disconnected condition and calls handleDisconnect, and the UI is updated, as shown in figure 14.10.
Figure 14.10. Disconnected state, waiting for a new connection

The UI is generated by a pair of View widgets and three drawables:[6] stop, up (forward), and down (backward). Based on the values read from the sensors, the respective View widgets have their background changed appropriately.
6 Download a drawables application that lists all resources in android.R.drawable for the current Android device: http://www.appbrain.com/app/android-drawables/aws.apps.androidDrawables.
This application is so dependent on the orientation of the phone for the control of the robot that you can’t allow the phone’s orientation to change back and forth between portrait and landscape, as it’ll both restart the Activity, which could wreak some havoc, as well as change the orientation of the sensors. To meet this objective, an attribute was added to the activity tag in the AndroidManifest.xml file:
android:screenOrientation=landscape
Once this orientation is set up, there’s no worry of the orientation changing to portrait while driving the robot. You’ll find holding the phone in landscape is comfortable when you’re “driving.”
By carefully coordinating the UI with the physical motors, you have a ready feedback mechanism to both make you better robot drivers and help troubleshoot any anomalies during the development phase of this engineering project
The communications are established and the orientation sensor is producing values; it’s now time to examine the interpretation of the sensor values.
14.3.2. Interpreting sensor values
To control the robot with the orientation of the phone, a “neutral zone” should be established with a “center” represented by the position of the phone when being held comfortably in a landscape orientation, slightly tilted back and up. Once this center is defined, a comfortable spacing or “sensitivity” is added in both of the x and y dimensions. As long as the phone’s orientation in these dimensions doesn’t exceed the sensitivity value, the motors remain in neutral and not powered. Variables named xCenter, yCenter, and xSensitivity and ySensitivity govern this “neutral box.”
Look at the onSensorChanged method: this is where you receive the SensorEvent providing the values of each dimension x, y, and z. The following listing shows the complete implementation of this method, including the sensor evaluation and movement suggestions.
Listing 14.6. The onSensorChanged method, which interprets orientation
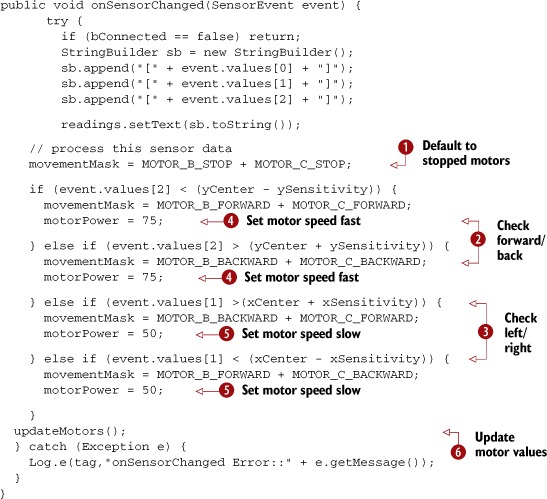
When interpreting the values for the motors, you default to having both motors stopped ![]() . Note that the B and C motors are managed separately. You check whether the y sensor value is outside the y quiet zone
. Note that the B and C motors are managed separately. You check whether the y sensor value is outside the y quiet zone ![]() . If the sensed value is beyond the “titled forward” boundary, you move the robot forward. Likewise, if the sensed value is
further back than the resting position, you move the robot backward by marking both motors to be turned backward. If the robot
hasn’t been determined to be going either forward or backward, you check for the lateral options of left and right
. If the sensed value is beyond the “titled forward” boundary, you move the robot forward. Likewise, if the sensed value is
further back than the resting position, you move the robot backward by marking both motors to be turned backward. If the robot
hasn’t been determined to be going either forward or backward, you check for the lateral options of left and right ![]() . If the robot is moving forward or backward, the speed is set to 75%
. If the robot is moving forward or backward, the speed is set to 75% ![]() . If the robot is to be spinning, its power is set to 50%
. If the robot is to be spinning, its power is set to 50% ![]() . The final step is to translate these movement masks into real actions by modifying the condition of the motors
. The final step is to translate these movement masks into real actions by modifying the condition of the motors ![]() and to update the UI to reflect these commands.
and to update the UI to reflect these commands.
Once the onSensorChanged method has completed processing the SensorEvent data, it’s time to drive the robot’s motors and update the user interface.
14.3.3. Driving the robot
Driving the robot is as simple—and as complex—as turning the motors on with a series of commands. The command protocol itself is shown in the next section; for now let’s focus on the updateMotors method to see how both the UI and the motor positions are modified. The following listing displays the updateMotors method.
Listing 14.7. The updateMotors method
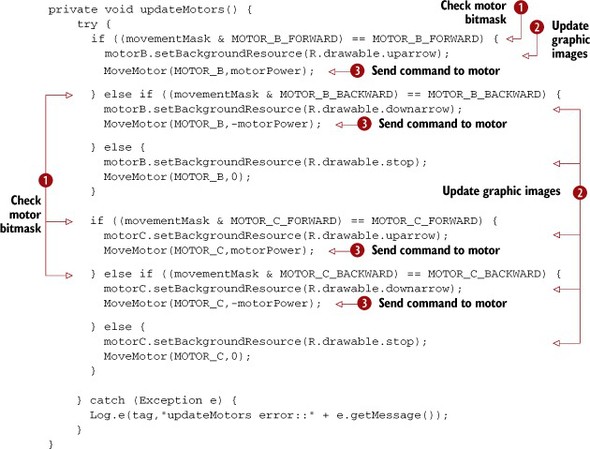
The updateMotors method compares the requested movement as defined in the movementMask variable with each of the motors individually ![]() . When a match is found—for example, when the MOTOR_B_FORWARD bit is set—the particular motor is enabled in the specified direction and speed
. When a match is found—for example, when the MOTOR_B_FORWARD bit is set—the particular motor is enabled in the specified direction and speed ![]() . A negative direction means backwards and the power value is scaled between 0 and 100. Additionally, the UI is updated
. A negative direction means backwards and the power value is scaled between 0 and 100. Additionally, the UI is updated ![]() in conjunction with the motors themselves, thereby giving the user as accurate a picture as possible of their performance
as a driver.
in conjunction with the motors themselves, thereby giving the user as accurate a picture as possible of their performance
as a driver.
14.3.4. Communication with the robot
The communications protocol for interacting with the LEGO NXT robot is a structured command with optional response protocol. Each packet of data is wrapped in an envelope describing its size. Within the envelope, each “direct command” has a standard header followed by its own specific parameters. For this application you need but a single command—to set the output state of the motor. The code that builds and sends these packets is shown in the next listing.
Listing 14.8. The MoveMotor method
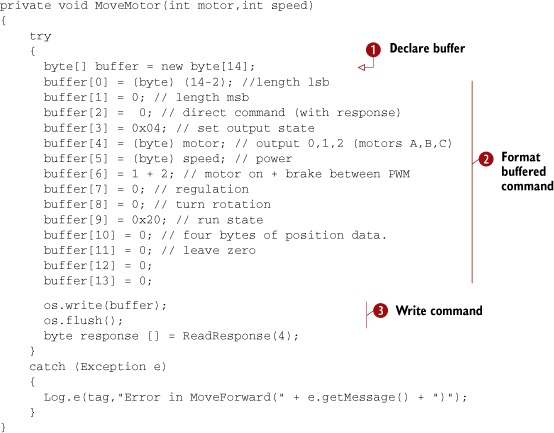
This code performs the simple yet precise operation of formatting a command, which is sent to the LEGO robot to provide direct
control over the motors. A buffer of the appropriate size is declared ![]() . The size for this buffer is dictated by the SetOutput-State command, which is one of many commands supported by the robot. Each of the various data elements are carefully provided
. The size for this buffer is dictated by the SetOutput-State command, which is one of many commands supported by the robot. Each of the various data elements are carefully provided ![]() in their respective locations. Once the command buffer is formatted, it’s written and flushed to the socket
in their respective locations. Once the command buffer is formatted, it’s written and flushed to the socket ![]() . The response code is consumed as a good measure by the ReadResponse method. As you can see, aside from the specific formatting related to controlling the robot, sending and receiving data with
Bluetooth is as simple as reading or writing from a byte-oriented stream.
. The response code is consumed as a good measure by the ReadResponse method. As you can see, aside from the specific formatting related to controlling the robot, sending and receiving data with
Bluetooth is as simple as reading or writing from a byte-oriented stream.
At this point, the sensors are working and the Android device and LEGO robot are communicating. In time, with practice you’ll be an expert Android LEGO pilot. The full source code to this application is available for download.
14.4. Summary
This chapter introduced two hardware-oriented features of the Android platform: Bluetooth and sensors. From these seemingly unrelated areas of functionality grew a fun application to operate a LEGO Mindstorms NXT robot. We demonstrated the essential steps required to connect an Android device to a remote Bluetooth-enabled peer via the use of the RFCOMM cable replacement protocol. This communications channel is used to exchange a command set known as the Direct Command protocol provided by the LEGO NXT controller. Through this command set, you can manipulate the robot’s motors to drive the robot. To make the user experience as intuitive as possible, use the orientation sensor built into most Android hardware to sense motions made by the user. The position of the device is interpreted and a corresponding set of commands is given to navigate the robot. Not only do the sensors provide a functional means for driving the robot, it’s quite fun!
In addition to these core Bluetooth communications and sensor interactions, this chapter also demonstrated techniques for providing intuitive user feedback during the operation of the application. For example, as the motors are engaged, the user visually sees the direction each motor is being driven. Likewise, the user’s driving motions are only processed when an active Bluetooth connection is detected. Because this is an event-driven scenario, the application demonstrates listening for these events through the use of a dynamically registered BroadcastReceiver with appropriate IntentFilters.
Hopefully you’ve enjoyed learning about Bluetooth and sensors in this chapter, and perhaps you even have access to a LEGO Mindstorm robot to take for a spin!
In the next chapter you’ll learn about another means of connecting your Android device to the outside world—this time working with the integration capabilities of the platform to sync data with the popular business networking site LinkedIn.