
Chapter 12. Putting Android to work in a field service application
This chapter covers
- Designing a real-world Android application
- Mapping out the application flow
- Writing application source code
- Downloading, data parsing, and signature capture
- Uploading data to a server
Now that we’ve introduced and examined Android and some of its core technologies, it’s time to put together a more comprehensive application. Exercising APIs can be informative, educational, and even fun for a while, but at some point a platform must demonstrate its worth via an application that can be used outside of the ivory tower—and that’s what this chapter is all about. In this chapter, we systematically design, code, and test an Android application to aid a team of field service technicians in performing their job. The application syncs XML data with an internet-hosted server, presents data to the user via intuitive user interfaces, links to Google Maps, and concludes by collecting customer signatures via Android’s touch screen. Many of the APIs introduced earlier are exercised here, demonstrating the power and versatility of the Android platform.
In addition to an in-depth Android application, this chapter’s sample application works with a custom website application that manages data for use by a mobile worker. This server-side code is presented briefly toward the end of the chapter. All of the source code for the server-side application is available for download from the book’s companion website.
If this example is going to represent a useful real-world application, we need to put some flesh on it. Beyond helping you understand the application, this definition process will get you thinking about the kinds of impact a mobile application can have on our economy. This chapter’s sample application is called a field service application. A pretty generic name perhaps, but it’ll prove to be an ample vehicle for demonstrating key elements required in mobile applications, as well as demonstrate the power of the Android platform for building useful applications quickly.
Our application’s target user is a fleet technician who works for a national firm that makes its services available to a number of contracted customers. One day our technician, who we’ll call a mobile worker, is replacing a hard drive in the computer at the local fast-food restaurant, and the next day he may be installing a memory upgrade in a piece of pick-and-place machinery at a telephone system manufacturer. If you’ve ever had a piece of equipment serviced at your home or office and thought the technician’s uniform didn’t really match the job he was doing, you’ve experienced this kind of service arrangement. This kind of technician is often referred to as hands and feet. He has basic mechanical or computer skills and is able to follow directions reliably, often guided by the manufacturer of the equipment being serviced at the time. Thanks to workers like these, companies can extend their reach to a much broader geography than internal staffing levels would ever allow. For example, a small manufacturer of retail music-sampling equipment might contract with such a firm to provide tech support to retail locations across the country.
Because of our hypothetical technician’s varied schedule and lack of experience on a particular piece of equipment, it’s important to equip him with as much relevant and timely information as possible. But he can’t be burdened with thick reference manuals or specialized tools. So, with a toolbox containing a few hand tools and of course an Android-equipped device, our fearless hero is counting on us to provide an application that enables him to do his job. And remember, this is the person who restores the ice cream machine to operation at the local Dairy Barn, or perhaps fixes the farm equipment’s computer controller so the cows get milked on time. You never know where a computer will be found in today’s world!
If built well, this application can enable the efficient delivery of service to customers in many industries, where we live, work, and play. Let’s get started and see what this application must be able to accomplish and how Android steps up to the task.
12.1. Designing a real-world Android application
We’ve established that our mobile worker will be carrying two things: a set of hand tools and an Android device. Fortunately, in this book we’re not concerned with the applicability of the hand tools in his toolbox, leaving us free to focus on the capabilities and features of a field service application running on the Android platform. In this section, we define the basic and high-level application requirements.
12.1.1. Core requirements of the application
Before diving into the bits and bytes of data requirements and application features, it’s helpful to enumerate some basic requirements and assumptions about our field service application. Here are a few items that come to mind for such an application:
- The mobile worker is dispatched by a home office/dispatching authority, which takes care of prioritizing and distributing job orders to the appropriate technician.
- The mobile worker is carrying an Android device, which has full data service—a device capable of browsing rich web content. The application needs to access the internet for data transfer as well.
- The home office dispatch system and the mobile worker share data via a wireless internet connection on an Android device; a laptop computer isn’t necessary or even desired.
- A business requirement is the proof of completion of work, most readily accomplished with the capture of a customer’s signature. Of course, an electronic signature is preferred.
- The home office wants to receive job completion information as soon as possible, as this accelerates the invoicing process, which improves cash flow.
- The mobile worker is also eager to perform as many jobs as possible, because he’s paid by the job, not by the hour, so getting access to new job information as quickly as possible is a benefit to the mobile worker.
- The mobile worker needs information resources in the field and can use as much information as possible about the problem he’s being asked to resolve. The mobile worker may have to place orders for replacement parts while in the field.
- The mobile worker will require navigation assistance, as he’s likely covering a rather large geographic area.
- The mobile worker needs an intuitive application—one that’s simple to use with a minimum number of requirements.
There are likely additional requirements for such an application, but this list is adequate for our purposes. One of the most glaring omissions from our list is security.
Security in this kind of an application comes down to two fundamental aspects. The first is physical security of the Android device. Our assumption is that the device itself is locked and only the authorized worker is using it. A bit naïve perhaps, but there are more important topics we need to cover in this chapter. If this bothers you, just assume there’s a sign-in screen with a password field that pops up at the most inconvenient times, forcing you to tap in your password on a small keypad. Feel better now? The second security topic is the secure transmission of data between the Android device and the dispatcher. This is most readily accomplished through the use of a Secure Sockets Layer (SSL) connection whenever required.
The next step in defining this application is to examine the data flows and discuss the kind of information that must be captured to satisfy the functional requirements.
12.1.2. Managing the data
Throughout this chapter, the term job refers to a specific task or event that our mobile worker engages in. For example, a request to replace a hard drive in a computer at the bookstore is a job. A request to upgrade the firmware in the fuel-injection system at the refinery is likewise a job. The home office dispatches one or more jobs to the mobile worker on a regular basis. Certain data elements in the job are helpful to the mobile worker to accomplish his goal of completing the job. This information comes from the home office. Where the home office gets this information isn’t our concern for this application.
In this chapter’s sample application, there are only two pieces of information the mobile worker is responsible for submitting to the dispatcher:
- The mobile worker communicates to the home office that a job has been closed, or completed.
- The collection of an electronic signature from the customer, acknowledging that the job has, in fact, been completed.
Figure 12.1 depicts these data flows.
Figure 12.1. Data flows between the home office and a mobile worker
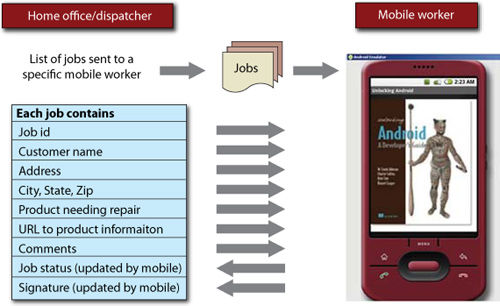
Of course, additional pieces of information exist that may be helpful here, such as the customer’s phone number, anticipated duration of the job, replacement parts required in the repair (including tracking numbers), any observations about the condition of related equipment, and much more. Although important to a real-world application, these pieces of information are extraneous to the goals of this chapter and are left as an exercise for you to extend the application for your own learning and use.
The next objective is to determine how data is stored and transported.
12.1.3. Application architecture and integration
Now that you know which entities are responsible for the relevant data elements, and in which direction they flow, let’s look at how the data is stored and exchanged. You’ll be deep into code before too long, but for now we’ll focus on the available options and continue to examine things from a requirements perspective, building to a proposed architecture.
At the home office, the dispatcher must manage data for multiple mobile workers. The best tool for this purpose is a relational database. The options here are numerous, but we’ll make the simple decision to use MySQL, a popular open source database. Not only are there multiple mobile workers, but the organization we’re building this application for is quite spread out, with employees in multiple markets and time zones. Because of the nature of the dispatching team, it’s been decided to host the MySQL database in a data center, where it’s accessed via a browser-based application. For this sample application, the dispatcher system is supersimple and written in PHP.[1]
1 See Manning’s PHP in Action for details on PHP development: http://www.manning.com/reiersol/.
Data storage requirements on the mobile device are modest. At any point, a given mobile worker may have only a half-dozen or so assigned jobs. Jobs may be assigned at any time, so the mobile worker is encouraged to refresh the list of jobs periodically. Although you learned about how to use SQLite in chapter 5, we have little need for sharing data between multiple applications and don’t need to build a Content-Provider, so we’ve decided to use an XML file stored on the filesystem to serve as a persistent store of our assigned job list.
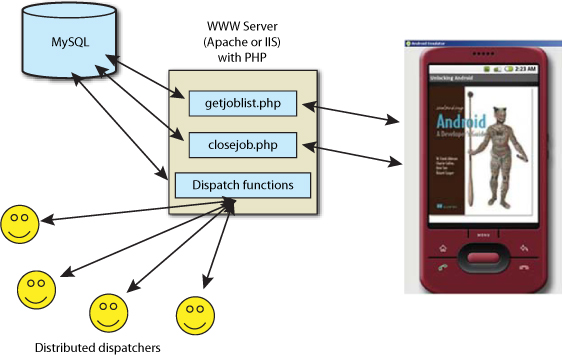
The field service application uses HTTP to exchange data with the home office. Again, we use PHP to build the transactions for exchanging data. Though more complex and sophisticated protocols can be employed, such as SOAP, this application simply requests an XML file of assigned jobs and submits an image file representing the captured signature. In fact, SOAP is simple in name only and should be avoided. A better solution that’s coming on strong in the mobile and web space is the JSON format. This architecture is depicted in figure 12.2.
Figure 12.2. The field service application and dispatchers both leverage server-side transactions.
The last item to discuss before diving into the code is configuration. Every mobile worker needs to be identified uniquely. This way, the field service application can retrieve the correct job list, and the dispatchers can assign jobs to workers in the field. Similarly, the mobile application may need to communicate with different servers, depending on locale. A mobile worker in the United States might use a server located in Chicago, but a worker in the United Kingdom may need to use a server in Cambridge. Because of these requirements, we’ve decided that both the mobile worker’s identifier and the server address need to be readily accessed within the application. Remember, these fields would likely be secured in a deployed application, but for our purposes they’re easy to access and not secured.
We’ve identified the functional requirements, defined the data elements necessary to satisfy those objectives, and selected the preferred deployment platform. The next section examines the high-level solution to the application’s requirements.
12.2. Mapping out the application flow
Have you ever downloaded an application’s source code, excited to get access to all that code, but found it overwhelming to navigate? You want to make your own changes, to put your own spin on the code, but you unzip the file into all the various subdirectories, and you don’t know where to start. Before we jump directly into examining the source code, we need to pay attention to the architecture, in particular the flow from one screen to the next.
12.2.1. Mapping out the field service application
In this section we’ll examine the application flow to better understand the relation among the application’s functionality, the UI, and the classes used to deliver this functionality. Doing this process up-front helps ensure that the application delivers the needed functionality and assists in defining which classes we require when it comes time to start coding (which is soon)! Figure 12.3 shows the relation between the high-level classes in the application, which are implemented as an Android Activity, as well as interaction with other services available in Android.
Figure 12.3. This figure depicts the basic flow of the field service application.

Here’s the procession of steps in the application:
1. The application is selected from the application launch screen on the Android device.
2. The application splash screen displays. Why? Some applications require setup time to get data structures initialized. As a practical matter, such time-consuming behavior is discouraged on a mobile device, but it’s an important aspect to application design, so we include it in this sample application.
3. The main screen displays the currently configured user and server settings, along with three easy-to-hit-with-your-finger buttons.
4. The Refresh Jobs button initiates a download procedure to fetch the currently available jobs for this mobile worker from the configured server. The download includes a ProgressDialog, which we discuss in section 12.3.5.
5. The Settings button brings up a screen that allows you to configure the user and server settings.
6. Selecting Manage Jobs lets our mobile worker review the available jobs assigned to him and proceed with further steps specific to a chosen job.
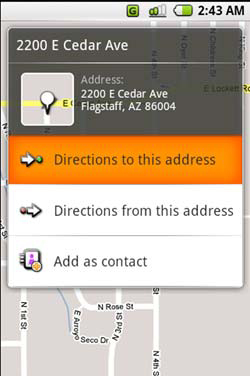
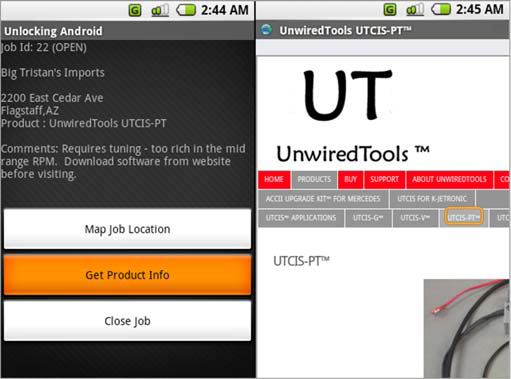
7. Selecting a job from the list of jobs on the Manage Jobs screen brings up the Show Job Details screen with the specific job information listed. This screen lists the available information about the job and presents three additional buttons.
8. The Map Job Location button initiates a geo query on the device using an Intent. The default handler for this Intent is the Maps application.
9. Because our mobile worker may not know much about the product he’s being asked to service, each job includes a product information URL. Clicking this button brings up the built-in browser and takes the mobile worker to a (hopefully) helpful internet resource. This resource may be an online manual or an instructional video.
10. The behavior of the third button depends on the current status of the job. If the job is still marked OPEN, this button is used to initiate the closeout or completion of this job.
11. When the close procedure is selected, the application presents an empty canvas upon which the customer can take the stylus (assuming a touch screen–capable Android device) and sign that the work is complete. A menu on that screen presents two options: Sign & Close or Cancel. If the user selects Sign & Close option, the application submits the signature as a JPEG image to the server, and the server marks the job as CLOSED. In addition, the local copy of the job is marked as CLOSED. The Cancel button causes the Show Job Details screen to be restored.
12. If the job being viewed has already been closed, the browser window is opened to a page displaying the previously captured signature.
Now that you have a feel for what the requirements are and how you’re going to tackle the problem from a functionality and application-flow perspective, let’s examine the code that delivers this functionality.
12.2.2. List of source files
The source code for this application consists of 12 Java source files, one of which is the R.java file, which you’ll recall is automatically generated based on the resources in the application. This section presents a quick introduction to each of these files. We won’t explain any code yet; we want you to know a bit about each file, and then it’ll be time to jump into the application, step by step. Table 12.1 lists the source files in the Android field service application.
Table 12.1. Source files used to implement the field service application
|
Source filename |
Description |
|---|---|
| Splash.java | Activity provides splash screen functionality. |
| ShowSettings.java | Activity provides management of username and server URL address. |
| FieldService.java | Activity provides the main screen of the application. |
| RefreshJobs.java | Activity interacts with server to obtain updated list of jobs. |
| ManageJobs.java | Activity provides access to list of jobs. |
| ShowJob.java | Activity provides detailed information on a specific job, such as an address lookup, or initiates the signature-capture process. |
| CloseJob.java | Activity collects electronic signature and interacts with the server to upload images and mark jobs as CLOSED. |
| R.java | Automatically generated source file representing identifiers in the resources. |
| Prefs.java | Helper class encapsulating SharedPreferences. |
| JobEntry.java | Class that represents a job. Includes helpful methods used when passing JobEntry objects from one Activity to another. |
| JobList.java | Class representing the complete list of JobEntry objects. Includes methods for marshaling and unmarshaling to nonvolatile storage. |
| JobListHandler.java | Class used for parsing XML document containing job data. |
The application also relies on layout resources to define the visual aspect of the UI. In addition to the layout XML files, an image used by the Splash Activity is placed in the drawable subfolder of the res folder along with the stock Android icon image. This icon is used for the home application launch screen. Figure 12.4 depicts the resources used in the application.
Figure 12.4. Resource files used in the sample application

In an effort to make navigating the code as easy as possible, table 12.2 shows the field service application resource files. Note that each is clearly seen in figure 12.4, which is a screenshot from our project open in Eclipse.
Table 12.2. Resource files used in the sample application
|
Filename |
Description |
|---|---|
| android.jpg | Image used in the Splash Activity. |
| icon.jpg | Image used in the application launcher. |
| fieldservice.xml | Layout for main application screen, FieldService Activity. |
| managejobs.xml | Layout for the list of jobs, ManageJobs Activity. |
| refreshjobs.xml | Layout for the screen shown when refreshing job list, RefreshJobs Activity. |
| showjob.xml | Layout for job detail screen, ShowJob Activity. |
| showsettings.xml | Layout for configuration/settings screen, ShowSettings Activity. |
| splash.xml | Layout for splash screen, Splash Activity. |
| strings.xml | Strings file containing extracted strings. Ideally all text is contained in a strings file for ease of localization. This application’s file contains only the application title. |
Examining the source files in this application tells us that we have more than one Activity in use. To enable navigation between one Activity and the next, our application must inform Android of the existence of these Activity classes. Recall from chapter 1 that this registration step is accomplished with the AndroidManifest.xml file.
12.2.3. Field service application’s AndroidManifest.xml
Every Android application requires a manifest file to let Android properly “wire things up” when an Intent is handled and needs to be dispatched. Take a look at the AndroidManifest.xml file used by our application, shown in the following listing.
Listing 12.1. The field service application’s AndroidManifest.xml file

12.3. Application source code
After a rather long introduction, it’s time to look at the source code for the field service application. The approach is to follow the application flow, step by step. Let’s start with the splash screen. In this portion of the chapter, we work through each of the application’s source files, starting with the splash screen and moving on to each subsequent Activity of the application.
12.3.1. Splash Activity
We’re all familiar with a splash screen for a software application. It acts like a curtain while important things are taking place behind the scenes. Ordinarily splash screens are visible until the application is ready—this could be a brief amount of time or much longer when a bit of housekeeping is necessary. As a rule, a mobile application should focus on economy and strive to consume as few resources as possible. The splash screen in this sample application is meant to demonstrate how such a feature may be constructed—we don’t need one for housekeeping purposes. But that’s okay; you can learn in the process. Two code snippets are of interest to us: the implementation of the Activity as well as the layout file that defines what the UI looks like. First, examine the layout file in the following listing.
Listing 12.2. splash.xml, defining the layout of the application’s splash screen

The splash.xml layout contains a single ImageView ![]() , set to fill the entire screen. The source image for this view is defined as the drawable resource
, set to fill the entire screen. The source image for this view is defined as the drawable resource ![]() , named android. Note that this is simply the name of the file (minus the file extension) in the drawable folder, as shown earlier.
, named android. Note that this is simply the name of the file (minus the file extension) in the drawable folder, as shown earlier.
Now you must use this layout in an Activity. Aside from the referencing of an image resource from the layout, this part is not that interesting. Figure 12.5 shows the splash screen running on the Android Emulator.
Figure 12.5. The splash screen

Of interest to us is the code that creates the splash page functionality, shown in the following listing.
Listing 12.3. Splash.java, which implements the splash screen functionality
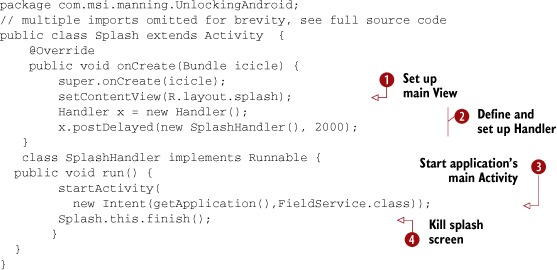
As with most Activity classes in Android, you want to associate the splash layout with this Activity’s View ![]() . A Handler is set up
. A Handler is set up ![]() , which is used to close down the splash screen after an elapsed period of time. Note that the arguments to the postDelayed method are an instance of a class that implements the Runnable interface and the desired elapsed time in milliseconds. In this snippet of code, the screen will be shown for 2,000 milliseconds,
or 2 seconds. After the indicated amount of time has elapsed, the class splashhandler is invoked. The FieldService Activity is instantiated with a call to startActivity
, which is used to close down the splash screen after an elapsed period of time. Note that the arguments to the postDelayed method are an instance of a class that implements the Runnable interface and the desired elapsed time in milliseconds. In this snippet of code, the screen will be shown for 2,000 milliseconds,
or 2 seconds. After the indicated amount of time has elapsed, the class splashhandler is invoked. The FieldService Activity is instantiated with a call to startActivity ![]() . Note that an Intent isn’t used here—you explicitly specify which class is going to satisfy your request. Once you’ve started the next Activity, it’s time to get rid of your splash screen Activity
. Note that an Intent isn’t used here—you explicitly specify which class is going to satisfy your request. Once you’ve started the next Activity, it’s time to get rid of your splash screen Activity ![]() .
.
The splash screen is happily entertaining our mobile worker each time he starts the application. Let’s move on to the main screen of the application.
12.3.2. Preferences used by the FieldService Activity
The goal of the FieldService Activity is to put the functions the mobile worker requires directly in front of him and make sure they’re easy to access. A good mobile application is often one that can be used with one hand, such as using the five-way navigation buttons, or in some cases a thumb tapping on a button. In addition, if there’s helpful information to display, you shouldn’t hide it. It’s helpful for our mobile worker to know that he’s configured to obtain jobs from a particular server. Figure 12.6 demonstrates the field service application conveying an easy-to-use home screen.
Figure 12.6. The home screen. Less is more.

Before reviewing the code in FieldService.java, let’s take a break to discuss how the user and server settings are managed. This is important because these settings are used throughout the application, and as shown in the fieldservice.xml layout file, we need to access those values to display to our mobile worker on the home screen.
Prefs Class
As you learned in chapter 5, there are a number of means for managing data. Because we need to persist this data across multiple invocations of our application, the data must be stored in a nonvolatile fashion. This application employs private SharedPreferences to accomplish this. Why? Despite the fact that we’re largely ignoring security for this sample application, using private SharedPreferences means that other applications can’t casually access this potentially important data. For example, we presently use only an identifier (let’s call it an email address for simplicity) and a server URL in this application. But we might also include a password or a PIN in a production-ready application, so keeping this data private is a good practice.
The Prefs class can be described as a helper or wrapper class. This class wraps the SharedPreferences code and exposes simple getter and setter methods, specific to this application. This implementation knows something about what we’re trying to accomplish, so it adds value with some default values as well. Let’s look at the following listing to see how our Prefs class is implemented.
Listing 12.4. Prefs class


To persist the application’s settings data, you employ a SharedPreferences object ![]() . To manipulate data within the SharedPreferences object, here named _prefs, you use an instance of the Editor class
. To manipulate data within the SharedPreferences object, here named _prefs, you use an instance of the Editor class ![]() . This snippet employs some default settings values
. This snippet employs some default settings values ![]() , which are appropriate for your application. The Prefs() constructor
, which are appropriate for your application. The Prefs() constructor ![]() does the necessary housekeeping so you can establish your private SharedPreferences object, including using a passed-in Context instance. The Context class is necessary because the SharedPreferences mechanism relies on a Context for segregating data. This snippet shows a pair of set and get methods that are generic in nature
does the necessary housekeeping so you can establish your private SharedPreferences object, including using a passed-in Context instance. The Context class is necessary because the SharedPreferences mechanism relies on a Context for segregating data. This snippet shows a pair of set and get methods that are generic in nature ![]() . The getEmail
. The getEmail ![]() and setEmail methods
and setEmail methods ![]() are responsible for manipulating the email setting value. The save() method
are responsible for manipulating the email setting value. The save() method ![]() invokes a commit() on the Editor, which persists the data to the SharedPreferences store.
invokes a commit() on the Editor, which persists the data to the SharedPreferences store.
Now that you have a feel for how this important preference data is stored, let’s return to examine the code of FieldService.java.
12.3.3. Implementing the FieldService Activity
Recall that the FieldService.java file implements the FieldService class, which is essentially the home screen of our application. This code does the primary dispatching for the application. Many of the programming techniques in this file have been shown earlier in the book, but please note the use of startActivityForResult and the onActivityResult methods as you read through the code shown in the following listing.
Listing 12.5. FieldService.java, which implements the FieldService Activity


This code implements a simple UI that displays three distinct buttons. As each is selected, a particular Activity is started in a synchronous, call/return fashion. The Activity is started with a call to startActivityForResult ![]() . When the called Activity is complete, the results are returned to the FieldService Activity via the onActivityResult method
. When the called Activity is complete, the results are returned to the FieldService Activity via the onActivityResult method ![]() . An instance of the Prefs class
. An instance of the Prefs class ![]() ,
, ![]() is used to obtain values for displaying in the UI. Updating the UI is accomplished in the method RefreshUserInfo
is used to obtain values for displaying in the UI. Updating the UI is accomplished in the method RefreshUserInfo ![]() .
.
Because the settings are so important to this application, the next section covers the management of the user and server values.
12.3.4. Settings
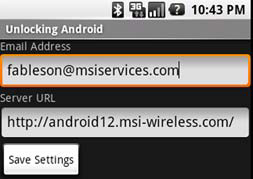
When the user clicks the Settings button on the main application screen, an Activity is started that allows the user to configure her user ID (email address) and the server URL. The screen layout is basic (see listing 12.6). It’s shown graphically in figure 12.7.
Figure 12.7. Settings screen in use
Listing 12.6. showsettings.xml, which contains UI elements for the settings screen
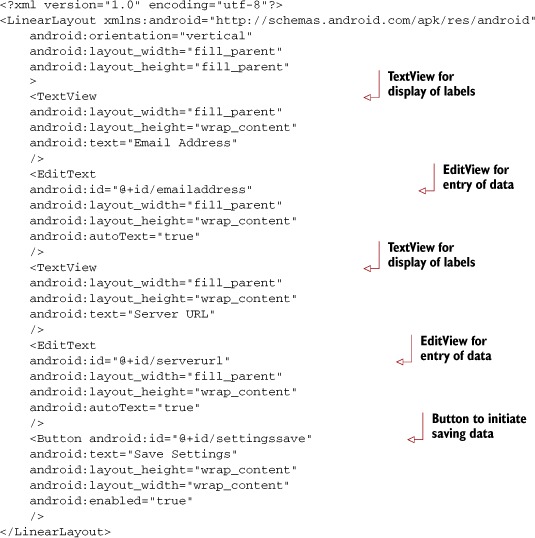
The source code behind the settings screen is also basic. Note the use of the PopulateScreen() method, which makes sure the EditView controls are populated with the current values stored in the SharedPreferences. Note also the use of the Prefs helper class to retrieve and save the values, as shown in the following listing.
Listing 12.7. ShowSettings.java, which implements code behind the settings screen
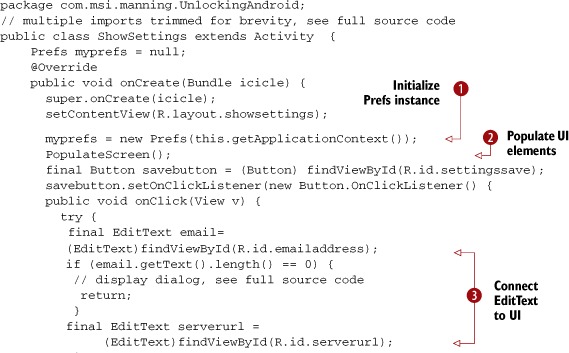

This Activity commences by initializing the SharedPreferences instance ![]() , which retrieves the setting’s values and subsequently populates the UI elements
, which retrieves the setting’s values and subsequently populates the UI elements ![]() by calling the application-defined PopulateScreen method
by calling the application-defined PopulateScreen method ![]() . When the user clicks the Save Settings button, the onClick method is invoked, wherein the data is extracted from the UI elements
. When the user clicks the Save Settings button, the onClick method is invoked, wherein the data is extracted from the UI elements ![]() and put back into the Prefs instance
and put back into the Prefs instance ![]() . A call to the finish method
. A call to the finish method ![]() ends this Activity.
ends this Activity.
Once the settings are in order, it’s time to focus on the core of the application: managing jobs for our mobile worker. To get the most out the higher-level functionality of downloading (refreshing) and managing jobs, let’s examine the core data structures in use in this application.
12.3.5. Managing job data
Data structures represent a key element of any software project and, in particular, projects consisting of multiple tiers, such as our field service application. Job data is exchanged between an Android application and the server, so the elements of the job are central to our application. In Java, you implement these data structures as classes, which include helpful methods in addition to the data elements. XML data shows up in many locations in this application, so let’s start there.
The following listing shows a sample XML document containing a joblist with a single job entry.
Listing 12.8. XML document containing data for the field service application
<?xml version="1.0" encoding="UTF-8" ?>
<joblist>
<job>
<id>22</id>
<status>OPEN</status>
<customer>Big Tristan's Imports</customer>
<address>2200 East Cedar Ave</address>
<city>Flagstaff</city>
<state>AZ</state>
<zip>86004</zip>
<product>UnwiredTools UTCIS-PT</product>
<producturl>http://unwiredtools.com</producturl>
<comments>Requires tuning - too rich in the mid range RPM.
Download software from website before visiting.</comments>
</job>
</joblist>
Now that you have a feel for what the job data looks like, we’ll show you how the data is handled in our Java classes.
Jobentry
The individual job is used throughout the application, and therefore it’s essential that you understand it. In our application, you define the JobEntry class to manage the individual job, as shown in listing 12.9. Note that many of the lines are omitted from this listing for brevity; please see the available source code for the complete code listing.
Listing 12.9. JobEntry.java

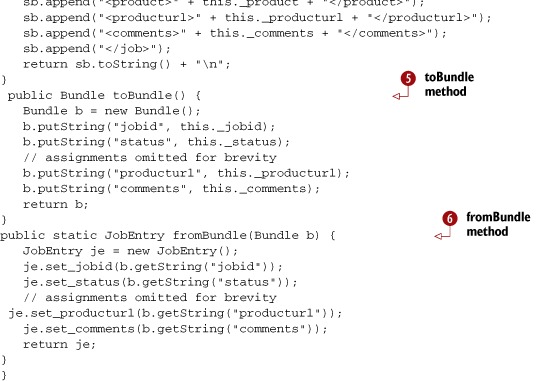
This application relies heavily on the Bundle class ![]() for moving data from one Activity to another. (We’ll explain this in more detail later in this chapter.) A String member
for moving data from one Activity to another. (We’ll explain this in more detail later in this chapter.) A String member ![]() exists for each element in the job, such as jobid or customer. The toString() method
exists for each element in the job, such as jobid or customer. The toString() method ![]() is rather important, as it’s used when displaying jobs in the ManageJobs Activity (also discussed later in the chapter). The toXMLString() method
is rather important, as it’s used when displaying jobs in the ManageJobs Activity (also discussed later in the chapter). The toXMLString() method ![]() generates an XML representation of this JobEntry, complying with the job element defined in the previously presented DTD. The toBundle() method
generates an XML representation of this JobEntry, complying with the job element defined in the previously presented DTD. The toBundle() method ![]() takes the data members of the JobEntry class and packages them into a Bundle. This Bundle is then able to be passed between activities, carrying with it the required data elements. The fromBundle() static method
takes the data members of the JobEntry class and packages them into a Bundle. This Bundle is then able to be passed between activities, carrying with it the required data elements. The fromBundle() static method ![]() returns a JobEntry when provided with a Bundle. toBundle() and fromBundle() work together to assist in the passing of JobEntry objects (at least the data portion thereof) between activities. Note that this is one of many ways in which to move data
throughout an application. Another method, as an example, is to have a globally accessible class instance to store data.
returns a JobEntry when provided with a Bundle. toBundle() and fromBundle() work together to assist in the passing of JobEntry objects (at least the data portion thereof) between activities. Note that this is one of many ways in which to move data
throughout an application. Another method, as an example, is to have a globally accessible class instance to store data.
Now that you understand the JobEntry class, we’ll move on to the JobList class, which is a class used to manage a collection of JobEntry objects.
Joblist
When interacting with the server or presenting the available jobs to manage on the Android device, the field service application works with an instance of the JobList class. This class, like the JobEntry class, has both data members and helpful methods. The JobList class contains a typed List data member, which is implemented using a Vector. This is the only data member of this class, as shown in the following listing.
Listing 12.10. JobList.java
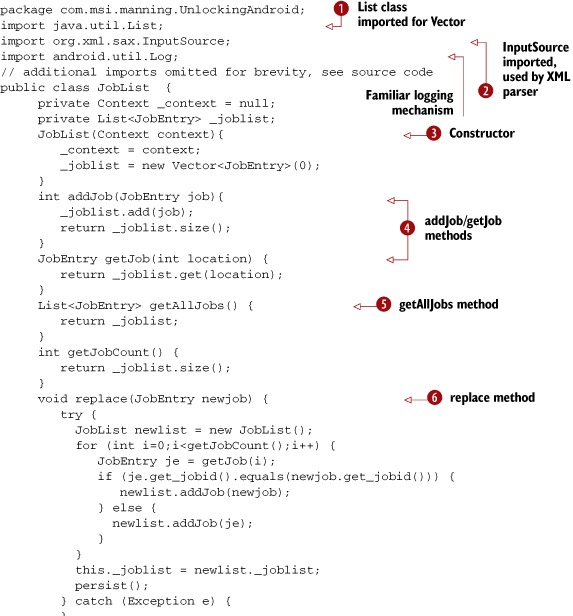

The list of jobs is implemented as a Vector, which is a type of List ![]() . The XML structure containing job information is parsed with the SAX parser, so you need to be sure to import those required
packages
. The XML structure containing job information is parsed with the SAX parser, so you need to be sure to import those required
packages ![]() . JobEntry objects are stored in the typed List object named _joblist
. JobEntry objects are stored in the typed List object named _joblist ![]() . Helper methods for managing the list are included as addJob and getJob
. Helper methods for managing the list are included as addJob and getJob ![]() . The getAllJobs() method
. The getAllJobs() method ![]() returns the list of JobEntry items. Note that generally speaking, the application uses the getJob() method for individual JobEntry management, but the getAllJobs() method is particularly useful when you display the full list of jobs in the ManageJobs Activity, discussed later in this chapter.
returns the list of JobEntry items. Note that generally speaking, the application uses the getJob() method for individual JobEntry management, but the getAllJobs() method is particularly useful when you display the full list of jobs in the ManageJobs Activity, discussed later in this chapter.
The replace() method ![]() is used when you’ve closed a job and need to update your local store of jobs. Note that after it has updated the local list
of JobEntry items, replace() calls the persist()
is used when you’ve closed a job and need to update your local store of jobs. Note that after it has updated the local list
of JobEntry items, replace() calls the persist()![]() method, which is responsible for writing an XML representation of the entire list of JobEntry items to storage. This method invokes the toXMLString() method on each JobEntry in the list. The openFileOutput method creates a file within the application’s private file area. This is essentially a helper method to ensure you get a
file path to which you have full read/write privileges.
method, which is responsible for writing an XML representation of the entire list of JobEntry items to storage. This method invokes the toXMLString() method on each JobEntry in the list. The openFileOutput method creates a file within the application’s private file area. This is essentially a helper method to ensure you get a
file path to which you have full read/write privileges.
The parse method ![]() obtains an instance of a FileInputStream to gain access to the file and creates an instance of an InputStream
obtains an instance of a FileInputStream to gain access to the file and creates an instance of an InputStream ![]() , which is required by the SAX XML parser. In particular, take note of the JobListHandler. SAX is a callback parser, meaning that it invokes a user-supplied method to process events in the parsing process. It’s
up to the JobListHandler (in our example) to process the data as appropriate.
, which is required by the SAX XML parser. In particular, take note of the JobListHandler. SAX is a callback parser, meaning that it invokes a user-supplied method to process events in the parsing process. It’s
up to the JobListHandler (in our example) to process the data as appropriate.
We have one more class to go before we can jump back to the higher-level functionality of our application. The next section takes a quick tour of the JobList-Handler, which is responsible for putting together a JobList from an XML data source.
Joblisthandler
As presented earlier, our application uses an XML data storage structure. This XML data can come from either the server or from a local file on the filesystem. In either case, the application must parse this data and transform it into a useful form. This is accomplished through the use of the SAX XML parsing engine and the JobList-Handler, which is shown in listing 12.11. The JobListHandler is used by the SAX parser for our XML data, regardless of the data’s source. Where the data comes from dictates how the SAX parser is set up and invoked in this application. The JobList-Handler behaves slightly differently depending on whether the class’s constructor includes a Handler argument. If the Handler is provided, the JobListHandler will pass messages back for use in a ProgressDialog. If the Handler argument is null, this status message passing is bypassed. When parsing data from the server, the ProgressDialog is employed; the parsing of a local file is done quickly and without user feedback. The rationale for this is simple—the network connection may be slow and we need to show progress information to the user. An argument could be made for always showing the progress of the parse operation, but this approach gives us an opportunity to demonstrate more conditionally operating code.
Listing 12.11. JobListHandler.java

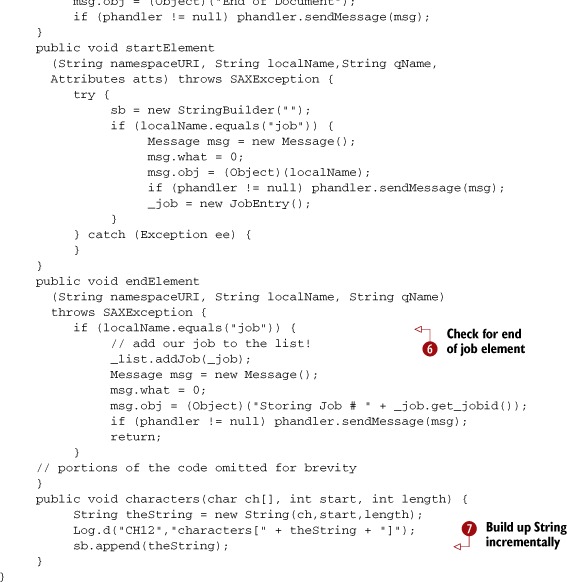
The JobListHandler constructor ![]() takes a single argument of Handler. This value may be null. If null, Message passing is omitted from operation. When reading from a local storage file, this Handler argument is null. When reading data from the server over the internet, with a potentially slow connection, the Message-passing code is utilized to provide feedback for the user in the form of a Progress-Dialog. The ProgressDialog code is shown later in this chapter in the discussion of the RefreshJobs Activity. A local copy of the Handler
takes a single argument of Handler. This value may be null. If null, Message passing is omitted from operation. When reading from a local storage file, this Handler argument is null. When reading data from the server over the internet, with a potentially slow connection, the Message-passing code is utilized to provide feedback for the user in the form of a Progress-Dialog. The ProgressDialog code is shown later in this chapter in the discussion of the RefreshJobs Activity. A local copy of the Handler ![]() is set up when using the Progress-Dialog, as described in
is set up when using the Progress-Dialog, as described in ![]() .
.
The getList()![]() method is invoked when parsing is complete. The role of getList is to return a copy of the JobList that was constructed during the parse process. When the startDocument() callback method
method is invoked when parsing is complete. The role of getList is to return a copy of the JobList that was constructed during the parse process. When the startDocument() callback method ![]() is invoked by the SAX parser, the initial class instances are established. The endDocument() method
is invoked by the SAX parser, the initial class instances are established. The endDocument() method ![]() is invoked by the SAX parser when all of the document has been consumed. This is an opportunity for the Handler to perform additional cleanup as necessary. In our example, a message is posted to the user by sending a Message.
is invoked by the SAX parser when all of the document has been consumed. This is an opportunity for the Handler to perform additional cleanup as necessary. In our example, a message is posted to the user by sending a Message.
For each element in the XML file, the SAX parser follows the same pattern: startElement is invoked, characters() is invoked (one or more times), and endElement is invoked. In the startElement method, you initialize StringBuilder and evaluate the element name. If the name is “job,” you initialize the class-level JobEntry instance.
In the endElement() method, the element name is evaluated. If the element name is “job” ![]() , the JobListHandler adds this JobEntry to the JobList data member, _joblist, with a call to addJob(). Also in the endElement() method, the data members of the JobEntry instance (_job) are updated. Please see the full source code for more details.
, the JobListHandler adds this JobEntry to the JobList data member, _joblist, with a call to addJob(). Also in the endElement() method, the data members of the JobEntry instance (_job) are updated. Please see the full source code for more details.
The characters() method is invoked by the SAX parser whenever data is available for storage. The JobListHandler simply appends this string data to a StringBuilder instance ![]() each time it’s invoked. It’s possible that the characters method may be invoked more than once for a particular element’s data. That’s the rationale behind using a StringBuilder instead of a single String variable; StringBuilder is a more efficient class for constructing strings from multiple substrings.
each time it’s invoked. It’s possible that the characters method may be invoked more than once for a particular element’s data. That’s the rationale behind using a StringBuilder instead of a single String variable; StringBuilder is a more efficient class for constructing strings from multiple substrings.
After this lengthy but important look into the data structures and the accompanying explanations, it’s time to return to the higher-level functionality of the application.
12.4. Source code for managing jobs
Most of the time our mobile worker is using this application, he’ll be reading through comments, looking up a job address, getting product information, and performing other aspects of working on a specific job. Our application must supply the functionality for the worker to accomplish each of these job-management tasks. We examine each of these Activitys in detail in this section. The first thing we review is fetching new jobs from the server, which gives us the opportunity to discuss the JobList-Handler and the management of the jobs list used throughout the application.
12.4.1. RefreshJobs
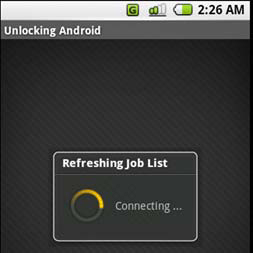
The RefreshJobs Activity performs a simple yet vital role in the field service application. Whenever requested, the RefreshJobs Activity attempts to download a list of new jobs from the server. The UI is super simple—just a blank screen with a Progress-Dialog informing the user of the application’s progress, as shown in figure 12.8.
Figure 12.8. The ProgressDialog in use during RefreshJobs
The code for RefreshJobs is shown in listing 12.12. The code is straightforward, as most of the heavy lifting is done in the JobListHandler. This code’s responsibility is to fetch configuration settings, initiate a request to the server, and put a mechanism in place for showing progress to the user.
Listing 12.12. RefreshJobs.java
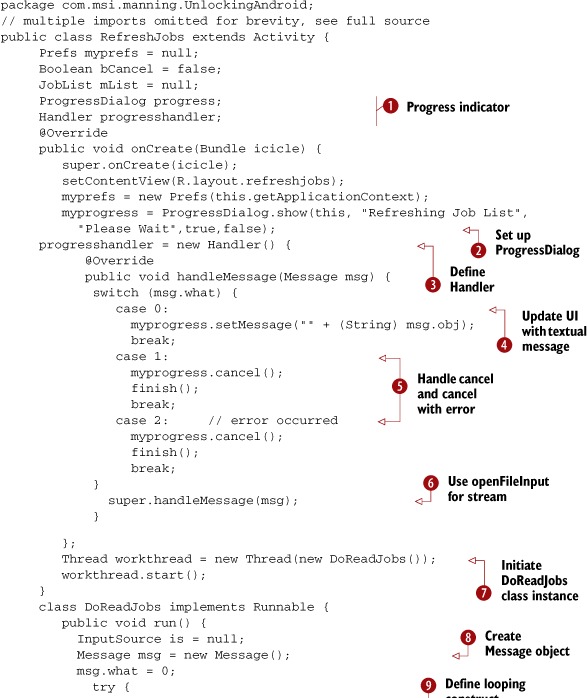

A ProgressDialog ![]() is used to display progress information to the user. There are a number of ways to display progress in Android. This is perhaps
the most straightforward approach. A Handler is employed to process Message instances. Though the Handler itself is defined as an anonymous class, the code requires a reference to it for passing to the JobListHandler when parsing, which is shown in
is used to display progress information to the user. There are a number of ways to display progress in Android. This is perhaps
the most straightforward approach. A Handler is employed to process Message instances. Though the Handler itself is defined as an anonymous class, the code requires a reference to it for passing to the JobListHandler when parsing, which is shown in ![]() . When instantiating the ProgressDialog
. When instantiating the ProgressDialog ![]() , the arguments include
, the arguments include
- Context
- Title of Dialog
- Initial Textual Message
- Indeterminate
- Cancelable
Using true for the Indeterminate parameter means that you’re not providing any clue as to when the operation will complete (such as percentage remaining),
just an indicator that something is still happening, which can be a best practice when you don’t have a good handle on how
long an operation may take. A new Handler ![]() is created to process messages sent from the parsing routine, which will be introduced momentarily. An important class that
has been mentioned but thus far not described is Message. This class is used to convey information between different threads of execution. The Message class has some generic data members that may be used in a flexible manner. The first of interest is the what member, which acts as a simple identifier, allowing recipients to easily jump to desired code based on the value of the what member. The most typical (and used here) approach is to evaluate the what data member via a switch statement.
is created to process messages sent from the parsing routine, which will be introduced momentarily. An important class that
has been mentioned but thus far not described is Message. This class is used to convey information between different threads of execution. The Message class has some generic data members that may be used in a flexible manner. The first of interest is the what member, which acts as a simple identifier, allowing recipients to easily jump to desired code based on the value of the what member. The most typical (and used here) approach is to evaluate the what data member via a switch statement.
In this application, a Message received with its what member equal to 0 represents a textual update message ![]() to be displayed in the ProgressDialog. The textual data itself is passed as a String cast to an Object and stored in the obj data member of the Message. This interpretation of the what member is purely arbitrary. You could’ve used 999 as the value meaning textual update, for example. A what value of 1 or 2 indicates that the operation is complete
to be displayed in the ProgressDialog. The textual data itself is passed as a String cast to an Object and stored in the obj data member of the Message. This interpretation of the what member is purely arbitrary. You could’ve used 999 as the value meaning textual update, for example. A what value of 1 or 2 indicates that the operation is complete ![]() , and this Handler can take steps to initiate another thread of execution. For example, a value of 1 indicates successful completion so the
ProgressDialog is canceled, and the RefreshJobs Activity is completed with a call to finish(). The value of 2 for the what member has the same effect as a value of 1, but it’s provided here as an example of handling different result conditions;
for example, a failure response due to an encountered error. In a production-ready application, this step should be fleshed
out to perform an additional step of instruction to the user and/or a retry step. Any Message not explicitly handled by the Handler instance should be passed to the super class
, and this Handler can take steps to initiate another thread of execution. For example, a value of 1 indicates successful completion so the
ProgressDialog is canceled, and the RefreshJobs Activity is completed with a call to finish(). The value of 2 for the what member has the same effect as a value of 1, but it’s provided here as an example of handling different result conditions;
for example, a failure response due to an encountered error. In a production-ready application, this step should be fleshed
out to perform an additional step of instruction to the user and/or a retry step. Any Message not explicitly handled by the Handler instance should be passed to the super class ![]() . In this way system messages may be processed.
. In this way system messages may be processed.
When communicating with a remote resource, such as a remote web server in our case, it’s a good idea to perform the communications
steps in a thread other than the primary GUI thread. A new Thread ![]() is created based on the DoReadJobs class, which implements the Runnable Java interface. A new Message object
is created based on the DoReadJobs class, which implements the Runnable Java interface. A new Message object ![]() is instantiated and initialized. This step takes place over and over throughout the run method of the DoReadJobs class. It’s important to not reuse a Message object, as they’re literally passed and enqueued. It’s possible for them to stack up in the receiver’s queue, so reusing
a Message object will lead to losing data or corrupting data at best and Thread synchronization issues or beyond at worst.
is instantiated and initialized. This step takes place over and over throughout the run method of the DoReadJobs class. It’s important to not reuse a Message object, as they’re literally passed and enqueued. It’s possible for them to stack up in the receiver’s queue, so reusing
a Message object will lead to losing data or corrupting data at best and Thread synchronization issues or beyond at worst.
Why are we talking about a commented-out line of code ![]() ? Great question—because it caused so much pain in the writing of this application! A somewhat odd and confusing element of
Android programming is the Looper class. This class provides static methods to help Java Threads to interact with Android. Threads by default don’t have a message loop, so presumably Messages don’t go anywhere when sent. The first call to make is Looper.prepare(), which creates a Looper for a Thread that doesn’t already have one established. Then by placing a call to the loop() method, the flow of Messages takes place. Prior to implementing this class as a Runnable interface, we experimented with performing this step in the same thread and attempted to get the ProgressDialog to work properly. That said, if you run into funny Thread/Looper messages on the Android Emulator, consider adding a call to Looper.prepare() at the beginning of your Thread and then Looper.loop() to help Messages flow.
? Great question—because it caused so much pain in the writing of this application! A somewhat odd and confusing element of
Android programming is the Looper class. This class provides static methods to help Java Threads to interact with Android. Threads by default don’t have a message loop, so presumably Messages don’t go anywhere when sent. The first call to make is Looper.prepare(), which creates a Looper for a Thread that doesn’t already have one established. Then by placing a call to the loop() method, the flow of Messages takes place. Prior to implementing this class as a Runnable interface, we experimented with performing this step in the same thread and attempted to get the ProgressDialog to work properly. That said, if you run into funny Thread/Looper messages on the Android Emulator, consider adding a call to Looper.prepare() at the beginning of your Thread and then Looper.loop() to help Messages flow.
When you want to send data to the user to inform him of your progress, you update an instance of the Message class ![]() and send it to the assigned Handler.
and send it to the assigned Handler.
To parse an incoming XML data stream, you create a new InputSource from the URL stream ![]() . This step is required for the SAX parser. This method reads data from the network directly into the parser without a temporary
storage file.
. This step is required for the SAX parser. This method reads data from the network directly into the parser without a temporary
storage file.
Note that the instantiation of the JobListHandler ![]() takes a reference to the progresshandler. This way the JobListHandler can (optionally) propagate messages back to the user during the parse process. Once the parse is complete, the JobList-Handler returns a JobList object, which is then persisted
takes a reference to the progresshandler. This way the JobListHandler can (optionally) propagate messages back to the user during the parse process. Once the parse is complete, the JobList-Handler returns a JobList object, which is then persisted ![]() to store the data to the local storage. Because this parsing step is complete, you let the Handler know by passing a Message
to store the data to the local storage. Because this parsing step is complete, you let the Handler know by passing a Message ![]() with the what field set to 1. If an exception occurs, you pass a message with what set to 2, indicating an error
with the what field set to 1. If an exception occurs, you pass a message with what set to 2, indicating an error ![]() .
.
Congratulations, your Android application has now constructed a URL object with persistently stored configuration information (user and server) and successfully connected over the internet to fetch XML data. That data has been parsed into a JobList containing JobEntry objects, while providing our patient mobile worker with feedback, and subsequently storing the JobList to the filesystem for later use. Now we want to work with those jobs, because after all, those jobs have to be completed for our mobile worker friend to make a living!
12.4.2. Managing jobs: The ManageJobs Activity
The ManageJobs Activity presents a scrollable list of jobs for review and action. At the top of the screen is a simple summary indicating the number of jobs in the list, and each individual job is enumerated in a ListView.
Earlier we mentioned the importance of the JobEntry’s toString() method:
public String toString() {
   return this._jobid + ": " + this._customer + ": " + this._product;
}
This method generates the String that’s used to represent the JobEntry in the List-View, as shown in figure 12.9.
Figure 12.9. ManageJobs Activity lists downloaded jobs.

The layout for this Activity’s View is simple: just a TextView and a ListView, as shown in the following listing.
Listing 12.13. managejobs.xml
<?xml version="1.0" encoding="utf-8"?>
<LinearLayout xmlns:android="http://schemas.android.com/apk/res/android"
    android:id="@+id/joblistview"
    android:orientation="vertical"
    android:layout_width="fill_parent"
    android:layout_height="wrap_content"
    android:scrollbars="vertical"
    >
    <TextView     android:id="@+id/statuslabel"
    android:text="list jobs here "
    android:layout_height="wrap_content"
    android:layout_width="fill_parent"
    />
    <ListView   android:id="@+id/joblist"
    android:layout_height="fill_parent"
    android:layout_width="fill_parent"
    />
</LinearLayout>
The code in listing 12.14 for the ManageJobs Activity connects a JobList to the GUI and reacts to the selection of a particular job from the ListView. In addition, this class demonstrates taking the result from another, synchronously invoked Activity and processing it according to its specific requirement. For example, when a job is completed and closed, that JobEntry is updated to reflect its new status.
Listing 12.14. ManageJobs.java, which implements the ManageJobs Activity
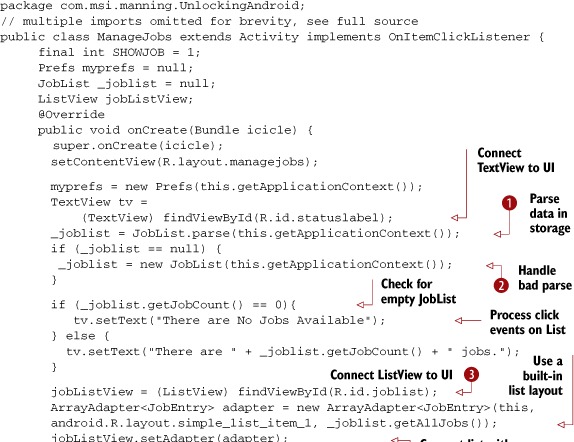

The objective of this code is to display a list of available jobs to the user in a ListView ![]() . To display the list of jobs, we must first parse the list stored on the device
. To display the list of jobs, we must first parse the list stored on the device ![]() . Note that the Context argument is required to allow the JobList class access to the private file area for this application. If the parse fails, we initialize the JobList instance to a new, empty list. This is a somewhat simplistic way to handle the error without the GUI falling apart
. Note that the Context argument is required to allow the JobList class access to the private file area for this application. If the parse fails, we initialize the JobList instance to a new, empty list. This is a somewhat simplistic way to handle the error without the GUI falling apart ![]() .
.
When a specific job is selected, its details are extracted via a call to the getJob method ![]() . The job is stored in a Bundle, put into an Intent
. The job is stored in a Bundle, put into an Intent ![]() , and subsequently sent to the ShowJob Activity for display and/or editing
, and subsequently sent to the ShowJob Activity for display and/or editing ![]() . Note the use of the constant SHOWJOB as the last parameter of the startActivityForResult method. When the called-Activity returns, the second parameter to startActivityForResult is “passed back” when the onActivityResult method is invoked
. Note the use of the constant SHOWJOB as the last parameter of the startActivityForResult method. When the called-Activity returns, the second parameter to startActivityForResult is “passed back” when the onActivityResult method is invoked ![]() and the return code checked. To obtain the changed JobEntry, you need to extract it from the Intent with a call to getExtras(), which returns a Bundle. This Bundle is turned into a JobEntry instance via the static fromBundle method of the JobEntry class. To update the list of jobs to reflect this changed JobEntry, call the replace method
and the return code checked. To obtain the changed JobEntry, you need to extract it from the Intent with a call to getExtras(), which returns a Bundle. This Bundle is turned into a JobEntry instance via the static fromBundle method of the JobEntry class. To update the list of jobs to reflect this changed JobEntry, call the replace method ![]() .
.
You need to pass the selected job to the ShowJob Activity, but you can’t casually pass an object from one Activity to another. You don’t want the ShowJob Activity to have to parse the list of jobs again; otherwise you could simply pass back an index to the selected job by using the integer
storage methods of a Bundle. Perhaps you could store the currently selected JobEntry (and JobList for that matter) in a global data member of the Application object, had you chosen to implement one. If you recall in chapter 1 when we discussed the ability of Android to dispatch Intents to any Activity registered on the device, you want to keep the ability open to an application other than your own to perhaps pass a job to
you. If that were the case, using a global data member of an Application object would never work! The likelihood of such a step is low, particularly considering how the data is stored in this application.
This chapter’s sample application is an exercise of evaluating some mechanisms you might employ to solve data movement around
when programming for Android. The chosen solution is to package the data fields of the JobEntry in a Bundle (![]() in listing 12.14) to move a JobEntry from one Activity to another. In the strictest sense, you’re not moving a real JobEntry object but a representation of a JobEntry’s data members. The net of this discussion is that this method creates a new Bundle by using the toBundle() method of the JobEntry.
in listing 12.14) to move a JobEntry from one Activity to another. In the strictest sense, you’re not moving a real JobEntry object but a representation of a JobEntry’s data members. The net of this discussion is that this method creates a new Bundle by using the toBundle() method of the JobEntry.
Now that you can view and select the job of interest, it’s time to look at just what you can do with that job. Before diving into the next section, be sure to review the Manage-Jobs code carefully to understand how the JobEntry information is passed between the two activities.
12.4.3. Working with a job with the ShowJob Activity
The ShowJob Activity is the most interesting element of the entire application, and it’s certainly the screen most useful to the mobile worker carrying around his Android-capable device and toolbox. To help in the discussion of the various features available to the user on this screen, take a look at figure 12.10.
Figure 12.10. An example of a job shown in the ShowJob Activity

The layout is straightforward, but this time you have some Buttons and you’ll be changing the textual description depending on the condition of a particular job’s status. A TextView is used to present job details such as address, product requiring service, and comments. The third Button will have the text property changed, depending on the status of the job. If the job’s status is marked as CLOSED, the functionality of the third button will change.
To support the functionality of this Activity, first the code needs to launch a new Activity to show a map of the job’s address, as shown in figure 12.11.
Figure 12.11. Viewing a job address in the Maps application
The second button, Get Product Info, launches a browser window to assist users in learning more about the product they’re being called on to work with. Figure 12.12 shows this in action.
Figure 12.12. Get Product Info takes the user to a web page specific to this job.
The third requirement is to allow the user to close the job or to view the signature if it’s already closed; we’ll cover the details in the next section on the CloseJob Activity.
Fortunately, the steps required for the first two operations are quite simple with Android—thanks to the Intent. The following listing and the accompanying annotations show you how.
Listing 12.15. ShowJob.java


Upon completion of the CloseJob Activity, the onActivityResult callback is invoked. When this situation occurs, this method receives a Bundle containing the data elements for the recently closed JobEntry ![]() . If you recall, the ShowJob Activity was launched “for result.”, which permits a synchronous pattern, passing the result back to the caller. The requirement is
to propagate this JobEntry data back up to the calling Activity, ManageJobs. Calling setResult() and passing the Bundle (obtained with getExtras()) fulfills this requirement.
. If you recall, the ShowJob Activity was launched “for result.”, which permits a synchronous pattern, passing the result back to the caller. The requirement is
to propagate this JobEntry data back up to the calling Activity, ManageJobs. Calling setResult() and passing the Bundle (obtained with getExtras()) fulfills this requirement.
Despite the simple appearance of some text and a few easy-to-hit buttons, the ShowJob Activity provides a significant amount of functionality to the user. All that remains is to capture the signature to close out the job. Doing so requires an examination of the CloseJob Activity.
12.4.4. Capturing a signature with the CloseJob Activity
Our faithful mobile technician has just completed the maintenance operation on the part and is ready to head off to lunch before stopping for another job on the way home, but first he must close out this job with a signature from the customer. To accomplish this, the field service application presents a blank screen, and the customer uses a stylus (or a mouse in the case of the Android Emulator) to sign the device, acknowledging that the work has been completed. Once the signature has been captured, the data is submitted to the server. The proof of job completion has been captured, and the job can now be billed. Figure 12.13 demonstrates this sequence of events.
Figure 12.13. The CloseJob Activity capturing a signature and sending data to the server

This Activity can be broken down into two basic functions: the capture of a signature and the transmittal of job data to the server. Notice that this Activity’s UI has no layout resource. All of the UI elements in this Activity are generated dynamically, as shown in listing 12.16. In addition, the ProgressDialog introduced in the RefreshJobs Activity is brought back for an encore, to let our mobile technician know that the captured signature is being sent when the Sign & Close menu option is selected. If the user selects Cancel, the ShowJob Activity resumes control. Note that the signature should be made prior to selecting the menu option.
One element not found in this sample application is the local queuing of the signature. Ideally this would be done in the event that data coverage isn’t available. The storage of the image is quite simple; the perhaps more challenging piece is the logic on when to attempt to send the data again. Considering all the development of this sample application is done on the Android Emulator with near-perfect connectivity, it’s of little concern here. But in the interest of best preparing you to write real-world applications, it’s worth reminding you of local queuing in the event of communications trouble in the field.
Listing 12.16. CloseJob.java—GUI setup

Unlike previous activities in this chapter, the UI doesn’t come from a design time-defined layout, but rather an instance
of a closejobView ![]() is the primary UI. The closejobView is defined in listing 12.17.
is the primary UI. The closejobView is defined in listing 12.17.
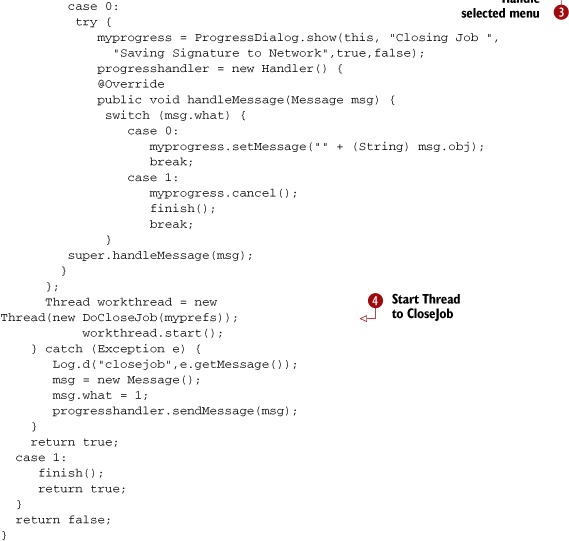
The onCreateOptionsMenu method ![]() is an override of the base View’s method, allowing a convenient way to add menus to this screen. Note that two menus are added, one for Sign & Close and
one for Cancel. The onOptionsItemSelected method
is an override of the base View’s method, allowing a convenient way to add menus to this screen. Note that two menus are added, one for Sign & Close and
one for Cancel. The onOptionsItemSelected method ![]() is invoked when the user selects a menu item. A ProgressDialog and accompanying Handler are instantiated when the user chooses the menu to close a job. Once the progress-reporting mechanism is in place, a new
Thread is created and started in order to process the steps required to close the job
is invoked when the user selects a menu item. A ProgressDialog and accompanying Handler are instantiated when the user chooses the menu to close a job. Once the progress-reporting mechanism is in place, a new
Thread is created and started in order to process the steps required to close the job ![]() . Note that an instance of Prefs is passed in as an argument to the constructor, as that will be needed to store a signature, as we’ll show in listing 12.18.
. Note that an instance of Prefs is passed in as an argument to the constructor, as that will be needed to store a signature, as we’ll show in listing 12.18.
The UI at this point is only partially set up; we need a means to capture a signature on the screen of our Android device. The next listing implements the class closejob-View, which is an extension of the View class.
Listing 12.17. CloseJob.java—closejobView class
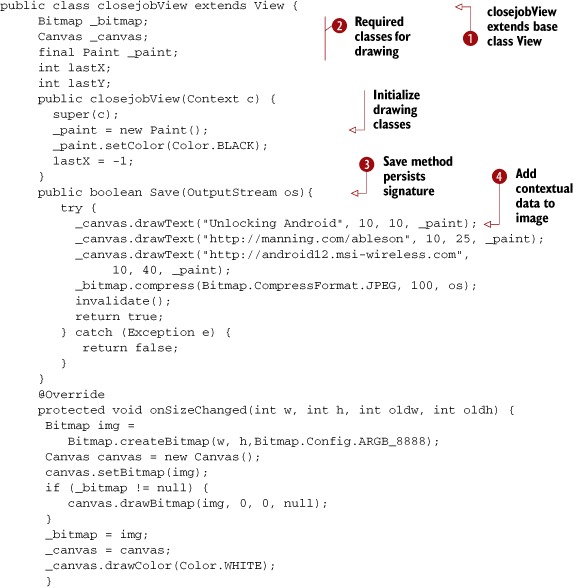

The closejobView extends the base View class ![]() . The Bitmap and Canvas classes
. The Bitmap and Canvas classes ![]() work together to form the drawing surface for this Activity. Note the call to the Canvas.drawColor method, which sets the background color to white. When the onDraw() method is invoked, the canvas draws its associated bitmap with a call to drawBitmap()
work together to form the drawing surface for this Activity. Note the call to the Canvas.drawColor method, which sets the background color to white. When the onDraw() method is invoked, the canvas draws its associated bitmap with a call to drawBitmap() ![]() .
.
The logic for where to draw relies on the onTouchEvent method ![]() , which receives an instance of the MotionEvent class. The MotionEvent class tells what happened and where. ACTION_UP, ACTION_DOWN, and ACTION_MOVE are the events captured, with some logic to guide when and where to draw. Once the signature is complete, the Save method
, which receives an instance of the MotionEvent class. The MotionEvent class tells what happened and where. ACTION_UP, ACTION_DOWN, and ACTION_MOVE are the events captured, with some logic to guide when and where to draw. Once the signature is complete, the Save method ![]() is responsible for converting the contents of the image to a form usable for submission to the server. Note that additional
text is drawn on the signature
is responsible for converting the contents of the image to a form usable for submission to the server. Note that additional
text is drawn on the signature ![]() . In this case, it’s little more than a shameless plug for this book’s web page, but this could also be location-based data.
Why is this important? Imagine someone forging a signature. It could happen, but it would be more challenging and of less
value to a rogue mobile technician if the GPS/location data were stamped on the job, along with the date and time. When converting
the image to our desired JPEG format, there’s an additional input argument to this method—an OutputStream, used to store the image data. This OutputStream reference was an input argument to the Save method.
. In this case, it’s little more than a shameless plug for this book’s web page, but this could also be location-based data.
Why is this important? Imagine someone forging a signature. It could happen, but it would be more challenging and of less
value to a rogue mobile technician if the GPS/location data were stamped on the job, along with the date and time. When converting
the image to our desired JPEG format, there’s an additional input argument to this method—an OutputStream, used to store the image data. This OutputStream reference was an input argument to the Save method.
Now that the UI has been created and a signature drawn on the screen, let’s look at the code used to close the job. Closing the job involves capturing the signature and sending it to the server via an HTTP POST. The class DoCloseJob is shown in the following listing.
Listing 12.18. CloseJob.java—DoCloseJob class
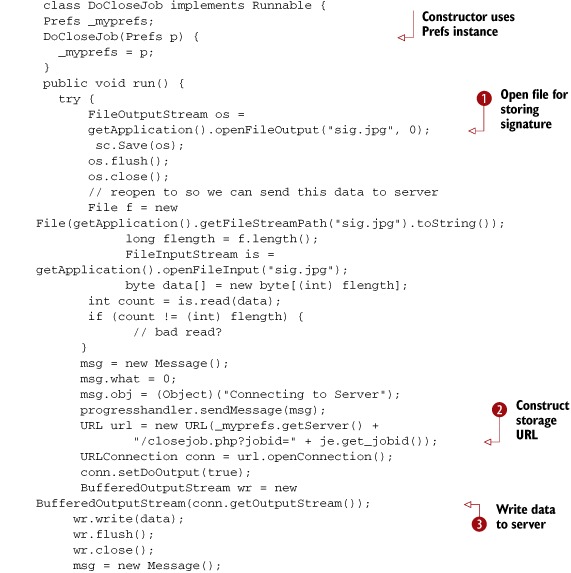

At this point, you have a signature on the screen and need to capture it. A new File-OutputStream ![]() is obtained for a file on the local filesystem, and the signature is written to this file. You’re now ready to transmit this
file to the server—remember, you want to bill the client as soon as possible for work completed!
is obtained for a file on the local filesystem, and the signature is written to this file. You’re now ready to transmit this
file to the server—remember, you want to bill the client as soon as possible for work completed!
In preparation for sending the signature to the server, the signature file contents are read into a byte array via an instance
of a FileInputStream. Using the Prefs instance to get specific configuration information, a URL ![]() is constructed in order to POST data to the server. The query String of the URL contains the jobid and the POST data contains the image itself. A BufferedOutputStream
is constructed in order to POST data to the server. The query String of the URL contains the jobid and the POST data contains the image itself. A BufferedOutputStream ![]() is employed to POST data, which consists of the captured signature in JPEG format.
is employed to POST data, which consists of the captured signature in JPEG format.
Once the job data and signature have been sent to the server, the response data is read back from the server ![]() . A specific string indicates a successful transmission
. A specific string indicates a successful transmission ![]() .
.
Upon successful closing, the JobEntry status member is marked as CLOSED ![]() , and this JobEntry is converted to a Bundle so that it may be communicated to the caller by invoking the setResult() method
, and this JobEntry is converted to a Bundle so that it may be communicated to the caller by invoking the setResult() method ![]() . Once the Handler receives the “I’m done” message and the Activity finishes, this data is propagated back to the ShowJob and all the way back to the ManageJob Activity.
. Once the Handler receives the “I’m done” message and the Activity finishes, this data is propagated back to the ShowJob and all the way back to the ManageJob Activity.
And that thankfully wraps up the source code review for the Android side of things! There were some methods omitted from this text to limit this already very long chapter, so please be sure to examine the full source code. Now it’s time to look at the server application.jobs
12.5. Server code
A mobile application often relies on server-side resources, and our field service application is no exception. This isn’t a book on server-side development techniques, server-related code, and discussion, so we’ll present these things briefly. We’ll introduce the UI and the accompanying database structure that makes up our list of job entries, and then we’ll review the two server-side transactions that concern the Android application. The server code relies on open source staples: MySQL and PHP. Let’s get started with the interface used to enter new jobs, used by the dispatcher.
12.5.1. Dispatcher user interface
Before jumping into any server code–specific items, it’s important to understand how the application is organized. All jobs entered by a dispatcher are assigned to a particular mobile technician. That identifier is interpreted as an email address, as seen in the Android example where the user ID was used throughout the application. Once the user ID is specified, all of the records revolve around that data element. For example, figure 12.14 demonstrates this by showing the jobs assigned to the author, [email protected].
Figure 12.14. The server-side dispatcher screen

Note
This application is available for testing the sample application yourself. It’s located at http://android12.msi-wireless.com. Sign on and add jobs for your email address.
Let’s now turn our attention to the underlying data structure, which contains the list of jobs.
12.5.2. Database
As mentioned earlier in section 12.1.3, the database in use in this application is MySQL,[2] with a single database table called tbl_jobs. The SQL to create this table is provided in the next listing.
2 For more on development using MySQL, try the developer zone: http://dev.mysql.com/.
Listing 12.19. Data definition for tbl_jobs

Each row in this table is uniquely identified by the jobid ![]() , which is an autoincrementing integer field. The identifier field
, which is an autoincrementing integer field. The identifier field ![]() corresponds to the user ID/email of the assigned mobile technician. The producturl field
corresponds to the user ID/email of the assigned mobile technician. The producturl field ![]() is designed to be a specific URL to assist the mobile technician in the field in quickly gaining access to helpful information
for completing the assigned job.
is designed to be a specific URL to assist the mobile technician in the field in quickly gaining access to helpful information
for completing the assigned job.
The next section provides a road map to the server code.
12.5.3. PHP dispatcher code
The server-side dispatcher system is written in PHP and contains a number of files working together to create the application. Table 12.3 presents a brief synopsis of each source file to help you navigate the application if you choose to host a version of it yourself.
Table 12.3. Server-side source code
|
Source file |
Description |
|---|---|
| addjob.php | Form for entering new job information |
| closejob.php | Used by Android application to submit signature |
| db.php | Database connection information |
| export.php | Used to export list of jobs to a CSV file |
| footer.php | Used to create a consistent look and feel for the footer of each page |
| getjoblist.php | Used by the Android application to request a job XML stream |
| header.php | Used to create a consistent look and feel for the header of each page |
| index.php | Home page, including the search form |
| manage.php | Used to delete jobs on the web application |
| savejob.php | Used to save a new job (called from addjob.php) |
| showjob.php | Used to display job details and load into a form for updating |
| showjobs.php | Displays all jobs for a particular user |
| updatejob.php | Used to save updates to a job |
| utils.php | Contains various routines for interacting with the database |
Of all these files, only two concern the Android application. We’ll discuss them in the next section.
12.5.4. PHP mobile integration code
When the Android application runs the RefreshJobs Activity, the server side generates an XML stream. Without going into excessive detail on the server-side code, we explain the getjoblist.php file in the following listing.
Listing 12.20. getjoblist.php
<?
require('db.php'),
require('utils.php'),
$theuser = $_GET['identifier'];
print (getJobsXML($theuser));
?>
The getJobsXML function retrieves data from the database and formats each row into an XML representation. It wraps the list of XML-wrapped job records in the <joblist> tags along with the <?xml ...> header declaration to generate the expected XML structure used by the Android application. Remember, this is the data ultimately parsed by the SAX-based JobListHandler class, as shown in listing 12.11.
The other transaction that’s important to our Android field service application is the closejob.php file, examined in the next listing.
Listing 12.21. closejob.php
<?
require('db.php'),
require('utils.php'),
$data = file_get_contents('php://input'),
$jobid = $_GET['jobid'];
$f = fopen("~/pathtofiles/sigs/".$jobid.".jpg","w");
fwrite($f,$data);
fclose($f);
print(closeJob($_GET['jobid']));
?>
The POSTed image data is read via the file_get_contents() function. The secret is the special identifier of php://input. This is the equivalent of a binary read. This data is read into a variable named $data. The jobid is extracted from the query String. The image file is written out to a directory that contains signatures as JPEG files, keyed by the jobid as part of the filename. When a job has been closed and the signature is requested by the Android application, this file is requested in the Android browser. The closeJob function (implemented in utils.php) updates the database to mark the selected job as CLOSED.
That wraps up the review of the source code for this chapter’s sample application.
12.6. Summary
The intent of the sample application was to tie together many things learned in previous chapters into a composite application. Our field service application has real-world applicability to the kind of uses an Android device is capable of bringing to fruition. Is this sample application production ready? Of course not, but almost! That, as they say, is an exercise for the reader.
Starting with a simple splash screen, this application demonstrates the use of Handlers and displaying images stored in the resources section of an Android project. Moving along to the main screen, a simple UI leads to different activities useful for launching various aspects of the realistic application.
Communications with the server involve downloading XML data, while showing the user a ProgressDialog along the way. Once the data stream commences, the data is parsed by the SAX XML parser, using a custom Handler to navigate the XML document.
We demonstrated that managing jobs in a ListView is as easy as tapping on the desired job in the list. The next screen, the ShowJobs Activity, allows even more functionality, with the ability to jump to a Map showing the location of the job and even a specific product information page customized to this job. Both of those functions are as simple as preparing an Intent and a call to startActivity().
Once the mobile technician completes the job in the field, the CloseJob Activity brings the touch-screen elements into play by allowing the user to capture a signature from his customer. That digital signature is then stamped with additional, contextual information and transmitted over the internet to prove the job was done. Jumping back to what you learned earlier, it would be straightforward to add location-based data to further authenticate the captured signature.
The chapter wrapped up with a quick survey of the server-side components to demonstrate some of the steps necessary to tie the mobile and the server sides together.
The sample application is hosted on the internet and is free for you to test out with your own Android application, and the full source code is provided for the Android and server applications discussed in this chapter.
Now that we’ve shown what can be accomplished when exercising a broad range of the Android SDK, the next chapter takes a decidedly different turn, as we explore the underpinnings of Android a little deeper and look at building native C applications for the Android platform.