
Chapter 5. Storing and retrieving data
- Storing and retrieving data with SharedPreferences
- Using the filesystem
- Working with a SQLite database
- Accessing and building a ContentProvider
Android provides several ways to store and share data, including access to the file-system, a local relational database through SQLite, and a preferences system that allows you to store simple key/value pairs within applications. In this chapter, we’ll start with preferences and you’ll create a small sample application to exercise those concepts. From there, you’ll create another sample application to examine using the filesystem to store data, both internal to our application and external using the platform’s Secure Digital (SD) card support. You’ll also see how to create and access a database.
Beyond the basics, Android also allows applications to share data through a clever URI-based approach called a ContentProvider. This technique combines several other Android concepts, such as the URI-based style of intents and the Cursor result set seen in SQLite, to make data accessible across different applications. To demonstrate how this works, you’ll create another small sample application that uses built-in providers, then we’ll walk through the steps required to create your own ContentProvider.
We’ll begin with preferences, the simplest form of data storage and retrieval Android provides.
5.1. Using preferences
If you want to share simple application data from one Activity to another, use a SharedPreferences object. You can save and retrieve data, and also choose whether to make preferences private to your application or accessible to other applications on the same device.
5.1.1. Working with SharedPreferences
You access a SharedPreferences object through your current Context, such as the Activity or Service. Context defines the method getSharedPreferences(String name, int accessMode) that allows you to get a preferences handle. The name you specify will be the name for the file that backs these preferences. If no such file exists when you try to get preferences, one is automatically created. The access mode refers to what permissions you want to allow.
The following listing demonstrates allowing the user to input and store data through SharedPreferences objects with different access modes.
Listing 5.1. Storing SharedPreferences using different modes


After you have a SharedPreferences variable ![]() , you can acquire a reference through the Context
, you can acquire a reference through the Context ![]() . Note that for each SharedPreferences object we get, we use a different constant value for the access mode, and in some cases we also add modes
. Note that for each SharedPreferences object we get, we use a different constant value for the access mode, and in some cases we also add modes ![]() . We repeat this coding for each mode we retrieve. Modes specify whether the preferences should be private, world-readable,
or world-writable.
. We repeat this coding for each mode we retrieve. Modes specify whether the preferences should be private, world-readable,
or world-writable.
To modify preferences, you must get an Editor handle ![]() . With the Editor, you can set String, boolean, float, int, and long types as key/value pairs
. With the Editor, you can set String, boolean, float, int, and long types as key/value pairs ![]() . This limited set of types can be restrictive, but often preferences are adequate, and they’re simple to use.
. This limited set of types can be restrictive, but often preferences are adequate, and they’re simple to use.
After storing with an Editor, which creates an in-memory Map, you have to call commit() to persist it to the preferences backing file ![]() . After data is committed, you can easily get it from a SharedPreferences object. The following listing gets and displays the data that was stored in listing 5.1.
. After data is committed, you can easily get it from a SharedPreferences object. The following listing gets and displays the data that was stored in listing 5.1.
Listing 5.2. Getting SharedPreferences data stored in the same application

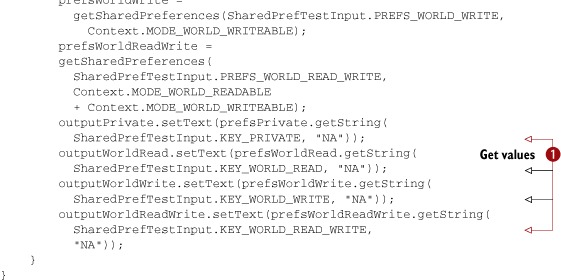
To retrieve previously stored values, we again declare variables and assign references. When these are in place, we can get
values using methods such as getString(String key, String default) ![]() . The default value is returned if no data was previously stored with that key.
. The default value is returned if no data was previously stored with that key.
Setting and getting preferences is straightforward. Access modes, which we’ll focus on next, add a little more complexity.
5.1.2. Preference access permissions
You can open and create SharedPreferences with any combination of several Context mode constants. Because these values are int types, you can add them, as in listings 5.1 and 5.2, to combine permissions. The following mode constants are supported:
- Context.MODE_PRIVATE (value 0)
- Context.MODE_WORLD_READABLE (value 1)
- Context.MODE_WORLD_WRITEABLE (value 2)
These modes allow you to tune who can access this preference. If you take a look at the filesystem on the emulator after you’ve created SharedPreferences objects (which themselves create XML files to persist the data), you can see how setting permissions works using a Linux-based filesystem.
Figure 5.1 shows the Android Eclipse plug-in File Explorer view. Within the explorer, you can see the Linux-level permissions for the SharedPreferences XML files that we created from the SharedPreferences in listing 5.1.
Figure 5.1. The Android File Explorer view showing preferences file permissions

Each Linux file or directory has a type and three sets of permissions, represented by a drwxrwxrwx notation. The first character indicates the type (d means directory, -means regular file type, and other types such as symbolic links have unique types as well). After the type, the three sets of rwx represent the combination of read, write, and execute permissions for user, group, and world, in that order. Looking at this notation, we can tell which files are accessible by the user they’re owned by, by the group they belong to, or by everyone else on the device. Note that the user and group always have full permission to read and write, whereas the final set of permissions fluctuates based on the preference’s mode.
Android puts SharedPreferences XML files in the /data/data/PACKAGE_NAME/shared_prefs path on the filesystem. An application or package usually has its own user ID. When an application creates files, including SharedPreferences, they’re owned by that application’s user ID. To allow other applications to access these files, you have to set the world permissions, as shown in figure 5.1.
In Android, each package directory is created with the world x permission. This permission means anyone can search and list the files in the directory, which means that Android packages have directory-level access to one another’s files. From there, file-level access determines file permissions.
If you want to access another application’s files, you must know the starting path. The path comes from the Context. To get files from another application, you have to know and use that application’s Context. Android doesn’t officially condone sharing preferences across multiple applications; in practice, apps should use a content provider to share this kind of data. Even so, looking at SharedPreferences does show the underlying data storage models in Android. The following listing shows how to get the SharedPreferences we set in listing 5.1 again, this time from a different application (different .apk and different package).
Listing 5.3. Getting SharedPreferences data stored in a different application


To get one application’s SharedPreferences from another application’s package ![]() , we use the createPackageContext(String contextName, int mode) method
, we use the createPackageContext(String contextName, int mode) method ![]() . When we have the other application’s Context, we can use the same names for the SharedPreferences objects that the other application created to access those preferences
. When we have the other application’s Context, we can use the same names for the SharedPreferences objects that the other application created to access those preferences ![]() .
.
With these examples, we now have one application that sets and gets SharedPreferences, and a second application with a different .apk file that gets the preferences set by the first. The composite screen shot shown in figure 5.2 shows what the apps look like. NA indicates a preference we couldn’t access from the second application, either as the result of permissions that were set or because no permissions had been created.
Figure 5.2. Two separate applications getting and setting SharedPreferences

Though SharedPreferences are ultimately backed by XML files on the Android filesystem, you can also directly create, read, and manipulate files, as we’ll discuss in the next section.
5.2. Using the filesystem
Android’s filesystem is based on Linux and supports mode-based permissions. You can access this filesystem in several ways. You can create and read files from within applications, you can access raw resource files, and you can work with specially compiled custom XML files. In this section, we’ll explore each approach.
5.2.1. Creating files
Android’s stream-based system of manipulating files will feel familiar to anyone who’s written I/O code in Java SE or Java ME. You can easily create files in Android and store them in your application’s data path. The following listing demonstrates how to open a FileOutputStream and use it to create a file.
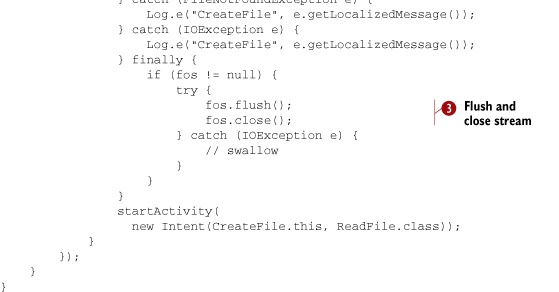
Listing 5.4. Creating a file in Android from an Activity

Android provides a convenience method on Context to get a FileOutputStream—namely openFileOutput(String name, int mode) ![]() . Using this method, you can create a stream to a file. That file will ultimately be stored at the data/data/[PACKAGE_NAME]/files/file.name
path on the platform. After you have the stream, you can write to it as you would with typical Java
. Using this method, you can create a stream to a file. That file will ultimately be stored at the data/data/[PACKAGE_NAME]/files/file.name
path on the platform. After you have the stream, you can write to it as you would with typical Java ![]() . After you’re finished with a stream, you should flush and close it to clean up
. After you’re finished with a stream, you should flush and close it to clean up ![]() .
.
Reading from a file within an application context (within the package path of the application) is also simple; in the next section we’ll show you how.
5.2.2. Accessing files
Similarly to openFileOutput, the Context also has a convenience openFileInput method. You can use this method to access a file on the filesystem and read it in, as shown in the following listing.
Listing 5.5. Accessing an existing file in Android from an Activity

For input, you use openFileInput(String name, int mode) to get the stream ![]() , and then read the file into a byte array as with standard Java
, and then read the file into a byte array as with standard Java ![]() . Afterward, close the stream properly to avoid hanging on to resources.
. Afterward, close the stream properly to avoid hanging on to resources.
With openFileOutput and openFileInput, you can write to and read from any file within the files directory of the application package you’re working in. Also, as we discussed in the previous section, you can access files across different applications if the permissions allow it and if you know the package used to obtain the full path to the file.
Occasionally, setting the user ID of your application can be extremely useful. For instance, if you have multiple applications that need to share data with one another, but you also don’t want that data to be accessible outside that group of applications, you might want to make the permissions private and share the UID to allow access. You can allow a shared UID by using the sharedUserId attribute in your manifest: android:sharedUserId="YourID".
In addition to creating files from within your application, you can push and pull files to the platform using the adb tool, described in section 2.2.3. The File Explorer window in Eclipse provides a UI for moving files on and off the device or simulator. You can optionally put such files in the directory for your application; when they’re there, you can read these files just like you would any other file. Keep in mind that outside of development-related use, you won’t usually push and pull files. Rather, you’ll create and read files from within the application or work with files included with an application as a raw resource, as you’ll see next.
5.2.3. Files as raw resources
If you want to include raw files with your application, you can do so using the res/raw resources location. We discussed resources in general in chapter 3. When you place a file in the res/raw location, it’s not compiled by the platform, but is available as a raw resource, as shown in the following listing.
Listing 5.6. Accessing a noncompiled raw file from res/raw

Accessing raw resources closely resembles accessing files. You open a handle to an InputStream ![]() . You call Context.getResources() to get the Resources for your current application’s context, and then call openRawResource(int id) to link to the particular item you want
. You call Context.getResources() to get the Resources for your current application’s context, and then call openRawResource(int id) to link to the particular item you want ![]() . Android will automatically generate the ID within the R class if you place your asset in the res/raw directory. You can use any file as a raw resource, including text, images, documents,
or videos. The platform doesn’t precompile raw resources.
. Android will automatically generate the ID within the R class if you place your asset in the res/raw directory. You can use any file as a raw resource, including text, images, documents,
or videos. The platform doesn’t precompile raw resources.
The last type of file resource we need to discuss is the res/xml type, which the platform compiles into an efficient binary type accessed in a special manner.
5.2.4. XML file resources
The term XML resources sometimes confuses new Android developers. XML resources might mean resources in general that are defined in XML—such as layout files, styles, arrays, and the like—or it can specifically mean res/xml XML files.
In this section, we’ll deal with res/xml XML files. These files are different from raw files in that you don’t use a stream to access them because they’re compiled into an efficient binary form when deployed. They’re different from other resources in that they can be of any custom XML structure.
To demonstrate this concept, we’re going to use an XML file named people.xml that defines multiple <person> elements and uses attributes for firstname and lastname. We’ll grab this resource and display its elements in last-name, first-name order, as shown in figure 5.3.
Figure 5.3. The example ReadXMLResourceFile Activity that we’ll create in listing 5.8, which reads a res/xml resource file

Our data file for this process, which we’ll place in res/xml, is shown in the following listing.
Listing 5.7. A custom XML file included in res/xml
<people>
     <person firstname="John" lastname="Ford" />
     <person firstname="Alfred" lastname="Hitchcock" />
     <person firstname="Stanley" lastname="Kubrick" />
     <person firstname="Wes" lastname="Anderson" />
</people>
If you’re using Eclipse, it’ll automatically detect a file in the res/xml path and compile it into a resource asset. You can then access this asset in code by parsing its binary XML, as shown in the following listing.
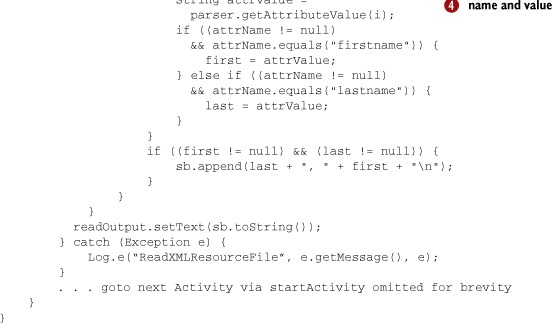
Listing 5.8. Accessing a compiled XML resource from res/xml

To process a binary XML resource, you use an XmlPullParser ![]() . This class supports SAX-style tree traversal. The parser provides an event type for each element it encounters, such as
DOCDECL, COMMENT, START_DOCUMENT, START_TAG, END_TAG, END_DOCUMENT, and so on. By using the next() method, you can retrieve the current event type value and compare it to event constants in the class
. This class supports SAX-style tree traversal. The parser provides an event type for each element it encounters, such as
DOCDECL, COMMENT, START_DOCUMENT, START_TAG, END_TAG, END_DOCUMENT, and so on. By using the next() method, you can retrieve the current event type value and compare it to event constants in the class ![]() . Each element encountered has a name, a text value, and an optional set of attributes. You can examine the document contents
by getting the attributeCount
. Each element encountered has a name, a text value, and an optional set of attributes. You can examine the document contents
by getting the attributeCount ![]() for each item and grabbing each name and value
for each item and grabbing each name and value ![]() . SAX is covered in more detail in chapter 13.
. SAX is covered in more detail in chapter 13.
In addition to local file storage on the device filesystem, you have another option that’s more appropriate for certain types of content: writing to an external SD card filesystem.
5.2.5. External storage via an SD card
One of the advantages the Android platform provides over some other smartphones is that it offers access to an available SD flash memory card. Not every Android device will necessarily have an SD card, but almost all do, and the platform provides an easy way for you to use it.
To work with an SD card image in the Android emulator, you’ll first need to use the mksdcard tool provided to set up your SD image file (you’ll find this executable in the tools directory of the SDK). After you’ve created the file, you’ll need to start the emulator with the -sdcard <path_to_file> option in order to have the SD image mounted. Alternately, use the Android SDK Manager to create a new virtual device and select the option to create a new SD card.
Generally, you should use the SD card if you use large files such as images and video, or if you don’t need to have permanent secure access to certain files. On the other hand, for permanent application-specialized data, you should use the internal filesystem.
The SD card is removable, and SD card support on most devices (including Android-powered devices) supports the File Allocation Table (FAT) ) filesystem. The SD card doesn’t have the access modes and permissions that come from the Linux file-system.
Using the SD card is fairly basic. The standard java.io.File and related objects can create, read, and remove files on the external storage path, typically /sdcard, assuming it’s available. You can acquire a File for this location by using the method Environment.getExternalStorageDirectory(). The following listing shows how to check that the SD card’s path is present, create another subdirectory inside, and then write and subsequently read file data at that location.
Listing 5.9. Using standard java.io.File techniques with an SD card


We first define a name for the file to create ![]() . In this example, we append a timestamp to create a unique name each time this example application runs. After we have the
filename, we create a File object reference to the removable storage directory
. In this example, we append a timestamp to create a unique name each time this example application runs. After we have the
filename, we create a File object reference to the removable storage directory ![]() . From there, we create a File reference to a new subdirectory, /sdcard/unlocking_android
. From there, we create a File reference to a new subdirectory, /sdcard/unlocking_android ![]() . The File object can represent both files and directories. After we have the subdirectory reference, we call mkdir() to create it if it doesn’t already exist.
. The File object can represent both files and directories. After we have the subdirectory reference, we call mkdir() to create it if it doesn’t already exist.
With our directory structure in place, we follow a similar pattern to create the actual file. We instantiate a reference File object ![]() , and then call createFile() to create a file on the filesystem. When we have the File and know it exists and that we’re allowed to write to it, we use a FileOutputStream to write data into the file
, and then call createFile() to create a file on the filesystem. When we have the File and know it exists and that we’re allowed to write to it, we use a FileOutputStream to write data into the file ![]() .
.
After we create the file and have data in it, we create another File object with the full path to read the data back ![]() . With the File reference, we then create a File-InputStream and read back the data that was earlier stored in the file
. With the File reference, we then create a File-InputStream and read back the data that was earlier stored in the file ![]() .
.
As you can see, working with files on the SD card resembles standard java.io.File code. A fair amount of boilerplate Java code is required to make a robust solution, with permissions and error checking every step of the way, and logging about what’s happening, but it’s still familiar and powerful. If you need to do a lot of File handling, you’ll probably want to create some simple local utilities for wrapping the mundane tasks so you don’t have to repeat them over and over again. You might want to use or port something like the Apache commons.io package, which includes a File-Utils class that handles these types of tasks and more.
The SD card example completes our exploration of the various ways to store different types of file data on the Android platform. If you have static predefined data, you can use res/raw; if you have XML files, you can use res/xml. You can also work directly with the filesystem by creating, modifying, and retrieving data in files, either in the local internal filesystem or on the SD card, if one is available.
A more complex way to deal with data—one that supports more robust and specialized ways to persist information—is to use a database, which we’ll cover in the next section.
5.3. Persisting data to a database
Android conveniently includes a built-in relational database.[1] SQLite doesn’t have all the features of larger client/server database products, but it includes everything you need for local data storage. At the same time, it’s quick and relatively easy to work with.
1 Check out Charlie Collins’ site for Android SQLLite basics: http://www.screaming-penguin.com/node/7742.
In this section, we’ll cover working with the built-in SQLite database system, from creating and querying a database to upgrading and working with the sqlite3 tool available in the adb shell. We’ll demonstrate these features by expanding the WeatherReporter application from chapter 4. This application uses a database to store the user’s saved locations and persists user preferences for each location. The screenshot shown in figure 5.4 displays the saved data that the user can select from; when the user selects a location, the app retrieves information from the database and shows the corresponding weather report.
Figure 5.4. The WeatherReporter Saved Locations screen, which pulls data from a SQLite database

We’ll start by creating WeatherReporter’s database.
5.3.1. Building and accessing a database
To use SQLite, you have to know a bit about SQL in general. If you need to brush up on the background of the basic commands, such as CREATE, INSERT, UPDATE, DELETE, and SELECT, then you might want to take a look at the SQLite documentation at http://www.sqlite.org/lang.html.
For now, we’ll jump right in and build a database helper class for our application. You need to create a helper class so that the details concerning creating and upgrading the database, opening and closing connections, and running through specific queries are all encapsulated in one place and not otherwise exposed or repeated in your application code. Your Activity and Service classes can use simple get and insert methods, with specific bean objects representing your model, rather than database-specific abstractions such as the Android Cursor object. You can think of this class as a miniature Data Access Layer (DAL).
The following listing shows the first part of our DBHelper class, which includes a few useful inner classes.
Listing 5.10. Portion of the DBHelper class showing the DBOpenHelper inner class
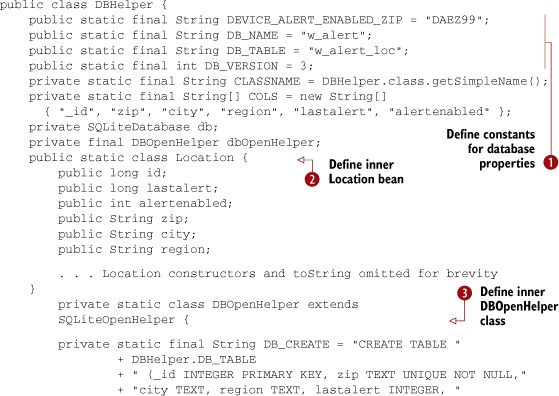
Within our DBHelper class, we first create constants that define important values for the database we want to work with, such as its name, version,
and table ![]() . Then we show several inner classes that we created to support the WeatherReporter application.
. Then we show several inner classes that we created to support the WeatherReporter application.
The first inner class is a simple Location bean that represents a user’s selected location ![]() . This class intentionally doesn’t provide accessors and mutators, because these add overhead and we don’t expose the class
externally. The second inner class is a SQLiteOpenHelper implementation
. This class intentionally doesn’t provide accessors and mutators, because these add overhead and we don’t expose the class
externally. The second inner class is a SQLiteOpenHelper implementation ![]() .
.
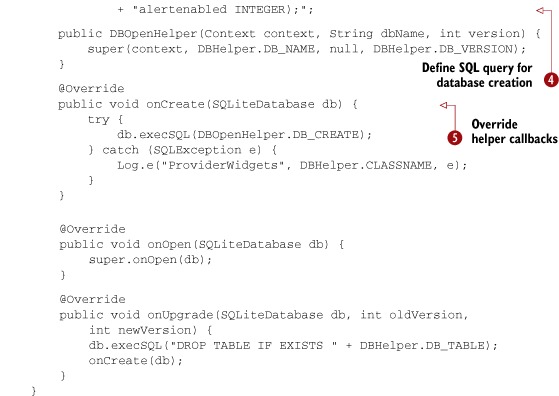
Our DBOpenHelper inner class extends SQLiteOpenHelper, which Android provides to help with creating, upgrading, and opening databases. Within this class, we include a String that represents the CREATE query we’ll use to build our database table; this shows the exact columns and types our table will have ![]() . We also implement several key SQLiteOpenHelper callback methods
. We also implement several key SQLiteOpenHelper callback methods ![]() , notably onCreate and onUpgrade. We’ll explain how these callbacks are invoked in the outer part of our DBHelper class, which is shown in the following listing.
, notably onCreate and onUpgrade. We’ll explain how these callbacks are invoked in the outer part of our DBHelper class, which is shown in the following listing.
Listing 5.11. Portion of the DBHelper class showing convenience methods


Our DBHelper class contains a member-level variable reference to a SQLiteDatabase object, as you saw in listing 5.10. We use this object as a workhorse to open database connections, to execute SQL statements, and more.
In the constructor, we instantiate the DBOpenHelper inner class from the first part of the DBHelper class listing ![]() . Inside the establishDb method, we use dbOpen-Helper to call openDatabase with the current Context, database name, and database version
. Inside the establishDb method, we use dbOpen-Helper to call openDatabase with the current Context, database name, and database version ![]() . db is established as an instance of SQLiteDatabase through DBOpenHelper.
. db is established as an instance of SQLiteDatabase through DBOpenHelper.
Although you can also just open a database connection directly on your own, using the open helper in this way invokes the provided callbacks and makes the process easier. With this technique, when you try to open your database connection, it’s automatically created, upgraded, or just returned, through your DBOpenHelper. Though using a DBOpenHelper requires a few extra steps up front, it’s extremely handy when you need to modify your table structure. You can simply increment the database’s version number and take appropriate action in the onUpgrade callback.
Callers can invoke the cleanup method ![]() when they pause, in order to close connections and free up resources.
when they pause, in order to close connections and free up resources.
After the cleanup method, we include the raw SQL convenience methods that encapsulate our helper’s operations. In this class, we have methods
to insert, update, delete, and get data ![]() . We also have a few additional specialized get and getAll methods
. We also have a few additional specialized get and getAll methods ![]() . Within these methods, you can see how to use the db object to run queries. The SQLiteDatabase class itself has many convenience methods, such as insert, update, and delete, and it provides direct query access that returns a Cursor over a result set.
. Within these methods, you can see how to use the db object to run queries. The SQLiteDatabase class itself has many convenience methods, such as insert, update, and delete, and it provides direct query access that returns a Cursor over a result set.
You can usually get a lot of mileage and utility from basic uses of the SQLiteDatabase class. The final aspect for us to explore is the sqlite3 tool, which you can use to manipulate data outside your application.
Unlike the SharedPreferences you saw earlier, you can’t make a database WORLD_READABLE. Each database is accessible only by the package in which it was created. If you need to pass data across processes, you can use AIDL/Binder (as in chapter 4) or create a ContentProvider (as we’ll discuss in section 5.4), but you can’t use a database directly across the process/package boundary.
5.3.2. Using the sqlite3 tool
When you create a database for an application in Android, it creates files for that database on the device in the /data/data/[PACKAGE_NAME]/database/db.name location. These files are SQLite proprietary, but you can manipulate, dump, restore, and work with your databases through these files in the adb shell by using the sqlite3 tool.
Data Permissions
Most devices lock down the data directory and will not allow you to browse their content using standalone tools. Use sqlite3 in the emulator or on a phone with firmware that allows you to access the /data/data directory.
You can access this tool by issuing the following commands on the command line. Remember to use your own package name; here we use the package name for the WeatherReporter sample application:
cd [ANDROID_HOME]/tools
adb shell
sqlite3 /data/data/com.msi.manning.chapter4/databases/w_alert.db
When you’re in the shell and see the # prompt, you can then issue sqlite3 commands. Type .help to get started; if you need more help, see the tool’s documentation at http://www.sqlite.org/sqlite.html. Using the tool, you can issue basic commands, such as SELECT or INSERT, or you can go further and CREATE or ALTER tables. Use this tool to explore, troubleshoot, and to .dump and .load data. As with many command-line SQL tools, it takes some time to get used to the format, but it’s the best way to back up or load your data. Keep in mind that this tool is available only through the development shell; it’s not something you can use to load a real application with data.
Now that we’ve shown you how to use the SQLite support provided in Android, you can do everything from creating and accessing tables to investigating databases with the provided tools in the shell. Now we’ll examine the last aspect of handling data on the platform, building and using a ContentProvider.
5.4. Working with ContentProvider classes
A ContentProvider in Android shares data between applications. Each application usually runs in its own process. By default, applications can’t access the data and files of other applications. We explained earlier that you can make preferences and files available across application boundaries with the correct permissions and if each application knows the context and path. This solution applies only to related applications that already know details about one another. In contrast, with a ContentProvider you can publish and expose a particular data type for other applications to query, add, update, and delete, and those applications don’t need to have any prior knowledge of paths, resources, or who provides the content.
The canonical ContentProvider in Android is the contacts list, which provides names, addresses, and phone numbers. You can access this data from any application by using the correct URI and a series of methods provided by the Activity and ContentResolver classes to retrieve and store data. You’ll learn more about ContentResolver as we explore provider details. One other data-related concept that a ContentProvider offers is the Cursor, the same object we used previously to process SQLite database result sets.
In this section, you’ll build another application that implements its own ContentProvider and includes a similar explorer-type Activity to manipulate that data.
Note
For a review of content providers, please see chapter 1. You can also find a complete example of working with the Contacts content provider in chapter 15.
To begin, we’ll explore the syntax of URIs and the combinations and paths used to perform different types of operations with the ContentProvider and ContentResolver classes.
5.4.1. Using an existing ContentProvider
Each ContentProvider exposes a unique CONTENT_URI that identifies the content type it’ll handle. This URI can query data in two forms, singular or plural, as shown in table 5.1.
Table 5.1. ContentProvider URI variations for different purposes
|
URI |
Purpose |
|---|---|
| content://food/ingredients/ | Return List of all ingredients from the provider registered to handle content://food |
| content://food/meals/ | Return List of all meals from the provider registered to handle content://food |
| content://food/meals/1 | Return or manipulate single meal with ID 1 from the provider registered to handle content://food |
A provider can offer as many types of data as it likes. By using these formats, your application can either iterate through all the content offered by a provider or retrieve a specific datum of interest.
The Activity class has a managedQuery method that makes calls into registered ContentProvider classes. When you create your own ContentProvider in section 5.4.2, we’ll show you how a provider is registered with the platform. Each provider is required to advertise the CONTENT_URI it supports. To query the contacts provider, you have to know this URI and then get a Cursor by calling managedQuery. When you have the Cursor, you can use it, as we showed you in listing 5.11.
To obtain a Cursor reference, you can also use the managedQuery method of the Activity class. The activity automatically cleans up any managed Cursor objects when your Activity pauses and restarts them when it starts. If you just need to retrieve data within an Activity, you’ll want to use a managed Cursor, as opposed to a ContentResolver.
A ContentProvider typically supplies all the details of the URI and the types it supports as constants in a class. In the android.provider package, you can find classes that correspond to built-in Android content providers, such as the MediaStore. These classes have nested inner classes that represent types of data, such as Audio and Images. Within those classes are additional inner classes, with constants that represent fields or columns of data for each type. The values you need to query and manipulate data come from the inner classes for each type.
When you use a ContentProvider to make a query, you get only the current state of the data. The data could change after your call, so how do you stay up to date? To receive notifications when a Cursor changes, you can use the ContentObserver API. ContentObserver supports a set of callbacks that trigger when data changes. The Cursor class provides register and unregister methods for Content-Observer objects.
For additional information, see the android.provider package in the Javadocs, which lists all the built-in providers. Now that we’ve covered a bit about using a provider, we’ll look at the other side of the coin—creating a ContentProvider.
5.4.2. Creating a ContentProvider
In this section, you’ll build a provider that handles data responsibilities for a generic Widget object you’ll define. This simple object includes a name, type, and category; in a real application, you could represent any type of data.
To start, define a provider constants class that declares the CONTENT_URI and MIME_TYPE your provider will support. In addition, you can place the column names your provider will handle here.
Defining a Content_URI and Mime_Type
In the following listing, as a prerequisite to extending the ContentProvider class for a custom provider, we define necessary constants for our Widget type.
Listing 5.12. WidgetProvider constants, including columns and URI
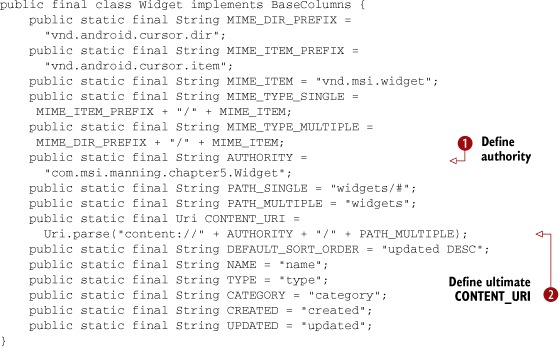
In our Widget-related provider constants class, we first extend the BaseColumns class. Now our class has a few base constants, such as _ID. Next, we define the MIME_TYPE prefix for a set of multiple items and a single item. By convention, vnd.android.cursor.dir represents multiple items, and vnd.android.cursor.item represents a single item. We can then define a specific MIME item and combine it with the single and multiple paths to create two MIME_TYPE representations.
After we have the MIME details out of the way, we define the authority ![]() and path for both single and multiple items that will be used in the CONTENT_URI that callers pass in to use our provider. Callers will ultimately start from the multiple-item URI, so we publish this one
and path for both single and multiple items that will be used in the CONTENT_URI that callers pass in to use our provider. Callers will ultimately start from the multiple-item URI, so we publish this one
![]() .
.
After taking care of all the other details, we define column names that represent the variables in our Widget object, which correspond to fields in the database table we’ll use. Callers will use these constants to get and set specific fields. Now we’re on to the next part of the process, extending ContentProvider.
Extending Contentprovider
The following listing shows the beginning of our ContentProvider implementation class, WidgetProvider. In this part of the class, we do some housekeeping relating to the database we’ll use and the URI we’re supporting.
Listing 5.13. The first portion of the WidgetProvider ContentProvider

Our provider extends ContentProvider, which defines the methods we’ll need to implement. We use several database-related constants to define the database name
and table we’ll use ![]() . After that, we include a UriMatcher, which we’ll use to match types, and a projection Map for field names.
. After that, we include a UriMatcher, which we’ll use to match types, and a projection Map for field names.
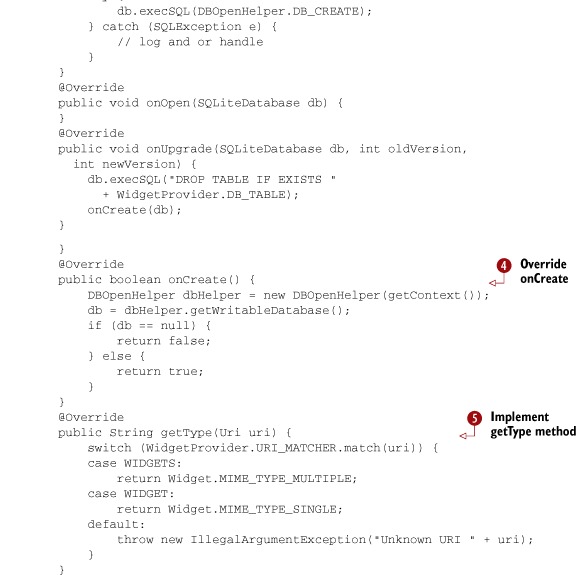
We include a reference to a SQLiteDatabase object; we’ll use this to store and retrieve the data that our provider handles ![]() . We create, open, or upgrade the database using a SQLiteOpenHelper in an inner class
. We create, open, or upgrade the database using a SQLiteOpenHelper in an inner class ![]() . We’ve used this helper pattern before, when we worked directly with the database in listing 5.10. In the onCreate method, the open helper sets up the database
. We’ve used this helper pattern before, when we worked directly with the database in listing 5.10. In the onCreate method, the open helper sets up the database ![]() .
.
After our setup-related steps, we come to the first method ContentProvider requires us to implement, getType ![]() . The provider uses this method to resolve each passed-in Uri to determine whether it’s supported. If it is, the method checks which type of data the current call is requesting. The data
might be a single item or the entire set.
. The provider uses this method to resolve each passed-in Uri to determine whether it’s supported. If it is, the method checks which type of data the current call is requesting. The data
might be a single item or the entire set.
Next, we need to cover the remaining required methods to satisfy the Content-Provider contract. These methods, shown in the following listing, correspond to the CRUD-related activities: query, insert, update, and delete.
Listing 5.14. The second portion of the WidgetProvider ContentProvider


The last part of our WidgetProvider class shows how to implement the Content-Provider methods. First, we use a SQLQueryBuilder inside the query method to append the projection map passed in ![]() and any SQL clauses, along with the correct URI based on our matcher
and any SQL clauses, along with the correct URI based on our matcher ![]() , before we make the actual query and get a handle on a Cursor to return
, before we make the actual query and get a handle on a Cursor to return ![]() .
.
At the end of the query method, we use the setNotificationUri method to watch the returned Uri for changes ![]() . This event-based mechanism keeps track of when Cursor data items change, regardless of who changes them.
. This event-based mechanism keeps track of when Cursor data items change, regardless of who changes them.
Next, you see the insert method, where we validate the passed-in ContentValues object and populate it with default values, if the values aren’t present ![]() . After we have the values, we call the database insert method
. After we have the values, we call the database insert method ![]() and get the resulting Uri to return with the appended ID of the new record
and get the resulting Uri to return with the appended ID of the new record ![]() . After the insert is complete, we use another notification system, this time for ContentResolver. Because we’ve made a data change, we inform the ContentResolver what happened so that any registered listeners can be updated
. After the insert is complete, we use another notification system, this time for ContentResolver. Because we’ve made a data change, we inform the ContentResolver what happened so that any registered listeners can be updated ![]() .
.
After completing the insert method, we come to the update ![]() and delete
and delete ![]() methods. These methods repeat many of the previous concepts. First, they match the Uri passed in to a single element or the set, and then they call the respective update and delete methods on the database object. Again, at the end of these methods, we notify listeners that the data has changed.
methods. These methods repeat many of the previous concepts. First, they match the Uri passed in to a single element or the set, and then they call the respective update and delete methods on the database object. Again, at the end of these methods, we notify listeners that the data has changed.
Implementing the needed provider methods completes our class. After we register this provider with the platform, any application can use it to query, insert, update, or delete data. Registration occurs in the application manifest, which we’ll look at next.
Provider Manifests
Content providers must be defined in an application manifest file and installed on the platform so the platform can learn that they’re available and what data types they offer. The following listing shows the manifest for our provider.
Listing 5.15. WidgetProvider AndroidManifest.xml file
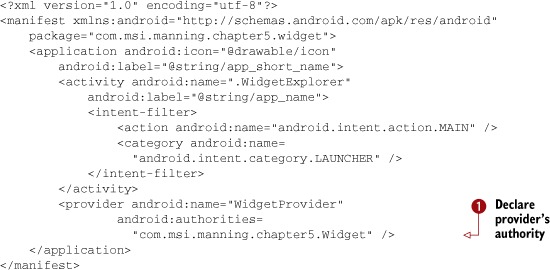
The <provider> element ![]() defines the class that implements the provider and associates a particular authority with that class.
defines the class that implements the provider and associates a particular authority with that class.
A completed project that supports inserting, retrieving, updating, and deleting records rounds out our exploration of using and building ContentProvider classes. And with that, we’ve also now demonstrated the ways to locally store and retrieve data on the Android platform.
The properties of a ContentProvider can configure several important settings beyond the basics, such as specific permissions, initialization order, multiprocess capability, and more. Though most ContentProvider implementations won’t need to delve into these details, you should still keep them in mind. For complete and up-to-date ContentProvider properties, see the SDK documentation.
5.5. Summary
From a simple SharedPreferences mechanism to file storage, databases, and finally the concept of a ContentProvider, Android provides myriad ways for applications to retrieve and store data.
As we discussed in this chapter, several storage types can share data across application and process boundaries, and several can’t. You can create SharedPreferences with a permissions mode, allowing the flexibility to keep things private, or to share data globally with read-only or read-write permissions. The filesystem provides more flexible and powerful data storage for a single application.
Android also provides a relational database system based on SQLite. Use this lightweight, speedy, and capable system for local data persistence within a single application. To share data, you can still use a database, but you need to expose an interface through a ContentProvider. Providers expose data types and operations through a URI-based approach.
In this chapter, we examined each of the data paths available to an Android application. You built several small, focused sample applications to use preferences and the filesystem, and you expanded the WeatherReporter sample application that you began in the last chapter. This Android application uses a SQLite database to access and persist data. You also built your own custom content provider from the ground up.
To expand your Android horizons beyond data, we’ll move on to general networking in the next chapter. We’ll cover networking basics and the networking APIs Android provides. We’ll also expand on the data concepts we’ve covered in this chapter to use the network itself as a data source.