
Chapter 15. Integration
This chapter covers
- Manipulating and extending Android contacts
- Managing multiple accounts
- Synchronizing data to a remote server
No phone is an island. A mobile smartphone’s primary purpose is to connect with others, whether through voice calls, email, text messaging, or some other way of reaching out. But phones have historically acted like islands when it came to storing information. You might painstakingly save phone numbers for years on your device, only to lose everything and start all over again when you switched phones.
Android leads the charge in breaking away from the old device-centric way of storing contacts and related data. Like all of Google’s services, Android looks to the cloud as a vast storage location for all your data. Integration allows your phone to stay in sync with what you care about, so you don’t need to manually copy doctors’ appointments and important emails from multiple computers to your phone.
For the most part, Android users can feel happily oblivious to much of this; everything “just works.” As a developer, you may want to take advantage of Android’s integration features and add new conveniences for your users. This chapter shows exactly how Android handles personal data such as contacts, how accounts work, what synchronization does, and what hooks you can play with. Along the way, we’ll build a real-world example: a plug-in that allows people to automatically sync their Android contacts with connections they’ve made on LinkedIn. LinkedIn is the social network most closely associated with business users, who use it to maintain their professional contacts. Synchronizing with this account will allow users to connect with their LinkedIn colleagues, making their information available anytime and anywhere.
15.1. Understanding the Android contact model
Contacts have long been the single most important feature on a mobile phone. After all, a phone exists to call people, and you don’t want to memorize the 10-digit phone number for every person you might call.
If you’ve owned mobile phones for a long time, you’ve probably noticed a gradual increase in the functionality of mobile contact applications. In the early days, people could only enter a name and a single phone number, similar to a speed-dial on a land-line phone. Modern phones allow you to enter multiple numbers for each contact, as well as email addresses, photos, birthdays, and more. Not only does this provide greater convenience to consumers, who now can turn to a single source for all related information about a person; it also opens up many new opportunities for application developers, who can take advantage of the wealth of information on a phone to make their apps more useful and relevant.
Android has always offered access to a user’s contacts, but its contact model has changed through different versions. The model is now extremely robust and flexible, offering great features for querying and updating contact information.
15.1.1. Choosing open-ended records
Imagine that you just got a new phone and started entering contacts. You entered three names and phone numbers. The final result would look something like figure 15.1. From a user’s perspective, you have all that you need. But how is this data being stored?
Figure 15.1. Making entries in the native Contacts application

In older phones, the underlying contact model might result in something similar to figure 15.2. This fixed-length record would dedicate a predetermined number of bytes to each contact. Such an approach had hard limits: for example, you might only be allowed 10 digits per phone number, 12 characters per name, and 500 records per device. This led to both undesirable truncation and wasted space.
Figure 15.2. Fixed-length storage records

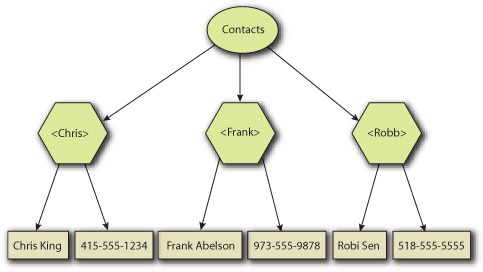
In addition to the problem of truncation, you can see that this style of contact storage doesn’t allow the user to add new types of data. Figure 15.2 shows that there’s no space between Chris and Frank to insert a mailing address or job title. Fortunately, Android uses a database to store its contact data, so the storage looks more like figure 15.3. Each contact is a collection of related data, and each piece of data can be as short or as long as it needs to be. Contacts can omit the data that they don’t require. These are called open-ended records: records can be freely extended to include previously unknown pieces of data.
Figure 15.3. Open-ended storage records
Given these limitations, you might wonder why anyone would’ve adopted fixed-length records in the first place. They do have the advantage of being fast. Because each record is the same length, the phone can immediately jump to the exact location in memory where, say, the 42nd record starts, without needing to search for it.
When phones had extremely limited processors and slow flash memory, this design allowed for a much speedier experience. Now that phones have gotten faster, OS designers can afford to be more flexible.
You can see exactly how the data is stored by querying the contacts database. See chapter 5 if you need a review of using the sqlite3 tool, with which we’ll query the tables that were created when adding the initial three contacts. In figure 15.4, we connect to the sqlite database stored at /data/data/com.android.providers.contacts/databases/contacts2.db. Querying the data table returns the individual pieces of contact information on the device. The contacts table includes individual contact entities. Joining these two tables results in the information visible in the contacts application.
Figure 15.4. Querying the contacts database

Android’s contacts are highly extensible because they’re stored as records in a database. Third-party applications can choose to define and add their own enhanced data fields. For example, a business application may include employee ID numbers, and a gaming application may use online handles. Other phone platforms require developers to maintain parallel data stores to add this kind of data, but Android allows you to insert directly into the main contacts database. This leads to much better consistency, and your enhanced information will automatically be updated when the user renames or deletes a contact.
15.1.2. Dealing with multiple accounts
Most Android phones require users to activate the device and associate it with a Google account. Upon activation, all of the user’s existing Gmail contacts will be available on the phone. This is convenient for people who keep all their information on Gmail, but not terribly useful for people who have multiple accounts or don’t want to use Gmail at all.
The early versions of Android were hampered by this problem, but fortunately, the new Android contact model offers a richer set of features that includes support for multiple accounts. Users still must generally tie the phone to a Google account, but they may also connect with a Microsoft Exchange[1] account for business contacts and email, with Facebook for friends’ statuses, and possibly other private accounts as well.
1 For information on Microsoft Exchange Server development technologies, go to http://www.outlookcode.com/archive0/d/exstech.htm.
Using multiple accounts offers great convenience but also greater complications. Consider the following issues:
- Differing data— Each account will support disparate types of data. For example, Facebook may offer an Instant Messaging screen name, whereas Exchange may provide a contact’s supervisor.
- Different formats— Even if the same type of data is supported by multiple accounts, it may display differently. For example, one account may return a phone number as (415) 555-1234, whereas another returns it as 4155551234.
- Consolidation— Having multiple accounts isn’t very convenient if you need to search through three versions of each contact to find the one with the information you need. Instead, you want to have a single contact that includes data from all your accounts.
- Linkage— On a related note, the phone needs some way to determine when two different accounts are referring to the same entity. If one refers to “James Madison” and the other to “Jim Madison,” a human could guess that they refer to the same contact, but software requires some more information to determine how they link together.
- Ownership— Some contacts may only appear on one account, whereas others may be listed in several. When you change a contact, you want to be sure they’re updated appropriately.
Android resolves these issues gracefully. Each account stores its data in separate rows in the contacts database. The raw_contacts table contains all the contacts that have been received from all of the user’s accounts, including potentially duplicate contacts. Table 15.1 shows a hypothetical view of a device’s contacts.
Table 15.1. Raw contacts including duplicates from multiple accounts
|
ID |
Name |
|
Phone number |
Status |
|---|---|---|---|---|
| 1 | James Madison | [email protected] | ||
| 2 | Adam Smith | [email protected] | ||
| 3 | James Madison | 2024561414 | “Negotiating with the British...” | |
| 4 | Adam Smith | [email protected] | +442055512345 |
Note
As you’ve seen, the actual contacts data fields will reside in the data table. The raw_contacts table allows you to associate the various rows in the data table with their corresponding accounts.
Splitting out the accounts’ views like this gives Android a great deal of flexibility. Whenever a piece of data is updated, it knows where that data originally came from. It can store data in the format most appropriate to the original account. And, because each account gets its own set of rows, no account can mess up the data that originally came from another account. This type of loose coupling extends a familiar Android philosophy to the world of contacts and provides the same sorts of benefits that you’ve seen elsewhere: more extensibility, stability, and transparency, at the cost of greater complication.
15.1.3. Unifying a local view from diverse remote stores
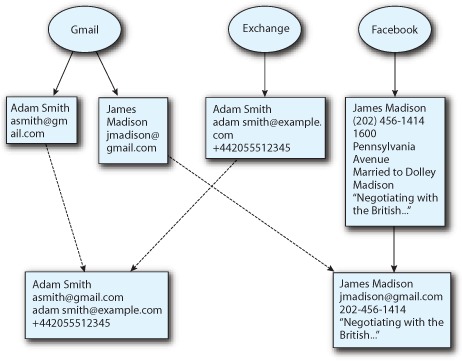
Storing raw contact data from each account makes architectural sense, but by itself it’d lead to a horrible user experience. If you had five accounts, you might have five separate entries for the same person, which would lead to extra complications whenever you wanted to call her. You want to have just one contact entry for each “real” contact you have, no matter how many accounts they’re associated with. Android provides exactly this utility.
Figure 15.5 shows how Android consolidates the information received from multiple accounts. In this example, the user has two contacts that are spread across three remote accounts. In the first phase, contacts are retrieved from each account. Next, Android will associate the matching accounts and consolidate each into a single logical contact. The raw contact data remains on the device, but the user will see and interact with the consolidated contact.
Figure 15.5. Combining raw contact data into unique contacts
This process works well but isn’t perfect. Android may require additional help to recognize that two contacts refer to the same person; sometimes it may mistakenly combine two records when it should’ve kept them separate. Fortunately, because Android never removes the raw contact data, you can easily join and separate accounts at any time, as shown in figure 15.6. This updates the contacts table and either creates or deletes a row there, but will leave raw_contacts untouched.
Figure 15.6. Joining and separating contacts
Caution
Android currently doesn’t offer a way to specify what name should be used after joining two records. You may get lucky, or you may be stuck with the wrong one.
15.1.4. Sharing the playground
With all the flexibility of Android’s new contact model comes potential for abuse. A single consolidated database holds all contacts information on the device, and any application can read from or write to it. Users must give apps permission before modifying the database, but within the database, there’s no notion of particular columns or rows being “owned” by a particular app or service.
When you write apps that use contacts data, try to be a good citizen. This includes the following principles:
- Only read and write Android’s built-in data fields and fields that you’ve created for your application.
- Be sure to provide unique types for new contact data that you define, such as vnd.manning.cursor.item/birthday instead of birthday.
- Always ask users for permission before doing anything destructive to their data.
- Clearly state if and how your app uses their personal contact data.
- If you store contact data taken from the user, be certain it’s well secured. You don’t want to be responsible for addresses falling into the hands of spammers or identity thieves.
Not only does upholding these standards garner good karma, but it also keeps your users happy and more likely to use your app.
15.2. Getting started with LinkedIn
You’ll build a sample app throughout the rest of this chapter that illustrates the concepts and techniques we’ve covered. To learn how contacts, accounts, and synchronizers all work together, you’ll build a plug-in for LinkedIn.[2]
2 Check out the LinkedIn blog for developers: http://blog.linkedin.com/category/linkedin-developer-network/.
Like most social networking sites, LinkedIn offers a developer API for building custom applications on top of their platform. To protect against abuse, LinkedIn requires the use of a developer API key with each request; this allows the company to shut off an app if it’s found to be misbehaving. You can get started developing with LinkedIn by following these steps:
1. Go to http://developer.linkedin.com.
2. Follow the links to request an API key for the LinkedIn APIs.
3. Fill in your information and join the Developer Network. You’ll need to create a LinkedIn profile if you don’t already have one.
4. Add a new application. There’s no charge, and you should automatically receive your API keys.
Once you receive your API key, take a look at the documentation available at http://developer.linkedin.com. LinkedIn also maintains a fairly active developer community in forums hosted at the same site if you need advice or want to see what the experts are saying.
Create a new Eclipse project called LinkedIn. The following listing shows a simple class called LinkedIn that holds useful constants you’ll use later.
Listing 15.1. Constants for LinkedIn

The MIME_TYPE refers to the new type of data you’ll be adding to contacts. With this information, Android will be able to distinguish between a contact’s LinkedIn data and data received from other sources. In the next section, you’ll use this type to insert new LinkedIn records. The other constants will be useful in later sections as you begin to connect with the LinkedIn server.
The LinkedIn docs describe how to use their API. You can follow this to implement your app, but you’ll be taking advantage of the linkedin-j project. Written by Nabeel Siddiqui, it comes under a generous Apache 2 license and provides a simple, logical wrapper around the raw API calls. Visit the project page at http://code.google.com/p/linkedin-j. Once you’ve downloaded the JAR files, add them as external JARs to your Java project.
While you’re doing the initial setup, let’s define all the strings for this application in strings.xml, based on the following listing. Most will be used by the login UI activity, but some will be used for other user-visible data.
Listing 15.2. Externalized strings for LinkedIn
<?xml version="1.0" encoding="utf-8"?>
<resources>
  <string name="app_name">LinkedInAdapter</string>
  <string name="login_activity_email_label">Email Address</string>
  <string name="login_activity_instructions">Please click the
    button below to log in to LinkedIn.</string>
  <string name="remoteLogin">Log In Online</string>
  <string name="login_activity_pin_label">PIN</string>
  <string name="login_activity_ok_button">Sign in</string>
  <string name="empty_fields_error">Please enter your email
    address and password.</string>
  <string name="start_login_error">Unable to connect to LinkedIn.
    Please verify your network connection and try again later.</string>
  <string name="login_fail_error">Login failed.
    Please click Log In Online and get a new PIN.</string>
  <string name="working">Finishing authentication.
    Please wait...</string>
  <string name="login_label">LinkedIn Login</string>
  <string name="contact_summary">LinkedIn</string>
  <string name="auth_token_label">LinkedIn</string>
</resources>
15.3. Managing contacts
Now that you understand the purpose behind Android’s contact model, it’s time to start interacting with it. Many applications can be improved by plugging into a user’s contacts. The degree of integration that you need, though, will differ depending on the type of app you’re writing. This section looks at three increasingly complex ways to hook into the phone’s contacts.
15.3.1. Leveraging the built-in contacts app
Why reinvent the wheel? Android’s engineers have spent the time and effort to build an attractive and familiar contacts app. In many cases, it’s quicker and better to just use that app when you need a contact.
As you’d expect, you communicate with the native contacts app by using an Intent. The platform will respond to an ACTION_PICK request by bringing the list of contacts to the foreground, allowing the user to select a single contact, and then returning that selection to your application. You specify that you want to select a contact by requesting the android.provider.ContactsContract.Contacts.CONTENT_URI data type.
Note
The ContactsContract class and all related classes were introduced during the overhaul of the contacts model in Android 2.0. You may occasionally see legacy code that uses the android.provider.Contacts class for interacting with contacts. This usage is deprecated; though it works, it won’t properly handle information from non-Google accounts.
After the user selects a contact, the response returns to your activity’s onActivity-Result method. You can query this result to pull out information such as the contact’s name and ID, as shown in the following listing from a class called ContactPicker.
Listing 15.3. Selecting a contact from the native contacts app

If you inspect the data returned by this cursor, you’ll notice that it doesn’t contain everything that you might expect from a contact. For example, though it includes fields for the name and photo, it won’t include any email addresses or phone numbers. As you saw in section 15.1.1, the open-ended style of contact record storage in Android requires contact data to be stored in a separate table from the actual contacts. Table 15.2 illustrates one hypothetical contacts table.
Table 15.2. The contacts table holds minimal information about each contact.
|
Contact ID |
Contact name |
|---|---|
| 1 | Chris King |
| 2 | Frank Ableson |
| 3 | Robi Sen |
When you pick a contact, you’ve found the entry in the first table; you can then use that contact ID as a foreign key to retrieve the extended data that you want. Table 15.3 shows the corresponding detailed information from the data table.
Table 15.3. The data table holds extended information for contacts.
|
Data ID |
Data type |
Contact ID |
Data value |
|---|---|---|---|
| 1 | 4 | 1 | 415-555-1234 |
| 2 | 1 | 1 | [email protected] |
| 3 | 4 | 2 | 973-555-9876 |
| 4 | 4 | 3 | 518-555-5555 |
To retrieve the email address for a selected contact, you look up the contact’s ID, and then use that ID in a new query against the data table. For convenience, the most useful data types have definitions in classes within the ContactsContract.CommonDataKinds class. For email, you can use CommonDataKinds.Email, which provides the URI and column names. The following listing expands listing 15.3 by making a new database query to determine whether the selected contact has an email address.
Listing 15.4. Retrieving email information for a selected contact

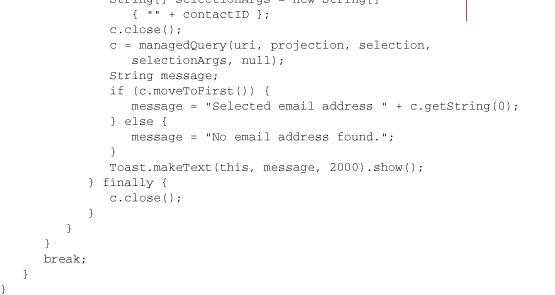
If you run this code, you’ll see a Toast with either a selected email address or a graceful error message. Please review chapter 8 if you’d like a reminder of how Toast objects work. The data table is open-ended, so a user may have multiple email addresses. Depending on the needs of your application, you could choose to iterate through all of them or only pick one, as shown in this example.
You can adopt this technique to retrieve any other data about a contact selected by the user. Browse the classes within ContactsContract.CommonDataKinds for natively supported fields, or use custom fields added by your own application.
An Android contact is a transient thing. Users may join different contacts together, split them apart, or delete them altogether. As such, you should avoid holding onto a contact ID for a long time and using it in future queries. If you need to retain a long-lived reference to a contact, such as a list of the user’s gaming buddies, then instead of the contact ID you should use the lookup key, which is a column defined by ContactsContract.Contacts.LOOKUP_KEY. The lookup key will continue to work even if the user joins or separates the contact.
But using the lookup key is slower than the contact ID, so if speed is critical in your application, you may want to keep both the contact ID and the lookup key, and only use the lookup key if retrieving by ID fails.
15.3.2. Requesting operations from your app
Now that we’ve retrieved contact data from the native app, let’s see how to edit that data. You’ll often want to use the native contact app to perform edits, because users are comfortable and familiar with this interface.
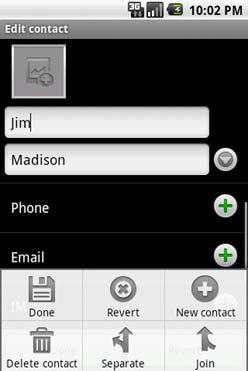
To create a new contact, use Intent.ACTION_INSERT. By itself this will pop open an empty contact for the user to fill out, which isn’t terribly useful. Most often, you’ll have some pieces of information about a new contact and ask the user to supply the rest. For example, your app might retrieve screen names and email addresses from a social networking service. You could fill out these portions of the contact ahead of time and let the user finish adding the person’s name in the native contacts app. Figure 15.7 shows a prepopulated contacts screen that was generated by an application.
Figure 15.7. Partially complete contact requested by application

Listing 15.5 shows how to generate this sort of screen. The fields that you can optionally prepopulate are available as static fields in the ContactsContract.Intents.Insert convenience class.
Listing 15.5. Adding a contact using the native contacts app

To edit a contact, request Intent.ACTION_EDIT. But unlike creating or picking a contact, when editing a contact you need a reference to a specific person. You could retrieve one by launching the picker, but that’s needlessly cumbersome. Instead, query for a particular contact, and then use its returned ID to launch the edit activity, as shown in the next listing.
Listing 15.6. Looking up a contact by name and then editing it

Note
You can’t insert new values into an existing contact in the same way that you can for a new contact. Any Intent extra fields will be ignored. Instead, use the techniques in the next section to edit the contact manually, and then display the updated contact for the user to further edit and approve.
15.3.3. Directly reading and modifying the contacts database
In many situations you want to take advantage of the built-in contacts app. But other times you should bypass it entirely and operate on the data itself. For example, your app might perform batch operations on a large number of contacts; it’d be tedious for the user to manually approve each individual change. Contact information is ultimately just another type of content stored on the phone, and you can use existing tools to look up and manipulate content.
You may have noticed that no special permissions were required to insert or edit contacts through the native application. This is because your application isn’t directly modifying the data itself; it’s merely issuing a request. But if you want to directly modify contact data, you’ll need to secure the android.permission.WRITE_CONTACTS permission in your app’s manifest.
You can retrieve the relevant URIs through queries such as those shown in listing 15.6, or by using the convenience definitions included under the ContactsContract class. Instead of retrieving a Cursor to enumerate results, use the ContentResolver class to manipulate data. Listing 15.7 demonstrates how to perform a conditional global replacement across all email addresses in the user’s contacts list. Specifically, it’ll find all addresses that contain the phrase waste and replace them with a concealed address.
Listing 15.7. Updating contact information using a ContentResolver
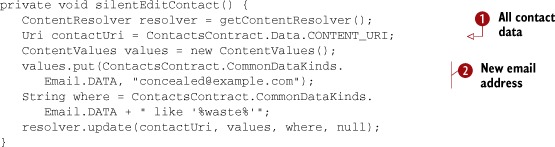
In this example, the Uri ![]() operates across all information for all contacts on the device. This is essential because we’re updating the data associated
with a contact; the ContactsContract.Contacts.CONTENT_URI only refers to basic contact information without extended data. The ContentValues
operates across all information for all contacts on the device. This is essential because we’re updating the data associated
with a contact; the ContactsContract.Contacts.CONTENT_URI only refers to basic contact information without extended data. The ContentValues ![]() describes the new information to place within the contacts. By itself, this would replace the email for every contact on
the device, which would be very destructive. The selection clause limits the update so it only applies to addresses containing
this string.
describes the new information to place within the contacts. By itself, this would replace the email for every contact on
the device, which would be very destructive. The selection clause limits the update so it only applies to addresses containing
this string.
Caution
Few things will anger users quicker than wrecking their contact data. If your app directly creates, edits, or deletes contact data, you should clearly explain to users what it does, and test thoroughly to ensure your app behaves itself.
This is only one example of how to directly modify contact data, but combined with the earlier discussions in this chapter, you should now be able to change any contact data. You only need to find where the information is stored in the data table, find or describe the rows that need to be modified, then use ContentResolver to insert or update your data.
15.3.4. Adding contacts
Our LinkedIn app begins with people. In addition to standard information such as contacts’ names, LinkedIn includes expanded details such as their educational background and work history. You’ll take advantage of Android’s open-ended contact model to store a unique type of data, the LinkedIn headline. The headline is a brief and punchy summary of someone’s role, such as “Code Ninja” or “Senior Director at Stationary Networks.”
To create a LinkedIn contact, you’ll make a new entry in the raw_contacts table, and also create any new data fields for that contact. The following listing shows a utility class that accepts LinkedIn-style data and either creates a new record or updates an existing record.
Listing 15.8. Helper class for storing LinkedIn connections


Because you’re performing multiple insertions at a time, we use a batch operation ![]() to wrap all the tasks involved. This operation performs more quickly and has the added benefit of protecting against partially
updated records if an error occurs midway through processing.
to wrap all the tasks involved. This operation performs more quickly and has the added benefit of protecting against partially
updated records if an error occurs midway through processing.
The DATA1 field ![]() refers to custom data. Android defines many similar columns, such as DATA1, DATA2, DATA3, and so on. Each new type of contact
data can decide for itself how it wants to define and interpret its data. In our example, you’re placing the headline in the
first available data slot. For more complex fields such as structured names, you can use the various data fields to store
multiple components such as first and last names.
refers to custom data. Android defines many similar columns, such as DATA1, DATA2, DATA3, and so on. Each new type of contact
data can decide for itself how it wants to define and interpret its data. In our example, you’re placing the headline in the
first available data slot. For more complex fields such as structured names, you can use the various data fields to store
multiple components such as first and last names.
Now that you can create contacts, you need to tell the native Contacts app how to display LinkedIn data. This is done through a custom XML file, shown in the following listing.
Listing 15.9. contacts.xml

Google hasn’t documented this file well, but fortunately there isn’t too much to know. The code in ![]() helps the Contacts app find the rows in the data table that correspond to LinkedIn. The icon to display in Contacts and the
summary column help users identify this type of data. Finally, the detail column describes the information unique to this
contact. In our case, this is the headline.
helps the Contacts app find the rows in the data table that correspond to LinkedIn. The icon to display in Contacts and the
summary column help users identify this type of data. Finally, the detail column describes the information unique to this
contact. In our case, this is the headline.
15.4. Keeping it together
People get calls all day long on their office phones at work and on their mobile phones. They have personal friends, business contacts, and fellow alumni. They belong to Facebook, LinkedIn, and Bebo. They have dental appointments, choir recitals, and quarterly reports.
Today’s mobile phone users are caught in a dilemma. On one hand, they want a single point of contact that handles all their information for them; why carry a pager, a scheduler, a phone, and a little black address book, when you can have it all in one smartphone? On the other hand, they want to compartmentalize their information. Most people like to keep their work and personal email accounts separate, and may not want friends on one social network to see friends on another network.
Android manages this tricky balancing act through the use of multiple accounts, as described in section 15.1.2. By understanding how accounts are managed and kept up-to-date, you’ll be able to build powerful apps that smoothly fulfill your users’ expectations.
15.4.1. The dream of sync
If you’ve ever changed email providers, you’ve probably experienced the pain of transferring your data. Copying old email manually is a cumbersome process, and transferring your address book isn’t much easier.
A similar problem constantly happens today with accounts that have multiple terminals. When you send and receive Gmail from your desktop, laptop, and phone, you expect the same emails to be visible everywhere. But if you use a POP3 email program from an ISP, emails might only be seen from the computer that sent them. When the same information is available in multiple places, we say that it’s synchronized. Synchronization refers to the process of ensuring that the most up-to-date information is available on all terminals.
Software developers have been trying to solve the synchronization problem for decades, and though they’ve gotten closer, it continues to be a tricky problem. A single master repository should hold the definitive view of a user’s information, such as their calendar. Users generally won’t directly interact with this repository; instead, they’ll use other programs to create calendar events and receive event reminders. If the user creates an event in one program, it must also display on the other. Figure 15.8 shows how this process is handled for Google accounts. All devices connect to the cloud, which stores all the data. When a user creates an event on her phone, it’s transferred to her remote calendar. The next time the user connects to the calendar with her desktop browser, she receives the event.
Figure 15.8. Synchronizing data across multiple terminals

Because mobile devices have unreliable network connections, the system needs to be extremely robust in the event of failure. If network synchronization fails, as in figure 15.9, the device will be responsible for retrying at a later time until it succeeds. Each provider will follow its own strategy for syncing, depending on the data being transferred. For example, in some situations the provider will want to abort all transferred data if the connection is interrupted; in other cases, the provider will accept the data that was already transmitted, and wait to receive the rest later.
Figure 15.9. Retrying a synchronization operation after initial failure

Try to keep this as transparent to the user as possible. Things should “just work”: emails sent on one device should display on another without any effort involved. Because of the complexity involved in synchronization, though, there are many ways for synching to fail, which can lead to baffling results. By seeing what’s happening behind the scenes, you’ve gained insight into detecting and handling these kinds of errors.
15.4.2. Defining accounts
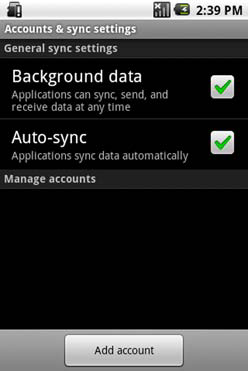
Section 15.1.2 described how Android handles multiple sets of contacts by creating separate accounts for each set. Users can manually manage their contacts by visiting Accounts, which is usually available as a menu option within the native Contacts activity. Figure 15.10 shows where to add and manage accounts.
Figure 15.10. Managing accounts
So what, exactly, is an account? An account combines your identity information, such as a login and password, with associated data, such as contacts and email.
Because accounts store their contact data separately from one another in the raw_contacts table, they can be toggled on and off without affecting unrelated information. For example, if you leave a company, you can remove all your former colleagues without worrying about destroying your personal data. You can create your own type of account by providing three components.
Service
Android will use accounts to retrieve the user’s remote information while running in the background, so a service will wrap all of the account’s actions.
Ibinder
The binder will service requests for this type of account, such as adding a new account, authenticating the user, or storing credentials. You can create an appropriate binder by extending AbstractAccountAuthenticator.
Activity
Users will need to enter their information to authenticate with their accounts. Different accounts may have differing requirements; for example, some may require the use of a key phrase, selecting a picture, or entering a soft crypto token. Because Android can’t provide a generic UI to cover all possible types of authentication, each account must implement an activity that extends AccountAuthenticatorActivity to present the user with a login screen and handle the results. You’ll see examples of all three components in section 15.5.
15.4.3. Telling secrets: The AccountManager service
Earlier versions of Android only had native support for a single Google account. Developers did write apps for other account types, such as Exchange, but these solutions were isolated and inconsistent. Each developer needed to rewrite from scratch the system for logging in to an account and managing the user’s data. Even worse, there were no enforceable standards for managing users’ secret data, such as passwords.
Android 2.0 fixed this problem by adding a new service called AccountManager. AccountManager provides a consistent and uniform means for interacting with all the accounts registered on a device, including adding and removing accounts or modifying their security. AccountManager also provides a single and secure storage facility for private user credentials; by using this service, your app is released from the burden of protecting the user’s secrets.
Each account can define whatever types of information are necessary to authenticate the user. Typically, this will include the following:
- Login name— The unique identifier for the user, such as [email protected].
- Password— A secret string, known to the user, which verifies that he is the owner of this account.
- Authentication token— A transient string, known to the account but generally not to the user, which demonstrates that the user has successfully logged in to the account. Often referred to as an auth token, this string frees the user from the need to manually type the password every time she wishes to connect with the account, and saves the server from performing additional, time-consuming authentications. An auth token is usually valid for a limited amount of time, and must occasionally be refreshed by performing a full login.
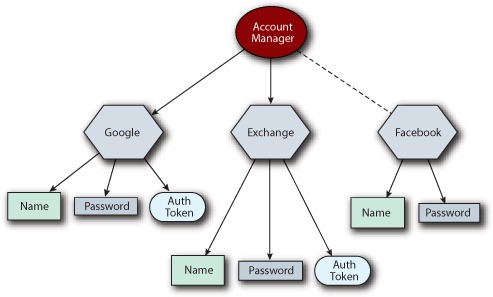
All of this data is stored and managed by AccountManager, as shown in figure 15.11. In this example, the user already has two active accounts on his device, which are currently authenticated. A third account can be added by providing the relevant account details, in this case a name and password. Once verified by AccountManager, this account will be accessible like the others.
Figure 15.11. Managing multiple accounts
Caution
Many permissions are required for implementing accounts. Be sure to claim the MANAGE_ACCOUNTS permission if your app will be creating or modifying accounts, and the AUTHENTICATE_ACCOUNTS permission for managing passwords and auth tokens. Many other permissions may be required as well, including GET_ACCOUNTS, USE_CREDENTIALS, and WRITE_SETTINGS. Most applications that provide new accounts will eventually require all of these and more. See a complete list in the sample manifest near the end of this chapter.
15.5. Creating a LinkedIn account
From a user’s perspective, connecting to LinkedIn looks simple. You just type in your email address and password, and you get access. Behind the scenes, though, a lot more is going on, particularly when connecting from a third-party application. No fewer than seven tokens are involved as part of the authentication process, and all must be handled correctly before you can start requesting data. This isn’t unique to LinkedIn, and learning how to navigate the LinkedIn authentication process will equip you well for handling almost any authentication scheme.
15.5.1. Not friendly to mobile
To protect against people viewing others’ private information, LinkedIn requires each user of a third-party app to sign in to their account through the LinkedIn portal. Once they do, LinkedIn returns two authentication tokens that’ll be included in all future requests. LinkedIn wrote its API assuming that developers would write web applications. The web app will redirect the user to the official LinkedIn login page, and LinkedIn will return the user to a URL specified by the developer once the login is complete.
But this system doesn’t work well for other platforms such as desktop and mobile applications. LinkedIn has no way of passing the authentication token directly to your app, so you must jump through extra hoops to obtain this necessary information.
15.5.2. Authenticating to LinkedIn
Fortunately, Android’s AccountManager system provides a perfect solution to circumvent this problem. You can use the custom login Activity to guide the user through the process of authenticating with LinkedIn, and then securely store the tokens for all future requests. LinkedIn is unusual in that it actually returns two auth tokens, both a public one and a secret version. Android’s AccountManager is robust and extensible enough to accept arbitrary data beyond the traditional username/password/authtoken combo, and so the complexity of authenticating with LinkedIn can be hidden.
The UI will contain a few important sections. An email address will uniquely identify the account. The activity will contain a link to the LinkedIn login page where the user can remotely authenticate. After she gets her secure token, it can be entered back into the login page to finish the authentication process.
You start by defining the UI, which will look like figure 15.12. The layout XML for this listing is available online on the website for this book.
Figure 15.12. Login screen for LinkedIn account

Next, you write the main Activity for our application, shown in the following listing. In addition to configuring the UI, it manages the two-stage process of authenticating against LinkedIn. This activity is responsible for many details; only the most important are printed here, but you can view the entire class in the download from this book’s website.
Listing 15.10. Login activity initialization and authentication


Android always shows this screen when adding a new account; additionally, it’ll display if the account later fails to sync
due to an expired auth token or other security error. As such, instance variables ![]() keep track of the reason for displaying the activity. Here you use OAuth variables
keep track of the reason for displaying the activity. Here you use OAuth variables ![]() to store the initially provided challenge tokens so you can send them to LinkedIn during the final stages of login. The linkedin-j APIs allow you to write terser and clearer code than would be possible with the raw LinkedIn APIs, which are more web services
oriented.
to store the initially provided challenge tokens so you can send them to LinkedIn during the final stages of login. The linkedin-j APIs allow you to write terser and clearer code than would be possible with the raw LinkedIn APIs, which are more web services
oriented.
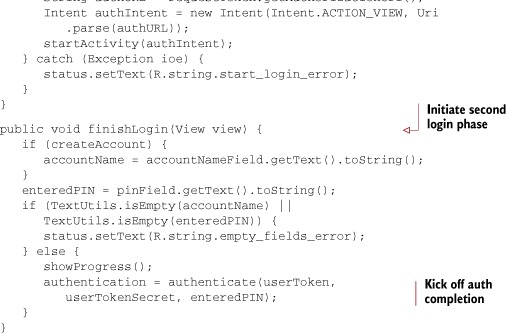
Logging into LinkedIn requires a two-stage process: first, you acquire a PIN number when the user visits the LinkedIn website, and then you use that PIN to complete the authentication. The following listing shows the methods in our Activity that control the handling of this authentication data.
Listing 15.11. Login activity’s multiple stages of logging in

After authentication has finished, you’ll inspect and handle the outcome of the attempt, as shown in this listing. If it succeeds, the token will be stored for future reuse.
Listing 15.12. Login activity responding to completed login attempt
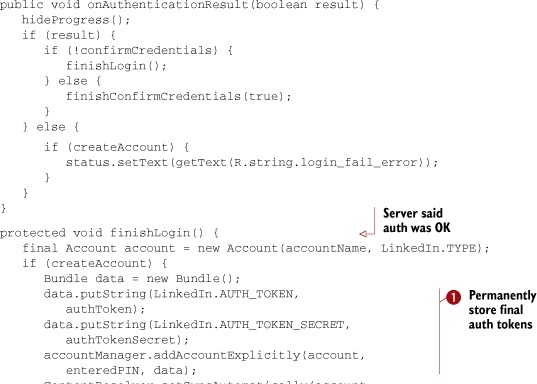
The most important parts of the Activity revolve around the AccountManager, where you store the final auth tokens ![]() . Note that, although you store the PIN as the password field, for LinkedIn you never touch the user’s actual password; the
auth tokens are the important pieces.
. Note that, although you store the PIN as the password field, for LinkedIn you never touch the user’s actual password; the
auth tokens are the important pieces.
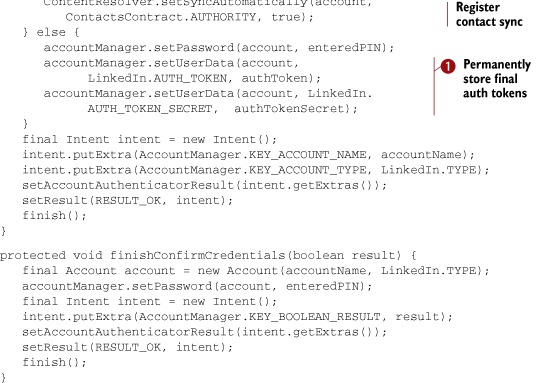
Next comes an AccountAuthenticator, shown in listing 15.13, which handles the final stages of authenticating against LinkedIn and actually creates the Android account. Most of the actions of an authenticator are boilerplate, so only the most relevant portions are shown here. You can view the entire class online. First come two main entry points that’ll be invoked by the system when adding a new account or confirming that an existing account still has valid credentials.
Listing 15.13. Authenticating against the LinkedIn account


Once again, the linkedin-j classes help clarify the code and take care of some rote bookkeeping tasks. The authenticator will be called in various situations,
including creating a new account and verifying the auth token for an existing account, and so it implements the AbstractAccountAuthenticator methods to support the different entry points. Note, for example, that addAccount ![]() is responsible for launching into the UI activity for creating a new account. Additionally, the authenticator will provide
previously created tokens, as shown in the following listing.
is responsible for launching into the UI activity for creating a new account. Additionally, the authenticator will provide
previously created tokens, as shown in the following listing.
Listing 15.14. Adding support for handling auth token
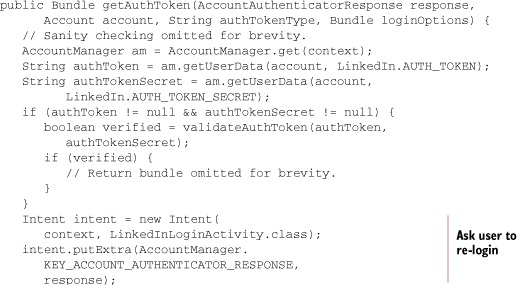

Once the final tokens come back from the server, a dummy API request ![]() ensures that the connection is good. If any problems occur, notify the caller and it can take an appropriate action, such
as showing a notification to the user.
ensures that the connection is good. If any problems occur, notify the caller and it can take an appropriate action, such
as showing a notification to the user.
Because authentication will run in the background, it must be a Service. The next listing shows the lightweight authentication service wrapper, which defers everything to our authenticator.
Listing 15.15. Defining the authentication service
package com.manning.unlockingandroid.linkedin.auth;

import android.app.Service;
import android.content.Intent;
import android.os.IBinder;

public class LinkedInAuthService extends Service {
   private LinkedInAccountAuthenticator authenticator;

   @Override
   public void onCreate() {
      authenticator = new LinkedInAccountAuthenticator(this);
   }

   @Override
   public void onDestroy() {
   }

   @Override
   public IBinder onBind(Intent intent) {
      return authenticator.getIBinder();
   }
}
Finally, the little piece of XML in the next listing will tell Android how to display this type of account in the Manage Accounts screen.
Listing 15.16. authenticator.xml

Caution
Android went to great lengths to separate account authentication and account synchronization; there’s no explicit linkage between the two pieces. But early versions of the OS will react badly if you attempt to create an account that doesn’t have a synchronizer. For example, the Android 2.1 emulator will crash and reboot if you successfully add an account that doesn’t have a matching synchronizer. Future versions of the OS should fix this bug. In the meantime, you may want to wait a bit longer before testing your authentication code.
15.6. Synchronizing to the backend with SyncAdapter
Authenticating an account connects you to the remote server, but by itself does nothing. The real power comes from an account’s ability to synchronize data onto and off of the phone. Android 2.0 added the ability to synchronize custom data from arbitrary accounts.
15.6.1. The synchronizing lifecycle
Synchronizing will generally happen in the background, similarly to authentication. The authenticator and the synchronizer are loosely coupled; the synchronizer will retrieve necessary information from the AccountManager instead of directly from the authenticator. Again, this is done to keep the user’s private information secure.
To perform synchronization, your service should return an IBinder obtained from a class you define that extends AbstractThreadedSyncAdapter. This defines a single method, onPerformSync, which allows you to perform all synching activities.
Tip
Synchronizing operations can differ drastically, depending on what type of data you’re synching. Though most accounts are oriented around personal information, an account could also be used to deliver daily recipes to an application, or to upload usage reports. The authenticator/synchronizer combo is best for situations where a password is required and you want to transfer data silently in the background. In other cases, a standard service would work better.
15.6.2. Synchronizing LinkedIn data
Now that you’ve written an account and utilities for our LinkedIn connections, all that remains is to tie the two together. You can accomplish this with a few final classes for synchronization. The most important is SyncAdapter, shown in this listing.
Listing 15.17. Synchronizing LinkedIn connections to contacts
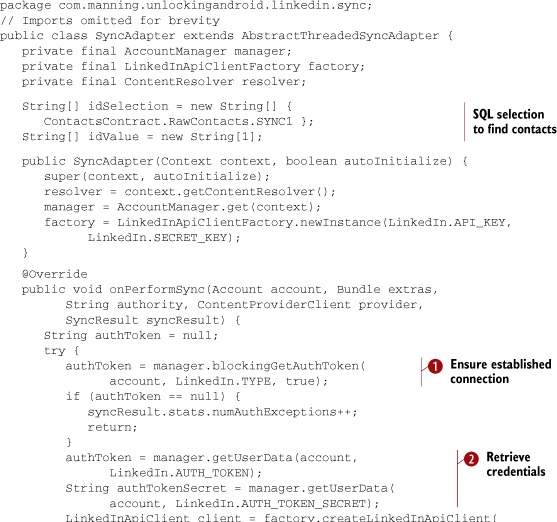

When performing a sync, you first verify a working auth token ![]() , then retrieve the two auth tokens
, then retrieve the two auth tokens ![]() that are needed to interact with LinkedIn. The linkedin-j APIs simplify retrieving and manipulating data model objects for the user’s connections. You iterate through these models
that are needed to interact with LinkedIn. The linkedin-j APIs simplify retrieving and manipulating data model objects for the user’s connections. You iterate through these models
![]() , check to see whether they’re already in your special LinkedIn contacts list
, check to see whether they’re already in your special LinkedIn contacts list ![]() , and then add
, and then add ![]() or update
or update ![]() the contacts as appropriate, using the ContactHelper class from listing 15.8. Android will read the syncResult variable to determine if and why the sync failed; this can cause the OS to prompt the user to reauthenticate if necessary.
the contacts as appropriate, using the ContactHelper class from listing 15.8. Android will read the syncResult variable to determine if and why the sync failed; this can cause the OS to prompt the user to reauthenticate if necessary.
As with authentication, a lightweight wrapper service, shown in the next listing, manages the sync adapter.
Listing 15.18. Defining the synchronization service

And, last but not least, a final piece of XML is shown in the following listing to describe the synchronization service’s capabilities.
Listing 15.19. syncadapter.xml

The content authority tells Android what type of data can be updated by this service; contacts are by far the most common.
The account type ![]() links the synchronizer to its corresponding authenticator. Finally, the XML describes whether the synchronizer supports one-way
downloading only, or whether it also supports uploading changes to data.
links the synchronizer to its corresponding authenticator. Finally, the XML describes whether the synchronizer supports one-way
downloading only, or whether it also supports uploading changes to data.
15.7. Wrapping up: LinkedIn in action
A few final pieces of code will conclude the sample project. A well-designed account seems invisible; once configured, it’ll silently and seamlessly work in the background, pulling in relevant data whenever available. We’ll also discuss a few advanced topics that push the limits of integration.
15.7.1. Finalizing the LinkedIn project
You’ve already written all the code, so all that remains is updating your Android manifest to describe the application’s capabilities. The following listing shows the final pieces.
Listing 15.20. AndroidManifest.xml for LinkedIn
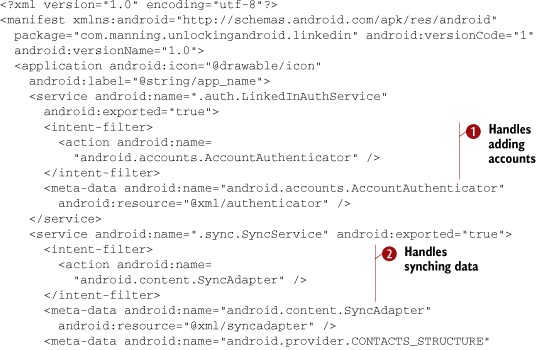

You’ll notice a few new intent-filter definitions for accounts ![]() and synchronizing
and synchronizing ![]() . These prompt Android to display your application as an available account type. You’ll also notice that the manifest pulls
in all of the XML that you previously wrote. Again, these instruct Android how to display custom content within other applications.
Finally, note that the Activity definition
. These prompt Android to display your application as an available account type. You’ll also notice that the manifest pulls
in all of the XML that you previously wrote. Again, these instruct Android how to display custom content within other applications.
Finally, note that the Activity definition ![]() doesn’t include an intent-filter. Users shouldn’t launch this activity themselves; as configured, it can only be started by our own classes that know its
full class name.
doesn’t include an intent-filter. Users shouldn’t launch this activity themselves; as configured, it can only be started by our own classes that know its
full class name.
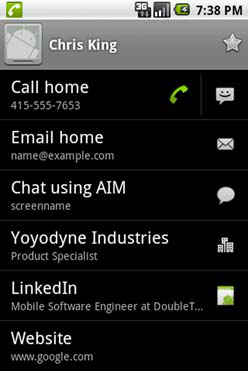
With the manifest in place, you can now run and synchronize against LinkedIn. After you fill in the account details, your existing contacts will begin receiving their headlines, as shown in figure 15.13.
Figure 15.13. A contact with standard and LinkedIn data
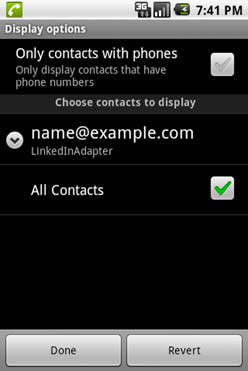
Most people have many more social network connections than they do phone numbers, so you’d expect the size of your contacts list to balloon after synchronizing with LinkedIn. By default, though, Android will only display your primary contacts; in other words, if someone is in both your phonebook and in LinkedIn, they’ll be displayed, but if they only appear in LinkedIn they won’t. You can change this behavior by modifying your contacts display options, as shown in figure 15.14. After making this selection, you’ll see all your LinkedIn contacts.
Figure 15.14. Choosing whether to display all LinkedIn contacts
15.7.2. Troubleshooting tips
Several issues may come up as you develop the LinkedIn app or other integration services. Common items include:
- If you have trouble authenticating, verify that the time on your emulator is correct. Many modern authentication schemes rely on synchronized time settings on the client and server, so if your clock is off by more than a few minutes, the login may fail.
- Because there’s no main activity for this application, selecting Debug from within Eclipse won’t automatically start debugging the application; it’ll only push it to the emulator. To debug, switch to the DDMS tab in Eclipse, select the com.manning.unlockingandroid.linkedin process, and click the Debug button.
- If your process isn’t already running, or you want to try some other debugging tactics, check out the AccountsTester and SyncTester activities included in the Dev Tools application. These can provide useful entry points into your application.
To solve problems with LinkedIn transactions, visit the developer forums or search for information online. Most likely you’re not the only one who’s encountered your problem, and someone else has found a solution. Similar resources exist for other popular types of accounts.
15.7.3. Moving on
Simple can be beautiful. For most users, getting a little of the most relevant LinkedIn information gives them want they want without cluttering up their contact screen. If you’re looking for more, though, consider the following ideas:
- Pull in more advanced LinkedIn fields, such as educational background and previous job positions.
- Tie in contacts data with the Field Service application. For example, you could create a contact when you receive a new job from a customer, and remove that contact once the job is marked complete.
- In addition to the previous, create a new raw_contacts type for a field service contact; this will allow users to toggle such contacts on and off as they wish.
- Create a new account type and synchronizer for connecting with your own favorite online service.
15.8. Summary
Congratulations! You’ve written a fully functional, and fully useful, application that seamlessly brings your LinkedIn connections to Android. Even better, you’ve experienced every piece of the integration puzzle. Android makes no assumptions about what contacts will look like, and offers a pluggable, extensible contacts model that lets developers add their own custom data into the native contacts experience. Users can synchronize their contacts remotely, and Android now supports an arbitrary number of different types of accounts, each of which can follow its own custom authentication scheme and still take advantage of secure storage for its credentials. Synchronization will run in the background, silently delivering useful information to the user.
Integration shows Android’s design principles at their finest. Most modern Android phones have built-in support for accounts such as Microsoft Exchange, but as useful as these are, it’d be limiting to restrict users to approved account types. Instead, Android’s open architecture has created an ecosystem where any type of account, even from a small startup, can enjoy equal standing on the phone. The best compliment you can pay to this kind of software is to say that it’s unnoticeable; great integration apps fade into the background, becoming an essential part of the user’s daily experience.
Now that you’ve integrated with the device’s internal store of contacts, it’s time to turn your focus outward, toward the web browser. Android has an extremely robust browser that supports unusually rich user experiences. The next chapter will help you evaluate your strategies for developing content that’ll look great in the Android browser.