
Chapter 8. Notifications and alarms
This chapter covers
- Building an SMS Notification application
- Working with Toasts
- Working with the NotificationManager
- Using Alarms and the AlarmManager
- Setting an Alarm
Today’s cell phones are expected to be not only phones but personal assistants, cameras, music and video players, and instant-messaging clients, as well as do just about everything else a computer might do. With all these applications running on phones, applications need a way to notify users to get their attention or to take some sort of action, whether in response to an SMS, a new voicemail, or an Alarm reminding them of a new appointment.
In this chapter, we’re going to look at how to use the Android BroadcastReceiver and the AlarmManager to notify users of these sorts of events. First, we’ll look at how to display quick, unobtrusive, and nonpersistent messages called Toasts, based on an event, such as receiving an SMS. Second, we’ll talk about how to create persistent messages, LED flashes, phone vibrations, and other events to alert the user. These events are called Notifications. Finally, we’ll look at how to trigger events by making Alarm events through the AlarmManager. Before we go too deeply into how notifications work, let’s first create a simple example application.
8.1. Introducing Toast
For our example, you’ll create a simple Receiver class that listens for an SMS text message. When a message arrives, the Receiver briefly pops up a message, called a Toast, to the user, with the content of the message. A Toast is a simple, nonpersistent message designed to alert the user of an event. Toasts are a great way to let a user know that a call is coming in, an SMS or email has arrived, or some other event has just happened. A Toast is not the same as a message, such as a status bar notification, which persists even when a phone is turned off or until the user selects the notification or the Clear Notification button.
In this example, we’ll also use the Android SmsMessage class, but we won’t go into depth about how SMS works in Android. For more information about how to work with SMS, see section 7.4 in chapter 7.
8.1.1. Creating an SMS example with a Toast
To look at how you can use a Toast, let’s create a simple example. First create a project called SMSNotifyExample in Eclipse. You can use whatever package name you like, but for this chapter we’ll use com.msi.manning.chapter8. Now that you’ve created the project, let’s edit AndroidManifest.xml. You’ll need to add several permission tags to allow Android to both receive and react to SMS messages. Make sure your AndroidManifest.xml file looks like the one shown in the following listing.
Listing 8.1. AndroidManifest.xml for SMSNotifyExample

The first thing we need to do is add an intent-filter ![]() to the AndroidManifest.xml file. For the intent-filter, we define SMSNotifyActivity, which is simply our Activity. The next class is SMSNotifyExample
to the AndroidManifest.xml file. For the intent-filter, we define SMSNotifyActivity, which is simply our Activity. The next class is SMSNotifyExample ![]() , which will act as our receiver. Next, and perhaps more importantly, we need to add user permissions
, which will act as our receiver. Next, and perhaps more importantly, we need to add user permissions ![]() to allow incoming SMS messages to be received and read. The Android security model default has no permissions associated
with applications; applications can essentially do nothing that might harm the device or the data on the device. To provide
Android permission, you need to use one or more permissions, which you set in the manifest.xml file. In chapter 9, we’ll go into greater detail about Android’s security model, but with the plethora of emerging SMS viruses and exploits,
Android’s security model provides important protection against such attacks.
to allow incoming SMS messages to be received and read. The Android security model default has no permissions associated
with applications; applications can essentially do nothing that might harm the device or the data on the device. To provide
Android permission, you need to use one or more permissions, which you set in the manifest.xml file. In chapter 9, we’ll go into greater detail about Android’s security model, but with the plethora of emerging SMS viruses and exploits,
Android’s security model provides important protection against such attacks.
8.1.2. Receiving an SMS message
Now that you’ve set up the project, you need to write the code to capture the response when an SMS is received. First, create a simple Activity class called SMSNotifyActivity, as shown in the following listing.
Listing 8.2. SMS Activity for the SMSNotifyExample class
public class SMSNotifyExampleActivity extends Activity {

    @Override
    public void onCreate(Bundle icicle) {
        super.onCreate(icicle);
        setContentView(R.layout.main);
    }
}
As you can see, there’s little to this listing, in part because for this first example we’re not doing much with the Activity. Later in this chapter, we’ll build on this class. For now, let’s create our Receiver class (see chapter 5 for more about Intent receivers), which will listen for the SMS message and fire off an action. The following listing shows the code for our SMSNotifyExample class.
Listing 8.3. A sample SMSNotifyExample

This should be easy to follow. First, we extend the SMSNotifyExample class using BroadcastReceiver, which allows the class to receive Intent classes. Then we create a String to hold the action that will be fired by the system when an SMS is received. After that, we create a simple method to notify
the user that an SMS message has been received, and we parse the SMS message to show whom it was from and the content of the
message ![]() . Next, we need to capture the contents of the SMS message
. Next, we need to capture the contents of the SMS message ![]() . We do this by extracting the data from the protocol data unit or PDUs.
. We do this by extracting the data from the protocol data unit or PDUs.
SMS messaging supports two different ways of sending and receiving messages. The one we’re using is text mode, which happens to be unavailable on some phones and is simply an encoding of the bit stream represented by the PDU mode. The PDU mode is generally superior, because a PDU not only contains the SMS message, but also metadata about the SMS message, such as encoding, information about the sender, SMS service center, and much more. PDUs are almost always used in mobile SMS applications as the mechanism for handling SMS messages.
We also use a Bundle, which acts as an Android-specific hash map and accepts only primitives. We can look over the contents of the PDU and build
an SmsMessage ![]() , as well as extract key pieces from the PDU, such as the SMS sender’s phone number, to display to the user in a Toast
, as well as extract key pieces from the PDU, such as the SMS sender’s phone number, to display to the user in a Toast ![]() .
.
Toast classes are transient little messages—they pop up and provide the user with quick information, without interrupting what the user is doing. In our code, we chain two methods together using the form makeText(Context context, CharSquence text, int duration).show(), where the first method contains a text view for the user and the second method, show(), shows the message to the user. Toast allows you to set a specific view using setView, but for our example, we allow it to show the default, which is the Android status bar.
After you’ve finished cutting and pasting the code, everything should automatically compile, and you should be able to run the application. The application should come up and look like figure 8.1.
Figure 8.1. A simple Toast, the SMSNotifyExample, shown running in the emulator
Note
In Unlocking Android, the first edition of this book, the code used the android.telephony.gsm.Smsmessage class for SMS messages. This class is now deprecated and you need to import android.telephony.Smsmessage.
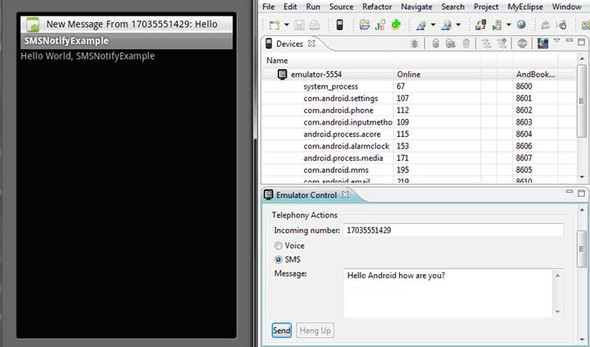
To test our application, select the DDMS option in Eclipse. Now, in the Telephony Actions field, type a telephone number, for example, 17035551429. Select SMS, type a message in the Message field, and click Send. Your message should be sent to the emulator, and you should be able to see the emulator responding in the Eclipse console. A message should appear in the Android status bar at the top of the Android screen representation, as shown in figure 8.2.
Figure 8.2. Example of a Toast message being generated from an SMS message

You’ve created a simple example and you know how to display a short message upon receiving an SMS and how to use the emulator to create an SMS. Now let’s look at how to create a more persistent message that can also be used to set LEDs, play a sound, or something of that nature, to let the user know an event has occurred.
8.2. Introducing notifications
In the previous section, we showed how simple it is to create a quick, unobtrusive message to let the user know an SMS message has arrived. In this section, we’re going to look at how to create a persistent notification that not only shows up in the status bar, but stays in a notification area until the user deletes it. To do that, we need to use the class Notification, because we want to do something more complex than Toast can offer us.
8.2.1. The Notification class
A notification[1] on Android can be many things, ranging from a pop-up message, to a flashing LED, to a vibration, but all these actions start with and are represented by the Notification class. The Notification class defines how you want to represent a notification to a user. This class has three constructors, one public method, and a number of fields. Table 8.1 summarizes the class.
1 To get your Android notifications on your Mac OS X, Linux, or Windows desktop, follow along here: http://www.readwriteweb.com/archives/how_to_get_android_notifications_on_your_computer_desktop.php.
Table 8.1. Notification fields
|
Access |
Type |
Method |
Description |
|---|---|---|---|
| public | int | audioStreamType | Stream type to use when playing a sound |
| public | int | defaults | Defines which values should be taken from defaults |
| public | int | deleteIntent | The Intent to execute when user selects Clear All Notifications button |
| public | flags | ||
| public | int | ledARGB | The color of the LED notification |
| public | int | ledOffMS | The number of milliseconds for the LED to be off between flashes |
| public | int | ledOnMS | The number of milliseconds for the LED to be on for each flash |
| public | Int | number | The number of events represented by this notification |
| public | ContentURI | sound | The sound to play |
| public | RemoteViews | contentView | View to display when the statusBar-Icon is selected in the status bar |
| public | CharSequence | statusBarBalloonText | Text to display when the statusBar-Icon is selected in the status bar |
| public | PendingIntent | contentIntent | The Intent to execute when the icon is clicked |
| public | int | icon | The resource ID of a drawable to use as the icon in the status bar |
| public | Int | iconLevel | The level of an icon in the status bar |
| public | CharSequence | tickerText | Text to scroll across the screen when this item is added to the status bar |
| public | long[] | vibrate | The vibration pattern to use |
| public | long | when | A timestamp for the notification |
As you can see, the Notification class has numerous fields; it has to describe every way you can notify a user. Using a Notification is as simple as running this code:
int icon = R.drawable.icon_from_resources;
CharSequence tickerText = "Hello Android";
long when = System.currentTimeMillis();

CharSequence contentTitle = "New Message";
CharSequence contentText = "Hello Android how are you?";
Intent notificationIntent = new Intent();      // new intent
PendingIntent contentIntent = PendingIntent.getActivity(context, 0,
     notificationIntent, 0);
The next two lines initialize the Notification using the configurations shown in the previous snippet:
Notification notification = new Notification(icon, tickerText, when);
notification.setLatestEventInfo(context,
   contentTitle, contentText, contentIntent);
To send the Notification, all you have to do is enter the following code:
mNotificationManager.notify(NOTIFICATION_ID_RECEIVED, notification);
where the notify method wakes up a thread that performs the notification task you have defined.
8.2.2. Notifying a user of an SMS
Now let’s take our previous example and edit it to change it from a Toast notification to a notification in the status bar. Before we do that, we’ll make the application more interesting by adding icons to our resources directory. For this example, we’re going to use the chat.png icon and the incoming.png icon. You can find these files in the downloaded code for this book, or you can get them from http://www.manning.com/ableson/. Simply drop them in the res/drawable directory to have Eclipse automatically register them for you in the R class.
Now let’s edit the code. First, we’ll edit the SMSNotifyActivity class so that when the Activity is called, it can find the Notification passed to it from the NotificationManager. After the Activity has run, SMSNotifyActivity can cancel it. The following listing provides the code you need for the new SMSNotifyActivity class.
Listing 8.4. A sample SMSNotifyActivity
public class SMSNotifyActivity extends Activity {
@Override
public void onCreate(Bundle icicle) {
        super.onCreate(icicle);
        setContentView(R.layout.main);
        NotificationManager nm = (NotificationManager)
getSystemService(NOTIFICATION_SERVICE);

                nm.cancel(R.string.app_name);


    }
}
As you can see, all we did was use the NotificationManager to look up the Notification, and then we used the cancel()method to cancel it. We could do more, such as set up a custom view, but for now we’ll leave it as is.
Next, we need to edit the SMSNotifyExample to remove the Toast Notification and support a Notification to the status bar. The following listing shows the edits we need to make.
Listing 8.5. Updated SMSNotifyExample.java
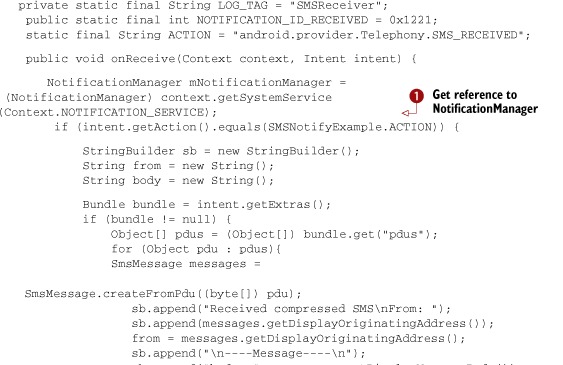

The first thing you’ll notice is the addition of the NotificationManager ![]() , which handles all notifications. The second major change to the code is the addition of the required fields that notifications
need, such as icon, when, and tickerText
, which handles all notifications. The second major change to the code is the addition of the required fields that notifications
need, such as icon, when, and tickerText ![]() .
.
Note the variable tickerMessage. The tickerMessage will hold the contents of the SMS message that we want to scroll in the notification bar. Though it’s possible to style the notification message in a variety of ways, the notification bar in general supplies little space and is best used for short messages.
Next, we instantiate the Notification with the required fields. After that, we create an Intent for the Notification’s expanded message ![]() . Notifications generally have two parts—a message that appears in the notification bar, then a message that appears in the expanded view
of the Notifications drop-down view when you open the notification bar. The message for the expanded Notifications window
is provided via the method setLatestEventInfo, like so:
. Notifications generally have two parts—a message that appears in the notification bar, then a message that appears in the expanded view
of the Notifications drop-down view when you open the notification bar. The message for the expanded Notifications window
is provided via the method setLatestEventInfo, like so:
Public void setLatestEventInfo(Context context,
 CharSequence contentTitle, CharSequence contentT006xt,
 PendingIntent contentIntent);
Finally, we use the notify() method ![]() from the NotificationManager to broadcast our Notification to the application.
from the NotificationManager to broadcast our Notification to the application.
Now if you run the application and then open the DDMS and pass an SMS message as you did earlier, you should see the new Notification in the status bar. The message displays each line for a short interval until the message is fully displayed. You should also see a new icon pop up in the status bar that indicates a new SMS message, as shown in figure 8.3.
Figure 8.3. Using the Android DDMS to send an SMS message to the application

When you’ve sent the message, click the New Messages icon; a bar should drop down from it. Click the bar and drag it down to the bottom of the screen. The default view of the SMS inbox for Android opens, as shown in figure 8.4.
Figure 8.4. The expanded SMS inbox displaying the contentIntent and appIntent

You could do a lot more with this demo, such as creating a better UI[2] or making the SMS inbox more feature-rich. You could even make the application play a sound when a message arrives. Even so, in this example, we’ve looked at everything you need to know to start working with notifications. In the next section, we’re going to look at Notification’s close relative, the Alarm.
2 Here is a great article about improving Android app quality and creating better UI experiences: http://android-developers.blogspot.com/2010/10/improving-app-quality.html.
8.3. Introducing Alarms
In Android, Alarms allow you to schedule your application to run at some point in the future. Alarms can be used for a wide range of applications, from notifying a user of an appointment to something more sophisticated, such as having an application start, check for software updates, and then shut down. An Alarm works by registering an Intent with the Alarm; at the scheduled time, the Alarm broadcasts the Intent. Android automatically starts the targeted application, even if the Android handset is asleep.
Android manages all alarms somewhat like it manages the Notification-Manager—via an AlarmManager class. The AlarmManager has four methods: cancel, set, setRepeating, and setTimeZone, as shown in table 8.2.
Table 8.2. AlarmManager public methods
|
Returns |
Method and description |
|---|---|
| void | cancel(PendingIntent intent) Remove alarms with matching Intent |
| void | set(int type, long triggerAtTime, PendingIntent operation) Set an Alarm |
| void | setRepeating(int type, long triggerAtTime, long interval, PendingIntent operation) Set a repeating Alarm |
| void | setTimeZone(String TimeZone) Set the time zone for the Alarm |
You instantiate the AlarmManager indirectly (as you do the NotificationManager), by using Context.getSystemService(Context.ALARM_SERVICE).
Setting alarms is easy, like most things in Android. In the next example, you’ll create a simple application that sets an Alarm when a button is pressed. When the Alarm is triggered, it will pass back a simple Toast to inform us that the Alarm has been fired.
8.3.1. Creating a simple alarm example
In this next example, you’re going to create an Android project called SimpleAlarm that has the package name com.msi.manning.chapter8.simpleAlarm, the application name SimpleAlarm, and the Activity name GenerateAlarm. In this project, we’ll use another open source icon, which you can find at http://www.manning.com/ableson/ or in the download for this chapter. Change the name of the icon to clock, and add it to the res/drawable directory of the project when you create it.
The next thing to do is edit the AndroidManifest.xml to have a receiver (we’ll create that soon) called AlarmReceiver, as shown in the following listing.
Listing 8.6. AndroidManifest.xml
<?xml version="1.0" encoding="utf-8"?>
<manifest xmlns:android="http://schemas.android.com/apk/res/android"
    package="com.msi.manning.chapter8.simpleAlarm">
    <application android:icon="@drawable/clock">
        <activity android:name=".GenerateAlarm"
           android:label="@string/app_name">
           <intent-filter>
               <action android:name="android.intent.action.MAIN" />
               <category android:name="android.intent.category.LAUNCHER" />
           </intent-filter>
        </activity>
        <receiver android:name=".AlarmReceiver" android:process=
":remote" />
    </application>
</manifest>
Now we edit the string.xml file in the values directory and add two new strings:
<string name="set_alarm_text">Set Alarm</string>
<string name="alarm_message">Alarm Fired</string>
We’ll use this as the value of the button in our layout. Next, we need to add a new button to our layout, so edit the main.xml file to add a new button, like this:
<Button android:id="@+id/set_alarm_button"
android:layout_width="wrap_content"
       android:layout_height="wrap_content"
       android:text="@string/set_alarm_text">
            <requestFocus />
</Button>
We’re ready to create a new class that will act as the Receiver for the Notification the Alarm will generate. In this case, we’re going to be generating a Toast-style Notification to let the user know that the Alarm has been triggered. Now, create a new class as shown in the following listing. This class waits for the Alarm to broadcast to the AlarmReceiver and then generates a Toast.
Listing 8.7. AlarmReceiver.java

Next, we need to edit the SimpleAlarm class to create a button widget (as we discussed in chapter 3) that calls the inner class setAlarm. In setAlarm, we create an onClick method that will schedule our Alarm, call our Intent, and fire off our Toast. The following listing shows what the finished class should look like.
Listing 8.8. SimpleAlarm.java

As you can see, this class is pretty simple. We create a Button to trigger our Alarm ![]() . Next, we create an inner class for our mOneShotListener. Then, we create the Intent to be triggered when the Alarm actually goes off
. Next, we create an inner class for our mOneShotListener. Then, we create the Intent to be triggered when the Alarm actually goes off ![]() . In the next section of code, we use the Calendar class to help us calculate the number of milliseconds from the time the button is pressed, which we’ll use to set the Alarm.
. In the next section of code, we use the Calendar class to help us calculate the number of milliseconds from the time the button is pressed, which we’ll use to set the Alarm.
Now we’ve done everything necessary to create and set the Alarm. We create the AlarmManager ![]() and then call its set() method to set the Alarm. To see a little more detail of what’s going on in the application, take a look at these lines of code:
and then call its set() method to set the Alarm. To see a little more detail of what’s going on in the application, take a look at these lines of code:
AlarmManager am = (AlarmManager)getSystemService(ALARM_SERVICE);
       am.set(AlarmManager.RTC_WAKEUP, calendar.getTimeInMillis(), intent);
These lines are where we actually create and set the Alarm by first using getSystem-Service to create the AlarmManager. The first parameter we pass to the set() method is RTC_WAKEUP, which is an integer representing the Alarm type we want to set. The AlarmManager currently supports four Alarm types, as shown in table 8.3.
Table 8.3. AlarmManager Alarm types
|
Type |
Description |
|---|---|
| ELAPSED_REALTIME | Alarm time in SystemClock.elapsedRealtime() (time since boot, including sleep) |
| ELAPSED_REALTIME_WAKEUP | Alarm time in SystemClock.elapsedRealtime() (time since boot, including sleep), which will wake up the device when it goes off |
| RTC | Alarm time in System.currentTimeMillis() (wall clock time in UTC) |
| RTC_WAKEUP | Alarm time in System.currentTimeMillis() (wall clock time in UTC), which will wake up the device when it goes off |
You can use multiple types of alarms, depending on your requirements. The RTC_WAKEUP, for example, sets the Alarm time in milliseconds; when the Alarm goes off, it’ll wake up the device from sleep mode for you, as opposed to RTC, which won’t.
The next parameter we pass to the method is the amount of time, in milliseconds, that we want to elapse, after which we want the alarm to be triggered. The following snippet shows how to set this sequence of events:
Calendar calendar = Calendar.getInstance();
calendar.setTimeInMillis(System.currentTimeMillis());
calendar.add(Calendar.SECOND, 30);
The last parameter is the Intent we want to broadcast to, which is our Intent-Receiver. Now, if you build the application and run it in the emulator, you should see something like the screen shown in figure 8.5.
Figure 8.5. Example of the SimpleAlarm application running in the emulator
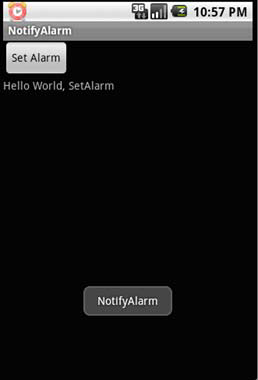
Clicking the Set Alarm button will set the alarm; after 30 seconds, you should see something like figure 8.6, displaying the Toast message.
Figure 8.6. After the Alarm runs, the application shows a simple Toast message.

8.3.2. Using notifications with Alarms
Creating an Alarm is pretty easy in Android, but what might make more sense would be for that Alarm to trigger a Notification in the status bar. To do that, you need to add a NotificationManager and generate a Notification. We’ve created a new method to add to listing 8.8 called showNotification, which takes four parameters and creates our Notification:
    private void showNotification(int statusBarIconID,
        int statusBarTextID, int detailedTextID, boolean showIconOnly) {
        Intent contentIntent = new Intent(this, SetAlarm.class);
        PendingIntent theappIntent =
PendingIntent.getBroadcast(SetAlarm.this,
            0, contentIntent, 0);
        CharSequence from = "Alarm Manager";
        CharSequence message = "The Alarm was fired";
        String tickerText = showIconOnly ? null :
     this.getString(statusBarTextID);
      Notification notif = new Notification( statusBarIconID,
 tickerText,
          System.currentTimeMillis());
      notif.setLatestEventInfo(this, from, message, theappIntent);
        nm.notify(YOURAPP_NOTIFICATION_ID, notif  );
    }
Much of this code is similar to the SMSNotifyExample code. To add it to your SimpleAlarm, edit listing 8.8 to look like listing 8.9, where the only other things we’ve done are to import the Notification and NotificationManager to the code, add the private variables nm and ApplicationID, and make a call to showNotification(), right after the Toast.
Listing 8.9. SetAlarm.java
public class SetAlarm extends Activity {
    private NotificationManager nm;
        Toast mToast;
    @Override
    protected void onCreate(Bundle icicle) {
        super.onCreate(icicle);
        setContentView(R.layout.main);
        this.nm = (NotificationManager)
getSystemService(Context.NOTIFICATION_SERVICE);
        Button button = (Button) findViewById(R.id.set_alarm_button);
        button.setOnClickListener(this.mOneShotListener);
    }
    private void showNotification(int statusBarIconID,
int statusBarTextID, int detailedTextID, boolean showIconOnly) {
        Intent contentIntent = new Intent(this, SetAlarm.class);
        PendingIntent theappIntent =

 PendingIntent.getBroadcast(SetAlarm.this, 0,
           contentIntent, 0);
        CharSequence from = "Alarm Manager";
        CharSequence message = "The Alarm was fired";
        String tickerText = showIconOnly ? null :
this.getString(statusBarTextID);
        Notification notif = new Notification(statusBarIconID, tickerText,
            System.currentTimeMillis());
        notif.setLatestEventInfo(this, from, message, theappIntent);
        this.nm.notify(this.YOURAPP_NOTIFICATION_ID, notif);
    }
    private OnClickListener mOneShotListener = new OnClickListener() {
        public void onClick(View v) {
            Intent intent = new Intent(SetAlarm.this, AlarmReceiver.class);
            PendingIntent appIntent =
     PendingIntent.getBroadcast(SetAlarm.this, 0,
               intent, 0);
            Calendar calendar = Calendar.getInstance();
            calendar.setTimeInMillis(System.currentTimeMillis());
            calendar.add(Calendar.SECOND, 30);
            AlarmManager am = (AlarmManager)
                getSystemService(Context.ALARM_SERVICE);
            am.set(AlarmManager.RTC_WAKEUP, calendar.getTimeInMillis(),
                appIntent);
            showNotification(R.drawable.alarm, R.string.alarm_message,
                R.string.alarm_message, false);
        }
    };
  }
}
If you run the code and click Set Alarm, you should see the Alarm Notification in the status bar. You could easily edit this code to take in parameters for time and date, have it show different Intents when the icons are clicked, and so on.
As you can see from this example, Android alarms and the AlarmManager are straightforward, and you should be able to easily integrate them into your applications.
8.4. Summary
In this chapter, we’ve looked at three separate but related items: Toast, Notification, and Alarm. You learned that for simple, nonpersistent messages, the Toast class provides an easy and convenient way to alert the user. We also looked at how to use the NotificationManager to generate simple to relatively complex notifications. Then you used the Notification class to present a Notification to the user by building a simple example that displays a message in the status bar, vibrates a phone, or even flashes an LED when an SMS messages arrives in the inbox.
We also looked at how to set an Alarm to cause an application to start or take some action in the future, including waking the system from sleep mode. Finally, we talked about how to trigger a Notification from an Alarm. Though the code presented in these simple examples gives you a taste of what can be done with notifications and alarms, both have broad applications limited only by your imagination.
Now that you have an understanding of how to work with the Notification and Alarm classes, we’re going to move on a discussion of graphics and animation. In chapter 9, you’ll learn the basic methods of generating graphics in Android, how to create simple animations, and even how to work with OpenGL to generate stunning 3D graphics.