
Chapter 7. Telephony
- Making and receiving phone calls
- Capturing call-related events
- Obtaining phone and service information
- Using SMS
People use Android devices to surf the web, download and store data, access networks, find location information, and use many types of applications. Android can even make phone calls.
Android phones support dialing numbers, receiving calls, sending and receiving text and multimedia messages, and other related telephony services. In contrast to other smartphone platforms, all these items are accessible to developers through simple-to-use APIs and built-in applications. You can easily leverage Android’s telephony support into your own applications.
In this chapter, we’ll discuss telephony in general and cover terms related to mobile devices. We’ll move on to basic Android telephony packages, which handle calls using built-in Intent actions, and more advanced operations via the TelephonyManager and PhoneStateListener classes. The Intent actions can initiate basic phone calls in your applications. TelephonyManager doesn’t make phone calls directly but is used to retrieve all kinds of telephony-related data, such as the state of the voice network, the device’s own phone number, and other details. TelephonyManager supports adding a PhoneStateListener, which can alert you when call or phone network states change.
After covering basic telephony APIs, we’ll move on to sending and receiving SMS messages. Android provides APIs that allow you to send SMS messages and be notified when SMS messages are received. We’ll also touch on emulator features that allow you to test your app by simulating incoming phone calls or messages.
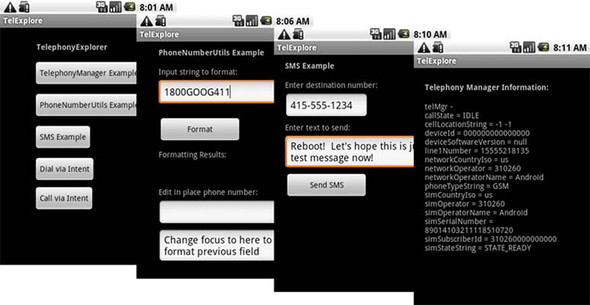
Once again, a sample application will carry us through the concepts related to the material in this chapter. You’ll build a sample TelephonyExplorer application to demonstrate dialing the phone, obtaining phone and service state information, adding listeners to the phone state, and working with SMS. Your TelephonyExplorer application will have several basic screens, as shown in figure 7.1.
Figure 7.1. TelephonyExplorer main screen, along with the related activities the sample application performs
TelephonyExplorer exercises the telephony-related APIs while remaining simple and uncluttered. Before we start to build TelephonyExplorer, let’s first define telephony itself.
7.1. Exploring telephony background and terms
Whether you’re a new or an experienced mobile developer, it’s important to clarify terms and set out some background for discussing telephony.
First, telephony is a general term that refers to electrical voice communications over telephone networks. Our scope is, of course, the mobile telephone networks that Android devices[1] participate in, specifically the Global System for Mobile Communications (GSM) and Code Division Multiple Access (CDMA) networks.
1 For a breakdown of all Android devices released in 2008-2010, go here: http://www.androphones.com/all-android-phones.php.
GSM and CDMA are cellular telephone networks. Devices communicate over radio waves and specified frequencies using cell towers. The standards must define a few important things, such as identities for devices and cells, along with all the rules for making communications possible.
7.1.1. Understanding GSM
We won’t delve into the underlying details of the networks, but it’s important to know some key facts. GSM is based on Time Division Multiple Access (TDMA), a technology that slices time into smaller chunks to allow multiple callers to share the same frequency range. GSM was the first network that the Android stack supported for voice calls; it’s ubiquitous in Europe and very common in North America. GSM devices use Subscriber Identity Module (SIM) cards to store important network and user settings.
A SIM card is a small, removable, secure smart card. Every device that operates on a GSM network has specific unique identifiers, which are stored on the SIM card or on the device itself:
- Integrated Circuit Card Identifier (ICCID)—Identifies a SIM card; also known as a SIM Serial Number, or SSN.
- International Mobile Equipment Identity (IMEI)—Identifies a physical device. The IMEI number is usually printed underneath the battery.
- International Mobile Subscriber Identity (IMSI)—Identifies a subscriber (and the network that subscriber is on).
- Location Area Identity (LAI)—Identifies the region within a provider network that’s occupied by the device.
- Authentication key (Ki)—A 128-bit key used to authenticate a SIM card on a provider network.
GSM uses these identification numbers and keys to validate and authenticate a SIM card, the device holding it, and the subscriber on the network and across networks.
Along with storing unique identifiers and authentication keys, SIM cards often store user contacts and SMS messages. Users can easily move their SIM card to a new device and carry along contact and message data. Currently, the Android platform handles the SIM interaction, and developers can get read-only access via the telephony APIs.
7.1.2. Understanding CDMA
The primary rival to GSM technology is CDMA, which uses a different underlying technology that’s based on using different encodings to allow multiple callers to share the same frequency range. CDMA is widespread in the Unites States and common in some Asian countries.
Unlike GSM phones, CDMA devices don’t have a SIM card or other removable module. Instead, certain identifiers are burned into the device, and the carrier must maintain the link between each device and its subscriber. CDMA devices have a separate set of unique identifiers:
- Mobile Equipment Identifier (MEID)— Identifies a physical device. This number is usually printed under the battery and is available from within device menus. It corresponds to GSM’s IMEI.
- Electronic Serial Number (ESN)— The predecessor to the MEID, this number is shorter and identifies a physical device.
- Pseudo Electronic Serial Number (pESN)— A hardware identifier, derived from the MEID, that’s compatible with the older ESN standard. The ESN supply was exhausted several years ago, so pESNs provide a bridge for legacy applications built around ESN. A pESN always starts with 0x80 in hex format or 128 in decimal format.
Unlike GSM phones, which allow users to switch devices by swapping out SIM cards, CDMA phones require you to contact your carrier if you want to transfer an account to a new device. This process is often called an ESN swap or ESN change. Some carriers make this easy, and others make it difficult. If you’ll be working on CDMA devices, learning how to do this with your carrier can save you thousands of dollars in subscriber fees.
Note
A few devices, sometimes called world phones, support both CDMA and GSM. These devices often have two separate radios and an optional SIM card. Currently, such devices operate only on one network or the other at any given time. Additionally, these devices are often restricted to using only particular carriers or technologies in particular countries. You generally don’t need to do anything special to support these devices, but be aware that certain phones might appear to change their network technology from time to time.
Fortunately, few applications need to deal with the arcana of GSM and CDMA technology. In most cases, you only need to know that your program is running on a device that in turn is running on a mobile network. You can leverage that network to make calls and inspect the device to find unique identifiers. You can locate this sort of information by using the TelephonyManager class.
7.2. Accessing telephony information
Android provides an informative manager class that supplies information about many telephony-related details on the device. Using TelephonyManager, you can access phone properties and obtain phone network state information.
Note
Starting with version 2.1 of the Android OS, devices no longer need to support telephony features. Expect more and more non-phone devices to reach the market, such as set-top boxes and auto devices. If you want to reach the largest possible market with your app, you should leverage telephony features but fail gracefully if they’re not available. If your application makes sense only when running on a phone, go ahead and use any phone features you require.
You can attach a PhoneStateListener event listener to the phone by using the manager. Attaching a PhoneStateListener makes your applications aware of when the phone gains and loses service, and when calls start, continue, or end.
Next, we’ll examine several parts of the TelephonyExplorer example application to look at both these classes. We’ll start by obtaining a TelephonyManager instance and using it to query useful telephony information.
7.2.1. Retrieving telephony properties
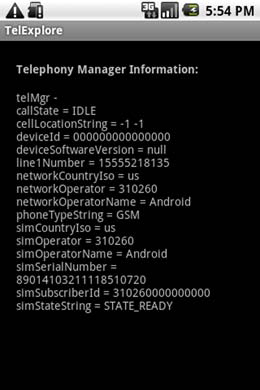
The android.telephony package contains the TelephonyManager class, which provides details about the phone status. Let’s retrieve and display a small subset of that information to demonstrate the approach. First, you’ll build an Activity that displays a simple screen showing some of the information you can obtain via TelephonyManager, as shown in figure 7.2.
Figure 7.2. Displaying device and phone network meta-information obtained from TelephonyManager
The TelephonyManager class is the information hub for telephony-related data in Android. The following listing demonstrates how you obtain a reference to this class and use it to retrieve data.
Listing 7.1. Obtaining a TelephonyManager reference and using it to retrieve data


We use the current Context, through the getSystemService method with a constant, to obtain an instance of the TelephonyManager class ![]() . After you have the manager, you can use it as needed. In this case, we create a helper method to get data from the manager
and return it as a String that we later display on the screen
. After you have the manager, you can use it as needed. In this case, we create a helper method to get data from the manager
and return it as a String that we later display on the screen ![]() .
.
The manager allows you to access phone state data, such as whether a call is in progress ![]() , the device ID and software version
, the device ID and software version ![]() , the phone number registered to the current user/SIM, and other SIM details, such as the subscriber ID (IMSI) and the current SIM state. TelephonyManager offers even more properties; see the Javadocs for complete details.
, the phone number registered to the current user/SIM, and other SIM details, such as the subscriber ID (IMSI) and the current SIM state. TelephonyManager offers even more properties; see the Javadocs for complete details.
Note
Methods generally return null if they don’t apply to a particular device; for example, getSimOperatorName returns null for CDMA phones. If you want to know in advance what type of device you’re working with, try using the method getPhoneType.
For this class to work, you must set the READ_PHONE_STATE permission in the manifest. Without it, security exceptions will be thrown when you try to read data from the manager. Phone-related permissions are consolidated in table 7.1.
Table 7.1. Phone-related manifest permissions and their purpose
|
Phone-related permission |
Purpose |
|---|---|
| android.permission.CALL_PHONE | Initiate a phone call without user confirmation in dialer |
| android.permission.CALL_PRIVILEGED | Call any number, including emergency, without confirmation in dialer |
| android.permission.MODIFY_PHONE_STATE | Allow the application to modify the phone state; for example, to turn the radio on or off |
| android.permission.PROCESS_OUTGOING_CALLS | Allow application to receive broadcast for outgoing calls and modify |
| android.permission.READ_PHONE_STATE | Allow application to read the phone state |
In addition to providing telephony-related information, including metadata about the device, network, and subscriber, TelephonyManager allows you to attach a PhoneStateListener, which we’ll describe in the next section.
7.2.2. Obtaining phone state information
A phone can be in any one of several conditions. The primary phone states include idle (waiting), in a call, or initiating a call. When you’re building applications on a mobile device, sometimes you not only need to know the current phone state, but you also want to know when the state changes.
In these cases, you can attach a listener to the phone and subscribe to receive notifications of published changes. With Android, you use a PhoneStateListener, which attaches to the phone through TelephonyManager. The following listing demonstrates a sample usage of both these classes.
Listing 7.2. Attaching a PhoneStateListener via the TelephonyManager
@Override
public void onStart() {
    super.onStart();
    final TelephonyManager telMgr =
         (TelephonyManager) this.getSystemService(
             Context.TELEPHONY_SERVICE);
    PhoneStateListener phoneStateListener =
      new PhoneStateListener() {

        public void onCallStateChanged(
          int state, String incomingNumber) {
            telMgrOutput.setText(getTelephonyOverview(telMgr));
        }
    };
    telMgr.listen(phoneStateListener,
       PhoneStateListener.LISTEN_CALL_STATE);
    String telephonyOverview = this.getTelephonyOverview(telMgr);
    this.telMgrOutput.setText(telephonyOverview);
}
To start working with a PhoneStateListener, you need to acquire an instance of TelephonyManager. PhoneStateListener itself is an interface, so you need to create an implementation, including the required onCallStateChanged method. When you have a valid PhoneStateListener instance, you attach it by assigning it to the manager with the listen method.
Listing 7.2 shows how to listen for any PhoneStateListener.LISTEN_CALL_STATE change in the phone state. This constant value comes from a list of available states that are in PhoneStateListener class. You can use a single value when assigning a listener with the listen method, as demonstrated in listing 7.2, or you can combine multiple values to listen for multiple states.
If a call state change does occur, it triggers the action defined in the onCallStateChanged method of your PhoneStateListener. In this example, we reset the details on the screen using the getTelephonyOverview method from listing 7.1. You can filter this method further, based on the passed-in int state.
To see the values in this example change while you’re working with the emulator, you can use the SDK tools to send incoming calls or text messages and change the state of the voice connection. You can access these options from the DDMS perspective in Eclipse. Additionally, the emulator includes a mock GSM modem that you can manipulate using the gsm command from the console. Figure 7.3 shows an example session from the console that demonstrates using the gsm command. For complete details, see the emulator telephony documentation at http://code.google.com/android/reference/emulator.html#telephony.
Figure 7.3. An Android console session demonstrating the gsm command and available subcommands

Now that we’ve covered the major elements of telephony, let’s start exploring basic uses of the telephony APIs and other related facilities. We’ll intercept calls, leverage telephony utility classes, and make calls from within applications.
7.3. Interacting with the phone
In regular development, you’ll often want to use your Android device as a phone. You might dial outbound calls through simple built-in intents, or intercept calls to modify them in some way. In this section, we’ll cover these basic tasks and examine some of the phone-number utilities Android provides for you.
One of the more common things you’ll do with Android telephony support doesn’t even require using the telephony APIs directly: making calls using built-in intents.
7.3.1. Using intents to make calls
As we demonstrated in chapter 4, to invoke the built-in dialer and make a call all you need to use is the Intent.ACTION_CALL action and the tel: Uri. This approach invokes the dialer application, populates the dialer with the provided telephone number (taken from the Uri), and initiates the call.
Alternatively, you can invoke the dialer application with the Intent.ACTION_DIAL action, which also populates the dialer with the supplied phone number but stops short of initiating the call. The following listing demonstrates both techniques using their respective actions.
Listing 7.3. Using Intent actions to dial and call using the built-in dialer application
dialintent = (Button) findViewById(R.id.dialintent_button);
   dialintent.setOnClickListener(new OnClickListener() {
            public void onClick(View v) {
                Intent intent =
                  new Intent(Intent.DIAL_ACTION,
                    Uri.parse("tel:" + NUMBER));
                startActivity(intent);
            }
       });
   callintent = (Button) findViewById(R.id.callintent_button);
   callintent.setOnClickListener(new OnClickListener() {
           public void onClick(View v) {
               Intent intent =
                 new Intent(Intent.CALL_ACTION,
                   Uri.parse("tel:" + NUMBER));
               startActivity(intent);
           }
       });
By now you should feel quite comfortable using intents in the Android platform. In this listing, we again take advantage of Android’s loose coupling, in this case to make outgoing calls to specified numbers. First, you set the action you want to take place, either populating the dialer with ACTION_DIAL or populating the dialer and initiating a call with ACTION_CALL. In either case, you also need to specify the telephone number you want to use with the Intent Uri.
Dialing calls also requires the proper permissions, which your application manifest includes in order to access and modify the phone state, dial the phone, or intercept phone calls (shown in section 7.3.3). Table 7.1 lists the relevant phone-related permissions and their purposes. For more detailed information, see the security section of the Android documentation at http://code.google.com/android/devel/security.html.
Android makes dialing simple with built-in handling via intents and the dialer application. The PhoneNumberUtils class, which you can use to parse and validate phone number strings, helps simplify dialing even more, while keeping numbers human-readable.
7.3.2. Using phone number-related utilities
Applications running on mobile devices that support telephony deal with a lot of String formatting for phone numbers. Fortunately, the Android SDK provides a handy utility class that helps to mitigate the risks associated with this task and standardize the numbers you use—PhoneNumberUtils.
The PhoneNumberUtils class parses String data into phone numbers, transforms alphabetical keypad digits into numbers, and determines other properties of phone numbers. The following listing shows an example of using this class.
Listing 7.4. Working with the PhoneNumberUtils class

The PhoneNumberUtils class offers several static helper methods for parsing phone numbers, including the useful formatNumber. This method takes a single String as input and uses the default locale settings to return a formatted phone number ![]() . Additional methods format a number using a locale you specify, parse different segments of a number, and so on. Parsing
a number can be combined with another helpful method, convertKeypadLettersToDigits, to convert any alphabetic keypad letter characters into digits
. Additional methods format a number using a locale you specify, parse different segments of a number, and so on. Parsing
a number can be combined with another helpful method, convertKeypadLettersToDigits, to convert any alphabetic keypad letter characters into digits ![]() . The conversion method won’t work unless it already recognizes the format of a phone number, so you should run the format
method first.
. The conversion method won’t work unless it already recognizes the format of a phone number, so you should run the format
method first.
Along with these basic methods, you can also check properties of a number string, such as whether the number is global and
whether it represents an emergency call. The compare method lets you see whether a given number matches another number ![]() , which is useful for user-entered numbers that might include dashes or dots.
, which is useful for user-entered numbers that might include dashes or dots.
Note
Android defines a global number as any string that contains one or more digits; it can optionally be prefixed with a + symbol, and can optionally contain dots or dashes. Even strings like 3 and +4-2 are considered global numbers. Android makes no guarantee that a phone can even dial such a number; this utility simply provides a basic check for whether something looks like it could be a phone number in some country.
You can also format a phone number with the overloaded formatNumber method. This method is useful for any Editable, such as the common EditText (or TextView). This method updates the provided Editable in-place, as shown in the following listing.
Listing 7.5. Using in-place Editable View formatting via PhoneNumberUtils
this.pnInPlaceInput.setOnFocusChangeListener(
  new OnFocusChangeListener() {
      public void onFocusChange(View v, boolean hasFocus) {
          if (v.equals(pnInPlaceInput) && (!hasFocus)) {
           PhoneNumberUtils.formatNumber(
             pnInPlaceInput.getText(),
               PhoneNumberUtils.FORMAT_NANP);
        }
    }
    });
The in-place editor can be combined with a dynamic update using various techniques. You can make the update happen automatically when the focus changes from a phone-number field. The in-place edit does not provide the keypad alphabetic character-to-number conversion automatically. To ensure that the conversion occurs, we’ve implemented an OnFocusChangeListener. Inside the onFocusChange method, which filters for the correct View item, we call the formatNumber overload, passing in the respective Editable and the formatting style we want to use. NANP stands for North American Numbering Plan, which includes an optional country and area code and a 7-digit local phone number.
Note
PhoneNumberUtils also defines a Japanese formatting plan, and might add others in the future.
Now that you can use the phone number utilities and make calls, we can move on to the more challenging and interesting task of call interception.
7.3.3. Intercepting outbound calls
Imagine writing an application that catches outgoing calls and decorates or aborts them, based on certain criteria. The following listing shows how to perform this type of interception.
Listing 7.6. Catching and aborting an outgoing call
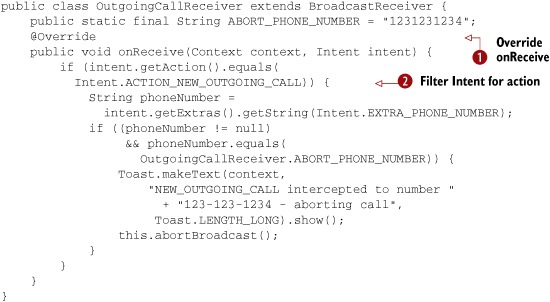
Our interception class starts by extending BroadcastReceiver. The new subclass implements the onReceive method ![]() . Within this method, we filter on the Intent action we want
. Within this method, we filter on the Intent action we want ![]() , then we get the Intent data using the phone number key. If the phone number matches, we send a Toast alert to the UI and abort the outgoing call by calling the abortBroadcast method.
, then we get the Intent data using the phone number key. If the phone number matches, we send a Toast alert to the UI and abort the outgoing call by calling the abortBroadcast method.
Beyond dialing out, formatting numbers, and intercepting calls, Android also provides support for sending and receiving SMS. Managing SMS can seem daunting, but provides significant rewards, so we’re going to focus on it for the rest of the chapter.
7.4. Working with messaging: SMS
Mobile devices use the Short Message Service (SMS), a hugely popular and important means of communication, to send simple text messages with small amounts of data. Android includes a built-in SMS application that allows users to send, view, and reply to SMS messages. Along with the built-in user-facing apps and the related ContentProvider for interacting with the default text-messaging app, the SDK provides APIs for developers to send and receive messages programmatically.
Because Android now supplies an excellent built-in SMS message application, you might wonder why anyone would bother building another one. The Android market sells several superior third-party SMS messaging applications, but SMS can do a lot more than text your contacts. For example, you could build an application that, upon receiving a special SMS, sends back another SMS containing its location information. Due to the nature of SMS, this strategy might succeed, while another approach like trying to get the phone to transmit its location in real time would fail. Alternately, adding SMS as another communications channel can enhance other applications. Best of all, Android makes working with SMS relatively simple and straightforward.
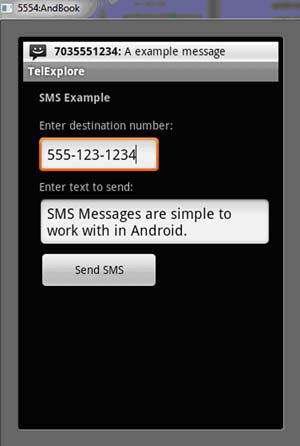
To explore Android’s SMS support, you’ll create an app that sends and receives SMS messages. The screen in figure 7.4 shows the SMS-related Activity you’ll build in the TelephonyExplorer application.
Figure 7.4. An Activity that sends SMS messages
To get started working with SMS, you’ll first build a class that programmatically sends SMS messages, using the SmsManager.
7.4.1. Sending SMS messages
The android.telephony package contains the SmsManager and SmsMessage classes. The SmsManager defines many important SMS-related constants, and also provides the sendDataMessage, sendMultipartTextMessage, and sendTextMessage methods.
Note
Early versions of Android provided access to SMS only through the android.telephony.gsm subpackage. Google has deprecated this usage, but if you must target older versions of the OS, look there for SMS-related functions. Of course, such classes work only on GSM-compatible devices.
The following listing shows an example from our TelephonyExplorer application that uses the SMS manager to send a simple text message.
Listing 7.7. Using SmsManager to send SMS messages

Before doing anything with SMS messages, we must obtain an instance of the SmsManager with the static getDefault method ![]() . The manager will also send the message later. Before we can send the message, we need to create a PendingIntent to provide to the send method.
. The manager will also send the message later. Before we can send the message, we need to create a PendingIntent to provide to the send method.
A PendingIntent can specify an Activity, Broadcast, or Service that it requires. In our case, we use the getActivity method, which requests an Activity, and then we specify the context, request code (not used for this case), the Intent to execute, and additional flags ![]() . The flags indicate whether the system should create a new instance of the referenced Activity (or Broadcast or Service), if one doesn’t already exist.
. The flags indicate whether the system should create a new instance of the referenced Activity (or Broadcast or Service), if one doesn’t already exist.
A PendingIntent specifies an action to take in the future. It lets you pass a future Intent to another application and allow that application to execute that Intent as if it had the same permissions as your application, whether or not your application is still around when the Intent is eventually invoked. A PendingIntent provides a means for applications to work, even after their process exits. It’s important to note that even after the application that created the PendingIntent has been killed, that Intent can still run.
Next, we check that the destination address is valid for SMS ![]() , and we send the message using the manager’s sendTextMessage method.
, and we send the message using the manager’s sendTextMessage method.
This send method takes several parameters. The following snippet shows the signature of this method:
sendDataMessage(String destinationAddress, String scAddress,
  short destinationPort, byte[] data, PendingIntent sentIntent,
  PendingIntent deliveryIntent)
The method requires the following parameters:
- destinationAddress— The phone number to receive the message.
- scAddress— The messaging center address on the network; you should almost always leave this as null, which uses the default.
- destinationPort— The port number for the recipient handset.
- data— The payload of the message.
- sentIntent— The PendingIntent instance that’s fired when the message is successfully sent.
- deliveryIntent— The PendingIntent instance that’s fired when the message is successfully received.
Note
GSM phones generally support receiving SMS messages to a particular port, but CDMA phones generally don’t. Historically, port-directed SMS messages have allowed text messages to be delivered to a particular application. Modern phones support better solutions; in particular, if you can use a server for your application, consider using Android Cloud to Device Messaging (C2DM)[2] for Android phones with software version 2.2 or later.
2 Read Tim Bray’s detailed article for more about C2DM: http://android-developers.blogspot.com/2010/05/android-cloud-to-device-messaging.html.
Much like the phone permissions listed in table 7.1, SMS-related tasks also require manifest permissions. SMS permissions are shown in table 7.2.
Table 7.2. SMS-related manifest permissions and their purpose
|
Phone-related permission |
Purpose |
|---|---|
| android.permission.READ_SMS | Allow application to read SMS messages |
| android.permission.RECEIVE_SMS | Allow application to monitor incoming SMS messages |
| android.permission.SEND_SMS | Allow application to send SMS messages |
| android.permission.WRITE_SMS | Write SMS messages to the built-in SMS provider (not related to sending messages directly) |
The AndroidManifest.xml file for the TelephonyExplorer application contains these permissions.
<uses-permission android:name="android.permission.RECEIVE_SMS" />
<uses-permission android:name="android.permission.READ_SMS" />
<uses-permission android:name="android.permission.WRITE_SMS" />
<uses-permission android:name="android.permission.SEND_SMS" />
Along with sending text and data messages via SmsManager, you can create an SMS BroadcastReceiver to receive incoming SMS messages.
7.4.2. Receiving SMS messages
You can receive an SMS message programmatically by registering for the appropriate broadcast. To demonstrate how to receive SMS messages in this way with our TelephonyExplorer application, we’ll implement a receiver, as shown in the following listing.
Listing 7.8. Creating an SMS-related BroadcastReceiver

To react to an incoming SMS message, we again create a custom BroadcastReceiver by extending that class. Our receiver defines a local constant for the Intent action it wants to catch, in this case, android.provider.Telephony.SMS_RECEIVED.
Next, we filter for the action we want on the onReceive method ![]() , and we get the SMS data from the Intent extras Bundle using the key pdus
, and we get the SMS data from the Intent extras Bundle using the key pdus ![]() . The Bundle is a hash that contains Android data types.
. The Bundle is a hash that contains Android data types.
PDU, or protocol data unit, refers to one method of sending information along cellular networks. SMS messaging, as described in the 3rd Generation Partnership Project (3GPP) Specification, supports two different ways of sending and receiving messages. The first is text mode, which some phones don’t support. Text mode encodes message content as a simple bit stream. The other is PDU mode, which not only contains the SMS message, but also metadata about the SMS message, such as text encoding, the sender, SMS service center address, and much more. To access this metadata, mobile SMS applications almost always use PDUs to encode the contents of a SMS message. For more information about PDUs and the metadata they provide, refer to the specification titled “Technical Realization of the Short Message Service (SMS)” which you can find at http://www.3gpp.org/ftp/Specs/html-info/23040.htm. This document, part of the 3GPP TS 23.040 Specification, is extremely technical but will help you with developing more sophisticated SMS applications.
For every pdu Object that we receive, we need to construct an SmsMessage by casting the data to a byte array ![]() . After this conversion, we can use the methods in that class, such as getDisplayMessageBody.
. After this conversion, we can use the methods in that class, such as getDisplayMessageBody.
Note
If you run the example shown in listing 7.8, you’ll see that even though the receiver does properly report the message, the message still arrives in the user’s inbox. Some applications might process specific messages themselves and prevent the user from ever seeing them; for example, you might implement a play-by-SMS chess program that uses text messages to report the other players’ moves. To consume the incoming SMS message, call abortBroadcast from within your onReceive method. Note that your receiver must have a priority level higher than that of the inbox. Also, certain versions of the Android OS don’t honor this request, so test on your target devices if this behavior is important to your app.
Congratulations! Now that you’ve learned how to send SMS messages programmatically, set permissions appropriately, and you can receive and work with incoming SMS messages, you can incorporate useful SMS features into your application.
7.5. Summary
Our trip through the Android telephony-related APIs covered several important topics. After a brief overview of some telephony terms, we examined Android-specific APIs.
You accessed telephony information with the TelephonyManager, including device and SIM card data and phone state. From there, we addressed hooking in a PhoneStateListener to react to phone state changes.
Besides retrieving data, you also learned how to dial the phone using built-in intents and actions, intercept outgoing phone calls, and format numbers with the PhoneNumberUtils class. After we covered standard voice usages, we looked at how to send and receive SMS messages using the SmsManager and SmsMessage classes.
In the next chapter, we’ll turn to the specifics of interacting with notifications and alerts on the Android platform. We’ll also revisit SMS and you’ll learn how to notify users of events, such as an incoming SMS, by putting messages in the status bar, flashing a light, or even by making the phone vibrate.