
Chapter 17. AppWidgets
- Introducing the AppWidget
- Introducing the sample application: SiteMonitor
- Implementing the AppWidgetProvider
- Configuring an AppWidget instance
- Updating the AppWidgets
Continuing with the theme of exploring the maturing Android platform, this chapter examines the AppWidget, which brings functionality to the phone-top, or home screen, of an Android device. In this chapter, you construct an application named SiteMonitor that ties together much of the fundamental application development skills from prior chapters and adds an interactive presence on the home screen.
By placing content directly on the Android device’s home screen, you empower the user to fully leverage the platform by making powerful tools available for use quickly and conveniently. Think about it—the deeper a user has to tap into an application to find information of value, the less likely the application will become an everyday staple. The goal is to create a mobile experience that brings value without becoming a black hole of time, attention, or worse, annoyance. A key ingredient to meeting this objective is the effective use of the AppWidget. This chapter equips you with an understanding of the uses and architecture of AppWidgets. It walks step by step through the creation of a nontrivial AppWidget example application, including important tasks such as configuration, data, and GUI updates, and wraps up with a discussion of the elements required within the application’s AndroidManifest.xml file.
17.1. Introducing the AppWidget
When a user picks up an Android device (or any smartphone for that matter), their first impression is often defined by their experience interacting with the phone’s home screen. On the home screen, a user interacts with applications, initiates a phone call, searches the device, launches a browser, and more. By the time the user begins to browse for an application among the sea of icons in the launcher window, a certain percentage of users will be “lost” and will conclude that the device just isn’t “user friendly.” This can be likened to burying important web content deep within a website—you need to be wary of hiding the value of your applications. One solution to this challenge for Android is to employ an AppWidget.
17.1.1. What’s an AppWidget?
An AppWidget is code that runs on the home screen of an Android device. The visual size of an AppWidget instance can vary and is designated by the programmer at design time. The home screen is broken up into 16 usable spaces, each of which is approximately 74 pixels square. An AppWidget can span a rectangular area ranging from 1×1 spaces to 4 × 4 spaces, provided there’s room on the current home screen “page.” (A typical phone has around five to nine home screen pages.)
An AppWidget is typically deployed as a read-only interface providing a view into application data. The UI is implemented in a manner similar to a layout for a traditional Android Activity. Unlike the Activity, the AppWidget is much more constrained in that the only user action permitted is a click. An AppWidget can’t present a scrollable list, an EditText, or any other user input mechanism beyond something that can react to a click. When anything beyond a click is required as user interaction, it’s prudent to load an Activity for the heavy lifting—an AppWidget just isn’t designed for significant user interactions. In this case, the AppWidget acts as a storefront for the underlying Activity. It accepts a click and then hands control off to the back office, implemented typically by an Activity.
Despite this apparent shortcoming, not all AppWidgets require anything beyond a basic user interface. For example, consider the Power Control Widget shown in figure 17.1. The Power Control Widget is an excellent demonstration of simplicity and value. This widget is used to enable and disable various system services such as Bluetooth, Wi-Fi, GPS, and other battery-impacting functions. GPS services are a significant drain on the battery—the fact that the Power Control Widget exposes this on/off feature so easily makes the use of location-based services a more realistic option for Android users. On other phone platforms, this kind of functionality is generally “hidden” under system or option menus.
Figure 17.1. Power Control Widget on the home screen

You add AppWidgets to the home screen by pressing and holding an empty area until a menu launches, as shown in figure 17.2.
Figure 17.2. Add to home screen

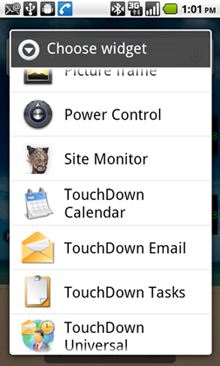
From this menu, select Widgets and available AppWidgets are displayed in a scrollable list, as shown in figure 17.3. Tap on the desired widget to add an instance to your home screen.
Figure 17.3. Choose a widget, any widget.
An AppWidget runs under another application, namely an AppWidgetHost, which is typically the device’s home screen. The AppWidget code is implemented in an instance of an AppWidgetProvider, which is an extension of the BroadcastReceiver class. Recall from prior chapters that a BroadcastReceiver is defined as a “receiver” in the AndroidManifest.xml file. The AppWidgetProvider is a BroadcastReceiver with a special IntentFilter and a metadata tag that further defines the AppWidgetProvider’s characteristics. An AppWidget may be implemented in code as a BroadcastReceiver alone, yet the AppWidgetProvider provides some convenience wrapper functionality and is the recommended means of coding an AppWidget.
AppWidgets are designed to be updated periodically. The stock implementation of an AppWidget automatically updates at an interval defined by the developer at design time. In general, this update is kept to a low frequency to conserve battery power. There are other mechanisms for updating an AppWidget on an as-needed basis through the use of Intents. The AppWidgetProvider extends BroadcastReceiver and therefore can receive different Intent Actions based on the defined IntentFilters. The common practice is to define an application-specific IntentFilter action and use the sendBroadcast method to trigger an AppWidget update on an as-needed basis.
The details of the AppWidgetProvider, the special metadata in the AndroidManifest, IntentFilters, RemoteViews, and much more are all discussed in this chapter. Before we delve into the details of constructing an AppWidget, let’s consider the various design patterns an AppWidget can satisfy.
17.1.2. AppWidget deployment strategies
In its most basic implementation, an AppWidget can be considered a dashboard of sorts. The Power Control Widget shown in figure 17.1 is a good example of this flavor of AppWidget. This AppWidget has no other user interface to which it’s tied and any actions taken directly invoke an underlying request to enable or disable a system feature. In any normal scenario, there’d be at most one Power Control Widget deployed to the home screen. A user is free to add multiple copies of the Power Control Widget to their home screen, but there’s no additional utility or benefit from doing so.
Now consider an AppWidget for Facebook or Twitter, as shown in figure 17.4.
Figure 17.4. Tweeting about this chapter!
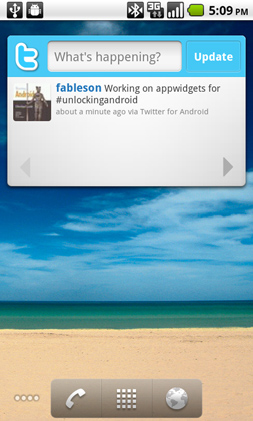
Some people have multiple social media accounts and may desire multiple AppWidgets instantiated for making updates to specific accounts. In this scenario, each AppWidget instance is tied to its own set of data. For the purposes of this chapter, we’ll call this data the AppWidget instance model. Each instance of the AppWidget has its own set of data—which in the case of a Twitter account widget would look like username/password information plus any cached data related to the specific account. We go into significant detail later in this chapter on how to manage this per-widget data.
One role an AppWidget can play is as a “smart shortcut.” Rather than simply displaying a static shortcut to an application, the AppWidget provides a means of displaying pertinent and timely information to the user. When clicked, the AppWidget loads the relevant Activity or launches a relevant web page. Consider, for example, a calendar widget that displays upcoming events on the home screen. Tapping on the widget causes the calendar application to load, jumping to the specific event of interest.
Due to the variable nature of an AppWidget’s deployment strategy, it’s important to give some consideration to how an AppWidget interacts with the other Android-based application components. What may seem like a simple AppWidget application may in fact require the collaboration of multiple components. Table 17.1 presents a nonexhaustive list of options for how an AppWidget may interact with other components within a suite of applications.
Table 17.1. Various AppWidget deployment patterns
|
Description |
Additional application components |
Example |
|---|---|---|
| AppWidget standalone | Singleton. No configuration options. No Activity required. May use a Service to process a longer-running request in some implementations. | Power Control. |
| AppWidget as smart shortcut | Used to present information and upon a click loads an Activity. | Email widget showing the number of messages in an inbox or upcoming events in a calendar. |
| AppWidget with specific static data | Configuration required. Variable amounts of data associated with each widget instance. | PictureFrame widget showing a user-selected image from the gallery. |
| AppWidget with dynamic data | Configuration required. Variable amounts of data associated with each widget. Service used to update data. BroadcastReceiver used to respond to alarm invocations or other triggers that prompt updates at various times. | News application widgets. The sample application from this chapter, SiteMonitor, demonstrates this pattern. |
What makes AppWidgets specifically (and Android generally) so appealing to a developer is the ability to distribute code that provides a small, focused piece of functionality. For example, let’s say you have a great idea to make interacting with the calendar much easier: the “Killer Calendar App.” In traditional mobile development, implementing your idea would require replacing the entire calendar application. With Android’s architecture, a developer can distribute their application as simply an AppWidget that provides a better interface, yet not have to replace the mountains of work already shipped in the form of built-in applications! What’s more, portions of your code could be called by third-party applications, provided they have the appropriate permissions.
Creating an AppWidget isn’t something to be taken lightly. There are decisions to be made and pitfalls to avoid—all of which we cover in this chapter. Before we dive into the weeds of constructing an AppWidget of our own, let’s take a step back and review the design objectives of SiteMonitor, our sample application for this chapter that provides the context for learning about AppWidgets.
17.2. Introducing SiteMonitor
To demonstrate the AppWidget, this chapter presents an application named SiteMonitor. SiteMonitor is a simple utility used to help monitor hosted applications such as blogs, commerce sites, and the like—web-based applications.
17.2.1. Benefits of SiteMonitor
The premise of SiteMonitor is that an Android device is highly connected and highly capable, and therefore should be leveraged to provide more value to the user than simply functioning as a fancy email device. Although this application may not be appealing to the mass consumer market, there’s a nontrivial population of individuals (entrepreneurs, system admins, service providers, and so on) who have an interest in keeping one or more websites running.
The implications of a website/hosted application not running properly range from annoyance, to embarrassment, to loss of revenue when a commerce site isn’t accepting transactions. Being able to keep an eye on a collection of online assets from anywhere is empowering and can even make things like a day out of the office seem more realistic. Mobile devices today often feel like long leashes—perhaps this application can lend a few more feet to the leash?
Of course it’s possible to receive SMS alerts or emails when a site is no longer available with server-side tools and third-party services—which is fine and applicable in many instances. But keep in mind that SiteMonitor works entirely without server-side integration, another desirable feature that’s in line with the trend of today’s mobile applications.
SiteMonitor is an AppWidget designed to meet the objective of monitoring website health. Let’s start with the high-level user experience.
17.2.2. The user experience
Checking on websites is possible today with an Android device—just bookmark a bunch of application URLs in the WebKit browser and check on them. And then check on them again. And again. You get the picture; it’d be desirable to get some automated assistance for this basic and repetitive task. The logical answer is to code an application to do this for you. In this case, SiteMonitor employs an AppWidget to bring useful information directly to the phone’s home screen. Let’s look at the user interface.
Figure 17.5 shows the home screen of an Android device with four instances of the SiteMonitor widget configured to monitor four different applications.
Figure 17.5. Four instances of the SiteMonitor AppWidget on the home screen
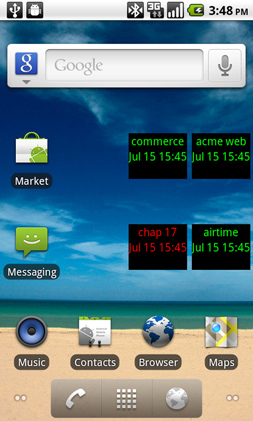
The UI is admittedly lackluster, but the information is precisely what’s needed in this situation. At a glance you can see that of the four sites being monitored, three are up (green) and one is in an error condition (red). You can see the name of each site and the date/time of the most recent update. Tapping on one of the SiteMonitor widget instances brings up an Activity where you can see detailed information about the site.
The widget-specific data includes not only the configuration values for the hosted application but also the most recent data retrieved from the hosted application. For example, you see in figure 17.6 that this particular site, named “chap 17,” has a low disk space warning. The application can easily support multiple conditions; for now let’s keep things simple with a good condition and a bad condition. Good sites are shown in green and bad are shown in red on the home screen.
Figure 17.6. Site details, including hot-linked text

Still referring to figure 17.6, note that the screen has support for maintaining three different fields, each implemented as an EditText control. The first Edit-Text instance manages the name of the site. Space is limited on the widget, so it’s best to keep the length of this name limited. Note that the widget can be expanded to take more space and therefore permit more descriptive names, and most users will be able to use a short descriptor such as a server name or a client’s nickname. More importantly, you want to fit multiple instances of the SiteMonitor widget on the home screen, so they shouldn’t take up any more space than absolutely necessary.
The next EditText field holds the URL that the application periodically pings to check the status of the site. When it’s time to update the status of a particular hosted application, SiteMonitor performs an HTTP GET against this URL and expects a pipe-delimited return string. For example, a response from a commerce site might look like the following:
GOOD|There are 10 orders today, totaling $1,000.00
Or perhaps a site that’s down might have a response that looks like this:
BAD|Cannot reach payment processor. Contact fakepaymentprocessor.com
at 555-123-4567
The third EditText field stores the site’s home page. When the Visit Site button is clicked, the application opens a browser and navigates to this URL. Why is this feature included? The answer is simple: the most common reaction to receiving a “the site is down” notification is to check out the site firsthand to see what kind of errors may be presenting themselves to site visitors. This approach is much easier than firing up the browser and tapping in a complete URL—particularly under duress!
Referring again to figure 17.6, note the highlighted phone number contained in the TextView field. Selecting that link causes the phone to launch the dialer as shown in figure 17.7. This TextView has the autoLink attribute enabled. When this attribute is enabled, the application is requesting that Android scan the textual information and attempt to turn any data that looks like a link into a clickable hotspot. Android can optionally look for websites, email addresses, phone numbers, and so forth. This feature is one more step in making things as streamlined as possible for a mobile user to support a hosted application.
Figure 17.7. Easy dialing to an affected user
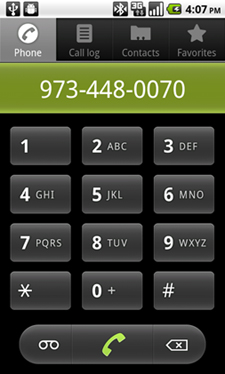
Let’s say the user is out to dinner and equipped only with an Android device when a site goes down or experiences an urgent condition. It may not be convenient or feasible to look up detailed support information about a particular hosted application, particularly if this site is one of many. When an error condition is observed, it’s useful to have key actionable data right at your fingertips. This is akin to a “break glass in case of emergency” situation. An emergency has occurred, so let’s be as prepared as possible.
The application isn’t limited to returning only bad news—it’s feasible to have the application monitor good news as well. For example, figure 17.8 shows that the Acme site has received over $1,000 worth of business today! Note the highlighted numbers: one of the side effects of the auto-linking is that it sometimes returns false positives.
Figure 17.8. Monitor the good news also—revenue!

The SiteMonitor application is AppWidget-centric. Although you can configure and examine various aspects of a specific site through the configuration Activity, there’s no other means of interacting with the application. This application doesn’t appear in the main launcher screen. As a natural consequence of relying solely on instances of an AppWidget for the UI, the number of sites monitored by SiteMonitor is limited by the amount of home-screen real estate available upon which SiteMonitor widget instances can be placed. Remember the motivation to keep an AppWidget design as conservative as possible with respect to screen real estate. It’s impossible to have an AppWidget that takes up less than one of the 16 available spaces on a home screen page, but easy to have one that’s larger than a 1 × 1 space.
Please keep in mind that this choice of making SiteMonitor available exclusively as an AppWidget is an arbitrary design decision to demonstrate working with an AppWidget. A simple extension of this application could remove this intentional limitation. To add this application to the home screen, you could add an Activity that presents each of the monitored sites and then add the Activity to the home screen launcher.
Now that you have a basic understanding of what SiteMonitor is attempting to do, it’s time to look at how the application is constructed.
17.3. SiteMonitor application architecture
Let’s start with a high-level architectural view and then drill down so that you can better understand each major aspect of the SiteMonitor application. Some of the code examples are provided in this chapter in an abbreviated form due to their length. You’re encouraged to download the full project to walk through the code as you move through the balance of this chapter.
Let’s begin with a pictorial representation of the application.
17.3.1. Bird’s-eye view of the application
The SiteMonitor application relies on multiple Android application components to deliver the desired functionality. Figure 17.9 depicts the major components of the application.
Figure 17.9. Architectural diagram of the SiteMonitor application

Examining in more detail the elements depicted in figure 17.9, you see an Android device ![]() hosting multiple instances of AppWidgets
hosting multiple instances of AppWidgets ![]() . In this diagram, each of the four AppWidgets represents an instance of the SiteMonitorWidget. This AppWidget class is implemented in the class named SiteMonitorWidgetImpl that extends an Android-provided class named AppWidgetProvider.
. In this diagram, each of the four AppWidgets represents an instance of the SiteMonitorWidget. This AppWidget class is implemented in the class named SiteMonitorWidgetImpl that extends an Android-provided class named AppWidgetProvider.
Each instance of the SiteMonitor widget is configured by the user to monitor a distinct hosted application/website in the
collection of sites ![]() . The relationship between a specific widget instance and its data is stored in the application’s SharedPreferences
. The relationship between a specific widget instance and its data is stored in the application’s SharedPreferences ![]() persistent store. The class SiteMonitorModel provides methods for managing and manipulating these data model instances. An Activity
persistent store. The class SiteMonitorModel provides methods for managing and manipulating these data model instances. An Activity ![]() is employed to permit a user to configure the widget instance data. This Activity is implemented as class SiteMonitorConfigure.
is employed to permit a user to configure the widget instance data. This Activity is implemented as class SiteMonitorConfigure.
Each time a new SiteMonitor widget is added to the home screen, the SiteMonitorConfigure Activity is invoked to query the user for site-specific data: name, URL, home page. This auto-launching of an Activity happens thanks to a special relationship between an AppWidget class and its configuration activity. This relationship is defined in the metadata file ![]() . This metadata is referenced by the <receiver> entry of the SiteMonitorWidgetImpl class in the manifest file
. This metadata is referenced by the <receiver> entry of the SiteMonitorWidgetImpl class in the manifest file ![]() . Note that the practice of having a configuration Activity for an AppWidget is optional.
. Note that the practice of having a configuration Activity for an AppWidget is optional.
When a SiteMonitor widget instance is added or removed, a corresponding method in the SiteMonitorWidgetImpl class is invoked. The specific methods of this class are described in section 17.3.2. The Android provided AppWidgetManager class ![]() acts as a helper to provide a list of AppWidget identifiers related to the SiteMonitorWidgetImpl class. At this point, there are multiple widget instances on the home screen, updating their visual display according to
an update-refresh interval setting defined in the metadata file
acts as a helper to provide a list of AppWidget identifiers related to the SiteMonitorWidgetImpl class. At this point, there are multiple widget instances on the home screen, updating their visual display according to
an update-refresh interval setting defined in the metadata file ![]() .
.
As mentioned earlier, it’s common practice to perform an AppWidget update outside of its normally defined update interval. This update is generally accomplished through the use of a Service, often triggered by an Alarm. It’s not a recommended practice to have long-running Services in the background, so you use the preferred method of employing an Alarm ![]() that propagates a PendingIntent.
that propagates a PendingIntent.
The PendingIntent contains an Intent that’s received by the SiteMonitorBootstrap class ![]() . This class also contains static methods for managing the alarm, called at various points in the application, each of which
is discussed further in this chapter. Consider the condition where there are no SiteMonitor widgets instantiated on the home
screen. If there are no hosted applications to monitor, there’s no need to have a periodic alarm activated. Likewise, when
a new SiteMonitor widget is added to the home screen, it’s desirable for an alarm to be set to ensure that the widget is updated
periodically. The relationship between the Intent Action triggered by the alarm and consumed by the SiteMonitorBootstrap class is defined in the manifest
. This class also contains static methods for managing the alarm, called at various points in the application, each of which
is discussed further in this chapter. Consider the condition where there are no SiteMonitor widgets instantiated on the home
screen. If there are no hosted applications to monitor, there’s no need to have a periodic alarm activated. Likewise, when
a new SiteMonitor widget is added to the home screen, it’s desirable for an alarm to be set to ensure that the widget is updated
periodically. The relationship between the Intent Action triggered by the alarm and consumed by the SiteMonitorBootstrap class is defined in the manifest ![]() . The Action field of the Intent set in the Alarm’s PendingIntent matches the IntentFilter Action for the SiteMonitorBootstrap.
. The Action field of the Intent set in the Alarm’s PendingIntent matches the IntentFilter Action for the SiteMonitorBootstrap.
When the SiteMonitorBootstrap ![]() receives the Intent in its onReceive method, the resulting step is the starting of SiteMonitorService
receives the Intent in its onReceive method, the resulting step is the starting of SiteMonitorService ![]() . The SiteMonitorService is responsible for carrying out the updates and checking on the hosted applications.
. The SiteMonitorService is responsible for carrying out the updates and checking on the hosted applications.
When it’s started, the SiteMonitorService iterates through the available widgets thanks again to assistance from the AppWidgetManager ![]() , which provides a list of widgets. For each active widget instance, the Service extracts the hosted application’s URL and performs an HTTP GET to retrieve the most up-to-date status information. The data model for each active AppWidget is updated with the information retrieved from the hosted application. When all the site data has been updated, the Service sends an Intent broadcast, in effect asking the SiteMonitorWidgetImpl class to update the visual status of the widgets themselves.
, which provides a list of widgets. For each active widget instance, the Service extracts the hosted application’s URL and performs an HTTP GET to retrieve the most up-to-date status information. The data model for each active AppWidget is updated with the information retrieved from the hosted application. When all the site data has been updated, the Service sends an Intent broadcast, in effect asking the SiteMonitorWidgetImpl class to update the visual status of the widgets themselves.
As you can see, there are quite a few moving pieces here in this prototypical AppWidget application. It may be helpful to refer back to this section as you consider each of the ensuing code descriptions. Let’s now take a tour of the files in the project.
17.3.2. File by file
We’ll be looking at code snippets soon, but first let’s tour the project from a high level, discussing the purpose of each significant file in the project. Figure 17.10 shows the project in the Eclipse IDE, and table 17.2 provides a brief comment for each file.
Figure 17.10. SiteMonitorWidget in Eclipse

Table 17.2. File listing for this project
|
Filename |
Comment |
|---|---|
| AndroidManifest.xml | Contains definitions of each Application component in the application along with IntentFilters and required permissions. |
| sitemonitorwidget.xml | Defines AppWidgetProvider-specific attributes, including dimensions, configuration activity, icon, and initial UI layout. |
| SiteMonitorWidgetImpl.java | Contains the AppWidgetProvider implementation. |
| SiteMonitorConfigure.java | Contains the Activity used to manipulate a specific entry’s data and to view data received from a remote hosted application. |
| SiteMonitorModel.java | Contains the methods for managing the SharedPreferences that store widget-specific data elements. |
| SiteMonitorService.java | Service responsible for performing the actual monitoring of remote sites. Network communications take place on a background thread. |
| SiteMonitorBootstrap.java | Contains code related to alarm management and is responsible for triggering the SiteMonitorService under various conditions, including alarm firing. |
| monitor.xml | Defines the user interface elements used by the AppWidget on the home screen. |
| main.xml | Defines the user interface elements used in the SiteMonitorConfigure Activity. |
| strings.xml | Contains externalized strings; useful for easy management of textual data and for potential localization. |
With this foundational understanding of how the various pieces relate to one another, it’s time to start looking at the code behind this application. Although it may be tempting to jump into the AppWidgetProvider implementation, we first need to look at the code for handling the AppWidget-specific data.
17.4. AppWidget data handling
As mentioned earlier, each instantiated AppWidget has a unique numeric identifier represented as an integer primitive (int). Any time the application is asked to work on a particular AppWidget, this identifier value is available to the code. Sometimes it’s provided, as in an Intent’s extras bundle; in other circumstances a collection of widget identifiers is retrieved from the AppWidgetManager as an array of integers (int []). Regardless of its source, managing the relationship between this identifier and the AppWidget instance-specific data defined by your own applications is crucial for success.
For the SiteMonitor application, all data management is performed by the SiteMonitorModel class, contained in the SiteMonitorModel.java source file. The SiteMonitorModel class can be broken down into two logical sections: the instance data and methods, and the static method. The instance portion of the class includes a number of String member variables, their respective getter and setter methods, and helpful bundling and unbundling methods.
The underlying data storage persistence method is the application’s SharedPreferences, which we introduced in chapter 5. To keep things simple, every data element is stored as a java.lang.String. When the entire “record” needs to be stored, the data elements are combined into a composite delimited String. When the data is read out of the SharedPreferences, the retrieved String is parsed and stored into respective members based on ordinal position in the string. Although this approach is perhaps pedestrian, it’s perfectly adequate for our purposes. Alternatively, we could’ve employed an SQLite database or constructed our own ContentProvider, but both of those mechanisms are overkill for this purpose at present. A ContentProvider is often only justified if the data needs to be shared with components outside of a single application suite.
The data elements managed for each AppWidget include:
- Site name
- Site update URL
- Site home page URL
- Status
- Last status date
- Message/comments
The class also includes four static methods used as helpers to manipulate instances of widget data throughout the application. Three of these methods are related to persistence of SiteMonitorModel data, and a fourth provides date formatting. This date formatting method was included to help standardize and centralize Date string representation.
The following listing presents the implementation of the SiteMonitorModel class, minus a few setter/getters, which are omitted here but are included in the full source listing available for download.
Listing 17.1. SiteMonitorModel class
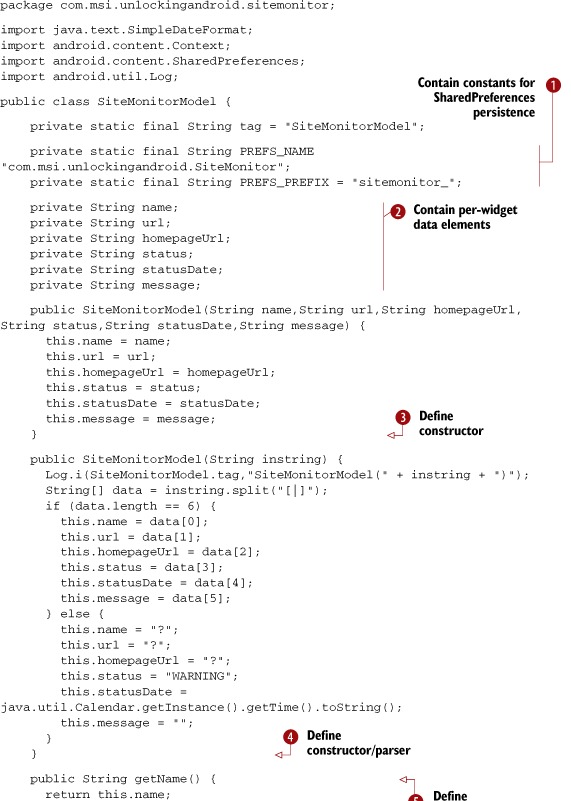

The SiteMonitorModel class meets the data management needs of the SiteMonitor AppWidget. The underlying data persistence method is the application SharedPreferences and as such a couple of constant String values are employed ![]() to identify the SharedPreferences data. Each data element is defined as a String member variable
to identify the SharedPreferences data. Each data element is defined as a String member variable ![]() . Two distinct constructors are employed. The first constructor
. Two distinct constructors are employed. The first constructor ![]() is for creating a new instance from distinct String values, and the second constructor
is for creating a new instance from distinct String values, and the second constructor ![]() is used to parse out data for an existing widget that has been retrieved from a SharedPreference.
is used to parse out data for an existing widget that has been retrieved from a SharedPreference.
Only one set of getter/setter methods ![]() is shown in this listing, but they all employ the same basic bean pattern.
is shown in this listing, but they all employ the same basic bean pattern.
When preparing data to be stored in the SharedPreferences, the widget instance data is reduced to a single delimited String with the assistance of the storageString method ![]() . The toString() method
. The toString() method ![]() is overridden and invokes the storageString method.
is overridden and invokes the storageString method.
Data storage, retrieval, and deletion are handled in statically defined methods. The saveWidgetData ![]() method stores the widget data with a key of PREFIX_NAME + widgetIdentifier. This means that the data for a widget with an ID of 200 would look like this:
method stores the widget data with a key of PREFIX_NAME + widgetIdentifier. This means that the data for a widget with an ID of 200 would look like this:
sitemonitor_200 = "sitename|url|homepageurl|status|statusDate|message"
For more specifics on using SharedPreferences, refer to chapter 5.
Widget data is retrieved from SharedPreferences in the getWidgetData method ![]() . This method returns a SiteMonitorModel
. This method returns a SiteMonitorModel ![]() by employing the parsing version of the constructor
by employing the parsing version of the constructor ![]() .
.
When a widget is removed from the device, you delete the associated data with a call to deleteWidgetData ![]() .
.
Finally, the getFormattedDate method ![]() is responsible for formatting a java.util.Date string into a String representation with the help of a SimpleData-Format class.
is responsible for formatting a java.util.Date string into a String representation with the help of a SimpleData-Format class.
At this point you should have a good feel for what data is managed and where it lives. Let’s get to the code to actually implement an AppWidget!
17.5. Implementing the AppWidgetProvider
The AppWidgetProvider for the SiteMonitor application is implemented in the file SiteMonitorWidgetImpl.java. The AppWidgetProvider is responsible for handling updates to the UI as well as responding to housekeeping events related to the AppWidget lifecycle, and is arguably the most important aspect of AppWidget programming to understand. Because of its centrality and importance to working with AppWidgets, we’re going to look at the code from two perspectives.
17.5.1. AppWidgetProvider method inventory
The methods presented in table 17.3 represent the core AppWidgetProvider functionality. Although these methods are common to AppWidgetProviders, the comments are made in the context of the SiteMonitor application. Also, the final two methods (denoted with *) are custom to the SiteMonitor application.
Table 17.3. Inventory of AppWidgetProvider methods
|
Method name |
Comment |
|---|---|
| onReceive | This is the same method found in all BroadcastReceiver classes. It’s used to detect ad hoc update requests, which it then hands off to the onUpdate method. |
| onUpdate | This method is responsible for updating one or more widget instances. The method receives an array of widget identifiers to be updated. |
| onDeleted | This method is invoked when one or more widgets are deleted. Like the onUpdate method, this method receives an array of widget identifiers—in this case each of these widgets has just been deleted. This method is responsible for cleaning up any data stored on a per-widget basis. |
| onEnabled | This method is invoked when the first AppWidget instance is placed on the home screen. In SiteMonitor this method initiates an Alarm sequence, which forces an update on a specific interval as defined within the SiteMonitorBootstrap class. |
| onDisabled | This method is invoked when the final AppWidget instance is removed from the home screen. When there are no instances of the SiteMonitor widget, there’s no need for updating them. Therefore the alarm is cleared. This method doesn’t reliably get called when you think it ought to be invoked. |
| *UpdateOneWidget | This static method is responsible for performing the update on a specific widget. Because there are multiple scenarios for interacting with the AppWidgets in our class, it was desirable to consolidate all widget UI impacting code into a single method. |
| *checkForZombies | The AppWidget subsystem has a nasty habit of leaving widgets behind without an effective means of cleaning them up short of a reboot. Consequently our AppWidgetProvider instance is consistently being asked to perform operations on widgets that don’t exist any longer. This method is used as a helper to the onDisabled method. Every time the onDelete method is invoked, call this method to perform an additional cleanup step. When no legitimate widgets are detected, clear the update alarm, performing the job that the onDisabled method can’t reliably perform. |
You now know what the method names are and the responsibility of each. It’s time to examine the code. Let’s begin with the implementation of an AppWidgetProvider as we look at SiteMonitorWidgetImpl.
17.5.2. Implementing SiteMonitorWidgetImpl
There’s a lot of code to examine in this class, so we’re going to break it into a couple of sections. In listing 17.2 you can see the basic callbacks or hooks that respond to the AppWidget events. As you know, every widget in the system has an integer identifier. When you’re working with AppWidgets, it’s common to manipulate an array of these identifiers, as shown in the upcoming listings, so keep an eye out for those identifiers as you review the code.
Listing 17.2. SiteMonitorWidgetImpl, which implements AppWidget functionality


The first thing to observe in listing 17.2 is the presence of some imports ![]() that provide resolution for the AppWidget-related classes. A String constant
that provide resolution for the AppWidget-related classes. A String constant ![]() is defined for comparing against Intents received by this class in the onReceive method
is defined for comparing against Intents received by this class in the onReceive method ![]() . Note that the protection level of this constant is public. It’s declared as a public member because this String is used by other classes in the application to trigger an update request.
. Note that the protection level of this constant is public. It’s declared as a public member because this String is used by other classes in the application to trigger an update request.
The onUpdate method ![]() is invoked both periodically based on the widget’s update frequency as well as on an ad hoc basis. Note that when this update
occurs, it’s simply performing a refresh of the AppWidget UI. The actual refreshing of the underlying data model is a separate and distinct operation, which is discussed in detail
in section 17.8.
is invoked both periodically based on the widget’s update frequency as well as on an ad hoc basis. Note that when this update
occurs, it’s simply performing a refresh of the AppWidget UI. The actual refreshing of the underlying data model is a separate and distinct operation, which is discussed in detail
in section 17.8.
Once you have a list of widgets that require updating, each is updated in turn with a call to SiteMonitorWidgetImpl.UpdateOneWidget ![]() . This method is defined as a static method, as it’s also called from the SiteMonitorConfigure Activity.
. This method is defined as a static method, as it’s also called from the SiteMonitorConfigure Activity.
The onDeleted method ![]() handles the scenario where a widget is removed from the home screen. When this method is invoked, it in turn calls the super
class’s onDeleted method. Next it removes the data related to each deleted widget with a call to SiteMonitorModel.deleteWidgetData. Finally, this method wraps up with a call to check for zombie widgets (which we describe in a moment) by calling checkForZombies
handles the scenario where a widget is removed from the home screen. When this method is invoked, it in turn calls the super
class’s onDeleted method. Next it removes the data related to each deleted widget with a call to SiteMonitorModel.deleteWidgetData. Finally, this method wraps up with a call to check for zombie widgets (which we describe in a moment) by calling checkForZombies ![]() . It’s not uncommon to have a widget identifier allocated but the widget itself not actually created. An example of this is
when a configuration activity is launched but then canceled by the user—no widget data gets created so you wind up with widget
identifiers not attached to meaningful widget data. The reason you want to track this situation is to disable the update alarm
when no legitimate widgets remain. Also, note that the arguments to this method include an array of integers representing
the list of deleted widget instances. This array will usually consist of only a single widget.
. It’s not uncommon to have a widget identifier allocated but the widget itself not actually created. An example of this is
when a configuration activity is launched but then canceled by the user—no widget data gets created so you wind up with widget
identifiers not attached to meaningful widget data. The reason you want to track this situation is to disable the update alarm
when no legitimate widgets remain. Also, note that the arguments to this method include an array of integers representing
the list of deleted widget instances. This array will usually consist of only a single widget.
When the AppWidgetProvider is enabled ![]() , the update alarm is “set.” Note that the onEnabled method can be used for other housekeeping setup tasks as well. This method is triggered when the first AppWidget is created.
, the update alarm is “set.” Note that the onEnabled method can be used for other housekeeping setup tasks as well. This method is triggered when the first AppWidget is created.
The mirror image of the onEnabled method is the onDisabled method ![]() . This method cancels the alarm set previously in the onEnabled method. This method isn’t called when you think it ought to be! Why? Because of the “zombie” widgets that lurk about in the
ether. It’s for this reason that the checkForZombies method was added to this class, accommodating for the scenario where there are no active widgets but the operating system
believes they still exist. These widgets will persist until the device is rebooted. The moral of the story here is that although
these callback methods are nice to have, it’s ultimately up to the developer to manage around the system. This will in all
likelihood be rectified in future releases but as of Android version 2.2, this “feature” remains.
. This method cancels the alarm set previously in the onEnabled method. This method isn’t called when you think it ought to be! Why? Because of the “zombie” widgets that lurk about in the
ether. It’s for this reason that the checkForZombies method was added to this class, accommodating for the scenario where there are no active widgets but the operating system
believes they still exist. These widgets will persist until the device is rebooted. The moral of the story here is that although
these callback methods are nice to have, it’s ultimately up to the developer to manage around the system. This will in all
likelihood be rectified in future releases but as of Android version 2.2, this “feature” remains.
Rounding out this code listing, you see the onReceive method ![]() . This is the same method required of all BroadcastReceiver implementations—recall that AppWidgetProvider extends the BroadcastReceiver. The super class’s onReceive method is invoked and then the Intent is examined
. This is the same method required of all BroadcastReceiver implementations—recall that AppWidgetProvider extends the BroadcastReceiver. The super class’s onReceive method is invoked and then the Intent is examined ![]() . If the Intent matches the special update constant defined in this class, SiteMonitorWidgetImpl.UPDATE_WIDGETS, the code gathers a list of relevant widget identifiers
. If the Intent matches the special update constant defined in this class, SiteMonitorWidgetImpl.UPDATE_WIDGETS, the code gathers a list of relevant widget identifiers ![]() and passes them to the onUpdate method to be refreshed visually.
and passes them to the onUpdate method to be refreshed visually.
17.5.3. Handling zombie widgets
We’ve discussed at length the nature of the relationship between the widget identifier and the widget data as defined and managed in the SiteMonitorModel class. There are a number of places in the application where a widget identifier is available and the code needs to check for the presence of legitimate data. One example of this is the processing that occurs after a widget instance is deleted. Listing 17.3 demonstrates a technique for keeping track of legitimate versus zombie widget identifiers. If no legitimate identifiers are found, the code disables the alarm—there’s no need to take up more system resources than necessary.
Listing 17.3. Dealing with AppWidgets that won’t die off

All interactions with widgets rely on the availability of a valid widget identifier. To obtain this information, the code
must have access to the AppWidgetManager, which is obtained with a call to that class’s static getInstance method ![]() . The AppWidget-Manager has a method named getAppWidgetIds
. The AppWidget-Manager has a method named getAppWidgetIds ![]() that takes a ComponentName argument. For each widget identifier, you attempt to load widget-specific data
that takes a ComponentName argument. For each widget identifier, you attempt to load widget-specific data ![]() . If no valid widget identifier-to-data relationships are found, you can clear the alarm with a call to SiteMonitorBootstrap.clearAlarm
. If no valid widget identifier-to-data relationships are found, you can clear the alarm with a call to SiteMonitorBootstrap.clearAlarm ![]() .
.
We have one method remaining to review: UpdateOneWidget. This method covers such a broad range of topics that it’s discussed in its own section, coming up next.
17.6. Displaying an AppWidget with RemoteViews
An AppWidget runs in the process space of another application, typically the home screen. Running in the space of another application has an impact on what can and can’t be accomplished when interacting with UI elements. This section demonstrates how an AppWidget’s user interface is managed through the use of the RemoteViews class.
17.6.1. Working with RemoteViews
The RemoteViews class is used to permit a View to be displayed and managed from a separate process. Unlike a traditional ViewGroup layout, which may be readily managed via direct methods, the access to the view hierarchy inflated under the RemoteViews class is limited and rigid. For example, in a typical Activity the code can inflate a layout by simply referencing it as R.layout.main and passing it to the method setContentView. AppWidgets require more effort than this.
The RemoteViews class offers two constructors. The one of most interest to us is defined as
RemoteViews(String packageName, int layoutId)
The packageName can be obtained with a call to context.getPackageName() and the layoutId is a layout defined in the normal manner using a subset of the familiar widgets such as TextView and Button.
RemoteViews rv = new RemoteViews(context.getPackageName(),R.id.monitor);
Once a reference to a “remote view” is available, a proxy-like mechanism is available for setting and getting basic properties of views contained within the view hierarchy loaded by the RemoteViews instance. Here’s an example of changing the text in a TextView identified by R.id.someTextView:
rv.setTextViewText(R.id.someTextView,"Fat cats buy ice");
Another available method is setInt, which passes an integer value to a named method on a specified view. For example, to change the height of the view to 200 pixels, you can use the following code:
rv.setInt(R.id.someTextView,"setHeight",200);
When you’re working with RemoteViews, the only user interaction you can trap is a click. You do so by passing a PendingIntent to the setOnClickListener method. The following listing demonstrates this procedure.
Listing 17.4. Setting up a PendingIntent to handle user interactions
Intent onClickedIntent = new Intent(context,SomeClass.class);
PendingIntent pi = PendingIntent.getActivity(context, 0, onClickedIntent, 0);
rv.setOnClickPendingIntent(R.id.someButton, pi);
To make a RemoteViews-based click handler, the first step is to create a new Intent. Initialize the Intent in any manner appropriate for your task. In this example, you define an Intent to launch a specific Activity. Next, create a PendingIntent using the getActivity static method. One of the arguments to this method is the previously created Intent. Then a call to the setOnClickPendingIntent method passing the PendingIntent will wire up the desired behavior.
Now that you have a feel for how RemoteViews operate, let’s finish up the discussion of the SiteMonitorWidgetImpl class’s code.
17.6.2. UpdateOneWidget explained
All of the code presented thus far for the SiteMonitorWidgetImpl class has taken care of the plumbing and scaffolding of the operation of our AppWidget. It’d be nice to get something onto the screen of the phone! That’s where the UpdateOneWidget method comes into play. Recall that the onUpdate method delegated the responsibility of updating the screen to this method. The following listing demonstrates updating the widget with the help of RemoteViews.
Listing 17.5. Updating the widget with RemoteViews in SiteMonitorWidgetImpl
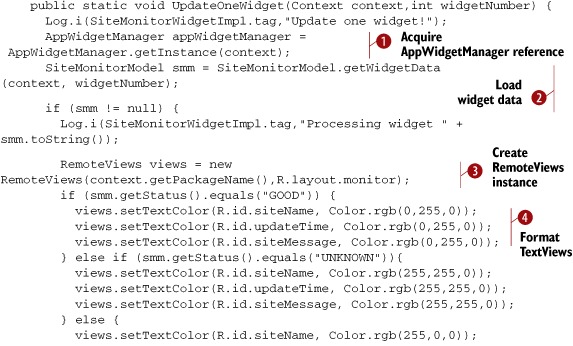

Like virtually everything related to AppWidget programming, the first thing to do is acquire a reference to the AppWidgetManager ![]() . Next, you load the widget-specific data associated with this widget identifier with SiteMonitorModel.getWidgetData
. Next, you load the widget-specific data associated with this widget identifier with SiteMonitorModel.getWidgetData ![]() and confirm that the data is valid. Assuming you have a good widget to work with, you next create an instance of the RemoteViews class
and confirm that the data is valid. Assuming you have a good widget to work with, you next create an instance of the RemoteViews class ![]() , passing in an identifier for your preferred layout R.id.monitor. Based on the status, you assign different TextColor values
, passing in an identifier for your preferred layout R.id.monitor. Based on the status, you assign different TextColor values ![]() to each of the visible TextViews within the layout, as well as populate the controls with the actual textual values for display with calls to setTextViewText
to each of the visible TextViews within the layout, as well as populate the controls with the actual textual values for display with calls to setTextViewText ![]() .
.
At this point, your widget is now ready for display. You’d also like the user to be able to tap on the widget and bring up related information. To do this, you must assign a PendingIntent to a view within the view hierarchy represented by the RemoteViews instance you previously instantiated.
To begin, you create an Intent referencing your configuration activity SiteMonitorConfigure. You next assign data related to this Intent with a call to the set-Data method ![]() . Note that the data here isn’t particularly important, as long as it’s unique. The reason for this is related to the manner
in which PendingIntents are resolved. Without this uniqueness, each subsequent PendingIntent assignment would replace the previously assigned Intent. By adding this custom and unique data to the Intent, your PendingIntent becomes unique per widget. If you doubt this, just comment out this line and find out what happens!
. Note that the data here isn’t particularly important, as long as it’s unique. The reason for this is related to the manner
in which PendingIntents are resolved. Without this uniqueness, each subsequent PendingIntent assignment would replace the previously assigned Intent. By adding this custom and unique data to the Intent, your PendingIntent becomes unique per widget. If you doubt this, just comment out this line and find out what happens!
Next you assign the widgetNumber to the key AppWidget.EXTRA_APPWIDGET_ID. This is used to make things a bit easier in the SiteMonitorConfigure Activity, which is discussed in the next section. A PendingIntent is created, requesting an Activity ![]() , and finally this PendingIntent is assigned to your widget via the setOnClickPendingIntent method. One piece of trivia to note here is that you’ve passed in an ID for the LinearLayout of the user interface. Layouts often don’t have ID attributes associated with them. Layouts are instances of ViewGroups, which are extensions of the View class, so there’s no reason why you can’t assign an ID to the layout itself. The net effect is that your entire widget is
clickable. Considering the fact that it’s a mere 74 pixels square, this is a reasonable approach.
, and finally this PendingIntent is assigned to your widget via the setOnClickPendingIntent method. One piece of trivia to note here is that you’ve passed in an ID for the LinearLayout of the user interface. Layouts often don’t have ID attributes associated with them. Layouts are instances of ViewGroups, which are extensions of the View class, so there’s no reason why you can’t assign an ID to the layout itself. The net effect is that your entire widget is
clickable. Considering the fact that it’s a mere 74 pixels square, this is a reasonable approach.
At this point, much of the heavy lifting for our AppWidget is behind you. Let’s look at some of the details associated with configuring a specific instance of an AppWidget next, as we examine the SiteMonitorConfigure Activity.
17.7. Configuring an instance of the AppWidget
There are two scenarios where our AppWidget may be configured. The first is right after the user requests its creation, and the second is when the user taps on an existing widget instance on the home screen.
Generally speaking, this Activity operates just as any other Activity you’ve experienced throughout the book. It inflates a layout, gets references to the various Views, and responds to user input. Only a couple of items are worthy of highlighting here, but they’re important details that you must implement.
Let’s start with how Android knows which Activity to launch after a new instance is created. To do that, we’ll take a brief side trip to look at the metadata related to this AppWidget.
17.7.1. AppWidget metadata
Earlier we alluded to a special metadata file that defines attributes for an AppWidget. This file is associated with a specific receiver entry in the AndroidManifest.xml file. Within the metadata file, you can associate a specific Activity as the preferred configuration tool. The following listing presents the sitemonitorwidget.xml file. Even though our focus in this section is on the Activity, this is a good opportunity to tie together a couple of ideas you’ve learned to this point.
Listing 17.6. AppWidget metadata file defining widget characteristics
<?xml version="1.0" encoding="utf-8"?>
<appwidget-provider
  xmlns:android="http://schemas.android.com/apk/res/android"
  android:minHeight="72dp"
  android:minWidth="72dp"
  android:initialLayout="@layout/monitor"
  android:updatePeriodMillis="0"
  android:configure=
"com.msi.unlockingandroid.sitemonitor.SiteMonitorConfigure"
  android:icon="@drawable/icon"
  >
</appwidget-provider>
Earlier in this chapter we described the screen real estate consumed by an AppWidget. The height and width are specified as minimum values. Each of the available “spaces” or cells in the screen is 74 pixels square. The formula for deriving the values here is the number of cells requested times 74 minus 2.
The initial layout used by the widget is defined in the initialLayout attribute. At runtime the application is free to change the layout, but you should consider the fact that by the time your widget is ready for updating, it’s already been placed on the screen, so your expectations might be shattered if you were hoping to bump some other widget out of the way!
The updatePeriodMillis specifies the update interval. Based on the architecture of the SiteMonitor, this has little importance, so set it to 0 to tell the widget not to bother waking itself up to update. Setting this attribute to a nonzero value causes the device to wake up periodically and call the onUpdate method in the AppWidget-Provider implementation.
Finally, you see the configure attribute, which permits you to specify the fully qualified class name for the Activity to be launched when the user selects this widget from the list of available widgets on the home screen. When the user is selecting from the list of widgets, the icon displayed in the list is defined by the icon attribute.
Now that the Activity is associated with our AppWidget, it’s time to examine the key elements of the Activity. The full code is available for download. The snippets shown here are only the portions particularly relevant to AppWidget interactions.
17.7.2. Working with Intent data
When the AppWidget’s configuration Activity is launched, the most important piece of information is the associated widget identifier. This value is stored as an extra in the Intent and should be extracted during the onCreate method. The following listing demonstrates this technique.
Listing 17.7. Setting up the configuration Activity to manage a widget instance
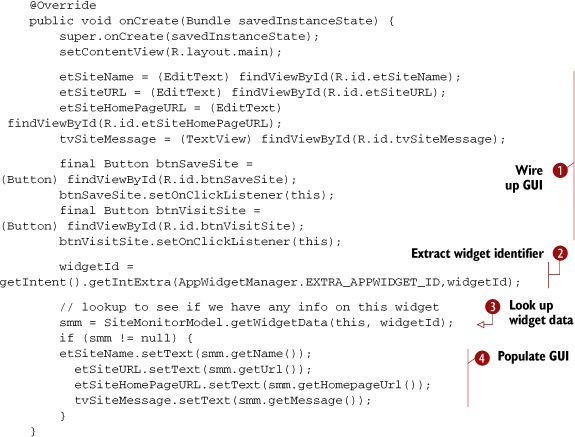
The Activity looks like boilerplate code, as it begins with wiring up the various view elements in the layout to class-level variables
![]() . The widgetId is extracted from the startingIntent
. The widgetId is extracted from the startingIntent ![]() . Again you see the relationship between widgetId and widget-specific data managed by the SiteMonitorModel class
. Again you see the relationship between widgetId and widget-specific data managed by the SiteMonitorModel class ![]() . If data is available, the GUI elements are prepopulated with the values
. If data is available, the GUI elements are prepopulated with the values ![]() . This scenario would only come into play after the widget has been successfully created and subsequently clicked for managing
it.
. This scenario would only come into play after the widget has been successfully created and subsequently clicked for managing
it.
At this point, the Activity operates as expected, permitting the user to update the details of the widget data as well as visit the associated website.
17.7.3. Confirming widget creation
When the user has populated the required fields and hits the Save button, you need to not only save the data via the SiteMonitorModel class but also let the AppWidget infrastructure know that you’ve affirmed the creation of this widget instance. This takes place by using the Activity’s setResult method along with an Intent containing an extra indicating the widget number. In addition you want to ensure that the alarm is enabled for future updates. Finally, you really don’t want to wait until the next alarm interval elapses; you want to get an update now. The following listing demonstrates how to accomplish each of these tasks.
Listing 17.8. Handling button clicks in the configuration Activity
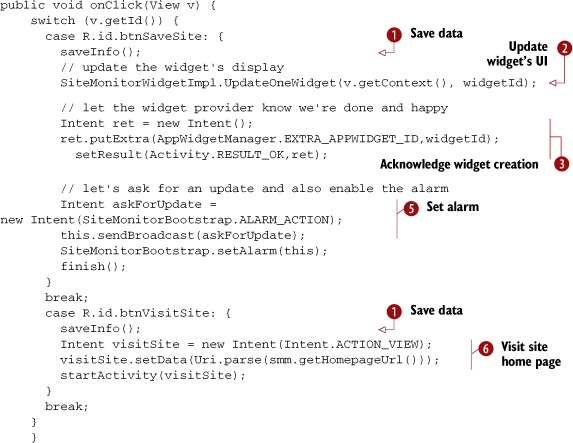
When the user clicks the Save button (or the Visit Site button), the widget-specific data is saved ![]() . There’s nothing fancy there—just a call to SiteMonitorModel.saveWidgetData(). The AppWidget subsystem is supposed to update the UI of the widget after the Configuration dialog box completes successfully, but experience
shows that this isn’t always the case. Therefore a call is made to SiteMonitorWidgetImpl.UpdateOneWidget with the newly created widgetId
. There’s nothing fancy there—just a call to SiteMonitorModel.saveWidgetData(). The AppWidget subsystem is supposed to update the UI of the widget after the Configuration dialog box completes successfully, but experience
shows that this isn’t always the case. Therefore a call is made to SiteMonitorWidgetImpl.UpdateOneWidget with the newly created widgetId ![]() .
.
An important step in the life of a new AppWidget is to be sure to set the Activity result to RESULT_OK ![]() , passing along an Intent extra that identifies the new widget by number.
, passing along an Intent extra that identifies the new widget by number.
At this point our new widget is populated with a name and no meaningful status information. To force an update, you broadcast
an Intent that simulates the condition where the alarm has just triggered ![]() . You also want to ensure that the alarm is armed for a subsequent operation, so you call SiteMonitorBootstrap.setAlarm
. You also want to ensure that the alarm is armed for a subsequent operation, so you call SiteMonitorBootstrap.setAlarm ![]() .
.
In the event that the Visit Site button is clicked, you want to take the user to the defined home page of the currently active
site being monitored by the widget ![]() .
.
The last condition to handle is the case where the widget has been selected from the Add New Widget list on the home screen when the user cancels out of the configuration activity. In this case the widget shouldn’t be created. To achieve this result, you set the result of the Activity to RESULT_CANCELED as shown in this listing.
Listing 17.9. Checking for a cancel
public void onDestroy() {
 super.onDestroy();
 if (!isFinishing()) {
   Intent ret = new Intent();
   ret.putExtra(AppWidgetManager.EXTRA_APPWIDGET_ID,widgetId);
   setResult(Activity.RESULT_CANCELED,ret);
 }
This code overrides the onDestroy method. If this method is invoked for any reason other than finish() was called by the Activity itself, you want to “cancel” the Activity. This is accomplished with a call to setResult with the inclusion of the Intent extra to pass along the widget identifier. Note that this cancel step is only required when the widget instance is first created. There’s no harm in setting the result for future invocations of the Activity.
At this point our AppWidget is created, you know how to store data, and you know how to configure a particular instance of the SiteMonitor widget. What’s needed next is to update the data. For that, we’ll look at the SiteMonitorService.
17.8. Updating the AppWidget
Our AppWidget instances on the home screen are only useful if they’re actually keeping data up-to-date. One means for performing this update is to solely rely on the AppWidgetProvider’s onUpdate method. The onUpdate method is invoked periodically according to the schedule specified in the metadata file.
One reason for updating the widget outside of the AppWidgetProvider is to provide more granularity than afforded by the built-in scheduling mechanism. For example, you may wish to update the data more frequently than once per hour depending on the conditions. Imagine an AppWidget that tracks stock prices. It makes little sense to have the widget update when the market is closed, and it wouldn’t be unreasonable to update once every 15 minutes during market hours.
Fortunately, the SiteMonitorWidgetImpl can process ad hoc updates. You’re already set up for this because you’re overriding the onReceive method. When the onReceive method receives an Intent with an Action equaling SiteMonitorWidgetImpl.UPDATE_WIDGETS, the widgets are updated on the home screen. So, now all you need to do is sort out how (and when) to update the underlying data.
Beyond the AppWidget built-in scheduler, there are basically two mechanisms for periodic updates. The first approach is to create a Service that periodically performs an update. The other approach is to set an Alarm that triggers the update on a recurring basis. Let’s take a brief look at both strategies.
17.8.1. Comparing services to alarms
A constantly running Service is capable of performing this periodic update; it’s the ideal place to perform operations that are to be carried out in the background. An Android Service is the appropriate vehicle for performing the update work—talking to a remote hosted application—but what about all the idle time between updates? Does the application need to be running, consuming resources but adding no additional value? Also, what happens if the Service stops running? Do you configure it to be restarted automatically? Perhaps it should be kept running at all times, but at what impact on the device’s overall performance? You need to conserve battery resources as well as keep the load on the CPU as low as feasible to improve overall device responsiveness. This approach isn’t ideal because a long-running Service that’s idle the majority of the time consumes resources unnecessarily and brings little overall benefit.
What about an alarm? An alarm can be set to trigger once or periodically. Additionally, an alarm may be configured to trigger only when the device is awake—if the widget doesn’t need to be updated while you and your device are sleeping, there’s no need to unnecessarily expend battery resources to perform an update you may never see! Also, the Alarm Manager can group a number of periodic alarms so that the device wakes up for short windows of activity rather than every time an alarm may request it. By giving Android some latitude on when an alarm can be fired, you can further manage battery resources for longer life.
As much as we like the alarm approach, there’s one thing you need to keep in mind: an alarm has no ability in and of itself to perform any real activity beyond signaling. The alarm can signal and the Service can perform the actual update, so the correct answer here is to use both an alarm and a Service. And for good measure we’re going to use a BroadcastReceiver to add more flexibility into the mix. Looking back at figure 17.9, you see that the preferred architecture is to have an alarm send an Intent via broadcast to a BroadcastReceiver, which in turn initiates a Service to perform the update process—fetching data over the internet from the various data sources. Once the data is fetched and the SiteMonitorModel updated, you can request that the widgets themselves be refreshed visually and the Service can shut down. It’ll be started again for the next periodic update.
Let’s see how the alarm is managed.
17.8.2. Triggering the update
Services have been covered in various portions of this book already, so they’ll receive relatively little coverage here. Of more interest in this section is the relationship between the alarm, the BroadcastReceiver, and the Service. Let’s look first at the code in SiteMonitorBootstrap.java.
Listing 17.10. SiteMonitorBootstrap.java


The SiteMonitorBootstrap class is responsible for managing alarms within the application as well as the starting the SiteMonitorService as needed. This class is a BroadcastReceiver and as such overrides the onReceive method, looking for Intents ![]() that it can process. The only IntentFilter set up for this class is for the SiteMonitorBootstrap.ALARM_ACTION
that it can process. The only IntentFilter set up for this class is for the SiteMonitorBootstrap.ALARM_ACTION ![]() . This constant is declared as a public static member so it can be accessed from other components as well as the local alarm.
The update frequency is fixed and set in the UDPATE_FREQUENCY constant
. This constant is declared as a public static member so it can be accessed from other components as well as the local alarm.
The update frequency is fixed and set in the UDPATE_FREQUENCY constant ![]() . An enhancement for this type of application would be to make this setting user configurable in some fashion. When an ALARM_ACTION Intent is encountered, an Intent is created to start the SiteMonitorService
. An enhancement for this type of application would be to make this setting user configurable in some fashion. When an ALARM_ACTION Intent is encountered, an Intent is created to start the SiteMonitorService ![]() It’s the responsibility of the SiteMonitorService to perform the update of the configured SiteMonitor widgets.
It’s the responsibility of the SiteMonitorService to perform the update of the configured SiteMonitor widgets.
This class can readily be extended to detect other events such as the device booting or power events. For example, if it’s detected that the device is being charged—a nonbattery power source is detected—the frequency of updates could be increased. Similarly, if it’s detected that the device is now roaming, this could suspend the update process to minimize any data roaming charges.
Beyond acting as a BroadcastReceiver to react to events of interest, this code also contains two static methods for setting and clearing the application-defined
alarm. Let’s walk through the two routines, starting with the setAlarm method. The first step in working with an alarm is to obtain a reference to the AlarmManager ![]() . When setting an alarm, you must create a PendingIntent that contains the Intent to be dispatched when the alarm triggers. In this case you create a PendingIntent
. When setting an alarm, you must create a PendingIntent that contains the Intent to be dispatched when the alarm triggers. In this case you create a PendingIntent ![]() that represents a subsequent Broadcast of the SiteMonitorBootstrap.ALARM_ACTION Intent. In essence, you’re setting an alarm to send an Intent to this Broadcast-Receiver, which in turn initiates the update process. Once the PendingIntent is set up, it’s passed as an argument to the setRepeating method
that represents a subsequent Broadcast of the SiteMonitorBootstrap.ALARM_ACTION Intent. In essence, you’re setting an alarm to send an Intent to this Broadcast-Receiver, which in turn initiates the update process. Once the PendingIntent is set up, it’s passed as an argument to the setRepeating method ![]() . When canceling the alarm, the steps are the same, except you call cancel
. When canceling the alarm, the steps are the same, except you call cancel ![]() .
.
You’ve done a lot of setup, and now it’s time to look at the code that performs the update of the underlying widget-specific hosted application status data.
17.8.3. Updating the widgets, finally!
Once the SiteMonitorService code is in control, updating the widgets is rather easy. Updating the SiteMonitorModel data is the sole responsibility of the SiteMonitorService. To accomplish this task, the SiteMonitorService performs these basic operations:
1. Starts a thread to perform the update
2. Updates each of the sites in turn
3. Shuts itself down to conserve resources
The Service creates a separate Thread for performing the update, because by default the Service attempts to run on the main GUI thread of the device. Running in a separate Thread of execution inside a Service is arguably the best place to perform a potentially blocking operation such as the operation required of the SiteMonitorService.
Let’s look at the code structure of the SiteMonitorService class.
Listing 17.11. SiteMonitorService class

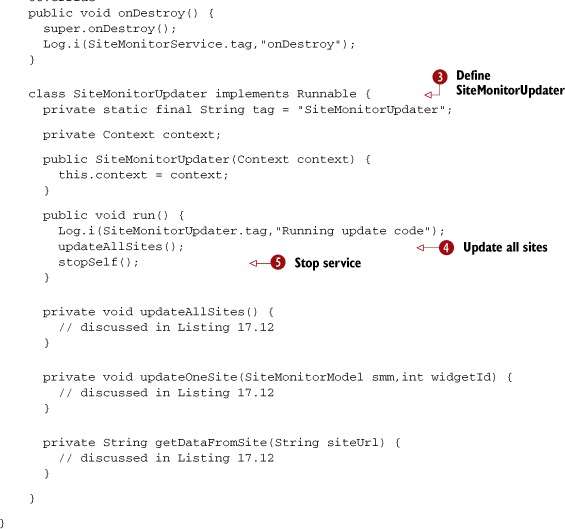
The first step this service takes is the creation of a new Thread ![]() based on the SiteMonitorUpdater class
based on the SiteMonitorUpdater class ![]() . Once created, the thread is started. The Service then returns Service.START_NON_STICKY
. Once created, the thread is started. The Service then returns Service.START_NON_STICKY ![]() . This tells Android not to restart the Service if it either crashes or is killed by the operating system. Because our Service will be started periodically, there’s no need to have the operating system restart it.
. This tells Android not to restart the Service if it either crashes or is killed by the operating system. Because our Service will be started periodically, there’s no need to have the operating system restart it.
All the update code resides in the SiteMonitorUpdater class ![]() . In the run method of this class, you perform two steps. First you call a method called updateAllSites
. In the run method of this class, you perform two steps. First you call a method called updateAllSites ![]() , which, as the name implies, performs the various steps to update the widget data. Once that operation is complete, the service
calls stopSelf, which cleanly terminates the service
, which, as the name implies, performs the various steps to update the widget data. Once that operation is complete, the service
calls stopSelf, which cleanly terminates the service ![]() .
.
At this point our Service is starting and has created an instance of the private SiteMonitorUpdater class. Let’s look at the update operations.
Listing 17.12. Iterating through each of the sites and request updates
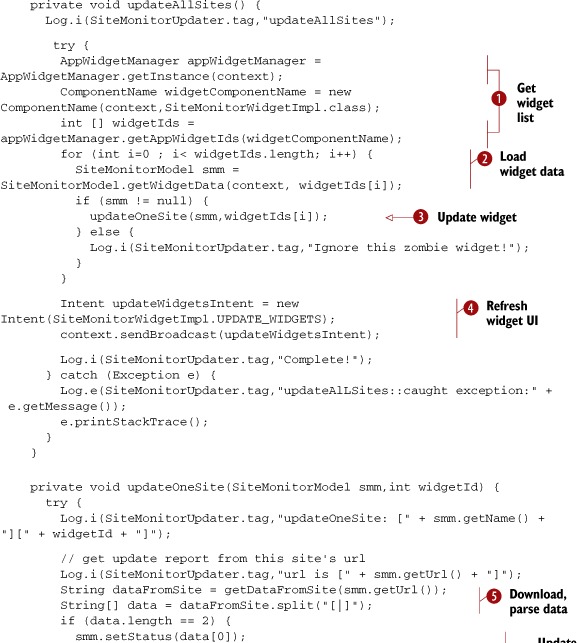

The updateAllSites method starts like so many other methods in this chapter: by obtaining a reference to the AppWidgetManager and creating a list of widgets ![]() . For each widget identifier, the code attempts to load the associated widget data
. For each widget identifier, the code attempts to load the associated widget data ![]() and perform an update by calling the updateOneSite method
and perform an update by calling the updateOneSite method ![]() .
.
The updateOneSite method invokes the getDataFromSite method ![]() . The getDataFromSite method performs some basic HTTP GET code to retrieve a string from the remote site
. The getDataFromSite method performs some basic HTTP GET code to retrieve a string from the remote site ![]() . Once the data is retrieved from the remote site, it’s returned
. Once the data is retrieved from the remote site, it’s returned ![]() to the updateOneSite method.
to the updateOneSite method.
The returned data is parsed and stored in the SiteMonitorModel instance ![]() . The date is updated and the widget data is saved with a call to SiteMonitorModel.saveWidgetData
. The date is updated and the widget data is saved with a call to SiteMonitorModel.saveWidgetData ![]() .
.
After all the sites have been updated, an Intent is broadcast with the action SiteMonitorWidgetImpl.UPDATE_WIDGETS ![]() . This causes the user widget UI to update, reflecting the most recent updated information.
. This causes the user widget UI to update, reflecting the most recent updated information.
That concludes the review of the code for this chapter. Let’s now look at AndroidManifest.xml, which has a lot of important information tucked away.
17.9. Tying it all together with AndroidManifest.xml
If you’re ever experiencing problems with an Android application, particularly during development, remember to check the manifest file. Chances are that you’ve forgotten to define an Activity or omitted a request for a required permission. The following listing presents the AndroidManifest.xml used for the SiteMonitor application. Looking at this should tie together any loose ends on how an AppWidget application can be constructed.
Listing 17.13. AndroidManifest.xml
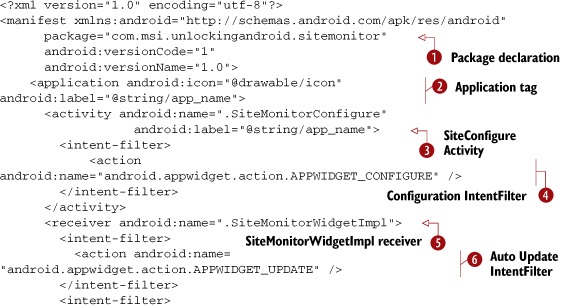
AndroidManifest.xml contains all the ingredients required to ensure that the application components know how to link to one
another at runtime. All the components within the application share the same package name ![]() . The Application tag defines the name of the application
. The Application tag defines the name of the application ![]() label, which in this case is taken from a string resource named app_name.
label, which in this case is taken from a string resource named app_name.
The SiteMonitorConfigure Activity is declared ![]() . Note the presence of the IntentFilter named android.appwidget.action.APPWIDGET_CONFIGURE
. Note the presence of the IntentFilter named android.appwidget.action.APPWIDGET_CONFIGURE ![]() . The presence of this IntentFilter, along with the contents of the AppWidget’s metadata file
. The presence of this IntentFilter, along with the contents of the AppWidget’s metadata file ![]() , serve to provide the necessary elements to support the use of an AppWidget-Provider. Note that this metadata file is stored in the xml folder beneath the res folder. This xml folder must be created manually,
as it’s not part of the stock project folders when a new Android project is created in Eclipse.
, serve to provide the necessary elements to support the use of an AppWidget-Provider. Note that this metadata file is stored in the xml folder beneath the res folder. This xml folder must be created manually,
as it’s not part of the stock project folders when a new Android project is created in Eclipse.
The class SiteMonitorWidgetImpl ![]() is defined with a receiver tag and additional pieces of information that are essential for this application’s proper operation. This receiver contains
the android.appwidget.action.APPWIDGET_UPDATE IntentFilter
is defined with a receiver tag and additional pieces of information that are essential for this application’s proper operation. This receiver contains
the android.appwidget.action.APPWIDGET_UPDATE IntentFilter ![]() along with the custom IntentFilter with an action of com.msi.unlocking-android.sitemonitor.UPDATE_WIDGETS
along with the custom IntentFilter with an action of com.msi.unlocking-android.sitemonitor.UPDATE_WIDGETS ![]() . This is the Intent Action used when the application wants to update the visual representation of the AppWidgets. This receiver tag also refers to the metadata entry that defines the attributes for an android.appwidget.provider.
. This is the Intent Action used when the application wants to update the visual representation of the AppWidgets. This receiver tag also refers to the metadata entry that defines the attributes for an android.appwidget.provider.
The SiteMonitorBootstrap is defined ![]() along with an action of com.msi.unlockingandroid.sitemonitor.ALARM_ACTION. This action triggers the launching of the SiteMonitorService
along with an action of com.msi.unlockingandroid.sitemonitor.ALARM_ACTION. This action triggers the launching of the SiteMonitorService ![]() . Finally, the SiteMonitorService can’t retrieve data over the Internet without the uses-permission of android.permission.INTERNET.
. Finally, the SiteMonitorService can’t retrieve data over the Internet without the uses-permission of android.permission.INTERNET.
17.10. Summary
In this chapter we covered AppWidgets; you learned not only what they are but how they can be used and what it takes to make them operate at runtime. You learned that there can be more to the AppWidget than meets the eye. A smart phone’s home screen is where users spend most of their time, so learning how to add value to the home screen is an essential skill for Android developers.
We presented some usage scenarios for AppWidgets and introduced a sample application named SiteMonitor that served as the context for discussing AppWidgets. This application demonstrated the techniques required to manage widget instances and refresh remote data in a nontrivial application. We explained the architecture required to support SiteMonitor and then presented it in a step-by-step fashion.
The major building blocks of the sample application presented important topics such as managing widget data through the versatile SiteMonitorModel class. Handling widget-specific data is critical to a successful AppWidget application. This chapter also covered some of the “undocumented features” of Android’s AppWidgets and you learned how to code around those features.
This chapter explored the use of many of the other skills you’ve learned throughout this book. The chapter covered AppWidgets but also integrating with SharedPreferences, managing alarms, Services, RemoteViews, Threads, and more. After building an AppWidget with moving pieces behind the scenes, you now have an appreciation of how and where AppWidgets can be deployed and how Android may be leveraged to deliver intuitive and high-value applications to your customers.
In the next chapter we look at another important feature set of Android devices: the numerous sensors that make these devices much more than a mere telephony tool.