
Chapter 6. Networking and web services
This chapter covers
- Networking basics
- Determining network status
- Using the network to retrieve and store data
- Working with web services
With the ubiquity of high-speed networking, mobile devices are now expected to perform many of the same data-rich functions of traditional computers such as email, providing web access, and the like. Furthermore, because mobile phones offer such items as GPS, microphones, CDMA/GSM, built in cameras, accelerometers, and many others, user demand for applications that leverage all the features of the phone continues to increase.
You can build interesting applications with the open Intent- and Service-based approach you learned about in previous chapters. That approach combines built-in (or custom) intents, such as fully capable web browsing, with access to hardware components, such as a 3D graphics subsystem, a GPS receiver, a camera, removable storage, and more. This combination of open platform, hardware capability, software architecture, and access to network data makes Android compelling.
This doesn’t mean that the voice network isn’t important—we’ll cover telephony explicitly in chapter 7—but we admit that voice is a commodity—and data is what we’ll focus on when talking about the network.
Android provides access to networking in several ways, including mobile Internet Protocol (IP), Wi-Fi, and Bluetooth. It also provides some open and closed source third-party implementations of other networking standards such as ZigBee and Worldwide Interoperability for Microwave Access (WiMAX). In this chapter, though, we’ll concentrate on getting your Android applications to communicate using IP network data, using several different approaches. We’ll cover a bit of networking background, and then we’ll deal with Android specifics as we explore communication with the network using sockets and higher-level protocols such as Hypertext Transfer Protocol (HTTP).
Android provides a portion of the java.net package and the org.apache.http-client package to support basic networking. Other related packages, such as android.net, address internal networking details and general connectivity properties. You’ll encounter all these packages as we progress though networking scenarios in this chapter.
In terms of connectivity properties, we’ll look at using the ConnectivityManager class to determine when the network connection is active and what type of connection it is: mobile or Wi-Fi. From there, we’ll use the network in various ways with sample applications.
One caveat to this networking chapter is that we won’t dig into the details concerning the Android Wi-Fi or Bluetooth APIs. Bluetooth is an important technology for close-range wireless networking between devices, but it isn’t available in the Android emulator (see chapter 14 for more on Bluetooth). On the other hand, Wi-Fi has a good existing API but also doesn’t have an emulation layer. Because the emulator doesn’t distinguish the type of network you’re using and doesn’t know anything about either Bluetooth or Wi-Fi, and because we think the importance lies more in how you use the network, we aren’t going to cover these APIs. If you want more information on the Wi-Fi APIs, please see the Android documentation (http://code.google.com/android/reference/android/net/wifi/package-summary.html).
The aptly named sample application for this chapter, NetworkExplorer, will look at ways to communicate with the network in Android and will include some handy utilities. Ultimately, this application will have multiple screens that exercise different networking techniques, as shown in figure 6.1.
Figure 6.1. The NetworkExplorer application you’ll build to cover networking topics

After we cover general IP networking with regard to Android, we’ll discuss turning the server side into a more robust API itself by using web services. On this topic, we’ll work with plain old XML over HTTP (POX) and Representational State Transfer (REST). We’ll also discuss the Simple Object Access Protocol (SOAP). We’ll address the pros and cons of the various approaches and why you might want to choose one method over another for an Android client.
Before we delve into the details of networked Android applications, we’ll begin with an overview of networking basics. If you’re already well versed in general networking, you can skip ahead to section 6.2, but it’s important to have this foundation if you think you need it, and we promise to keep it short.
6.1. An overview of networking
A group of interconnected computers is a network. Over time, networking has grown from something that was available only to governments and large organizations to the almost ubiquitous and truly amazing internet. Though the concept is simple—allow computers to communicate—networking does involve advanced technology. We won’t get into great detail here, but we’ll cover the core tenets as a background to the general networking you’ll do in the remainder of this chapter.
6.1.1. Networking basics
A large percentage of the time, the APIs you use to program Android applications abstract the underlying network details. This is good. The APIs and the network protocols themselves are designed so that you can focus on your application and not worry about routing, reliable packet delivery, and so on.
Nevertheless, it helps to have some understanding of the way a network works so that you can better design and troubleshoot your applications. To that end, let’s cover some general networking concepts, with a focus on Transmission Control Protocol/Internet Protocol (TCP/IP).[1] We’ll begin with nodes, layers, and protocols.
1 For an in-depth study of all things TCP/IP related, take a look at Craig Hunt’s book: http://oreilly.com/catalog/9780596002978.
Nodes
The basic idea behind a network is that data is sent between connected devices using particular addresses. Connections can be made over wire, over radio waves, and so on. Each addressed device is known as a node. A node can be a mainframe, a PC, a fancy toaster, or any other device with a network stack and connectivity, such as an Android-enabled handheld.
Layers and Protocols
Protocols are a predefined and agreed-upon set of rules for communication. Protocols are often layered on top of one another because they handle different levels of responsibility. The following list describes the main layers of the TCP/IP stack, which is used for the majority of web traffic and with Android:
- The Link Layer—including physical device address resolution protocols such as ARP and RARP
- The Internet Layer—including IP itself, which has multiple versions, the ping protocol, and ICMP, among others
- The Transport Layer—where different types of delivery protocols such as TCP and UDP are found
- The Application Layer—which includes familiar protocols such as HTTP, FTP, SMTP, IMAP, POP, DNS, SSH, and SOAP
Layers are an abstraction of the different levels of a network protocol stack. The lowest level, the Link Layer, is concerned with physical devices and physical addresses. The next level, the Internet Layer, is concerned with addressing and general data details. After that, the Transport Layer is concerned with delivery details. And, finally, the top-level Application Layer protocols, which make use of the stack beneath them, are application-specific for sending files or email or viewing web pages.
IP
IP is in charge of the addressing system and delivering data in small chunks called packets. Packets, known in IP terms as datagrams, define how much data can go in each chunk, where the boundaries for payload versus header information are, and the like. IP addresses tell where each packet is from (its source) and where it’s going (its destination).
IP addresses come in different sizes, depending on the version of the protocol being used, but by far the most common at present is the 32-bit address. 32-bit IP addresses (TCP/IP version 4, or IPv4) are typically written using a decimal notation that separates the 32 bits into four sections, each representing 8 bits (an octet), such as 74.125.45.100.
Certain IP address classes have special roles and meaning. For example, 127 always identifies a loopback[2] or local address on every machine; this class doesn’t communicate with any other devices (it can be used internally, on a single machine only). Addresses that begin with 10 or 192 aren’t routable, meaning they can communicate with other devices on the same local network segment but can’t connect to other segments. Every address on a particular network segment must be unique or collisions can occur and it gets ugly.
2 The TCP/IP Guide provides further explanation of datagrams and loopbacks: http://www.tcpipguide.com/index.htm.
The routing of packets on an IP network—how packets traverse the network and go from one segment to another—is handled by routers. Routers speak to each other using IP addresses and other IP-related information.
TCP and UDP
TCP and UDP (User Datagram Protocol) are different delivery protocols that are commonly used with TCP/IP. TCP is reliable, and UDP is fire and forget. What does that mean? It means that TCP includes extra data to guarantee the order of packets and to send back an acknowledgment when a packet is received. The common analogy is certified mail: the sender gets a receipt that shows the letter was delivered and signed for, and therefore knows the recipient got the message. UDP, on the other hand, doesn’t provide any ordering or acknowledgment. It’s more like a regular letter: it’s cheaper and faster to send, but you basically just hope the recipient gets it.
Application Protocols
After a packet is sent and delivered, an application takes over. For example, to send an email message, Simple Mail Transfer Protocol (SMTP) defines a rigorous set of procedures that have to take place. You have to say hello in a particular way and introduce yourself; then you have to supply from and to information, followed by a message body in a particular format. Similarly, HTTP defines the set of rules for the Internet—which methods are allowed (GET, POST, PUT, DELETE) and how the overall request/response system works between a client and a server.
When you’re working with Android (and Java-related APIs in general), you typically don’t need to delve into the details of any of the lower-level protocols, but you might need to know the major differences we’ve outlined here for troubleshooting. You should also be well-versed in IP addressing, know a bit more about clients and servers, and how connections are established using ports.
6.1.2. Clients and servers
Anyone who’s ever used a web browser is familiar with the client/server computing model. Data, in one format or another, is stored on a centralized, powerful server. Clients then connect to that server using a designated protocol, such as HTTP, to retrieve the data and work with it.
This pattern is, of course, much older than the web, and it has been applied to everything from completely dumb terminals that connect to mainframes to modern desktop applications that connect to a server for only a portion of their purpose. A good example is iTunes, which is primarily a media organizer and player, but also has a store where customers can connect to the server to get new content. In any case, the concept is the same: The client makes a type of request to the server and the server responds. This model is the same one that the majority of Android applications (at least those that use a server side at all) generally follow. Android applications typically end up as the client.
In order to handle many client requests that are often for different purposes and that come in nearly simultaneously to a single IP address, modern server operating systems use the concept of ports. Ports aren’t physical; they’re a representation of a particular area of the computer’s memory. A server can listen on multiple designated ports at a single address; for example, one port for sending email, one port for web traffic, two ports for file transfer, and so on. Every computer with an IP address also supports a range of thousands of ports to enable multiple conversations to happen at the same time.
Ports are divided into three ranges:
- Well-known ports—0 through 1023
- Registered ports—1024 through 49151
- Dynamic and/or private ports—49152 through 65535
The well-known ports are all published and are just that—well known. HTTP is port 80 (and HTTP Secure, or HTTPS, is port 443), FTP is ports 20 (control) and 21 (data), SSH is port 22, SMTP is port 25, and so on.
Beyond the well-known ports, the registered ports are still controlled and published, but for more specific purposes. Often these ports are used for a particular application or company; for example, MySQL is port 3306 (by default). For a complete list of well-known and registered ports, see the Internet Corporation for Assigned Names and Numbers (ICANN) port-numbers document: http://www.iana.org/assignments/port-numbers.
The dynamic or private ports are intentionally unregistered because they’re used by the TCP/IP stack to facilitate communication. These ports are dynamically registered on each computer and used in the conversation. Dynamic port 49500, for example, might be used to handle sending a request to a web server and dealing with the response. When the conversation is over, the port is reclaimed and can be reused locally for any other data transfer.
Clients and servers communicate as nodes with addresses, using ports, on a network that supports various protocols. The protocols Android uses are based on the IP network the platform is designed to participate in and involve the TCP/IP family. Before you can build a full-on client/server Android application using the network, you need to handle the prerequisite task of determining the state of the connection.
6.2. Checking the network status
Android provides a host of utilities that determine the device configuration and the status of various services, including the network. You’ll typically use the ConnectivityManager class to determine whether network connectivity exists and to get notifications of network changes. The following listing, which is a portion of the main Activity in the NetworkExplorer application, demonstrates basic usage of the ConnectivityManager.
Listing 6.1. The onStart method of the NetworkExplorer main Activity
@Override
public void onStart() {
    super.onStart();
    ConnectivityManager cMgr =  (ConnectivityManager)
 this.getSystemService(Context.CONNECTIVITY_SERVICE);
    NetworkInfo netInfo = cMgr.getActiveNetworkInfo();
    this.status.setText(netInfo.toString());
}
This short example shows that you can get a handle to the ConnectivityManager through the context’s getSystemService method by passing the CONNECTIVITY_SERVICE constant. When you have the manager, you can obtain network information via the NetworkInfo object. The toString method of the NetworkInfo object returns the output shown in figure 6.2.
Figure 6.2. The output of the NetworkInfo toString method

Of course, you won’t normally just display the String output from NetworkInfo, but this example does give you a glance at what’s available. More often, you’ll use the isAvailable or isConnected methods (which return a boolean value), or you’ll directly query the NetworkInfo.State using the getState method. NetworkInfo.State is an enum that defines the coarse state of the connection. The possible values are CONNECTED, CONNECTING, DISCONNECTED, and DISCONNECTING. The NetworkInfo object also provides access to more detailed information, but you won’t normally need more than the basic state.
When you know that you’re connected, either via mobile or Wi-Fi, you can use the IP network. For the purposes of our NetworkExplorer application, we’re going to start with the most rudimentary IP connection, a raw socket, and work our way up to HTTP and web services.
6.3. Communicating with a server socket
A server socket is a stream that you can read or write raw bytes to, at a specified IP address and port. You can deal with data and not worry about media types, packet sizes, and so on. A server socket is yet another network abstraction intended to make the programmer’s job a bit easier. The philosophy that sockets take on—that everything should look like file input/output (I/O) to the developer—comes from the Portable Operating System Interface for UNIX (POSIX) family of standards and has been adopted by most major operating systems in use today.
We’ll move on to higher levels of network communication in a bit, but we’ll start with a raw socket. For that, we need a server listening on a particular port. The EchoServer code shown in the next listing fits the bill. This example isn’t an Android-specific class; rather, it’s an oversimplified server that can run on any host machine with Java. We’ll connect to it later from an Android client.
Listing 6.2. A simple echo server for demonstrating socket usage


The EchoServer class we’re using is fairly basic Java I/O. It extends Thread and implements run, so that each client that connects can be handled in its own context. Then we use a ServerSocket ![]() to listen on a defined port. Each client is then an implementation of a Socket. The client input is fed into a BufferedReader that each line is read from
to listen on a defined port. Each client is then an implementation of a Socket. The client input is fed into a BufferedReader that each line is read from ![]() . The only special consideration this simple server has is that if the input is EXIT, it breaks the loops and exits
. The only special consideration this simple server has is that if the input is EXIT, it breaks the loops and exits ![]() . If the input doesn’t prompt an exit, the server echoes the input back to the client’s OuputStream with a BufferedWriter.
. If the input doesn’t prompt an exit, the server echoes the input back to the client’s OuputStream with a BufferedWriter.
This example is a good, albeit intentionally basic, representation of what a server does. It handles input, usually in a separate thread, then responds to the client, based on the input. To try out this server before using Android, you can telnet to the specified port (after the server is running, of course) and type some input; if all is well, it will echo the output.
To run the server, you need to invoke it locally with Java. The server has a main method, so it’ll run on its own; start it from the command line or from your IDE. Be aware that when you connect to a server from the emulator (this one or any other), you need to connect to the IP address of the host you run the server process on, not the loopback (not 127.0.0.1). The emulator thinks of itself as 127.0.0.1, so use the nonloopback address of the server host when you attempt to connect from Android. (You can find out the IP address of the machine you’re on from the command line by entering ifconfig on Linux or Mac and ipconfig on Windows.)
The client portion of this example is where NetworkExplorer itself begins, with the callSocket method of the SimpleSocket Activity, shown in the next listing.
Listing 6.3. An Android client invoking a raw socket server resource, the echo server

In this listing, we use the onCreate method to call a private helper callSocket method ![]() and set the output to a TextView. Within the callSocket method, we create a Socket to represent the client side of our connection
and set the output to a TextView. Within the callSocket method, we create a Socket to represent the client side of our connection ![]() , and we establish a writer for the input and a reader for the output. With the housekeeping taken care of, we then write
to the socket
, and we establish a writer for the input and a reader for the output. With the housekeeping taken care of, we then write
to the socket ![]() , which communicates with the server, and get the output value to return
, which communicates with the server, and get the output value to return ![]() .
.
A socket is probably the lowest-level networking usage in Android you’ll encounter. Using a raw socket, though abstracted a great deal, still leaves many of the details up to you, especially the server-side details of threading and queuing. Although you might run up against situations in which you either have to use a raw socket (the server side is already built) or you elect to use one for one reason or another, higher-level solutions such as leveraging HTTP usually have decided advantages.
6.4. Working with HTTP
As we discussed in the previous section, you can use a raw socket to transfer IP data to and from a server with Android. This approach is an important one to be aware of so that you know you have that option and understand a bit about the underlying details. Nevertheless, you might want to avoid this technique when possible, and instead take advantage of existing server products to send your data. The most common way to do this is to use a web server and leverage HTTP.
Now we’re going to take a look at making HTTP requests from an Android client and sending them to an HTTP server. We’ll let the HTTP server handle all the socket details, and we’ll focus on our client Android application.
The HTTP protocol itself is fairly involved. If you’re unfamiliar with it or want the complete details, information is readily available via Requests for Comments (RFCs) (such as for version 1.1: http://www.w3.org/Protocols/rfc2616/rfc2616.html). The short story is that the protocol is stateless and involves several different methods that allow users to make requests to servers, and those servers return responses. The entire web is, of course, based on HTTP. Beyond the most basic concepts, there are ways to pass data into and out of requests and responses and to authenticate with servers. Here we’re going to use some of the most common methods and concepts to talk to network resources from Android applications.
To begin, we’ll retrieve data using HTTP GET requests to a simple HTML page, using the standard java.net API. From there, we’ll look at using the Android-included Apache HttpClient API. After we use HttpClient directly to get a feel for it, we’ll also make a helper class, HttpRequestHelper, that you can use to simplify the process and encapsulate the details. This class—and the Apache networking API in general—has a few advantages over rolling your own networking with java.net, as you’ll see. When the helper class is in place, we’ll use it to make additional HTTP and HTTPS requests, both GET and POST, and we’ll look at basic authentication.
Our first HTTP request will be an HTTP GET call using an HttpUrlConnection.
6.4.1. Simple HTTP and java.net
The most basic HTTP request method is GET. In this type of request, any data that’s sent is embedded in the URL, using the query string. The next class in our Network-Explorer application, which is shown in the following listing, has an Activity that demonstrates the GET request method.
Listing 6.4. The SimpleGet Activity showing java.net.UrlConnection


To get an HTTP response and show the first few lines of it in our SimpleGet class, we call a getHttpResponse method that we’ve built ![]() . Within this method, we construct a java.net.URL object
. Within this method, we construct a java.net.URL object ![]() , which takes care of many of the details for us, and then we open a connection to a server using an HttpURLConnection
, which takes care of many of the details for us, and then we open a connection to a server using an HttpURLConnection ![]() .
.
We then use a BufferedReader to read data from the connection one line at a time ![]() . Keep in mind that as we’re doing this, we’re using the same thread as the UI and therefore blocking the UI. This isn’t a
good idea. We’re using the same thread here only to demonstrate the network operation; we’ll explain more about how to use
a separate thread shortly. After we have the data, we append it to the result String that our method returns
. Keep in mind that as we’re doing this, we’re using the same thread as the UI and therefore blocking the UI. This isn’t a
good idea. We’re using the same thread here only to demonstrate the network operation; we’ll explain more about how to use
a separate thread shortly. After we have the data, we append it to the result String that our method returns ![]() , and we close the reader and the connection. Using the plain and simple java.net support that has been ported to Android this way provides quick and dirty access to HTTP network resources.
, and we close the reader and the connection. Using the plain and simple java.net support that has been ported to Android this way provides quick and dirty access to HTTP network resources.
Communicating with HTTP this way is fairly easy, but it can quickly get cumbersome when you need to do more than just retrieve simple data, and, as noted, the blocking nature of the call is bad form. You could get around some of the problems with this approach on your own by spawning separate threads and keeping track of them and by writing your own small framework/API structure around that concept for each HTTP request, but you don’t have to. Fortunately, Android provides another set of APIs in the form of the Apache HttpClient[3] library that abstract the java.net classes further and are designed to offer more robust HTTP support and help handle the separate-thread issue.
3 You’ll find more about the Apache HttpClient here: http://hc.apache.org/httpclient-3.x/.
6.4.2. Robust HTTP with HttpClient
To get started with HttpClient, we’re going to look at using core classes to perform HTTP GET and POST method requests. We’re going to concentrate on making network requests in a Thread separate from the UI, using a combination of the Apache ResponseHandler and Android Handler (for different but related purposes, as you’ll see). The following listing shows our first example of using the HttpClient API.
Listing 6.5. Apache HttpClient with Android Handler and Apache ResponseHandler


The first thing we do in our initial HttpClient example is create a Handler that we can send messages to from other threads. This technique is the same one we’ve used in previous examples; it allows
background tasks to send Message objects to hook back into the main UI thread ![]() . After we create an Android Handler, we create an Apache ResponseHandler
. After we create an Android Handler, we create an Apache ResponseHandler ![]() . This class can be used with HttpClient HTTP requests to pass in as a callback point. When an HTTP request that’s fired by HttpClient completes, it calls the onResponse method if a ResponseHandler is used. When the response comes in, we get the payload using the HttpEntity the API returns
. This class can be used with HttpClient HTTP requests to pass in as a callback point. When an HTTP request that’s fired by HttpClient completes, it calls the onResponse method if a ResponseHandler is used. When the response comes in, we get the payload using the HttpEntity the API returns ![]() . This in effect allows the HTTP call to be made in an asynchronous manner—we don’t have to block and wait the entire time
between when the request is fired and when it completes. The relationship of the request, response, Handler, ResponseHandler, and separate threads is diagrammed in figure 6.3.
. This in effect allows the HTTP call to be made in an asynchronous manner—we don’t have to block and wait the entire time
between when the request is fired and when it completes. The relationship of the request, response, Handler, ResponseHandler, and separate threads is diagrammed in figure 6.3.
Figure 6.3. The relationship between HttpClient, ResponseHandler, and Android Handler

Now that you’ve seen HttpClient at work and understand the basic approach, the next thing we’ll do is encapsulate a few of the details into a convenient helper class so that we can call it over and over without having to repeat a lot of the setup.
6.4.3. Creating an HTTP and HTTPS helper
The next Activity in our NetworkExplorer application, which is shown in listing 6.6, is a lot more straightforward and Android-focused than our other HTTP-related classes up to this point. We’ve used the helper class we mentioned previously, which hides some of the complexity. We’ll examine the helper class itself after we look at this first class that uses it.
Listing 6.6. Using Apache HttpClient via a custom HttpRequestHelper


The first thing we do in this class is create another Handler. From within it, we update a UI TextView based on data in the Message. Further on in the code, in the onCreate method, we call a local performRequest method when the Go button is clicked, and we pass a selected String representing a URL ![]() .
.
Inside the performRequest method, we use a static convenience method to return an HttpClient ResponseHandler, passing in the Android Handler that it’ll use ![]() . We’ll examine the helper class next to get a look at exactly how this works, but the important part for now is that the
ResponseHandler is created for us by the static method. With the ResponseHandler instance taken care of, we instantiate an HttpRequestHelper instance
. We’ll examine the helper class next to get a look at exactly how this works, but the important part for now is that the
ResponseHandler is created for us by the static method. With the ResponseHandler instance taken care of, we instantiate an HttpRequestHelper instance ![]() and use it to make a simple HTTP GET call (passing in only the String URL). Similar to what happened in listing 6.5, when the request completes, the ResponseHandler fires the onResponse method, and our Handler is sent a Message, completing the process.
and use it to make a simple HTTP GET call (passing in only the String URL). Similar to what happened in listing 6.5, when the request completes, the ResponseHandler fires the onResponse method, and our Handler is sent a Message, completing the process.
The example Activity in listing 6.6 is fairly clean and simple, and it’s asynchronous and doesn’t block the UI thread. The heavy lifting is taken care of by HttpClient itself and by the setup our custom HttpRequestHelper makes possible. The first part of the all-important HttpRequestHelper, which we’ll explore in three listings (listing 6.7, 6.8, and 6.9), is shown in the following listing.
Listing 6.7. The first part of the HttpRequestHelper class


The first thing of note in the HttpRequestHelper class is that a ResponseHandler is required to be passed in as part of the constructor ![]() . This ResponseHandler will be used when the HttpClient request is ultimately invoked. After the constructor, we see a public HTTP GET-related method
. This ResponseHandler will be used when the HttpClient request is ultimately invoked. After the constructor, we see a public HTTP GET-related method ![]() and several different public HTTP POST-related methods
and several different public HTTP POST-related methods ![]() . Each of these methods is a wrapper around the private performRequest method that can handle all the HTTP options
. Each of these methods is a wrapper around the private performRequest method that can handle all the HTTP options ![]() . The performRequest method supports a content-type header value, URL, username, password, Map of additional headers, similar Map of request parameters, and request method type.
. The performRequest method supports a content-type header value, URL, username, password, Map of additional headers, similar Map of request parameters, and request method type.
Inside the performRequest method, a DefaultHttpClient is instantiated. Next, we check whether the user and pass method parameters are present; if they are, we set the request credentials with a UsernamePasswordCredentials type (HttpClient supports several types of credentials; see the Javadocs for details). At the same time as we set the credentials, we also set an AuthScope. The scope represents which server, port, authentication realm, and authentication scheme the supplied credentials are applicable for.
You can set any of the HttpClient parameters as finely or coarsely grained as you want; we’re using the default ANY scope that matches anything. What we notably haven’t set in all of this is the specific authentication scheme to use. HttpClient supports various schemes, including basic authentication, digest authentication, and a Windows-specific NT Lan Manager (NTLM) scheme. Basic authentication (simple username/password challenge from the server) is the default. Also, if you need to, you can use a preemptive form login for form-based authentication—submit the form you need, get the token or session ID, and set default credentials.
After the security is out of the way, we use an HttpRequestInterceptor to add HTTP headers ![]() . Headers are name/value pairs, so adding the headers is pretty easy. After we have all of the properties that apply regardless
of our request method type, we then add additional settings that are specific to the method. The following listing, the second
part of our helper class, shows the POST- and GET-specific settings and the execute method.
. Headers are name/value pairs, so adding the headers is pretty easy. After we have all of the properties that apply regardless
of our request method type, we then add additional settings that are specific to the method. The following listing, the second
part of our helper class, shows the POST- and GET-specific settings and the execute method.
Listing 6.8. The second part of the HttpRequestHelper class


When the specified request is a POST type, we create an HttpPost object to deal with it ![]() . Then we add POST request parameters, which are another set of name/value pairs and are built with the BasicNameValuePair object
. Then we add POST request parameters, which are another set of name/value pairs and are built with the BasicNameValuePair object ![]() . After adding the parameters, we’re ready to perform the request, which we do with our local private execute method using the method object and the client
. After adding the parameters, we’re ready to perform the request, which we do with our local private execute method using the method object and the client ![]() .
.
Our execute method sets up an error response handler (we want to return a response, error or not, so we set this up just in case) ![]() and wraps the HttpClient execute method, which requires a method object (either POST or GET in our case, pre-established) and a ResponseHandler as input. If we don’t get an exception when we invoke HttpClient execute, all is well and the response details are placed into the ResponseHandler. If we do get an exception, we populate the error handler and pass it through to the ResponseHandler.
and wraps the HttpClient execute method, which requires a method object (either POST or GET in our case, pre-established) and a ResponseHandler as input. If we don’t get an exception when we invoke HttpClient execute, all is well and the response details are placed into the ResponseHandler. If we do get an exception, we populate the error handler and pass it through to the ResponseHandler.
We call the local private execute method with the established details for either a POST or a GET request. The GET method is handled similarly to the POST, but we don’t set parameters (with GET requests, we expect parameters encoded in the URL itself). Right now, our class supports only POST and GET, which cover 98 percent of the requests we generally need, but it could easily be expanded to support other HTTP method types.
The final part of the request helper class, shown in the following listing, takes us back to the first example (listing 6.7), which used the helper. Listing 6.9 outlines exactly what the convenience getResponseHandlerInstance method returns (constructing our helper requires a ResponseHandler, and this method returns a default one).
Listing 6.9. The final part of the HttpRequestHelper class


As we discuss the getResponseHandlerInstance method of our helper, we should note that although we find it helpful, it’s entirely optional. You can still use the helper
class without using this method. To do so, construct your own ResponseHandler and pass it in to the helper constructor, which is a perfectly plausible case. The getResponseHandlerInstance method builds a convenient default ResponseHandler that hooks in a Handler via a parameter ![]() and parses the response as a String
and parses the response as a String ![]() . The response String is sent back to the caller using the Handler Bundle and Message pattern we’ve seen used time and time again to pass messages between threads in our Android screens.
. The response String is sent back to the caller using the Handler Bundle and Message pattern we’ve seen used time and time again to pass messages between threads in our Android screens.
With the gory HttpRequestHelper details out of the way, and having already explored basic usage, we’ll next turn to more involved uses of this class in the context of web service calls.
6.5. Web services
The term web services means many different things, depending on the source and the audience. To some, it’s a nebulous marketing term that’s never pinned down; to others, it’s a rigid and specific set of protocols and standards. We’re going to tackle it as a general concept, without defining it in depth, but not leaving it entirely undefined either.
Web services are a means of exposing an API over a technology-neutral network endpoint. They’re a means to call a remote method or operation that’s not tied to a specific platform or vendor and get a result. By this definition, POX over the network is included; so are REST and SOAP—and so is any other method of exposing operations and data on the wire in a neutral manner.
POX, REST, and SOAP are by far the most common web services around, so they’re what we’ll focus on in this section. Each provides a general guideline for accessing data and exposing operations, each in a more rigorous manner than the previous. POX basically exposes chunks of XML over the wire, usually over HTTP. REST is more detailed in that it uses the concept of resources to define data and then manipulates them with different HTTP methods using a URL-style approach (much like the Android Intent system in general, which we explored in previous chapters). SOAP is the most formal of them all, imposing strict rules about types of data, transport mechanisms, and security.
All these approaches have advantages and disadvantages, and these differences are amplified on a mobile platform like Android. Though we can’t possibly cover all the details here, we’ll touch on the differences as we discuss each of these concepts. We’ll examine using a POX approach to return recent posts from the Delicious API (formerly del.icio.us), then we’ll look at using REST with the Google GData AtomPub API. Up first is probably the most ubiquitous type of web service in use on the internet today, and therefore one you’ll come across again and again when connecting Android applications—POX.
6.5.1. POX—Putting it together with HTTP and XML
To work with POX, we’re going to make network calls to the popular Delicious online social bookmarking site. We’ll specify a username and password to log in to an HTTPS resource and return a list of recent posts, or bookmarks. This service returns raw XML data, which we’ll parse into a JavaBean-style class and display as shown in figure 6.4.
Figure 6.4. The Delicious recent posts screen from the NetworkExplorer application

The following listing shows the Delicious login and HTTPS POST Activity code from our NetworkExplorer application.
Listing 6.10. The Delicious HTTPS POX API with authentication from an Activity


To use a POX service, we need to know a bit about it, beginning with the URL end-point ![]() . To call the Delicious service, we again use a Handler to update the UI
. To call the Delicious service, we again use a Handler to update the UI ![]() , and we use the HttpRequestHelper we previously built and walked through in the last section. Again in this example, we have many fewer lines of code than if we didn’t use the helper—lines of code we’d likely
be repeating in different Activity classes. With the helper instantiated, we call the performRequest method with a username and password
, and we use the HttpRequestHelper we previously built and walked through in the last section. Again in this example, we have many fewer lines of code than if we didn’t use the helper—lines of code we’d likely
be repeating in different Activity classes. With the helper instantiated, we call the performRequest method with a username and password ![]() . This method, via the helper, will log in to Delicious and return an XML chunk representing the most recently bookmarked
items
. This method, via the helper, will log in to Delicious and return an XML chunk representing the most recently bookmarked
items ![]() .
.
To turn the raw XML into useful types, we then also include a parseXMLResult method ![]() . Parsing XML is a subject in its own right, and we’ll cover it in more detail in chapter 13, but the short takeaway with this method is that we walk the XML structure with a parser and return our own DeliciousPost data beans for each record. That’s it—that’s using POX to read data over HTTPS.
. Parsing XML is a subject in its own right, and we’ll cover it in more detail in chapter 13, but the short takeaway with this method is that we walk the XML structure with a parser and return our own DeliciousPost data beans for each record. That’s it—that’s using POX to read data over HTTPS.
Building on the addition of XML to HTTP, above and beyond POX, is the REST architectural principle, which we’ll explore next.
6.5.2. REST
While we look at REST, we’ll also try to pull in another useful concept in terms of Android development: working with the various Google GData APIs (http://code.google.com/apis/gdata/). We used the GData APIs for our RestaurantFinder review information in chapter 3, but there we didn’t authenticate, and we didn’t get into the details of networking or REST. In this section, we’ll uncover the details as we perform two distinct tasks: authenticate and retrieve a Google ClientLogin token and retrieve the Google Contacts data for a specified user. Keep in mind that as we work with the GData APIs in any capacity, we’ll be using a REST-style API.
The main REST concepts are that you specify resources in a URI form and you use different protocol methods to perform different actions. The Atom Publishing Protocol (AtomPub) defines a REST-style protocol, and the GData APIs are an implementation of AtomPub (with some Google extensions). As we noted earlier, the entire Intent approach of the Android platform is a lot like REST. A URI such as content://contacts/1 is in the REST style. It includes a path that identifies the type of data and a particular resource (contact number 1).
That URI doesn’t say what to do with contact 1, though. In REST terms, that’s where the method of the protocol comes into the picture. For HTTP purposes, REST uses various methods to perform different tasks: POST (create, update, or in special cases, delete), GET (read), PUT (create, replace), and DELETE (delete). True HTTP REST implementations use all the HTTP method types and resources to construct APIs.
In the real world, you’ll find few true REST implementations. It’s much more common to see a REST-style API. This kind of API doesn’t typically use the HTTP DELETE method (many servers, proxies, and so on, have trouble with DELETE) and overloads the more common GET and POST methods with different URLs for different tasks (by encoding a bit about what’s to be done in the URL, or as a header or parameter, rather than relying strictly on the method). In fact, though many people refer to the GData APIs as REST, they’re technically only REST-like, not true REST. That’s not necessarily a bad thing; the idea is ease of use of the API rather than pattern purity. All in all, REST is a popular architecture or style because it’s simple, yet powerful.
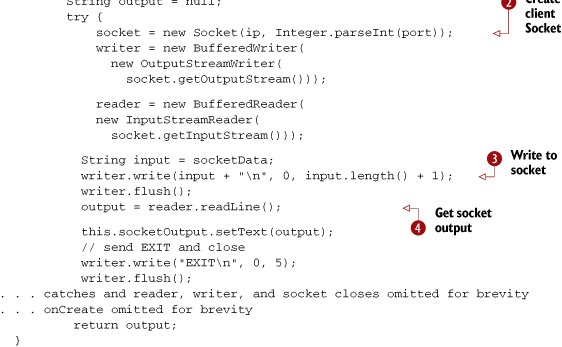
The following listing is an example that focuses on the network aspects of authentication with GData to obtain a ClientLogin token and use that token with a subsequent REST-style request to obtain Contacts data by including an email address as a resource.
Listing 6.11. Using the Google Contacts AtomPub API with authentication
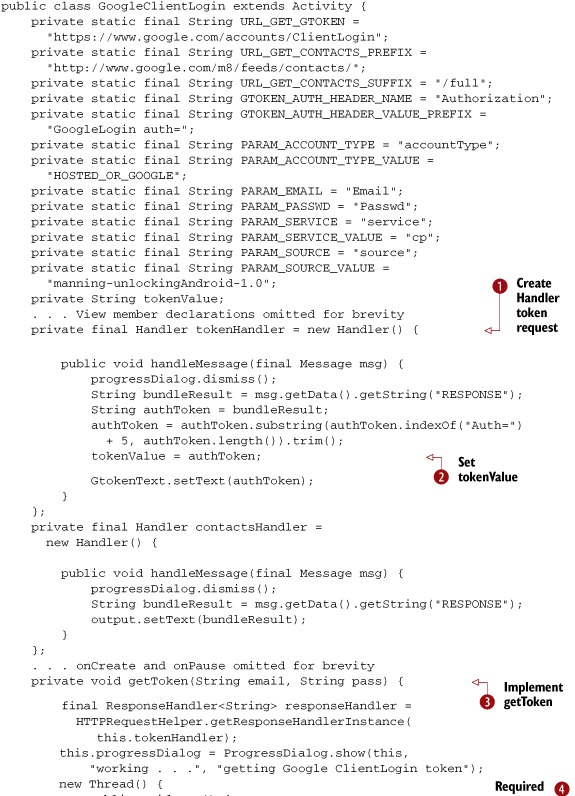

After a host of constants that represent various String values we’ll use with the GData services, we have several Handler instances in this class, beginning with a token-Handler ![]() . This handler updates a UI TextView when it receives a message, like similar examples you saw previously, and updates a non-UI member tokenValue variable that other portions of our code will use
. This handler updates a UI TextView when it receives a message, like similar examples you saw previously, and updates a non-UI member tokenValue variable that other portions of our code will use ![]() . The next Handler we have is the contacts-Handler that will be used to update the UI after the contacts request.
. The next Handler we have is the contacts-Handler that will be used to update the UI after the contacts request.
Beyond the handlers, we have the getToken method ![]() . This method includes all the required parameters for obtaining a ClientLogin token from the GData servers (http://code.google.com/apis/gdata/auth.html)
. This method includes all the required parameters for obtaining a ClientLogin token from the GData servers (http://code.google.com/apis/gdata/auth.html) ![]() . After the setup to obtain the token, we make a POST request via the request helper
. After the setup to obtain the token, we make a POST request via the request helper ![]() .
.
After the token details are taken care of, we have the getContacts method ![]() . This method uses the token obtained via the previous method as a header
. This method uses the token obtained via the previous method as a header ![]() . After you have the token, you can cache it and use it with all subsequent requests; you don’t need to obtain the token every
time. Next, we encode the email address portion of the Contacts API URL
. After you have the token, you can cache it and use it with all subsequent requests; you don’t need to obtain the token every
time. Next, we encode the email address portion of the Contacts API URL ![]() , and we make a GET request for the data—again using the HttpRequestHelper
, and we make a GET request for the data—again using the HttpRequestHelper ![]() .
.
With this approach, we’re making several network calls (one as HTTPS to get the token and another as HTTP to get data) using our previously defined helper class. When the results are returned from the GData API, we parse the XML block and update the UI.
Though we included a working ClientLogin example in listing 6.11, we also skipped over an important part—CAPTCHA. Google might optionally require a CAPTCHA with the ClientLogin approach. To fully support ClientLogin, you need to handle that response and display the CAPTCHA to the user, then resend a token request with the CAPTCHA value that the user entered. For details, see the GData documentation.
Now that we’ve explored some REST-style networking, the last thing we need to discuss with regard to HTTP and Android is SOAP. This topic comes up frequently in discussions of networking mobile devices, but sometimes the forest gets in the way of the trees in terms of framing the real question.
6.5.3. To SOAP or not to SOAP, that is the question
SOAP is a powerful protocol that has many uses. We would be remiss if we didn’t at least mention that though it’s possible to use SOAP on a small, embedded device such as a smartphone, regardless of the platform, it’s not recommended. The question within the limited resources environment Android inhabits is really more one of should it be done rather than can it be done.
Some experienced developers, who might have been using SOAP for years on other devices, might disagree. The things that make SOAP great are its support for strong types (via XML Schema), its support for transactions, its security and encryption, its support for message orchestration and choreography, and all the related WS-* standards. These things are invaluable in many server-oriented computing environments, whether or not they involve the enterprise. They also add a great deal of overhead, especially on a small, embedded device. In fact, in many situations where people use SOAP on embedded devices, they often don’t bother with the advanced features—and they use plain XML with the overhead of an envelope at the end of the day anyway. On an embedded device, you often get better performance, and a simpler design, by using a REST- or POX-style architecture and avoiding the overhead of SOAP.
Even with the increased overhead, it makes sense in some situations to investigate using SOAP directly with Android. When you need to talk to existing SOAP services that you have no control over, SOAP might make sense. Also, if you already have J2ME clients for existing SOAP services, you might be able to port those in a limited set of cases. Both these approaches make it easier only on you, the developer; they have either no effect or a negative one in terms of performance on the user. Even when you’re working with existing SOAP services, remember that you can often write a POX-or REST-style proxy for SOAP services on the server side and call that from Android, rather than use SOAP directly from Android.
If you feel like SOAP is still the right choice, you can use one of several ports of the kSOAP toolkit (http://ksoap2.sourceforge.net/), which is specially designed for SOAP on an embedded Java device. Keep in mind that even the kSOAP documentation states, “SOAP introduces some significant overhead for web services that may be problematic for mobile devices. If you have full control over the client and the server, a REST-based architecture may be more adequate.” In addition, you might be able to write your own parser for simple SOAP services that don’t use fancy SOAP features and just use a POX approach that includes the SOAP XML portions you require (you can always roll your own, even with SOAP).
All in all, to our minds the answer to the question is to not use SOAP on Android, even though you can. Our discussion of SOAP, even though we don’t advocate it, rounds out our more general web services discussion, and that wraps up our networking coverage.
6.6. Summary
In this chapter, we started with a brief background of basic networking concepts, from nodes and addresses to layers and protocols. With that general background in place, we covered details about how to obtain network status information and showed several different ways to work with the IP networking capabilities of the platform.
In terms of networking, we looked at using basic sockets and the java.net package. Then we also examined the included Apache HttpClient API. HTTP is one of the most common—and most important—networking resources available to the Android platform. Using HttpClient, we covered a lot of territory in terms of different request types, parameters, headers, authentication, and more. Beyond basic HTTP, we also explored POX and REST, and we discussed a bit of SOAP—all of which use HTTP as the transport mechanism.
Now that we’ve covered a good deal of the networking possibilities, and hopefully given you at least a glint of an idea of what you can do with server-side APIs and integration with Android, we’re going to turn to another important part of the Android world—telephony.