
Hardware Interrupts
With an idea as to what functions can do for us, we can move on to a different kind of function—one that is driven by specific hardware in the microcontroller. The reasons for using interrupts are many; maybe we have a lot of code in our loop() function and sitting there waiting for a button press would slow things down too much or maybe we might even miss the button press all together. Or instead we might be using a photo sensor or interrupter that triggers when something gets close and it is important to stop a motor right at that exact time. These things are possible with a hardware interrupt that can be configured on one of two digital pins to trigger a unique kind of advanced function called an interrupt service routine (ISR). When the interrupt is triggered, the ISR will be called regardless of whatever the program is in the middle of. Like using one of the internal timers, monitoring of the hardware interrupt pin happens in the background and the jump to the ISR can happen within four instructions, so fairly quickly. After the ISR has been executed, program flow returns back to where it left off before the interrupt and, if done correctly, with little effect on the rest of the code.
An ISR looks a lot like a regular function but there are a few rules that we need to stick to. First, as was shown in our second project code, the ISR should be kept as short as possible, often only three to four lines of code at the maximum, so as to not overly disrupt the program flow and prevent the interrupt from being triggered again while executing the ISR. If we have a longer ISR than that, we need to disable the interrupt briefly while the ISR is running. Likewise, timing related functions would not work properly within the ISR because they use the same hardware timer. For example, millis() will not increment and delay() will not work at all. Other than that, an ISR is declared just like a normal function, but in order to use a hardware interrupt we need to first attach it in our code.
attachInterrupt()
The attachInterrupt() function enables hardware interrupts and links a hardware pin to an ISR to be called when the interrupt is triggered. This function also specifies the type of state change that will trigger the interrupt. Its syntax follows:
attachInterrupt(interrupt, function, mode)
The first parameter is the number of the interrupt. On the Arduino Uno there are only two possible hardware interrupts, 0 and 1, which correspond to digital pins 2 and 3 respectively. Note that this parameter refers to the interrupt number and not the pin number. The second parameter is the name of the function that will serve as the interrupt service routine that we will want to execute when the interrupt is triggered. Finally, we have the mode that represents the specific state change that will cause the interrupt to trigger. There are four possible modes, as shown in Figure 7-7, which include LOW, CHANGE, RISING, and FALLING.
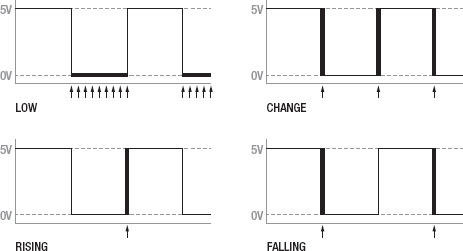
LOW triggers when the interrupt pin is in the LOW state. This mode will continuously trigger the interrupt for as long as it remains in this condition and because of this is not used as much as the other modes. CHANGE will trigger when the state of an interrupt pin changes either from HIGH to LOW or from LOW to HIGH. RISING will only trigger the interrupt when the signal goes from LOW to HIGH while FALLING will trigger on the reverse going from HIGH to LOW. Because of how our example circuit is connected, the button will send a signal of HIGH when triggered so we used the RISING mode to trigger the interrupt when the digital pin's state changes from LOW to HIGH.
Once the interrupt has been properly configured, often but not always in the setup() function, we need to write the ISR function. The function selectHSB() is a fairly good example of a short and succinct ISR. Its entire job is to increment the counter i and keep those values to a possible range of 0–3. Remember though, that in order for us to use the indexing variable i elsewhere in our sketch, we need to first use the volatile variable qualifier at the beginning of our sketch. Because the interrupt could sneak in there and change the value of a variable without the rest of the sketch knowing it, by using the volatile keyword we can tell the compiler to put the variable data in a more secure place in memory to prevent weird things from happening to our number.
detachInterrupt()
With our hardware interrupt enabled, it is possible that in a given application, we might need to change the mode of an interrupt, for example to change it from RISING to FALLING. To do this we would need to first stop the interrupt by using the detachInterrupt() function. Its syntax is fairly straightforward, as follows:
detachInterrupt(interrupt)
With only one parameter to determine which interrupt we are disabling, this parameter is specified as either 0 or 1. Once the interrupt has been disabled, we can then reconfigure it using a different mode in the attachInterrupt() function.