
Soldering
We love our solderless breadboards for making our lives that much easier, but occasionally there is no escaping the need to solder. Maybe the pins on a switch don't fit in the breadboard so we need to solder wires to it. Some of the breakout boards that we have been using do not already have pins attached when we buy them, so we need to solder pin headers to them to plug them into our breadboard. Figure 12-16 shows a couple of different breakout boards that will need a little soldering.
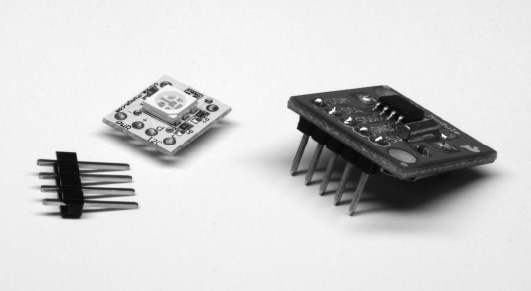
Figure 12-16. BlinkM MinM and SparkFun DS1307 RTC breakouts
In this image are the BlinkM MinM smart LED and the DS1307 RTC breakout board from SparkFun Electronics. Unfortunately, neither of these devices comes ready to plug right into the breadboard. In the case of the BlinkM MinM, it includes the four-pin male pin header shown in the image, while the SparkFun device requires a separate purchase of the pin headers needed. Pin headers are kind of like the glue of electronics prototyping, so having a few extra on hand is always a good idea. We will make the assumption here that to complete some of the projects discussed earlier, you might want to know how to go about soldering these pins to these breakout boards.
To get started soldering you'll need to pick up a few things. The first thing, of course, is a soldering iron. On the low end, a $10–$20 pen-style soldering iron in the 30-watt ballpark is just fine for learning how to solder. A soldering stand and a sponge to clean the soldering iron tip are also good ideas. We like to use our Weller WES-51 adjustable soldering station, but other higher-end stations that run about $100 are also a good choice if you find that you'll be doing quite a bit of soldering. You will also need some solder. As long as you avoid the solder for copper pipes that you might find at the hardware store, you will probably be fine. We find .03” diameter 60/40 tin/lead rosin core solder works great for general, personal-use soldering. Other sizes and types of solders, including those that are lead-free, are also available and will work fine. It can also be tricky to hold four different things—the iron, solder, and two parts—while soldering, so some form of clamp or helper is also a good idea to have on hand.
A quick note here about safety. We are indeed recommending lead-based solder for personal use because of its ease of use and it is generally nicer to our irons. The fumes that come from soldering are mostly the rosin inside the solder burning off, but you do not necessarily want to make a habit of breathing it. Lead-free solder is not only harder on the iron, but it also uses far more toxic rosin, so you will want to seriously ventilate when using this type of solder, if you choose to use it. Either way, you should always wash your hands after handling any kind of solder.
Okay, before we start soldering, we need to get the iron good and hot. We also want a nice, clean, and shiny tip at the end of our iron. We can get this by applying a little bit of solder to the tip of our iron and then wipe the tip across a damp sponge. This is a process called tinning. It is also a good idea to clean the tip before and after each use. A clean tip will make the heat transfer better and the solder flow more smoothly. With a properly tinned tip, it's now time to solder. Figure 12-17 provides the illustrated and abbreviated version of this process.
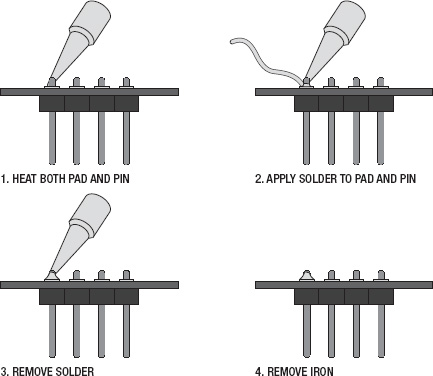
Our example assumes that you want to solder pin headers to a printed circuit board, or PCB, although this process is fundamentally the same as soldering two wires together. Generally, we want to equally heat both parts with the tip of the iron and apply the solder to the two heated parts to be soldered and not directly to the soldering iron tip. We do this by putting the two parts together so that the metal bits are in contact, and then place the tip of the iron so that it touches both of these parts. In reality, we are using both the very tip and the side of the tip to make a good enough contact with both parts. In our example, we are soldering the short side of the pin header to the copper pad surrounding the hole that the pin was fed through on the circuit board.
When the parts are sufficiently heated, solder can be applied to the parts and it should flow quickly and smoothly when there is enough heat and everything is clean. Sometimes we will touch the solder to the tip of the iron to start the flow of molten solder, but we want to keep the solder on the parts to be soldered and not the iron. Remove the solder when a nice little mountain of solder has formed, but leave the iron heating things for another second or so. Once the solder has had a chance to flow over the whole pad, we can then remove the iron allowing the joint to cool naturally.
When the joint has been soldered correctly, you should have a clean and shiny little mound of solder that completely fills the copper pad and fully encompasses the pin. Sometimes when we don't add enough solder to the joint, we will end up with a pin that is only partially attached. This might work initially, but can create problems later when you least expect it. The simple fix is to simply heat up the joint and add more solder. However, if we add too much solder, we will end up with an enormous blob that might come into contact with other nearby pins or pads on the board. To fix this, we just need to heat up the solder again and shake or tap the board to remove the extra solder. Other times, instead of a shiny little mountain, we might end up with a solder joint that is dirty and dull looking. This is what's called a cold solder joint and happens when the tip is either not clean or not hot enough for the job. Make sure that your iron has had time to fully heat up, check that the tip is clean, and if you have an adjustable iron, set the iron to a higher temperature.
Like learning to ride a bicycle, soldering is a whole lot of fun, but it takes time and practice to get it right. The best way to learn is to pick up some electronic kits from Adafruit, SparkFun, or the Maker SHED. Electronic kits like the Minty Boost, Simon Soldering Kit, and the Atari Punk Console are all great places to continue practicing your soldering skills.