

Chapter 4
The Prompting Framework
Asking the User Questions
4.1 Getting Started
4.1.1 Quick Tour
4.2 Understanding Prompts
4.2.1 Using Dynamic Prompts
4.2.2 Using Dependencies between Prompts
4.2.3 Using Prompt Groups
4.2.4 Using Selection Groups
4.2.5 Using Shared Prompts
4.3 Creating a New Prompt
4.3.1 Populating the List of Available Values Using a Data Table
4.3.2 Populating the List of Available Values Dynamically
4.4 Grouping Prompts
4.4.1 Open the Add New Group Window
4.4.2 Creating a New Group Prompt
4.4.3 Group Types
4.4.4 Creating a Selection Group Prompt
4.5 Shared Prompting
4.5.1 Set Up a Folder Structure for Shared Prompts
4.5.2 Set Up a Central Starting Point
4.5.3 Creating a Shared Prompt
4.6 Tips and Tricks
4.6.1 Building Dependent Prompts
4.6.2 Creating Prompt Groups for SAS Web Report Studio
4.6.3 Making a Filter Optional
4.7 Quick Reference for Prompts
4.8 SAS Administrator Tasks
4.8.1 Access Requirements
4.8.2 Allowing Limited Access to SAS Management Console
Chapter 4
The Prompting Framework
Asking the User Questions
Prompts are commonly seen on the Web, allowing users to enter information, search through data, or interact with a tool. Consumers can apply for loans, search for automobiles, or choose preferences using forms made from multiple prompts.
In SAS software, prompts provide developers with the capability to produce more dynamic content with less effort and fewer resources. Developers can leverage prompting functionality by enabling one program to meet multiple needs rather than using smaller programs that must be modified or duplicated for various uses. Reusing material improves productivity and efficiency by offering consistent and organized items across multiple products.
Users also have a friendly interface that offers data validation and removes the need to know how to modify SAS code. Prompts guide users through a report, automatically generating code with values they have selected. Reports can use the prompt value to do things such as filter the data, specify titles, or stylize the report.
As with many components, prompts are the most valuable when the interface is user friendly and provide the results users need. This requires an understanding of not only creating prompts, but how to store and share them with other components of SAS Business Intelligence system.
4.1 Getting Started
The following sections describe the underlying technology of prompting used across multiple BI clients, including SAS Stored Processes and SAS Enterprise Guide.
You can create prompts from several locations but you can only share them using SAS Management Console. When sharing prompts, multiple applications are able to use the same prompt.
The following table provides an overview of where you can create a prompts and where you can share a prompt.
| Tools | Create Prompts | Create Dynamic Prompts | Create Dependent Prompts | Share Prompts |
|---|---|---|---|---|
| SAS Management Console | Yes | Yes | Yes | Yes |
| SAS Information Studio | Yes | Yes (from data added to the map) | Yes | No |
| SAS Enterprise Guide | Yes | Yes (from data tables only) | No | No |
| SAS Web Report Studio | Yes | Yes (only from data selected for the report section) | Yes (only from data selected for the report section) | No |
| SAS BI Dashboard | Yes | No | No | No |
Table 4.1-1 Tools that support prompt creation
Prompts created in SAS Enterprise Guide are available only within that specific project. The only caveat is when the project flow or specific task using a prompt is converted into a SAS Stored Process. When this prompt is converted, the prompt moves to the Stored Process system and is no longer associated with the prompt in SAS Enterprise Guide.
If users create a prompt in SAS Web Report Studio or SAS Add-In for Microsoft Office the prompt is only available when the filter is run for the specific report.
Indicator interactions can be developed in SAS BI Dashboard to simulate dependent and dynamic prompts. Refer to Chapter 9, “SAS BI Dashboard,” for more information how to implement interactions.
4.1.1 Quick Tour
The interface to create new prompts (used in this section) is identical in SAS Enterprise Guide, SAS Stored Processes, SAS Management Console, and SAS Information Map Studio.
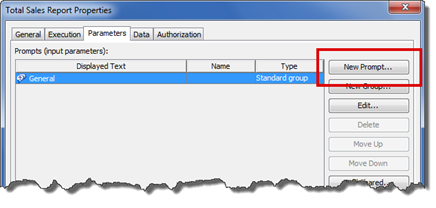
- From SAS Management Console, select Properties on an existing stored process. Then, from the Parameter tab, select New Prompt.
- In SAS Information Map Studio, select Manage Prompts from
the Tools menu. Then select New on the Manage Prompts window.


- From SAS Enterprise Guide, select the Add button within the Prompt Manager window.

- From the SAS Enterprise Guide Create New SAS Stored Process wizard, select New Prompt from the New drop-down box on the Prompts page.

4.2 Understanding Prompts
Prompts can be used to meet a variety of your users’ requirements as there are various prompting techniques, types, and functionalities. The following sections define how to use the various prompts, show where you can create the prompts, and give a detailed overview of each individual prompt.
You can further improve the user’s experience by setting up prompts with capabilities such as:
- a dynamically derived list of values, referred to as dynamic prompts
- one prompt driving the values for the next prompt, referred to as dependent prompts
- groups of prompts organized for quicker user entry, also called prompt groups
- prompts that drive what other prompts are displayed, defined as selection groups
- creating prompts for reuse in multiple locations, otherwise known as shared prompts
4.2.1 Using Dynamic Prompts
Dynamic prompts point to data sets as the source values for the prompt. This is useful for changing values, such as the list of customers that exists in a weekly data table.

Figure 4.2-1 Dynamic prompts
In Figure 4.2-1, the list of choices for the region prompt are dynamically generated from the data table each time the prompt is displayed. The distinct list of regions is retrieved each time the prompt is displayed to a user.
- When to use
- Static prompts contain a list of values that is managed by an individual. If this list of values requires constant modifications and updates, using a dynamic prompt is the better option. For example, a static prompt with a list of customers would need modification any time new customers are added. Reduce the management of this prompt by pointing to a data source that is either the raw table or a refreshed summary table with the list of valid customers.
- When not to use
- Each time the prompt screen appears, it runs a query to select the distinct values within the source table. Because of this, users might experience a delay before they are allowed to make a selection. Therefore, you should not run this for prompts that do not require a dynamic list. For instance, for severity, the possible values (Critical, Major, Minor, Information) might never change.
When using dynamic prompts, if the data table source is extremely large, the response time to view the prompt might be long. If this is the case, you can create a summary table containing the list of distinct values needed for the prompt. Update this table as part of the overall extract transform load (ETL) process to ensure that it contains current information. Implementing an index on larger summary tables further improves its response time.
4.2.2 Using Dependencies between Prompts
Also referred to as cascading prompts, dependencies between prompts means that the first prompt selection is used to subset the values displayed in the second prompt. This is extremely useful if the second prompt list of values is extremely large, which causes the users first to see only the top 20 values and opt to view additional values.

Figure 4.2-2 Cascading prompts
In this example, the data table provides two columns: State and City. The first prompt is a static prompt listing all US states. When users select a state ![]() , the value is used to generate a list of cities for that state and returns those values to the second prompt
, the value is used to generate a list of cities for that state and returns those values to the second prompt ![]() .
.
- When to use
- A common use for cascading prompts is on geographic data filtering, for instance from state to city. The list of cities would be extraordinarily large if it included all cities in the data set. Using state to filter city and then display only those cities within the selected state keeps the interface user friendly.
- When not to use
- If the second prompt is not a subset of the first, then using the dependency capability does not provide any value.
4.2.3 Using Prompt Groups
Prompt groups are prompts that are commonly used together, creating a usable interface for users. In this example, three prompt groups exist: Location, Automobile, and Output Options, each with a set of related prompts.

Figure 4.2-3 Grouped prompts
- When to use
- Prompt groups are helpful when organizing and sharing complex dependent prompts or when the data must use all prompts to be successfully queried. In the State – City example, grouping these prompts makes sense. Querying on City will cause incorrect results because the same city name exists in multiple states.
- When not to use
- SAS Web Report Studio cannot directly use grouped prompts.
A workaround is to call a stored process that uses the prompt group.
You cannot group project prompts from SAS Enterprise Guide.
4.2.4 Using Selection Groups
Selection groups allow the user to select which prompt group to choose.

Figure 4.2-4 Selection group prompts
In this example, the user first is prompted to decide how
they want to interact with the data. If the user selects the Location option in
the Select a query
type ![]() prompt, the
State and City prompts appear
prompt, the
State and City prompts appear ![]() . Selecting Make and Model changes the prompts displayed so the user can then enter a make and model. This
flexibility allows a single report to address even more user requirements.
. Selecting Make and Model changes the prompts displayed so the user can then enter a make and model. This
flexibility allows a single report to address even more user requirements.
- When to use
- Users need to first select which option group to display, and then the prompt changes, based on their selection, with subsequent prompts and filtering. For example, the user searches for an automobile to purchase. She can choose to search by the city the car is in, by make and model, or by price. If she selects the make and model option, the dependent prompts for make and model appear for further selection.
- When not to use
- SAS Web Report Studio cannot directly use selection group prompts. The workaround is to call a stored process that uses the prompt group. SAS Enterprise Guide project prompts do not provide the interface to group prompts together.
 Groups of prompts can be used only in SAS Information Map Studio and SAS Web Report Studio through an attached stored process.
In stored processes, creating the flexible code for various query scenarios can become complex. Also, selection groups cannot be shared between stored processes or information maps. You must create selection groups for each location in which they are used.
4.2.5 Using Shared Prompts
Individual prompts can be shared across all BI clients by creating and sharing them within the SAS Management Console New SAS Stored Process wizard.
You can create prompts in several different locations, but they can be shared only using SAS Management Console. Shared prompts are then available for multiple applications to use the same prompt.
This mechanism allows you to centrally manage the prompt text, the required formats, and so on.
- When to use
- Sharing prompts improves productivity. If the State–City dependent prompt is used in SAS Web Report Studio, stored processes, and SAS Add-In for Microsoft office, having the definitions in a single place makes management of changes much simpler.
- When not to use
- If the prompt is used in only one location, then there is no value with stepping outside of the tool it is used in to create it within SAS Management Console.
You can modify the prompt name, description, and displayed text without affecting the shared prompt definition in the metadata.
4.3 Creating a New Prompt
- In the Add New Prompt window, do the following to create dynamic prompt. To create the Customer prompt (referred to in Chapter 6, “SAS Information Map Studio”) type CustomerPrompt in the Name field and Select one or more customers in the Displayed
text field.

Field Name Description 1
Name
Must not contain any special characters or blanks.
2
Displayed text
The information the user sees, examples are:
Select the State or Choose one or more customers
3
Description
This appears to users as subtext. It is useful when more information is needed to assist the user with interacting with the report.
Example: “Select the type of query you would like to run. Location will provide prompts for State and City, while Make and Model will prompt you for that information.”
4
Options
These are additional prompt options used to customize how the prompt interacts with the user and with the report.
Hide from user: The prompt does not display to the user. This initially seems to contradict the reason you create prompts in the first place; however, this is commonly used by developers or administrators to create macro values applicable to a single report behind the scenes. An example is to set the reserved macro _odsstyle for a stored process. This macro sets the color schemes for the output. The user would not see this prompt or be able to modify it, but the report developer could modify it in the prompt GUI without changing the underlying SAS code.
Read-only values: Similar to the Hide from user option, this sets a prompt to a prespecified value. Users cannot modify the value, but they are allowed to see it. For example, an organization specifies that users cannot query data older than one year, due to the size and performance requirements of the resulting query. A prompt with this option selected would allow users to see that this filter is present; however, they cannot interact or modify the filter itself.
Requires a non-blank value: The user cannot go forward with running the report until the prompt has a value selected. Consider stored processes; an example of when to use this option is for cases when the code will return an error message and not run successfully if the user runs the report without selecting a value.
Use prompt value throughout project: This option appears only for prompts within SAS Enterprise Guide. You can choose to use this prompt value for multiple tasks and for code within the project by selecting this option. Otherwise, the prompt is used only for specified task and code elements.
- After entering values on this tab, move to the Prompt Type and Values tab. Continuing with the information map example, choose the populating prompt
method User selects
values from a dynamic list and select Customer for the Formatted (Displayed) Values data item.

1
The Prompt type drop-down option is where you select the type of prompt. The options are listed and detailed in Section 4.7, “Quick Reference for Prompts.”
2
Method for populating prompt specifies how the prompt values will be generated.
- If users can enter their own values, then the prompt allows the user to type in the value and to see specific options based on the prompt type. For example, with the prompt type date, there is still a drop-down list with options such as Tomorrow or N days ago, as well as a calendar widget. But the prompt also would allow the user to manually type in “July 20, 2011”.
- Static lists are pregenerated values that the prompt displays to the user. When you create the prompt, you can manually type in available values or you can generate the list of values off an existing data table. The list does not update, so if an additional value is needed, you must modify manually through the prompt graphical user interface (GUI). An example of this option is detailed in Section 4.3.1, “Populating the List of Available Values Using a Data Table.”
- For prompts that require a changing list of values, you will find the dynamic list option valuable because of the reduced administration requirements. In Section 4.3.2, “Populating the List of Available Values Dynamically,” you can learn where and how to use the dynamic list option.
3
If the user can select one or more values within a prompt, the Number of values option is modified accordingly.
4
In the preceding display, the prompt type Text is selected. Therefore, the available options include text type, length, and special character handling options. This entire area changes based on which prompt type is selected.
5
The default value entered is automatically assigned to the prompt selection. If the users can interact with the prompt, meaning it is not hidden from view or read-only, they can modify this value.
4.3.1 Populating the List of Available Values Using a Data Table
When you select the static list method of generating values for the prompt, you can manually type values for use in a prompt. However, it is much more efficient to upload the distinct values from an existing data table. When adding values in this manner, you remove the possibility of missing a value that exists in the table or inserting a value with a typo, which will result in zero records returned.
An example of using this is option is when generating a static list of US states. Administration of this list is minimal, because the number and names of US states very rarely change. Typing in the values of 50 states is time consuming, so getting the values from an existing data table reduces development time.
- On the Prompt Type and Values window, select User selects values from a static list.
- Click the Get Values button.

- Based on which tool you are using, the Get Values window uses different methods.
- From SAS Enterprise Guide and SAS Management Console, you can select a data table by clicking the Browse button.
- From SAS Information Map Studio, you can use a data item that exists in the information map or you can select a separate data table.
- After selecting the data source, the interface automatically populates the Column drop-down box with the list of columns that can be used by the prompt. Note that if, for example, you selected the prompt type Date, the list includes only date-formatted columns.
For the prompt type Text, the Get Values window in the following the example shows the column selection Two-letter abbrev. for state name.
The Formatted (Displayed) Values drop-down box lets you select a different column which the user then sees. This is valuable when you have two different columns in your data source, such as STATENAME and STATECODE, and would like the user to see STATENAME, but you want the value passed to the query as STATECODE.
- Move values from the Available values box to the Selected values box using the arrows.
- After saving the prompt, you can see a drop-down box with the list of US states.

4.3.2 Populating the List of Available Values Dynamically
When creating a new prompt, select User selects values from a dynamic list from the Method for populating prompt list. Then click Browse to choose the data source.
- It is important to note that the data source must always be accessible to anyone you think will access this prompt.
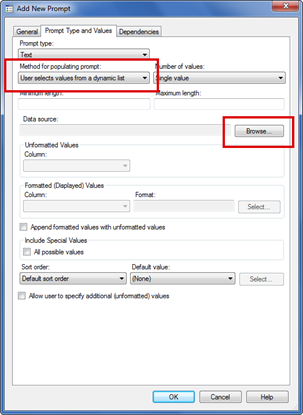
Figure 4.3-1 Select dynamic list to populate prompt
You can select an information map or a data set defined in the metadata.
You should choose a table that does not take long to return a SELECT DISTINCT value result; otherwise, the performance of the prompt can be impacted for all users.
4.4 Grouping Prompts
In Section 4.3, “Creating a New Prompt,” you learned about several mechanisms available to group prompts together. This technique provides users with more intuitive and organized prompt screens.
New groups are created for stored processes, through SAS Management Console or through the SAS Enterprise Guide Create New SAS Stored Process wizard. To use groups from information maps, a stored process can be used to supply the prompting screens.
After groups and prompts are created, they are organized within the prompt structure. In the following example, there is also a transparent group called Single Prompts that helps to keep all the shared, non-dependent prompts in a single list.

Figure 4.4-1 Grouping prompts
You will notice that the Single Prompts is a transparent group. This is useful to developers interested in keeping prompts organized; however, this setting does not make the prompts transparent to the users. Users will see all groups unless the option Hide from user is selected. For more information, refer to Section 4.4-2, “Creating a New Group Prompt.” Notice that there are two selection group prompts that allow the user to select how to query the data either through Make and Model or through Location. Then there are dependencies between make and model, as well as between state and city.
4.4.1 Open the Add New Group Window
The interface to create new groups is identical in SAS Management Console and for SAS Stored Processes.
- From SAS Management Console, select Properties on an existing stored processs. Then from the Parameter tab, select New Group.
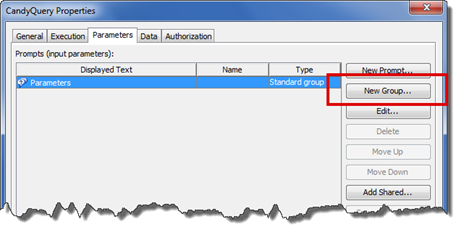
Figure 4.4-2 Add group prompt for SAS Management Console
- In the Create New SAS Stored Process wizard, select New>New Group from the Prompts page.
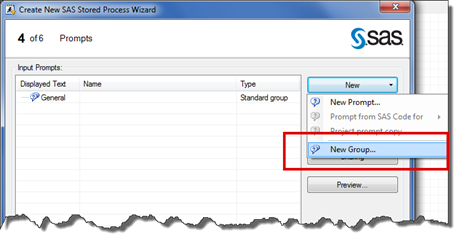
Figure 4.4-3 Add group prompt from SAS Enterprise Guide
4.4.2 Creating a New Group Prompt
The New Group window is identical for both the Create New SAS Stored Process wizard and SAS Management Console interfaces.

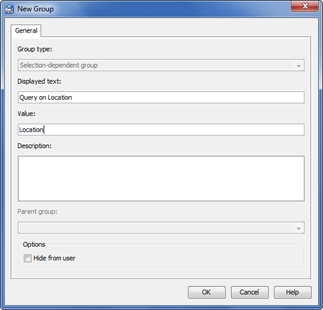
Figure 4.4-4 Creating a group prompt
1 |
Group types are explained in Section 4.4.3, “Group Types.” |
2 |
The information entered in the Displayed text field represents the menu name users can select or the name administrators see from the Parameter window. |
3 |
Descriptions offer additional information on what the group does; however, this is not displayed for end users. |
4 |
Parent Group allows you to specify where this new group resides. |
5 |
The Hide from user option is available for all group types. When selected, end users are unable to view the entire group. Requires a non-blank value is available for selection groups. This requires the user to complete the selection prior to running the report. |
4.4.3 Group Types
- Standard group
Standard groups are used to organize prompts into more usable prompt screens. In the following example, the three standard groups are Location, Automobile, and Output Options. Each item selected on the left panel modifies the available prompts in the main window.
Figure 4.4-5 Standard group example
- Transparent groups
In the following example, a transparent group for output options has been created so that administrators can see that these prompts are similar.
Figure 4.4-6 Transparent groups
However, when the user runs the prompts, the group is not seen.

Figure 4.4-7 Transparent groups not seen by user
- Selection group
Provides the user with the ability to choose the group of prompts to enter. In the following example the users can choose whether to only query data on Location or on Make and Model.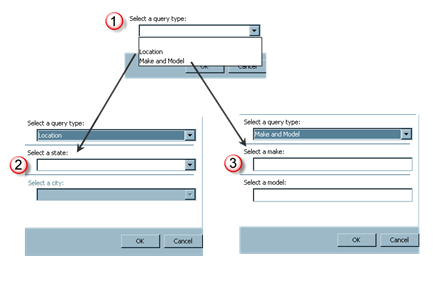
Figure 4.4-8 Selecting the next set of prompts to display using Selection Groups
4.4.4 Creating a Selection Group Prompt
As mentioned in the prior section, selection groups offer additional flexibility for users by allowing them to choose the next set of prompts before running the report. Creating a selection group prompt involves defined dependencies between the users selection and the available prompts. Included are the steps to create the example seen in Figure 4.4-8.
- Choose the Group type Selection Group. Name the group Querytype and type Select a query type in the Displayed Text field.

- On the Selection-Dependent Groups tab, select the New Group button.

- Define two groups, one for Location and one for Make and Model. In the following figure, the Location group properties are shown.
- After entering these two selection groups, the New Group window appears as shown in the following figure.

After completing the selection group definition, you need to edit each prompt that will exist within the selections.
The Parameter tab shows multiple groups but you must then reorganize the prompts for Location and Make and Model to show only when the user selects the new option to either Query on Location or Query on Make and Model.
- You can quickly move these prompts by editing them and changing the parent group. In this example, select the State prompt and click Edit.

- Change the parent group from ParametersLocation to ParametersSelect a
query type:Location.

The Parameter tab looks like the following figure.

As shown in Figure 4.4-8, the user then can select the query type and be shown either prompt group.
4.5 Shared Prompting
There are a few tricks to working with shared prompts since they are ideally available to many users. The following topic explains how to setup and create shared prompts.
4.5.1 Set Up a Folder Structure for Shared Prompts
Before creating a shared prompt, you must determine the metadata folder structure where the shared prompts are saved. Shared prompts might be placed in a single folder or have different folders, based on project or organization security structures. You must grant read metadata authentication on this folder; otherwise, the users cannot access the shared prompts.
The simplest implementation is to create a new folder within Shared Data, which grants all SAS users read metadata access by default.

Figure 4.5-1 Creating a new folder
4.5.2 Set Up a Central Starting Point
You should create a single location to create and share prompts from SAS Management Console. This will also provide you with a quick way to access and edit previously created shared prompts.
- From SAS Management Console, select the My Folder location within the SAS folder structure and open the New Stored Process wizard.

- Type in a name, such as Shared Prompt Mgr.

- Specify the stored process server, the source code repository, and the source file name.

- Save this stored process.
From this point forward, simply right-click on the stored process in the My Folder location and choose Properties. A parameter window appears where you can create and share prompts.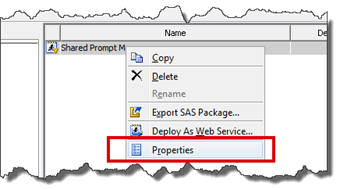
4.5.3 Creating a Shared Prompt
After creating the central starting point for shared prompts, open the Properties window.
- Return to the folder where you started the stored process, right-click on the Shared Prompt Mgr stored process and select Properties.
- Click Parameters. From here, you can add and edit prompts and prompt groups.

- Click New Prompt and create a region prompt.

- Move to the Prompt Type and Values tab. Because the organization has stated that the region values never change, select the static method for populating the prompt and allow users to select multiple values. As seen on the following screen, these values have been chosen. Then select the Get Values button.

- On the Get Values window, select the CANDY_CUSTOMERS table and choose the Region column. Then move the regions from the Available values list to the Selected values list, as seen in the following figure.

- Choose Central as the default value by selecting the check box next to that row and save the prompt.
- On the Parameters tab, verify that the new region prompt is highlighted and select Save as Shared.

- Navigate to the Shared Prompt Folder location and save the new prompt as Region. Now the prompt is ready to add to various information maps and stored processes.
4.6 Tips and Tricks
In addition to creating and sharing individual or grouped prompts, you might want additional functionality or be interested in working around some of the limitations.
4.6.1 Building Dependent Prompts
After you modify the second prompt in the selection group so that the user selects the values from a dynamic list, the Dependencies tab appears.

Figure 4.6-1 Dependencies tab
- Select the Add button to create a filter on the value list based on the first prompt. In this example, choose the Select a state prompt to create the dependency.

- Modify the dependency conditions by changing the Column or Operator values, if needed.

4.6.2 Creating Prompt Groups for SAS Web Report Studio
Information maps cannot create prompt groups; however, you can add a stored process that already has the grouping set up and include the stored process to the information map to display grouped prompts to SAS Web Report Studio users.
The following steps implement a grouped prompt in SAS Web Report Studio. The grouped prompt queries the user for the company name and a date range from a SAS Web Report.
- Create a stored process, either from the Create New SAS Stored Process wizard in SAS Enterprise Guide or in SAS Management Console. Define the prompt groups as explained earlier in this chapter.
The blank
stored process code needs only one line to pass the parameters from the stored
process prompt to the information map:
*PROCESSBODY;
As we will mention in Chapter 6, “SAS Information Map Studio,” the stored process must be registered to run in the SASApp – Workspace Server.
- Create an information map, select the data table to query, and add the stored process. (Refer to Chapter 6, “SAS Information Map Studio,” for detailed instructions.)

You might be unable to test the information map at this point; however, the report continues to run correctly in SAS Web Report Studio.
- Note that despite the fact that the stored process was added to the information map, the map is not filtering the data based on the user selections. You must create two filters for each prompt in this example and use the macro values generated automatically by the prompting framework.


- Because these filters must always be included in the information map to return the filtered results, add these to the General Prefilters tab. This tab is located within the information map properties (found in the menu Edit -> Properties -> Information Map).

- When you use this information map from SAS Web Report Studio, the user then sees the grouping of prompts.

4.6.3 Making a Filter Optional
When using shared prompts from information maps, the prompt option Requires a non-blank value must be selected. When the method of generating values for the prompt is a static or dynamic list, an additional option in the Include Special Values area is available, called All possible values.
This addresses the error message: The prompt abc
prompt name does not require a value. SAS Information Map Studio
cannot use prompts that do not require values. Please select a different prompt.
The following figure shows a before and after view of this special value option being selected.
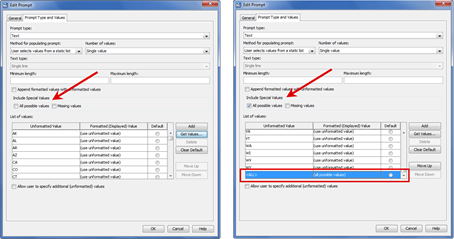
Figure 4.6-2 Optional filters
The user then sees the Formatted (Displayed) Value (all possible values) available in the prompt, as seen in the following figure.

Figure 4.6-3 Example of all possible values
4.7 Quick Reference for Prompts
Each of the prompt types in the following table is available when you are defining a prompt. When a prompt is created, it generates a set of macro variables that can used by the report.
| Prompt Type | Description | Available Macros |
|---|---|---|
Text |
Enter the value in a text box or select one or more text values.
|
Prompt_name If more than one option is enabled: Prompt_name Prompt_name_count Prompt_name0 (which equals &prompt_name_count) Prompt_name1 .. Prompt_namen |
Text Range |
Enter two values in side-to-side text boxes. Once entered, the prompt automatically tests either the alpha or numeric order to ensure that the lesser value is entered first.
|
Prompt_name_min Prompt_name_max |
Hyperlink |
Include a hyperlink. Also provides a box for link text. Note: This prompt is available for stored processes only through the SAS Enterprise Guide Stored Process wizard. |
Prompt_name - which includes the link text Prompt_path - includes the URL |


| Prompt Type | Description | Available Macros |
|---|---|---|
Numeric |
Enter the value in a text box or select one or more numeric values. Once entered, the prompt automatically tests for integers. The prompt is similar to the Text prompt. However, if nonnumeric values are entered, an error message is generated, such as for the value “a” below.
|
Prompt_name If more than one option is enabled: Prompt_name Prompt_name_count Prompt_name0 (which equals &prompt_name_count) Prompt_name1 .. Prompt_namen |
Numeric Range |
Enter two values in side-to-side text boxes. Once entered, the prompt automatically tests for integers and verifies that the range is valid. The prompt is similar to the Text Range prompt and provides the same validation checking as the error message shown for the numeric prompt above. |
Prompt_name_min Prompt_name_max |
Date |
Enter the value by using a calendar prompt. Also provides the user the option to select a relative term (such as yesterday or N days ago).
|
Prompt_name - returns results in date9. format. (01Apr2011) Prompt_name_label – returns full date (April 01, 2011) Prompt_name_end – if type of prompt selected is Week, Month, Quarter, or Year Prompt_name_rel – the relative term the user selected within the prompt |


| Prompt Type | Description | Available Macros |
|---|---|---|
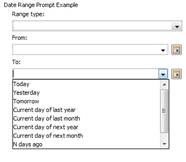
Date Range |
Provides two date boxes with the same options as for the Date prompt. Once entered, the prompt automatically tests for valid date ranges. Also, range types are allowed for quick entry in the two date boxes.
|
Prompt_name_min – returns results in date9. format. (01Apr2011) Prompt_name_min_label - returns full date (April 01, 2011) for the first entry Prompt_name_min_rel – the relative term the user selected for the first prompt Prompt_name_max - returns full date (April 01, 2011) for the second entry Prompt_name_max_label – returns results in date9. format. (01Apr2011) Prompt_name_max_rel – the relative term the user selected for the second prompt |
Time |
Enter the value by using a clock prompt. Users can also select a relative term (such as Previous Hour or Next Minute)
|
Prompt_name - returns the entry in time. format (16.30.22) Prompt_name_label - returns the entry in timeampm11. format (4:30:22 PM) Prompt_name_rel – the relative term that the user selected |

| Prompt Type | Description | Available Macros |
|---|---|---|
Time Range |
Provides two time entry boxes with the same options as the Time prompt. Time Range prompts are validated for proper range (small to large). Also, a range type is allowed for quick entry in the two time entry boxes.
|
Prompt_name_min – returns the entry in time. format (16.30.22) for the first prompt Prompt_name_min_label - returns the entry in timeampm11. format (4:30:22 PM) for the first prompt Prompt_name_min_rel – the relative term that the user selected for the first prompt Prompt_name_max - returns in time. format (18.30.22) for the second entry Prompt_name_max_label – returns the entry in timeampm11. format (6:30:22 PM) for the second prompt Prompt_name_max_rel – the relative term that the user selected for the second prompt |
Timestamp |
Note that the value is almost in the datetime19. format. You can convert to datetime19. by completing a code step to convert space to : using the TRANWRD function. Here is an example in a DATA _NULL_ step: input(tranwrd("&prompt_name",
" ", ":"), datetime19.);
Also, a range type is allowed for quick entry.
|
Prompt_name – returns the entry in time. format (01Apr2011 16:30:22) Prompt_name_label - returns the entry in timeampm11. format (4:30:22 PM) Prompt_name_rel – the relative term that the user selected |


| Prompt Type | Description | Available Macros |
|---|---|---|
Timestamp Range |
Provides two timestamp entries. Once entered, the prompt automatically tests for a valid range selection prior to executing the project. Also, the same range types within the Timestamp prompt are provided to allow quick entry of values. Note: The conversion of the prompt to a valid datetime format is discussed in the description of the Timestamp prompt.
|
Prompt_name_min – returns the entry in time. format (01Apr2011 16:30:22) for the first prompt. Prompt_name_min_label - returns the entry in timeampm11. format (4:30:22 PM) for the first prompt Prompt_name_min_rel – the relative term the user selected for the first prompt Prompt_name_max - returns in time. format (18.30.22) for the second entry Prompt_name_max_label – returns the entry in timeampm11. format (6:30:22 PM) for the second prompt Prompt_name_max_rel – the relative term that the user selected for the second prompt |
Data Source |
Select a data source to use in the project.
|
Prompt_name – returns the metadata path of the data source selected Prompt_name_type – provides a numeric response for what the user selected so that the programmer can devise different actions 1 for tables 2 for OLAP cubes 4 for relational information maps 8 for OLAP information cubes |


| Prompt Type | Description | Available Macros |
|---|---|---|
Data Source Item |
Select a variable in a data source to use in the project.
|
Prompt_name – the variable Prompt_name_path – the metadata path for the data table selected Prompt_name_type - provides a numeric response for what the user selected so that the programmer can devise different actions 1 for tables 2 for OLAP cubes 4 for relational information maps 8 for OLAP information cubes |
File or Directory |
Select a file or directory structure to analyze in the project. The prompt is identical to the Data Source and Data Source Item prompts. However, the Browse button allows you to navigate through the Workspace Server file structure. |
Prompt_name –physical file path of the file or directory selected Prompt_name_server –name of server that contains the files or the directories the user can select from. Server is defined by the prompt creator. |
Color |
Select a color from a color palette. The result is returned in hexadecimal format.
|
Prompt_name – If the user selects red, it returns as cxff0000 This prompt can be used to customize graphical output. |


| Prompt Type | Description | Available Macros |
|---|---|---|
Data Library |
Browse through the metadata to select the library to use in the code.
|
Prompt_name – LIBREF Prompt_name_path – the metadata data library location |
Variable |
Select from a list of variables that the prompt creator defines. Variable names are of only one type. Option to allow users to manually type a variable name is also available in the Edit Prompt window. Note that only one entry is returned to the code. |
Prompt_name – variable selected An example of when to use this prompt is if you have multiple date fields (such as open date, close date, on hold date, pending date) that the user might want to search through. A combination of the Variable prompt and the Date Range prompt would be useful to generate the query. |
4.8 SAS Administrator Tasks
Using SAS Management Console, the SAS administrator can set responsibilities and make system-wide changes that assist all users.
4.8.1 Access Requirements
From SAS Management Console, the following items are required for users to use and for developers to share prompts.
- Developers need Write Member Metadata access to create shared prompts in a metadata folder.
- Users require Read Metadata access to the metadata folder that contains the prompts.
- Users require Read access to any source data the prompt uses to dynamically populate the available values.
4.8.2 Allowing Limited Access to SAS Management Console
Since you can only share prompts through the SAS Management Console interface, it might be necessary to grant business users access to SAS Management Console on a limited basis. To limit the functionality for these users, creating a new role is recommended. Included are the steps.
- From User Manager plug-in, select New -> Role from the Actions menu.

- On the General tab, we named this role ‘Sharing Prompts Role.’
- Move to the Capabilities tab and select Folder View as highlighted in the following figure.

- The SASUSER group is defined to SAS Management Console: Content Management Properties role by default. This will need to be changed as these permissions and capabilities are inherited by all SAS users. Open up the SASUSER group, on the Roles tab, select Management Console: Content Management and click one of the arrows to deselect this capability for users.

- Create a Shared Prompt Manager group, add all the individuals who need this access, and on the Groups and Roles tab select the newly created ‘Sharing Prompts Role’.
- After installing SAS Management Console for these users, they will now have the ability to log in and see the SAS Folders tab and create their own Shared Prompt Manager stored process.
