
BUYING AND SETTING UP YOUR COMPUTER
In this lesson, you’ll learn about the different types of computers, what to look for when purchasing a computer, and how to set up your new computer.
What Kind of Computer Do I Need?
What Specifications Do I Need?
In the 14 easy lessons in this book, you’ll learn to do useful, entertaining, and exciting things with your computer, such as how to write and send emails; organize photos; keep in touch with loved ones; and find books, movies, music, and more on the internet.
But before you can take advantage of all that a computer has to offer, you need to choose a computer and learn how to set it up. In the following pages, we’ll show you the different types of computers and offer advice to help you choose the one that’s right for you. We’ll also demonstrate how to connect and set up your new computer.
If you already have a computer set up and you’re comfortable using the keyboard and mouse, you can skip forward to Lesson 1.
Choosing a Computer
The first step of your journey begins with choosing a computer. When you’re shopping for a computer, it’s important to know what kind will suit your needs so you can get one that works best for you.
WHAT KIND OF COMPUTER DO I NEED?
Computers come in all different shapes and sizes! The largest type of computer is a desktop, which sits on or under your desk and isn’t portable. The smallest computer you’ll find is a tablet, which you can carry around with you everywhere. A laptop is somewhere in between. Deciding between a desktop, a laptop, and a tablet is the first important choice to make when buying a new computer. Let’s take a look at each of these.
Desktops
A desktop computer is designed to sit on or under your desk. It usually consists of a tower, which does all the actual work of the computer, and a monitor, which is the screen you look at. Desktops have large screens, which is great if you need items on the screen to look bigger.

Desktop computers are heavy and need to be plugged into a power outlet, so they usually just stay at a desk in your home and aren’t intended to be portable. This means you won’t be able to take your desktop with you on vacation! They also take up more space than other types of computers, which can be a downside if you live in a small apartment.
Laptops

Laptops are smaller, lightweight computers that can comfortably fit on your lap, which is wonderful if you like the idea of using your computer while lounging in your favorite chair. Most laptops weigh only a few pounds, so you can easily move them from room to room, work on them at the dining table or in front of the TV, or even take them with you on vacation. The battery should last for a few hours while the laptop is not plugged in, so you can use it on the go.
The trade-offs for this more portable, convenient computer are that the screen is smaller than that of a desktop, and a laptop is often a little less powerful than a desktop of the same price. We’ll look at what makes a computer powerful a little later.
Tablets

These small computers are the most portable you’ll find. In fact, the entire computer is built into the small screen. They’re great for carrying around with you and are easy to use on the train, on vacation, or at a coffee shop. Tablets don’t come with a keyboard, so you’ll need to tap the screen to type anything. This can be a bit awkward, so many tablet users buy separate keyboards, but they’re clunky and detract from the portability a bit. Tablets also have much smaller screens and relatively little space for storing photos, music, and other files. They tend to be more expensive than desktops or laptops of comparable power or storage space.
* NOTE: This book covers only Windows tablets. There are other types of tablets, such as Apple iPads and Android tablets, but they work quite differently.
Where do you plan to use your computer?

WHAT SPECIFICATIONS DO I NEED?
Once you’ve decided on the type of computer you want, you’ll need to choose a specific model. With so many different models available, picking the right one for you can feel daunting. But don’t worry! This section gives you the information you need to choose the perfect computer for you.
Many companies use technical terms to advertise their products. These terms describe some of the most important parts of a computer, so it’s useful to know what they mean. Let’s go over some of these terms to help you decide what you want in your new computer, and then we’ll pose a few questions to help you decide which computer is right for you.
Processor
The processor is like the brain of the computer. The better your processor, the faster and more responsive your computer will be. When we say a computer is powerful, we’re saying that it has a lot of processing power. Some common processors are the Intel Pentium, Core i3, Core i5, and Core i7. An Intel Pentium or Core i3 will be fine for most computer tasks, like sending emails and browsing the internet, but a Core i5 or Core i7 will perform better, making your computer run faster and feel more responsive. If you’re unsure, a Core i3 or Core i5 is usually a safe bet!
RAM
RAM, which stands for random access memory, is the computer’s short-term memory. Everything you do on your computer uses a little piece of RAM. Just like a person trying to remember lots of different numbers, names, and tasks at the same time, your computer can become slow if it’s trying to juggle too many tasks at once—the more RAM it has, the more tasks it can do simultaneously.
RAM is measured in gigabytes (GB). Computers need at least 4 gigabytes (4GB) of RAM; 8 gigabytes (8GB) is even better, but not essential unless you plan to do more demanding tasks such as video editing or want to have lots of different things open on your computer at one time.
What would you like to do with your computer?

Hard Drive
The hard drive is the computer’s long-term memory. Everything you save on your computer to use again, including letters, photos, videos, songs, and programs, is stored on the hard drive. The bigger the hard drive, the more you can store on your computer! Like RAM, hard drives are also measured in gigabytes. However, because hard drives can be a lot larger than RAM, you might also see them advertised in terabytes (TB), where 1 terabyte is equal to 1000 gigabytes.
If you don’t plan to store lots of photos, music, or videos, then a hard drive that’s 60GB or larger will be perfectly fine. If you’re a movie or music buff and plan to keep a collection on your computer, look for a hard drive with at least 500GB. Generally, 1GB of hard drive space stores around an hour of home video or around 200 photos or songs, but remember that you’ll also need room for your apps, emails, and Windows itself! You can expect these to use up at least 40GB of your hard drive.
* 150GB Hard Drive: Up to 150 hours of home videos, 40 movies, 30,000 photos, or 40,000 songs.
* 500GB Hard Drive: Up to 500 hours of home videos, 120 movies, 100,000 photos, or 125,000 songs.
* 300GB Hard Drive: Up to 300 hours of home videos, 80 movies, 60,000 photos, or 80,000 songs.
DVD Drive
A DVD drive lets you insert and play both music CDs and video DVDs. Almost all desktops and many laptops come with a DVD drive, but tablets don’t. The one downside about a DVD drive in a laptop is that it makes the laptop heavier and thicker, so it’s more difficult to take it around with you. Nonetheless, if you think you’re likely to need a DVD drive, make sure the computer you buy has one.
Screen Size
When you’re using a computer, you’ll spend a lot of time staring at the screen, so it’s a good idea to make sure that you get one that’s big enough to read comfortably. Keep in mind, though, that the bigger the screen, the bulkier and less portable the computer will be. Screen sizes are measured diagonally in inches, just like TV screens. Most desktops have screens between 20" and 27". Most laptops are between 11" and 18", while most tablets are between 7" and 13". If you want to take your laptop on frequent trips, a 13" screen is ideal. If you don’t mind leaving your computer at home and want to avoid straining your eyes, you should find a 20" to 24" screen very comfortable.
Operating System
An operating system is like a manager in your computer who makes sure different programs are running properly. All computers need operating systems to function. Most new computers, except those sold by Apple, will already have Windows 10 as their operating system, but it’s worth checking to make sure. This book assumes that you have a computer with Windows 10 as its operating system.
There are two versions of Windows 10: Home and Professional. The Professional version includes a few additional features for advanced users, which we won’t be covering in this book. It is more expensive, so it’s better to look for a computer with Windows 10 Home Edition. But don’t worry if you have Professional instead—it can do everything that Home can do, and you’ll still be able to follow along with the lessons in this book.
Unboxing Your Computer
Once you have your new desktop, laptop, or tablet, the first step is to take it out of the box and get it all plugged in!
MEETING THE PORTS
The first thing you’ll probably notice is some sockets on the back or side of your computer. These sockets, called ports, are the connection points for various devices. Think of the power cord for a toaster that you plug into an outlet before you can turn it on. In the same way, you might need to plug a few cables into your computer before you can start to use it.
Let’s look at the important ports on your computer and then examine how to insert the cables into the appropriate ports to get connected! Every computer is a little different, and the ports are likely to be in different places on each, but you can see two examples of these ports on a typical computer below. You’ll see that not all of these ports are on every computer, and your computer may have other ports not mentioned here. Of course, if your computer is already connected, you can skip this section and go to “Your Main Tools” on page 14.


* Power port: The power port provides the power your computer needs to run. This port is also what you use to charge the battery of a laptop or tablet. We’ll take a closer look at the power ports on the three types of computers in “Plugging It In” on page 10.
* USB port: A USB port allows you to connect a number of different devices to your computer, such as a keyboard, mouse, printer, USB flash drive, and webcam. For more information about connecting and installing USB devices, see “Connecting a Printer, Scanner, Webcam, or Other Device” on page 293.
* VGA and HDMI ports: The VGA and HDMI ports connect your computer to a screen or monitor. If you have a laptop, for example, and you want to watch a movie on a bigger screen, you can use the VGA or HDMI port and cable to connect it to a television.
* Audio ports: Audio ports let you plug speakers, headphones, and microphones into your computer. On many desktops, these are color coded to help you easily spot the different connections: a green port is used for speakers or headphones and a pink port for microphones. On laptops, you’ll probably see a small headphones symbol next to the speaker port and a small microphone symbol next to the microphone port.
PLUGGING IT IN
Now that you’re familiar with the various ports on your computer, it’s time to start plugging things in! In this section, you’ll learn how to connect your computer so you can turn it on. We’ll go through each type of computer separately, so you can skip to the section for the computer you have.
Plugging In a Laptop or Tablet
On a laptop or tablet, the plug-in process is quite simple!
Plug the power cord into the power port on your laptop or tablet. The power cord should have an outlet plug on one end and a plug that fits in the power port on the other end. The power port on a laptop or tablet is usually circular or rectangular.

Plug the outlet end of the power cord into a power outlet.
Your laptop or tablet should now start powering up. If your computer was unplugged and you used some of the battery power, or if you’re just not using it at the moment, plug it in like this to recharge the battery.
Plugging In a Desktop
To use a desktop computer, you need the computer tower, a monitor, a mouse, and a keyboard. You’ll learn how to connect all of these elements in the next section. If you have any trouble, you should also look at the user manual that came with your computer when you purchased it. This guide should include setup steps specific to your computer.
Connect your monitor to your computer using a VGA or HDMI cable.

Connect your monitor to a power outlet using the power cable that came with your monitor.
Now get your mouse and keyboard, which should each have a USB cable. Plug your keyboard and mouse into any of the USB ports on your desktop.

If your keyboard or mouse is wireless, meaning that it does not have a cable connecting it to the computer, it will come with a small transmitter that connects to a USB port. Find the small device with a USB connection and plug it into any USB port on your computer. A wireless keyboard or mouse will also require batteries. The battery compartment is typically located on the bottom of the keyboard or mouse. There should be a small switch on the bottom of the mouse to turn the mouse on. If you have any other USB devices, such as a printer or webcam, you can connect these to any spare USB ports on your computer as well.
If your computer comes with separate speakers, you can usually connect them to your computer’s audio port. Otherwise, they might plug into a USB port. Just check the connection at the end of the wire.

Connect one end of the power cord to the power port on your computer. Connect the other end of the cord to the outlet on your wall.

We’ll look at turning on the computer shortly, but one thing to know is that if your computer doesn’t turn on when you try, it’s a good idea to make sure all the plugs are correctly connected. Check that all the plugs are secure in their sockets; some may need to be pushed in fairly hard.
Turning On Your Computer
Your computer will have some sort of power button. The size, shape, and position of power buttons vary between computers, but they will often have a symbol like this: ![]() . If you have trouble finding your power button, you might want to consult the computer’s manual or Quick Start Guide.
. If you have trouble finding your power button, you might want to consult the computer’s manual or Quick Start Guide.
On a desktop, the power button is usually on the front of the tower. There should also be another power button on the monitor, which needs to be turned on separately. This is usually on the front or side of the monitor screen.
On a laptop, the power button is usually located above the keyboard, as shown next.

On a tablet, the power button is usually on the side or top of the tablet, as shown here.

Your Main Tools
Once your computer is on, you’ll need to learn how to give it instructions using the keyboard and mouse.
THE MOUSE
One of your main tools is the mouse, shown next. If you have a desktop computer, your mouse will look like the one on the left and should sit next to your computer on the side of your dominant hand. A laptop computer has a touchpad, shown on the right, which is a built-in mouse on your keyboard that looks like a pad with two clickable buttons.

You use the mouse to navigate on the screen. If you watch the screen, you’ll notice that as you move your mouse, a small arrow ![]() follows the movements of your hand over the screen. This is called the pointer. It lets you select things on your screen to help you control the computer. Depending on the program you’re using, that pointer can change to a hand
follows the movements of your hand over the screen. This is called the pointer. It lets you select things on your screen to help you control the computer. Depending on the program you’re using, that pointer can change to a hand ![]() or a cursor
or a cursor ![]() .
.
Using the mouse to give commands to your computer is easy!
* Left-click (usually known as just “click”): Press once on the left mouse button with your forefinger and immediately release it. This type of click is often used to select something on the screen or to activate a button, as you’ve already seen.
* Double-click: Press on the left button on your mouse twice in quick succession. This type of click is generally used to open an item, such as a program or a folder.
* Right-click: Press once on the right button of your mouse and release it. Right-clicking something, or just right-clicking the screen, usually opens a small menu of items. The menu will be different depending on what you right-click.
* Scroll wheel: Most mice have a little wheel between the right and left click buttons. Gently rolling the wheel lets you roll up or down the screen so you can see more content.
Tablets come with touchscreens that allow you to use your fingers to interact directly with the display without using a device like a mouse. You’ll be able to control the pointer by simply touching the screen with your finger! There are four important actions to know:
* Tap: A tap involves pressing your finger down once and quickly lifting it. This is the same as a left-click with a mouse. If you’re following this book on a touchpad, you can tap whenever you’re asked to click.
* Double-tap: This involves tapping your finger on a button or region of the screen twice in quick succession. It’s equivalent to double-clicking with a mouse.
* Press and hold: This involves holding your finger down on a button or region of the screen for a few seconds. This is the same thing as right-clicking with a mouse.
* Drag: A drag involves lightly pressing down on the screen with your finger and then moving it to the spot you want while keeping it pressed against the screen. Lift your finger off the screen when you’re done moving it to the desired spot. This action is similar to scrolling with a mouse.
You can also use a desktop computer mouse with a laptop, which many people find easier to use than the touchpad, so it’s worth trying out both methods. To connect a mouse to your laptop, simply connect the cable attached to the mouse to any spare USB port on your laptop.
THE KEYBOARD
Before you set up your computer, it’s worth looking at a few keyboard skills, too. As you’ll see in the lessons, pressing a letter or number key on the keyboard places that letter or number on the screen wherever the cursor ( ) is located. The following diagram outlines some of the important parts of the keyboard that you’ll need to know.

* Enter key: Press ENTER to move your cursor down a line or finish inputting information in a text field.
* Backspace key: Press BACKSPACE to erase the last letter that you typed. Keeping it held down erases more characters!
* Shift key: Hold down SHIFT and press a letter key at the same time to type that letter in uppercase. You can also hold down the SHIFT key and tap a number key at the same time to type the symbol on the number key. For example, holding SHIFT and pressing the number 1 key inserts an exclamation mark!
* Spacebar: The spacebar inserts a space. Tap it to make a space between words as you type.
On a tablet, the keyboard appears onscreen when you tap in a box that allows you to type. The onscreen keyboard looks like this:

Tapping the numbers key changes the onscreen keyboard to display numbers and symbols instead of letters. To change the keyboard back to displaying letters, press the numbers key again. You can also use the emoticons key to insert fun pictures.
Setting Up Your Computer
Now that your computer is on and you know a bit about how to use the main tools to navigate it, it’s time to get familiar with Windows 10!
Whether you purchased a new computer or upgraded a computer to use Windows 10 from an older version such as Windows 7 or Windows 8, you’ll need to set up your computer. This includes connecting your computer to the internet and setting up a Microsoft account, which you’ll use throughout this book. If you don’t feel completely confident doing this alone, you can often ask the store where you purchased your computer to set it up for you.
SETTING UP AN INTERNET CONNECTION
It’s good to first make sure your computer is connected to the internet because you’ll need it for setting up your Microsoft account. The internet is a vast community of computers that can communicate with each other.
By connecting to the internet, your computer can talk to other computers and access information added by other users. The internet lets you send messages to friends and family, look up information, read the news, watch videos, get directions, shop and bank online, and much, much more!
Before you can join the internet, you need to sign up with an internet service provider (ISP), which will be the company connecting you to the internet in the same way your phone company connects you to other phones. Here are some common ISPs in the US:
* Comcast
* AT&T
* Spectrum
* CenturyLink
* Verizon
There are two main types of internet connection. Fixed internet connections let you use the internet at home and usually allow unlimited use for a set monthly fee. Mobile internet connections let you use the internet when you’re out and about but only provide you with a limited amount of usage each month, so you won’t be able to view as many pages, emails, and videos. You should discuss your needs with an ISP, and be prepared to shop around for a good price.
If you’re not ready to take the leap just yet, you can always visit a friend or relative who has an internet connection, or visit your local library and connect to the internet there.
CONNECTING TO THE INTERNET
When you first turn on your computer, you should see a setup screen. Some computer manufacturers add their own steps and screens as well, so the choices you see on your computer might not exactly match the ones pictured but should be similar. If your computer has already been set up, you can skip ahead to Lesson 1.
If you’re not already connected to the internet when you start the setup process, you’ll be asked to connect first before anything else. You should see a list of available nearby internet connections. To connect to the internet, follow these steps:
Click the internet connection you want to use. If you’ve signed up for internet, your ISP will have provided you with the network name you should connect to.
Enter the password to the connection, if you’re asked for one. This should also have been provided by your ISP. It’s usually also printed on the underside of your modem router so you can find it easily.
Click Connect.
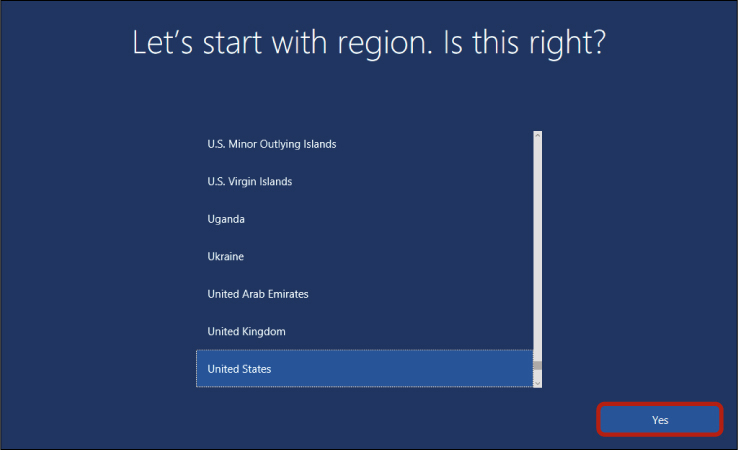
CHOOSING YOUR KEYBOARD SETTINGS
Your next step is to choose your region and keyboard settings.
Windows will select the region it thinks you’re in. If the selected region is correct, simply click Yes. Otherwise, click the region you’re in, such as United States, before clicking Yes.
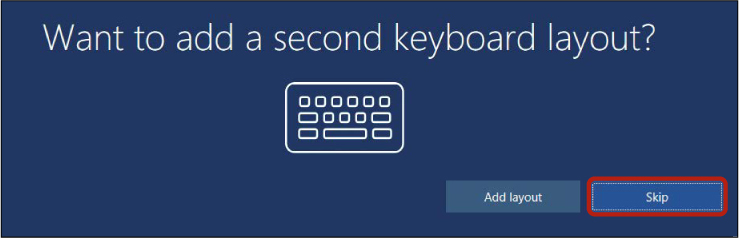
Windows will ask which keyboard layout you’re using, because different countries often have different types of keyboards. Click the region in which you bought your keyboard and then click Yes. If you’re not sure, just click Yes without choosing a different layout.

You’ll then be asked if you want to add a second keyboard layout. Most people don’t need this, so click Skip.
CREATING A MICROSOFT ACCOUNT
The next step is to create a Microsoft account, which will provide you with an email address and let you install apps on your computer. We’ll make use of these features throughout this book, so it is important to set up a Microsoft account now.
If you have an email address that ends in @outlook.com or @hotmail.com, you already have a Microsoft account. In this case, you can simply enter your email address and the password for that email account in the boxes shown and then click Sign in. If you have a Microsoft account but have forgotten your password, click the Forgotten your password? button and then follow the instructions on the screen to reset it. Next, skip ahead to “Managing Your Advertising Options” on page 24.
If you don’t have a Microsoft account, click Create account and then follow the directions provided in the next sections.

Creating an Email Address
The first thing your new Microsoft account must have is an email address. If you already have a non-Microsoft email address, such as a Gmail or Yahoo address, you can enter it here, click Next, and then skip ahead to “Creating a Password” on page 22. If you don’t have an email address, you need to create one. Continue with these steps to do so:
Click Get a new email address to create a new address.

Now you need to create a unique name for your new email address! No one else in the world can use the same email address; if they could, emails sent to that address would go to both of you. You might need to be creative to find one that hasn’t been used before. You can use any combination of letters and numbers, but your new address has to end in @outlook.com. Be sure to write down your new email address because you’ll need it later. Once you’ve typed in your new email address, click the Next button.
Creating a Password
Whether you used an existing email address or just created a new one, you’ll also need to choose a password.
* NOTE: Make sure you choose a password you can remember—you’ll need to type it in every time you use your computer. It’s probably a good idea to write it down somewhere safe as well.
To keep your Microsoft account safe, use a unique password that you don’t use for anything else. Your password must be at least eight characters long and should include numbers and letters, to make it harder to guess. Good passwords do not include factual information that others know about you (such as your name or birthday) or personal details that others will easily guess (such as your pet or best friend’s name). You should also avoid well-known phrases or letters such as “abc123” and “good morning.”
Click in the Password box and enter a new password.

Click Next.
Entering Personal Information
You’ll need to enter a few more personal details to continue. This is required for Microsoft to comply with child privacy legislation and is perfectly safe to provide. Note that if you’re located outside of the United States, you won’t be asked for your date of birth.
Click in the Location box and choose your country from the drop-down list.
Click in the Birthdate box and choose the date you were born in the format requested: usually month, then day, then year.

Click Next.
Providing a Phone Number for Security Information
If you ever forget your password and need to reset it, Microsoft can call you or send you a text message to make sure it’s really you and not a hacker trying to get into your account!
Select your country from the drop-down box.
Enter your phone number (with the area code) in the field to the right of the drop-down box.

Click Next.
MANAGING YOUR ADVERTISING OPTIONS
Microsoft should now ask your permission to use your information when deciding what type of advertising to show you. This is quite safe, but if you don’t want Microsoft to do this, uncheck the Enhance my online experiences... box. If you don’t want any special offers to be emailed to you by Microsoft, you can also uncheck the Send me promotional offers from Microsoft box. Click Next to move on.

SKIPPING PIN SETUP
Microsoft also encourages you to set a personal identification number (PIN), as well as a password, that you can use to sign in to your computer. This can make it a bit faster to log in to your computer, but it’s also one more number to memorize. Rather than adding yet another password to your list, click Do this later.

SKIPPING ONEDRIVE SETUP
Microsoft encourages you to save all your documents and pictures to OneDrive, which is a storage area online. This can be handy, as you’ll see when we look at setting up OneDrive in Lesson 13, but for now, click No.

YOUR OWN DIGITAL ASSISTANT: CORTANA!
Microsoft wants to introduce you to its digital assistant, Cortana. Cortana lets you give verbal directions to your computer, like “Open the News app” or “Search for pictures of cats.” We won’t cover these verbal directions in this book, but there’s no harm in having Cortana available, so click Yes.

PRIVACY SETTINGS
Finally, you’ll be asked to choose some privacy settings that control the type of information you share with Microsoft. The default settings are quite safe, and they allow you to make full use of the new Windows 10 features, but if you aren’t comfortable sharing any of this information with Microsoft, you can click any of the sliders to change the setting from On to Off (in the case of diagnostics, from Full to Basic). When you’re satisfied with the privacy settings, click Accept.
Your computer might take a few minutes to finish processing your settings, but this concludes the setup process.

Phew, We Did It!
We’ve looked at buying and setting up a computer and examined the different types of computers and their most important specifications. We also looked at the different types of internet connections and how to connect to the internet. You learned how to do the following:
* Choose which computer type is best for you
* Unbox and plug in your new computer
* Decide what type of internet connection is right for you
* Turn on your computer
* Use the keyboard and mouse
* Set up Windows 10 on your new computer
* Connect to the internet
Great work! Now that your computer is set up, move on to Lesson 1 to start using it.