
LESSON 12
TYPING LETTERS AND DOCUMENTS
WordPad is a wonderful tool that you can use to create all kinds of documents, such as letters, invitations, and even posters.
Fixing Mistakes in Your Document
In this lesson, you’ll learn how to type up documents and how to change the color, size, and style of the text to customize your documents. You’ll also learn to save the document so that you can find and edit it again later, and you’ll learn how to print so you have physical copies of the document to pass out to your friends!
Why Use WordPad?
WordPad can help you create all different types of creative, attractive, basic, and professional-looking documents, including the following:
* Letters
* Reports
* Invitations
* Posters
* Cards
* Shopping lists
WordPad has many advantages over handwritten documents. Most importantly, typed letters are easier to read (especially for younger generations!), and if you make a mistake, you can simply delete your error and retype without making a mess. WordPad also lets you change the color, style, and size of your text as well as add pictures, which gives your document a professional look and tailors it to your needs. You can also save your document so you can revisit it at any time in the future.
WordPad is probably one of Microsoft’s best-kept secrets. This helpful app is entirely free and simple to use to write documents. It certainly doesn’t have all the bells and whistles of a full-fledged word processing program like Microsoft Word, but it does offer simplicity. Most importantly, WordPad is free, whereas Microsoft Word must be paid for. All the features of WordPad also exist in Microsoft Word, so if you’re familiar with WordPad, you can easily get started with Microsoft Word as well. This means that WordPad is a great starting point, and if you find yourself wanting more, you can turn to Microsoft Word later.
Meeting WordPad
Like every other app, WordPad can be opened using any of the methods in the previous lessons. To open WordPad, follow these steps:
Click the start button in the bottom-left corner of the screen and type wordpad.
Click WordPad from the list that appears.

WordPad will open and will automatically create a new blank document.

WordPad has a lot of features, so it’s important to get comfortable with where to find things. The tools and buttons appear at the top of the screen. They’re organized into a File menu, a Quick Access Bar, and two ribbons that contain the Home tools and View tools. Let’s take a look at WordPad’s features.
* Quick Access Bar: The Quick Access Bar provides a selection of the most useful tools in WordPad. These tools stay on the screen permanently. These are shortcuts to tools you can find in other ribbons. By default, the Quick Access Bar has tools to let you quickly save your document, undo a mistake you’ve just made, and redo that change if you then decide it wasn’t a mistake after all.
* Home ribbon: The Home ribbon contains tools needed to create and change the appearance of your document. This includes tools for changing the size, color, alignment, and font of your text, and tools for adding pictures, drawings, and dates.

* View ribbon: The View ribbon holds tools that change the way you see your document. For example, from the View ribbon, you can zoom to make your document appear larger or smaller. This doesn’t actually affect any of the text in your document, just how it appears on your screen.

* File menu: The File menu appears as a menu that drops down on your screen. It holds tools that let you work with your document as a whole. For example, after you’ve finished creating a letter, the File menu will help you save, print, or email the letter. The File menu also lets you open previously created documents, create new documents, and find out more about WordPad.
* The page: WordPad provides a fresh piece of white “paper” for you to write on. You’ll find this page of “paper” in the middle of the screen.

Typing Your First Document
You’ve opened WordPad, and you’re now ready to begin creating your first document! Just like with a handwritten letter, you start a document by putting words on the page. You should see the cursor, a small flashing black line on your page. It shows you where the text will appear as you type.

Use any letter key on your keyboard to type a few letters. If you hold down a letter key, you should notice that it repeats itself across the entire line and then moves onto the line below until you release it again. The automatic move to the next line is known as word wrap and is the hallmark of any word processing program. This means that you can concentrate on typing, and WordPad will move your text to the next line when required.
Fixing Mistakes in Your Document
If you want to delete or add text, you will need to move the cursor to the point in the document where you want to make a change. Let’s say you want to change “very good” to “great” in the sentence from Activity #37. Follow these steps to do just that:
Click after the word good in your document. You should see the cursor move to the point where you clicked. You can also use the arrow keys on the keyboard to move the cursor.
Use the backspace key to delete the words very good.
Type the word great.
Click at the end of the sentence to place your cursor there and continue writing your document.
Formatting Your Document
Currently, your document is looking quite plain. We want to liven it up with bigger text, colorful words, different text styles, and much, much more! This is known as formatting your document.
Before you can apply any formatting to your text, you must first highlight it. This means selecting the text so you can format it. Follow these steps to highlight text:
Click just in front of the text you want to select.
Hold down the left mouse button and keep it held down.
Drag the mouse to the end of the text you wish to select. Make sure to keep your mouse steady; if you drag it too far up or down, it will highlight the whole line. If you do highlight the wrong text, click elsewhere in the document to release the highlight and then try again.
Let go of the mouse button.
For example, here’s how to highlight the word great:
Click before the letter g.
Hold down the left mouse button.
Drag the mouse to the end of the letter t.
Let go of the mouse button.
Highlighted text should appear as follows:

TEXT FORMATTING
Once your text has been highlighted, you can change its size, color, and style. You’ll apply any of these text-formatting features using the Font box on the Home ribbon, highlighted next.

Let’s have a look at what these tools do and how to use them.
Changing the Font
The style of your text is known as the font. There are many different types of fonts—from traditional script styles to fun chunky styles. To change the font of your text, follow these steps:
Make sure you’ve highlighted the text you want to format (see the preceding section on selecting text).
Click the arrow in the box with the name of the current font.
Click the name of another font from the list that appears.
The font of only your highlighted text will change.
Changing the Size
Your text can also be made larger or smaller. Once again, highlight a word or a few words and then follow these steps:
Click the arrow next to the current size.
Click a different size. Larger numbers provide larger font sizes.
Changing the Color
The color of your text can also be changed. To do this, highlight a word and then follow these steps:
Click the arrow next to the selected color.
Click a new color from the list that appears.
Bold, Italics, and Underline
Bold, italics, and underline are three common ways of emphasizing particular words or sentences. To use them, highlight some text and select one of the following buttons:
* Bold ![]() : Makes the text thicker.
: Makes the text thicker.
* Italics ![]() : Places the text on a slant.
: Places the text on a slant.
* Underline ![]() : Underlines the selected text.
: Underlines the selected text.
In all cases, you can highlight the text again and click the same button a second time to return the text to normal.
PARAGRAPH FORMATTING
The paragraph-formatting tools let you adjust the alignment of an entire paragraph of text. A new paragraph is begun when you press ENTER at the end of an existing paragraph.
Click anywhere in the paragraph you would like to adjust. Make sure the cursor has moved to somewhere within the paragraph. You don’t have to highlight any text this time.
The paragraph-formatting buttons are in the Paragraph box in the Home ribbon, highlighted here.

Click one of these buttons to format the paragraph as a whole.
There are the paragraph alignment buttons you can use:
* Left align ![]() : Aligns your text to the left of the page. This is the default alignment of text in your document.
: Aligns your text to the left of the page. This is the default alignment of text in your document.
* Center align ![]() : Aligns your text in the center of the page.
: Aligns your text in the center of the page.
* Right align ![]() : Aligns your text to the right of the page.
: Aligns your text to the right of the page.
* justify ![]() : Aligns your text like newspaper print—fitting it from the left of the page to the right of the page and automatically adjusting the spacing so both edges are straight. You need at least one complete line of text; otherwise, it works the same as left align!
: Aligns your text like newspaper print—fitting it from the left of the page to the right of the page and automatically adjusting the spacing so both edges are straight. You need at least one complete line of text; otherwise, it works the same as left align!
You’ll notice some other formatting features within the Paragraph box as well. We won’t cover them here, because they tend to be used less often, but we encourage you to explore these features on your own.
Undoing a Mistake
Undoing is an extremely helpful feature that lets you go back a step if you have made a mistake. If, for example, you italicized the wrong word and want to unitalicize it, instead of highlighting the word again and clicking the italics button, you can just click the undo button ![]() in the Quick Access Ribbon. If you’ve accidentally undone something you wanted to keep, click the redo button
in the Quick Access Ribbon. If you’ve accidentally undone something you wanted to keep, click the redo button ![]() .
.
Zooming In or Out
Zooming lets you magnify the text on the screen to make it easier to see. It does not affect the size of the text within the document, just how the document appears to you on the screen. To zoom in and out, follow these steps:
Find the zoom slider at the bottom right of the page.

Click the button to zoom in.
Click the button to zoom out.
Saving Your Document
Saving a document lets you come back to it in the future, to look at the document or continue working on it. To save a document, follow these steps:
Click the File menu in the top-left corner of the screen.
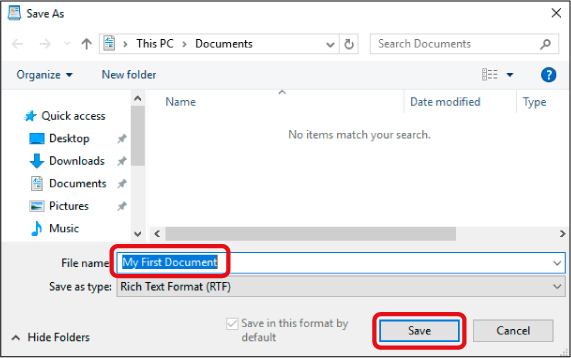
Click the Save button from the list that appears. If this is your first time saving the document, WordPad will bring up the screen shown on the next page. This lets you choose where you want to save the document on your computer and what you want to call it.
* Note: By default, your document will be saved to the Documents folder. In Lesson 13, you’ll see how to save the document to a different spot on your computer, but for now, let’s just save it in the Documents folder and focus on the file’s name.
Click in the File name box. The text should all be highlighted in blue; if it isn’t, highlight it with the click-and-drag mouse method discussed earlier.
Type My First Document as the file’s name. This name will let you identify the document when you need to find it again.
Click Save.
In the future, when you click the Save button for this document, this dialog will not appear again. WordPad remembers what you named the document and where you saved it and just replaces the old version with your latest version. But you still have to remember to save your document the first time—it won’t save on its own! We’ll see how to find the document and reopen it in the Lesson 13.
Printing Your Document
Printing a document requires that you have a printer installed. If you need advice on setting up a printer, check out “Connecting a Printer, Scanner, Webcam, or Other Device” on page 293.
To print a document, follow these steps:
Click the File menu in the top-left corner of the screen.
Click the Print button from the menu that appears. This will open the Print dialog.
Make sure your printer is the one selected underneath the Select Printer heading.
Click the Print button.

Your document should now print. If it doesn’t print, check the name and model of the printer on the printer itself, like you did in Lesson 3, and make sure it matches the one in the Select Printer area.
Phew, We Did It!
In this lesson, we looked at creating documents with WordPad. You learned how to type a document and format it to make it look exactly how you want. In this lesson, you learned how to do the following:
* Start a text document
* Use the WordPad ribbons
* Format text, including changing its size, color, and font
* Align paragraphs across the page
* Undo mistakes
* Zoom in and out of the document
* Save the document
* Print the document
In the next lesson, you’ll learn how to organize your files so that you can easily find your documents and pictures.