
LESSON 3
THE PHOTOS APP
This lesson covers the Photos app and shows you a simple and useful way to enjoy your photos.
Why Should I Use the Photos App?
From Film Photos to Digital Photos
Connecting Your Camera or Phone
Printing Old-Fashioned Hard Copies
The Photos app is another free app that will already be on your Windows 10 computer. We’ll begin by exploring how to add photos to your computer from a camera or phone, and then you’ll see how to view and edit your images. We’ll finish this lesson with printing your photos so you can share them with friends or put them in a frame!
Why Should I Use the Photos App?
The Photos app makes it easy to manage your digital photos. Digital photos are found everywhere in modern life—and for good reason! Unlike with traditional photo albums, you can store hundreds, even thousands of photos in an orderly and easily managed fashion, without taking up space in your home. Digital photos mean there’s no waste, and because you’re not using film, you can take as many photos as will fit on your camera’s or phone’s memory—which tends to be thousands! You just take as many photos as you want and then look at the digital files of these photos to decide which ones you want to keep, which to print, and which to delete to free up space for even more photos.
You can also do much more with digital photos than you can with film photographs. With the Photos app, you can improve, fix, and edit your photos; you can rotate photos to the correct orientation; and you can crop photos to remove objects. When you’re happy with your photos, you can print as many copies as you like to share with friends and family, or send digital copies for people to receive instantly (we’ll look at emailing picture files in Lesson 4).
From Film Photos to Digital Photos
In this lesson, you’ll learn to add photos to the Photos app from a digital camera or phone. This is wonderfully easy, but it only works for digital photos, not older hard-copy photos that have been developed using film. However, if you do have a large collection of film photos, there is a way to create a digital version of them to use with the Photos app: you need to scan them with a scanner, which is an external device that basically creates a digital copy of the photo. Scanners are quite cheap to buy, and many public libraries will have one. To make things even easier, your computer has a Scan app. To find out more about how to connect a scanner, see “Connecting a Printer, Scanner, Webcam, or Other Device” on page 293.
Another quick way to digitize print photos is simply to take a picture of them using a phone or digital camera. This is an easy way to share older photos with friends and family online, although the quality of the picture may not be high enough to make new prints.
Connecting Your Camera or Phone
If you’ve taken photos using your computer or tablet’s camera, the photos will appear in the Photos app without your needing to add them! In this case, you can skip ahead to “Viewing a Photo” on page 80. But if you’ve taken photos on your phone or digital camera, you need to add them to your computer before you can work with them in the Photos app.
First, you need to connect your camera or phone to your computer. Most cameras and phones will come with a cable, called a USB cable, to allow you to do this. The cable will look something like the one shown in the following figures and will have a small rectangular plug on one end and a larger rectangular plug on the other. Once you’ve found the cable for your phone or camera, follow these steps:
Plug the larger end of the cable into your computer. If you’re using a laptop or tablet, find a small rectangular port on the side that fits the cable, as shown below.

If you’re using a desktop computer, the ports will be on the main computer unit. There are usually ports on the front of the unit, but if you can’t find them, look on the back of the computer.
Plug the smaller end of the cable into your camera or phone, as shown here.
Turn the camera or phone on. Most cameras will connect automatically; however, some may require you to press a button on the camera or phone to connect. On an iPhone, for example, you need to press Trust before you can access your photos on a separate device. If your camera or phone doesn’t seem to be connecting, look at its screen and see if there are any instructions. Check your camera’s manual for details.

Importing Photos
It’s time to add the photos from your camera or phone to the Photos app! This is called importing photos, which just means the photos will be copied from your device and stored on your computer. Before you begin, it’s important to know that adding the photos to the Photos app won’t delete your photos from the camera. We’ll cover how to remove photos from your camera later, since it can be good for freeing up space, but this action won’t occur automatically. To import your photos, follow these steps:
Click the start button in the bottom-left corner of the screen.
The Start menu will appear. Find the Photos tile, highlighted next, and click it once.

If you don’t see this tile in the Start menu, click in the search box next to the start button and then type photos. Click Photos from the list that appears.
This should bring up the Photos app. Your screen might look a little different, depending on which version of the Photos app you have.


The Import button loads pictures from your camera or phone into your computer to use in the Photos app. Click this button now.

If you have more than one camera, phone, or other photo device connected, you’ll be asked which device to import from. Choose the device you just connected with the cable by clicking it once. If you only have one device connected, the app will know to import from that device, and you won’t see this step.
If you receive a message stating “There’s nothing to import” or if your device doesn’t appear in the list, double-check your phone or camera’s screen to see if there’s a button labeled Trust or Allow. If there is, press it to let your computer see your photos. Otherwise, double-check the cable connection between the computer and your device.
Once you’ve chosen a device, you should see a list of the photos stored on that device. These photos appear small so they can be listed efficiently, but once they are imported, you can view them much bigger! You will see a check mark next to the photos that are going to be imported, as shown in the following figure. The app will assume you want every photo imported unless you tell it otherwise by deselecting photos. If you don’t want certain photos to be imported, just click once on the photo, and the check mark will disappear, meaning it will not be imported.

Let’s have a closer look at what you’re seeing on the screen:
* Selected photos: Small versions of the photos appear in a list, and the photos selected for import are shown with a checkmark. If you don’t want to important a certain photo, click it once, and the checkmark should disappear.
* Number of photos selected: This is the number of photos on your device selected for import. It might be higher than you realized!
* Clear: If you only want to import a few photos but lots of photos are selected, click the Clear button once to deselect all the photos for a particular month, and then scroll through and click any photos you do want to import. Using the Clear button can be much quicker than deselecting all the photos one by one!
* Scroll bar: If there are lots of photos on your device, you’ll need to scroll down to see the rest of them. To do this, click the scroll bar and hold the mouse button down; then drag the mouse down and up, like you did in Lesson 1. This will move the screen of the Photos app to reveal more photos.
When you’re happy with the photos selected for import, click the Continue button, shown in the previous figure.
A window like the one shown next will appear, asking you to confirm that you want to import the photos. If you want to delete the photos from the device once they’ve been imported, click the checkbox labeled Delete imported items from [your device] after importing.

Once they’ve been deleted, they’ll be gone for good from your device. They will, however, be stored on your computer at that point. This can be a good idea if you’re running out of space for more photos on your device.
Click the Import button.
The photos will now begin importing. Depending on how many photos there are, this might take a minute or two. You can see the progress at the top of the screen. Once this bar fills, the import is done.
When the import is complete, your photos will be grouped by the date they were taken, as shown here. You may need to scroll down the page with the scroll bar to see all of your photos.

Congratulations—you’ve imported your photos!
Viewing a Photo
Now that you have some photos in your Photo app, it’s time to enjoy them! To view a photo, follow these steps:
Click the photo you want to view.

This should display the photo on its own in a larger size. Remember from Lesson 1 that you can make the app take up the full screen by clicking the maximize button at the top right (highlighted next). This lets you see your photo at an even bigger size. You can also zoom in on your photo by double-clicking it—that is, by clicking the left mouse button twice in quick succession.

You can return to the list of photos by clicking the back button at the top-left corner of the screen (on a tablet, this arrow will appear at the bottom-left corner).

Deleting Unwanted Photos
Now that you’ve viewed your photos, you may decide that you don’t want to keep some of them (if you don’t like them, for example, or if you have lots of photos of the same thing and just want to keep the best ones). Fortunately, the Photos app lets you delete photos easily. To delete a photo, follow these steps:
Find the photo you want to delete and click it to view it at full size.
Click the delete button at the top of the screen (highlighted here).

A box will appear to confirm that you’re certain you want to delete the photo. Click Delete.

Let’s Get Editing!
We’ve all taken a less-than-perfect photo before! Maybe you took the photo upside down or accidently included your thumb or some other unwanted item in the shot. All is not lost. The Photos app can help you fix and improve your photo! Try it out:
Find the photo you want to edit and click it to view it at full size.
Click the Edit & Create button at the top of the screen.
A drop-down menu will appear. Click the Edit button.

This should open a list of editing options in columns along the right side of the screen, as shown here.

CROP AND ROTATE
This tool lets you remove unwanted parts of a photo and rotate photos.
Click Crop and rotate to bring up a Crop and Rotate screen.
A box with four white dots should appear around the image. Click a dot and drag it inward to select the area of the photo you want to keep. The area outside of the box will be cropped out.
Click the Rotate button to rotate the picture clockwise by 90°.
Once you’re happy with the cropping and rotation, click Done at the bottom of the screen to go back to the editing screen.
IMPROVE QUALITY WITH ENHANCE
The Enhance tool automatically adjusts a photo using some default settings to try to fix aspects such as lighting and color by boosting contrast and saturation where needed.
Click Enhance your photo.
A white slider will appear over the “Enhance your photo” button. Click and drag the slider left or right to decrease or increase the enhancement effect until you like what you see.
ADDING EFFECTS WITH FILTERS
Filters change the shades or colors of your photo for dramatic effect. Using filters is a popular way to edit your photos. The name of each filter appears beneath a small preview version of your photo, which shows you how the photo may appear with that filter applied.
Click a filter (the preview image of your photo, not the name) to apply it.
A white slider should appear below the image. Drag the slider left or right to decrease or increase the filter effect.
FURTHER ADJUSTMENTS
There are a few more adjustments you can use to change the light, color, or clarity of your image.
Click the Adjust tab.
The following adjustment options should appear:
* Light: Makes the photo as a whole lighter or darker.
* Color: Increases or decreases the color saturation, which makes the colors more or less vibrant, respectively.
* Clarity: Makes the image sharper (less blurred) or softer (more blurred).
* Vignette: Darkens the edges of the image.
* Red Eye: Removes the “red eye” effect from faces.
* Spot Fix: Fixes blemishes or other small imperfections in the image.
Click an adjustment to apply it and drag the white slider from left to right to change the amount of the adjustment.
SAVING YOUR EDITS
Once you’ve finished editing your photo, you’ll want to save your hard-earned improvements!
Find the Save button at the bottom of the editing screen and click it. Your edited photo will now be saved!
If you decide you don’t like your edits and would prefer to have your original photo back, click Undo all. This will remove all of your edits.
Printing Old-Fashioned Hard Copies
After you’ve edited your photos into masterpieces, you might want to print them to put in a picture frame or to show your friends! For best results when printing important images, it’s a good idea to use photo paper, which you can buy from any office supply store. Photo paper costs a bit more than ordinary paper but gives you much better-looking photos.
* NOTE: To print a photo, your computer must be connected to a printer. See “Connecting a Printer, Scanner, Webcam, or Other Device” on page 293 for instructions on setting up your computer with a printer.
To print a photo, follow these steps:
Find a photo you want to print, and click it to view it at full size. If you want to make any edits, do so now before you print.
Click the print button in the control section about the photo, like in the image shown next.

This will open a window with a preview of the printout on the right side and some printing options on the left side. Let’s take a look at some of the important options:
* Printer: Make sure the correct printer is selected using this drop-down box.
* TIP: Printers are listed in the Photos app by their make and model. If you aren’t sure which printer from the list is the one you’re connected to, compare the make and the model number to the make and model of your printer. You can usually find this on the top or front of your printer.
* Copies: Use the plus button on the right to print more than one copy of your photo.
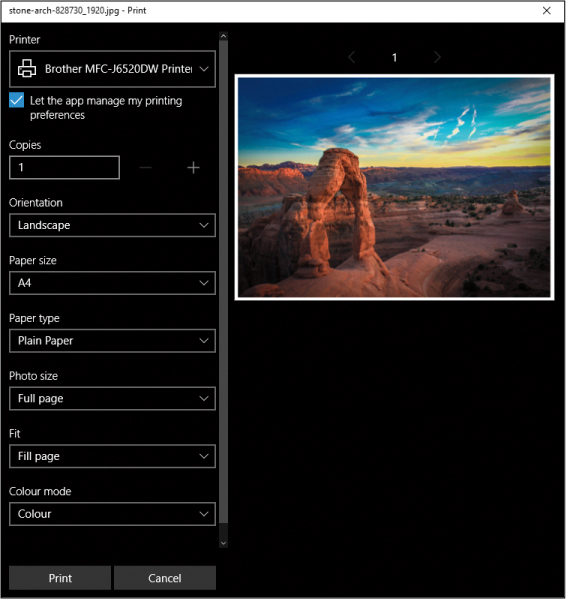
* Orientation: From here you can select whether you want to print in landscape or portrait mode. A landscape image is wider than it is tall; a portrait image is taller than it is wide.
* Paper size: It’s important to make sure you select the correct paper size; otherwise, your photo probably won’t print. Normal plain printing paper is generally letter size, but you can buy 4“×6” photo paper and a variety of other sizes. If you’re using photo paper, the size should be listed on the front or back of the packaging.
* Paper type: Here you need to choose what kind of paper you’re using. If you’re using normal copy paper, leave Plain Paper as the setting. If you’re using photo paper, it’s important to select Photo Paper here.
* Photo size: This is how big the photo will be when printed.
* Fit: This option changes how the photo is printed if it doesn’t exactly match your paper size. If set to Full Page, the edges of the photo may be cut off so that it fills the entire page. If set to Shrink to Fit, the entire photo will be printed, which may leave some gaps on the sides.
* Color mode: This lets you choose whether you want the photo to be printed in color or black and white.
After you’ve chosen your print settings, click the Print button.
Your image should now be printed!
Phew, We Did It!
In this lesson, we looked at using the Photos app. We imported pictures from a camera and discussed how to edit the photos and print them. In this lesson, you learned to do the following:
* Connect a camera or phone to your computer
* Import photos from your camera or phone
* View and delete photos on your computer
* Make alterations to your photos, including cropping, rotating, and enhancing
* Print your photos
In the next lesson, you’ll learn to send and receive emails from your computer.