
LESSON 4
In this lesson, you’ll learn how to set up the Windows Mail app, send emails, receive and reply to emails, and send photos.
Switching to Another Email Account
Sending Pictures and Other Files
What Exactly Is Email?
Email is electronic mail that you can send and receive using your computer. There are many advantages to email: it’s free to send and receive regardless of the message length; it’s instant; and you can send pictures, videos, links to interesting websites, and much more. Millions of people around the world rely on email for their daily correspondence. And because so many people use email, it’s likely that many of your friends and family are already using it, making it a simple way to keep in touch with people you know.
Many apps and email services refer to emails as “messages,” so if you see the term message instead of email, just know that it’s often the same thing.
Like with traditional mail, to send an email you need to know where to send it. This is where email addresses come in: an email address is a unique address that ensures your email goes precisely to the right person. This also means that people can contact you at your email address without worrying that their email has gone to the wrong person. An email address might look like this: [email protected].
All email addresses have an @ symbol (pronounced “at”) in the middle. The part before the @ symbol is your unique address name, which you choose when setting up your email account. The part after the @ symbol is the email provider you’re using. For example, Google email addresses end in @gmail.com, and Microsoft email addresses end in @outlook.com.
You will need to use either a Microsoft account or your own email address to follow along with the chapter. If you followed the steps in “Setting Up Your Computer” on page 17, you’ll already have a Microsoft account with an email address that ends in @outlook.com. If not, consult “Switching to a Microsoft Account” on page 297 to check whether you have a Microsoft account and then set one up if you do not.
Opening the Mail App
Windows 10 includes the built-in Mail app, which makes sending and receiving emails easier. If you’ve used an older Windows computer, you may be familiar with Windows Live Mail or Outlook Express, which are also email programs. The Mail app performs a similar function, but its layout is quite different from Live Mail and Outlook Express. There are other ways to use email with web-based email managers such as Gmail and Hotmail, but to keep things simple, we’ll focus on the Mail app.
To open the Mail app, follow these steps:
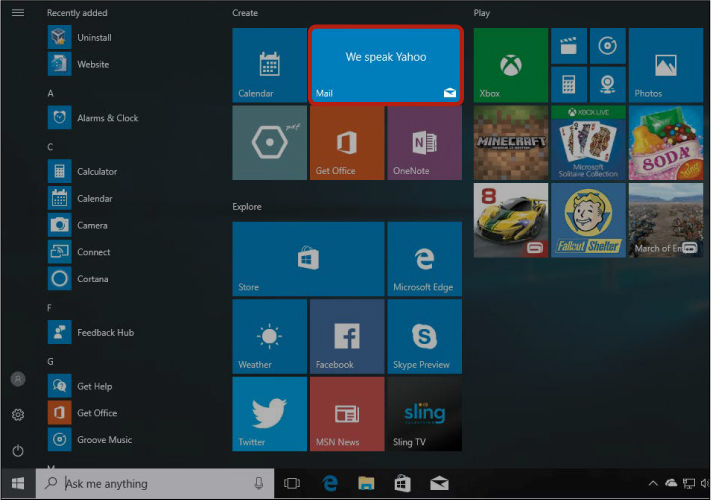
Click the start button in the bottom-left corner of the screen.
The Start menu will appear. Find the Mail tile, shown next, and click it once. If you can’t find the Mail tile, click in the search box next to the start button, type mail, and click Mail from the list that appears.
The Mail app will open.
Setting Up the Mail App
If this is your first time using the Mail app, you’ll be asked to go through a quick setup process. This involves adding your email address to the Mail app so you can send and receive messages.
Click the Get started button, shown here.

If the @outlook.com email account you created in “Setting Up Your Computer” on page 17 is the only email address you want to use, click Ready to go and then skip ahead to “Checking Your Email” on page 96. If you’d like to set up additional accounts, continue to step 3.

You can use Mail to manage all of your email accounts. To add a second email account, click the Add account button.
You’ll be asked to choose the type of account you want to add from a list of email providers. You can tell what email provider you have from your email address. If it ends in @yahoo.com, for example, Yahoo is your provider, and you have a Yahoo email account. Here are some other popular account types:
* Outlook.com: An address using this type of account ends in @outlook.com or @hotmail.com.
* Google: A Google email address ends in @gmail.com.
* iCloud (Apple): An address using this type of account ends in @iCloud.com.
Select your email provider from the list. (If your email provider isn’t listed, select Other account.) Different email providers will ask for slightly different information. Enter the information requested by your provider.
Click Done to confirm your account has been set up, as shown next.

Click the Ready to go button.
Congratulations! Your email is ready to use.
Checking Your Email
After you’ve set up your email account, the Mail app should open. The screen is divided into three sections:
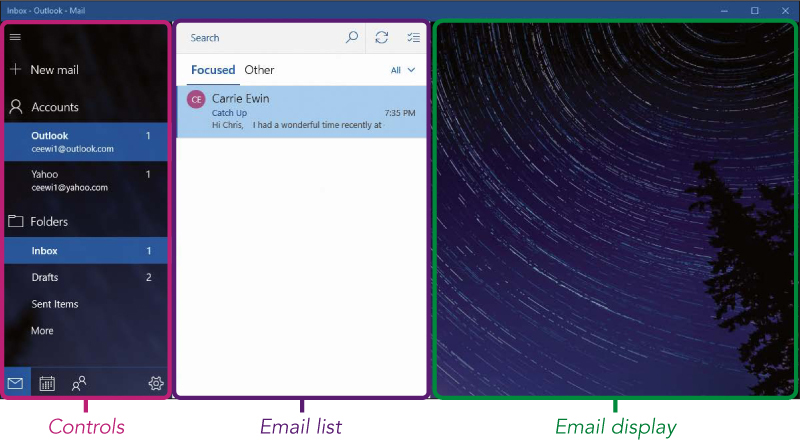
* Controls: This area has tools for creating a new email mesesage, switching accounts, selecting various folders, and so on.
* Email list: The middle section shows a list of the emails in the selected folder—for example, the Inbox or Sent Items folder.
* Email display area: When you select a message in the email list, the contents of the message will be displayed on the right. If no message is selected, you’ll see a background image instead.
RECEIVING AN EMAIL
All the emails you receive appear in your Inbox. When your Inbox is selected, the messages will be displayed in a list in the middle of the screen. Each message in the email list contains five main pieces of information, as shown in the following figure.

* Unread: A vertical blue strip along the left side of the message means you haven’t read the message.
* Sender: This is the name of the person who sent the email.
* Subject: This blue text describes what the email is about; this is written by the sender.
* Preview: This shows the first few words of the email.
* Date: Next to the preview is the date the email was sent. If the email was sent recently, you’ll see the time it was sent.
* NOTE: Some, but not all, email accounts will separate your Inbox into two sections labeled Focused and other. Focused messages are ones that Microsoft thinks you’re most likely to want to read, while Other messages contain all the rest. If your account separates messages like this, you’ll start off by seeing Focused messages, but you can click the Other heading to see the rest.
OPENING AN EMAIL
Clicking an email to view its contents is called opening an email, like opening a letter. Using the email you looked at in Activity #7, follow these steps:
Click once on the email you want to read, listed in the Inbox.
The contents of that email will now be displayed on the right.

READING AN EMAIL
Some emails, like the one shown next, are too long to fit on the screen. Fortunately, you can use a scroll bar on the right side of the screen to see the rest of the message. You can click the arrow at the bottom of the scroll bar to move down the email, and the arrow at the top takes you back up. If you have a mouse with a scroll wheel, you can roll your scroll wheel up or down to do the same.
At the top of an email, you should see who sent the email and when, with the subject of the email underneath. Below that, the email lists the recipients (emails can be sent to multiple people at once, so you might not be the only recipient). Then the message of the email will follow.

The topic and intent of an email vary depending on the sender. Friends and family use email to keep in touch, but companies can also send emails advertising their products or services. There isn’t necessarily anything wrong with that. After all, you might like to receive a special offer from your local store once in a while. But companies should give you the ability to opt out of, or “unsubscribe” from, their emails if you don’t want to receive their ads. Just click the link in the email that reads “Unsubscribe.” It often appears at the bottom of the email. The exact wording varies, but you should be able to find the link in each email.
SWITCHING TO ANOTHER EMAIL ACCOUNT
If you’ve set up a second email address in the Mail app, you’ll need to switch to that account before you can read its emails. You should see your accounts listed on the left side of the screen. The number beside an account tells you how many unread emails that account currently has. To switch to another account, simply click the one you want to switch to, as shown next.
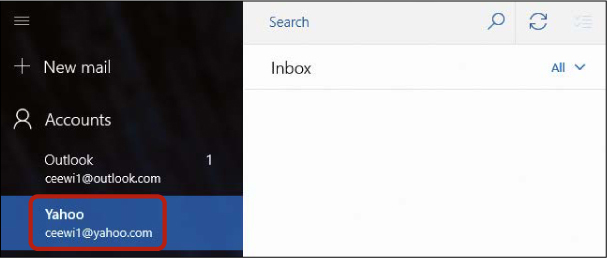
When you switch to another account, your screen should remain the same, but you’ll be viewing the list of emails sent to that email address.
Sending an Email
Now that you know how to read emails, it’s time to send one of your own. Remember, you can send an email to anybody in the world for free—as long as you know their correct email address. To send an email message, follow these steps:
From the controls on the left side of the screen, click the New mail button, highlighted here.
The new mail screen, which should look like the following image, will appear on the right side of the screen.


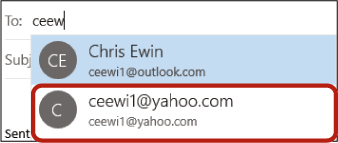
Click in the To box and type the email address of the person you want to send your message to. It is very important that you type their email address correctly. If you make a typo, click at the end of the email address to place your cursor there and then use the BACKSPACE key to delete your mistake. Now try again!
The good news is that Mail remembers the addresses of people you’ve sent emails to in the past. If you start typing their address again, the complete address should show up underneath, as shown next, and you can click the address to fill it in automatically.
Click in the Subject box to place your cursor there and then type a few words that describe your email. The word “Subject” will be there at first but disappear as soon as you start typing.
Click the larger box below the Subject to place your cursor there and then type your email message.

Note that the message area might already contain the text “Sent from Mail for Windows 10.” You can delete this text or just type your message above it. You can also format the text in your email with bold text and other options. To learn more about formatting, flip forward to Lesson 12—the formatting tools in WordPad are very similar to the ones in Mail.
When you’re ready to send the message, click the Send button in the top-right corner. If you decide not to send the message, click the Discard button to delete the message you’ve just typed and go back to your Inbox.
Replying to an Email
The best way to respond to an email you’ve received is by sending a reply. When you click the Reply button, Mail creates an email with the address of the original sender already filled in. The Subject box keeps the subject used in the original email sent to you but with “RE:” before it to indicate that it’s a reply. This saves you a lot of work and makes replying easy!
The contents of the original email should be included below your new message to remind everyone what’s being discussed. To reply to an email, follow these steps:
Click an email to open it, like you did earlier.
Click the Reply button at the top of the email display area.

* NOTE: If there is more than one recipient in an email, you can click Reply all instead of Reply to send your reply to everyone on the recipient list. You can also click Forward if you want to pass the email on to somebody else.
A reply email will open, with a blank area where you can type your response. Notice that the To box and Subject box are filled in and the original message is included below the blank area. Your cursor should be blinking in the space above the original message.
Type your reply. When you’re ready, click the Send button in the top-right corner of the message.

You can reply to a reply, too. This will create an email chain, or thread, that can go on indefinitely. But if you’re writing about something new, it’s better to start a new email chain. This makes it easier to manage your emails and find the exact email you’re looking for.
Sending Pictures and Other Files
Another great thing about email is that you can send electronic files such as photos or a résumé, and your recipient gets them almost instantly. An electronic file that’s added to an email is called an attachment. It’s the modern equivalent of attaching a photo to a letter with a paper clip! To add an attachment to a new email, follow these steps:
From the controls on the left side of the screen, click the New mail button to create a new email.
Write an email, just as you did earlier, by typing the other person’s email address, a subject, and a brief message.
Click the Insert button at the top of the screen. A small menu will appear that shows the different things you can insert.
From this list, click the Files button, highlighted next.

This should bring up a screen asking you to choose the files you want to send. Find the Pictures folder on the left side of the screen, highlighted here.

* NOTE: Files on your computer are organized and stored in folders. We’ll look more at storing and finding files in Lesson 13. For now, we’ll focus on attaching pictures, but you can use this exact same process to attach all sorts of files too.
Click the Pictures folder once to open it. If you can’t see the folder, you might need to scroll through the options. You can scroll by clicking the scroll bar and, while holding down the mouse button, dragging the mouse up or down to move the bar.
The screen should now show the contents of the Pictures folder. It might contain a number of other folders, represented by icons that look like manila folders (shown next). This helps organize your photos so you can easily find them. If you’ve completed Lesson 3, you should find the pictures you imported in a folder labeled with the year and month you imported them.
Double-click the folder containing your Lesson 3 photos, labeled with the year and month you imported them, as shown here.

This opens that folder to show its contents. Find and click the picture you want to attach to your email; then click the Open button, as shown here.

You should now see a smaller version of your attached picture above your message, as shown next.
* NOTE: If you accidentally attach the wrong file and want to remove it, you can do so by clicking the close button in the top-right corner of the attachment.

To add more than one file, follow these steps again, starting with step 4. You have a limit on the number of files you can add to one email. If Mail says you’ve exceeded that limit, you might need to send more than one email to accommodate all of your pictures.
Click the Send button to send your email with the attached photo.
Opening Attachments
Just as you can send attachments to your friends, your friends can send attachments (such as photos) to you. If you receive an email with an attachment, it will have an image of a paper clip in the top-right corner, making it easy to recognize in your Inbox. You need to open the email to see the attachment.
Look at your Inbox and find an email with a paper clip icon, indicating that it contains an attachment.

Click the email to display the message.
The attachment should be shown above the message, just like when you added an attachment to an email earlier. It should be a small symbol surrounded by a light gray box, like in the following figure. Click once on the attachment.

* WARNING: Be aware that attachments from unknown sources can contain viruses designed to harm your computer. You should never open an attachment unless you trust the person who sent it. For more tips about email security, skip to Lesson 14.
The attachment opens in a separate window, as shown next. To return to your Inbox, click the close button.

Deleting an Email
It’s always a good idea to delete unwanted emails, making it easier to find the emails you do need. To delete an email, follow these steps:
Click the unwanted email in the list of messages.
Click the Delete button in the top-right corner of the message display, as shown next.

A red bar should appear at the bottom of the screen to let you know that the email has been deleted. If you delete the wrong email or decide you didn’t want to delete the email after all, you can click the Undo button to bring it back. This bar will disappear after a little while, so you need to be fairly quick if you want to bring the email back in this way.

Searching for Emails
If you keep a lot of emails in your Inbox, it can be difficult to find a particular one you want to read. Fortunately, the Mail app lets you search for emails. You can search for the person who sent the email, the subject line, or even particular words within the message. To search for an email, follow these steps:
Click the Search box at the top of the screen, highlighted next.

Type the words you want to search for, such as the sender’s name or email address, the subject of the email, or particular words that you remember from the email. Then press the ENTER key.
A list of results should appear. Words that you searched for will be highlighted in yellow. Click the message you want to read to display it on the right side of the screen.
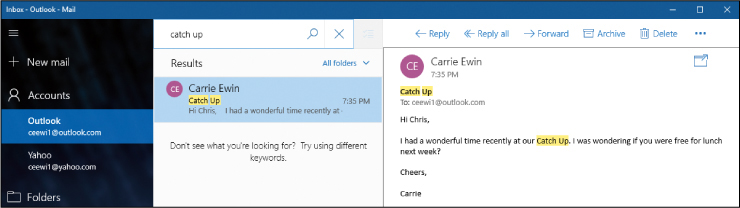
When you’re done searching, you can click the close button next to the search box (shown next) to go back to the Inbox.

You should now see the Inbox again.
Staying Safe with Emails
While email is a convenient way to keep in touch with your friends and family members, scammers might use emails to try to trick you into giving them your financial details or into installing a virus on your computer. They might attempt this by pretending to be a bank or a legitimate company, asking you to click a link or provide personal information. However, a real bank would never ask for information via email. If you’re concerned that an email from a bank might be a scam, contact the bank directly (not using the contact details provided in the email) to confirm. For more information about staying safe with emails, jump forward to Lesson 14.
Phew, We Did It!
In this lesson, we looked at using the Mail app to set up and organize emails. You learned to do the following:
* Set up the Mail app
* Add other email accounts
* Read, send, and reply to emails
* Send pictures and files, and open attachments from other people
* Delete emails
* Search for emails
In the next lesson, you’ll learn to browse websites and explore the internet.