
LESSON 13
FILES AND FOLDERS
Learn how to organize your computer!
Working with Files and Folders
Restoring a Deleted File or Folder
A file is a piece of information saved on your computer. For example, every letter, document, photo, song, and video saved on your computer is an individual file. Just as you store your bills, CDs, and letters in a certain place at home, every file you save on your computer is stored in a folder. The icon for a folder looks similar to the manila folders sold at stationery stores, and they have a similar purpose. Generally, it’s good practice to store files that have something in common together inside a folder. This makes it easier to find the particular file you want.
As you begin to master your computer, you’ll find yourself creating more files and folders. You’ll need an easy way to remember where you stored your files and how to find them again. File management is the art of organizing your files so that they can easily be found and retrieved.
Exploring File Explorer
When organizing files, you can think of your computer as a filing cabinet that contains all of your saved files, and they are all organized into folders. To locate a file, you need to open the cabinet, look in the right folder, and find the right file. Simple!
To begin your search, you must open the File Explorer window. This is where you start your navigation of the folders in your computer. Follow these steps to open the File Explorer.
Click the File Explorer icon in the taskbar at the bottom of your desktop screen, as shown here. If you don’t see the File Explorer icon in the taskbar, you can access it by clicking the start button, where you will find the File Explorer icon in the list on the left side.

The File Explorer window will then appear, showing you the Quick Access folder. This handy folder shows you the folders you use most often. Folder shortcuts in Quick Access will disappear if you don’t use them regularly so as to keep only your most commonly used folders at hand.

To find other folders that don’t appear in Quick Access, use the This PC folder. To open this folder, simply click This PC from the list on the left side of the File Explorer window, as shown below. This opens the list of folders stored in This PC.


* Menu/Ribbons: Just like WordPad, a folder includes a set of useful ribbons with some of your most important buttons and tools. Inside the This PC folder, you have a Computer ribbon and a View ribbon. The contents of these ribbons are usually hidden to save space, and you can click the Computer or View button to display the ribbon. We’ll look more at these ribbons and what they can do throughout this lesson.
* The address bar: This bar tells you which folder you’re currently inside. In this example, we’re inside This PC. The Pictures folder has its home inside This PC. If we opened Pictures to see some photos, the address bar would then show This PC4Pictures. This lets us know that we’re currently inside Pictures, which is inside This PC. The address bar will help you from getting lost!
* The navigation pane: The navigation pane appears on the left of the File Explorer window. This side section lets you see all the folders or locations on your computer, not just the handy folders you use often. We’ll explore the navigation pane in more detail later in this lesson.
* Drives: A drive is a type of storage device that houses your folders and files. Your computer likely has the C: drive, which is a huge drive that stores almost everything on your computer. You can also get external storage devices, like USB flash drives, that you can plug into your computer and move files to and from. This gives you a way to transport files! We’ll cover this topic later in the lesson.
* Folders: Your Windows computer will come with a number of useful folders already created to help you get started with the job of organizing your computer. Let’s meet these folders:
* Desktop: This folder shows you all of the items you’ve saved on your desktop.
* Documents: Here you can store your text documents. In most cases, these will be the documents you create in WordPad. This might include letters, lists, reports, cards, budgets, invoices, or anything you want to type up.
* Downloads: When you download documents, photos, or apps from the internet, the files will automatically be placed in the Downloads folder. You can move them to a different folder, but this is where there’ll first appear by default.
* Music: You can put all your favorite songs and audiobooks into this folder.
* Pictures: You can store your photos and images in this folder.
* Videos: You can put all your home movies or videos you download into this folder.
Opening a Folder
To find the files stored inside a folder, you first need to find and open that folder. A folder can be opened by double-clicking the folder icon.
Choose the folder you would like to open. In this example, we’ll open Pictures, highlighted next.

Double-click the folder icon.
The folder will then open, and you can see the files and folders inside. Remember you can use the address bar to work out exactly which folder you’ve opened.

Over time, you may find you have created dozens of folders inside other folders, and it may take a while for you to click through to find the folder you want. Opening folders via the navigation pane makes it quick to open any folder on the computer, however deeply it’s buried. Although it is a little trickier, it is well worth the effort. Follow these steps to open a folder from the navigation pane:
Open the File Explorer window if it’s not already open. Remember that the navigation pane is located on the left side of the window.
Hover your mouse over any folder in the navigation pane, and a small triangle icon should appear to the left of the folder. This indicates that there are more folders inside this folder. (A folder inside another folder is known as a subfolder.)

Click the small triangle icon next to the folder—in this case, next to This PC—and the long list of folders inside will appear, as shown next. You might notice that the subfolders do not neatly line up underneath but instead are pushed slightly further to the right. This is a quick and easy way of showing that they’re subfolders.

To open the folder, just click once on the folder’s icon from the list that appears.

The folder will then open. Once the folder is opened, the triangle icon will change to point downward. Click this icon to close the folder, and all the subfolders will disappear from view.
Congratulations! You can now open and view any folder on your computer.
Working with Files and Folders
Once you’ve opened a folder, you’ll need to be able to view and open the files inside it.
VIEWING FILES WITHIN A FOLDER
The icons for the files inside your folder may appear as little images that can be quite difficult to see. You can change the folder view so that the icons appear bigger or smaller, and sometimes show a preview of your document or picture. To change the view, follow these steps:
Make sure that you have a folder open.
Click View at the top of the File Explorer window. This will open the View ribbon.
The viewing options will then appear, as shown next.

Let’s explore these options:
* Extra large, Large, and Medium icons: These views provide three sizes of icons. For photos and pictures, these views give you a preview of the image.
* Small icons and List: These views make your icons appear smaller but also help fit many more files onto the screen. Photos and videos show a generic icon rather than a preview of the image. This is ideal if you want to quickly browse a long list.
* Details: This view shows you more information about your files, such as the date the files were made and what type of files they are. This is very useful if you need more information to find a particular file.
OPENING A FILE
Once you’ve found the files you need, you’ll want to open them. This way, you can check content, work on them some more, and share them.
Open a folder that has a useful file inside. In this example, we’ll open Documents in This PC.

Find the file that you would like to view or open, such as My First Document, highlighted next.

Double-click the file icon to open the file.
CREATING NEW FOLDERS
Now, to truly get organized, you’ll learn to create brand-new folders that can contain new documents, photos, songs, videos, and more. Remember that your computer already has a useful selection of folders for these types of files: Documents, Pictures, Music, and Videos. We don’t want to reinvent the wheel, so we’re just going to create new folders inside these existing folders to help us organize our files further.
For example, maybe you’re an avid cook and have a whole host of recipes. Because you’re organized, you would like your recipes sorted into different folders according to the type of dish. This way, when you want to bake your famous chocolate cake, you can pull out your recipe in no time at all. In the following example, you’ll create a folder called Cake Recipes.
Open the folder you want to create your new folder inside. In our example, we’ll create the Cake Recipes folder inside the Documents folder, so go ahead and open Documents.

Once inside Documents, click the Home ribbon, highlighted next.

Click the New folder button inside the Home ribbon.

A new folder will appear with the rather dull name “New folder.”

The folder’s name should be highlighted in blue, indicating that you can simply begin typing a new name. If you accidently click somewhere in the name, the text will no longer be highlighted in blue. In this case, you can simply move the cursor to the end of the name and press backspace until all the letters are deleted; then you can begin typing.
* Note: If you accidentally click somewhere else on the screen and you can’t see the cursor inside the folder name, see “Renaming a File or Folder” on page 268.
Type the new name Cake Recipes.

Press enter.
Your new folder has now been created!
RENAMING A FILE OR FOLDER
You can rename a file even after it has been created. For example, you might need to rename a file if you make a spelling mistake or realize the name is unclear. You can rename a folder in exactly the same way as you rename a file.
Click the file or folder that you want to rename.
Click the Home ribbon.
Click Rename, highlighted next.

The file or folder name should now be highlighted in blue.
Type the new name and press ENTER.
The file or folder will now be renamed!
DELETING A FILE OR FOLDER
Deleting a file will move it to the Recycle Bin, helping you keep your computer organized. You can delete a folder in exactly the same way as you delete a file. If you delete a folder, however, all of the files inside it will be deleted as well.
Click the file or folder you want to delete.
Click the Home ribbon.
Click Delete, highlighted next.

The file or folder will now be moved to the Recycle Bin.
RESTORING A DELETED FILE OR FOLDER
If you accidently delete a file or folder or just decide you want it back, you can go to the Recycle Bin and restore it.
Open the Recycle Bin from your desktop—you can get to the desktop by minimizing or closing all the files, folders, and apps you have open.

Find your file or folder (if you’ve deleted a lot of items, you might need to scroll through a bit) and then click it.
Click the Manage ribbon and then click Restore the selected items.
Your file or folder will then return to the folder you deleted it from!
Organizing Your Files
Now that you have some files and folders to work with, we’ll look at some ways to keep your computer organized.
SAVING FILES INTO FOLDERS
The quickest way to stay organized is to save a file directly into the folder you want it stored in. In this example, we’ll use WordPad to create a recipe that can be saved directly into its recipe folder.
Open WordPad. Remember that you can open WordPad by clicking the start button and typing WordPad.
Type a brief chocolate cake recipe.
Click the File menu in the top-left corner of the screen. Click the Save button from the list that appears. This will bring up the same Save As box you saw in Lesson 12. This time, though, you want to save your recipe directly into the Cake Recipes folder.
Open the Documents folder.
Open the Cake Recipes folder by double-clicking the icon.
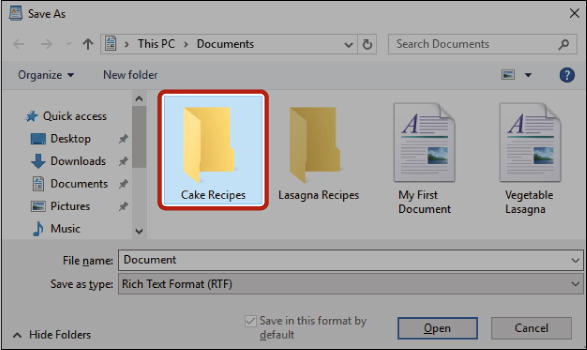
Your recipe will also need a name so that you can find it easily. Type Chocolate Cake Recipe into the File name box.

Click Save.
Congratulations! Your recipe has been saved to the Cake Recipes folder.
MOVING FILES INTO FOLDERS
You may already have documents and images saved that you would like to organize. If you didn’t save a file directly inside the folder you want, it’s not too late! You can still move loose files into organized folders; for example, you might move a vegetable lasagna recipe file from Documents into a folder called Lasagna Recipes.
* Note: In the following section, we will be working with the folder we created in Activity #41 and the recipe from the Lesson Review in Lesson 12. If you skipped those activities, it would be a good idea to go back to them now.
Cut and paste is an excellent method for moving files into folders. The key idea is that you cut a file out of one spot and paste it into another, removing it from the first location. Think of it like cutting an article out of a newspaper and pasting it into a scrapbook.
Open the folder containing the file you want to move. In our example, this is the Documents folder.
Find and click the file. In our example, we will choose Vegetable Lasagna. A blue shading will appear once you click the file.

Click the Home ribbon.
Click the Cut button, highlighted next, which looks like a pair of scissors.

Notice that after the file has been cut, its icon will appear faded out. This is a sign that your cut has been successful!
Open the folder you would like to move the file to. In our example, we’re moving the Vegetable Lasagna file into the Lasagna Recipes folder, so we’ll open the Lasagna Recipes folder.
Inside the target folder, click the Home ribbon and click the Paste button, highlighted next, which looks like a clipboard.

The Vegetable Lasagna file will now appear inside the Lasagna Recipes folder!
CLOSING A FOLDER
Closing a folder works in the same way as closing any document, app, or window. To close a folder, click the close button in the top-right corner of the folder. That window will now disappear.
Searching for Elusive Files
Understanding how files and folders are stored can give you a powerful sense of mastery over your computer! However, you may find that your files have been lost or forgotten and can be difficult to find. The Search box is an excellent solution—it will search through all areas on your computer for files or folders that match your search term.
Click in the Search box next to the Start menu, or simply click the start button itself.
Type the name of the file or folder you’re searching for. If you’re searching for a document and don’t remember the name, you can search for a word or phrase you know is in the document.
Windows will offer a list of files and folders that match that search term, along with apps and even web results. Files will appear at the top of the list and will have a colorful icon to the left of the filename. Everything under the heading “Web” will perform a web search of your term.
Find your file and click it to open your missing file.
Taking Your Files on the Go
Your saved files aren’t confined to your computer. There are several ways to move your files around, including emailing them as attachments, like you did with images in Lesson 4. You can also store them in a small portable memory device known as a USB flash drive, and even on the internet. There are lots of great reasons to keep a copy of your files in places other than just your computer:
* To take files with you: Often you’ll want to be able to access your files from other computers. You might want to work on a document when you’re on vacation, show photos to your friends and family at their homes, or have your photos professionally printed at a store.
* For backup: Storing your files only on your computer can be dangerous! If, for example, you are the victim of a robbery, your computer (and your precious files) could be taken and you’d lose them forever. Your computer might break down, or it could be attacked by a virus that deletes all your files. By storing your files in a second location, you have peace of mind knowing that no matter what happens, your files are safe.
STORING FILES ON A USB FLASH DRIVE
A USB flash drive is a portable stick with lots of room to store files. It’s small enough to fit in your pocket but has enough digital space to store hundreds or thousands of files.

With the exception of some tablets, you can plug a USB flash drive into almost any type of computer and it doesn’t require access to the internet. So whether you’re traveling to Africa or Antarctica, your files can safely travel with you on your USB flash drive.
To stores files on a USB flash drive, the drive must be connected to the computer. Once the drive is connected, you can open it much like with any other folder on your computer. To connect and open a USB flash drive, follow these steps:
Find the right-sized connection (or hole!) on your computer (refer to the following figure). The connection should fit the USB flash drive, so it will be rectangular, and it might have the USB symbol:
 .
.
Plug the (usually silver) connector of the USB flash drive into the correct connection on the computer. It will only fit one way, so if you’re having trouble connecting the drive, it might be upside down—or you might have the wrong hole!
Open File Explorer from the taskbar or Start menu.
Look at the navigation pane and you should see your flash drive, identified either by the brand name of the drive or simply as the rather generic “Removable Disk.” Whatever it is called, it will be a new drive that wasn’t on your computer before.

Click the USB flash drive to open it in the window.
The files and folders on your USB flash drive will then be displayed. If you’ve never used the drive before, it might not contain any files, in which case it will simply say “This folder is empty.”
Double-click a file or folder to open that item on the USB flash drive. You can save these files to your computer, too, in the same ways you moved files earlier.
You can move files onto the USB flash drive using the cut-and-paste method. It’s usually better to leave a copy of your files on your computer as well so that you don’t lose your files if you lose your flash drive. You can do this by clicking the Copy button instead of the Cut button when moving your files.
STORING FILES REMOTELY WITH ONEDRIVE
OneDrive is a wonderful free app made by Microsoft that lets you store a copy of your files on the internet, a method of storing known as cloud storage. Storing your files in OneDrive allows you to access them from anywhere in the world (even on vacation!) as long as you have an internet connection, and it provides a storage space protected from physical disasters or theft.
OneDrive stores files on the internet, but the app makes your life easier by appearing as a folder on your computer. Although the files are actually stored on the internet, you can still access the files from the OneDrive folder on your computer, just like with any other folder. Neat!
Before you can use OneDrive, you need to set it up. Fortunately, this is very easy! Follow these steps to set up and open the OneDrive app.
Click the OneDrive icon, which looks like a pair of clouds, in the system tray.

If you don’t see the OneDrive icon, click the Show Hidden Icons arrow in the system tray, as shown here. You should then see the icon in the box that appears.

If a message appears informing you that OneDrive is up-to-date, as shown here, then OneDrive has been set up on your computer. If not, follow the instructions on the screen to set up OneDrive.

Open File Explorer.
From the navigation pane, click OneDrive, highlighted next.

OneDrive will now open as a File Explorer window! The OneDrive folder works in exactly the same way as any other folder on your computer. You can move files into OneDrive using the copy-and-paste method, and files in OneDrive can be opened like any other file.
Explore: The OneDrive Website
The OneDrive website lets you access files you’ve placed into OneDrive from any computer in the world! To access the OneDrive website, open Microsoft Edge and enter onedrive.live.com into the address bar. Click Sign in and enter your Microsoft account details, and then you should see a page like the one below. It looks slightly different from the files and folders on your computer, but navigating them works in the same way.

Phew, We Did It!
In this lesson, we looked at creating and organizing your files and folders. You learned how to do the following:
* Use File Explorer to find the files you’ve created
* Change the folder view to make icons larger or smaller
* Rename files and folders
* Delete and restore files
* Save files into folders
* Move files around using the cut-and-paste method
* Use the Search feature to find lost files
* Put files on a USB flash drive or in cloud storage
The next lesson is our final lesson! You’ll learn all about staying safe on your computer and online.