

Step One I begin by sketching the basic shapes of the lory with an HB pencil, careful to accurately block in the bird’s proportions and position. This lory is lowering his head as he bends forward. When placing the eye, I keep in mind that the forehead is very large.
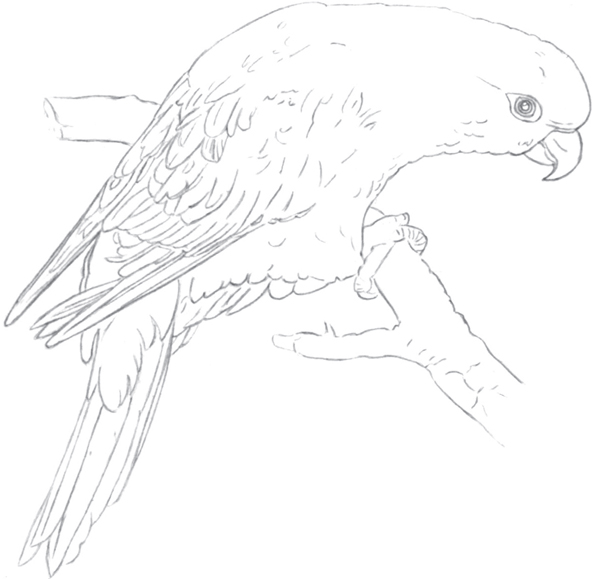
Step Two Next I refine the shape of the bird and draw the large feathers, indicating a few of the smaller feathers. I detail the eye, which features several rings. The pupil has a circle around it, then a teardrop surrounded by another teardrop shape. I also refine the shape of the branch and add a few lines to the talons.

Step Three With a very sharp Tuscan red, I draw over the inner teardrop shape of the eye, color in the dark area between the top and bottom beak, and make a small line at the top of the beak. I fill in the pupil with a very sharp black, then outline the outer teardrop shape. I add a few black lines inside this area and then use the black on the toenails and within the feathers, as shown. I add black cherry to some feather edges and apply a light layer of the black cherry to some of the darkest areas of the red feathers. I also color the curved line from the eye along the upper beak with black cherry; then I use sepia to add some lines to the branch.

Step Four I apply burnt ochre to the branch in a few small areas. Then I use warm gray 50% for the branch, pressing hard for the lines and using medium pressure for the shaded areas. I add cool gray 50% around the pupil and the inside of the beak for shadows. I add canary yellow evenly over the beak with medium pressure. To achieve more realism, I indicate smaller feathers with Tuscan red, although it is not necessary to render every feather. Using light pressure, I add Tuscan red to the shadowed areas of the feathers. With the same color, I go over some feather edges and outline the bird’s head using medium pressure. I add ultramarine to the feather edges on the lory’s back and near its foot with firm pressure, pulling the color into the Tuscan red.
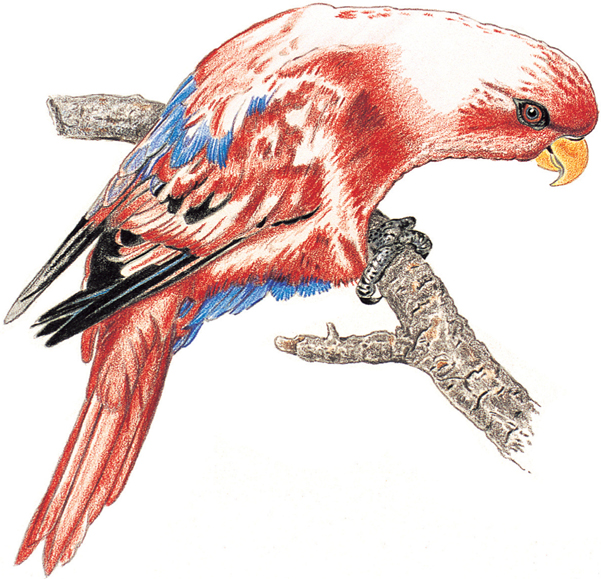
Step Five I apply cool gray 50% to the outermost eye shape and the foot, carefully leaving the highlighted areas white. I color some of the medium dark areas of the lory’s body with crimson red, using medium pressure and pulling the color over the Tuscan red. Next I use true blue on the feathers over the ultramarine with firm strokes to define the shape of the feathers. I also add a light hint of true blue over the foot. Then I apply a light layer of black to a few feathers for greater contrast. I use warm gray 50% over the branch with medium strokes, following the contours of the bark. I also add a light layer of cadmium orange hue to the beak, leaving yellow showing at the inner edge.

Step Six Next I apply poppy red to the remainder of the bird using strokes in the direction of feather growth, but I leave a few areas on the back and wings white to indicate the lustrous feather texture. I pull poppy red over the edges of the existing reds to blend the colors more evenly. The tail feathers are a lighter red, so I use cadmium orange hue over the reds, leaving a few light areas for highlights. I add a little more black to the long wing feathers.

Step Seven Now I make the shapes of the feathers crisp using crimson red and a few strokes of Tuscan red. I blend the highlights of the feathers on the back with white, using firm pressure to pull the white over the edges of the red. I also apply a little ultramarine to the blue feathers and blend with white using firm strokes. I apply a few short strokes of white to the side of the head to refine the round form. I add a very light layer of ultramarine to the lower part of the branch, indicating a shadow and giving the branch more depth. Finally, I enhance the detail around the eye using a very sharp black.