

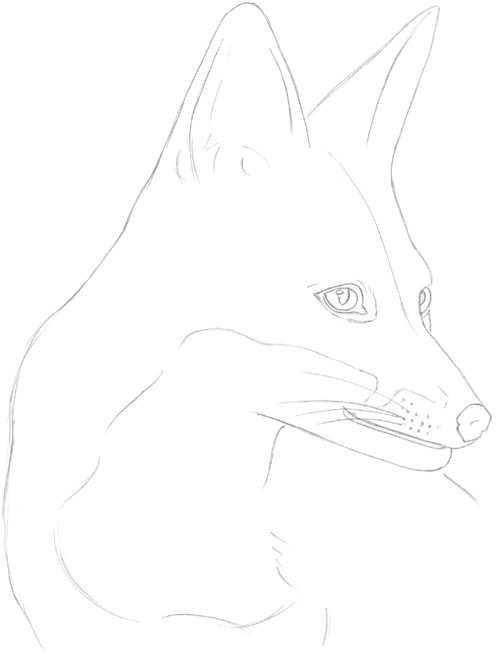
Step One Using an HB pencil, I sketch the basic shapes of the fox’s head. The nose is long and extends from the head because the fox is at a three-quarter angle; the vertical centerline curves with the head and extends out along the nose. Next I add triangle shapes for the ears, a line for the mouth, and ovals for the eyes. Note that the eye on the right is hardly visible.
Step Two I refine the drawing, adding more of the neck and body and the outlines of the inner ears. I also indicate the areas of fur on the chin and neck. Then I draw the whisker markings and the whiskers themselves. I refine the eyes and nose, drawing the iris and pupil as half-circles for the eye on the right.

Step Three I add a few more details to the drawing, including a few strokes to indicate the direction of the fur growth. Now I switch to a black colored pencil to shade the tips of the ears, the pupils, and the outlines around the eyes. I shade most of the nose with firm pressure, leaving the top white; I also shade the mouth area. Next I fill in the ear on the left with cool gray 90%, using firmer pressure as I go down. With the same color and medium pressure, I shade around the eye, forehead, neck, and mouth, and I add a patch on the side of the muzzle. Then I make short, firm strokes inside the ear with a white pencil; I add a few darker strokes between the white strokes with cool gray 90% .

Step Four Now I apply short strokes of dark brown to areas of the head, neck, face, and body. With firmer strokes I apply dark brown to the area below the black in the inner ear, pulling the strokes over the white fur. I also add a layer of henna to the left side of the inner ear. Then I add some firm stokes of white to the head, body, and areas around the eye. Next I apply cool gray 90% to the nose, leaving the highlight white. Using medium pressure and dark brown, I add strokes to the iris that radiate out from the pupil. Now I use the HB pencil to sketch the hairs above the eyes; I will darken them later.

Step Five I add burnt ochre to the irises, layering it over existing colors. Then I apply medium-length strokes of burnt ochre to most of the fur on the body. Where I want the fur to be darker, I use harder pressure. Next I add cool gray 70% to the whisker markings and along the bottom edge of the chin. Then I shade the white neck area with cool gray 30% and medium pressure. To show patterns in the fur, I press harder and make some of the strokes parallel. Now I apply cool gray 30% to the inner ears, using short, firm strokes in the ear on the left and lighter, longer strokes in the ear on the right. Switching to a sharp dark brown, I go over the outline of the eye on the left. Then I add a small amount of black to the pupil and layer yellow over the burnt ochre in the irises. With very small strokes, I apply dark brown to the right edge of the face along the nose. I use a sharp black to apply short and medium hairs to the bottom of the chin; then I darken the whiskers with long strokes and draw the hairs above the eyes.

Step Six Using short strokes of dark brown, I add more fur over most of the head and body, layering over existing colors. I apply yellow ochre to the bottom side of the ear on the left and along the left side of the body to add warmth and show the light source. Then I add some strokes of mineral orange to the underside of the neck to show the orange fur reflecting onto the white fur. I also apply some firm strokes of cool gray 70% to the neck to add depth. Next I add a small amount of pumpkin orange to the right side of the body. I make short strokes with beige along the inside edges of both ears to show fur overlapping the inner ear. Then I apply beige over the fur on the left side of the body to blend the colors and cover the small white areas. Next I add a good amount of slate gray to the neck and chest areas to put them in shadow. Then I slate gray over the orange fur where it meets the white to indicate a cast shadow. Next I shade along the top edge of the nose with black to blend it with the surrounding fur. I add a spot of cloud blue to the highlights in the eyes and a few strokes to the white areas on the face and neck. I also add a light layer of cloud blue to the orange fur beneath the chin. To finish, I use black to sharpen some edges and darken areas of fur. I also darken the whiskers, adding one more as a final touch.