4. Adding Text To Your Pages
The main message of most Web sites is conveyed by the site’s text, and a major part of your job in working with any site will be adding, modifying, and styling that text. Dreamweaver gives you the tools you need to effectively put text on your pages and get your message across.
When you add text, you need to deal with two different aspects of the text: its structure and its presentation. Structural elements are things like paragraphs, headings, lists, and the like; presentation is how the text looks, including things like the font, font size, text color, and so on. Most sites these days separate the structure and the presentation. Structure is about organizing the content on the page, and presentation is concerned with making the content look good.
In this chapter, we’ll concentrate on getting text onto your page, and how to apply structure using headings and lists. We’ll also cover using basic HTML text styles to change the look of your text. You’ll learn how to more precisely style text and present it using Cascading Style Sheets in Chapter 5.
Adding Text
Most of the text on a Web page is formatted in blocks, which are enclosed by beginning and ending HTML tags. For example, the HTML for a line of text with paragraph tags wrapped around it looks like this:
![]()
In order for a browser to understand that this is a paragraph, you (or in this case, Dreamweaver) have to make it one by adding the surrounding <p> tags.
Of course, in Dreamweaver’s Design view, you won’t see the HTML tags. All of the text contained between the opening <p> tag and the closing </p> tag is considered by a Web browser to be within the same paragraph, no matter how much text is between the tags. The <p>...</p> combination is an example of a container tag. Virtually all of the structural formatting that you can apply with Dreamweaver is done with container tags.
When you add text to a page with Dreamweaver, the program automatically wraps the text with paragraph tags when you press the Enter (Return) key on your keyboard. You can see this if you switch to Code view, by clicking the Code button at the top of the Dreamweaver editing window, as shown in Figure 4.1.
Figure 4.1. Dreamweaver adds paragraph tags around text when you press the Enter (Return) key.

Dreamweaver also has special commands that help you import entire Microsoft Word or Excel documents as Web pages. (See “Using Paste Special,” later in this chapter, and Chapter 16 for more information.)
To insert text
1. In Dreamweaver’s Design view, click in the page where you want to add text.
2. Type the text you want.
Cutting, Copying, and Pasting Text
Just like a word processor, you can cut, copy, and paste text on a page in Dreamweaver, which shares the same menu commands with virtually all standard Windows and Mac word processors and text editors. When pasting text in Design view from one part of a Dreamweaver page to another, or between Dreamweaver pages, text formatting is automatically maintained.
Dreamweaver also allows you to paste text and maintain some or all of the text’s formatting. This is especially useful when moving text from applications such as Microsoft Word or Excel to a Web page. See “Using Paste Special,” later in this chapter.
To cut or copy text
1. Select the text you want to cut or copy.
2. To cut the text to the Clipboard, choose Edit > Cut, or press Ctrl-X (Cmd-X) on the keyboard.
or
To copy the text to the Clipboard, choose Edit > Copy, or press Ctrl-C (Cmd-C) on the keyboard.
The text is placed on the Clipboard.
 Tip
Tip
• When you have text selected, most of the time you can right-click to cut or copy the text using a shortcut menu. You can also right-click to paste text from the shortcut menu. If you have a single button mouse on the Mac, you can Ctrl-click to bring up the shortcut menu.
To paste plain text
1. Click to place the insertion point on the page where you want the text to appear.
2. Choose Edit > Paste, or press Ctrl-V (Cmd-V) on the keyboard.
Tips
• If you copy some HTML source code from another program, such as the Source view of a Web browser, and paste it into a Dreamweaver page in Design view, the HTML appears on the page, with tags and all. That’s because while what you’ve pasted in is HTML markup, Dreamweaver is trying to be smarter than you—it’s assuming that markup is what you want to display. If that’s not what you want, but rather you want the result of the markup to display in your page, just switch to Code view in Dreamweaver before you paste. The HTML code will paste into the page, and when you switch back to Design view, it will display the proper formatting.
• Dreamweaver offers Undo and Redo commands in the Edit menu, which can often be very useful for fixing mistakes or repeating operations. You can also use the keyboard shortcuts Ctrl-Z (Cmd-Z) for Undo and Ctrl-Y (Cmd-Y) for Redo.
Dragging and Dropping Text
If all you want to do is move some text from one place on a page to another, it’s often faster to drag and drop the text.
To drag and drop text
1. Select the text you want to move (Figure 4.2).
Figure 4.2. Begin dragging and dropping text by selecting it.

2. Move the cursor over the selected text.
The cursor changes from an I-beam to an arrow.
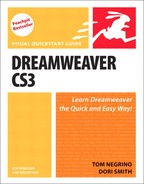
3. Click and hold your mouse button over the selected text, and drag it to its new location, releasing the mouse button when the cursor is where you want the text (Figure 4.3).
Figure 4.3. When you release the mouse button, the text moves to where you dropped it.
The text moves to its new home.
Tip
• To duplicate the text, hold down the Ctrl (Option) key while dragging-and-dropping. A copy of the text appears when you release the mouse button.
Using Paste Special
Dreamweaver’s Paste Special command in the Edit menu gives you a variety of options that control the way formatted content is pasted into Dreamweaver’s Design view.
You will probably use the Paste Special command most often when pasting in text from Microsoft Word or Excel, in order to maintain the formatting that the text had in those programs (Figure 4.4). Text pasted in from Excel can appear in Dreamweaver as a formatted table which saves you a lot of time and effort.
Figure 4.4. Paste Special does a great job of maintaining the formatting from Microsoft Word documents.

The Paste Special options are:
• Text only pastes just the text; paragraph marks and all formatting are stripped from the text (Figure 4.5).
Figure 4.5. This is the “Text only” version of the text from Figure 4.4, with paragraph marks and formatting stripped out.

• Text with structure pastes the text and maintains the structure (notably paragraphs, tabs, and lists), but eliminates other text formatting (Figure 4.6).
Figure 4.6. With the “Text with structure” option, the text in paragraph marks are there, but there’s no character formatting.

• Text with structure plus basic formatting keeps the text and text structure and retains bold and italic formatting (Figure 4.7).
Figure 4.7. The “Text with structure plus basic formatting” option maintains bold and italic formatting.
• Text with structure plus full formatting preserves the text, structure, and styles from the original document (Figure 4.8).
Figure 4.8. The final option, “Text with structure plus full formatting,” maintains all the formatting from the Word document.

To use Paste Special
1. Select the text you want to cut or copy.
The text will usually be in a different application than Dreamweaver.
2. Cut or copy the text.
3. Switch to Dreamweaver, and click to set the insertion point where you want the text to appear.
4. Choose Edit > Paste Special, or press Ctrl-Shift-V (Cmd-Shift-V).
The Paste Special dialog appears (Figure 4.9).
Figure 4.9. Choose the option that you want from the Paste Special dialog.

5. In the dialog, click the radio button next to the paste option you want.
6. Click OK.
The text pastes in according to the option you selected.
Tips
• If you use the “Text with structure plus basic formatting” or “Text with structure plus full formatting” choices, you can also paste graphics into Dreamweaver along with the formatted text.
• You can copy and paste graphics from most applications into Dreamweaver, but if you want to paste a graphic along with formatted text, you must use Paste Special.
Applying Headings
After paragraphs, headings are the most important structural element on most Web pages. Headings point your site’s visitors to essential information on the page, and they separate sections of the page. Think of headings as being similar to headlines in a newspaper.
Text you enter into Dreamweaver begins with no heading; Dreamweaver refers to this text as None in the Property Inspector. As soon as you press Enter (Return), Dreamweaver wraps the text in paragraph tags, and the text becomes paragraph text.
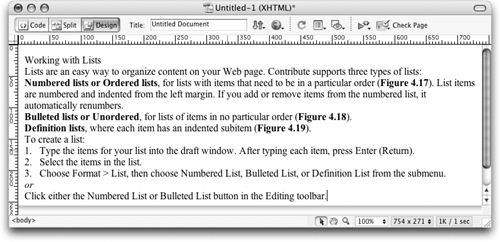
HTML has six sizes of headings, plus paragraph text, as shown in Figure 4.10. These headings don’t have a fixed point size, unlike headings in say, Microsoft Word or Adobe InDesign. Instead, they are sized relative to one another and the size of the paragraph text, and the size that the user sees depends on the settings in the user’s Web browser. By default, headings are usually displayed in boldface.
Figure 4.10. Here are examples of the six Heading sizes, plus Paragraph, which is usually used for body text.
You can change the look of headings (their size, font, color, and so forth) using CSS, which we’ll cover in Chapter 5.
Tips
• You can only have one size of HTML heading in a particular element. You can work around this limitation with CSS styles.
• Headings are also important because they help search engines find and index content on your pages. Google in particular uses headings in this fashion, so it’s a good idea to use headings when they are appropriate to your content.
To apply a heading
1. Click in the line you want to change.
Note that you don’t have to select text; a heading is a block style, so it affects the entire paragraph the cursor is in.
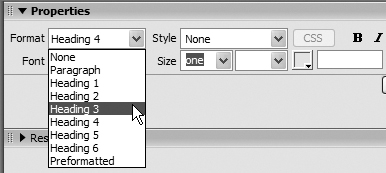
2. Choose Text > Paragraph Format > Heading x, where x is the heading size you want (Figure 4.11).
Figure 4.11. Choose the heading size you want from the Paragraph Format submenu.

or
Press Ctrl-1 for Heading 1, Ctrl-2 for Heading 2, and so on. On the Mac, press Cmd-1 for Heading 1, Cmd-2 for Heading 2, and so on.
or
Choose a heading from the Format pop-up menu of the Property Inspector (Figure 4.12).
Figure 4.12. Another way to choose the heading size is to use the Format pop-up menu of the Property Inspector.
or
Click one of the heading buttons in the Text tab of the Insert Bar (Figure 4.13).
Figure 4.13. The Text tab of the Insert Bar gives you buttons with many options, including ways to apply three heading sizes.
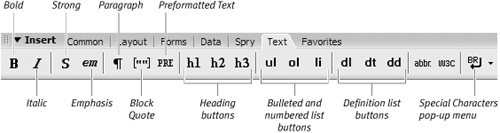
There are only buttons for Heading 1, Heading 2, and Heading 3, listed as h1, h2, and h3, respectively.
The text changes to the heading you selected.
To turn text into paragraph text
1. Click in the line you want to change.
2. Choose Text > Paragraph Format > Paragraph.
or
Choose None from the Format pop-up menu of the Property Inspector.
or
Press Ctrl-Shift-P (Cmd-Shift-P).
Dreamweaver changes the text into a paragraph.
To remove heading formatting
1. Click in the line you want to change.
2. Choose Text > Paragraph Format > None.
or
Press Ctrl-0 (Cmd-0). (Those are zeros, not the letter “O”.)
The Format menu of the Property Inspector changes to None, indicating that the text has no heading or paragraph style assigned to it.
Applying Character Formats
Character formatting is styling that you can apply to words and individual characters, rather than to blocks such as paragraphs. This formatting includes changing the font, font size, and font color.
Beginning with Dreamweaver MX 2004, and continuing through Dreamweaver 8 to Dreamweaver CS3, the program dispensed with the old method of applying these sorts of character formatting (which was to use the HTML <font> tag), in favor of using CSS styles. This change happened mostly behind the scenes in Code view, so if you have been using Dreamweaver for quite some time, you may not have even noticed the change.
The reason for this change is important. Pages styled with CSS are much more flexible than pages that use HTML <font> tags, and they can be maintained more easily. For example, when a site is redesigned, every page that uses <font> tags must be individually changed to match the new design. If you have hundreds or thousands of pages in your site, that’s a lot of work. Sites that use CSS to style text only need to change the stylesheet document, and the changes automatically ripple through the whole site. You’ll learn more about using CSS to style text in Chapter 5.
Changing Fonts and Font Sizes
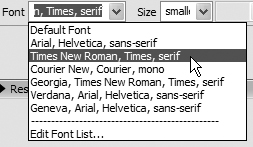
In Dreamweaver, you have the ability to set the typeface, or font, for any text on your page. But not all computers or Web browsers use the same fonts. If you specify a font that your site visitor doesn’t have on his or her computer, chances are the content won’t look the way you intend. Because neither you nor Dreamweaver can be sure what fonts will be available to your site visitors, Dreamweaver uses font combinations (also called font groups) to work around the problem. Font combinations allow you to provide options for the browser by creating multiple font choices. For example, a font combination could include Arial, Helvetica, and Geneva fonts, and the Web browser would render the page using the first choice available to the browser. If none of the fonts in the combination are installed, the browser will display the text using whatever font is set as the default in the browser’s preferences. Dreamweaver comes with six predetermined font combinations, and you can add more as you need them. Each choice in the Font pop-up menu in the Property Inspector represents the first font in that font combination (Figure 4.14).
Figure 4.14. Choose a font combination from the Font pop-up menu in the Property Inspector.
Although Dreamweaver is reminiscent of a word processor, it’s really not one, and it has the font-handling characteristics of HTML and CSS. Dreamweaver allows users to apply several font sizes from the Font Size pop-up menu in the Property Inspector, which it implements as CSS styles (Figure 4.15). You also have the option to choose the units of measurement used for font sizes (Figure 4.16).
Figure 4.15. Choose a font size from the Size pop-up menu.

Figure 4.16. You can also choose the units of measurement for the font size.

To set a font
1. Select the text you want to modify.
2. Choose a different font combination from the Font pop-up menu in the Property Inspector, or choose Text > Font, and then choose the font combination from the submenu.
The text changes appearance.
Tip
• Dreamweaver’s preset font combinations include fonts that are found on nearly every computer sold in the last several years. Most of these fonts are available for both Windows and Macintosh. For example, Arial, Courier, Georgia, Helvetica, Times New Roman, Verdana, and Trebuchet are all fonts that come standard on both platforms.
To set font size
1. Select the text you want to modify.
2. Choose a different size from the Font Size pop-up menu in the Property Inspector.
3. Choose the unit of measurement you want from the units pop-up menu, next to the Font Size pop-up menu.
The text changes appearance.
Tip
• The sizes listed in the Font Size pop-up menu in the Property Inspector that are not numbers (e.g., x-small, medium, xx-large) are relative sizes, meaning they set a font size to be larger or smaller relative to the default font size.
Making Your Own Font Lists
You can modify the preset font combinations, and you can also create new font combinations.
To edit the Font List
1. Choose Text > Font > Edit Font List.
The Edit Font List dialog appears (Figure 4.17).
Figure 4.17. The Edit Font List dialog lets you define new font combinations.
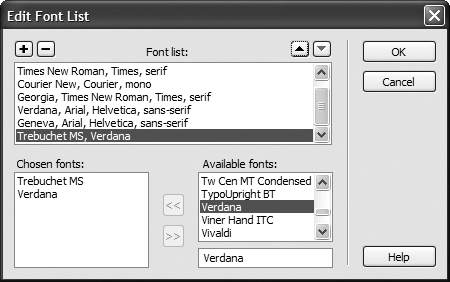
2. To add a font combination, click the plus button, then click the arrow buttons next to the Available fonts list and select fonts to move them to the Chosen fonts list.
or
Select a font combination in the Font list, and click the minus button to remove it.
or
Use the arrow buttons above the Font list to move a selected font combination up or down in the list.
3. Click OK to save your changes.
Tips
• You can type the name of a font not on your system in the field below the Available fonts list, then click the left-facing arrow button to add that font to the Chosen fonts list. You might choose to add a font when you want to use one you know is available on the systems of users who will be visiting your site. For example, if your site will attract many Mac OS X visitors, you can use some of the OS X system fonts, such as Lucida Grande, that are common on the Mac but not on Windows.
• If you add specialized fonts to your own font lists, you must remember that most users on the Internet may not have access to those fonts. If you’re designing a site for a specific client base, such as a corporate intranet, and you know all of the machines that will be viewing the site will have your specialized fonts available, then go for it.
Changing Font Color
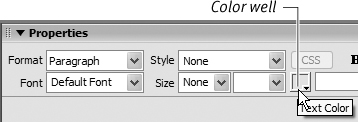
You can select text and change its color, which applies a CSS style to the text. You’ll use the color well in the Property Inspector and the color picker to do the job.
To color text
1. Select the text you want to color.
2. Click the color well in the Property Inspector (Figure 4.18).
Figure 4.18. Click the color well in the Property Inspector to set the font color.
The color picker appears (Figure 4.19).
Figure 4.19. Use the eyedropper on the color picker to choose your new text color.

3. Click a color with the eyedropper to select it; it can be any color in the color picker or any color visible on your desktop or the page you are editing.
When you select the color, the color picker closes and the text changes color.
Applying Text Styles
The most common text formatting is to make text bold or italicized, and of course Dreamweaver can do that. But it can also apply several other text styles, some of which are for specialized uses, as shown in Figure 4.20 and Table 4.1.
Figure 4.20. Dreamweaver offers a number of useful (and not so useful) text styles.


Many of these text styles are meant for displaying programming or script code, so they won’t be used at all on many sites. Others, such as Underline and Strikethrough, are deprecated in the HTML 4.01 standard, which means that they are obsolete and may not work in future browsers.
To apply a text style
1. Select the text you want to change.
2. Choose Text > Style, then choose the style you want from the submenu.
The text’s appearance changes.
Tip
• Actually, by default Dreamweaver does not use the traditional <b> and <i> HTML tags for bold and italic, respectively. Instead it uses <strong> and <em> (for emphasis). The latter tags are preferred as part of best practices, because they are better handled by screen readers used by visually impaired users. If you want to switch Dreamweaver back to using <b> and <i>, choose Edit > Preferences (Dreamweaver > Preferences), and in the General category of the Preferences dialog, deselect “Use <strong> and <em> in place of <b> and <i>.”
Using Preformatted Text
Browsers usually ignore invisible formatting that doesn’t affect page content, such as tabs, extra spaces, extra line feeds, and the like. If you need to display text exactly as entered, however, you can use the Preformatted paragraph format, which wraps the text in the <pre>...</pre> tags and makes browsers display all of the text characters.
Originally, preformatted text was meant to display tabular data in rows and columns, such as the output of a spreadsheet. In order to make the information line up, browsers display preformatted text in a monospaced font such as Courier (Figure 4.21).
Figure 4.21. Preformatted text lines up neatly, as with this table.

To apply preformatting
1. Select the text you want to change.
2. From the Format pop-up menu of the Property Inspector, choose Preformatted.
or
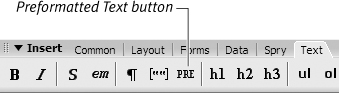
In the Text tab of the Insert Bar, click the Preformatted Text button (Figure 4.22).
Figure 4.22. Apply the style with the Preformatted Text button.
or
Choose Text > Paragraph Format > Preformatted text.
The text changes appearance.
Tip
• If you want to display tabular data, it often makes more sense to use a table, rather than preformatted text. You get much more control over the table style and spacing of the items in the table, and you can add CSS to style the table’s contents if needed. See Chapter 10 for information about using tables.
Adding Line Breaks
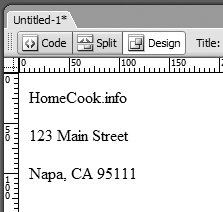
Just as in a word processor, you press Enter (Return) in Dreamweaver to create a new paragraph. This is fine when you want to actually create a new paragraph, but not so great when you just want to move the cursor down a line, as you might want to do when entering an address. That’s because Web browsers (and Dreamweaver) insert a blank line above and below a paragraph, so if you make each line of the address its own paragraph, it looks goofy (Figure 4.23).
Figure 4.23. Paragraphs have whitespace before and after them, which isn’t really appropriate for things like addresses.
What you want to do is add a line break, which moves the cursor down one line without creating a new paragraph. In the code, Dreamweaver adds the HTML <br /> tag to the end of the line.
To insert a line break
• At the end of the line you want to break, press Shift-Enter (Shift-Return).
or
At the end of line you want to break, in the Text tab of the Insert Bar, select Line Break from the Special Characters pop-up menu.
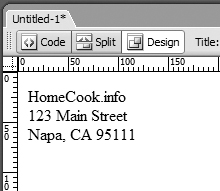
The text changes (Figure 4.24).
Figure 4.24. After you replace the paragraph tags with line breaks, the address looks better.
Tip
• Line breaks are invisible characters in both Dreamweaver and Web browsers, but you can make them visible in Dreamweaver if you want. Choose Edit > Preferences (Dreamweaver > Preferences), then click the Invisible Elements category. Click the check box next to “Line breaks,” then click OK. Dreamweaver then displays line breaks in Design view (Figure 4.25).
Figure 4.25. With the appropriate preference enabled, you can see the invisible line break characters.

Indenting Text
You won’t indent text in Dreamweaver as you would with a word processor. The most common kind of indenting, indenting the first line in a paragraph, is usually done with a tab in a word processor, but tabs have no effect in HTML. Instead, you can use the text-indent CSS style rule. See Chapter 5 for more about using CSS.
You can add whitespace to text—and simulate a tab—with non-breaking spaces. See “Inserting Special Characters,” later in this chapter.
When you are indenting paragraphs to set them apart from preceding and following paragraphs, Dreamweaver uses the HTML <blockquote> tag. This indents both the left and right margins of the block quoted paragraph. You aren’t limited to paragraphs; you can block quote any block element, such as headings.
To block quote text
1. Click in the paragraph or other block element you want to indent.
2. Click the Indent button on the Property Inspector (Figure 4.26).
Figure 4.26. Use the Indent button to apply a block quote to your text.

or
In the Text tab of the Insert Bar, click the Block Quote button.
or
Choose Text > Indent or press Ctrl-Alt-] (Cmd-Opt-]).
The text changes (Figure 4.27).
Figure 4.27. The block quote nicely sets off the sonnet from the commentary text.

Tips
• To add more indenting, click the Indent button on the Property Inspector again. This nests the <blockquote> tags.
• The CSS margin style rule is a much more flexible way to indent block elements. See Chapter 5.
To remove block quoting
1. Click in the paragraph or other block element you want to indent.
2. Click the Outdent button on the Property Inspector.
or
Choose Text > Outdent or press Ctrl-Alt-[ (Cmd-Opt-[).
The text changes.
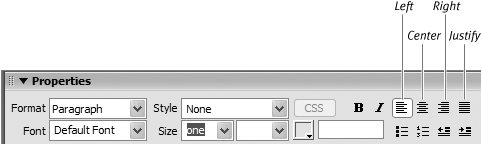
Aligning Text
Dreamweaver can align text with the left margin, right margin, or center of the page. You can also justify text, which adds space as needed between words so that both the left and right margins are aligned.
To align text
1. Click inside the paragraph you want to align.
2. Click one of the alignment buttons in the Property Inspector (Figure 4.28).
Figure 4.28. The text alignment buttons in the Property Inspector.
After you click the button, it appears highlighted, so you know which alignment has been selected.
or
Choose Text > Align > Left, Center, Right, or Justify.
or
Use one of the keyboard shortcuts listed in Table 4.2.
Table 4.2. Alignment Shortcut Keys

Working with Lists
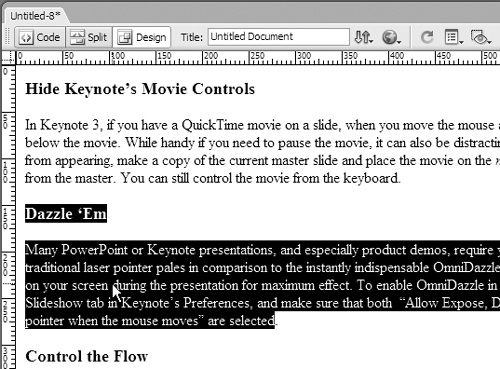
Lists are an easy way to organize content on your Web page. Dreamweaver supports three types of lists:
• Numbered lists or Ordered lists, for lists with items that need to be in a particular order (Figure 4.29). List items are numbered and indented from the left margin. If you add or remove items from the numbered list, it automatically renumbers.
Figure 4.29. Numbered lists automatically renumber if you insert a new item between two existing items.

• Bulleted lists or Unordered, for lists of items in no particular order (Figure 4.30).
Figure 4.30. Bulleted lists are single-spaced and indented.

• Definition lists, where each item has an indented subitem (Figure 4.31).
Figure 4.31. Definition lists have the definitions indented under the definition terms. The definition terms don’t have to be all uppercase—they just happen to be in this figure.

To create a list
1. Type the items for your list into the window. After typing each item, press Enter (Return).
2. Select the items in the list.
3. Choose Text > List, then choose Unordered List, Ordered List, or Definition List from the submenu.
or
Click either the Unordered List or Ordered List button in the Property Inspector.
or
Click one of three buttons in the Text tab of the Insert Bar: ul for Unordered List, ol for Ordered List, or dl for Definition List.
The text changes to the kind of list you chose.
Tips
• At the end of your list, you can turn off the list function either by pressing Enter (Return) twice or by clicking the appropriate list button in the Property Inspector.
• There are three other buttons in the Text tab of the Insert Bar that you can use to apply list tags to text. The li button marks text as a list item; the text must be within a bulleted or numbered list. The other two buttons are used for definition lists. The dt button marks text as a definition term, and the dd button marks text as a definition description.
• Because the Text tab of the Insert Bar was originally designed to help you work in Code view, some of the list buttons will cause the Dreamweaver window to change to Split view, so you can see the code and design panes at the same time. If you want to avoid code altogether, use the Property Inspector or the menu bar to format your lists.
Setting List Properties
You can change numbered list and bulleted list properties in Dreamweaver. Choose between five types of numbering, as shown in Table 4.3. For bulleted lists, you can choose either a round bullet (the default) or a square bullet. There are no properties to set for a definition list.
Table 4.3. List-Numbering Options

To set list properties
1. Click in the list you want to change to place the insertion point.
2. Choose Text > List > Properties.
The List Properties dialog appears (Figure 4.32).
Figure 4.32. In the List Properties dialog, you can change the way lists are numbered and bulleted.
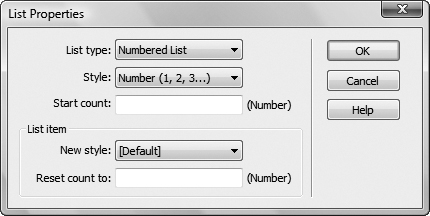
3. Do one or more of the following:
• In the List type pop-up menu, select Bulleted List, Numbered List, or Directory List (“definition list” is called “Directory List” in this dialog for some reason).
• In the Style pop-up menu, select one of the Bulleted List or Numbered List styles.
• Use the Start count text box to set the value for the first item in the numbered list.
4. Click OK.
Tip
• You may notice that there is a fourth choice in the List type pop-up menu, called Menu List. That choice creates an unusual type of list that is based on the <menu> tag. That tag was deprecated (that is, recommended that it not be used) when HTML 4.01 was standardized several years ago. We suggest that you avoid the use of the Menu List option.
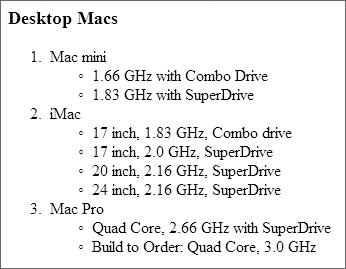
Nesting Lists
You can indent lists within lists to create nested lists. Because nested lists do not have to be of the same type, you can create, for example, a numbered list with an indented bulleted list, and you can have multiple levels of nested lists within one overall list (Figure 4.33).
Figure 4.33. You can nest bulleted lists inside numbered lists.
To create a nested list
1. Click the end of a line within an existing list to place the insertion point.
2. Press Enter (Return).
Dreamweaver creates another line of the list.
3. Press Tab.
Dreamweaver creates a new indented sublist of the same type as the parent list. For example, if the parent list is a numbered list, the new sublist will also be a numbered list.
4. (Optional) If you want the sublist to be a different type of list than the parent list, click the Numbered List or Bulleted List button in the Property Inspector.
5. Type the list item.
6. Press Enter (Return).
Dreamweaver creates a new sublist item.
7. To return to the original list, use the up or down arrow keys to move the insertion point into one of the items in the original list, or click to place the insertion point where you want it.
Tips
• You can also click the Outdent button in the Property Inspector to merge the sublist back into the main list.
• Use the List Properties dialog to format sublists as well as lists.
• If you try to create a sublist within a list that is in a table by pressing Tab, Dreamweaver jumps to the next cell, rather than indenting and creating a nested list. One workaround is to create the nested list outside of the table, cut it, then paste it in the table cell where you want it to go.
Inserting Special Characters
You can add special characters, such as the Euro, copyright, or trademark symbol, to your page in Dreamweaver without having to remember their bizarre HTML equivalents or odd keyboard combinations. In Dreamweaver, relief is just a menu choice away.
To insert a special character
1. Click in the page to place the insertion point where you want the special character to appear.
2. In the Text tab of the Insert Bar, choose the character you want from the Special Characters pop-up menu (Figure 4.34).
Figure 4.34. Insert unusual characters from the Special Characters pop-up menu in the Text tab of the Insert Bar.

or
Choose Insert > HTML > Special Characters, then choose the special character you want from the submenu.
or
If the character you want doesn’t appear in the menu, choose Other Characters from the pop-up menu in the Insert Bar, or choose Other from the Insert > HTML > Special Characters submenu. The Insert Other Character dialog appears (Figure 4.35).
Figure 4.35. The Insert Other Character dialog provides the rest of the special characters Dreamweaver can insert.

3. Click the character you want to use, then click OK to close the dialog.
Dreamweaver inserts the special character on your page.
Adding Automatic Dates
Dreamweaver can insert the current date and time in a variety of formats into your Web page. You can choose whether or not to add the day of the week.
To insert the current date
1. Click in your page to place the insertion point where you want the date to appear.
2. Choose Insert > Date.
The Insert Date dialog appears (Figure 4.36).
Figure 4.36. Dreamweaver lets you insert dates into your pages in a variety of formats.

3. Do one or more of the following:
• If you want the name of the day to appear, use the Day format pop-up menu to set the appearance of the day of the week.
• Make a selection from the Date format list.
• If you want the time to appear, choose the 12-hour or 24-hour format from the Time format list.
• Select Update automatically on save, if you want that to happen. This is very useful if you want visitors to your site to know when the page was last updated.
4. Click OK.
Dreamweaver inserts the date (and any additional items you chose) into your page.
Adding Horizontal Rules
A horizontal rule is a line that runs across the page, creating a division between parts of the document (Figure 4.37). By default, a horizontal rule in Dreamweaver is the width of the page, is 1 pixel high, and has a small drop shadow. You can change these properties if you want.
Figure 4.37. This horizontal rule separates two sections of the page.

To insert a horizontal rule
1. Click in the page to place the insertion point where you want the horizontal rule to appear.
2. Choose Insert > HTML > Horizontal Rule.
A line appears as wide as the page.
To modify a horizontal rule’s properties
1. Click the horizontal rule to select it.
The Property Inspector changes to show the Horizontal Rule properties (Figure 4.38).
Figure 4.38. You can change the width and height of a horizontal rule in the Property Inspector.

2. Do one or more of the following:
• Type a number in the W (for Width) field, and choose either pixels or % from the pop-up menu. Choosing pixels creates a fixed-width line; choosing % creates a line that expands or contracts depending on the width of the site visitor’s browser window.
• In the H (for Height) text box, type a number for the horizontal rule. This height is measured in pixels.
• From the Align pop-up menu, choose Default, Left, Center, or Right. The Left and Right choices are only going to be useful if the width of the horizontal rule is less than the width of the page.
• The Class pop-up menu allows you to apply a CSS style to the horizontal rule.
• If you select the Shading check box, the line appears as an outline, rather than as a solid line.
Tip
• Horizontal rules are a leftover from the early days of HTML. Use them sparingly, if at all, because they tend to make a page look dated.
Finding and Replacing
Dreamweaver’s Find and Replace feature can save you a lot of time, because you can automatically find and change text on a single page, in pages within a folder, on pages you select, or throughout your site. You can choose to change text in Design view, or search and change just in Code view.
Imagine that you have a company’s site with dozens of pages devoted to singing the praises of their premier product, the amazing WonderWidget. Then one day you get a call from your client letting you know that because of a trademark dispute, they have to rename the product WonderThing. Rather than opening each page and making one or more changes on each of them, just put Dreamweaver’s Find and Replace feature to work, and you’ll be done in just a few minutes.
The Find and Replace window
The Find and Replace window, which you open by choosing Edit > Find and Replace, or by pressing Ctrl-F (Cmd-F), will be the tool you use for changing text, as shown in Figure 4.39. Let’s look at some of the parts of this window.
Figure 4.39. The Find and Replace dialog provides a lot of power for making quick changes on a single page, or throughout your site.

• The Find in pop-up menu allows you to tell Dreamweaver the scope of the search. You can choose to find text in the Current Document (the default); Selected Text; Open Documents; in a Folder you select; in Selected Files in Site; or in the Entire Current Local Site.
• The Search pop-up menu lets you choose what kind of search you want to do. You can choose Text; Text (Advanced), which gives you additional search options; Source Code, which allows you to search in the HTML; or Specific Tag, which searches the contents of HTML tags that you select. The latter two options are covered later in this chapter.
• The Find field is where you enter the text you wish to find.
• The Replace field is where you enter the text you want to use to replace the found word.
• The Save Query button allows you to save searches for later use. This is great for instances where you create complex queries, so you don’t have to do all the work to set up the search again.
• The Load Query button allows you to retrieve a saved search.
• The Search Options let you constrain your searches. “Match case” returns results with the same uppercase and lowercase letters as the text you entered in the Find field. “Match whole word” only finds the text if it matches one or more complete words. “Ignore whitespace” tells Dreamweaver not to pay attention to additional spaces, tabs, and non-breaking spaces. It’s on by default, and it’s usually best to leave it on. Finally, “Use regular expression” (covered later in this chapter) lets you use wildcard characters to construct extremely complex searches.
Finding Text with a Simple Search
Simple searches work pretty much the same way that they do in a word processor. Just enter the text you want to find and the text that you want to replace it with, and away you go. Of course, you don’t have to replace text; if you want you can just use the Find and Replace dialog to find text in one or more files.
To find text
1. Choose Edit > Find and Replace, or press Ctrl-F (Cmd-F).
The Find and Replace dialog appears (Figure 4.39).
2. From the Find in pop-up menu, choose one of the options for the scope of your search.
3. From the Search pop-up menu, choose Text.
4. In the Find field, type the word or phrase that you’re looking for.
5. Click the Find Next button.
Dreamweaver finds and highlights the found text. If the scope of the search included more than one page, Dreamweaver opens the first file the text was found within, and highlights the text. If the text isn’t found, you’ll get a message to that effect at the bottom of the Find and Replace dialog.
or
Click the Find All button.
Dreamweaver does the search, closes the Find and Replace dialog, and opens the Search tab of the Results panel (Figure 4.40).
Figure 4.40. The Search tab of the Results panel shows you the file name and matched text when you click the Find All button.

6. If you clicked Find All in step 5, double-click one of the search results in the Results panel to open it and highlight the found text.
Tips
• If you select some text before you bring up the Find and Replace dialog, the text automatically appears in the Find field, as long as you selected fewer than 255 characters.
• You can do a quick find on the current page by selecting some text and choosing Edit > Find Selection, or by pressing Shift-F3 (Cmd-Shift-G). Dreamweaver highlights the next occurrence of the text you selected.
• You can click the green triangle button in the Results panel to reopen the Find and Replace dialog with the same search terms.
• If you have a search that’s running for a very long time, you can cancel it by clicking the octagonal red Cancel button in the Results panel.
• You can clear the search results in the Results panel by right-clicking in the panel and choosing Clear Results from the resulting shortcut menu.
To find the next result
• Choose Edit > Find Next, or press F3 (Cmd-G).
Dreamweaver finds and highlights the next result of the search, without reopening the Find and Replace dialog.
To find and replace text
1. Choose Edit > Find and Replace, or press Ctrl-F (Cmd-F).
The Find and Replace dialog appears.
2. From the Find in pop-up menu, choose one of the options for the scope of your search.
3. From the Search pop-up menu, choose Text.
4. In the Find field, type the word or phrase that you’re looking for.
5. In the Replace field, type the replacement word or phrase.
6. Click the Find Next button.
When Dreamweaver finds the text, it is highlighted.
7. Click the Replace button.
Dreamweaver replaces the found text with the contents of the Replace field.
or
Click Replace All.
Dreamweaver warns you that you cannot undo changes made in unopened files. Of course, you can undo changes in any open documents by choosing Edit > Undo. If you still want to make the changes, click Yes.
Dreamweaver searches through the entire scope of the search, replacing all occurrences of the found text. When it is done, you’ll see a message telling you how many changes it made.
Tips
• Use a Replace operation to expand abbreviations and save time while you’re creating pages. For example, let’s say that you’re creating a Web site about JavaScript. Rather than typing JavaScript again and again while writing the site, just type “JS,” then before you upload the site, do a Find and Replace, changing every occurrence of “JS” to “JavaScript.” You can do the same thing with company or people’s names, or almost any text that you repeat a lot.
• Dreamweaver does not update the Search tab of the Results panel when you perform Replace operations.
• If you get a bunch of search results, but you only want to make replacements in some of those results, you can do that, and save a bunch of time in the process. Rather than opening each page separately and applying the replacement, do it all in one swoop by using the Results panel and the Find and Replace dialog together. First, click the green triangle in the Results panel, which reopens the Find and Replace dialog. In the Results panel, Ctrl-click (Cmd-click) the results where you want to make replacements. Those lines will highlight. Then switch back to the Find and Replace dialog, and click Replace (not Replace All). The files that are modified are marked by a green dot next to their names in the Results panel.
Performing Advanced Text Searches
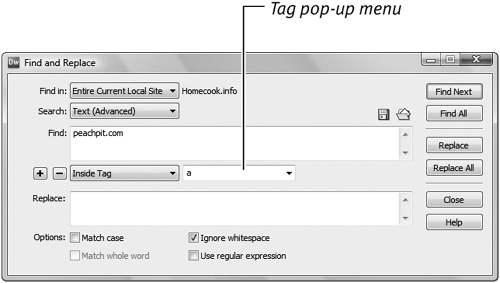
An advanced text search allows you to do a more precise search by looking for text within (or outside of) particular HTML tags. You can further fine-tune the search by specifying particular attributes of the HTML tags.
Perhaps the most common example of why you would want to use such a search lies in the title of your Web pages. Whenever you create a new page in Dreamweaver, the page automatically gets the title “Untitled Document.” If you forget to enter titles, you could end up with a bunch of pages on your site with the same “Untitled Document” name (it’s easy to do: while writing this section, I found and fixed a page on my personal site that had been titled “Untitled Document” for four years!). A basic search and replace won’t help, because “Untitled Document” is within the <title> tag of the pages, and a basic search only searches the body of a document. An advanced text search, which combines text and HTML searches, is the solution.
To perform an advanced text search
1. Choose Edit > Find and Replace, or press Ctrl-F (Cmd-F).
The Find and Replace dialog appears.
2. From the Find in pop-up menu, choose one of the options for the scope of your search.
3. From the Search pop-up menu, choose Text (Advanced).
The dialog changes, and adds the option to search tags (Figure 4.41).
Figure 4.41. The Text (Advanced) option allows you to search for text within HTML tags.
4. In the Find field, type the word or phrase that you’re looking for.
5. Choose either Inside Tag or Not Inside Tag from the pop-up menu next to the + and - buttons.
Inside Tag refers to text that is enclosed within a container tag, such as <p>...</p>.
6. Choose an HTML tag from the Tag pop-up menu.
7. (Optional) If you want to narrow the search further by limiting the search to a particular attribute of the tag you chose in step 6, click the + button. If you do not, skip to step 12.
The attribute line is added to the dialog (Figure 4.42).
Figure 4.42. You can narrow your search further by adding one or more attributes to the tag search.

An example of an attribute would be the width attribute of the <table> tag.
8. (Optional) From the first pop-up menu in the attribute line, choose With Attribute or Without Attribute.
9. (Optional) Choose the attribute you want from the next pop-up menu.
Dreamweaver only shows the attributes for the tag you chose in step 6.
10. (Optional) Set a comparison in the next pop-up menu, choosing from = (equals), < (less than), > (greater than), or != (not equals). These only work if the attribute’s value is a numeric amount, such as the size attribute of the <font> tag, i.e., <font size=”4”>.
11. (Optional) In the next field (which is also a pop-up menu), type the value of the attribute. This can be a number or text.
or
Choose [any value] from the pop-up menu. This is useful when you want all tags with a particular attribute, but you don’t care what the value of the attribute is.
12. If you want to replace the found text, type the replacement word or phrase in the Replace field.
13. Depending on what you want to do, click Find Next, Find All, Replace, or Replace All.
Tip
• For more information about the different HTML tags and their attributes, choose Window > Reference, then choose O’Reilly HTML Reference from the Book pop-up menu of the Reference tab of the Results panel.
Finding and Replacing in Source Code
Dreamweaver’s ability to find and replace within the HTML source code is extremely powerful. You can look for text within particular tags, and you can even look within particular tags for specific attributes. You can also find text relative to other tags. For example, you can change specified text within a <table> tag, and leave everything else alone. If you like, you can even use Find and Replace to replace, delete, or change tags and attributes.
Searching and replacing inside source code is much like regular text searches, except that you’ll be working in Code view. When you perform the search, Dreamweaver automatically changes to Code view, so you don’t have to do it manually before you start the search.
To find and replace in source code
1. Choose Edit > Find and Replace, or press Ctrl-F (Cmd-F).
The Find and Replace dialog appears.
2. From the Find in pop-up menu, choose one of the options for the scope of your search.
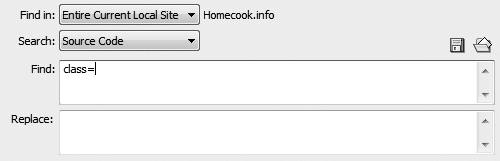
3. From the Search pop-up menu, choose Source Code (Figure 4.43).
Figure 4.43. Choose Source Code to search the HTML in Code view.
4. In the Find field, type the word or phrase that you’re looking for.
5. In the Replace field, type the replacement word or phrase.
6. Depending on what you want to do, click Find Next, Find All, Replace, or Replace All.
Finding and Replacing with a Specific Tag
A specific tag search lets you find and modify HTML tags. This has many uses; for example, many people are now converting old sites that used <font> tags to CSS. You can use a specific tag search to strip out all those old tags. Or you can change the now-passé <b> and <i> tags to their more modern equivalents, <strong> and <em>.
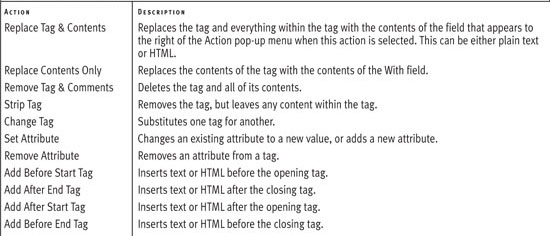
The key to the specific tag search is the Action menu, which specifies what replacement action Dreamweaver will carry out on the tags found in the search. See Table 4.4 for a list of the actions available.
Table 4.4. Action Menu Options
To find and replace within a specific tag
1. Choose Edit > Find and Replace, or press Ctrl-F (Cmd-F).
The Find and Replace dialog appears.
2. From the Find in pop-up menu, choose one of the options for the scope of your search.
3. From the Search pop-up menu, choose Specific Tag.
The Find and Replace dialog changes to show the tag functions (Figure 4.44).
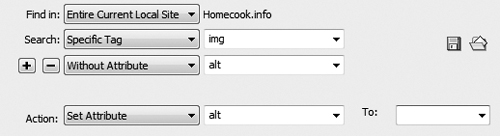
Figure 4.44. When you are searching within a specific tag, you can add attributes for that tag, and you can also specify actions that you want to perform on the found tag.
4. Choose the tag that you want from the tag pop-up menu that appears next to the Search pop-up menu.
You can either scroll the pop-up menu to find a tag, or you can type the first letter of the tag in the box. Dreamweaver automatically scrolls the list.
5. (Optional) If you want to narrow the search to a particular attribute of the tag that you selected, click the + button, then choose values for that attribute, as discussed previously in this chapter.
If you want to narrow the search further, you can do so by clicking the + button and adding attributes.
6. Choose from the Action pop-up menu, then (depending on the action you chose) set any required values.
7. Depending on what you want to do, click Find Next, Find All, Replace, or Replace All.
Using Regular Expressions for Searching
A regular expression is a pattern, written using special symbols, which describes one or more text strings. You use regular expressions to match patterns of text, so that Dreamweaver can easily recognize and manipulate that text. Like an arithmetic expression, you create a regular expression by using operators, in this case operators that work on text, rather than numbers.
The operators in a regular expression (see Table 4.5 on page 130) are like the wildcard symbols that you may have seen in find and replace features in other programs, such as word processors, except that regular expressions are much more powerful. They can also be complex and difficult to learn and understand, so if Dreamweaver’s other finding and replacing methods are sufficient for you, you may not need to bother with regular expressions.
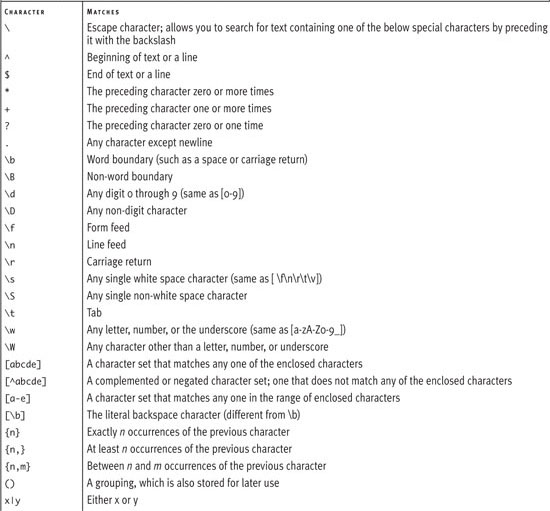
Table 4.5. Regular Expression Special Characters
Learning regular expressions is beyond the scope of this book, but we’ll show you how to use one in an example. Let’s say that you want to find all of the HTML comments throughout your site. You can use this simple regular expression:
<!--[wW]*?-->
Let’s break that expression down. You read a regular expression from left to right. This one begins by matching the beginning characters of the HTML comment, <!—. The square brackets indicate a range of characters; for example, [a-z] would match any character in the range from a to z. In this case, the range includes two regular expression operators: w means “any single letter, number, or the underscore,” and W means “any character other than a letter, number, or underscore.” Taken together as a range, [wW] means “any range of characters.” The * means “the preceding character (in this case, everything found by the contents of the square brackets) zero or more times” and the ? means “the preceding character zero or one time.” Taken together, they match a comment of any length. The regular expression ends by matching the closing characters of an HTML comment, —>.
To search with a regular expression
1. Choose Edit > Find and Replace, or press Ctrl-F (Cmd-F).
The Find and Replace dialog appears.
2. From the Find in pop-up menu, choose one of the options for the scope of your search.
3. From the Search pop-up menu, choose any of the options.
In this case, since we’re looking for HTML comments, you should choose Source Code.
4. Enter the regular expression in the Find field (Figure 4.45).
Figure 4.45. You can add regular expressions to both the Find and Replace fields.

5. Select the check box next to “Use regular expression.”
When you choose “Use regular expression,” it disables the “Ignore whitespace” search option, because they are mutually exclusive.
6. (Optional) Enter text or a regular expression in the Replace field.
7. Depending on what you want to do, click Find Next, Find All, Replace, or Replace All.
Tip
• There’s a lot to say about regular expressions, certainly enough to fill an entire book or twelve. If you’re interested in learning more, check out Mastering Regular Expressions, by Jeffrey Friedl (2006, O’Reilly & Associates). For a lighter read, try Teach Yourself Regular Expressions in 10 Minutes by Ben Forta (2004, Sams). There are also many Web sites that provide regular expression tutorials, which you can find with a Google search.
Checking Spelling
No word processor comes without a spelling checker these days, and neither does Dreamweaver. You can check the spelling on the currently open page and add words to Dreamweaver’s spelling checker in a personal dictionary.
To spell-check your page
1. Choose Text > Check Spelling, or press Shift-F7 (same on Windows and Mac).
If Dreamweaver finds a word it believes is spelled incorrectly, the Check Spelling dialog opens (Figure 4.46). Otherwise, you’ll get a dialog that says “Spelling check completed.”
Figure 4.46. Click Add to Personal in the Check Spelling dialog to add an unknown word to Dreamweaver’s personal dictionary.
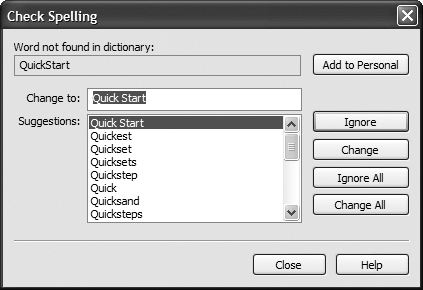
2. Click Add to Personal if the word Dreamweaver found is correct and you want to add it to your personal dictionary so that Dreamweaver doesn’t flag it as an error again.
or
Click Ignore to tell the spelling checker to ignore this instance of the word, or Ignore All to ignore the word throughout the document.
or
Select a replacement from the Suggestions list, or type the replacement in the Change to text box. Then click the Change button, or click Change All to replace the word throughout the document.
3. When the spelling check is finished, click Close.