5. Styling Page Content
You want your Web site to look inviting, colorful, and organized, right? You need style! With styles, your site doesn’t just look good—you get other benefits as well. Compared to older font-tag-based styling, your site is easier to maintain and update, it downloads faster and uses less bandwidth, and it’s more accessible to every type of browser. In this chapter you’ll get a basic understanding of Cascading Style Sheets, better known as CSS. Then we’ll get into the details of how Dreamweaver uses the CSS Styles panel and the CSS Rule definition dialog to give you control over creating and applying styles to your pages.
Understanding CSS
Cascading Style Sheets are all about style, looks, and presentation. CSS properties and rules give you an amazing array of control over foregrounds, backgrounds, colors, fonts, positions, alignments, margins, borders, lists, and other aspects of presentation.
Appendix C contains a list of CSS properties. That list is amazing in its scope, but it can be a little overwhelming as well. Dreamweaver organizes all the properties listed in Appendix C into a couple of manageable interfaces: the CSS Rule definition dialog and the CSS Styles panel. With these two features, you can control every style aspect of every element on your page. From your document’s body to its paragraphs, lists, tables, and links, to styling individual words or even individual letters, it’s all handled with the CSS Styles panel or the CSS Rule definition dialog.
Content vs. presentation
Content is king, the saying goes, because users seek content when they come to your site. Content is the actual information in the headings, paragraphs, lists, divs, tables, forms, images, blockquotes, links, and other HTML elements you use on a page. With no styling, content looks something like an outline (Figure 5.1).
Figure 5.1. A page with no styles shows content and working links, even though it isn’t beautifully arranged.

The unstyled content should be useful and informative, even if it doesn’t look like much. That’s because some users are getting only the text content; for instance, those with screen readers, PDA browsers, cell phone browsers, or text-only browsers. Some of these also get images, but not all, so be careful to never require images on your pages.
Once you add presentation rules in a style sheet, you have the layout, color scheme, font choice, background, and other “pretties” that make a Web page look good in a standard browser (Figure 5.2). The content itself hasn’t changed. What has changed is the way the content is presented on the page. With different presentation, that is, different styles, the same content could look entirely different.
Figure 5.2. Add styles to the same page to determine rules for layout, background, fonts, margins, and other presentation features.

The power of CSS derives from the separation of content from presentation. You can make the content look like anything you want simply by changing the way it is styled and presented.
Working with tags
When you look through this chapter, you might be thinking to yourself, “Hey, I bought a WYSIWYG tool so I wouldn’t have to learn about HTML tags!” That’s understandable—but you’ll need to learn at least a little something about HTML tags in order to take full advantage of CSS.
For instance, each paragraph inside your documents should be inside a <p> tag, where <p> stands for paragraph. Makes sense so far, right? Next, in order to apply a style to that paragraph, you apply it to that <p> tag. You’re not taking anything out of the paragraph or adding anything to the paragraph itself. It’s still a paragraph; but with CSS, you have some say about how that paragraph appears.
You can learn just enough about HTML tags by looking at the tag selector of your Dreamweaver document. If you find you then want to know even more, check out Chapter 17, “Editing Code.”
Creating a Style Rule for a Tag
A style rule begins with a selector. A selector can be a tag, an id, or a class. Everything you do to create new styles, apply styles, and edit styles starts with creating a rule.
To create a style rule for a tag
1. With a page open in Dreamweaver, click the New CSS Rule button ![]() in the CSS Styles panel. The New CSS Rule dialog appears (Figure 5.5).
in the CSS Styles panel. The New CSS Rule dialog appears (Figure 5.5).
Figure 5.5. If a tag is selected in the document, it may automatically appear in the Tag field in the New CSS Rule dialog.
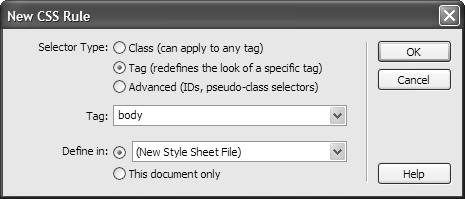
2. Complete the following:
• Selector Type: Choose Tag (redefines the look of a specific tag).
• Tag: Dreamweaver makes its best guess (based on your current selection or cursor placement when you clicked the New Style button) as to what tag you wanted this style to apply to. That tag automatically appears in the Tag field. If that tag isn’t the one you wanted, select it using the pop-up menu (Figure 5.6).
Figure 5.6. Any tag can be styled—just select the one you want.
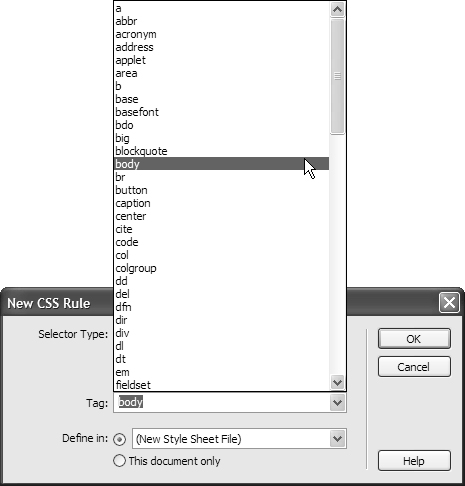
• Define in: Select “This document only” to add the style to just the document you have open. We’ll cover the other options available here later.
3. Click OK, and the CSS Rule definition dialog appears (Figure 5.7).
Figure 5.7. Font rules are set in the Type category and the colors picked here are foreground (text) colors.
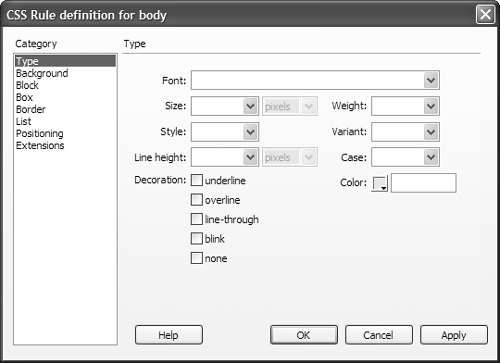
4. Set properties in the eight categories as desired. Which category contains which field is covered in “Dreamweaver CSS Categories,” next. If you want to see how something looks without dismissing the dialog, click Apply.
5. Click OK, and the new rule will take effect.
 Tips
Tips
• New rules can also be created by selecting text in the document window and choosing Text > CSS Styles > New.
• There’s a lot more to the New CSS Rule dialog, but don’t fret; we’ll cover its other options later in this chapter.
• Not familiar with classes and ids? What you’ll need to know is covered in the sidebar “Choosing Between Classes and IDs” on page 144.
• This example creates an internal style: one where the style information is included inside the Web page itself. Internal styles are useful for testing, but in the long run, you’ll want to make all your styles external, that is, in their own file. We’ll cover that in Chapter 7, “Managing Styles.”
Dreamweaver CSS Categories
Dreamweaver uses the CSS Rule definition dialog to break down CSS into various categories. Below, you’ll find each of the categories in the CSS Rule definition dialog, along with what you can find in that category. If you want more details about valid values for each field, check out Appendix C.
Type (Figure 5.7)
• Font
• Size
• Style
• Line height
• Decoration
• Weight
• Variant
• Case
• Color
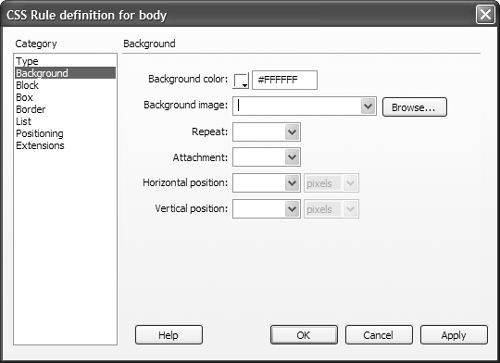
Background (Figure 5.9)
• Background color
• Background image
• Repeat
• Attachment
• Horizontal position
• Vertical position
Figure 5.9. Always give a page a background color, even if you’re using a background image.
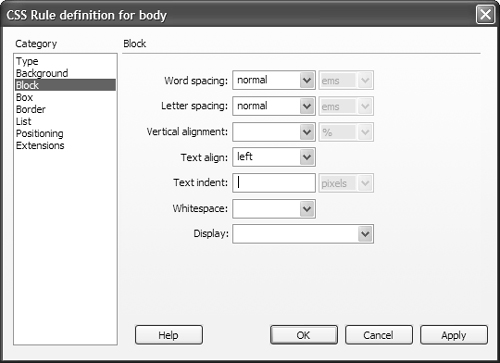
Block (Figure 5.10)
• Word spacing
• Letter spacing
• Vertical alignment
• Text align
• Text indent
• Whitespace
• Display
Figure 5.10. Set rules for spacing and alignment of text in the Block category. Text indent affects first line only—yes, you can indent paragraphs with CSS!
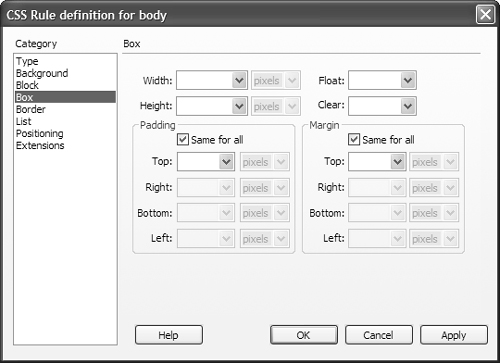
Box (Figure 5.11)
• Width
• Height
• Float
• Clear
• Padding (Same for All, Top, Right, Bottom, Left)
• Margin (Same for All, Top, Right, Bottom, Left)
Figure 5.11. Set rules for width and height in the Box category. Margin and padding are both transparent, which means that a background shows through either.
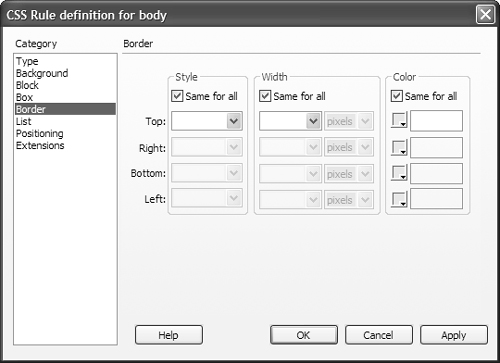
Border (Figure 5.12)
• Style (Same for All, Top, Right, Bottom, Left)
• Width (Same for All, Top, Right, Bottom, Left)
• Color (Same for All, Top, Right, Bottom, Left)
Figure 5.12. Set rules for borders in the Border category. Uncheck “Same for all” to style borders individually.
List (Figure 5.13)
• Type
• Bullet image
• Position
Figure 5.13. Set rules for list type and position in the List category. If you want an image instead of a standard bullet, specify it here.

Positioning (Figure 5.14)
• Type
• Width
• Height
• Visibility
• Z-Index
• Overflow
• Placement (Top, Right, Bottom, Left)
• Clip (Top, Right, Bottom, Left)
Figure 5.14. Set position in the Positioning category. The Z-Index refers to the stacking order when more than one layer occupies the same position. Clip refers to material that might overflow the size set for width and height.

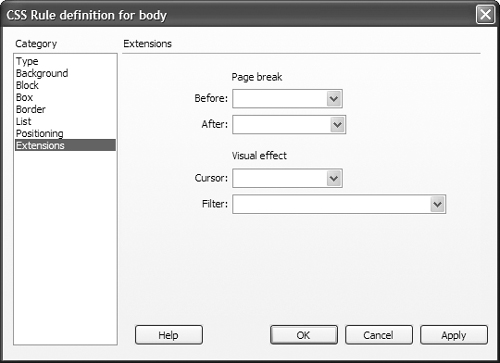
Extensions (Figure 5.15)
• Page break (Before, After)
• Cursor visual effect
• Filter visual effect
Figure 5.15. Set extensions in the Extensions category. Internet Explorer for Windows is the only browser that supports the Filter extensions.
 Tips
Tips
• Page break properties are used in style sheets for print.
• The eight categories of style definitions in the CSS Rule definition dialog cover nearly every CSS property included in Appendix C. Even more impressive is that you can apply any of the properties in any of the eight categories to any element in your document. Backgrounds, for example, can be used in the body element, but can also be used with div, class, table, blockquote, span, acronym, quote, form, paragraphs, or any other element.
Creating a Custom Class
Redefining the style for a tag gives you considerable control, as HTML has a tag for nearly any type of text you need to format. And yet, there are times when you want to create a style rule for something that doesn’t already have a logical tag as a label. You can do that with a class. You get to create a custom name for the style when you create a class.
To create a class
1. With a page open in Dreamweaver, click the New CSS Rule button ![]() in the CSS Styles panel. The New CSS Rule dialog appears (Figure 5.16).
in the CSS Styles panel. The New CSS Rule dialog appears (Figure 5.16).
Figure 5.16. A class selector name is preceded by a period when creating a new style.
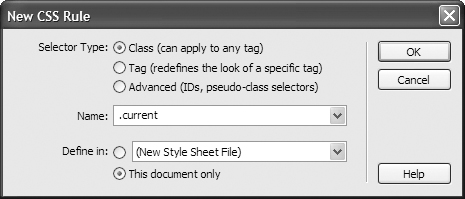
2. Set the Selector Type to Class (can apply to any tag), and set the Name to a name of your own choosing, preceded by a period (.). This is your new class name.
3. Click OK, and the CSS Rule definition dialog appears.
4. When you’ve completed filling out the CSS Rule definition dialog, click OK to accept your changes.
 Tips
Tips
• Pick a class name that will serve you over time. A name that describes a purpose rather than a particular property works best. For example, if you wanted to highlight certain vocabulary words in red, you could name a class either .red or .vocab. If you redesign the site later and change the color scheme, the name .red might not make sense any longer, but .vocab would still have meaning.
• Don’t create classes to describe text when there are already logical tags that do the job. For example, don’t create a class to make text big and bold and use it as a heading. HTML already provides six heading tags (h1, h2, h3, h4, h5, and h6). Simply redefine one of the existing heading tags to suit your purpose. Remember, you want to use HTML to create a logical structure for your content, and CSS to style the structured content.
Creating Advanced Selectors
Elements in HTML can nest. Inside the body might be a div named content, with a div named newitem nested inside that. Each of these nested elements exists in a parent-child relationship that allows CSS properties to be inherited. The child elements are descendants of the parent elements and inherit properties from them.
Descendant elements can be pinpointed precisely to create extremely selective selectors. Take the lowly list item, or li. If you redefine the li tag, you style every list item anywhere in the body. However, if you have div named content, and a list item li within that, you can write a style for the selector #content li. Instead of styling every li anywhere in the document, it will only style each li inside the content div.
Dreamweaver calls contextual selectors like this advanced. There’s more about advanced selectors in the “Advanced Terminology” sidebar, later in this chapter.
To create an advanced style
1. With a page open in Dreamweaver, click the New CSS Rule button ![]() in the CSS Styles panel. The New CSS Rule dialog appears (Figure 5.18).
in the CSS Styles panel. The New CSS Rule dialog appears (Figure 5.18).
Figure 5.18. The pseudo-class selectors are available from a pop-up menu for Advanced selector types.

2. Set Selector Type to Advanced (IDs, pseudo-class selectors). For Selector, one of the pseudo-class selectors may appear in the dialog by default. Select a pseudo-class selector from the pop-up menu or type a selector of your own choosing in this field by doing one of the following:
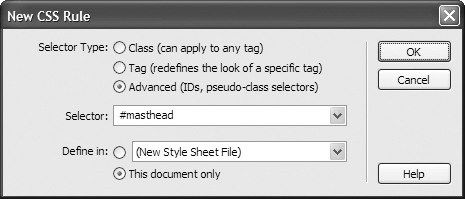
Type a pound sign (#) and the id name to style a named section of the page—usually a div (Figure 5.19).
Figure 5.19. A selector based on an id must begin with a pound sign (#).
or
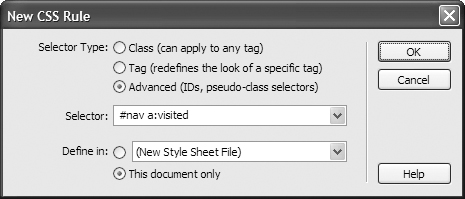
Type a pound sign (#), the id name, and a space before the pseudo-class selector to style only those navigation links in a particular named section of the page (Figure 5.20).
Figure 5.20. Type in the Selector field to create selectors that fit your document.
or
Type a pound sign (#), the id name, a space, and an HTML tag to style an element found only in the named section of the page (Figure 5.21).
Figure 5.21. A contextual selector lets rules apply to only tags within certain named divs.

or
Type a group of selectors, separated by a comma and a space, to assign the same style properties to every selector in the group with a single rule (Figure 5.22).
Figure 5.22. Every tag in this group list of selectors will follow the same style rule.
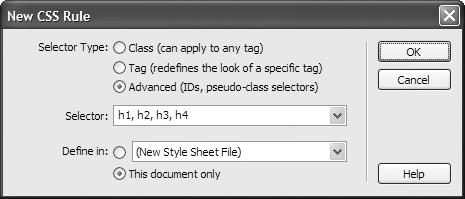
3. Click OK, and the CSS Rule definition dialog appears.
4. When you’ve completed filling out the CSS Rule definition dialog, click OK to accept your changes.
 Tips
Tips
• Rules for link pseudo-classes won’t work reliably with the cascade unless you define them in the following order: a:link, a:visited, a:hover, a:active. A way to remember the L-V-H-A order is the memory device LoVeHAte.
• If you use the Insert Div Tag button on the Insert Bar (found in both the Common and Layout categories) to insert a div, Dreamweaver offers you the chance to create a new advanced style for the div immediately (Figure 5.23). Click the New CSS Style button in the Insert Div Tag dialog to define properties for the new div.
Figure 5.23. Dreamweaver politely suggests that you create a new style for a new div as soon as you insert it in your document.

Working with the CSS Styles Panel
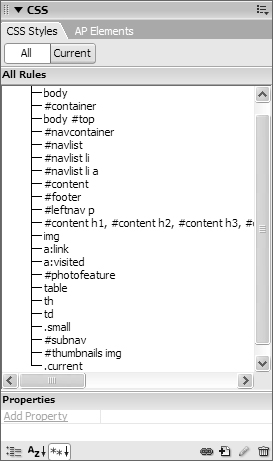
The CSS Styles panel (Window > CSS Styles) shows all the styles affecting a document or a selected style. You can apply, modify, delete, and do other style-related tasks right in the CSS Styles panel without having to open the CSS Rule definition dialog. If you need an overview of what’s where in the panel, look back at the “Anatomy of the CSS Styles Panel” sidebar, earlier in this chapter.
To work in All mode
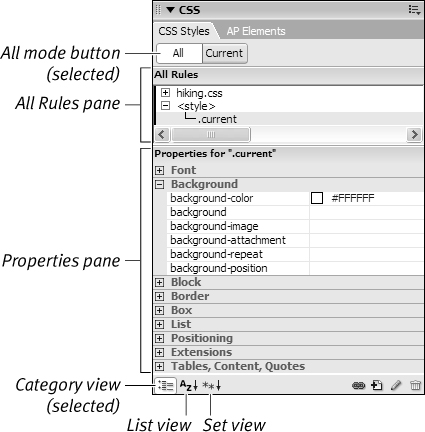
1. In your document, click All at the top of the CSS Styles panel (Figure 5.24). All the styles affecting the document appear: any linked or imported external style sheets as well as any styles in only the open document. An external style sheet is indicated by a file name, for example, hiking.css. Styles internal to this document only are in the <style> category. Click the plus (+) (Windows) or the disclosure triangle (Mac) to expand a category if it isn’t already expanded.
Figure 5.24. When you’re in All mode in the CSS Styles panel, any external style sheets are listed by file name, while internal styles are shown in <style>.
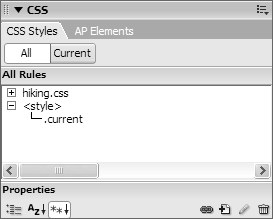
2. Examine the rules for individual styles by highlighting a specific style and doing one of the following:
Click the Show category view icon ![]() at the lower left of the CSS Styles panel. Properties for the selector appear in categories in the Properties pane at the bottom (Figure 5.25). Click the plus (
at the lower left of the CSS Styles panel. Properties for the selector appear in categories in the Properties pane at the bottom (Figure 5.25). Click the plus (+) or the disclosure triangle (Mac) to expand any category.
Figure 5.25. Expand a style sheet name to see all the style rules. The Category view of the Properties pane shows categories, which must be expanded to examine properties.

or
Click the Show list view icon ![]() at the lower left of the CSS Styles panel. Properties for the selector appear as a list in the Properties pane at the bottom (Figure 5.26).
at the lower left of the CSS Styles panel. Properties for the selector appear as a list in the Properties pane at the bottom (Figure 5.26).
Figure 5.26. Pick a specific style from the list and its properties are shown in the Properties pane. In List view, the Properties pane shows a list of all the properties for a selected style.
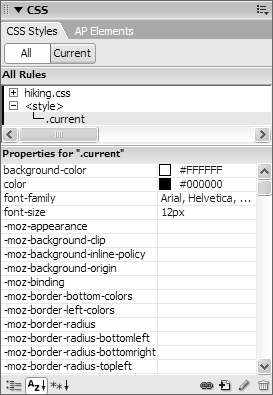
or
Click the “Show only set properties” icon ![]() at the lower left of the CSS Styles panel. Set properties for the selector appear in the Properties pane (Figure 5.27).
at the lower left of the CSS Styles panel. Set properties for the selector appear in the Properties pane (Figure 5.27).
Figure 5.27. In Show only set properties view, the Properties pane eliminates everything from view except the set properties for the selected style.

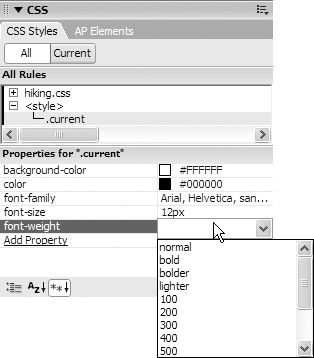
3. To add a new property directly in the CSS Styles panel, click the icon for “Show only set properties” ![]() , and then click Add Property. An editable field appears with a pop-up menu listing every possible property (Figure 5.28).
, and then click Add Property. An editable field appears with a pop-up menu listing every possible property (Figure 5.28).
Figure 5.28. To set a new property while in the Properties pane, choose from the list.

4. To modify a property, click on the property value. An editable field appears (Figure 5.29). Type any change and press Return (Enter).
Figure 5.29. Any property value is editable in the Properties pane.
To work in Current mode
1. In your document, do one of the following:
Place the cursor in an element in the document window.
or
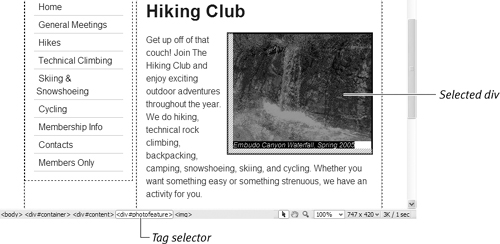
Select an element using the tag selector at the lower left of the document window (Figure 5.30).
Figure 5.30. Elements you want to style can be selected in the document window with the tag selector.

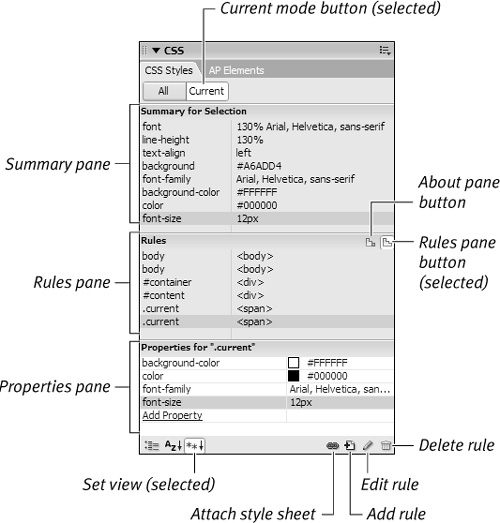
2. Click Current at the top of the CSS Styles panel (Figure 5.31). The Summary for Selection pane appears.
Figure 5.31. Current mode focuses on only the currently selected style.

3. In the middle pane, you can choose whether to show information about the selected property (About, Figure 5.31), or show the cascade of rules for the selected tag (Rules, Figure 5.32). Click on a property highlighted in the Summary for Selection list, and then choose either the About or Rules button on the right. At the bottom, the Properties list shows the properties and their values.
Figure 5.32. You can see information about the selected property or see the cascade of rules that apply to the selected tag.
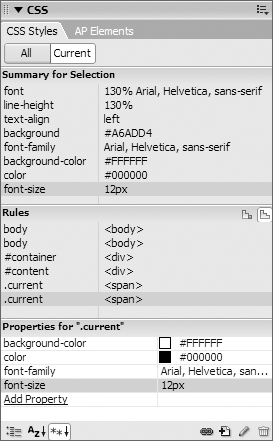
4. If properties for the selected element were overridden by rules for other selectors, Dreamweaver indicates this with a strikethrough of the property name (Figure 5.33). Use the mouse to hover over the property showing a strikethrough and a pop-up tip appears explaining why this property is not applied.
Figure 5.33. In Current mode, you can see inherited styles affecting a selector. The style is shown with a strikethrough if it doesn’t apply to the current selection.

 Tips
Tips
• Verify how styles are implemented on your pages by previewing them in a variety of browsers. More than one style rule can affect a particular page element. Sometimes the style rules conflict and you get unexpected results.
• When things don’t look as expected in the browser, troubleshoot style rules using Current mode in the CSS Styles panel. The Properties pane provides valuable help to spot style conflicts.
• Inheritance information in the About pane of the CSS Styles panel in Current mode is also useful when troubleshooting conflicting style rules.
Applying Styles
Most styles take effect immediately in the current document and in any other documents linked to an external style sheet. If you redefine a tag, for example, h3, then any time you use the h3 tag, the style is applied. Pseudo-class selectors such as a:link also are immediately applied to the selected elements in any linked documents.
Other styles are different—your document doesn’t use them until you add them to an element. For instance, after you create a style rule for a class, you must then apply that class to text in the document, and the same goes for ids.
To apply a style to a class
1. In a document, select the text to which you want the style to apply.
or
Place the cursor anywhere in a paragraph to apply the class to the entire paragraph.
or
Select a tag with the tag selector at the lower left of the document window.
2. Do one of the following:
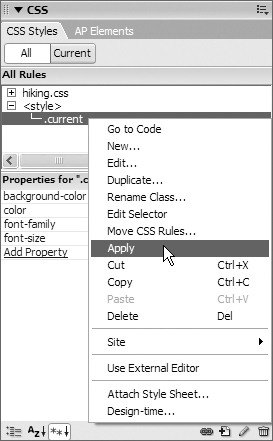
In the CSS Styles panel, select All mode, then right-click the name of the style you want to apply, and choose Apply from the contextual menu (Figure 5.34).
Figure 5.34. Use the contextual menu to apply a class style rule.
or
In the Property Inspector, choose the style you want to apply from the Style pop-up menu (Figure 5.35).
Figure 5.35. Use the Style pop-up menu on the Property Inspector to apply a class style rule.

or
In the document, right-click the selected text, then in the contextual menu, choose CSS Styles and then the style you want to apply.
or
Choose Text > CSS Styles, and in the submenu choose the style you want to apply (Figure 5.36).
Figure 5.36. Another way to apply a class style rule is to choose the menu Text > CSS Styles and then choose from the submenu.

To remove a style from a class
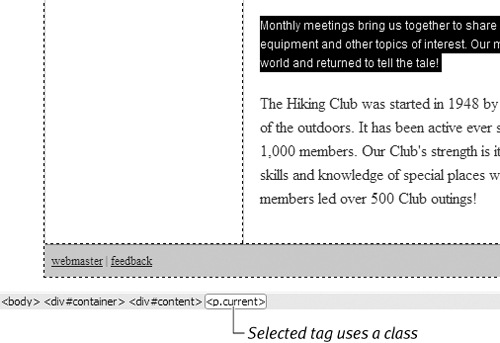
1. Select the text to which the class was applied. The tag selector in the lower left of the document indicates the presence of a class with a period; for example, <p.current> means that the class current has been applied to this <p> tag (Figure 5.37).
Figure 5.37. It’s easy to identify elements with classes applied in the tag selector bar. The element has a period in the name, for example <p.current>.
2. Do one of the following:
In the Property Inspector, choose None from the Style pop-up menu.
or
In the document, right-click the selected text. In the contextual menu, choose CSS Styles and then None (Figure 5.38).
Figure 5.38. Removing a class is as simple as choosing None from the CSS Styles submenu.

or
Choose Text > CSS Styles, and in the submenu choose None.
3. The class is no longer applied to the selected text. However, the style is still available in the style sheet.
To apply a style to an id
1. In a document, select the text or tag to which you want to add an id.
2. Do one of the following:
In the CSS Styles panel, select All mode, then right-click the name of the style you want to apply, and select Apply from the contextual menu (Figure 5.34).
or
Right-click the element in the tag selector, and choose Set ID from the contextual menu, and choose an ID from the submenu (Figure 5.39).
Figure 5.39. Even the tag selector has a contextual menu, giving you an easy way to add an id.

or
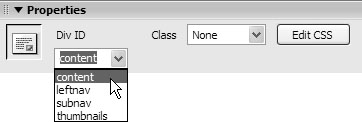
If the selected element is a div, use the Property Inspector to choose an id to apply from the pop-up menu (Figure 5.40).
Figure 5.40. The Property Inspector can be used to add an id, but only for divs.
3. Check the tag selector to verify that the id has been applied by looking for the name of the tag followed by a # followed by the name of the id.
 Tips
Tips
• When you remove a class from the selected text, it’s still available to be applied elsewhere. Removing the class from the tag doesn’t remove the rule itself from your page.
• If you select some text that isn’t inside a container (a paragraph or div, for example), and apply a style, Dreamweaver wraps a new span tag around that text and applies the new style to the span.
• If the pop-up menu in the Property Inspector doesn’t show the id you want, it may be because that id is used elsewhere on the page. An id must be unique on the page, so if you want to move it from one place to another, remove it from the first place before attempting to apply it to the second.
Creating Styles with the Property Inspector
For users who are upgrading from an older version of Dreamweaver, it’s the most natural thing in the world to use the Property Inspector to create styles. You can still style text with the Property Inspector, but there are a few things to keep in mind.
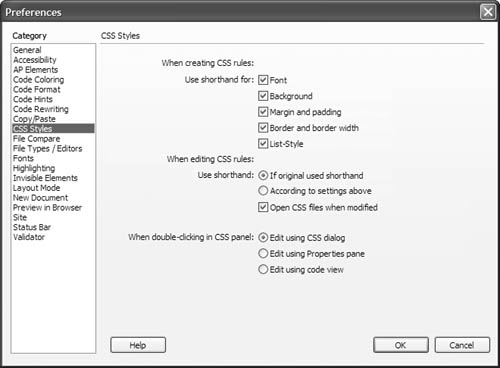
The old way of using Dreamweaver added dozens, perhaps hundreds, of font tags to a page with the Property Inspector. Getting rid of all those bandwidth-eating font tags is a good thing. Nowadays, the Property Inspector won’t generate font tags if your Preferences are set to Use CSS instead of HTML tags (see Figure 5.3). Instead, it creates styles.
This sounds good, but there’s a problem: the Property Inspector only writes internal styles. There’s nothing wrong with internal styles, if that’s what you want. You may want to design a page using internal styles and export the styles when you’re finished. Keep in mind that this is what’s happening, and you’ll be good to go.
To create styles with the Property Inspector
1. Open a new, blank document, or a document with content but with no styles yet applied.
2. Click the Page Properties button ![]() on the Property Inspector. The Page Properties dialog appears (Figure 5.41).
on the Property Inspector. The Page Properties dialog appears (Figure 5.41).
Figure 5.41. Page Properties for Appearance determine backgrounds, fonts, colors, and margins.
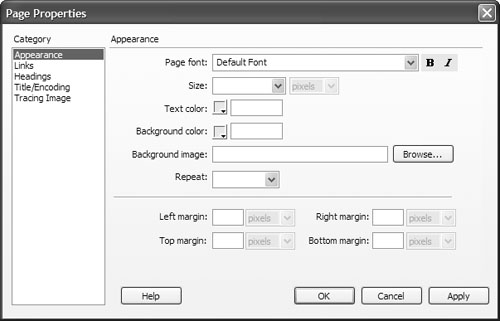
3. The Page Properties dialog contains five categories. You can set properties as desired in the following:
Appearance: Set appearance properties for the body, including page font, size, text color, background color, and background image. If you use a background image, you should also set how it repeats. Margins are set individually for top, right, bottom, and left.
Links: Set the font and size, colors for unvisited, visited, rollover, and active links, and select underline style from the pop-up menu (Figure 5.42).
Figure 5.42. Page Properties for Links set up fonts, colors, and sizes for links.

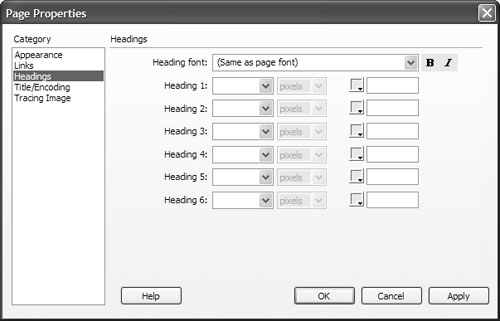
Headings: Set a heading font, and choose a size and color for each heading (Figure 5.43).
Figure 5.43. Page Properties for Headings set up fonts, colors, and sizes for headings.
Title/Encoding: Type a page title. Choose Document Type (DTD) from the pop-up menu. Leave Encoding and Unicode Normalization Form alone unless you know what you’re doing and are creating pages in multiple languages (Figure 5.44).
Figure 5.44. Page Properties for Title/Encoding determine title, document type, and language encoding.

Tracing Image: Browse to locate the tracing image and set the degree of transparency (Figure 5.45). We discuss tracing images in Chapter 3, “Building Your First Page.”
Figure 5.45. Page Properties for Tracing Image allows you to set an image to trace over when designing your page.

4. Click Apply to see how your changes look, and then OK to accept your changes.
 Tips
Tips
• The styles and properties you set are stored internally in this document only. You can inspect them in Code view. The Document Type appears in the first line of code. The language encoding appears in a meta element in the head. The styles are enclosed in a style element in the head. If you set a tracing image, it appears in Design view.
• Names in the Page Properties dialog are not always standard CSS selector or property names. For example, in the Links category, Rollover links correspond to the CSS pseudo-class selector a:hover and Underline style corresponds to the CSS property text-decoration.
To create classes with the Property Inspector
1. Open a document and select the text or tag to be styled.
2. On the Property Inspector, set new values for any or all of the following: Font, Size, and Color. For color, use the Color Picker to choose a color for the selected text (Figure 5.46).
Figure 5.46. Write class rules for font, size, and color with the Property Inspector. Here, color is being set.

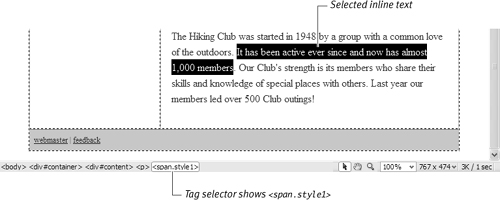
3. Dreamweaver creates a class with a generic name, and that class is applied immediately to the selected text. The new class appears in the Style pop-up menu on the Property Inspector (Figure 5.47). The class is applied with a span tag to inline text (Figure 5.48). If the selected text is a complete element, such as a paragraph, the class is applied to the element’s tag.
Figure 5.47. The Style pop-up menu on the Property Inspector lists available class rules. Choose a class from this menu to apply it.
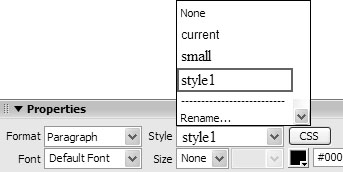
Figure 5.48. To apply a class to an inline element, such as a sentence, word, or letter, Dreamweaver uses a span element.
 Tip
Tip
• In step 2, don’t change the Format or Style value or you’ll be changing your selection instead of creating a new class.
Modifying a Style
Changing a style is quick and easy. You’re already familiar with the CSS Rule definition dialog and the CSS Styles panel, and you can modify styles using either one.
To modify a style with the CSS Rule definition dialog
1. Open a document. In the CSS Styles panel, click All mode, choose a style, and then do either of the following:
Right-click the style name and choose Edit from the contextual menu (Figure 5.49).
Figure 5.49. Right-click any style to reveal the Edit menu choices.

or
Click the Edit Style button ![]() at the lower right of the CSS Styles panel.
at the lower right of the CSS Styles panel.
2. The CSS Rule definition dialog appears. Make changes as desired.
3. Click OK to accept your changes.
To modify a style with the CSS Styles panel
1. Open a document. In the CSS Styles panel, choose a style in either All or Current mode. Properties for the selected style appear in the Properties pane.
2. Click a value in the Properties pane. An editable field appears (Figure 5.50).
Figure 5.50. Edit any property value directly in the Properties pane.
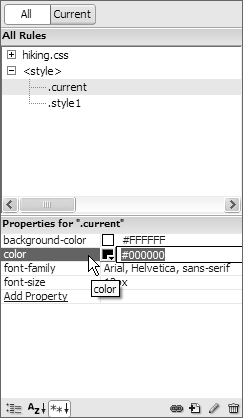
3. Change as desired, and press Enter (Return) to complete your changes.
Working with Font Groups
Font groups determine which fonts a browser displays on your Web page. A browser uses the first font in the group that is installed on the user’s system. If none of the fonts in the group are installed, the browser displays the text as specified by the user’s browser preferences.
To modify a font group
1. Open a document in Dreamweaver.
2. Choose Text > Font > Edit Font List.
or
Choose Edit Font List from the Font pop-up menu in the Property Inspector.
The Edit Font List dialog appears (Figure 5.51) and displays three categories of information:
Font list: Displays current font groups.
Chosen fonts: Displays fonts in the chosen group.
Available fonts: Displays all the fonts available on your system. The font selected is displayed in the text field below.
Figure 5.51. Use the Edit Font List dialog to create, modify, or remove font groups.
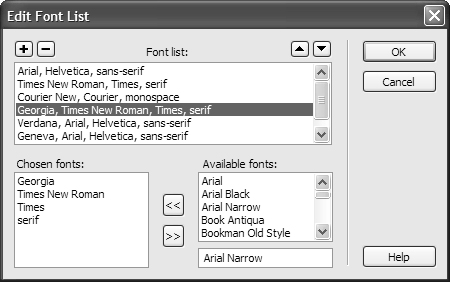
• To add or remove fonts from a font group, click the arrows button (![]() or
or ![]() ) between the Chosen fonts list and the Available fonts list.
) between the Chosen fonts list and the Available fonts list.
• To add or remove a font group, click the Plus or Minus button (![]() ) at the top of the dialog.
) at the top of the dialog.
• To add the name of a font that is not installed on your system, type the font name in the text field below the Available fonts list and click the left-facing arrow button to add it to the group.
• To move a font group up or down in the list, select it from the Font list box and then click the arrow buttons (![]() ) at the top of the dialog.
) at the top of the dialog.
4. Click OK to accept your changes.
 Tips
Tips
• To avoid surprises, it’s good practice to stick with the commonly available fonts for most text. If you really need to use a fancy, decorative font for short bits of text, you may be better off making an image of the text and placing it as a graphic.
• We would love to add something here like, “You can be assured that people with this browser and this operating system will have these fonts”—but we can’t. New browser versions get shipped that don’t include the same fonts the older versions did. The same goes for operating systems. And then, of course, people can always delete or disable their existing fonts. The font groups that ship with Dreamweaver, as a general rule, are very likely to be dependable. And of course, always end your font list with either serif or sans-serif for best results.


