
When you create a report, you build a data set and typically specify filter criteria to display specific data in the report. When a user views the report, the user sees the information that you selected. As users become familiar with the report and recognize its potential as an analytical tool, they may want to view the data in different ways. For example, in a sales report, a user may want to view only sales in California, or sales over a certain amount, or sales that closed in the last 30 days.
The solution for this type of ad hoc reporting requirement is for the report to prompt the user to provide information that determines what data to display. Report developers make this solution available by using report parameters.
Report parameters select information that determines the data to display in the report when the report runs. Typically, you use report parameters to prompt a report user to specify what data to display before BIRT generates the report. You can also use report parameters in more creative ways. For example, a web application can use a user’s login information to programmatically set the value of an account number report parameter. Then the web application can generate a report for that particular account.
Using report parameters, you can
Generate on-demand reports.
By using report parameters in a report design, you can create a single report design that generates specialized reports, on demand, to meet the different needs of report users.
Design a report once, and use the same design to display different data that is based on specific criteria.
Report parameters are essential tools for time-sensitive reports. Consider a monthly sales report. A report developer generates and publishes a report each month. When the report developer first creates the report, she builds a query to show sales data for the month of January only. To generate a report for February’s numbers, she must modify the query to get data for February only. Without using report parameters, the report developer must modify the query manually every month. By creating a report parameter that prompts for the month for which to display sales information, the report developer can create one report and run it each month to refresh its data. The report user gets exactly what he needs to see.
Manage large reports.
Report parameters are also useful for managing large reports. Consider a report design that generates a detailed report that is several hundred pages long. It displays, for example, all itemized sales orders for all customers in all cities in every state. That report is comprehensive but includes more information than most users want most of the time. To reduce the size of the report and let the user select only the data that he wants to view, you can use report parameters to generate specific parts of the original report. You can, for example, provide report parameters that ask the user to specify a customer name, a city, or a state for which to display sales orders.
Enter Parameters, shown in Figure 16-1, displays the available parameters to a report user.

When the user runs the report, he chooses the parameter values that he wants to see. The report developer must specify default parameter values in order for the report to run even if the user fails to specify any parameters.
Before you create parameters for a report, decide what field values you want the report user to specify and how to prompt the user for those values:
Think of the different ways in which a user may need to filter the information. You create one report parameter for each question that you want the user to answer. Theoretically, you can create a parameter for each discrete piece of data in the data source. To ensure that report parameters are not overwhelming for the user, limit the available parameters to important fields.
If you create more than one report parameter, consider the interaction of the values. For example, if you create two parameters to get the values of state and sales total, decide whether to return rows only if both values in the row match or if either value matches.
If you create many report parameters, organize them in logical groups. For example, you can create two groups of parameters to organize customer parameters, such as customer name, city, and state, in one group and order parameters, such as order ID, order date, and order amount, in another group.
Use short, descriptive text prompts, but ensure the text is not ambiguous. For example, Customer State is clearer than State.
Do not assume that the report user knows how the data is stored in the data source. For example, a user might not know that an order-status field takes three values: Open, Closed, and In Evaluation. Without this knowledge, the user does not know what value to enter for an order-status parameter. To improve usability, create a drop-down list or radio buttons for the user to select a value instead of requiring the user to type a value. Figure 16-1 provides an example of a simple, but effective, parameter presentation.
You can enable filtering on user-specified values either at query run time, or after running the query. To enable a user to filter at query run time, you must use a JDBC data source. By defining filters at the table-element level, you can also enable user filtering after the query returns a result set. You can enable user filtering at this level for any data source.
As described previously, a report parameter enables or requires users to specify a value that they can easily understand. When they run a report, BIRT updates the SQL query with these values before it retrieves any data. The data source then returns only the rows that match the user-specified values.
To enable users to filter database data, you complete the following tasks in the recommended order. For detailed information about these tasks, see the corresponding topics later in this section.
Create report parameters to prompt the user to specify values that determine what rows to retrieve.
Insert parameter markers in the SQL query.
Create a data set parameter to supply a value for each parameter marker in the SQL query.
Bind the data set parameter to the report parameter, so the data set parameter gets the user-specified value from the report parameter and passes it to the SQL query.
Determine how to present the report parameters to a user.
Test the report parameters.
Report parameters provide a mechanism for passing values into a report. You can create a report parameter to prompt the report user to specify a value for a particular field, or you can use a hidden report parameter to pass a value into the report on a programmatic basis. For instance, a hidden parameter might be used to pass a customer’s account code into a report if you did not want a customer to look at any account data but her own.
Report parameters have global scope, which means they are available to the entire report and any report element can access a report parameter’s value. To enable user filtering, you typically bind the report parameter to a corresponding data set parameter.
When you create a report parameter, you perform two main tasks.
Define the basic properties of the parameter: its name and data type.
Design the presentation of the parameter to the report user. The tasks you should consider include:
How to create a simple report parameter
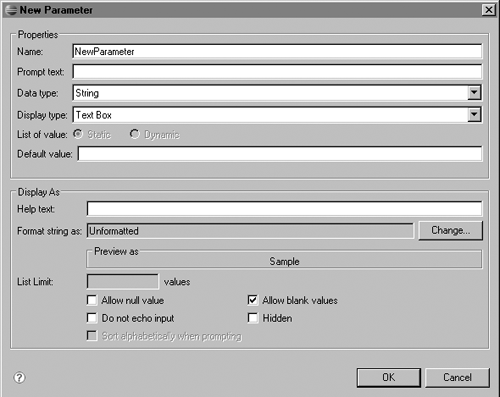
In the data explorer, right-click Report Parameters, and choose New Parameter.
New Parameter appears, as shown in Figure 16-2.
Specify the following basic properties:
For Name, type a name for the parameter. If you do not specify a value for Prompt text, the report user sees that Name value as the prompt. Instead, it is good practice to supply a user-friendly name for the parameter in Prompt text. Prefix the value you select for Name with RP to help distinguish report parameters from other parameter types, such as data set parameters. For example, a report parameter used to filter quantityinstock might be named RP_quantityinstock.
For Data type, select a data type for the parameter.
The data type that you select does not have to match the data type of the field in the data source. Values in an orderID field, for example, can be stored as integers in the database, but the report parameter that is associated with this field can be of decimal or string type. The data type that you select for the report parameter determines the formatting options that are available if you choose to provide a default value or a list of values for the report parameter.
For date fields, you can select either Date Time or String. Specifying the string data type provides more flexibility for the user to specify dates in a variety of formats. For example, the user can type 02/04/2004, 2/4/04, or Feb 4, 2004. The trade-off is that you cannot use date-and-time formats to change how dates appear if you choose to provide the user with a list of date values.
Choose OK.
The parameter appears in Report Parameters in the data explorer.
If necessary, repeat these steps to create additional report parameters.
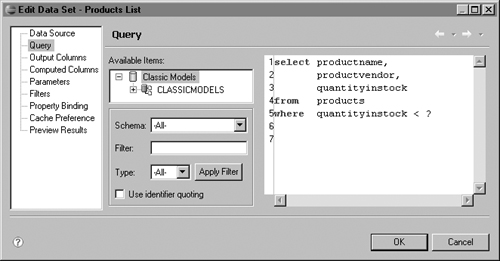
After you create your report parameter, insert a parameter marker in the WHERE clause of the SQL query of the data set that you want to filter with the value of the report parameter. The parameter marker, represented by a question mark (?), indicates where you want BIRT to insert the parameter value.
For example, to ask the user to specify the threshold inventory quantity for a restocking report, insert the ? parameter marker in the WHERE clause, as shown in the following example:
WHERE quantityinstock < ?
When the report runs, if the user specifies 500 for quantityinstock, BIRT replaces ? with 500 and sends the following filter condition to the data source:
WHERE quantityinstock < 500
If you write a filter condition that uses more than one field, think about the interaction of the field values. Each of the following WHERE clauses, for example, returns a different set of rows:
    WHERE quantityinstock < ? AND productvendor = ?

    WHERE quantityinstock < ? OR productvendor = ?
The first clause returns only those rows in which both the quantityinstock and the productvendor values match the values that replace the ? markers. The second clause returns more rows. It returns rows in which the quantityinstock value is less than the value that replaces the quantityinstock marker and rows in which the productvendor value matches the value that replaces the productvendor ? marker.
It is necessary to write filter conditions that make sense for your report. Before you complete all steps to enable filtering, you should test your filter conditions by specifying actual values in the WHERE clause to verify that the results meet your expectations.
SQL supports many options and operators for specifying filter conditions. For complete information about writing WHERE clauses and SQL statements in general, consult a book about SQL.
How to insert a parameter marker in the SQL query
This procedure assumes that you already created a data set.
In the data explorer, right-click the data set whose query you want to edit, then choose Edit. Edit Data Set displays the query.
Add a WHERE clause with one or more parameters.
    WHERE quantityinstock < ?

    WHERE quantityinstock < ? AND productvendor = ?

    WHERE quantityinstock < ? OR productname LIKE ?
Figure 16-3 shows an example of a query with a single parameter marker.
At this point, you are ready to create a data set parameter for each ? parameter marker. The next section describes this task.
A data set parameter passes a value that replaces the ? parameter marker in the WHERE clause of the query when the query is run. You must create one data set parameter for each parameter marker in the query’s WHERE clause. If you do not, BIRT displays an error.
SQL uses the positions of the ? parameter markers in the WHERE clause to determine which data set parameter matches which ? marker. Therefore, the order of the data set parameters is critical. For example, you must create two data set parameters if you specify the following WHERE clause:
WHERE quantityinstock < ? and productvendor = ?
The first parameter in the list of data set parameters must pass a value to quantityinstock < ?, and the second parameter must pass a value to productvendor = ?. Figure 16-4 shows these two data set parameters. The order of these parameters matches the order of the parameter markers’ appearance in the example WHERE clause.
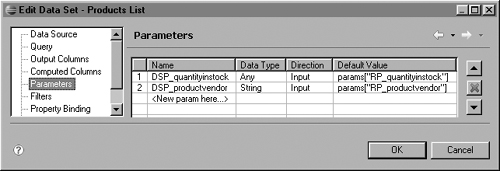
A data set parameter replaces a parameter marker in the query with a value from another part of the report design. Think of the data set parameter as an intermediary—it gets a value from a report element, then it passes the value to the query. To enable users to filter data, you use a data set parameter to get a value from a report parameter. If you change the WHERE clause in the query, update the data set parameters accordingly.
The following procedure tells you how to create a data set parameter.
How to create a data set parameter
This procedure assumes that you already inserted a parameter marker in the SQL query, as described previously. If you use multiple data set parameters, create them in the order in which their corresponding parameter markers appear in the WHERE clause.
In the data explorer, choose the data set for which you want to create parameters. Edit Data Set displays the query for the data set.
Choose Parameters. Edit Data Set displays default parameter information in the first row.
Create a data set parameter by specifying the following required values:
In the first row, in Name, type a name for the parameter. It is good practice to prefix the name you select with DSP for data set parameter to to help distinguish the parameter from other parameter types, such as report parameters. For example, a data set parameter used to filter quantityinstock might be named DSP_quantityinstock.
In Data type, select a data type for the parameter.
In Direction, choose Input. This value means that the parameter is an input parameter.
Select Default value and a button appears at the right of the empty field.
Choose the ellipsis (…) button at the right. Expression Builder appears.
Bind the data set parameter to the appropriate report parameter by selecting the report parameter as the data set’s default value:
In Category, choose Report Parameters, then choose All in Sub-Category. The report parameters that you created appear, as shown in Figure 16-5.
Double-click the appropriate report parameter. The report parameter appears in the expression area.
Choose OK.
Repeat steps 3 and 4 to create additional data set parameters for any other parameter markers that you inserted in your SQL query.
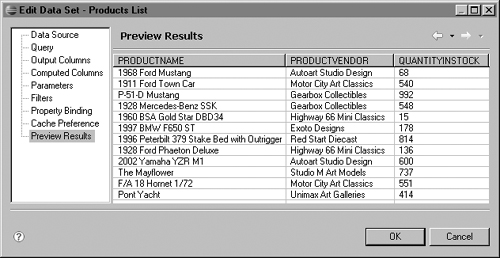
Assuming that you entered a default value for each report parameter, you can choose Preview Results to verify that the query returns rows that match your WHERE condition.
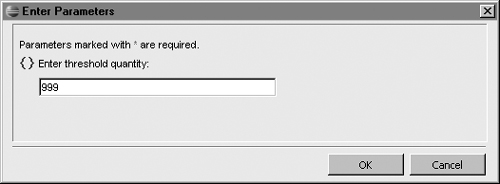
Figure 16-6 shows the results of the previous example where a default value of 999 was entered for the report parameter RP_quantityinstock. It shows all rows for products in stock with a quantity of less than 999.
Test the parameters to verify that the query updates with user-specified values and that the report shows the results you expect:
Choose Preview.
If Enter Parameters does not appear, choose Show Report Parameters.
Enter Parameters displays all the report parameters that you created. Figure 16-7 shows the simple report parameter RP_quantityinstock.
Specify a value for each parameter, then choose OK.


If you completed all the tasks that were described earlier in this chapter, the WHERE clause of your query updates with the specified values, and the report displays the rows that match the WHERE clause.
An alternative to enabling filtering at query run time is to enable filtering at the time the report is rendered. This option is available for all data sources, including JDBC, XML and text-file, but filtering at query run time through the use of data set parameters is usually the preferred approach for JDBC for performance reasons.
Though the goal in enabling users to filter at query run time and after the query runs is the same, the steps are different. To enable users to filter after running the query, you complete the following tasks in the recommended order. For detailed information about these tasks, see the corresponding topics later in this section:
Create report parameters to prompt a user to specify field values that determine what data to display.
Create one filter condition for each field for which you want the report user to supply a value. Set the value of each filter condition to a report parameter to dynamically update the filter condition with the parameter value.
Determine how to present the report parameters.
Test the report parameters.
Just as you create a report parameter to enable user filtering at query run time, you create a report parameter to enable user filtering after the query is executed. As report parameter creation is covered earlier in this chapter, it is not repeated here.
Typically, when you specify a filter condition to display only certain data in a report, you specify the value on which to search, as in these examples:
    row["quantityinstock"] Less than 500
    row["productvendor"] Equal to "Exoto Designs"
To enable a user to filter data when the report runs, specify the report parameter as the filter value. The following expressions are examples of filter conditions whose values are set to report parameters:
    row["quantityinstock"] Less than params["RP_quantityinstock"]
    row["productvendor"] Equal to params["RP_productvendor"]
When the user runs the report and supplies a value for the report parameter, BIRT dynamically updates the filter condition with the parameter value and generates a report that displays only the specified data.
How to dynamically update a filter condition when the report runs
This procedure assumes that you already created
A report that contains a table or list to display data from a data set
One or more report parameters for the report
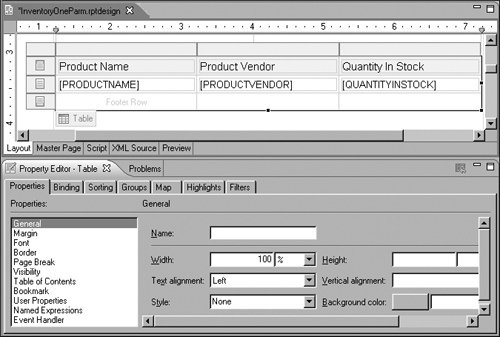
In the layout editor, select the table element or list element to filter. The property editor displays the properties of the selected table or list.
Figure 16-8 shows an example of a selected table and its properties.
Choose the Filters tab. The property editor displays the Filters page, as shown in Figure 16-9.
Choose Add to create a new filter condition.
Specify the filter condition:
Choose the cell below Expression. Two buttons appear at the right.
Choose the arrow button, then select the field for which you want the user to specify a value when the report runs.
For Operator, select an operator from the drop-down list.
For Value 1, specify the name of the report parameter that you created.
You can use the expression builder to select the report parameter from the list of report parameters that you created for the report. Figure 16-10 shows an example of a filter condition for which the value is set to a report parameter.
Preview the report.
Enter Parameters appears and displays the report parameters that you created. Figure 16-11 shows an example.
Specify values for the report parameters, then choose OK.
The report displays data that matches the values that you specified.


After you verify that your report parameters generate the report that you expect, remember to improve the presentation of the parameter information. If you used the default options when you created the report parameter, you can make the parameters more user-friendly by setting their display properties when you edit the report parameters. You access these properties by double-clicking a report parameter in Data Explorer. Table 16-1 lists the ways in which you can enhance the usability and appearance of report parameters. Details about each technique are presented in subsequent sections.
Table 16-1. Techniques for enhancing report parameter usability
Technique | Property to set |
|---|---|
Use a prompt that describes clearly what values a user can enter. For example, you can display text, such as: Enter the state's abbreviation | Prompt text |
Provide a default value that results in a well-presented report in the event that a user does not supply a value. A default value also functions as an example. | Default value |
Provide helpful information about a report parameter. Users see this information just below the input field for a parameter. For example, for a customer ID parameter, you can provide information, such as: Type a number between 100 and 500 | Help text |
Rather than requiring the user to type a value in a text box, create a list box, a combo box, or a set of radio buttons that provide values from which a user can select. | Display type |
If a report parameter displays a default value or a list of values in a list box, a combo box, or radio buttons, display those values in a suitable format. For example, if values for sales totals are stored in #### format in the data source, you can change the display format to $#,###.00. | Format |
Provide the user with the option of specifying null values. | Allow null value |
Provide the user with the option of specifying blank values. | Allow blank values |
While it is not required, you should provide a default value for each report parameter. If you do not, the user must specify a value to generate the report. It is particularly important to specify a default value if you present the report parameter as a text box in which the user has to type a value, rather than a list box from which the user can select a value.
The default value can be any value from the data set field that is bound to the report parameter. You should, however, specify a value that most users would select, such as Active for an account status. Another option is to specify a value that appears most often. If the field contains unique values, such as an order ID or a customer ID, it is typical to specify the first ID as the default value, particularly when using a list box or combo box to display a list of values.
How to provide a default value for a report parameter
This procedure assumes you are editing a report parameter that you already created.
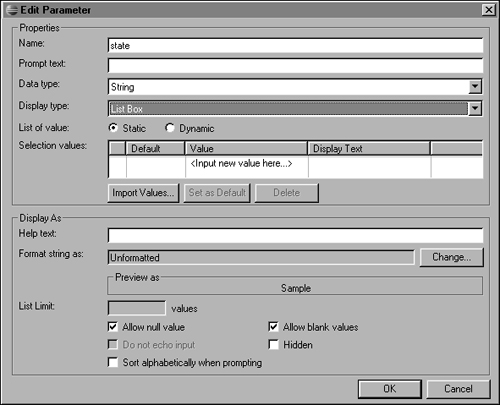
In the data explorer, expand Report Parameters, then choose the report parameter to edit. Edit Parameter displays the current property settings for the selected report parameter. Figure 16-12 shows an example of a report parameter with no value specified for Default value.
Depending on the display type that you select, complete one of these tasks:
Choose OK.

List boxes, combo boxes, and radio buttons are ideal mechanisms for providing a list of choices to a user. A user can make only one selection from multiple choices. The differences between these user interface elements are:
Radio buttons occupy as many lines in the Enter Parameters dialog as there are choices, and you must specify one button as a default value. For ease of use, a set of radio buttons should contain fewer than 10 entries.
The list box and combo box appear identical to the user. Both save space because they take up only one line in the Enter Parameters dialog. For ease of use, a list box and combo box should contain fewer than 100 values.
Unlike the list box, the combo box auto-completes text that the user types. For example, when the user starts to type Ad, the first matching value, such as Advanced Design Inc., appears.
The combo box requires you to specify a default value when you create it. A list box does not.
The combo box does not support the user specifying null values or blank values for string data. The list box does.
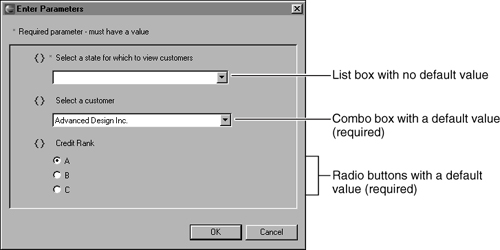
Figure 16-13 shows an example of an Enter Parameters dialog that displays a list box, combo box, and radio buttons.
You create a list of values for a list box or a combo box using one of the following techniques:
Create a static list of values.
Create a dynamic list of values.
For radio buttons, you can only create a static list of values. In a static list, you specify the values to display to the report user during report design. In a dynamic list, BIRT retrieves the values from the data source when the report runs. Create a dynamic list for values that are frequently updated in the data source. New customer names or product names, for example, are often added to a data source. If you create a static list of these values, you have to manually update the list to match the values in the data source. Creating a static list, however, provides more control over the list of values to display to the report user. For example, you might not want to present all values to the user.
You can create a static list of values for a list box, combo box, or a set of radio buttons using one or both of the following techniques:
Import values from a data set field.
Type each value to display.
To display all the unique values in a data set field, which is the typical case, import the values from the data set field. You can type the values, but this task would be tedious. Type a value only to display a value that is not in the data set field, such as ranges of values (0–100, 101–200, and so on).
To import all values from a data set field, you first create a data set that retrieves the values. The query in the following example retrieves all the values from the state field. You would specify this simple query to populate a parameter list with all the state names.
    SELECT Customers.state
    FROM Customers
You do not need to specify SELECT DISTINCT, because BIRT automatically populates the parameter list with unique values.
How to specify static report parameter values for users to select
This procedure assumes that you are editing a report parameter that you already created.
In the data explorer, expand Report Parameters, then choose the report parameter to edit. Edit Parameter displays the property settings for the report parameter.
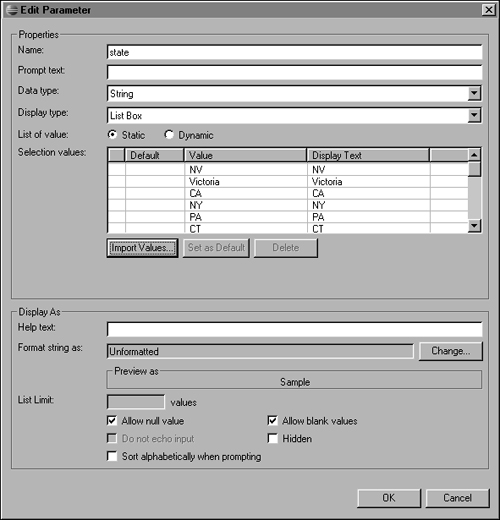
For Display type, choose Combo Box, List Box, or Radio Button. Edit Parameter displays the Selection values field and the Import Values button, as shown in Figure 16-14.
The Selection values field is where you specify the values to display in the list box, combo box, or radio buttons.
Use the default value, Static, for List of value.
To import values from a data set field:
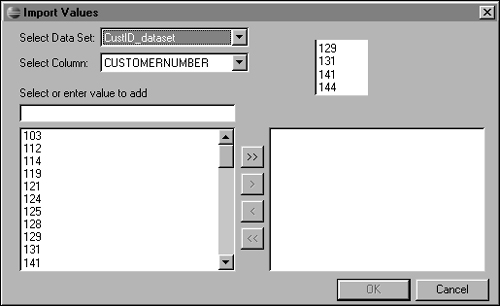
Choose Import Values. Import Values displays the first data set in the report and the values of the first field in the data set, as shown in Figure 16-15.
In Select Data Set, choose the data set for which to display the field values in the list box, combo box, or radio buttons. Typically, this data set is one that you create specifically for populating the parameter’s list of values.
In Select Column, choose the field that contains the values to use. Import Values displays the values for the selected field.
Select the values to import:
 To import all values, choose the double right arrow (>>) button.
 To import a particular value, select the value, and choose the right arrow (>) button.
Choose OK. Edit Parameter displays the imported values in Selection values—Value and Display Text, as shown in Figure 16-16.
To add values manually, complete the following steps for each value:
To provide labels for users to choose, other than the value in Display Text, select Display Text beside the value for which you want to provide an alternative label. Then, type the label to display to the user. Press Enter, or select another field.
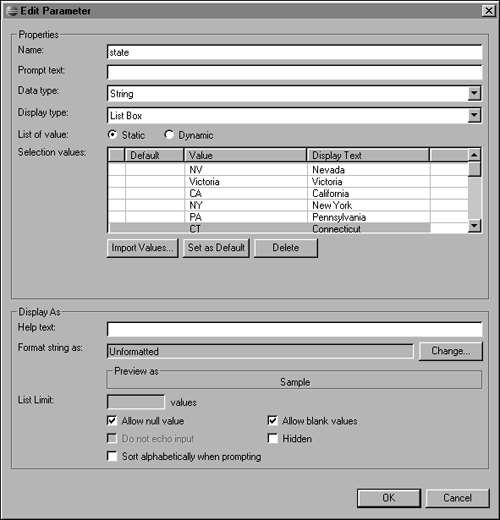
BIRT Report Designer adds the labels to the list. Figure 16-17 shows examples of labels for field values. The labels, state names, appear for the user instead of the state abbreviation values.
To designate a value as the default value, select the value, then choose Set as Default. A default value is required for a combo box or a set of radio buttons. For these items, the OK button is not available until you select a default value.
To sort the values in ascending order when the report presents them to the user, choose Sort alphabetically when prompting.
You can create a dynamic list of values for a list box or a combo box. In the same way as you create a static list, you first create a data set that retrieves the values with which to populate the list. The query in the following example retrieves all the values from the name field in the Customers table. You specify this simple query in a data set to populate a parameter list with all the customer names.
    SELECT Customers.name
    FROM Customers
With dynamic lists, values are retrieved from the data source when the report runs. You cannot tell during the design process how many values the list box or combo box displays when the user runs the report. If you are concerned about the list getting too long, you can specify a maximum number of values to display.
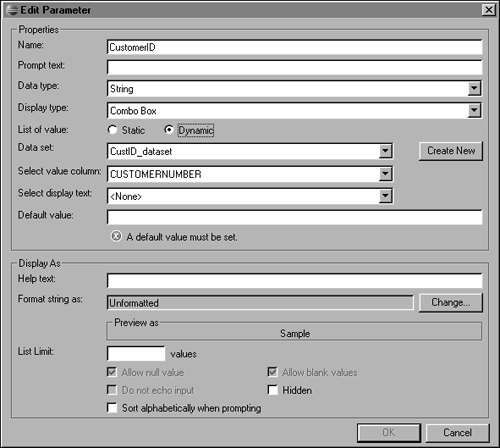
How to specify dynamic report parameter values for users to select
This procedure assumes that you are editing a report parameter that you have already created.
In the data explorer, expand Report Parameters, then choose the report parameter to edit. Edit Parameter displays the property settings for the report parameter.
For Display type, choose Combo Box or List Box.
For List of value, choose Dynamic. Edit Parameter displays additional fields, as shown in Figure 16-18.
For Data set, select the data set from which you want to display the field values in the list box or combo box.
For Select value column, select the field that contains the values that you want to use. Optionally, for List Limit, specify the maximum number of values to display. Choose OK.
By default, the default values you specify and the values that you import to display in a list box, combo box, or radio buttons appear exactly as they are stored in the data source. Sometimes, the values are not in a format that is appropriate for display. For example, US telephone numbers might be stored in ########## format. It is preferable to display these values in another format, such as (###) ###-####. Remember also that international telephone numbers will not appear correctly using this format.
You can specify a different format using the Format property. You format a report parameter value in the same way that you format a value that a data element displays. You select from a list of common formats, or you specify a custom format pattern.
Note that you can reformat values for display purposes only. You cannot use the Format property to require a user to type values in a particular format, nor does it affect the format of the data in the generated report.
How to format a report parameter value
This procedure assumes that you are formatting a report parameter that you already created.
In the data explorer, expand Report Parameters, then choose the report parameter to edit. Edit Parameter displays the current property settings for the selected report parameter.
In Format, choose Change. Change is not available for report parameters of Boolean type. The format builder appears. Its contents differ, depending on the data type of the report parameter. Figure 16-19 shows Format Builder for string data.
Specify what format to use. The format choices that are available vary according to the data type of the parameter.
For Format <data type> as, choose one of the predefined formats, or choose Custom to define your own format pattern. Additional fields may appear, depending on the data type and format that you selected. A sample formatted value appears in Preview with format. Figure 16-20 shows the additional fields that are available for a report parameter of decimal type when Currency format is selected.
Type or select values for any additional fields that are available for that parameter data type and format. When you finish specifying the format, choose OK. Edit Parameter appears. Format shows the format that you specified.


You can provide users who are database-savvy with the option of selecting rows when a field has a null value. Databases use a null value to indicate that there is no data in that field. A user might find it useful, for example, to view customer data where a customer’s credit-limit field is null, because null in this field means that the customer account is new, and a credit limit has not been set.
For string data, a null value is not the same as an empty string (" "), which is an actual value. You can set properties that determine whether a user can choose to match a null value, an empty string, or both. To enable a user to match a null value or a blank value, you must use a text box or a list box for the report parameter. The combo box and radio buttons require the user to specify an actual value.
Figure 16-21 shows Enter Parameters with two parameters for which null values are enabled. The Threshold Quantity parameter uses a text box, and the Product Vendor parameter uses a list box. To specify a null value, the user selects Null Value.

How to enable a user to specify a null or blank value
This procedure assumes that you are editing a report parameter that you already created.
In the data explorer, expand Report Parameters, then choose the report parameter to edit. Edit Parameter displays the current property settings for the selected report parameter.
For Display type, select either Text Box or List Box. These are the only items that support the user specifying a null or blank value.
To enable a user to specify a null value for the report parameter, select Allow null value. This property applies to data of all types except Boolean. To enable a user to specify an empty string, or blank value, select Allow blank values. This property applies to string data only.
If you create many parameters or want to provide the user with a prompt for certain sets of parameters, consider using parameter groups. Typically, you create parameter groups to organize report parameters logically. For example, you could create a parameter group to contain the report parameters for a specific table or data set.
When prompting the user to supply parameter values, the Enter Parameters dialog displays the parameter group name and the parameters within that group. Figure 16-22 shows two parameter groups, Customer Information and Order Information. Each group contains multiple report parameters.

You can create a parameter group before or after you create the report parameters. If you create the report parameters first, you can drag them from the report parameters list to the parameter group. If you create the parameter group first, you create the report parameters in the parameter group.
How to create a parameter group
In the data explorer, right-click Report Parameters, and choose New Parameter Group. New Parameter Group appears.
In Name, specify a unique name for this parameter group.
In Display Name, specify the name that the Enter Parameters dialog displays when it prompts a user for parameter values.
Figure 16-23 shows an example.
BIRT Report Designer creates the new parameter group and displays it in Report Parameters in the data explorer, as shown in Figure 16-24.
Add report parameters to the parameter group. You can add parameters to a parameter group in two ways:
Move an existing parameter to the parameter group. From the report parameters list in the data explorer, drag an existing parameter, and drop it in the parameter group.
Create a new parameter in the parameter group. In Report Parameters, right-click the parameter group name, and choose New Parameter.
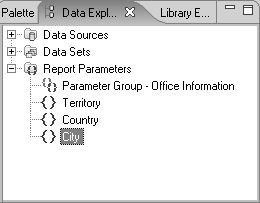
Figure 16-25 shows the data explorer after you move three report parameters to a parameter group called Office Information.
Figure 16-26 shows the Enter Parameters dialog, which displays the new parameter group and its three report parameters.
Enter Parameters displays parameter groups and report parameters in the order in which they appear in the report parameters list. To display the groups or report parameters in a different order, change the order in the data explorer.


Cascading parameters are report parameters that have a hierarchical relationship, as shown in the following three examples:
Product Type         Territory           Mutual Fund Type
   Product              Country             Fund Class
                          City                 Fund
In a group of cascading parameters, each report parameter displays a set of values. When the report user selects a value from the top-level parameter, the selected value determines the values that the next parameter displays, and so on.
The advantages of cascading parameters are obvious when you compare the alternative technique, which is the creation of separate and independent parameters. Consider the Territory-Country-City example. If you create three separate parameters, the territory parameter displays a list of all territories, the country parameter displays all countries, and the city parameter displays all cities. Figure 16-27 shows independent parameters as they appear to the report user.
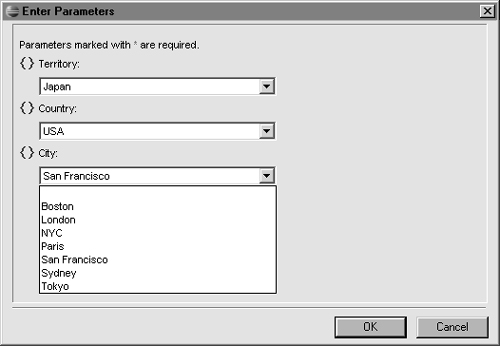
The user has to traverse three long lists to select the values, and there is a potential for user errors. The user can inadvertently select invalid combinations, such as Japan, USA, Paris.
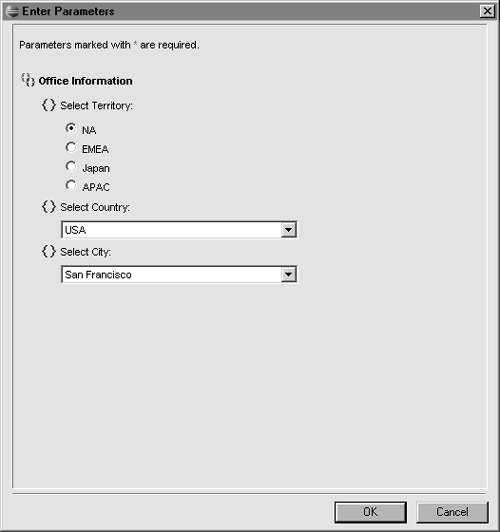
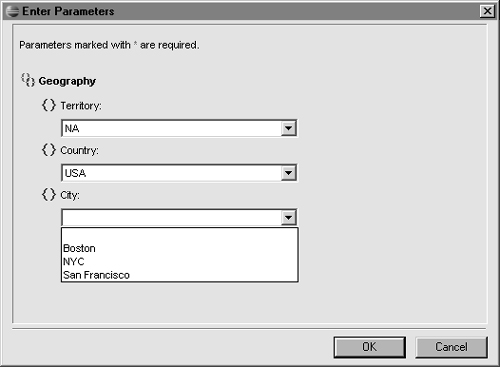
Cascading parameters, on the other hand, display only relevant values based on user selections. For example, the territory parameter displays all the territories, and when the report runs, the user selects a territory, such as NA (North America), then the country parameter displays only countries in the sales territory of NA. Similarly, when the user selects USA, the city parameter displays only cities in the USA. Figure 16-28 shows cascading parameters as they appear to the report user.
Cascading parameters can be based on a single data set or multiple data sets. Use cascading parameters with a single data set when the values for all the parameters are contained in a single data set. Use cascading parameters with multiple data sets when the values for the parameter must be retrieved from more than one data set.
Before you create cascading report parameters, you must first create the data set(s) that retrieve the values with which to populate the cascading parameter lists. The query in the following example retrieves all the values from the territory, country, and city fields of the Offices table. You specify this query in a data set to populate the Territory-Country-City parameter lists.
    SELECT Offices.territory,
    Offices.country,
    Offices.city
    FROM Offices
Given that only one data set is required, Territory-Country-City would be a single data set cascading parameter.
When you create cascading parameters based on multiple data sets, you must link the data sets together by adding a data set parameter to the queries for all data sets except for the one used to value the top-level parameter. Each data set parameter must then be bound to the appropriate report parameter from the cascading parameter group in order to form the appropriate dependency relationships.
For example, if you were creating a cascading parameter that prompted the report user to select an office from the Offices table and then prompted the user to select an employee from the Employees table based on the office in which she worked, you would create an Offices data set and an Employee data set. The Employee data set would have a data set parameter bound to the value of the office-report parameter in order to filter rows for employees from the selected office.
After you create cascading parameters, bind the final report parameter in the group to a data set parameter, or specify the report parameter as a filter-condition value, depending on the user-filtering technique that you are using.
How to create single data set cascading parameters
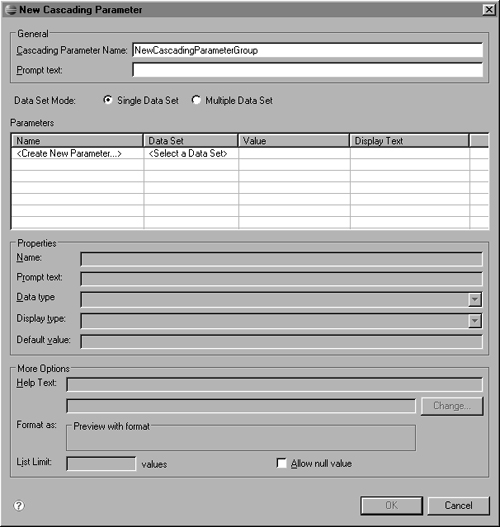
In the data explorer, right-click Report Parameters, and choose New Cascading Parameter. New Cascading Parameter appears, as shown in Figure 16-29.
For Cascading Parameter Name, you can specify a different name. The name that you specify appears in the list of report parameters in the data explorer.
For Prompt text, specify the name for the parameter group that appears in the Enter Parameters dialog.
Create the report parameters for this group of cascading parameters:
In Parameters, choose the first row. <Create New Parameter> appears in Name. Specify the following values:
In Name, type the parameter name.
In Data Set, select the data set from which to retrieve the values for all the parameters.
In Value, select the field for the value of the top-level parameter.
In Display Text, optionally select a field with a more friendly display value to represent the parameter to the report user. For example, if the parameter is based on productcode field, it is better to display the associated productname to the user.
In Properties, specify a descriptive name for the parameter, such as Territory.
To create the next report parameter, choose the row below the report parameter that you just created, and follow the same steps until you set up all levels of the cascading parameter group. Figure 16-30 shows sample values in New Cascading Parameter.
When you finish creating all the report parameters in the group, choose OK.
The cascading parameters appear in Report Parameters in the data explorer.

How to create multiple data set cascading parameters
This procedure assumes that you created all the data sets that retrieve the values for the cascading parameter lists.
In the data explorer, right-click Report Parameters, and choose New Cascading Parameter.
In New Cascading Parameter, for Cascading Parameter Name, you can specify a different name. The name that you specify appears only in the list of report parameters in the data explorer.
For Prompt text, specify the name for the parameter group that appears in the Enter Parameters dialog.
Select Multiple Data Set.
Create the report parameters for this group of cascading parameters:
In Parameters, choose the first row. <Create New Parameter> appears. Specify the following values:
In Name, type the parameter name.
In Data Set, select the data set from which to retrieve the values for the top-level parameter.
In Value, select the field for the value of the top-level parameter.
In Display Text, optionally select a field with a more friendly display value to represent the parameter to the report user. For example, if the parameter is based on productcode field, it is better to display the associated productname to the user.
In Properties, specify a descriptive name for the parameter, such as Territory.
Set the other properties for this report parameter.
To create the next report parameter, choose the next row in Parameters, then repeat steps 1 through 3 to set up all levels of the cascading parameter group.
When you finish creating all the report parameters in the group, choose OK. The cascading parameters appear in Report Parameters in the data explorer.
Add data set parameters to the dependent data sets and bind them to the appropriate report parameters from the cascading parameter group.
In the data explorer, right-click the data set that supplies the values for the second parameter in the cascading parameter group, then choose Edit. Edit Data Set displays the query.
Insert a parameter marker in the WHERE clause of the SQL query to filter the values of the data set based on the top-level parameter in the cascading group. Figure 16-31 shows an example.
Choose Parameters. Create a data set parameter to supply a value for the parameter marker in the SQL query.
Using the expression builder, set the default value of the data set parameter to the top-level parameter in the cascading group, so the data set parameter gets the user-specified value from the top-level parameter and passes it to the SQL query. Figure 16-32 shows an example.
Choose OK.
Follow the same steps for subsequent data sets in the cascading parameter group until you establish dependencies for all levels in the group.
Figure 16-33 shows how Enter Parameters appears to the report user when you create a multiple data set cascading parameter group based on the Office and Employee data sets.


By default, report parameter groups and report parameters are displayed to the user in the order in which they appear on Data Explorer—Report Parameters. The list of groups and parameters in the report parameters list, in turn, appear in the order in which you created them. You can change the order of groups and report parameters.
How to change the order in which report parameters appear
Choose Data Explorer.
Expand the report parameters list to display the list of parameter groups and report parameters.
Select a report parameter group or a report parameter, and drag it to a new position in the list. Figure 16-34 shows how to move the State report parameter to the top of the list.
Repeat step 3 until all the report parameter groups and report parameters appear in the desired order.

It is important to test all the report parameters that you create to verify that they work the way that you intend and that they meet user needs. Testing entails running the report, supplying different report parameter values, and checking the generated report carefully. You can test parameters using the following guidelines:
Test each report parameter as you create it.
If you create many report parameters, it is best to test each parameter as you create it. If you wait until you create all the report parameters before you begin testing, it is much harder to debug errors in the output, because it is not immediately clear which parameter causes the problem.
Run the report without specifying any parameter values.
The result of running a report without specifying any parameter values should be a report with information in it. If the OK button on the Enter Parameters dialog is unavailable, at least one report parameter that is currently empty requires the user to specify a value. Ensure that you provide a default value for each required parameter. A report parameter requires a value if you do not set its Allow null or Allow blank values properties.
Test each value in a list box, combo box, or series of radio buttons.
If you manually created the values that these items display, rather than importing values from the data set field, test each value to confirm that the output is correct. If the report appears with no data, it means that no records matched your selection, which indicates one of three possibilities:
There are no rows that contain the value that you selected.
The value that you created is not valid. For example, you might have created the value Closed for an order-status field, but the value in the data source is actually Shipped.
Another parameter causes the problem.
To debug the first two possibilities, review the data in the data source. Debugging the third possibility requires more effort if the report contains many other report parameters. As suggested earlier, you can avoid this situation if you always test parameters, one at a time, as you create them.
How to test report parameters
In the layout editor, choose Preview. Enter Parameters displays the report parameters that you created.
Specify a value for the report parameters. Choose OK. The report appears.
Review the report data carefully.
Test each report parameter with a different value by first choosing Show Report Parameters, then providing another value.
Repeat step 4 until you are certain that the report displays the correct data.