
IN THIS CHAPTER
In the previous chapter, you saw how easy it is to get SUSE Linux up and running. In this chapter, you’ll learn more about configuring hardware after the installation. You’ll start with the no-longer-inevitable but still troublesome post-installation glitches, and you’ll finish with peripherals and portables.
Linux applications, and the kernel itself, are much more fault tolerant than they used to be. It’s hard to render a system completely unbootable. At the same time, it’s much easier to overlook certain problems that may be affecting performance on a system that seems to be running well. Services may not start, modules don’t load, or the hard drive does not respond as quickly as it should. It’s a good idea to run the dmesg program occasionally to review the information the kernel is getting during bootup. Also review /var/log/messages regularly to see everything that goes into the log. Anyone can view this file in a text editor, but you can also view it in YaST. Go to the Misc page and click View System Log.
Tip
Besides /var/log/messages, you can view other logs, such as /var/log/warn and several process tables from the /proc directory in this YaST module. Use the drop-down menu to change the file you’re viewing.
Messages in /var/log/messages are generated by the kernel and other applications run by sysinit. Many “errors” noted here are not really errors. If the system has configured a device you don’t have, it will generate an error, but that’s harmless. But look for errors that appear to affect devices and processes that you use. Investigate the causes of these errors.
When you’re troubleshooting problems, search the SUSE help pages and check the man page for the problem application (along with modules.conf for kernel modules that are not loading). Paste the error message (up to 10 words) into an Internet search engine and see what comes up. Then head over to the “Getting Help” section of Chapter 1, “Welcome to SUSE Linux,” to look deeper into the problem.
YaST autodetects and configures many types of peripheral hardware. But it’s not really Linux if you can’t tweak the default settings. In this section, you look at the YaST Hardware page and learn what you can configure, and how.
Tip
In both the KDE and GNOME desktop environments, the green “card” icon in the taskbar represents the YaST Hardware Tool, also called the SUSEplugger. It loads selected hardware-related applications at startup and handles autodetection of new hardware after the initial installation. Right-click to configure its functioning.
Before tweaking away, you may want a snapshot of what hardware is already recognized and functioning. The YaST Hardware Information module is a graphical version of the hwinfo command-line utility. It probes your system and displays a comprehensive report on what hardware (cards, controllers, devices, and the like) is on your system, along with fairly in-depth information about most of the items. To start this program, open YaST and go to the Hardware page. Click Hardware Information and you’re on your way. Figure 4.1 gives you an idea of what it looks like.
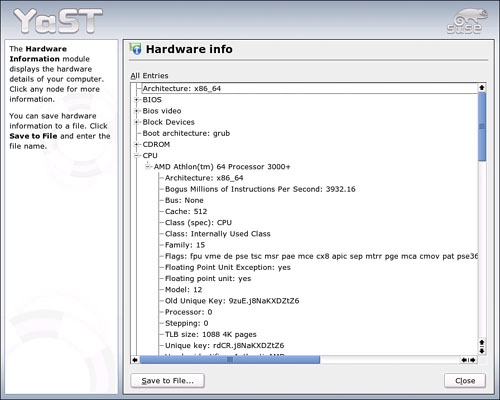
Click the plus (+) sign next to an item to see detailed information on that item. To save the results to a file readable in a text editor, click Save to File. Name the file (hwinfo<date-run>, for example) and put it somewhere in your home directory. Click Close to return to YaST.
Your hard disk controller (HDC) is located on the motherboard. The Linux kernel loads the disk controller early in the boot process. You can set optional parameters here to improve system performance, if you know what you’re doing. These parameters and modules will vary depending on your system. Your motherboard’s manual may have some suggestions, and Googling “<module_name> parameters” may offer valuable advice.
Caution
Always test the loading of modules when changing disk controller parameters! If your hard disk does not load when you boot, you will be able to launch Linux only from the CD-ROM and will not have access to any files on your hard drive!
If you have more than one HDC on your system, you can use the Move Up or Move Down buttons to choose what loads first. If you don’t want an HDC to load on boot, uncheck the Load Module in initrd box. Initrd is a file the kernel accesses to determine what modules it should load at boot.
Click Finish to confirm your settings and return to YaST.
Learn more about the Linux boot process in Chapter 22, “Managing the Boot Process and Other Services.”
If YaST did not detect your joystick, use the Joystick module to select one yourself. It has a Test button so you can confirm that the joystick works properly with the selected driver.
Note
Joysticks connected via your USB port do not need to configure a driver. Just plug your joystick into the USB port and fire away!
You can further configure joystick behavior (even without SuperUser access) in the settings for your desktop environment. In the KDE Control Center, go to Peripherals, Joystick.
Do you occasionally type in a different language from your primary tongue? Do you use a Dvorak keyboard? The YaST Keyboard Layout module can change how the OS and all applications respond to your individual keystrokes. Open the module and you will see a long list of layout styles. Select a different language and tab to the Keyboard Test. Chances are that most of the letter keys will be the same as what you are used to, but the punctuation and symbol keys will be different. In some languages, even the number keys will be changed. The changes generally involve accented letters and common symbols used in a particular language.
Note
Changing your keyboard layout to a different character set (such as Russian-Cyrillic or Japanese) will not load that character set. You will need to install the appropriate language font set first.
Click Expert Settings to change certain system defaults. If you don’t use the keypad on the right of your keyboard to enter numbers and don’t like the NumLock light on all the time, you can turn off NumLock on startup here. The same is true for Caps Lock. You can even disable Caps Lock completely. These settings are written to /etc/sysconfig/keyboard, so you can review and adjust them manually if you prefer.
Tip
You can further configure keyboard behavior (even without SuperUser access) in the settings for your desktop environment. In the KDE Control Center, go to Peripherals, Keyboard. In the GNOME Control Center, go to Hardware, Keyboard. One nice thing about the GNOME keyboard settings is that you can tell the system to force you to take breaks from your keyboard to forestall repetitive motion injuries.
In all likelihood, YaST autodetected your mouse and loaded appropriate drivers during the installation. If you had the capability to use your mouse during the installation, your mouse should be installed properly. Feel free to check what driver SUSE Linux is using in the YaST Mouse Model module.
Although many drivers are included in the list, options are minimal. Consult the documentation for your mouse to check for appropriate drivers. If you don’t have a working mouse, use the Tab key to maneuver to the module and then to the list. If you see your model, arrow down to select it. Tab again to highlight the Test button. You should be able to click it. If you can’t, you will have to work your way through the list, testing one by one to find a working driver.
Tip
You can configure (even without SuperUser access) many more mouse options in the settings for your desktop environment. These include selecting left-handed mouse behavior, cursor themes, and acceleration settings.
In the KDE Control Center, go to Peripherals, Mouse. In the GNOME Control Center, go to Hardware, Mouse.
If YaST did not autodetect your scanner when you first installed (or when you hooked it up to your PC), you’ve got problems. Manual configuration of USB-connected scanners is complex and dangerous (it is possible to damage your scanner with the wrong settings). Manually configuring a SCSI scanner is a little easier, but you can’t do it without shutting down your system first.
Common reasons for a scanner not being detected include the following:
The scanner is not supported. Check http://cdb.suse.de/index.php?LANG=en for a list of Linux-compatible devices.
The SCSI controller was not installed correctly.
There are termination problems with your SCSI port.
The SCSI cable is too long.
The scanner has a SCSI light controller that is not supported by Linux.
The scanner is defective.
With a TV card, you can turn an ordinary PC into a home entertainment system. You’ll learn more about this, including how to make your own personal video recorder, in the “TV and Video” section of Chapter 10, “Sights, Sounds, and Other Fun Things.”
As with the other cards and peripherals in this chapter, YaST should have recognized your TV or radio card on installation. If not, you can install it manually with the TV Card module. Open the module in YaST and click Configure. A list of manufacturers and models (see Figure 4.2) appears. Select yours.

Depending on your card, you may also have to select a tuner model. Click Select Tuner and choose from the list. To get a list of TV stations and channels available to you, click TV Channels and use the drop-downs to set your location and type (TV Norm) of signal. North Americans should set the TV Norm for NTSC and choose one of the US Frequency Tables. Click Scan the Channels to get the list. You can then use the Add, Edit, or Delete buttons to customize the list.
Click Next to specify how to manage audio output. By default, SUSE Linux sends it to your sound card. If you have multiple sound cards, you can select one here to work with your TV card. If no sound cards are set up, click Configure Sound Cards to open that YaST module (this configuration is discussed in Chapter 10). Click Next to continue.
This screen configures the infrared control mechanism for your card. You can choose from two different kernel modules to load and then click Test to see which one works. Click Next to complete the process.
During the installation, YaST will ask for your time zone and set your clock accordingly. If you move, or if you have a laptop that travels with you, it’s easy to change time zones with the YaST Date and Time module (see Figure 4.3), located on the System page. When you open it, select your region in the left pane and your time zone in the right.

If you prefer to have your clock set in relation to the Universal Time (also known as Greenwich Mean Time), click the Etc region. The Global region includes several nonstandard zones, such as South Pole time and Navajo time.
In this module, you can also specify how the kernel sets your hardware clock at boot. If you are dual booting with Windows, this should be set for Local Time. Otherwise, it is good to use the Unix Universal Time standard.
When your settings are correct, click Accept to confirm.
You can also configure your time and date settings in your desktop environment. Change time and clock settings in KDE by right-clicking on your taskbar clock, usually located on the right end of the taskbar. This context menu gives you the option to change your timezone, manually adjust the time, and change the display settings. Because the clock displays 24-hour time by default, you may want to switch this to AM/PM right away. You have to reboot for changes to stick, though.
In GNOME, right-clicking the clock opens the Clock Preferences dialog box. You can choose from four display types: the traditional 12-hour (AM/PM) and 24-hour standards, or the less traditional UNIX or Internet times. UNIX Time counts seconds since January 1, 1970, while Internet Time was invented by the Swatch watch company. Here’s how they describe the format on their website:
“Internet Time is a new universal time created by Swatch. With this new way of timekeeping, there are no more time zones, as the entire world is happening at the same time, at the same moment. Internet Time divides the 24 hours of a day into 1,000 units called beats. 1 beat represents 1 minute, 26.4 seconds. Internet Time is displayed by @ and three digits, ranging from @000 to @999. The internet day starts at midnight (@000) in Biel, the home of Swatch.”
Use the checkboxes to decide whether to display the passing seconds and/or the current date on your clock, and whether to use Universal Time (called UTC here).
If you have an always-on connection to the Internet, either through a LAN or broadband modem, consider running a Network Time Protocol (NTP) client. You can use NTP to connect to public servers attached to an atomic clock. These clocks, which measure the resonance of a cesium atom, will lose a second every million years. The NTP client included with SUSE Linux checks with a specified public time server and resets your system’s clock accordingly.
Go to the YaST Network Services page to open the NTP Client module (see Figure 4.4). Turn the client on by clicking When Booting System where it asks when to start the client. This will load the NTP client daemon. To make it work, the daemon needs a time server to connect to.

Figure 4.4. Set up your NTP client to use the pool NTP servers to reduce the load on high-traffic servers.
There are two ways to set up your NTP connection, simple and complex. The Simple way is to identify another machine on your LAN (which, presumably, is then connected to a time server), or choose from a selection of public time servers that SUSE has found. Click Select to choose a server to connect to. Another screen will come up. Now choose Public NTP Server, and you will see a list of predefined servers for your country. Select one geographically close to you. It’s a little better if the server is in your time zone, but it does not matter greatly. Click Test to confirm the server is active and then click OK to confirm the selection.
Click Complex Configuration to set up a backup server. Click Add from the first screen (Figure 4.5). After choosing Server from the Peer Type choices (Figure 4.6), click Next.

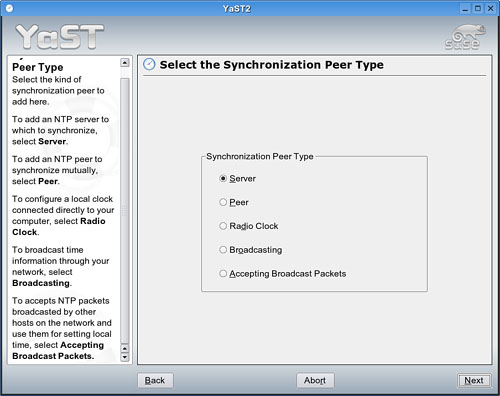
Figure 4.6. You can select from many types of timekeepers, but most likely you will choose a public time server to manage your clock.
To ease the burden on public time servers—and keep them going—the Server Pool Project was created. This is a system where the client points to a nearby pool server (such as north-america.pool.ntp.org) and this site points to a different public server every hour. It is most courteous to do this, so enter this server in the appropriate box. Click Test again to confirm that this connection is working. Check the Use for Initial Synchronization box so the kernel defaults to this server at boot, and then click OK to add this server to the list.
Note
If you are not in North America, visit http://ntp.isc.org/bin/view/Servers/NTPPoolServers for the current list of “subzone” pool servers. You can also use pool.ntp.org as a last resort.
There are other settings in the Complex Configuration dialog box. Accepting the defaults, as always, is OK.
Run NTP Daemon in chroot jail: Never underestimate the creativity of bad guys who want to interfere with your system. When you are contacting remote public servers, there is a risk (however slight) that malware could exist on that server that could compromise security on your system. Checking this box (which is the default setting) puts the NTP daemon in a special
/home/jaildirectory, where it cannot access any part of your system.Configure NTP Daemon with DHCP: If there is a DHCP server on your network, it may help you connect to NTP servers. This provides another security layer, because the information passes through another secure machine before getting to you. Check with your network administrator to see if the DHCP server is set up to look for NTP servers before turning this option on.
Open Port in Firewall: Say you’re traveling with your laptop, and want to connect to this machine through a Wide Area Network to set your laptop time. You must first open the firewall to get access. Do that by checking this box. Click Firewall Details to choose a network interface that you’ll use. It’s best to only open one port in the firewall.
Click Finish to confirm your choices. The NTP daemon will connect to your designated server(s) the next time you boot to Linux. If you change settings while the daemon is running, YaST will restart it when you click Finish.
There’s no getting around this fact: Computers and peripherals consume a lot of electricity. With dwindling supplies of fossil fuels leading to ever-higher energy bills, it’s good to minimize the power drain.
We are in a transition phase for power management on PCs and laptops, with one standard replacing another. Advanced Power Management (APM) is supported by most hardware manufacturers and BIOS routines.
Advanced Configuration and Power Interface (ACPI) is a power-management specification that allows the operating system (OS) to control the amount of power distributed to the computer’s devices. Devices not in use can be turned off, reducing unnecessary power expenditure. ACPI is the latest generation of DOS-based power management software for PCs. ACPI replaces the older Intel APM software utility. ACPI does more than just manage timeouts during periods of inactivity; it dynamically monitors power usage within the computer’s systems and assigns power accordingly. ACPI controls are found in your PC’s BIOS, and ACPI will work only if supported by the systems BIOS and your systems OS, such as SUSE Linux as of Kernel release 2.6.
APM allows workstations and servers to automatically shut down when told to. ACPI provides more control over the process. Depending on your system, you may want to configure for both standards. In this section, you’ll learn how to use YaST to configure your desktop PC. In the next, you’ll see how to configure your laptop.
The Power Management module is located under the System page. It is shown in Figure 4.7.
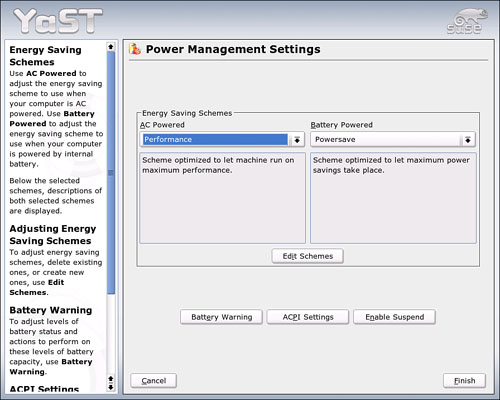
Figure 4.7. YaST offers several power management schemes, or you can adjust it your own way or even make your own.
By default, a PC is set for best performance, but you can adjust this scheme in favor of Powersave (for the least energy consumption) or Acoustic (for quiet operation). The fourth scheme, Presentation, is the same as Performance, but turns the screensaver off. You can add your own scheme or edit existing ones by clicking Edit Schemes.
Laptop computers are finicky beasts with many proprietary bits of hardware and software. These issues can make it difficult to install SUSE Linux. After you have the OS installed and running, though, you don’t have to settle for a lesser system when you’re on the move. This section will offer some tips to help.
SUSE Linux configures laptops for saving power and prolonging battery life, whether you have an APM or ACPI system (see the earlier “YaST Power Management” section if you missed those definitions). The YaST Power Management module lets you tweak those settings.
Choose Edit Schemes to make changes to the default settings or add your own. Use the three buttons on the main screen (refer to Figure 4.7) for quicker adjustments.
Battery Warning lets you set three levels of warnings that your battery is going dead. You decide both when the threshold is met (through a numerical scheme), and what warning SLP issues. By default, SLP sends a popup to the screen for the first two levels, and then shuts down automatically when the power situation becomes Critical. Use the drop-down menu to change these actions; perhaps you want the screensaver to come on at the second (Low Capacity) warning level, or for the machine to suspend itself.
ACPI Settings: Defines what actions occur when you press the Power and Sleep buttons, or when you close the laptop cover. Use the drop-down menu to choose from the same actions used in Battery Warning (Notify, Shutdown, Logout, Standby, Suspend to RAM, Suspend to Disk, Start Screensaver, Ignore).
Enable Suspend: Three ways to do this. Suspend to Disk is checked by default. This protects your data most effectively, but takes longer to revive than suspending to RAM. Suspending to RAM recovers quickly, but if you happen to run out of power while you are suspended to RAM, you could lose unsaved data on the screen.
Switch to Standby Mode: This shuts down power to your screen, turns off the fan, and other power drains until you power back up. Designed for brief respites, data is not saved before going to Standby.
YaST checks to see if your machine supports all these options. Unsupported options may not be available.
Laptops often use PCMCIA (Personal Computer Memory Card International Association) cards to add functionality, memory, or peripherals.
To activate support for PCMCIA cards, use the YaST Runlevel Editor. This module is on the System page.
When the Swedish telecommunications company Ericsson developed a new wireless tool that allowed different electronic components to communicate without being attached by heavy cables, it wanted a snappy name for it. Reaching back into the Scandinavian past, someone discovered a Danish king, Harald Blaatand, who united Denmark and Norway in the tenth century. Blaatand translated into English is Bluetooth. And that is how this trademark was born.
SUSE Linux should autodetect your Bluetooth device and load the appropriate drivers. YaST should also install the bluez-libs and bluez-utils software packages to manage your connection.
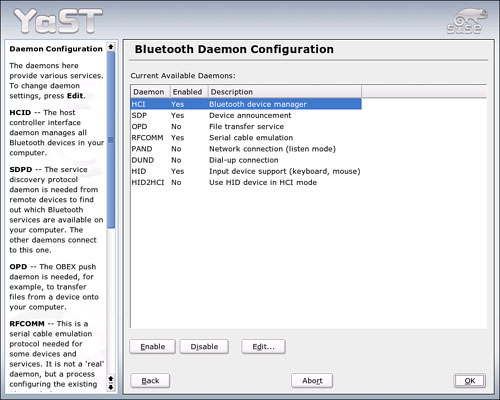
You can enable Bluetooth support manually through the YaST Bluetooth module, located on the Hardware page. This tells the kernel to “hot-plug” the Bluetooth kernel module and its daemon at boot. Click Advanced Daemon Configuration to further set up Bluetooth support (see Figure 4.8).
If you want Bluetooth communication channels to be encrypted, click Security Options. First, enable Authentication to force users to enter a password before making a Bluetooth connection; then enable Encryption to further protect data passing through the connection.
Note
Not all Bluetooth devices support authentication or encryption. You may have to turn these options off when connecting to that type of device.
Click Finish to confirm your changes.
Chances are good that your laptop uses either Bluetooth or Infrared Data Association (IrDA) to communicate with other devices. IrDA’s differences with Bluetooth are minimal, but significant:
In Bluetooth, the individual devices do not need to “see” each other directly.
In Bluetooth, several devices can be connected in a network. However, the maximum data rate is 720 Kilobits per second (in the current version 1.2). The next version of Bluetooth is expected to improve that rate to more than 2 Megabits per second.
Theoretically, Bluetooth can even communicate through walls. In practice, however, this depends on the properties of the wall and the device class. There are three device classes with transmission ranges between 10 and 100 meters.
There are two IrDA operation modes. The standard mode, SIR, accesses the infrared port through a serial interface. This mode works on almost all systems and is sufficient for most requirements. The faster mode, FIR, requires a special driver for the IrDA chip. Not all chip types are supported in FIR mode because of a lack of appropriate drivers. Set the desired IrDA mode in the BIOS of your computer. The BIOS also shows which serial interface is used in SIR mode.
IrDA is a major drain on your battery, so SUSE Linux does not automatically turn IrDA on at boot. You must go to the YaST IrDA module located on the Hardware page.
Click Start IrDA and then set the proper serial port for the connection (consult your laptop manual). Test the connection and then click Finish to get to work.
So much of our entertainment now comes on compact disks of various types, it is essential for our computers and operating systems to keep up. Although it has had some obstacles to surmount, Linux developers have made it relatively easy to run CDs, DVDs, and the gamut of recordable CD formats. This section focuses on the technical end of providing device drivers for these types of drives and disks. To learn more about the Linux multimedia experience, including how to burn CDs and DVDs, see Chapter 10.
YaST simplifies the process of mounting your CD and DVD drives (see Figure 4.9). The CD-ROM module identifies your drive(s) and adds a reference and mount point to your /etc/fstab file.
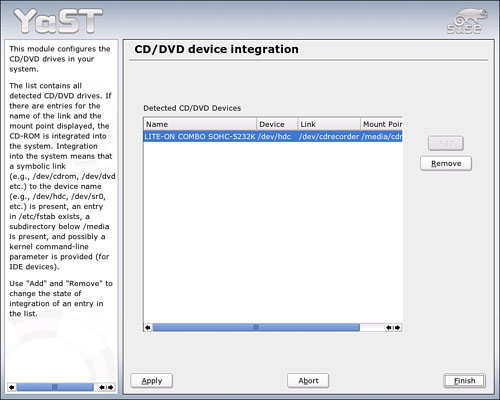
The CD-ROM module is very limited in what it can do. If YaST autodetects a drive (which it will nearly always do, especially when you install via CD/DVD), you cannot manually set up and integrate the drive. It also does not permit changing any of your settings (you can still edit /etc/fstab yourself).
Essentially, the only option in this module is to “remove” (or unintegrate) a drive. This removes the symlink to the drive in the /dev directory and the mount point in the /media directory. To restore the drive, click Add. Click Finish to return to YaST.
Learn more about mounting drives and
/etc/fstabin Chapter 18, “Managing Files, Volumes, and Drives.”
By default, your IDE hard drive can bypass the processor and call on memory directly. This is referred to as Direct Memory Access or DMA. Bypassing the processor using DMA frees up the processor to continue with other tasks and can greatly enhance system performance.
At one time, SUSE Linux set the defaults so all IDE drives could use DMA, but problems with systems locking up or losing data occurred when some CD-ROM drives had DMA turned on. Thus, DMA is turned on for hard drives by default, but not CD drives. You can change this setting yourself in the IDE DMA Setup module (see Figure 4.10).

Select the CD drive in the list and then click the DMA Mode drop-down menu. Choose the DMA On default setting for starters. If that works trouble-free, consider changing to a higher speed. You will get another warning about the potential for problems, so you can back off before making the change. Click Finish to confirm the new setting or click Abort to return to YaST.
http://www.bluetooth.com—The Bluetooth website.
http://www.holtmann.org/linux/bluetooth—Marcel Holtmann’s Linux and Bluetooth page. Articles in English and German, plus downloads.
http://www.cs.ucl.ac.uk/staff/s.zachariadis/btpalmlinux.html—A guide to connecting your Palm PDA to your PC with Bluetooth.
http://tuxmobil.org—The place to get information on Linux on all sorts of mobile hardware: laptops, PDAs, and cell phones. A monthly newsletter is available as well.
http://tuxmobil.org/Infrared-HOWTO/Infrared-HOWTO.html—The Linux Infrared HOWTO. Configuring and using IrDA.
http://linux-laptop.net—Another portable Linux site.
http://www.sane-project.org—Home of the Linux scanner driver project “Scanner Access Now Easy.” Search to see if your scanner is supported by Linux.
http://www.ntp.org—Network Time Protocol home.
http://ntp.isc.org/bin/view/Servers/WebHome—The Public NTP Server list. Find a Network Time Protocol server to connect to. Contains much more helpful information, too.
http://www.cpqlinux.com/acpi-howto.html—The Linux ACPI HOWTO.