Chapter 1 The Motion Graphics Toolbox

An architect’s most useful tools are an eraser at the drafting board, and a wrecking bar at the site.
—Frank Lloyd Wright
Chances are you’ve picked up this book because you want to master Adobe After Effects. Well, it turns out that the path to mastery is a bit windy. We see many motion graphics artists limit themselves by being too narrowly focused. They come to rely on Adobe After Effects for everything. Don’t get us wrong, After Effects has powerful motion graphics capabilities, but it is part of a bigger ecosystem, the Adobe Creative Suite.
Our philosophy is simple. If you were a carpenter, you could do all your work with a hammer. But things would get tough when it came time to tighten a screw in a board. Sure, you could force it through, but seasoned pros know that using the right tool for the job makes the job easier and produces better results.
It’s difficult to create motion graphics without the graphic component (hence the need for Adobe Photoshop, Adobe Illustrator, and Adobe Flash). Likewise, you may want to utilize video in your After Effects work, which means using Adobe OnLocation and Adobe Premiere Pro. This chapter looks at the Production Premium bundle of tools and identifies ways in which they’ll help your After Effects workflow.
Adobe Creative Suite 5 Production Premium
Many users have moved to the Production Premium edition of Creative Suite because it’s a natural progression. For less than the cost of After Effects and Photoshop, you can add a powerful suite of tools to your workflow. Several of the applications in the suite may be just sitting on your computer, rarely being launched. We’d like to change that and make your job easier.
The Production Premium toolset offers a complete solution for motion graphic design. Once you become familiar with the entire suite, you’ll see how seamlessly the tools intersect. All the applications share a similar user interface, and you’ll find that technologies like Dynamic Link and the Edit Original command workflow can make the entire process of sharing projects and assets effortless. Let’s explore the support role each application plays when you’re working with After Effects. The Production Premium toolset allows you to output your final project to multiple formats for viewing on air, online, and on device.
Adobe Premiere Pro CS5
![]()
The presence of video in After Effects projects has become commonplace. The use of Premiere Pro enables you to capture, organize, edit, and output video more efficiently than any other tool in the Creative Suite. Premiere Pro shares many similarities with After Effects, so if you are familiar with After Effects, you should be comfortable using Premiere Pro.
Using Premiere Pro allows you to professionally polish your video footage. By creating a sequence, you can assemble shots in the correct order, trim away any unwanted portions, seamlessly blend audio, adjust color and volume, and then add transitions. Premiere Pro is an efficient and powerful, yet clear-cut solution. Once the video is edited, you can import it into After Effects in several ways. We’ll explore this workflow later in this chapter.
Photoshop CS5 Extended
![]()
Photoshop is the leading choice for editing raster graphics such as photos. The current version of Photoshop significantly extends its nondestructive editing capacities, allowing for even greater control.
Many designers also choose to build their initial designs in Photoshop. With its powerful type controls and precise alignment and scaling tools, you can quickly build prototype designs. Photoshop’s layered file format also imports seamlessly into After Effects with nearly every feature intact, including blending modes, layer grouping, and even layer styles.
 Tip
Tip
After Effects is rarely used for its audio capabilities. Typically, the audio track is exported from Premiere Pro, Audition, or Soundbooth and re-synced with the final composition.
The Production Premium bundle includes the additional capabilities of Photoshop Extended. This allows for easier video file integration and also provides advanced options like Vanishing Point Exchange and 3D objects when working with After Effects. With Adobe Photoshop CS5 Extended, you can even use the new Repoussé command (Figure 1.1) to create 3D objects, which you can then import into After Effects.
Figure 1.1 The Repoussé command is a powerful graphics creation tool that is included with Photoshop CS5. The 3D models you create can be imported as Live 3D objects into After Effects.

Illustrator CS5
![]()
As Photoshop is to raster graphics, Illustrator is to vector graphics. Vector graphics can be infinitely scaled and often have very small file sizes. For After Effects, vector files offer the flexibility of scaling to any size without pixelization. They can also be used as design elements or vector masks. In addition, After Effects can import a layered Illustrator file, which makes animation tasks painless.
We’ll explore vector tools in depth in Chapter 10, “Designing with Vectors.”
Flash Professional CS5
![]()
Flash Professional has a long history of being the tool of choice for developing rich interactive content. On its own, it offers sophisticated tools for animation, video delivery, and interactive design. When combined with the other tools in the Creative Suite, its power truly shines.
The latest version of Flash also sports powerful animation tools, including inverse kinematics. This robust animation style uses a series of linked objects to create relationship-based animation. Additionally, a single shape can be distorted or animated using the new Bones tool. Flash now has an easier-to-use animation model for creating animations in its Timeline for use in multimedia projects or for export to After Effects.
Soundbooth CS5
![]()
Adobe Soundbooth represents a significant evolution in approaching audio tasks (Figure 1.2). The software is designed to simplify essential audio tasks like mixing audio tracks, sweetening sound, and creating music or sound beds. It is designed to be intuitive since much of the complexity of other audio tools has been removed.
Figure 1.2 Soundbooth offers several scores to choose from. You can customize these scores in duration and intensity. Several sound effects can also be used to sound design your animations (such as glints and impact effects). Be sure to visit Resource Central (Window < Resource Central) to browse and download more elements.

Soundbooth even allows you to mix multiple audio tracks together to create complex sound beds. These mixes can be saved using the Adobe Sound Document (ASND) format. You can then bring an ASND file into After Effects, which results in making your timelines cleaner without sacrificing the ability to make adjustments.
Many users bypass Soundbooth and miss out on significant features. Some mistake its ease of use for a lack of functionality; others avoid it due to past experiences with the complexity of other audio tools. However, we recommend you take a closer look because Soundbooth offers a truly useful toolset that works well with After Effects. We’ll explore its uses in Chapter 9, “Designing with Audio.”
Tip
Be sure to visit the extensive Adobe TV online learning center at tv.adobe.com for more on Soundbooth. You should also check out the official page at www.adobe.com/support/soundbooth.
After Effects recognizes six audio file formats. If your source file is not on the following list, you might be able to use Soundbooth to convert it:
• Adobe Sound Document (ASND)
• Advanced Audio Coding (AAC, M4A)
• Audio Interchange File Format (AIF, AIFF)
• MP3 (MP3, MPEG, MPG, MPA, MPE)
• Video for Windows (AVI)
• Waveform (WAV)
If you need to add a custom score or perform sound design for an After Effects composition, remember the value of Soundbooth. In Soundbooth just choose File < Adobe Dynamic Link < Import Adobe After Effects Composition. This makes it very easy to create custom music or add sound effects because you can adjust to match the video.
Bridge CS5
![]()
Adobe Bridge is a command center for the entire Creative Suite. The most useful functions of Bridge include its ability to visually manage media. This includes moving, copying, and renaming files. Bridge can also facilitate tasks that involve multiple applications within the Creative Suite (like creating contact sheets or websites for client review). We’ll explore Bridge more in Chapter 2, “Organizing Your Project.”
Adobe OnLocation CS5
![]()
If you need to acquire new footage for your motion graphics projects, OnLocation can help. OnLocation is a direct-to-disk recording and monitoring solution. By using OnLocation during the preproduction and production stages of a project, you can accelerate the pace of postproduction.
During the planning of a video project, OnLocation allows you to create interactive shot lists or shooting plans that you can check off as you acquire shots. You can also use this organization to improve logging and note taking during the video shoot. If you use Adobe Story, an online tool you have access to through CS Live services, you can even integrate your script and footage directly.
While shooting, OnLocation offers several valuable features. It provides powerful calibration tools—including waveform and vectorscopes—to set up your camera accurately. You can also compare multiple shots for continuity in lighting and exposure. The shots you record can be written directly to a hard drive, which means the footage is organized and ready for After Effects or Premiere Pro for rapid import.
One unique feature that animators will like is that OnLocation provides support for the stop-motion style of animation. This traditional approach uses a series of stills to create fluid motion. OnLocation makes the frame recording options simple and even allows for a split-screen overlay view with opacity control. This precise control makes it easy to position objects from frame to frame.
Encore CS5
![]()
What began its life as a powerful tool to create DVDs has evolved into a multiformat authoring tool. Adobe Encore is a suite of tools that allows video and photos to be authored for deployment as a DVD, Blu-ray Disc, and SWF file. Encore accepts video files as well as photos, music, and sound.
 Notes
Notes
We’ll explore Adobe Encore in greater depth in Chapter 13.
Flash Catalyst CS5
![]()
Adobe Flash Catalyst is a new addition to the Production Premium toolset. Like Encore, it is not a graphics creation tool. Rather, it’s a simple-to-use authoring solution for creating interactive Flash content using Photoshop and Illustrator files. You can also import rendered video that you create with After Effects or Premiere Pro to use in your projects. Flash Catalyst is an excellent way to build interactive projects such as portfolios, training modules, and entertainment websites.
Device Central CS5
![]()
Adobe Device Central is designed to simplify the production of content for mobile phones and consumer electronic devices. At its heart is an extensive and frequently updated database that profiles many devices. There are several options as to how you can use Device Central to streamline your design process.
The primary use of Device Central is as a launching pad. Because it knows what size and type of files work best on each device, it can create template projects for Flash or After Effects.
Once a project is built, you can test it on a virtual device (even simulating different viewing conditions and connection speeds). Device Central works closely with Bridge and makes it straightforward for multimedia designers to create, test, and deploy their work to consumer electronic devices and phones.
Adobe Media Encoder CS5
![]()
Adobe Media Encoder is a robust application that offers a wealth of output options. You can use it to transcode files between formats or optimize files for delivery via Web or optical media (such as Blu-ray). You can use Media Encoder to optimize the video you create in After Effects for delivery to a broader audience. Be sure to check out the watch folder feature of the Adobe Media Encoder. You can create a set of rules so when After Effects outputs a file, the Adobe Media Encoder can process it to multiple formats in the background.
Tip
You can import a Premiere Pro sequence or After Effects composition directly into the Adobe Media Encoder without rendering.
Improving Your Workflow with the Creative Suite
Now that you’ve learned about the diverse suite of applications at your fingertips, let’s focus on your workflow. Motion graphics has become a broad term. Ten years ago, motion graphics design meant you were only targeting a few screens for standard definition television or film.
Oh, have times changed! The number of devices that can play back motion graphics has grown immensely—from smart phones and tablet computers to digital signage and websites. Let’s explore three general scenarios in which motion graphics are in demand.

Traditional Uses
Motion graphics continue to be a requirement in nearly all video and film projects. Whether you’re designing for a news broadcast, a film title sequence, or a marketing video, clients want motion graphics.
In these situations, the Creative Suite excels. Programs like Photoshop and Illustrator allow you to create graphic assets. Additionally, you can easily convert existing assets for print and Web projects for motion graphics use because Adobe’s tools are used across design fields.
The rich video toolset provided makes integrating your motion graphics into a traditional postproduction pipeline stress-free. Premiere Pro lets you import and organize video assets. It can even exchange media and projects with Final Cut Pro and Avid users.
Interactive Uses
Many motion graphics projects are becoming a key ingredient in interactive experiences. The Production Premium toolset offers several approaches to building interactivity. You can easily import video created by After Effects into Flash Catalyst for interactive content. For more robust interactive design, Flash Professional offers a complete toolset. Making this migration process simpler, you can even harness the XFL exchange format to import a layered After Effects file into Flash.
If optical media is more your approach, there’s Encore. Both Blu-ray and DVD have come to depend on motion graphics for their menu systems. You can easily design menus in After Effects and even use individual compositions for menus without intermediate rendering thanks to Dynamic Link. If you plan your project with some foresight, you can even reuse your graphics across multiple mediums. With an Encore project, you can publish a standard DVD, a Blu-ray Disc, and a Flash version.
Mobile Screens
The world of mobile video and motion graphics is a vast wilderness. There truly is a lack of standards when it comes to designing for mobile devices like phones, game systems, and media players. Fortunately, there’s Device Central, which offers a rich database of profiles for several devices (Figure 1.3).
Figure 1.3 Device Central offers profiles for many mobile devices. You can create custom After Effects compositions that match the pixel dimensions and frame rates for the intended device.
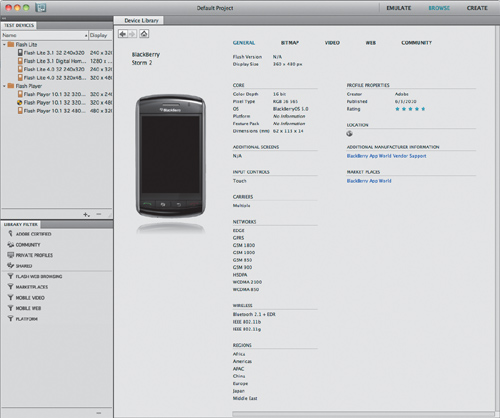
You can browse for a particular device that supports video or Flash content in the Device Library. Once you’ve found the desired platform, drag it into the Test Devices panel and select it. You can then create a new After Effects composition by choosing File < New Document In < After Effects. If it’s not visible, click the Create workspace, examine the selected settings to make sure they meet your needs, and click the Create button (Figure 1.4) to launch After Effects and create a composition with the newly specified settings. If After Effects is already running, a new composition will be added to a folder called Device Central Comps.
Figure 1.4 If a device supports video playback, you’ll often find that Device Central offers After Effects composition settings that you can use.

Making Integration Trouble-free
A major focus of the Creative Suite is to eliminate wasted steps. Instead of constantly rendering or exporting media assets, you’ll find support for exchanging media through Dynamic Link as well as layered graphics. On first use, linking may seem a little confusing, but you’ll find that the flexibility and speed benefits are enormous. Being able to copy and paste or send assets between applications is a huge time-saver (rendering and exporting are avoided until final render or output). Disk space is also conserved (no need for intermediate files).
Working with Image Files
Using After Effects is a great way to animate images. Whether it’s a vector logo or a still photo, it’s easy to import and apply effects and transformations. Throughout this book we’ll use sources created or manipulated in Photoshop and Illustrator. Although Photoshop is traditionally thought of as a raster-editing program and Illustrator as a vector-editing program, you can actually work with both types of graphics in either application.
Supported Image File Types

After Effects can import several graphic formats. If you have a source image that is not on the list, you can often convert it using Photoshop or Illustrator. If you have a series of still images, you can import them as a sequence. Here are the formats After Effects supports:
Notes
Photoshop CS5 discontinued support for PICT graphics. This format was previously widely used by many Macintosh-based video tools. We recommend you switch to other formats like TIFF or PSD to preserve a flexible editing workflow with Photoshop.
• Adobe Illustrator (AI, AI4, AI5, EPS, PS; continuously rasterized)
• Adobe PDF (PDF; first page only; continuously rasterized)
• Adobe Photoshop (PSD)
• Bitmap (BMP, RLE, DIB)
• Camera Raw (TIF, CRW, NEF, RAF, ORF, MRW, DCR, MOS, RAW, PEF, SRF, DNG, X3F, CR2, ERF)
• Cineon/DPX (CIN, DPX; 10 bpc)
• Discreet RLA/RPF (RLA, RPF; 16 bpc; imports camera data)
• EPS
• GIF
• JPEG (JPG, JPE)
• Maya IFF (IFF, TDI; 16 bpc)
• OpenEXR (EXR, SXR, MXR; 32 bpc)
• PICT (PCT)
• Portable Network Graphics (PNG; 16 bpc)
• Radiance (HDR, RGBE, XYZE; 32 bpc)
• SGI (SGI, BW, RGB; 16 bpc)
• Softimage (PIC) (After Effects can also read ZPIC files corresponding to imported PIC files.)
• Targa (TGA, VDA, ICB, VST)
• TIFF (TIF)
Edit Original Command
The Edit Original command is a great way to update a graphic file. When working in After Effects, we find a continuous need for graphic assets. Although After Effects can import nearly any graphics file format, it’s best to stick with layered Adobe formats such as Photoshop (.psd) and Illustrator (.ai).
Both graphic formats can be imported as compositions into After Effects. The major benefit here is the flexibility that layers provide. We’ll explore animation techniques throughout the rest of the book.
Although the Edit Original command can be run on any image format, it really shines when you’re working with native Adobe files with layers.
1. Select any footage item in the Project panel, Composition panel, or Timeline panel.
2. Choose Edit < Edit Original or press Command+E (Ctrl+E).
3. Make edits to the graphic in its original application, and then save the changes.
4. Return to After Effects, and the source updates automatically.
Notes
If the graphic you’re updating uses an alpha channel, be sure to modify or update it before saving. If you’re using the native transparency of layered Photoshop or Illustrator files, there’s nothing to update.
Working with Footage Files
There’s a good chance your motion graphics project uses footage. If you have more than a few clips, using Premiere Pro to organize, arrange, and trim the footage is essential. With its real-time performance, you can mix and match footage and edit without RAM previews. As an experienced After Effects user, you’ll find Premiere Pro fairly intuitive.
Notes
If you’re working with older Flash Video files, they might not work with After Effects CS5. You’ll only be able to use FLV files with video encoded using the On2 VP6 video codec. If you’ve used the older Sorenson Spark video codec, you’ll need to transcode the file to a different format with an older version of the Adobe Media Encoder. Be sure to keep a copy you installed with CS4 around for this purpose.
After Effects cannot work with all MXF formats. Those created by Panasonic cameras (such as P2 cameras) should work. This includes MXF files using the AVC-Intra 50, AVC-Intra 100, DV, DVCPRO, DVCPRO50, and DVCPRO HD codecs. After Effects can also import XDCAM HD files in MXF format from many Sony cameras.
Supported Footage File Types

After Effects can import several footage, or motion, formats. The challenge, however, is that footage clips are often much longer than you need. The following formats can be imported directly, although we usually prefer to edit or trim the footage to just what we need in Premiere Pro first.
Tip
If the MPEG formats you want to use aren’t recognized, it might be because they use a container (such as .vob and .mod). In this case you can try to import the files into Premiere Pro or modify the filename extension to one of the recognized extensions.
• Animated GIF (GIF)
• DV (in MOV or AVI container or as containerless DV stream)
• Electric Image (IMG, EI)
• FLV, F4V
• Media eXchange Format (MXF)
• MPEG formats (MPEG-1, MPEG-2, and MPEG-4 formats)
• PSD file with video layer (requires QuickTime)
• QuickTime (MOV; 16 bpc, requires QuickTime)
• RED (R3D)
• SWF (continuously rasterized)
• Video for Windows (AVI, WAV)
• Windows Media File (WMV, WMA, ASF; Windows only)
• XDCAM HD and XDCAM EX (MXF and MP4 formats only)
 Close-Up: Working with Tapeless Sources in Premiere Pro
The use of tapeless acquisition is the new standard. Premiere Pro supports most of the options on the market, including Panasonic P2 (Figure 1.5), Sony XDCAM, AVCHD, RED, and DSLR cameras. The rise in tapeless sources has been driven by several factors, including lowered costs and greater flexibility in recording formats. Additionally, the tapeless formats are more likely to have extensive metadata already attached. This information about the shot will automatically come in with the file on import.
Figure 1.5 A Panasonic P2 card is one of the many formats supported natively by Premiere Pro.

The tapeless workflow is pretty straightforward:
1. With tapeless sources you’ll want to copy the media to a hard drive first. You can copy the media to your Common Media Folder or use the Project Manager later to consolidate footage. Tapeless sources can transfer much faster than realtime if you use a fast card reader or connection type.
2. In Premiere Pro, activate the Media Browser panel. If it’s not visible, choose Window < Media Browser. Drag the edge to make the Browser larger.
3. Browse to the folder containing the media files. The Media Browser will show a thumbnail of the footage if the format supports it and the name of each shot.
4. When you’re ready to import, choose File < Import From Browser. Premiere Pro imports the selected footage as single clips.
Notes
When importing a SWF, it is treated as a vector object. Audio, interactive content, and scripted animations are not retained. Nested animations may also not come across correctly. For more on working with Flash and After Effects, see the book After Effects for Flash/Flash for After Effects (Adobe Press, 2009).
When you’re working with tapeless sources, be sure to download the latest drivers from the camera manufacturer’s website. Otherwise, you may have difficulty mounting media and transferring footage.
Organizing Footage with Premiere Pro Sequences
The easiest way to select footage for your After Effects project is to assemble the clips into a Premiere Pro sequence. You can edit footage nondestructively, assembling multiple clips into the correct order. By setting In and Out points on your clips, the trims will come into After Effects (with handles intact).
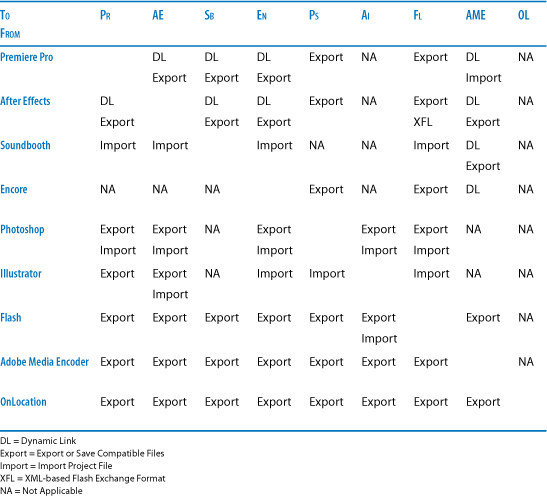
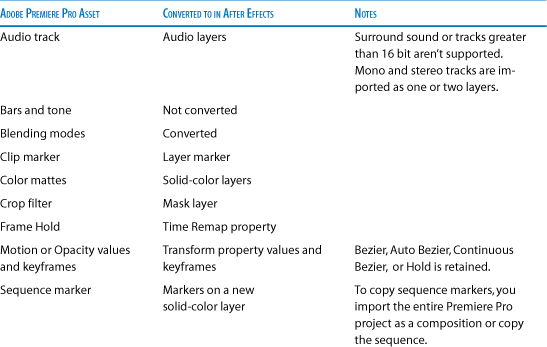
Table 1.1 shows what you can expect when you import a Premiere Pro sequence into After Effects or use the Copy and Paste feature.
Table 1.1 Importing or Copying from Premiere Pro to After Effects

Importing from other Nonlinear Editors
As a motion graphics artist, you may find that you’ve become dependent on video editors for your footage. As such, you may have little control over which nonlinear editing system is used. Fortunately, Premiere Pro is flexible in its support. You can import both media and sequence files from Avid or Final Cut Pro (Figure 1.6).
Figure 1.6 A Final Cut XML file can be imported into Premiere Pro and then shared with After Effects through Dynamic Link or Copy and Paste.

Notes
Once you’ve started capturing media, you’ll likely end up with more than you need. When you start editing, you can reduce a Premiere Pro project to include only the footage used in a sequence. This is useful for media management as well as efficiency purposes. Be sure to look up the Project Manager in the Premiere Pro help menu to ensure that you’ve used the proper steps for reducing, collecting, and moving project assets.
1. Have the editor use the preferred editing software to media manage the sequence. Final Cut Pro and Avid have their own media management tools that the editor should know how to use. The editor should copy the needed media to a mobile drive or across a network.
2. Have the editor export a sequence file in a converted format.
• For Final Cut Pro systems, the editor should create an XML file for the selected sequence.
• For Avid systems, the editor should create AAF files for the selected sequence.
3. In Premiere Pro, choose File < Import and select the Final Cut Pro or Avid sequence. All the related media will also be added.
4. Use Dynamic Link or the Copy and Paste command to move assets into After Effects (more next). You can also import a saved Premiere Pro project directly into After Effects.
Dynamic Link
With Dynamic Link technology, Adobe has created a way to allow tight integration between its core video applications. It’s designed to streamline the moving of assets between After Effects, Premiere Pro, Soundbooth, or Encore. The functionality exists between several applications but behaves a little differently depending on the pair being used.
The primary goal of Dynamic Link is to minimize time lost from rendering or exporting. This means an After Effects composition can be placed into a Premiere Pro sequence without needing to render until final output. Additionally, footage can be edited in Premiere Pro and easily exchanged to After Effects for compositing and motion graphics tasks. You can bring over a series of clips as individual clips or use an entire Premiere Pro sequence as a single video track in After Effects.
Close-Up: Importing Clips from an OnLocation Project
Premiere Pro can easily import clips captured with OnLocation. If you are using a different machine to edit than the one you used when shooting, you’ll need to copy the media to a removable drive or to the new computer.
1. In the Media Browser panel, select the folder with the clips from OnLocation.
2. In the Media Browser, select the clips that you want to import into your Premiere Pro project.
3. Choose File < Import From Browser. Premiere Pro adds the selected clips into the Project panel.
Premiere Pro to After Effects
Earlier we discussed how useful Premiere Pro is to a motion graphics artist for assembling and pre-editing video clips. With its robust audio controls, real-time performance, and video capture to After Effects, you’ll quickly find it indispensible—especially when you see Dynamic Link (Figure 1.7) or Copy and Paste in action.
Figure 1.7 With Dynamic Link you can import a single sequence as a clip into After Effects. Changes to the clip in Premiere Pro are automatically updated in After Effects.
To import a sequence or assets from Premiere Pro to After Effects:
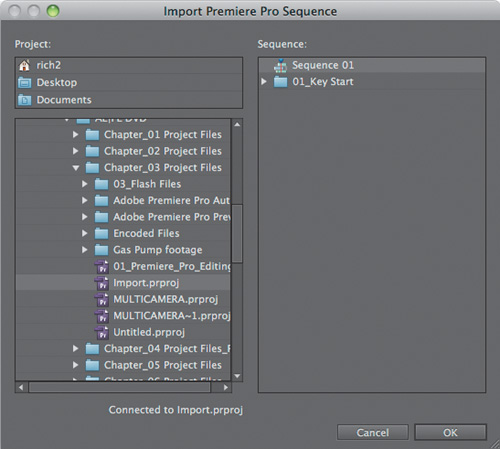
• In After Effects, choose File < Adobe Dynamic Link < Import Premiere Pro Sequence. This allows you to use a sequence as a single layer in your After Effects composition. This can all be accomplished without having to render or export from Premiere Pro first. If you make any changes in Premiere Pro, they will be automatically reflected in your After Effects compositions.
• If you have desired clips on a Timeline, it’s easy to do a precise move. Simply select the clips on your Timeline and choose Edit < Copy. You can then switch to an open composition in After Effects and choose Edit < Paste. After Effects converts all the assets into layers and copies the source footage into its Project panel (Figure 1.8). Unlike Premiere Pro, which allows multiple objects on one track, After Effects will convert each item to its own layer. Additionally, any effects or transitions will attempt to be transferred if a close After Effects effect matches.
Figure 1.8 Moving assets between Premiere Pro and After Effects is as easy as copy and paste.

After Effects to Other Applications
After Effects compositions can also be imported into other applications within the Creative Suite. It is possible to import without rendering first, which makes it easy to use After Effects compositions in several ways:
In Premiere Pro
• Preview a composition in the Source Monitor.
• Set In and Out points for a composition, and then add it to a sequence.
• Edit a composition with Premiere Pro tools.
Notes
If you import an After Effects composition with Dynamic Link, Premiere Pro inserts linked video and audio clips into the Timeline. If needed, you can unlink the video from the audio so that the clips can be edited separately.
• Create a motion menu with a composition.
• Insert a composition into an Encore Timeline.
• Edit a composition with Encore tools.
XFL Format Exchange
If you want to exchange a project file between After Effects and Flash, it’s gotten easier. A newer format, the XFL file, allows you to send layers intact over to Flash. Once in Flash you can add interactivity. When you export a composition from After Effects, all layers and keyframes are preserved.
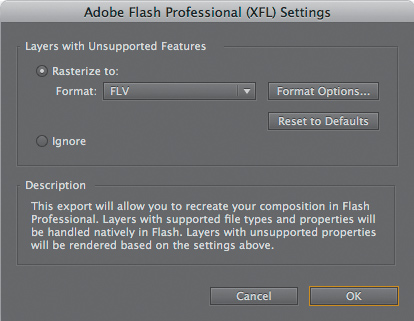
In After Effects choose File < Export < Adobe Flash Professional (XFL). Choose how you want unsupported effects to be handled and what codec to use for the video assets (Figure 1.9). The XFL file can then be converted and exported.
Figure 1.9 The XFL format can export video and graphic assets with layers intact. This makes the process of moving from After Effects to Flash simpler.
Tip
For a video tutorial about exporting XFL files from After Effects, see “Importing and exporting XFL files between Flash and After Effects” at www.adobe.com/go/lrvid4098_xp.
The XFL file is essentially a bundle that contains all the pieces in a neat file. When you import the XFL file into Flash, it unpacks the assets and adds them to the FLA file according to the instructions in the XFL file. In Flash choose File < Open and navigate to your XFL formatted file. Flash brings in the media with layers intact and adds it to your current project.
Moving Media in the Creative Suite
The efficiency and versatility of the Production Premium toolset allows you to move files within the Creative Suite quickly. Technologies like Dynamic Link and the Edit Original command save time, effort, and money. Table 1.2 summarizes how the files are exchanged between applications.
Table 1.2 Moving Files Within the Production Premium Toolset