Chapter 8. Exploiting Windows 7
With every new version of Windows comes a vast amount of new functionality for developers to exploit, and Windows 7 is no exception. Windows 7, like Windows Vista, introduced a number of new user interface concepts for applications to leverage. An application can appear much more modern and provide users some extra delight by exploiting these features.
This chapter begins by examining how to leverage two common features that make a WPF application feel more at home on Windows 7:
After that, it demonstrates two features introduced in Windows Vista that are still just as relevant for Windows 7:
Jump Lists
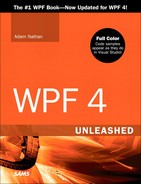
One of the most prominent new user interface features in Windows 7 is Jump Lists on taskbar items. A Jump List contains handy shortcuts and can be seen when you right-click or swipe upward on a taskbar item. Figure 8.1 shows the Jump List for Internet Explorer.
Figure 8.1 The Jump List for Internet Explorer can contain items in several categories.

Even if an application doesn’t do anything to take advantage of Jump Lists, it still gets a default one. Figure 8.2 shows the default Jump List for the previous chapter’s Photo Gallery application, when the application is open and when it is closed. (You can see a Jump List for a closed application only if it has been pinned to the taskbar.)
Figure 8.2 The default Jump List for Photo Gallery.

In WPF 4, the System.Windows.Shell.JumpList class enables you to define a custom Jump List for an application in simple managed code—or even in XAML! This doesn’t mean that you can use WPF visual elements inside the Jump List, just that the available functionality is exposed via managed objects with simple properties.
To associate a custom Jump List with an application, you set the silly-sounding JumpList.JumpList attached property on the Application instance to a JumpList instance or call the corresponding JumpList.SetJumpList method from procedural code. If you create or modify a JumpList from procedural code, you must call JumpList’s Apply method to send the updates to the Windows shell.
JumpList has a JumpItems content property that can contain two types of items, JumpTasks and JumpPaths, both of which derive from a common abstract JumpItem class.
JumpTask
To a user, JumpTasks represent actions to perform, such as the Start InPrivate Browsing and Open new tab tasks from Figure 8.1. To a developer, JumpTasks represent programs to be launched (operating system tasks). These are typically used to launch the host program with command-line arguments that indicate which task was selected.
Listing 8.1 demonstrates the use of a few JumpTasks by updating the App.xaml file from the last chapter’s Photo Gallery example. The resulting Jump List is shown in Figure 8.3. Notice that the bottom three items (two, if the application is pinned and closed) are always present, so a custom Jump List only affects what items are presented on top of these standard ones.
Figure 8.3 A custom Jump List with three simple JumpTasks.

Listing 8.1 App.xaml—Applying a Custom JumpList with Simple JumpTasks

Each JumpTask has a Title shown inside the Jump List and an optional Description used as its tooltip. Because no other properties are specified, the first JumpTask simply relaunches the host Photo Gallery application. This duplicates the functionality of the standard Photo Gallery item in the bottom section of the Jump List, so it doesn’t make sense for a real application to do this. The next two JumpTasks, however, pass command-line arguments so the new instance of Photo Gallery that gets launched can take some arbitrary action. Photo Gallery can use Environment.CommandLine at some point in its initialization to respond appropriately.
Tip
From the user’s perspective, a typical task from a Jump List doesn’t launch a new instance of the program but rather causes something to happen inside the already-running instance. To accomplish this behavior, you can make an application a single-instance application (discussed in the preceding chapter) and communicate the action back to the running instance.
Whenever an application has a custom Jump List, its items also appear in the Start menu when the application is selected. Figure 8.4 shows how the Jump List from Listing 8.1 automatically enhances the Start menu.
Figure 8.4 The same Jump List from Figure 8.3 automatically appears in the Start menu.

Warning: Visual Studio’s debugger interferes with Jump Lists!
When you run an application under the Visual Studio debugger, the application appears as vshost32.exe, as shown in Figure 8.5. You still see the custom JumpTasks, but their icons might be different, and clicking on them won’t work (because it causes vshost32.exe, rather than your application, to be launched). The situation is even worse for JumpPaths, described in the next section, which don’t appear at all. To avoid this problem, you can uncheck “Enable the Visual Studio hosting process” in the Debug section of the project’s properties.
Figure 8.5 The Jump List is affected by Visual Studio’s debugger host process.

Warning: Jump Lists are shared by all instances of an application!
Jump Lists are associated with an application—not a specific window or running instance. Any items placed in a Jump List are persisted when the application isn’t running. If a second instance of an application starts and places different items in its Jump List, those items replace the items that the first instance previously placed.
Customizing JumpTask Behavior
JumpTask has a number of properties for customizing each item’s icon and for launching other applications besides the host. Listing 8.2 demonstrates these properties, and Figure 8.6 shows the results.
Figure 8.6 Launching other programs with customized JumpTasks.

Listing 8.2 App.xaml—Demonstrating Additional JumpTask Properties

Each JumpTask sets an additional property to customize the experience above and beyond the previous one. The first item leverages ApplicationPath to invoke magnify.exe. Notice that ApplicationPath happily accepts environment variable syntax, so you can reliably set certain paths in XAML rather than build up the path in procedural code.
The second JumpTask sets IconResourcePath to customize the icon. The icon should be a Win32 resource embedded inside an EXE or DLL file. (You can specify a loose .ico file instead, but this requires a full path that doesn’t use environment variables, so it’s not reasonable to set this inside XAML.) By setting the path to an EXE file, you can easily get the default icon for that program. When IconResourcePath is null, as with the first JumpTask, the host executable is used. That’s why the first JumpTask picks up Photo Gallery’s icon.
Tip
%WINDIR%System32shell32.dll and %WINDIR%System32imageres.dll have many stock icons that can useful for JumpTasks. They are not guaranteed to be the same across different versions of Windows, but they can be helpful.
The third JumpTask sets WorkingDirectory to affect how the program (Notepad, in this case) is launched. As with ApplicationPath and IconResourcePath, you can use environment variable syntax inside the string.
The last JumpTask not only sets Arguments to invoke Internet Explorer in its “no add-ons” mode but sets IconResourceIndex to customize the icon. This is why the icon in Figure 8.6 is a house rather than the blue “e” logo. An EXE or DLL file might have a long list of icon resources embedded inside. When IconResourceIndex is left at its default value of zero, the first icon (the one also used by the Windows shell) is used. But if the EXE or DLL file has more, you simply set IconResourceIndex to a higher index to leverage it. If you specify an invalid index, you get a generic icon, like the one shown in Figure 8.5.
Tip
If you don’t want any icon next to a JumpTask, set its IconResourceIndex to -1. This works whether or not you explicitly set IconResourcePath.
Tip
If you want to separate JumpTasks with a horizontal line, just add a JumpTask at the appropriate spot, with no properties set. Figure 8.7 shows the result of adding <JumpTask/> between the first two JumpTasks and again adding <JumpTask/> between the last two JumpTasks from Listing 8.2.
Figure 8.7 Adding two horizontal line separators with empty JumpTask elements.

Custom Categories
You can use one more property to customize the behavior of a JumpTask, although this one is inherited from the base JumpItem class. You can set the CustomCategory property to any non-empty string to place an item in a separate section with a heading other than the “Tasks” default.
Listing 8.3 updates Listing 8.2 by placing one item in a category called One and two items in a category called Two. Figure 8.8 shows the results.
Figure 8.8 Applying custom categories to a Jump List.

Listing 8.3 App.xaml—Using the CustomCategory Property

Items in custom categories automatically support user pinning and user removal. (The latter is available via a context menu.) When an item is pinned, it moves into a Pinned category. The user can later unpin the item, as shown in Figure 8.9.
Figure 8.9 Pinning a JumpTask from a custom category.

Warning: Pinning a JumpTask doesn’t work when it its Arguments property is not set!
Due to a bug in Windows 7, argument-free tasks cannot be pinned. The pin button still appears, but nothing happens when the user clicks on it. Fortunately, most tasks use at least one argument. If you want to launch a program that doesn’t need any arguments, and if you are not able to pass a dummy argument, you can work around this by using an intermediary program that accepts and ignores the argument.
Warning: Custom categories appear in order from the bottom up!
Both JumpTasks and custom categories appear in the order in which they appear inside the JumpItems collection. However, whereas the list of JumpTasks grows from top to bottom, the list of categories grows from bottom to top! That is why Two appears above One in Figures 8.8 and 8.9.
JumpPath
Whereas JumpTasks represent programs, JumpPaths represent files that can be opened by the host application. In fact, an application can use JumpPaths only if it is registered with Windows to handle the relevant file extension(s). To run the examples in this section, you can temporarily register the sample application as a handler for .JPG files. (For experimentation, you probably want to do this via Windows Explorer’s Open With, Choose Default Program context menu item rather than doing this programmatically.)
Listing 8.4 updates Listing 8.3 by adding a JumpPath to the existing collection of JumpTasks. (JumpPaths and JumpTasks can be intermingled because they share the common JumpItem base class.) Because this file exists on the current C: drive, and because the application is registered to handle .JPG files, the Jump List now appears as shown in Figure 8.10. If either of these conditions were false, the Jump List would appear the same as it did in Figure 8.8.
Figure 8.10 A JumpPath added to the Jump List from Figure 8.8 in its own Photos custom category.

Listing 8.4 App.xaml—Adding a JumpPath to Listing 8.3

By default, JumpPaths are placed in the Tasks category, which is a bit odd. But you can set CustomCategory (inherited from JumpItem) to move them to different categories. This approach has the advantage of making each item automatically pinnable.
When the user clicks the DSC06397.jpg item, a new instance of the host application is launched, with Path passed as the one and only command-line argument. Therefore, except for its icon and context menu, the JumpPath in Listing 8.4 is somewhat like the following JumpTask:

It is the responsibility of the application to respect the command-line argument and do whatever it means to “open” the file, just as with any other JumpTasks you may define.
Warning: JumpPath’s Path property does not support environment variable syntax!
That is why Listing 8.4 uses a hard-coded path to the .JPG file. In practice, however, this should not be a big problem. Applications typically add JumpPaths dynamically from procedural code, which can use arbitrary logic (including environment variables) to compose each path.
Recent and Frequent JumpPaths
Most applications—even ones that are registered handlers for certain file types—will have no reason to do anything explicit with JumpPaths. That’s because Jump Lists automatically provide end-to-end functionality for the two most common types of categories—recent items and frequent items.
To get either one of these categories added to a Jump List, you simply set JumpList’s ShowRecentCategory and/or ShowFrequentCategory properties to true. These categories will automatically appear and be populated if appropriate files have been recently and/or frequently opened. Windows tracks the opening of a file whenever it is done through the common File Open dialog or whenever the file type association is leveraged (for example, by double-clicking the file in Windows Explorer or by clicking a JumpPath).
If you want to force items onto these lists (for example, if an application opens files in a way that doesn’t go through these mechanisms), you can call the JumpList.AddToRecentCategory method. It has overloads that accept either a path string, a JumpPath instance, or even a JumpTask instance. There is no AddToFrequentCategory method; you would only be able to force an item to show up as frequent by adding it to the recent category enough times.
Adding both categories to the JumpList from Listing 8.4 gives the result in Figure 8.11:

Figure 8.11 Leveraging the built-in Recent and Frequent categories.

Of course, using both categories simultaneously is not typical due to the high amount of overlap that is likely between the two lists. As seen in Figure 8.1, Internet Explorer chooses to show Frequent, whereas a lot of applications choose Recent. (Windows 7 provides the Recent category automatically for apps not built to specifically take advantage of Jump Lists.)
Responding to Rejected or Removed Items
Because JumpPaths added to JumpList’s JumpItems property might be rejected by Windows if the application isn’t registered to handle the file type or if the file doesn’t exist, items are sometimes automatically removed from the JumpItems collection. If you want to react to such automatic removal, you can handle JumpList’s JumpItemsRejected event.
JumpItemsRejected is raised once if one or more items are removed, although not until the next time a JumpList is applied, such as the next launch of the application. To handle the event for a XAML-defined JumpList, you should attach the handler in XAML. For a JumpList created in procedural code, be sure to attach the handler before calling Apply.
The JumpItemsRejectedEventArgs instance passed to event handlers contains a list of the rejected JumpItems as well as a list of JumpItemRejectionReason enumeration values. Each value can be one of the following:
• NoRegisteredHandler—The application is not registered to handle the file type.
• InvalidItem—The file does not exist (or you’re running a version of Windows prior to Windows 7).
• RemovedByUser—The item was manually removed by the user.
• None—The item was rejected for an unknown reason.
If you only care about handling items removed by the user, you could alternatively handle the JumpItemsRemovedByUser event, which simply presents the list of removed JumpItems. It makes sense to handle this, for example, to see if the user has removed one of your JumpTasks. That way, you know to stop including it in the Jump List on future launches.
Taskbar Item Customizations
Starting with WPF 4, Window has a TaskbarItemInfo property (of type System.Windows.Shell.TaskbarItemInfo) that enables several customizations to an application’s taskbar item or its corresponding thumbnail preview. For example, you can add a custom tooltip to the taskbar item’s thumbnail preview by setting TaskbarItemInfo’s Description property as follows:

Or, in C# you can set it this way:

Figure 8.12 shows the result of doing this.
Figure 8.12 The tooltip supplied by TaskbarItemInfo.Description.

Of course, you can do much more with TaskbarItemInfo besides setting a tooltip.
Using a Taskbar Item Progress Bar
Taskbar items support a built-in progress bar, which is useful for displaying the status of long-running tasks in a low-impact fashion. Windows Explorer and Internet Explorer take advantage of this functionality, which is especially nice for keeping an eye on progress while you’re working inside another program.
Showing a progress bar is as simple as setting two properties on TaskbarItemInfo: ProgressValue and ProgressState. ProgressValue can be set to a double between 0 (0%) and 1 (100%) to affect how “filled” the progress bar is. ProgressState can be set to one of the following values from the TaskbarItemProgressState enumeration:
• Normal—Show a green progress bar.
• Paused—Show a yellow progress bar.
• Error—Show a red progress bar.
• Indeterminate—Show a green progress bar that constantly animates rather than showing the standard fill that reveals the value of ProgressValue.
• None—Don’t show a progress bar. This is the default value.
The first three values all result in a “normal” progress bar; the choice only affects the color. Yellow is meant to be used when progress is paused, and red is meant to be used when an error has occurred, but this is entirely in your control. For instance, you’re not prevented from reporting progress even when ProgressState is Paused.
The Indeterminate ProgressState is perfect for situations in which you are unable to report ongoing progress values. In this state, the progress bar animation ignores the value of ProgressValue and simply shows a standard animation.
You can update ProgressState and ProgressValue at any time, and you can see the change reflected in the progress bar. Figure 8.13 demonstrates all five values of ProgressState with ProgressValue set to .85.
Figure 8.13 The five ProgressState settings supported by a taskbar item progress bar.

Adding an Overlay to the Taskbar Item
In addition to a progress bar, taskbar items support displaying a little image overlay on top of its icon to communicate additional status. TaskbarItemInfo exposes this as an Overlay property of type ImageSource (a class examined in later chapters).
Figure 8.14 shows what happens when setting an overlay as follows:

Figure 8.14 An overlay image and its use on a taskbar item.

If the user has changed the taskbar to use small icons, overlay images are not supported, so setting this property does nothing. Similarly, using any of the TaskbarItemInfo functionality does nothing when the application runs on a version of Windows earlier than Windows 7.
Tip
Changing Overlay from one image to another does not trigger the fade effect. Therefore, you can rapidly update Overlay with a series of images to produce an animated result!
When the overlay image is applied, it is placed in the lower-right corner and smoothly fades in. Similarly, removing the overlay by later setting Overlay to null smoothly fades it out.
Customizing the Thumbnail Content
By default, the thumbnail shown when hovering over a taskbar item is a live preview of the entire window. TaskbarItemInfo provides one small way to customize this. By setting the ThumbnailClipMargin property (of type Thickness), you can crop the default thumbnail.
Figure 8.15 demonstrates one potential use of this feature. Photo Gallery could set ThumbnailClipMargin (and adjust its value when the window is resized) whenever viewing a single photo, in order to crop out the chrome and focus on the main content.
Figure 8.15 Clipping the taskbar thumbnail to a photo rather than the entire window.

Adding Thumb Buttons to the Taskbar Thumbnail
The last customization exposed by TaskbarItemInfo is the ability to place buttons at the bottom of the thumbnail preview, to provide a user interface like Windows Media Player’s miniature Play/Pause, Previous, and Next buttons. This is exposed as TaskbarItemInfo’s ThumbButtonInfos property, a collection of ThumbButtonInfo objects.
Although ThumbButtonInfo is not a WPF UIElement, it exposes the basic properties you would expect for a button, considering the limitation that its content can only be an ImageSource. Each ThumbButtonInfo has an ImageSource property for its content, a Description property for its tooltip, and a Click event. (However, unlike Button, its Click event is not a routed event. It works with plain event handlers.) ThumbButtonInfo also has a Command property with corresponding CommandTarget and CommandParameter properties, so these buttons can participate nicely in commands used by your application.
ThumbButtonInfo has a standard Visibility property, with all three possible values doing what you would expect. (This is a neat trick, considering that WPF layout is not involved here.) It also has a handful of Boolean properties that are all true by default except for the last one: IsEnabled, IsInteractive, IsBackgroundVisible, and DismissWhenClicked. The “background” referred to by IsBackgroundVisible is the button chrome; there actually is no customizable background for these buttons.
Figure 8.16 demonstrates the following ThumbButtonInfos applied to Photo Gallery:
Figure 8.16 Thumb buttons can be placed inside the thumbnail preview popup.


Warning: Only the first seven ThumbButtonInfos matter!
Because there is room for only seven thumb buttons on the thumbnail preview popup, only the first seven ThumbButtonInfos in the collection are respected. What’s subtle is that this is true even if some of the first seven buttons are marked with Visibility set to Collapsed (leaving room for later buttons to appear). Therefore, to dynamically swap between more than seven buttons, you actually need to add/remove items from the collection rather than simply toggle their Visibility.
FAQ
![]() How can I customize the hover color of my taskbar item?
How can I customize the hover color of my taskbar item?
You can’t customize this color, other than changing the colors in your icon. Windows picks up the dominant color of the icon and bases the glow color on that.
Aero Glass
Aero Glass is the blurry, transparent window chrome that can be extended into the client area, introduced with Windows Vista. The easiest way to use it in a WPF application is to call the Win32 DwmExtendFrameIntoClientArea API. (The Dwm stands for Desktop Window Manager.) With this method, you can make an entire Window a sheet of glass (as shown in Figure 8.17) or choose to extend the glass a specified amount from any of the Window’s four edges (as shown in Figure 8.18). Either way, you can add WPF content on top of the glass, just as you would if the Window background were a simple solid color.
Figure 8.17 A glass background for the entire Window.

Figure 8.18 Extending glass on the bottom of the Window only.

If you’re using Visual C++, you can call the DwmExtendFrameIntoClientArea API directly. But in a language like C# or Visual Basic, PInvoke (that is, using the DllImport attribute) enables you to call it. PInvoke is the key to calling all the Desktop Window Manager APIs from C#. Listing 8.5 contains PInvoke signatures and a simple reusable utility method that wraps the PInvoke calls.


The GlassHelper.ExtendGlassFrame method accepts a Window and a familiar Thickness object for representing how much glass should be extended on all four edges. (To get the “sheet of glass” effect, you can pass -1 for all four sides.) After checking that desktop composition is enabled (a prerequisite for glass), the code maps the Thickness object to the MARGINS type expected by DwmExtendFrameIntoClientArea and calls this API with the appropriate HWND. The Window’s Background is also set to Transparent so the glass is able to show through. For more information about the techniques used here, consult Chapter 19, “Interoperability with Non-WPF Technologies.”
Any WPF Window can use GlassHelper.ExtendGlassFrame as follows:

The method must not only be called during initialization but whenever desktop composition is disabled and then reenabled. This could happen because of explicit user action, or it could be triggered from something like Remote Desktop. To be notified of changes to desktop composition, you need to intercept a Win32 message (WM_DWMCOMPOSITIONCHANGED). See Chapter 19 to get a better understanding of how the preceding code works.
Figure 8.19 shows Photo Gallery using the preceding code to enable a glass background.
Figure 8.19 A glass-enabled Photo Gallery.

TaskDialog
It’s often tempting for a developer to use MessageBox where it might be more appropriate to craft a custom dialog. But laziness is a fact of life, so Windows Vista introduced a new and improved MessageBox—called TaskDialog—that gives such developers better results and more flexibility. It matches the more modern look and feel of Windows and even enables deep customization of the dialog with additional controls.
You can take advantage of this new functionality by calling a Win32 API called TaskDialog. As with working with Aero Glass, PInvoke is the key to calling the TaskDialog API. Listing 8.6 shows a PInvoke signature for TaskDialog and its associated types.
Listing 8.6 TaskDialog Signature and Types in C#

Unlike MessageBox, the TaskDialog API enables you to specify a main instruction that is visually separated from the rest of the content. It also enables you to choose an arbitrary mix of buttons. Figures 8.20 and 8.21 illustrate the difference between MessageBox and TaskDialog, based on the following code:

Figure 8.20 A MessageBox looks a little old-fashioned and lazy on Windows 7.

Figure 8.21 A similar TaskDialog looks more user friendly.

Warning: The use of TaskDialog requires version 6 of the Windows Common Controls DLL (ComCtl32.dll)!
For compatibility reasons, applications don’t bind to this version by default. One way to bind to version 6 is to place a manifest file alongside your executable (named YourAppName.exe.manifest), with the following content:

This manifest can also be embedded as a Win32 resource inside your executable (with the name RT_MANIFEST and ID set to 1), if you don’t want to have the extra standalone file. Visual Studio can do this work for you, if you associate your manifest file in your project’s properties.
If you fail to bind to this version, calling TaskDialog results in an EntryPointNotFoundException with the message "Unable to find an entry point named 'TaskDialog' in DLL 'comctl32.dll'."
It is a good idea to bind to this version of the Windows Common Controls DLL even if you don’t use TaskDialog. If you don’t do this, any Win32 control that might get displayed, such as MessageBox, is given an older visual style that might look out of place.
Tip
To customize TaskDialog further, you can use a more complicated TaskDialogIndirect API. The Windows SDK contains samples for using this and other Win32 features in .NET applications. You can also check http://pinvoke.net for PInvoke signatures and types for just about any popular Win32 API.
Summary
This chapter examines the newest Windows user interface enhancements introduced in Windows 7 and some of the interesting enhancements introduced in Windows Vista. Fortunately, WPF provides first-class support for consuming these Windows 7 features in XAML or the procedural .NET language of your choice. Leveraging the Windows Vista features requires the use of PInvoke to call the unmanaged Win32 APIs. However, the basic functionality is still pretty easy to use from managed code.
Although this chapter covers all the Windows 7 features that WPF exposes for easy consumption, it only scratches the surface of new functionality available as Win32 APIs in Windows 7 (and Windows Vista). Rather than start from scratch and attempt to do all sorts of unmanaged interoperability wizardry to consume some of these other features, you should download the Windows API Code Pack from http://code.msdn.microsoft.com/WindowsAPICodePack. The Windows API Code Pack contains a bunch of classes and samples that make it easy to consume a lot of Windows 7 and Windows Vista functionality from managed code. It covers a wide variety of functionality, from more advanced shell and taskbar customizations to areas such as sensors, linguistic services, and power management.
Tip
If you are not yet ready to migrate an application to WPF 4, you can still take advantage of the Windows 7 features in this chapter by using the WPF Shell Integration Library available at http://code.msdn.microsoft.com/WPFShell.
This library is a .NET Framework 3.5-compatible version of the System.Windows.Shell APIs from WPF 4. There are a few minor incompatibilities between the two sets of APIs (for example, in the 3.5 library, TaskbarItemInfo is an attached property rather than a regular dependency property), but it provides a nice migration path for moving to a newer version of WPF at a later date.
Tip
Whenever you exploit features in a specific version of Windows, you need to think about your fallback plans for running on earlier versions of Windows—if you want to support them.
For the Jump List and taskbar item features exposed through the System.Windows.Shell namespace, WPF gracefully handles older versions of Windows for you. If you run the related samples in this chapter on Windows Vista, your code that interacts with JumpList, TaskbarItemInfo, and so on will still execute without errors but will do nothing.
For the features that you consume directly via unmanaged interoperability, you must explicitly check for the version of Windows and adjust your behavior accordingly. .NET code can easily check the operating system version using System.Environment.OSVersion. Here’s an example:

The major/minor version of Windows 7 is 6.1, and the major/minor version of Windows Vista is 6.0.