Chapter 12. Resources
The .NET Framework has generic infrastructure for packaging and accessing resources—the noncode pieces of an application or component, such as bitmaps, fonts, audio/video files, and string tables. As with many other parts of WPF, WPF not only leverages the core .NET resources system but adds a little more support. WPF supports two distinct types of resources: binary resources and logical resources.
Binary Resources
The first type—binary resources—is exactly what the rest of the .NET Framework considers to be resources. In WPF applications, these are typically traditional items like bitmaps. However, even compiled XAML gets stored as a binary resource behind the scenes. Binary resources can be packaged in three different ways:
• Embedded inside an assembly
• As loose files that are known to the application at compile time
• As loose files that might not be known to the application at compile time
An application’s binary resources are often put into two categories: localizable resources that must change depending on the current culture and language-neutral (or nonlocalizable) resources that don’t change based on culture. This section looks at the ways in which binary resources are defined, accessed, and localized.
Defining Binary Resources
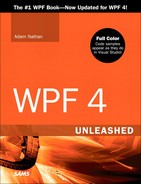
The typical procedure for defining a binary resource consists of adding the file to a Visual Studio project and selecting the appropriate build action in the property grid, as shown in Figure 12.1 for an image called logo.jpg.
Figure 12.1 Marking a file as a binary resource in Visual Studio.
Visual Studio supports several build actions for WPF applications, two of which are relevant for binary resources:
• Resource—Embeds the resource into the assembly (or a culture-specific satellite assembly).
• Content—Leaves the resource as a loose file but adds a custom attribute to the assembly (AssemblyAssociatedContentFile) that records the existence and relative location of the file.
If you’re an MSBuild user editing a project file by hand, you can add such a file with the following syntax:
![]()
where BuildAction is the name of the build action. A build action may include child elements that refine its behavior, as in the following example:
![]()
Warning: Avoid the Embedded Resource build action!
The Resource build action is confusingly similar to the EmbeddedResource build action (Embedded Resource in Visual Studio’s property grid). Both embed a binary resource inside an assembly, but the latter should be avoided in WPF projects. Whereas Resource was added specifically for WPF, EmbeddedResource predates WPF (and is used to embed binary resources in Windows Forms projects).
WPF’s APIs that reference resources via uniform resource identifiers (described in the next section) are designed for resources that use the build action Content or Resource only. This also means that resources embedded with the Content or Resource build action can be referenced easily from XAML, but resources embedded with the EmbeddedResource build action cannot be (unless you write some custom code).
If you want to keep your resources as loose files, adding them to a project with a Content build action is not required; you could simply put them at the appropriate location when the application runs and not worry about adding them to the project at all. This is not recommended, however, because it makes accessing the resources a bit less natural (as described in the next section). Still, sometimes using resources that aren’t known at compile time is inevitable, such as files that are dynamically generated at runtime.
Resources should be embedded (with the Resource build action) if they are localizable, or if you feel the benefits of having a single binary file outweigh the benefits of having a loose file that can be easily replaced independently from the code. If neither of these is true, or if the content needs to be accessible directly from external entities as well (perhaps from HTML pages rendered inside the application), using the Content build action is a good choice.
Accessing Binary Resources
Whether binary resources are embedded with the Resource build action, linked as loose files with the Content build action, or left as loose files with no special treatment at compile time, WPF provides a mechanism for accessing them from code or XAML with a uniform resource identifier (URI). A type converter enables such URIs to be specified in XAML as simple strings with a few built-in shortcuts for common scenarios.
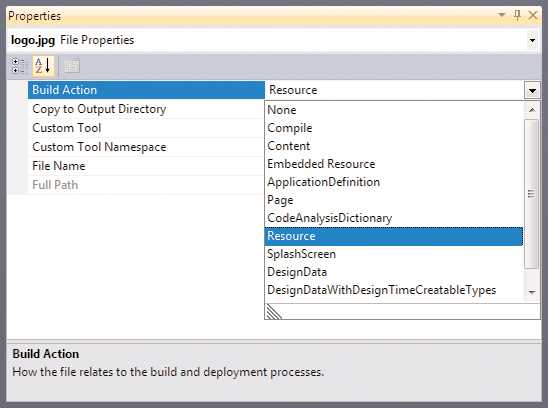
You can see this by examining the source code for the Photo Gallery application introduced in Chapter 7, “Structuring and Deploying an Application.” The following XAML snippet from Photo Gallery references several images that are included in the project with the Resource build action:
Note that this same XAML works even if the .gif files are given the Content build action instead of Resource (as long as the loose files are copied to the same directory as the executable when it runs). It does not work, however, if the loose .gif files are not added to the project.
Warning: Compiled XAML can’t reference a binary resource in the current directory via its simple filename unless it has been added to the project!
It often surprises people that compiled XAML, unlike loose XAML, can’t reference an arbitrary file in the current directory as follows:
![]()
If you require a resource to be loose and do not want to add it to your project, you have a few easy alternatives. One (unsatisfactory) alternative is to qualify the filename with its full path:
![]()
A better alternative is to use the following odd-looking syntax, described later in the “Accessing Resources at the Site of Origin” section:
![]()
The key to accessing binary resources, whether done with the Image element or other elements, is understanding what URIs you can use to address a resource that could be embedded or loose. Table 12.1 summarizes the main options for URI strings in XAML. Note that not all of these options are available for partial-trust applications.
Table 12.1 URIs for Accessing Binary Resources from XAML

Note that the first two entries in Table 12.1 can work with both embedded and loose binary resources. This means that you can replace loose resources with embedded ones (or vice versa) without having to change your XAML.
FAQ
![]() What happens when attempting to access resources on a slow or unavailable network?
What happens when attempting to access resources on a slow or unavailable network?
Table 12.1 shows that binary resources can be directly referenced from potentially unreliable sources such as a website or a Universal Naming Convention (UNC) share. This access is done synchronously, so you’ll unfortunately see an application “hang” while waiting for all the bits to be retrieved. In addition, failure to retrieve the resource results in an unhandled exception.
The notion of using subfolders with embedded resources might sound a little odd, but it can be a nice way to organize embedded resources just as you would organize loose ones. For example, say that you put logo.jpg in an images folder in your Visual Studio project, using either of the following in the project file:
![]()
or
![]()
Then you can access it as follows, regardless of whether logo.jpg physically resides as a loose file in an images subfolder at runtime or if it’s simply embedded in the assembly:
![]()
The final four rows of Table 12.1 need a bit more explanation. The first two enable you to access binary resources embedded in another assembly, and the second two enable you to access binary resources at a special place known as a site of origin.
Accessing Resources Embedded in Another Assembly
The ability to easily access binary resources embedded in another assembly is very handy (and gives you more options for updating resources without needing to replace the main executable), but the syntax is a little bizarre. As Table 12.1 implies, the syntax is
/AssemblyReference;Component/ResourceName
where AssemblyReference identifies the specific assembly, but Component is a keyword and must be used literally. ResourceName is the filename (which can include subfolders).
AssemblyReference can be the simple assembly display name, or it can optionally include other pieces of a .NET assembly’s identity: version number and public key token (if it’s a strong-named assembly). So, you have four options for AssemblyReference:
• AssemblyName
• AssemblyName;vVersionNumber (the v prefix is required)
• AssemblyName;PublicKeyToken
• AssemblyName;vVersionNumber;PublicKeyToken
Accessing Resources at the Site of Origin
Although full-trust applications can hard-code a uniform resource locator (URL) or path for loose binary resources, taking advantage of the site of origin notion is a more maintainable approach. (In addition, it is required for partial-trust applications.) The site of origin gets resolved to different places at runtime, depending how the application is deployed:
• For a full-trust application installed with Windows Installer, the site of origin is the application’s root folder.
• For a full-trust ClickOnce application, the site of origin is the URL or UNC path from which the application was deployed.
• For a partial-trust XAML Browser Application (XBAP) or ClickOnce application, the site of origin is the URL or UNC path that hosts the application.
• For loose XAML pages viewed in a web browser, there is no site of origin. Attempting to use it throws an exception.
The syntax for taking advantage of the site of origin is even stranger than the syntax to reference resources embedded in another assembly! You must use the pack://siteOfOrigin:,,,/ prefix, followed by the resource name (which can contain subfolders). Note that siteOfOrigin is a keyword to be used literally, not a placeholder for other text.
FAQ
![]() Where does that awful triple-comma syntax come from?
Where does that awful triple-comma syntax come from?
The Pack URI format is part of the XML Paper Specification (XPS), which can be found at http://microsoft.com/whdc/xps/xpsspec.mspx. This is the specified format:
pack://packageURI/partPath
packageURI is actually a URI within a URI, so it is encoded by converting its forward slashes into commas. packageURI can point to an XPS document, such as file:///C:/Document.xps encoded as file:,,,C:,Document.xps. Or, in WPF programs, it can be one of two URIs treated specially by the platform:
• siteOfOrigin:/// (encoded as siteOfOrigin:,,,)
• application:/// (encoded as application:,,,)
Therefore, the triple commas are actually encoded forward slashes, not placeholders for optional parameters! (Note that these can also be specified with two slashes/commas rather than three.)
The application:/// package is implicitly used by all the resource references shown in Table 12.1 that don’t use siteOfOrigin. (This is thanks to the fact that relevant objects in WPF implement the IUriContext interface. IUriContext contains a single BaseUri property that gives context to relative URIs.) In other words, the following URI used in XAML:
logo.jpg
is really just shorthand notation for this:
pack://application:,,,/logo.jpg
and this URI:
/MyDll;Component/logo.jpg
is shorthand notation for this:
pack://application:,,,/MyDll;Component/logo.jpg
You can use these longer and more explicit URIs in XAML, but there’s no good reason to.
Accessing Resources from Procedural Code
When creating URIs in C# for referencing resources, you aren’t able to use the XAML-specific shortcuts from Table 12.1. Instead, such URIs must be constructed with a fully qualified Pack URI or a fully qualified path/URL.
For example, the following code assigns an Image’s Source property to the contents of logo.jpg:
![]()
This instantiates a System.Windows.Media.Imaging.BitmapImage object (which works with popular image formats such as JPEG, PNG, GIF, and BMP), which ultimately derives from the abstract ImageSource type (the type of the Source property). The URI is represented by a System.Uri object.
The use of pack://application:,,,/ works only with resources belonging to the current project marked as Resource or Content. To reference relative loose files with no relation to the project, the easiest approach is to use a siteOfOrigin-based URI.
Localizing Binary Resources
If an application contains some binary resources that are specific to certain cultures, you can partition them into satellite assemblies (one per culture) that get loaded automatically, when appropriate. If you’re doing this, then you likely have strings in your user interface that you need to localize as well. LocBaml, a sample tool in the Windows SDK, makes it easy to manage the localization of strings and other items without having to rip them out of XAML and manually apply a level of indirection. This section walks through the basics steps to get started with LocBaml and satellite assemblies.
Preparing a Project for Multiple Cultures
To specify a default culture for resources and automatically build an appropriate satellite assembly, you must add a UICulture element to the project file. Visual Studio doesn’t have a means to set this within its environment, so you can open the project file in your favorite text editor instead.
Tip
You can open a raw project file without leaving Visual Studio if you right-click and unload it from the current solution first. After it’s unloaded, right-click the project again and select Edit from the context menu.
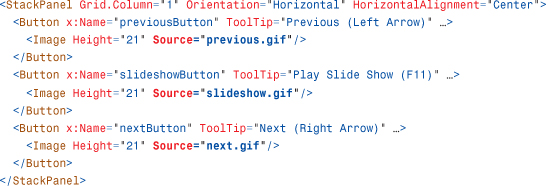
The UICulture element should be added under any or all PropertyGroup elements corresponding to the build configurations you want to affect (Debug, Release, and so on), or to a property group unrelated to build configuration so it automatically applies to all of them. This setting should look as follows for a default culture of American English:
If you rebuild your project with this setting in place, you’ll find an en-US folder alongside your assembly, containing the satellite assembly named AssemblyName.resources.dll.
You should also mark your assembly with the assembly-level NeutralResourcesLanguage custom attribute with a value matching your default UICulture setting, as follows:
![]()
Marking a User Interface with Localization IDs
The next step is to apply a Uid directive from the XAML language namespace (x:Uid) to every object element that needs to be localized. The value of each directive should be a unique identifier.
This would be extremely tedious to do by hand, but it fortunately can be done automatically by invoking MSBuild from a command prompt, as follows:
msbuild /t:updateuid ProjectName.csproj
Running this gives every object element in every XAML file in the project an x:Uid directive with a unique value. You can add this MSBuild task inside your project before the Build task, although this might produce too much noise if you rebuild often.
Creating a New Satellite Assembly with LocBaml
After compiling a project that has been enhanced with Uids, you can run the LocBaml tool from the Windows SDK on a .resources file generated by the build process (found in the objdebug directory), as follows:
LocBaml /parse ProjectName.g.en-US.resources /out:en-US.csv
This generates a simple .csv text file containing all the property values you should need to localize. You can edit the contents of this file so it correctly corresponds to a new culture. (There’s no magic in this part of localization!) If you save the file, you can then use LocBaml in the reverse direction to generate a new satellite assembly from the .csv file! For example, if you changed the contents of the .csv file to match the French Canadian culture, you could save the file as fr-CA.csv and then run LocBaml as follows:
LocBaml /generate ProjectName.resources.dll /trans:fr-CA.csv /cul:fr-CA
This new satellite assembly needs to be copied to a folder alongside the main assembly with a name that matches the culture (fr-CA in this case).
To test a different culture, you can set System.Threading.Thread.CurrentThread.CurrentUICulture (and System.Threading.Thread.CurrentThread.CurrentCulture) to an instance of the desired CultureInfo.
Logical Resources
The second type of resources is a mechanism first introduced by WPF and supported by both WPF and Silverlight. In this chapter, these resources are called logical resources for lack of a better term, but mostly the book refers to them as resources in contrast to the binary resources just covered. (You might be tempted to call them XAML resources, but as with almost everything else in XAML, you can create and use them entirely in procedural code.)
These logical resources are arbitrary .NET objects stored (and named) in an element’s Resources property, typically meant to be shared by multiple child elements. The FrameworkElement and FrameworkContentElement base classes both have a Resources property (of type System.Windows.ResourceDictionary), so most WPF classes you’ll encounter have such a property. These logical resources are often styles (covered in Chapter 14, “Styles, Templates, Skins, and Themes”) or data providers (covered in Chapter 13, “Data Binding”). But this chapter demonstrates logical resources by storing some simple Brushes.
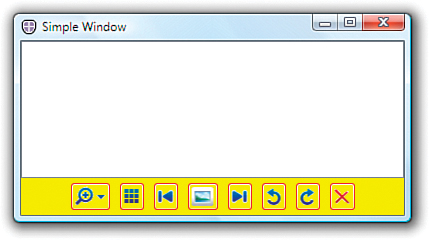
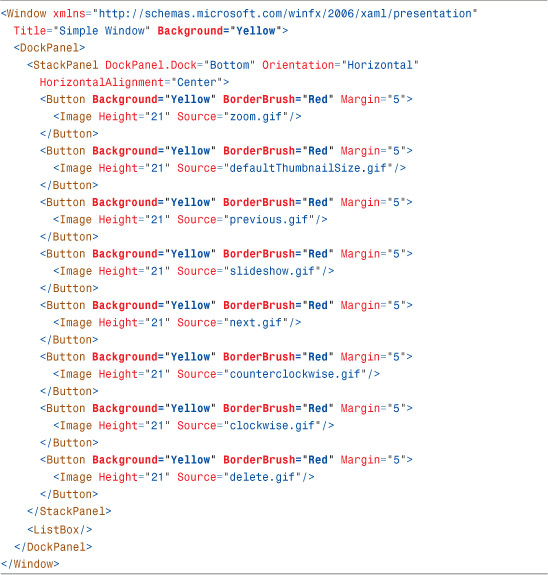
Listing 12.1 contains a simple Window with a row of Buttons along the bottom, similar to ones from the Photo Gallery user interface. It demonstrates a brute-force way to apply a custom Brush to each Button’s (and the Window’s) Background, as well as each Button’s BorderBrush. Figure 12.2 shows the result.
Figure 12.2 The rendered Window from Listing 12.1.
Listing 12.1 Applying Custom Color Brushes Without Using Logical Resources
Alternatively, you could organize the yellow and red Brushes as logical resources for the Window and apply them to individual elements as resource references. This is a nice way to separate and consolidate the style information, much like using Cascading Style Sheets (CSS) to control colors and styles in a webpage rather than hard-coding them on individual elements. The sharing of objects enabled by the logical resources scheme can also help you consume significantly less memory, depending on the complexity of the objects. Listing 12.2 is an update to Listing 12.1, using logical resources for the two Brushes.
Listing 12.2 Consolidating Color Brushes with Logical Resources
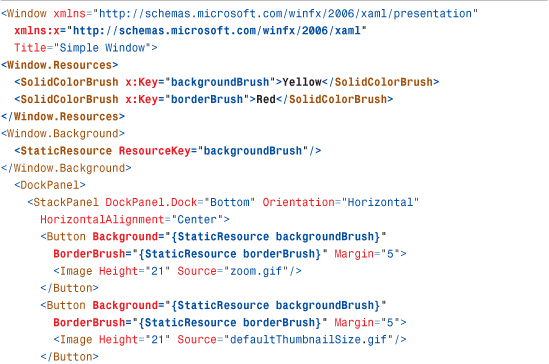

The definition of resources and the x:Key syntax should look familiar, from when ResourceDictionary was introduced in Chapter 2, “XAML Demystified.” Applying the resource to elements uses the StaticResource markup extension (short for System.Windows.StaticResourceExtension). This is applied to Window.Background with property element syntax, and to Button.Background and Button.BorderBrush with property attribute syntax. Because both resources in this example are Brushes, they can be applied anywhere a Brush is expected.
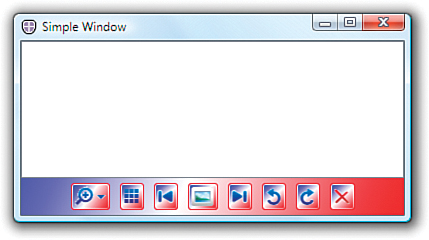
Because simple yellow and red Brushes are still used in Listing 12.2, the result looks identical to Figure 12.2. But now, you can replace the Brushes in one spot and leave the rest of the XAML alone (as long as you use the same keys in the resource dictionary). For example, replacing the backgroundBrush resource with the following linear gradient produces the result in Figure 12.3:
Figure 12.3 The same Window from Listing 12.2, but with a new definition for backgroundBrush.

Resource Lookup
The StaticResource markup extension accepts a single parameter representing the key to the item in a resource dictionary. But that item doesn’t have to be inside the current element’s resource dictionary. It could be in any logical parent’s collection, or even in application-level or system-level resource dictionaries.
The markup extension class implements the ability to walk the logical tree to find the item. It first checks the current element’s Resources collection (its resource dictionary). If the item is not found, it checks the parent element, its parent, and so on until it reaches the root element. At that point, it checks the Resources collection on the Application object. If it is not found there, it checks a collection of theme resources, a concept covered in Chapter 14. If it is not found there, it finally checks a system collection (which contains system-defined fonts, colors, and other settings). If the item is in none of these collections, it throws an InvalidOperationException.
Warning: Be careful with application-level resources inside multi-threaded applications!
Recall from Chapter 7 that a WPF application may have multiple UI threads. In such an application, application-level resources will be accessed directly by each of these threads. To make this work, such resources must either be Freezables that are frozen, or marked with x:Shared=false, an attribute described in the upcoming “Resources Without Sharing” section.
Because of this behavior, resources are typically stored in the root element’s resource dictionary or in the application-level dictionary for maximum sharing potential. Note that although each individual resource dictionary requires unique keys, the same key can be used in multiple collections. The one “closest” to the element accessing the resource will win because of the way the tree gets walked.
Static Versus Dynamic Resources
WPF provides two ways to access a logical resource:
• Statically with StaticResource, meaning that the resource is applied only once (the first time it’s needed)
• Dynamically with DynamicResource, meaning that the resource is reapplied every time it changes
The DynamicResource markup extension (System.Windows.DynamicResourceExtension) implements the ability to walk the logical tree just like StaticResource does, so DynamicResource can often be used wherever StaticResource is used to get the same effect. Nothing about the resource declarations themselves make them suited for one versus the other; choosing StaticResource or DynamicResource is mostly about deciding whether you want consumers of the resource to see updates. In fact, you could even mix and match StaticResource and DynamicResource with the same resource key, although that would be a strange thing to do.
Examining the Differences
The main difference between StaticResource and DynamicResource is that any subsequent updates to the resource are reflected only to those elements that use DynamicResource. Such updates can be done in your own code (changing a yellow Brush to blue, for example) or they can be done by a user changing system settings.
StaticResource and DynamicResource have different performance characteristics. On the one hand, using DynamicResource requires more overhead than StaticResource because of the extra tracking. On the other hand, the use of DynamicResource can potentially improve load time. StaticResource references are always loaded when the Window or Page loads, whereas a DynamicResource reference is not loaded until it is actually used.
In addition, DynamicResource can only be used to set dependency property values, whereas StaticResource can be used just about anywhere. For example, you could use StaticResource as an element to abstract away entire controls! This Window:

is equivalent to this Window:
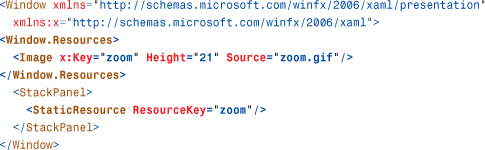
Using elements such as Image as a resource might be an interesting way to factor XAML, but it doesn’t allow you to share the object. Image can have only one parent because it derives from Visual (therefore participating in the logical and visual trees), so any attempt to use the same object as a resource more than once fails. For example, pasting a second but identical StaticResource element in the preceding XAML snippet produces an exception with the message “Specified Visual is already a child of another Visual or the root of a CompositionTarget.”
Digging Deeper: Factoring XAML
Resources provide a nice way to factor XAML within a page. And if you store them as application-level resources, they can live in a separate XAML file. But if you want to partition a set of resources into arbitrary XAML files, no matter where they are stored in the logical tree (perhaps for maintainability or flexibility), you can leverage the MergedDictionaries property of the ResourceDictionary class to achieve this.
For example, a Window could set its Resources collection as follows to merge together multiple resource dictionaries from separate files:

The separate files must use ResourceDictionary as the root element. For example, file1.xaml could contain this:

If the dictionaries being merged have a duplicate key, the last one wins (unlike in the case of having duplicate keys in a single dictionary).
Besides this approach of using resources, creating custom controls (covered in Chapter 20, “User Controls and Custom Controls”) is the other way to factor XAML into multiple files. There is no general-purpose C/C++-preprocessor-like #include mechanism for XAML.
There’s one more (and subtle) difference between static and dynamic resource access. When using StaticResource in XAML, forward references aren’t supported. In other words, any uses of the resource must appear after it is declared in the XAML file. This means you can’t use StaticResource with property attribute syntax if the resource is defined on the same element (because the resource necessarily appears afterward)! DynamicResource does not have this limitation.
This forward reference rule is the reason that the Window in Listing 12.2 uses property element syntax to set Background. By doing so, it ensures that the resource is defined before it is used.
Although DynamicResource could be used the same way, you can also use it via property attribute syntax in this case because it doesn’t matter that the resource is referenced before it is defined:

Resources Without Sharing
By default, when a resource is applied in multiple places, the same object instance is used everywhere. This is usually the desired behavior. However, you can mark items in a compiled resource dictionary with x:Shared="False" to make each request for that resource produce a distinct instance of the object that can be modified independently of the others.
One case where this behavior can be interesting is the previous example of using an entire Image (or any other Visual-derived object) as a resource. Such a resource can be applied only once in an element tree because each application is the same instance. But setting x:Shared="False" changes this behavior, enabling the resource to be applied multiple times as independent objects. This could be done as follows:
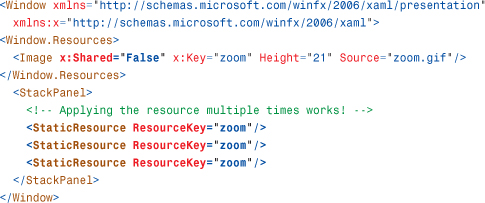
Note that x:Shared can be used only in a compiled XAML file. Its use in loose XAML files is not supported.
Defining and Applying Resources in Procedural Code
So far, this chapter has examined how to define and apply logical resources in XAML, but it hasn’t yet looked at what it means to do the same things in procedural code. Fortunately, defining resources in code is straightforward. The two SolidColorBrush resources used in Listing 12.2 can be defined as follows in C#, assuming a Window called window:
![]()
Applying resources in code is a different story, however. Because StaticResource and DynamicResource are markup extensions, the equivalent C# code to find and apply resources is not obvious.
For StaticResource, you can get the equivalent behavior by setting an element’s property to the result from its FindResource method (inherited from FrameworkElement or FrameworkContentElement).
So, the following Button (similar to one declared in Listing 12.2):
![]()
is equivalent to the following C# code (assuming an appropriate StackPanel variable named stackPanel for containing the Button):

FindResource throws an exception when the resource cannot be found, but you can alternatively call TryFindResource, which returns null when the lookup fails.
For DynamicResource, a call to an element’s SetResourceReference (also inherited from FrameworkElement or FrameworkContentElement) does the trick of setting up the updatable binding with the dependency property.
Therefore, replacing both StaticResource references with DynamicResource:
![]()
is equivalent to using the following C# code:
![]()
This works as long as the Button is eventually added to the element tree as a descendant of the Window (where the resources are defined). Unlike the StaticResource case, such placement in the tree does not need to happen before referencing each resource.
The forward reference rule with StaticResource also applies to procedural code. A call to FindResource or TryFindResource fails if you call it before adding the resource to an appropriate resource dictionary with the appropriate key. SetResourceReference, on the other hand, can be called before the resource has been added.
Digging Deeper: Accessing Resources Directly
Because resource dictionaries are simple collections exposed as public properties, nothing prevents you from accessing a resource dictionary’s items directly in source code. For example, you could set a Button’s Background and BorderBrush properties as follows in C# (assuming a Window object called window):
![]()
This is similar to the use of StaticResource in XAML (FindResource in code) in that it’s a one-time property set. However, it doesn’t search the logical tree, application, or system for the named resources. Therefore, this gives you less flexibility and makes the binding between XAML and code more brittle, but it also gives you a minor performance boost by avoiding the lookups. Note that there is no way to use this technique in XAML.
Interaction with System Resources
One obvious place where it’s appropriate to use DynamicResource is with system settings encapsulated by static properties on three classes in the System.Windows namespace: SystemColors, SystemFonts, and SystemParameters. That’s because a user can change the settings via Control Panel while your application is running.
The SystemColors, SystemFonts, and SystemParameters classes define their properties in pairs—a property for each actual value and a corresponding property that serves as the resource key to be used for lookups. Each resource key property is given a Key suffix by convention. For example, SystemColors contains properties of type Brush called WindowBrush and WindowTextBrush along with properties of type ResourceKey called WindowBrushKey and WindowTextBrushKey.
Table 12.2 demonstrates the various ways you might try to set a Button’s background to the system’s currently defined “window color.” The second approach is what I see people do most commonly, but only the last approach is completely correct.
Table 12.2 Potential Options for Setting a System-Defined Background


Summary
Of all the WPF features covered in this part of the book, the support for resources is the one that is practically impossible to live without. It’s hard to build a professional-looking application without at least an icon and a few images!
But using resources is about much more than just making an application or a control look (or sound, if you’re using audio resources) a little better. It’s a fundamental piece of enabling software to be localized into different languages. It also enables higher productivity for developing software because the logical resources support enables you to consolidate information that might otherwise be duplicated, and even factor XAML files into more manageable chunks. The most fun—and perhaps most important—application of logical resources is their use with objects such as styles and templates, covered in Chapter 14.