Chapter 19. Interoperability with Non-WPF Technologies
Despite the incredible breadth of Windows Presentation Foundation, it lacks some features that other technologies have. When creating a WPF-based user interface, you might want to exploit such features. For example, the fourth release of WPF still doesn’t include some of the standard controls that Windows Forms has had for almost a decade: NumericUpDown, NotifyIcon, and more. Windows Forms also has support for multiple-document interface (MDI) window management, wrappers over additional Win32 dialogs and APIs, and various handy APIs, such as Screen.AllScreens (which returns an array of screens with information about their bounds). Win32 has controls such as an IP Address text box (SysIPAddress32) that have no equivalent in either Windows Forms or WPF. Windows includes many Win32-based user interface pieces that don’t have first-class exposure to WPF, such as “glass” effects, task dialogs, and a wizard framework. Tons of ActiveX controls exist for the purpose of embedding rich functionality into your own software. And some technologies cover scenarios that are fundamentally different from what WPF is designed to enable, but it would still be nice to leverage such pieces in a WPF application. Some examples are high-performance immediate-mode DirectX rendering and platform-agnostic HTML-based rendering.
Perhaps you’ve already put a lot of effort into developing your own pre-WPF user interfaces or controls. If so, you might want to leverage some of your own work that’s already in place. Maybe you have developed an application in a non-WPF technology with an extremely complicated main surface (for example, a CAD program) and just want to “WPF-ize” the outer edges of the applications with rich menus, toolbars, and so on. Maybe you’ve created a web application with tons of HTML content that you want to enhance but not replace.
In earlier chapters, you’ve seen WPF’s HTML interoperability. Given that HTML can be hosted inside a WPF Frame or WebBrowser and WPF content can be hosted inside HTML (as a XAML Browser Application or a loose XAML page), you can leverage existing HTML content—and any Silverlight, Flash, and other content it contains—alongside new WPF content. Fortunately, WPF’s support for interoperability goes much deeper than that. It’s fairly easy for WPF applications and controls to leverage all kinds of non-WPF content or APIs, such as all the examples in the previous two paragraphs. Some of these scenarios are possible thanks to the features described in this chapter, some are possible thanks to the .NET Framework’s interoperability between managed and unmanaged code, and (in the case of calling miscellaneous Windows Forms APIs from WPF) some are possible simply because the other technology defines managed APIs that just happen to live in non-WPF assemblies.
Figure 19.1 summarizes different user interface technologies and the paths you can take to mix and match them. Win32 is a general bucket that includes any technology that runs on Windows: MFC, WTL, OpenGL, and so on. Notice that there’s a direct path between WPF and each technology except for Silverlight and ActiveX. In these cases, you must use another technology as an intermediate layer. Silverlight does provide a mechanism for being directly hosted outside of HTML, leveraged by Visual Studio and Expression Blend. It involves using Silverlight’s HostingRenderTargetBitmap class to get a bitmap representation of the Silverlight content then feeding that information into a WPF InteropBitmap or WriteableBitmap. This support is pretty primitive, however, so it is omitted from the figure.
Figure 19.1 The relationship between various Windows user interface technologies.

All the blue lines connecting the technologies are discussed in this chapter. The line between Win32 and Windows Forms is enabled by standard .NET Framework interoperability technologies for mixing managed and unmanaged code (and the fact that Windows Forms is based on Win32), and the lines between Win32 and ActiveX/DirectX are somewhat artificial because there are no big barriers separating Win32 and ActiveX or Win32 and DirectX.
This chapter focuses on embedding controls of one type inside applications of another type. It first examines both directions of WPF/Win32 interoperability separately, then both directions of WPF/Windows Forms interoperability separately. WPF/DirectX interoperability is examined in a single section because its seamless mixing can be used to effectively get either direction of interoperability. The chapter ends by examining the options with WPF/ActiveX interoperability. Although the focus is on embedding controls, we’ll look at another important scenario at the end of most sections that isn’t as straightforward as you might imagine: launching heterogeneous dialogs.
Warning: You cannot overlap WPF content with non-WPF content (except when using D3DImage)!
As with hosting HTML content in Frame or WebBrowser, any non-WPF content that’s hosted in a WPF application has extra limitations that don’t apply to native WPF content. For example, you can’t apply Transforms to non-WPF content. Furthermore, you cannot overlap content from one technology over content from another. You can arbitrarily nest (for example) Win32 inside WPF inside Windows Forms inside WPF, and so on, but every pixel must have one and only one technology responsible for its rendering. DirectX is the only exception to this rule—and only if you use the D3DImage feature described later in this chapter—because WPF internally uses DirectX for rendering. Therefore, you can mix WPF and DirectX on the same pixels, and there is still only one technology (DirectX) ultimately responsible for rendering them.
Embedding Win32 Controls in WPF Applications
In Win32, all controls are considered to be “windows,” and Win32 APIs interact with them via window handles known as HWNDs. All Windows-based user interface technologies (such as DirectX and MFC) ultimately use HWNDs to some degree, so the ability to work with HWNDs provides the ability to work with all of these technologies.
Although WPF’s subsystems (layout, animation, and so on) don’t know how to interact directly with HWNDs, WPF defines a FrameworkElement that can host an arbitrary HWND. This FrameworkElement is System.Windows.Interop.HwndHost, and it makes HWND-based controls look and act almost exactly like WPF controls.
To demonstrate the use of HwndHost in a WPF application, let’s look at embedding a custom Win32 control to add webcam functionality to WPF. WPF’s video support doesn’t include anything for interacting with local video capture devices such as a simple webcam. Microsoft’s DirectShow technology has support for this, however, so Win32 interoperability enables you to leverage that webcam support in a WPF application.
A Win32 Webcam Control
Listing 19.1 contains the unmanaged C++ definition for a custom Win32 Webcam control that wraps a few DirectShow COM objects.
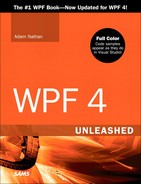
Listing 19.1 Webcam.h—Definition of Some Webcam Win32 APIs

The Webcam class is designed to work with a computer’s default video capture device, so it contains a set of simple static methods for controlling this device. It is initialized with a width and height (which can be later retrieved via GetWidth and GetHeight methods). Then, after telling Webcam (via AttachToWindow) what HWND to render itself on, the behavior can be controlled with simple Start, Pause, and Stop methods.
Listing 19.2 contains the implementation of the Webcam class. The complete implementations of Webcam::Initialize and Webcam::Terminate are omitted for brevity, but the entire implementation can be found with this book’s source code (http://informit.com/title/9780672331190).
Listing 19.2 Webcam.cpp—Implementation of the Webcam APIs


The implementation begins with a simple Win32 window procedure, which makes sure to repaint the video whenever a WM_ERASEBKGND message is received. Inside Initialize, a Win32 window class called WebcamClass is defined and registered, and a bunch of DirectShow-specific COM objects are created and initialized. (The Terminate method releases all these COM objects.) AttachToWindow not only tells DirectShow which window to render on, but it sets the size of the video to match the dimensions passed to Initialize. The other methods are simple wrappers for the underlying DirectShow methods.
Using the Webcam Control in WPF
The first step in using the Webcam control in a WPF application is to create a project that is able to “see” this unmanaged control from the WPF-specific managed code that must be written. Many options exist for integrating managed code into an unmanaged codebase. If you’re comfortable with C++, using C++/CLI to seamlessly mix managed and unmanaged code is usually the best approach. This is especially true for the Webcam class because it doesn’t expose any functionality outside the DLL in which it is compiled.
FAQ
![]() What Is C++/CLI?
What Is C++/CLI?
C++/CLI is a version of the C++ language that supports managed code. Ignoring the now-deprecated Managed C++ features in earlier versions of Visual C++, C++/CLI is the way for C++ developers to consume and produce .NET components. (CLI stands for Common Language Infrastructure, which is the name of the Ecma-standardized pieces of the .NET Framework’s common language runtime.) C++/CLI is has been standardized by Ecma (like the CLI and C#).
Just to put some context around these standards: Visual C++ is Microsoft’s implementation of C++/CLI, Visual C# is Microsoft’s implementation of C#, and the common language runtime (CLR) is Microsoft’s implementation of the CLI. Using the managed code features in Visual C++ is often as simple as adding the /clr compilation switch to relevant source files or projects, changing incompatible switches, and learning some new bits of syntax specific to managed data types.
Listing 19.3 defines a WPF Window—all in C++/CLI—and uses the HwndHost type to integrate the Win32 Webcam control. Because it is using and defining managed data types, it must be compiled with the /clr compiler option.
Warning: Visual C++ does not support compiled XAML!
This is why Listing 19.3 defines the Window entirely in procedural code. Other options would be to load and parse XAML at runtime (as shown in Chapter 2, “XAML Demystified”) or to define the Window in a different language that supports compiled XAML.
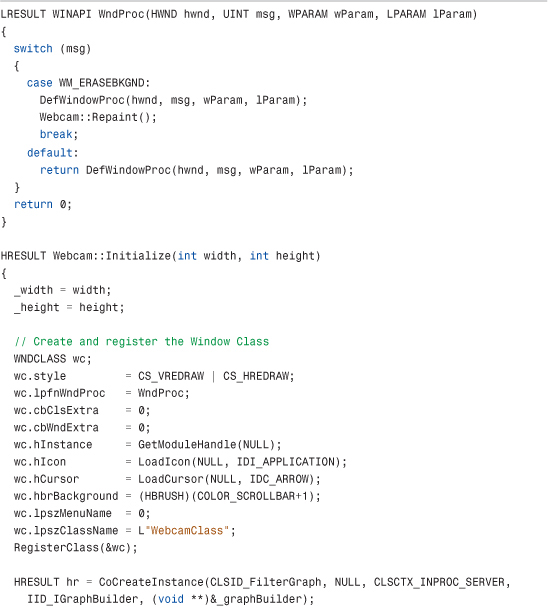
Listing 19.3 Window1.h—A WPF Window Using an HwndHost-Derived Class


The first thing to notice about Listing 19.3 is that it defines a subclass of HwndHost called MyHwndHost. This is necessary because HwndHost is actually an abstract class. It contains two methods that need to be overridden:
• BuildWindowCore—In this method, you must return the HWND to be hosted. This is typically where initialization is done as well. The parent HWND is given to you as a parameter to this method. If you do not return a child HWND whose parent matches the passed-in parameter, WPF throws an InvalidOperationException.
• DestroyWindowCore—This method gives you the opportunity to do any cleanup/termination when the HWND is no longer needed.
For both methods, HWNDs are represented as HandleRef types. HandleRef is a lightweight wrapper (in the System.Runtime.InteropServices namespace) that ties the lifetime of the HWND to a managed object. You’ll typically pass this as the managed object when constructing a HandleRef.
Tip
A typical implementation of an HwndHost subclass calls CreateWindow inside BuildWindowCore and DestroyWindow inside DestroyWindowCore. Note, however, that calling DestroyWindow isn’t really necessary. That’s because a child HWND is automatically destroyed by Win32 when the parent HWND is destroyed. So in Listing 19.3, the implementation of DestroyWindowCore could be left empty.
Listing 19.3 calls the Win32 CreateWindow API inside BuildWindowCore to create an instance of the WebcamClass window that was registered in Listing 19.2, passing the input HWND as the parent. The HWND returned by CreateWindow is not only returned by BuildWindowCore (inside a HandleRef), but it is also passed to the Webcam::AttachToWindow method so the video is rendered appropriately. Inside DestroyWindowCore, the Win32 DestroyWindow API is called to signify the end of the HWND’s lifespan.
Tip
For some applications, initialization of the Win32 content might need to wait until all the WPF content has been rendered. In such cases, you can perform this initialization from Window’s ContentRendered event.
Inside the Window’s constructor, the MyHwndHost is instantiated and added to a DockPanel just like any other FrameworkElement. The Webcam is then initialized, and the video stream is started.
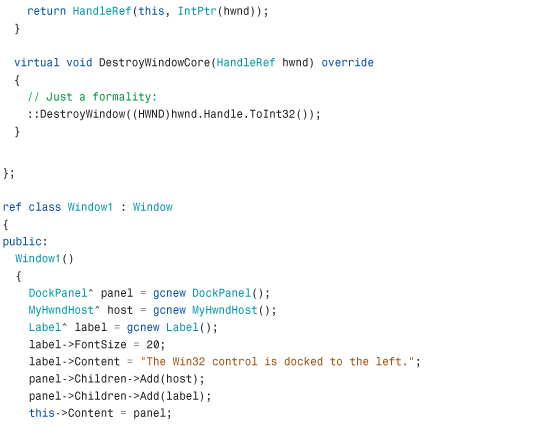
Listing 19.4 contains the final piece needed for the WPF webcam application, which is the main method that creates the Window and runs the Application. It is also compiled with the /clr option. Figure 19.2 shows the running application.
Figure 19.2 A live webcam feed is embedded in the WPF window.
Listing 19.4 HostingWin32.cpp—The Application’s Entry Point

Tip
With Visual C++’s /clr compiler option, you can compile entire projects or individual source files as managed code. It’s tempting to simply compile entire projects as managed code, but it’s usually best if you decide on a file-by-file basis what should be compiled as managed and what should be compiled as unmanaged. Otherwise, you could create extra work for yourself without any real gain.
The /clr option works well, but it often increases build time and can sometimes require code changes. For example, .C files must be compiled as C++ under /clr, but .C files often require some syntax changes to be compiled as such. Also, managed code can’t run under the Windows loader lock, so compiling DllMain (or any code called by it) as managed results in a (fortunately quite descriptive) runtime error.
Note that when you first turn on /clr, other now-incompatible settings need to be changed (such as /Gm and /EHsc). Fortunately, the compiler gives clear error messages telling you what needs to be done.
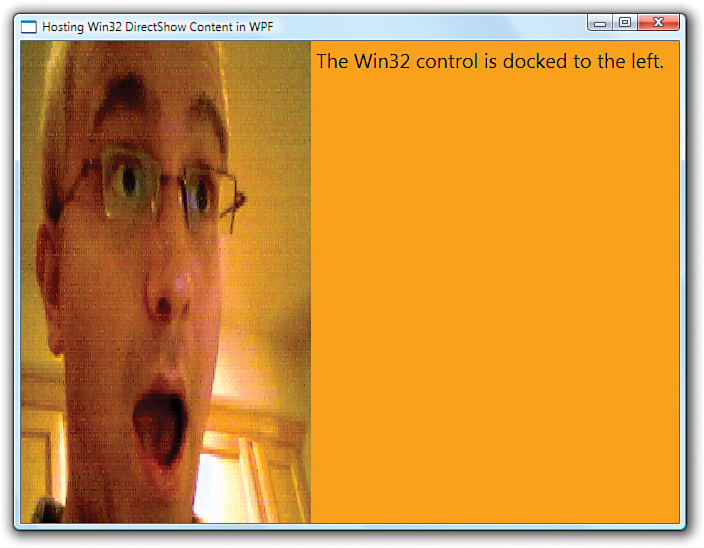
Notice the gray area underneath the video stream in Figure 19.2. The reason this appears is quite simple. The MyHwndHost element is docked to the left side of the DockPanel in Listing 19.3, but the Webcam control is initialized with a fixed size of 640×480.
If the implementation of Webcam::AttachToWindow in Listing 19.2 were changed to discover the size of the HWND, the video could stretch to fill that area. This change is shown in the following code, and Figure 19.3 shows the result:
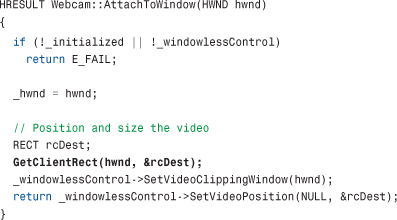
Figure 19.3 The Webcam control, altered to fill the entire rectangle given to it.
Although the best solution for a webcam application is probably to give the HwndHost-derived element a fixed (or at least unstretched) size, it’s important to understand that WPF layout applies only to the HwndHost. Within its bounds, you need to play by Win32 rules to get the layout you desire.
Supporting Keyboard Navigation
In addition to the two abstract methods that must be implemented, HwndHost has a few virtual methods that can optionally be overridden if you want to handle seamless keyboard navigation between WPF elements and hosted Win32 content. This doesn’t apply to the hosted Webcam control as is, as it never needs to gain keyboard focus. But for controls that accept input, there are some common features that you’d undoubtedly want to support:
• Tabbing into the hosted Win32 content
• Tabbing out of the hosted Win32 content
Figure 19.4 illustrates the contents of a hypothetical WPF Window with two WPF controls surrounding a Win32 control (hosted in HwndHost) with four child Win32 controls. We’ll use this illustration when discussing each of these three features. The numbers represent the expected order of navigation. For the three WPF controls (1, 6, and the HwndHost containing 2–5), the ordering could come implicitly from the way in which they were added to their parent, or it could come from an explicit TabIndex being set for each control. For the four Win32 controls (2–5), the order is defined by application-specific logic.
Figure 19.4 A scenario in which keyboard navigation is important with hosted Win32 content.

Tabbing Into the Hosted Win32 Content
“Tabbing into” the Win32 content means two things:
• When the previous WPF element has focus, pressing Tab moves focus to the first item in the Win32 control. In Figure 19.4, this means focus moves from 1 to 2.
• When the next WPF element has focus, pressing Shift+Tab moves focus back to the last item in the Win32 control. In Figure 19.4, this means focus moves from 6 to 5.
Both of these actions can be supported fairly easily by overriding HwndHost’s TabInto method, which is called when HwndHost receives focus via Tab or Shift+Tab. In C++/CLI, a typical implementation would look like the following:
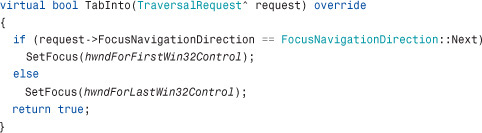
TabInto’s parameter reveals whether the user has just pressed Tab (giving FocusNavigationDirection.Next) or Shift+Tab (giving FocusNavigationDirection.Previous). Therefore, this code uses this information to decide whether to give focus to its first child or last child. It does this using the Win32 SetFocus API. After setting focus to the correct element, it returns true to indicate that it successfully handled the request.
Tabbing Out of the Hosted Win32 Content
Supporting tabbing into a Win32 control is not enough, of course. If you don’t also support tabbing out of the control, keyboard navigation can get “stuck” inside the Win32 control. For Figure 19.4, tabbing out of the control means being able to navigate from 5 to 6 with Tab or from 2 to 1 with Shift+Tab.
Supporting this direction is a little more complicated than the other direction. That’s because after focus enters Win32 content, WPF no longer has the same kind of control over what’s going on. The application still receives Windows messages that are ultimately passed along to HwndHost, but WPF’s keyboard navigation functionality can’t “see” what’s going on with focus.
Therefore, there is no TabOutOf method to override. Instead, there is a TranslateAccelerator method, which gets called whenever the application receives WM_KEYDOWN or WM_SYSKEYDOWN message from Windows (much like the Win32 API with the same name). Listing 19.5 shows a typical C++/CLI implementation of TranslateAccelerator for the purpose of supporting tabbing out of Win32 content (and tabbing within it).
Listing 19.5 A Typical C++/CLI Implementation for TranslateAccelerator

TranslateAccelerator is passed a reference to a “raw” Windows message (represented as a managed System.Windows.Interop.MSG structure) and a ModifierKeys enumeration that reveals whether the user is pressing Shift, Alt, Control, and/or the Windows key. (This information can also be retrieved using the Win32 GetKeyState API.)
In this listing, the code takes action only if the message is WM_KEYDOWN and if Tab is being pressed (which includes Shift+Tab). After determining whether the user pressed Tab or Shift+Tab using GetKeyState, the code must determine whether it is time to tab out of the control or within the control. Tabbing out should occur if focus is already on the first child control and the user pressed Shift+Tab, or if focus is already on the last child control and the user pressed Tab. In these cases, the implementation calls OnNoMoreTabStops on HwndHost’s KeyboardInputSite property. This is the way to tell WPF that focus should return under its control. OnNoMoreTabStops needs to be passed a FocusNavigationDirection value so it knows which WPF element should get focus (1 or 6 in Figure 19.4). The implementation of TranslateAccelerator must return true if it handles the keyboard event. Otherwise, the event bubbles or tunnels to other elements. One point that Listing 19.5 glosses over is that setting the values of hwndOfPreviousControl and hwndOfNextControl appropriately involves a small amount of application-specific code to determine what the previous/next Win32 control is, based on the HWND that currently has focus.
With such an implementation of TranslateAccelerator and TabInto (from the previous section), a user of the application represented by Figure 19.4 would now be able to navigate all the way from 1 to 6 and back from 6 to 1 by using Tab and Shift+Tab, respectively.
Warning: C++/CLI compilation is likely to run into a conflict with TranslateAccelerator!
The standard Windows header file winuser.h defines TranslateAccelerator as an alias for the Win32 TranslateAcceleratorW function (if compiling with UNICODE defined) or the Win32 TranslateAcceleratorA function (if compiling with UNICODE undefined). Therefore, this is likely to conflict with the WPF-based TranslateAccelerator method in a Win32-based C++ project. To prevent compilation errors, you can undefine this symbol immediately before your TranslateAccelerator method as follows:
![]()
Supporting Access Keys
The final piece of keyboard navigation to support is jumping to a control via an access key (sometimes called a mnemonic). For example, the text boxes in Figure 19.4 would likely have corresponding labels with an access key (indicated by an underlined letter). When they are hosted in a WPF application, you still want focus to jump to the corresponding controls when the user presses Alt and the access key.
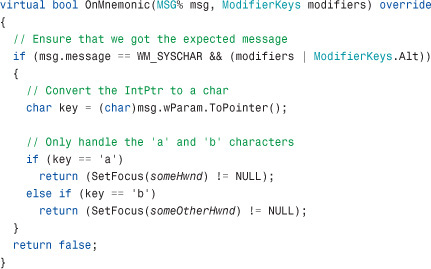
To support access keys, you can override HwndHost’s OnMnemonic method. Like TranslateAccelerator, it is given a raw Windows message and a ModifierKeys enumeration. So you could implement it as follows, if you want to support two access keys, a and b:
Tip
Because C++/CLI was introduced with Visual C++ 2005, you might find yourself needing to upgrade an older codebase to a later compiler to take advantage of it. This can sometimes be tricky because of increased ISO standard compliance in the compiler and various changes to Windows libraries and headers. Although it might not be an automatic process, there are many benefits to upgrading to the latest Visual C++ compiler, even for your unmanaged code!
FAQ
![]() How do I launch a Win32 modal dialog from a WPF application?
How do I launch a Win32 modal dialog from a WPF application?
You can still use your favorite Win32 technique for showing the dialog (such as calling the Win32 DialogBox function). With C++/CLI, this can be a direct call. With a language such as C#, you can use PInvoke to call the relevant function(s). The only trick is to get the HWND of a WPF Window to pass as the dialog’s parent.
Fortunately, you can get the HWND for any WPF Window by using the WindowInteropHelper class from the System.Windows.Interop namespace.
This looks as follows in C++/CLI:
![]()
Embedding WPF Controls in Win32 Applications
Lots of compelling WPF features can be integrated into a Win32 application: 3D, rich documents support, animation, easy restyling, and so on. Even if you don’t require this extra “flashiness,” you can still take advantage of important features, such as flexible layout and resolution independence.
WPF’s HWND interoperability is bidirectional, so WPF controls can be embedded in Win32 applications much like the way Win32 controls are embedded in WPF applications. In this section, you’ll see how to embed a built-in WPF control—DocumentViewer, the viewer for XPS documents—in a simple Win32 window using a class called HwndSource.
Introducing HwndSource
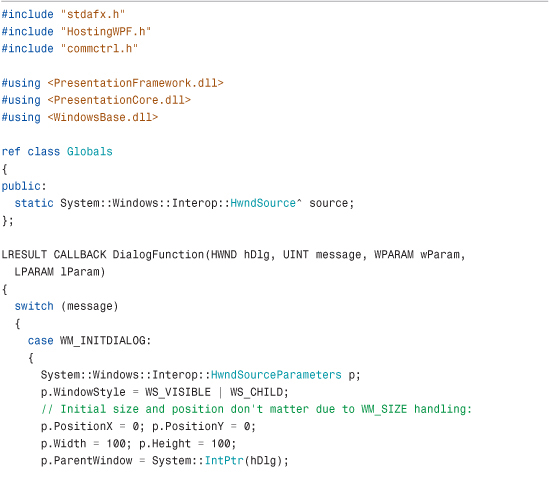
HwndSource does the opposite of HwndHost: It exposes any WPF Visual as an HWND. Listing 19.6 demonstrates the use of HwndSource with the relevant C++ source file from a Win32 project included with this book’s source code. It is compiled with /clr, so it is managed code that uses both managed and unmanaged data types.
Listing 19.6 HostingWPF.cpp—Embedding a WPF Control in a Win32 Dialog

In this project, a simple dialog is defined via a Win32 resource script (not shown here). The application’s entry point (_tWinMain) simply shows this dialog via the Win32 DialogBox function, specifying DialogFunction as the window procedure that receives the Win32 messages.
Inside DialogFunction, only two messages are processed—WM_INITDIALOG, which creates and embeds the WPF control on initialization, and WM_CLOSE, which terminates the dialog appropriately. Inside the processing of WM_INITDIALOG, an HwndSourceParameters structure is created, and some of its fields are initialized to give the HwndSource an initial size, position, and style. Most important, it is given a parent HWND (which, in this case, is the dialog itself). For Win32 programmers, this type of initialization should look very familiar. It’s mostly the same kind of information that you would pass to the Win32 CreateWindow function.
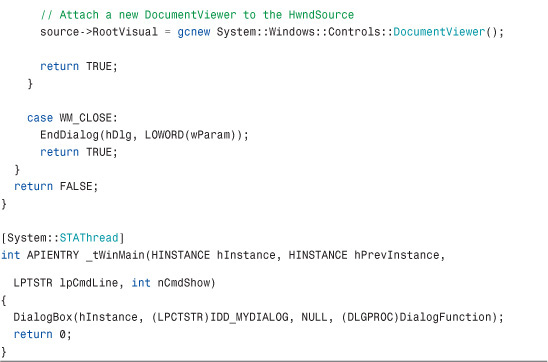
After HwndSourceParameters is populated, the code only needs to do two simple steps to put the WPF content in place. It instantiates an HwndSource object with the HwndSourceParameters data, and then it sets HwndSource’s RootVisual property (of type System.Windows.Media.Visual) to an appropriate instance. Here, a DocumentViewer is instantiated. Figure 19.5 shows the resul.
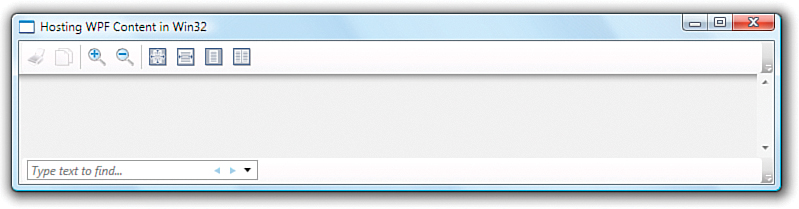
Figure 19.5 The WPF DocumentViewer control hosted in a simple Win32 dialog.

Although this example uses a built-in WPF control, you can follow the same approach with your own arbitrarily complex WPF content. Just take the top-level element (for example, a Grid or Page) and use HwndSource to expose it to the rest of Win32 as one big HWND.
Warning: WPF must run on an STA thread!
As with Windows Forms and earlier technologies, the main thread in an application using WPF must live in a single-threaded apartment. In Listing 19.6, STAThreadAttribute must be applied to the entry point because the entire file is compiled as managed code, and managed code defaults to MTA.
However, the most reliable way to force the main thread to be STA in Visual C++ is to use the linker option /CLRTHREADATTRIBUTE:STA. This works regardless of whether the application’s entry point is managed or unmanaged. STAThreadAttribute, on the other hand, can be used only when the entry point is managed.
Warning: Be sure to set the Visual C++ debugger mode to Mixed!
For large Win32 applications, it can often make sense to integrate WPF (and managed code in general) into DLLs loaded by the executable but to leave the executable as entirely unmanaged. This can cause a few development-time gotchas, however.
The debugger in Visual C++ defaults to an Auto mode, which means it performs unmanaged-only or managed-only debugging, based on the type of executable. But when an unmanaged EXE loads a DLL with managed code, you aren’t able to properly debug that managed code with unmanaged-only debugging. The solution is simply to set the project’s debugger mode to Mixed.
Tip
If you don’t specify a parent HWND when creating an HwndSource, the result is a top-level Win32 window, with HwndSourceParameters.Name used as the window title. So creating a parent-less HwndSource and setting its RootVisual property to arbitrary WPF content gives pretty much the same result as creating a WPF Window and setting its Content property to that same content. In fact, Window is really just a rich wrapper over HwndSource. By using HwndSource directly to create a top-level window, you have more control over the various style bits used when creating the HWND, but you lack all sorts of handy members defined by Window and related classes (such as the automatic message loop handled by Application.Run).
Getting the Right Layout
Because you’re in the world of Win32 when doing this type of integration, there’s no special layout support for the top-level WPF control. In Listing 19.6, the DocumentViewer is given an initial placement of (10,10) and a size of (500,350). But that placement and size are never going to change without some explicit code to change them. Listing 19.7 makes the DocumentViewer occupy the entire space of the window, even as the window is resized. Figure 19.6 shows the result.
Figure 19.6 The WPF DocumentViewer control hosted and resized in a simple Win32 dialog.
Listing 19.7 HostingWPF.cpp—Updating the Size of the WPF Control
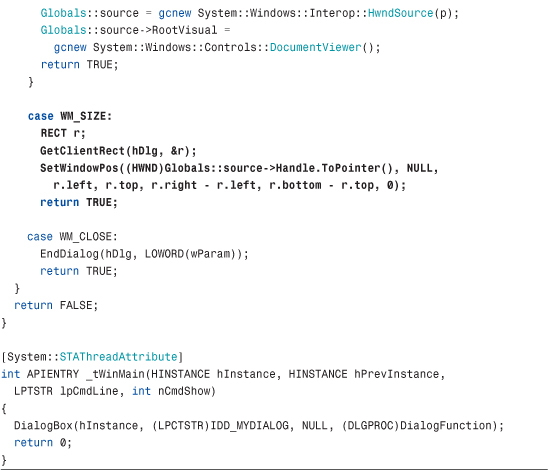
The most important code in Listing 19.7 is the handling of the WM_SIZE message. It uses the Win32 GetClientRect API to get the current window size, and then it applies it to the HwndSource using the Win32 SetWindowPos API. There are two interesting points about this new implementation:
• The HwndSource variable is now “global,” so it can be shared by multiple places in the code. But C++/CLI does not allow a managed variable to be truly global, so the listing uses a common technique of making it a static variable of a managed class.
• To operate on the HwndSource with Win32 APIs such as SetWindowPos, you need its HWND. This is exposed via a Handle property of type IntPtr. In C++/CLI, you can call its ToPointer method (which returns a void*) and then cast the result to an HWND.
Tip
You don’t need to share an HwndSource globally as long as you have its corresponding HWND. HwndSource defines a static FromHwnd method, which returns an HwndSource instance corresponding to any HWND (assuming that the HWND belongs to an HwndSource in the first place). This is very handy when retrofitting Win32 codebases with WPF content because HWNDs are often passed around as parameters. With this technique, you can avoid the need to define a managed Globals class, as was done in Listing 19.7.
Tip
You can use HwndSource with a pure WPF application to respond to obscure Windows messages. In pure WPF applications, you don’t need to define a window procedure and respond to Windows messages. But that’s not because Windows messages don’t exist; the top-level window still has an HWND and still plays by Win32 rules. As mentioned in a previous tip, WPF’s Window object actually uses HwndSource to host any content inside the top-level HWND. And internally, WPF has a window procedure that exposes relevant messages in its own way. For example, WPF handles WM_SIZE messages and raises a SizeChanged event.
There are, however, Windows messages that WPF does not expose. But you can use HwndSource with any WPF Window to get exposure to all messages. The key is to use the System.Windows.Interop.WindowInteropHelper class, which exposes the HWND for any WPF Window. After you have this handle, you can get the corresponding HwndSource object (using HwndSource.FromHwnd) and attach a window procedure by calling HwndSource’s AddHook method.
In Chapter 8, “Exploiting Windows 7,” we performed these actions to discover WM_DWMCOMPOSITIONCHANGED messages. The following Window intercepts WM_TCARD, an obscure message that can be sent by Windows Help when certain directives are selected inside an application’s help file:

FAQ
![]() How do I launch a WPF modal dialog from a Win32 application?
How do I launch a WPF modal dialog from a Win32 application?
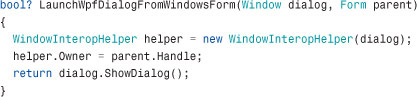
To launch a WPF Window, whether from Win32 code or WPF code, you can instantiate it and call its ShowDialog method. The trick, as with the reverse direction, is assigning the proper parent to the WPF Window. Correctly setting the parent of a modal dialog is important to get the desired behavior—ensuring that it remains on top of the parent window at all times, that both windows minimize together, and so on.
The problem is that Window’s Owner property is of type Window, and it has no other property or method that enables its parent to be set to an arbitrary HWND. Furthermore, you can’t fabricate a Window object from an arbitrary HWND.
The solution to this dilemma is to use the WindowInteropHelper class in the System.Windows.Interop namespace. This class not only exposes the HWND for any WPF Window but enables you to set its owner to an arbitrary HWND. This looks as follows in C++/CLI:

Embedding Windows Forms Controls in WPF Applications
You’ve seen that WPF can host Win32 controls by wrapping any HWND inside an HwndHost. And Windows Forms controls can easily be exposed as Win32 controls. (Unlike WPF controls, they are all HWND based, so System.Windows.Forms.Control directly defines a Handle property exposing the HWND.) Therefore, you could use the same techniques previously discussed to host Windows Forms controls inside WPF.
However, there is an opportunity for much richer integration between Windows Forms and WPF, without delving into the underlying HWND-based plumbing. Sure, they have different rendering engines and different controls. But they both have rich .NET-based object models with similar properties and events, and both have services (such as layout and data binding) that go above and beyond their Win32 common denominator.
Indeed, WPF takes advantage of this opportunity and also has built-in functionality for direct interoperability with Windows Forms. This support is still built on top of the Win32 HWND interoperability described in the preceding two sections, but with many features to make the integration much simpler. The hard work is done for you, so you can communicate more directly between the technologies, usually without needing to write any unmanaged code.
As with Win32 interoperability, WPF defines a pair of classes to cover both directions of communication. The analog to HwndHost is called WindowsFormsHost, and it appears in the System.Windows.Forms.Integration namespace (in the WindowsFormsIntegration.dll assembly).
Embedding a PropertyGrid with Procedural Code
This chapter’s introduction mentions that Windows Forms has several interesting built-in controls that WPF lacks. One such control—the powerful PropertyGrid—helps to highlight the deep integration between Windows Forms and WPF, so let’s use that inside a WPF Window. (Of course, you can also create custom Windows Forms controls and embed them in WPF Windows as well.)
The first step is to add a reference to System.Windows.Forms.dll and WindowsFormsIntegration.dll to your WPF-based project. After you’ve done this, your Window’s Loaded event is an appropriate place to create and attach a hosted Windows Forms control. For example, consider this simple Window containing a Grid called grid:
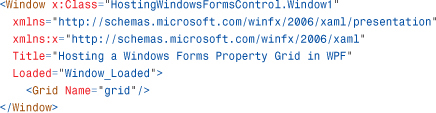
The following handler of the Loaded event adds the PropertyGrid to the Grid, using WindowsFormsHost as the intermediate element:

The integration-specific code is as simple as instantiating WindowsFormsHost and setting its Child property to the desired object. WindowsFormsHost’s Child property can be set to any object that derives from System.Windows.Forms.Control.
The last line, which sets PropertyGrid’s SelectedObject property to the instance of the current WPF Window, enables a pretty amazing scenario. PropertyGrid displays the properties of any .NET object, and, in some cases, enables the editing of the object’s values. It does this via .NET reflection. Because WPF objects are .NET objects, PropertyGrid provides a fairly rich way to edit the current Window’s properties on the fly, without writing any extra code. Figure 19.7 shows the previously defined Window in action. When running this application, you can see values change as you resize the Window, you can type in new property values to resize the Window, you can change its background color or border style, and so on.
Figure 19.7 The hosted Windows Forms PropertyGrid enables you to change properties of the WPF Window on the fly.

Notice that the enumeration values for properties such as HorizontalContentAlignment are automatically populated in a drop-down list, thanks to the standard treatment of .NET enums. But Figure 19.7 highlights some additional similarities between Windows Forms and WPF, aside from being .NET-based. Notice that Window’s properties are grouped into categories such as “Behavior,” “Content,” and “Layout.” This comes from CategoryAttribute markings that are used by both Windows Forms and WPF. The type converters that WPF uses are also compatible with Windows Forms, so you can type in “red” as a color, for example, and it gets automatically converted to the hexadecimal ARGB representation (#FFFF0000). Another neat thing about the PropertyGrid used in this manner is that you can see attached properties that could be applied to the object, with the syntax you would expect.
Tip
The WindowsFormsHost class actually derives from HwndHost, so it supports the same HWND interoperability features described earlier, just in case you want to dig into lower-level mechanics, such as overriding its WndProc method.
Embedding a PropertyGrid with XAML
There’s no reason that you have to instantiate a WindowsFormsHost instance in procedural code; you could instead define it right inside your XAML file. Furthermore, there’s nothing to stop you from using Windows Forms controls inside XAML, except for limitations of the expressiveness of XAML. (The controls must have a default constructor, useful instance properties to set, and so on, unless you’re in an environment in which you can use XAML2009.)
Not all Windows Forms controls work well within XAML, but PropertyGrid works reasonably well. For example, the previous XAML can be replaced with the following XAML:

The System.Windows.Forms.Integration .NET namespace is already included as part of WPF’s standard XML namespace, so WindowsFormsHost can be used without any additional work, as long as your project has a reference to WindowsFormsIntegration.dll. And with the System.Windows.Forms .NET namespace given the prefix swf, the PropertyGrid object can be instantiated directly in the XAML file. Notice that the PropertyGrid can be added as a child element to WindowsFormsHost because its Child property is marked as a content property. PropertyGrid’s properties can generally be set in XAML rather than C#. Thanks to x:Reference, SelectedObject can be set to the current Window instance (now named rootWindow), replicating the entire example without any procedural code needed!
Tip
The x:Reference markup extension is often mistakenly associated with the XAML2009 features that can only be used from loose XAML at the time of this writing. Although x:Reference is a new feature in WPF 4, it can be used from XAML2006 just fine as long as your project is targeting version 4 or later of the .NET Framework. One glitch is that the XAML designer in Visual Studio 2010 doesn’t properly handle x:Reference, so it gives the following design-time error that you can safely ignore:
Service provider is missing the INameResolver service
Tip
By default, Windows Forms controls hosted in WPF applications might look old-fashioned. That’s because they use the “classic” Win32 Common Controls library unless you explicitly enable the Windows XP–era visual styles. You can do this by embedding a special manifest file in an application, but it’s easiest to just call the System.Windows.Forms.Application.EnableVisualStyles method before any of the Windows Forms controls are instantiated. The Visual Studio template for Windows Forms projects automatically inserts this method call, but the template for WPF projects does not.
FAQ
![]() How do I launch a Windows Forms modal dialog from a WPF application?
How do I launch a Windows Forms modal dialog from a WPF application?
The answer to this question seems like it should be simple: Instantiate your Form-derived class and call its ShowDialog method. But for it to behave like a correct modal dialog, you should call the overload of ShowDialog that accepts an owner. This owner, however, must be in the form of an IWin32Window, a type that’s incompatible with a WPF Window.
As explained in the previous section, you can get the HWND for a WPF Window by using the WindowInteropHelper class from the System.Windows.Interop namespace, but how do you get an IWin32Window? You actually have to define a custom class that implements it. Fortunately, this is pretty easy because IWin32Window defines only a single Handle property. The following code defines an OwnerWindow class that can be used in this situation:
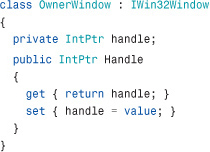
With this class in place, you can write code like the following that launches a modal Windows Forms dialog, using a WPF Window as its parent:

Embedding WPF Controls in Windows Forms Applications
WPF controls can be embedded inside a Windows Forms application, thanks to a companion class of WindowsFormsHost called ElementHost. ElementHost is like HwndSource but it is customized for hosting WPF elements inside a Windows Forms Form rather than inside an arbitrary HWND. ElementHost is a Windows Forms control (deriving from System.Windows.Forms.Control) and internally knows how to display WPF content.
To demonstrate the use of ElementHost, we’ll create a simple Windows Forms application that hosts a WPF Expander control. After creating a standard Windows Forms project in Visual Studio, the first step is to add ElementHost to the Toolbox using the Tools, Choose Toolbox Items menu item. This presents the dialog shown in Figure 19.8.
Figure 19.8 Adding ElementHost to the Toolbox in a Windows Forms project.

With ElementHost in the Toolbox, you can drag it onto a Windows Forms Form just like any other Windows Forms control. Doing this automatically adds references to the necessary WPF assemblies (PresentationFramework.dll, PresentationCore.dll, and so on). Listing 19.8 shows the main source file for a Windows Forms project whose Form contains an ElementHost called elementHost docked to the left and a Label on the right.
Listing 19.8 Form1.cs—Embedding a WPF Expander in a Windows Forms Form

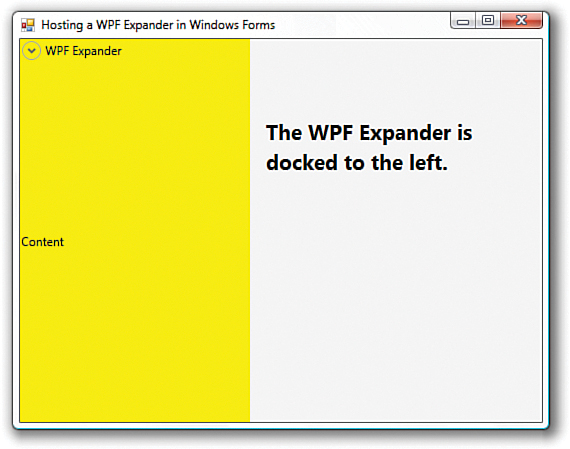
This code uses the System.Windows.Controls namespace for Expander, which it simply instantiates and initializes inside the Form’s constructor. ElementHost, like WindowsFormsHost, has a simple Child property that can be set to any UIElement. This property must be set in source code rather than in the Windows Forms designer, so here it is set to the Expander instance. Figure 19.9 shows the result. Notice that, by default, the Expander occupies all the space given to the ElementHost.
Figure 19.9 A Windows Forms application containing a WPF Expander control.
Taking this example one step further, you can use a combination of ElementHost and WindowsFormsHost to have a Windows Forms control embedded in a WPF control embedded in a Windows Forms application! All you need to do is set the Content of the WPF Expander to a WindowsFormsHost, which can contain an arbitrary Windows Forms control. Listing 19.9 does just that, placing a Windows Forms MonthCalendar inside a WPF Expander, all on the same Windows Forms Form. Figure 19.10 shows the result.
Figure 19.10 The Windows Forms MonthCalendar is inside the WPF Expander, which is on a Windows Forms Form.

Listing 19.9 Form1.cs—Using Both Directions of Windows Forms and WPF Integration

FAQ
![]() How do I launch a WPF modal dialog from a Windows Forms application?
How do I launch a WPF modal dialog from a Windows Forms application?
The technique for doing this is almost identical to the way you launch a WPF modal dialog from Win32. You can instantiate a Window-derived class and call its ShowDialog method. But you also need to set the Window’s Owner property for it to behave correctly. Owner must be set to a Window, whereas in a Windows Forms application, the owner is undoubtedly a System.Windows.Forms.Form.
Once again, you can use the WindowInteropHelper class to set its owner to an arbitrary HWND. Therefore, you can set it to the value returned by Form’s Handle property. The following code does just that:
Mixing DirectX Content with WPF Content
As with Windows Forms content, DirectX content can be hosted in WPF applications using HwndHost, and WPF content can be hosted in DirectX applications using HwndSource. In the first version of WPF, using such HWND interoperability mechanisms was the only way to mix WPF and DirectX. Given that WPF is built on top of DirectX, however, there was again the opportunity for much richer integration between the two technologies, without being forced through a largely orthogonal HWND mechanism.
Starting with WPF 3.5 SP1 (and WPF 3.0 SP2), direct mixing of WPF and DirectX is now possible, no matter which direction you want to achieve interoperability. This feature—an ImageSource called D3DImage—doesn’t make interoperability significantly easier, but it does remove the inability to overlap that is unavoidable in the other interoperability scenarios. This means that you can blend, layer, and transform the two types of content with the same seamlessness that you get with any two WPF elements. The D3DImage functionality is not layered on top of HWND interoperability; it is a distinct and more powerful mechanism.
D3DImage is a container that can host an arbitrary DirectX surface. (Despite the name, this surface can contain 2D as well as 3D content.) Because D3DImage is an ImageSource, it can be used in a number of places, such as an Image, ImageBrush, or ImageDrawing.
For the example that demonstrates D3DImage, we’ll use a slightly different approach than the previous examples. This section’s example uses a simple unmanaged C++ application from the DirectX SDK. (The details of the example are unimportant for this chapter, but the full source code is available with this book’s source code on the website, http://informit.com/title/9780672331190.) This DirectX SDK example will remain completely unmanaged, but it will be turned into a DLL instead of an EXE. Then, a WPF C# application will access the functionality of the DirectX sample by using PInvoke to call three unmanaged APIs that it exposes.
The resulting sample is a hypothetical order form for tigers, where the background is a 3D spinning tiger provided by the DirectX DLL, and the foreground contains a bunch of standard WPF controls directly on top of the spinning tiger. Figure 19.11 shows the result.
Figure 19.11 A WPF Window containing a DirectX-based spinning 3D tiger underneath basic WPF controls.

Listing 19.10 contains the XAML for this WPF Window. It uses a D3DImage as its background, thanks to ImageBrush. It then places several WPF controls inside the Window at 70% opacity, to help demonstrate the blending of these controls with the DirectX background.
Listing 19.10 MainWindow.xaml—A WPF Window Control with DirectX Background Content
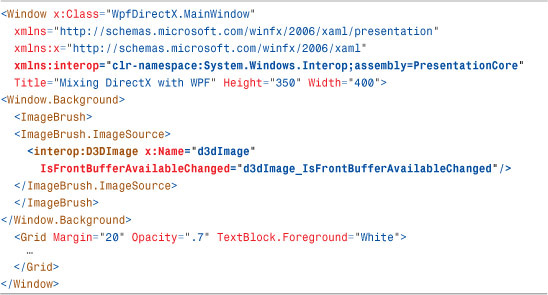
The IsFrontBufferAvailableChanged event on D3DImage is important to handle. Throughout the application’s lifetime, WPF’s DirectX surface might occasionally become unavailable. (This can happen in a number of situations, such as when the user presses Ctrl+Alt+Delete to bring up Winlogon or when the video driver changes.) Therefore, this event can trigger the initialization (or reinitialization) of the custom DirectX content as well as its cleanup, based on the value of D3DImage’s IsFrontBufferAvailable property.
The work of connecting the empty D3DImage to the actual DirectX content happens in the code-behind file, shown in its entirety in Listing 19.11.
Listing 19.11 MainWindow.xaml.cs—Making D3DImage Work with DirectX Content from an Unmanaged C++ DLL


The listing begins by defining three simple PInvoke signatures for the three unmanaged APIs exported from DirectXSample.dll. Although the source code for DirectXSample.dll is not shown here, it is included in this book’s source code. (To build it yourself, you must first download and install a recent DirectX SDK from http://microsoft.com.) Regardless of the actual work done by the DirectX code, the pattern of Initialize, Render, and Cleanup is pretty universal. Initialize requires an HWND, because the underlying DirectX API—creating a Direct3D device—requires an HWND.
Because Initialize needs an HWND, you can’t call it from MainWindow’s constructor (unless you give it an HWND for a different window). Therefore, Window’s OnSourceInitialized method is overridden so initialization can be done from there. At this point, WindowInteropHelper is able to give you a valid HWND for the WPF Window. But rather than duplicate the initialization code from the d3dImage_IsFrontBufferAvailableChanged event handler, the code in OnSourceInitialized just calls it.
Tip
If you want to obtain an HWND for a WPF Window before it is shown, WindowInteropHelper’s EnsureHandle method enables you to do so. EnsureHandle creates the underlying Win32 window (and raises the SourceInitialized event) if it hasn’t been created yet then returns the appropriate HWND. After calling this method, you could even decide never to show the Window! For example, Visual Studio 2010 does exactly that when it is invoked during a command-line build.
Inside d3dImage_IsFrontBufferAvailableChanged, the initialization path calls Initialize with the Window’s HWND, width, and height and gets back a reference to an IDirect3DSurface9 interface pointer disguised as an IntPtr (a common trick to avoid the need to create a managed definition of the interface). This IntPtr can then be passed to D3DImage.SetBackBuffer (while the D3DImage is locked) to associate the content. The unmanaged Render method needs to be called once per frame, so CompositionTarget’s static Rendering event is perfect for this purpose. The cleanup path of d3dImage_IsFrontBufferAvailableChanged—when IsFrontBufferAvailable is false—simply detaches the Rendering event handler and calls the unmanaged Cleanup method so the C++ code has a chance to release its resources.
Warning: Remember that WPF has a reference to the Direct3D surface!
Memory management can be tricky in hybrid managed/unmanaged applications. It’s easy to forget about reference counting when you’re primarily using managed code, but be aware that WPF is referencing the surface passed to SetBackBuffer until IsFrontBufferAvailable becomes false or until SetBackBuffer is called again. Therefore, if you want to break that reference, you can call SetBackBuffer with IntPtr.Zero as the second parameter.
Warning: D3DImage must be locked before any modifications are done to the back buffer!
Locking is necessary to avoid WPF presenting an incomplete frame. (If you’re in the midst of drawing to it when WPF wants to present it, it won’t look right.) Operations that require locking include method calls on D3DImage—SetBackBuffer and AddDirtyRect—as well as any rendering done by the custom DirectX code that is using the IDirect3DSurface9 pointer. This locking can be accomplished by either calling D3DImage.Lock, which blocks when WPF is busy reading the back buffer, or D3DImage.TryLock, which will wait only as long as a user-specified timeout. Regardless of which you use, be sure to call D3DImage.Unlock when you are done modifying the back buffer!
Warning: Allow WPF to present the back buffer!
If you’re modifying existing DirectX code to be used with WPF (as in this example), you need to make sure it no longer calls Present on the Direct3D device. That’s because WPF presents its own back buffer, based on internal contents and the contents of the surface you passed to SetBackBuffer. Doing your own presenting of the back buffer would interfere with the proper operation of the rendering system.
Finally, the CompositionTarget_Rendering event handler calls the unmanaged Render method (while the D3DImage is locked) and also invalidates the entire area of the D3DImage by calling AddDirtyRect with the dimensions of the D3DImage. WPF composes any dirty regions from the D3DImage with its own internal surface and then renders the result. In some applications, this could be optimized by reducing invalidation to one or more smaller regions. In addition, some applications might not require the DirectX rendering and D3DImage invalidation to happen every frame.
Warning: D3DImage doesn’t work under software rendering!
When the WPF render thread is doing software rendering (for less powerful hardware, remote desktop, and similar situations), the content inside D3DImage simply doesn’t get rendered. D3DImage does work when printing or using RenderTargetBitmap, however. Despite the fact that these mechanisms use software rendering, they operate on the UI thread and therefore don’t run into this limitation.
Embedding ActiveX Controls in WPF Applications
There must thousands of ActiveX controls in existence, and they can be easily embedded in WPF applications. But that’s not because of any hard work done by the WPF team. Ever since version 1.0, Windows Forms has had a bunch of plumbing built in for interoperability with ActiveX controls. Rather than duplicate all that plumbing natively inside WPF, the team decided to simply depend on Windows Forms for this scenario. WPF gets the functionality “for free” just by working well with Windows Forms.
Using Windows Forms as an intermediate layer between ActiveX and WPF might sound suboptimal, but the development experience is just about as pleasant as can be expected. To demonstrate how to embed an ActiveX control in a WPF application, this section uses the Microsoft Terminal Services control that ships with Windows. This control contains basically all the functionality of Remote Desktop, but it is controllable via a few simple APIs.
The first step for using an ActiveX control is to get a managed and Windows Forms–compatible definition of the relevant types. This can be done in two different ways:
• Run the ActiveX Importer (AXIMP.EXE) on the ActiveX DLL. This utility is included in the .NET Framework component of the Windows SDK.
• In any Windows Forms project in Visual Studio, add the component to the Toolbox using the COM Components tab from the dialog shown by choosing the Tools, Choose Toolbox Items menu item. Then drag the control from the Toolbox onto any Form. This process causes Visual Studio to invoke the ActiveX Importer behind the scenes.
No matter which approach you use, two DLLs are generated. You should add references to these in your WPF-based project (along with System.Windows.Forms.dll and WindowsFormsIntegration.dll). One is an interop assembly that contains “raw” managed definitions of the unmanaged interfaces, classes, enums, and structures defined in the type library contained inside the ActiveX DLL. The other is an assembly that contains a Windows Forms control that corresponds to each ActiveX class. The first DLL is named with the library name from the original type library, and the second DLL is named the same but with an Ax prefix.
For the Microsoft Terminal Services control, the original ActiveX DLL is called mstscax.dll and is found in the Windows system32 directory. (In the Choose Toolbox Items dialog, it shows up as Microsoft Terminal Services Client Control.) Running the ActiveX Importer generates MSTSCLib.dll and AxMSTSCLib.dll.
With the four relevant assemblies added to a project (MSTSCLib.dll, AxMSTSCLib.dll, System.Windows.Forms.dll, and WindowsFormsIntegration.dll), Listings 19.12 and 19.13 contain the XAML and C# code to host the control and get the resulting application shown in Figure 19.12.
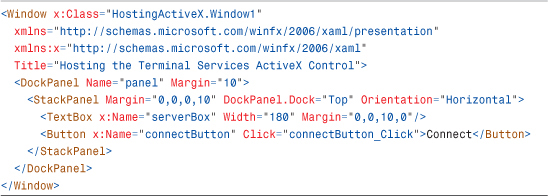
Listing 19.12 Window1.xaml—XAML for the Terminal Services WPF Application
Listing 19.13 Window1.xaml.cs—C# Code for Hosting the Terminal Services ActiveX Control
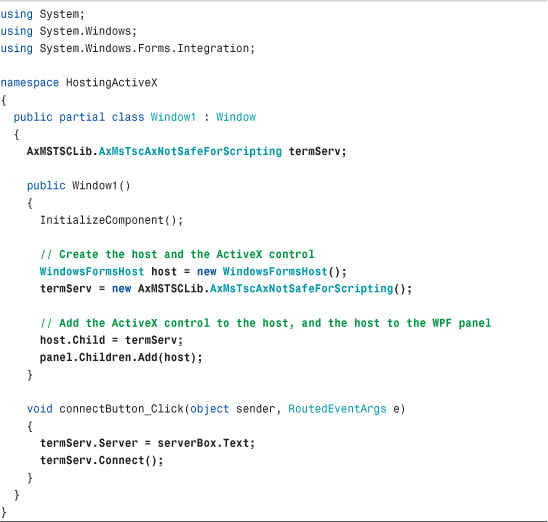
There’s nothing special about the XAML in Listing 19.12; it simply contains a DockPanel with a TextBox and Button for choosing a server and connecting to it. In Listing 19.13, a WindowsFormsHost is added to the DockPanel, and the Windows Forms representation of the ActiveX control is added to the WindowsFormsHost. This control is called AxMsTscAxNotSafeForScripting. (In versions of Windows prior to Windows Vista, it has the somewhat simpler name AxMsTscAx.) The interaction with the complicated-sounding AxMsTscAxNotSafeForScripting control is quite simple. Its Server property can be set to a simple string, and you can connect to the server by calling Connect.
Figure 19.12 Hosting the Terminal Services ActiveX control in a WPF Window.

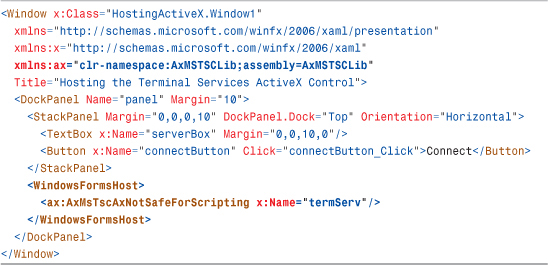
Of course, the instantiation of the WindowsFormsHost and the AxMsTscAxNotSafeForScripting control can be done directly in XAML, replacing the boldface code in Listing 19.13. This is shown in Listing 19.14. You could go a step further and use data binding to replace the first line in connectButton_Click, but you would still need the event handler for calling the Connect method.
Listing 19.14 Window1.xaml—Updated XAML for the Terminal Services WPF Application
Tip
It’s possible to host ActiveX controls in a partial-trust XAML Browser Application or loose XAML page, but you can’t use Windows Forms interoperability to do so (because this feature requires a higher level of trust). Instead, you can use a Frame or WebBrowser control that hosts a webpage containing the ActiveX control. For example:
![]()
where webpage.html contains the following:
As far as security goes, you will see the same behavior as if you navigated to webpage.html directly in Internet Explorer. You might get security prompts, determined by the user’s settings and the current zone. But you can avoid prompts in some cases by using a signed, safe-for-scripting ActiveX control.
FAQ
![]() What about the reverse direction—exposing WPF controls as ActiveX controls?
What about the reverse direction—exposing WPF controls as ActiveX controls?
There is no built-in support for this above and beyond HWND interoperability, so your best bet is to use your favorite means of creating a non-WPF ActiveX control (using Active Template Library [ATL], for example) and inject WPF content inside it.
Summary
Most developers understand that it’s possible to build really powerful applications with WPF. But with the HWND, Windows Forms, DirectX, and ActiveX interoperability features discussed in this chapter, there’s essentially no limit to the power. That’s because you can tap into decades of effort that has been poured into controls and functionality that have already been developed, tested, and deployed. For organizations with huge investments in existing code, this is a critical feature.
The main scenarios discussed in this chapter boil down to five classes. Their names are a bit confusing and inconsistent, so Table 19.1 provides a summary that you can flip back to if you ever forget which class is which.
Table 19.1 The Five Main Interoperability Classes

The benefits of interoperability are broader than the features discussed in this chapter, however. You could completely overhaul an application’s user interface with WPF but hook it up to back-end logic already in place—even if that logic is unmanaged code. This could be done using a number of techniques, such as using C++/CLI, PInvoke, or COM interoperability.
Despite the ease and power of the features described in this chapter, there are still clear benefits to having an all-WPF user interface rather than a hybrid one. For example, in a pure WPF user interface, all the elements can be scaled, styled, and restyled in a similar fashion. They can be seamlessly overlaid on top of each other. Keyboard navigation and focus works naturally without much extra effort. In addition, you don’t have to worry about mixing resolution-independent elements with resolution-dependent elements. A pure WPF user interface also opens the door to being able to run in a partial-trust environment (depending on how you separate your back-end logic)—perhaps even buildable for Silverlight as well.
Even complex applications with years of user-interface investment can easily benefit from WPF if they are well factored. For example, I once came across an MFC-based program that showed street maps across the United States. The application used various MFC (therefore GDI-based) primitives to draw each line and shape in the current scene. By swapping in a WPF surface and performing the same drawing actions using the drawing APIs discussed in Chapter 15, “2D Graphics,” the map could be replaced with a WPF version with relatively small code changes. After making the leap to WPF, the application could now easily support features that would have been difficult otherwise: crisp zooming, tilting the map in 3D, and so on.
Therefore, if you have developed a pre-WPF application, there are many ways to improve its look or functionality by using interoperability to incrementally add WPF features. If you’ve developed pre-WPF controls, there’s another nice use of interoperability that doesn’t necessarily involve updating end-user functionality: Simply wrap such controls in a WPF object model so consumers can treat it like a first-class WPF control without having to learn about WPF’s interoperability features. Creating custom controls (whether pure WPF or not) is the topic of the next chapter.