
Creating Your Personal Profile
To personalize your blog, visit your Profile page in your WordPress Dashboard.
To access your Profile page, click the down arrow to the right of Users to open the Users menu list, and then click the Your Profile link. The Profile page appears, as shown in Figure 3-10.
Here are the settings on this page:
- Personal Options: In the Personal Options section, you can set three preferences for your blog:
- • Visual Editor: Select this check box to indicate that you want to use the Visual Editor when writing your posts. The Visual Editor refers to the formatting options you find in the Write Post page (discussed in detail in Book IV, Chapter 1). By default, the check box is selected, which means that the Visual Editor is on. To turn it off, clear the check box.
Figure 3-10: Establish your profile details on the Profile page.
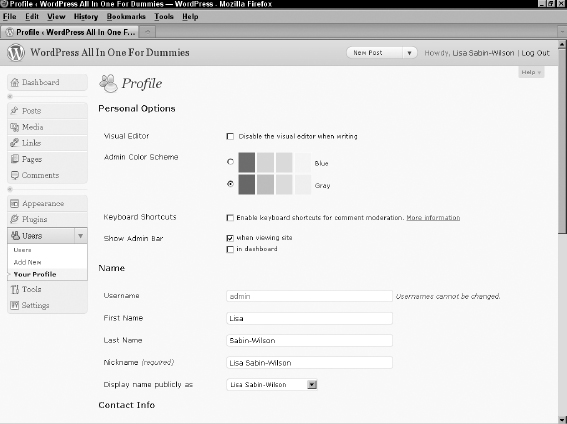
- • Admin Color Scheme: These options set the colors in your Dashboard. The default is the Gray color scheme. If you've been using WordPress since before March 2007, the Blue color scheme will be familiar to you because previous versions of the Dashboard used those colors.
- • Keyboard Shortcuts: Enables you to use keyboard shortcuts for comment moderation. To find out more about keyboard shortcuts, click the More Information link; you're taken to the Keyboard Shortcuts page (http://codex.wordpress.org/Keyboard_Shortcuts) in the WordPress Codex, which offers some helpful information.
- • Show Admin Bar: Allows you to control where the admin bar (see Book III, Chapter 1) is shown on your site. By default, the admin bar displays on the top of every page of your site when you are viewing it in your browser. You can also set it to display on the top of every Dashboard page by checking the In Dashboard check box. You can completely disable the admin bar by removing the checks in the check boxes.
- • Visual Editor: Select this check box to indicate that you want to use the Visual Editor when writing your posts. The Visual Editor refers to the formatting options you find in the Write Post page (discussed in detail in Book IV, Chapter 1). By default, the check box is selected, which means that the Visual Editor is on. To turn it off, clear the check box.
- Name: Input personal information, such as your first name, last name, and nickname, and specify how you want your name to appear publicly. Fill in the text boxes with the requested information.
- Contact Info: Provide your e-mail address and other contact information to tell your visitors who you are and where they can contact you. Aside from e-mail, you can provide your username for various Internet chat programs such as Yahoo! IM, AIM (AOL Instant Messenger), and Jabber/Google Talk.
Your e-mail address is the only required entry in this section. This address is the one WordPress uses to notify you when you have new comments or new user registrations on your blog. Make sure to use a real e-mail address so that you get these notifications.
- About Yourself: Provide a little bio for yourself and change the password for your blog, if you want, including
- • Biographical Info: Type a short bio in the Biographical Info text box. This information can appear publicly if you're using a theme that displays your bio, so be creative!
- • New Password: When you want to change the password for your blog, type your new password in the first text box in the New Password section. To confirm your new password, type it again in the second text box.
![]() When your profile is published to your Web site, not only can anyone view it, but also search engines, such as Google and Yahoo!, can pick it up. Always be careful with the information in your profile. Think hard about the information you want to share with the rest of the world!
When your profile is published to your Web site, not only can anyone view it, but also search engines, such as Google and Yahoo!, can pick it up. Always be careful with the information in your profile. Think hard about the information you want to share with the rest of the world!
![]() Directly below the two New Password text boxes is a little password helper. WordPress helps you create a secure password. It alerts you if the password you chose is too short or not secure enough by telling you that it's Bad. When creating a new password, use a combination of letters, numbers, and symbols to make it hard for anyone to guess (for example, aty89!#4j). When you create a password that WordPress thinks is a good one, it lets you know by saying that the password is Strong.
Directly below the two New Password text boxes is a little password helper. WordPress helps you create a secure password. It alerts you if the password you chose is too short or not secure enough by telling you that it's Bad. When creating a new password, use a combination of letters, numbers, and symbols to make it hard for anyone to guess (for example, aty89!#4j). When you create a password that WordPress thinks is a good one, it lets you know by saying that the password is Strong.
 Change your password frequently. We can't recommend this practice strongly enough. Some people on the Internet make it their business to attempt to hijack blogs for their own malicious purposes. If you change your password monthly, you lower your risk by keeping hackers guessing.
When you finish setting all the options on the Profile page, don't forget to click the Update Profile button to save your changes.