
Managing and Administering Wikis
After you set up a wiki for your class or individual learners, you can start creating new wiki pages. As you start using the wiki, you and your learners will be inspired to find creative ways to present and use wiki content. This is where the fun begins!
Checking out a new wiki page
Your new wiki page includes a number of features you and your learners need to familiarize yourself with. Looking at your wiki page, Moodle first displays the summary located above the tabs, as shown earlier in Figure 9-3. Above the main text area are five tabs you and your learners can click to interact with your wiki. Here are descriptions for the tabs and what they do:
- View: You and your learners see this tab when browsing the wiki. It is the page you and your learners first come to when you click the wiki from the front course page or when you first create the wiki. The View tab includes a link to all the attached files for the wiki page.
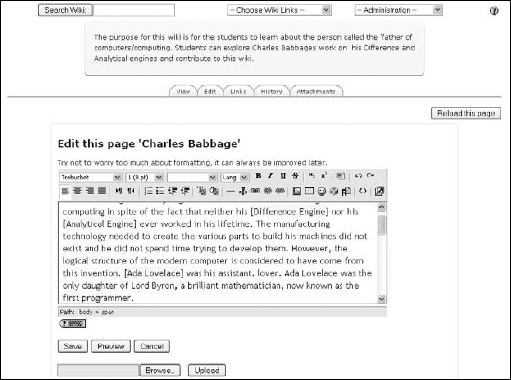
- Edit: From this tab, you can change content, attach files, and create new wiki pages, as shown in Figure 9-4. Notice that I place brackets around [Difference Engine], [Ada Lovelace], and [Charles Babbage], which tells Moodle to create new wiki pages.
Figure 9-4: Editing a wiki page and setting up new wiki pages using words in brackets.
- Links: The Links tab displays a list of all the titles of wiki pages that link from the page. Each title is a link to that particular wiki page.
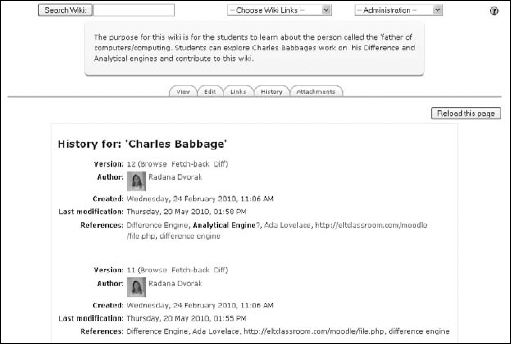
- History: Check out the History tab to see the complete activity of the wiki page. Every time learners click the Save button, they save a new version of the wiki page, and the History tab shows you the changes, who made them, and the date and time, as shown in Figure 9-5.
The History tab also offers three more cool functions:
- Browse: Allows you to view every version of a wiki page.
- • Fetch-back: Fetches an old page for editing. Once changes are made, it becomes the newest version of the page.
- • Diff: Highlights the differences between two consecutive versions of the same wiki page. The additions have a plus sign (+), and deletions have a negative sign (-).
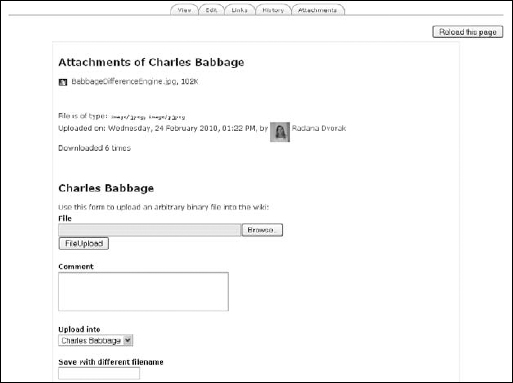
- Attachments: On the Attachments tab, you can attach any type of file to your wiki page, add a comment in the comments box, and give the image a name that is different from the saved image file. The Attachments tab also shows you who attached the file and the date it was attached. You can link straight to the learner's profile by clicking the name. Figure 9-6 shows the upload field, a linked image, and the name of the user who added the image to the wiki page, a text box for comments, and a field to enter the name.
Figure 9-5: Displaying the layout of a wiki history page.
 Each time you see a profile picture and name of a learner's activity, you can access his or her full profile by clicking the name.
Creating wiki pages
Accessing your wiki is simple. Moodle takes you right to your first page when you set up the wiki, or you can go to it by clicking the wiki icon from your front page. Then you're ready to take these steps:
Figure 9-6: The Attach-ments tab.
- Add content to your first wiki page by typing in the editing box.
You can copy and paste text from Notepad or another plain-text document into the editing box, or use the Clean Word function in the editing box, as described in Chapter 5. But you can't copy and paste text straight from Word or other word processing software because you will copy HTML code, which will make your page look messy.
- Place brackets around any words or phrases you want to act as links to generate new wiki pages.
For example, earlier in the chapter in Figure 9-4, I placed brackets around the words [Difference Engine], [Analytical Engine], and [Ada Lovelace]. (Note: I highlighted the words in yellow so they are visible in the figure. Moodle software does not highlight the text.)
- Click the Save button under the text box.
Moodle refreshes the page and thanks you for your contribution.
In the center, you can see your new text with a red question mark next to the word or phrase you enclosed in brackets. This is a link to your new wiki page.
- Click the red question mark, and Moodle takes you to the new editing view page.
You or your learners can add content and create as many new links and wiki pages, from every new page, as you need.
Assigning wiki admin duties
For the successful evolvement of your wiki, and so that you and your learners can experience the wiki as a fun and collaborative activity, you need to assign administrative duties to your learners. A lot of learners will get a kick out of being “wiki wardens.” If you use wikis in your course or in groups, choosing group leaders with specific tasks will help manage the wiki. Administrative tasks include monitoring new wiki pages, keeping an eye on most updated pages, testing links between wiki pages and to external resources, and removing wiki pages (called stripping pages). For example, you will want one of your learners to help with removing old versions of all wiki pages, or the database can quickly fill up. Every time someone adds a link, attachment, or any other file to a wiki page, Moodle saves the old version.
There are three wiki management tools you will want to familiarize yourself with. They are the Search Wiki, Choose Wiki Links, and Administration tools located under the Moodle navigation bar. Each is described in more detail here.
- Search Wiki: Allows learners to find wiki pages that include specific search terms. The search results list every page, as a specific link, where the search term is found. For example, I entered Ada Lovelace into the wiki search engine, and the search page returned five links. See Figure 9-7.
- Choose Wiki Links: Click the down arrow next to Choose Wiki Links to explore your wiki in different formats. This is useful when looking for information by means other than a search. These tools are also useful to assist you or your learners to view wiki page activities. Wikis need to be monitored to identify errors and whether you need to delete old wiki pages or alter any content. You can view the wiki pages in the format listed here:

- Site Map: Moodle displays all the wiki pages by name, starting with the first wiki page. Each name is also a link to that particular wiki page.
- • Page Index: Lists all the pages in the wiki alphabetically. Each page is a link.
- • Newest Pages: List most recently updated and created pages.
- • Most Visited Pages: Generates a number of most-visited wiki pages with the hits (number of times it was visited). If you set up learners to create individual wiki pages, you can give an award to the winning page based on visits. Alternatively, you may just want to keep a check on high-traffic pages just in case learners swayed away from the original task and decided to add something resembling entertainment value to distract learners in the course.
- • Most Often Changed Pages: Keep an eye on a page that may be constantly changed. You may find a wicked wiki battle is happening between a few learners and clogging up your database.
- • Updated Pages: Displays wiki pages by time and date of last edit.
- • Orphaned Pages: These are standalone pages that were created but all the links to them have been deleted.
- • Wanted Pages: These are pages that have not been created, but identified by learners by placing brackets around text.
- • Export Pages: Moodle allows you to select your wiki pages and export them as HTML files to a Zip folder you can download or save in one of your Moodle directories.
- • File Download: Allows you to download all files that you or your learners attached to wiki pages.
- Administration: Click the Administration drop-down list to find tools that you and your learners can use to keep your wiki running effortlessly.
For instance, you may want to look for orphaned pages using the Search Wiki links tool discussed earlier, and delete them or reconnect them. Orphaned pages are wiki pages that are not linked to or from another page, or have no links in them to go to another wiki page — they are stand-alone pages that no one would find. Learners may leave orphaned pages if they frequently update and add files to wiki pages. Too many orphaned pages can quickly take up database space, and you may find your Moodle course using up your allocated server space.
- • Set Page Flags: Allows you to set specific permission for each wiki page. See Table 9-2, which explains each flag.
Table 9-2 Setting Page Flags Permissions
Page Flags Page Flag Properties TXT Allows the wiki page to contain text. BIN Allows binary (graphics) content. OFF Short for offline. The page is there but can't be read if learners don't have editing permissions. HTM Allows HTML content instead of wiki default text. RO Short for read-only. Learners can read the wiki page but can't make changes. WR Means read-write or writable. Allows anyone in the course to make changes. - • Remove Pages: Allows you and your learners to remove orphaned wiki pages. You need this tool because orphaned pages can't be reached through the wiki View or Edit tabs.
- • Strip Pages: The wiki keeps track of all changes and stores old versions in the database. It's important you check the history and occasionally delete all the old versions so the database doesn't get cluttered.
- • Revert Mass Changes: No need to panic. This tool allows you to roll back the clock and restore an older version of the wiki if learners make a mess of many pages in the wiki. You don't need to share with your learners that at a click of a button you can restore everything and clean up their catastrophic mess. Letting them stew about their mistakes for a few minutes may be satisfying. Keep paramedics on hand though.
- • Set Page Flags: Allows you to set specific permission for each wiki page. See Table 9-2, which explains each flag.
Note: Students can work simultaneously on the same wiki but not on the same wiki pages. Moodle informs students if a wiki page is being used (it is locked), and they'll have to try later.
Be sure your learners know that it's important to save after editing because if they open a page and forget to save the changes, the opened wiki page is locked, and no one else can view or edit it. You or IT support can change permissions, allowing learners to override locked pages. See Chapter 13 for advice and information on how to change permissions.