Managing and Administering Glossaries
After you create your glossary for your class or individual learners, you can start populating it with entries. I suggest you add a few entries and attach an example file when you first introduce the glossary to your course.
Checking out a glossary page
When you and your learners first view the newly created glossary page, it may look baffling because it appears quite busy with many features. It's actually easy to use, and your learners will have a lot of fun populating it when you start adding entries.
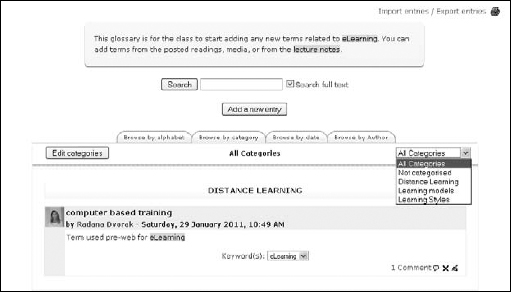
Click the glossary icon from the course front page. (It's located in the week or unit where you set up the glossary.) Moodle opens the glossary, as shown in Figure 9-9.
Figure 9-9: A new glossary page with an entry.
- Browsing the glossary: Notice the four large browsing tabs in the center.
- • Browse by Alphabet: Learners are able to look up words by its first letter.
- • Browse by Category: You can create categories for your glossary and then learners can use them when looking for specific words. For example, you can create categories for each unit topic and add related entries. To learn how to set up categories, see the next section.
- • Browse by Date: If learners will add content to the glossary, browsing by author is useful to keep track of who is participating in the assignment.
- Import Entries and Export Entries: In the top right under the Update This Glossary button, you see two links allowing you to import and export glossaries. You can import a glossary from another course, or this course, and you can export a glossary to a file that you can download to your computer or another Moodle course. Importing and exporting are outside the scope of this book; if you need details, visit http://docs.moodle.org, or access the Moodle forums at http://moodle.org, or go to this book's companion Web site at www.dummies.com/go/moodlefd.
- Waiting approval: If you set the Approval default to No when you set up the glossary, after your class begins to add entries you see an additional link with a number, in brackets, telling you how many words are waiting for your approval before they can be added to the glossary. When you click the link, you're taken to a page with a list of these new entries, and a check box next to each.
- Printer icon: If you set Allow Print View to Yes when you set up the glossary, you see a small printer icon right under the Import Entries/Export Entries links. Your learner can click the printer icon to print the entries and definitions in a printer-friendly format.
- Search: You and your learners can search for terms by entering the key term in the field located right above the browsing tab. If you want to search for an entry anywhere in the text, select the check box next to the text entry field.
When you understand the layout of the glossary page, you can start adding terms to your glossary. If you plan to use the glossary as a collaborative exercise, add a few terms, definitions, and notes to demonstrate to your learners how the glossary looks. I advise you to take your students through a short tutorial, emphasizing how the activity is related to the learning goal or the course or project. If you use one glossary across a number of units or topics, you may want to think about categorizing the terms, enabling your learners to search by categories.
To add a new glossary entry, take these steps:
- Click the Add a New Entry button located in the middle of the glossary page. (The earlier Figure 9-9 shows the button.)
Moodle takes you to the Add a New Entry page. Notice the name of your glossary at the top of this page.
- Fill in the new word or concept in the Concept field.
- Fill in the definition and/or explanation in the text box.
- If you have set up categories for your glossary, choose the category where the new term belongs by highlighting the category name in the selection box.
See the upcoming “Adding categories” section if you need to know how to add categories.
- If it would be useful to your course members, add synonyms in the field next to Keyword(s).
If you have more than one synonym, enter one word per line in the text field.
- Click the Browse button next the Attachment field to add a file to your glossary term.
The file can be any type, text, graphics, sound.
- If you or your learners require the term to appear as a link, select the check box next to This Entry Should Be Automatically Linked.
Activating the automatically linked functions enables you to choose from the following options:
- • This Entry Is Case Sensitive: Select this option if correct case is a requirement for the word(s).
- • Match Whole Words Only: Select this option if you want to match whole words (concept) or part of a word.
- Click the Save Changes button.
Moodle saves the new term and returns you to the main glossary page.
Commenting on entries
If you selected Yes for the Allowing Comments on Entries option when you first set up the glossary, you and your learners can see small icons at the bottom right of the glossary for each term added. (You can see the icons in the earlier Figure 9-9.)
- Speech bubble icon: Click the icon, and a text box appears for comments. As with all editing additions and changes in Moodle, you have to click the Save button for Moodle to make changes and return to the term with the new comment right below it.
- • Editing and delete icons: You and your learners can edit and delete the comments.
The comment will appear right under the term and next to the bubble icon. Moodle tells you how many comments are associated with the term. (Figure 9-9 shows one comment.) If you enabled the author details to show, you can link to the author's profile.
Adding categories
To add a category, here's what you do:
- On the main glossary page, click the Browse by Category tab.
Moodle takes you to the Edit Categories page.
- Click the Edit Categories button.
Moodle refreshes the screen, taking you to the Categories page, where you can add and edit categories. Click the Add Category button to get to the Add category page shown in Figure 9-10.
Figure 9-10: Adding categories to your glossary.

- Give the new category a name and decide whether you want to link the category as well as the term.
I recommend against linking the category name because any occurrence of the words will be linked, and when your learners click the link, they're taken to the Browse by Category page instead of the main glossary page. This may be confusing.
- Click the Save Changes button, and Moodle returns you to the Add Category page.
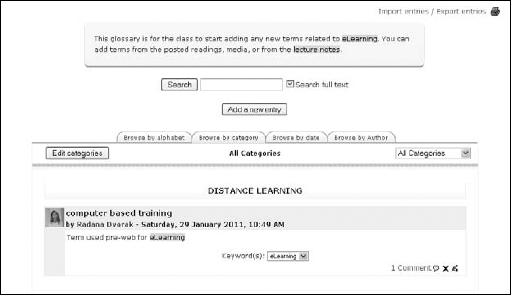
If you don't want to add another category, click the Back button, and Moodle returns you to the Browse by Category page. Notice you can see your new category in the drop-down list located in the right side under the tabs (as shown in Figure 9-11).
Figure 9-11: Find your category in the drop-down list.