
10. Fine-tune task details
Practice files
For this chapter, use the FineTuneTasks practice file from the Project2016SBSCh10 folder. For practice file download instructions, see the introduction.
In this chapter, you continue the deep dive into task-management features that you began in the previous chapter. This chapter focuses on specific features you can apply to individual tasks.
This chapter guides you through procedures related to entering deadline dates, entering fixed costs, creating a recurring task, viewing the plan’s critical path, and scheduling summary tasks manually.
Enter deadline dates
One common mistake made by new Project users is to place semi-flexible or inflexible constraints on too many tasks in their plans. Such constraints severely limit your scheduling flexibility. (If you need a refresher on task constraints, see “Control task scheduling by using constraints” in Chapter 9, “Fine-tune task scheduling.”)
In many cases, setting a deadline date for a task is a better choice. When you set a deadline for a task, you identify the latest date by which you want the task to be completed. The deadline date itself does not constrain the scheduling of the task. Project displays a deadline symbol on the chart portion of a Gantt chart view. If the task’s finish date moves past its deadline date, a missed deadline indicator (a red exclamation point) appears in the Indicators field for that task. When you spot the missed deadline indicator, you can take corrective steps.
Here’s an example of how you might use a deadline rather than a constraint. Assume that you have a five-day task that you want completed by April 20. If you enter a Must Finish On constraint on the task and set it to April 20, Project will move the task out so that it will indeed end on April 20.
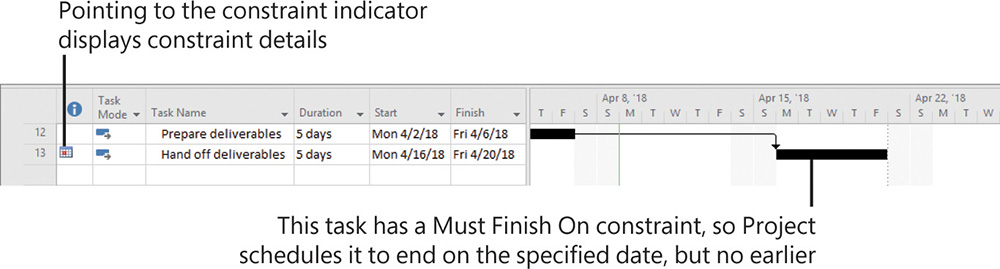
When the constraint is applied to task 13, Project keeps the finish-to-start task relationship with its predecessor but reschedules the task to honor its constraint type and date
Even if the task could be completed earlier, Project will not reschedule it to start earlier. In fact, by applying that constraint, you have increased the risk for this task. If the task is delayed for even one day for any reason (if a required resource is sick, for example), the task will miss its planned finish date.
A better approach to scheduling this task is to use the default As Soon As Possible constraint and then enter a deadline of April 20.

The deadline date lets you keep track of the important target finish date, but gives you greater scheduling flexibility
Now the task has the greatest scheduling flexibility. It might be completed well before its deadline, depending on resource availability, predecessor tasks, and whatever other scheduling issues apply. If the scheduled completion of the task moves past its deadline date, Project will display the missed deadline indicator in the Indicators column.

The missed deadline indicator appears if the task’s finish date is scheduled after the deadline date
You can then take corrective action to pull in the task’s finish date prior to its deadline.
To set a deadline date on a task
1. Select the task for which you want to set a deadline.
2. On the Task tab, in the Properties group, click the Information button to open the Task Information dialog box, which contains details about the currently selected task.
![]() Tip
Tip
Double-clicking a task name is a quick way to open the Task Information dialog box.
3. Click the Advanced tab, and then in the Deadline field, enter or select the date you want.
4. Click OK to close the Task Information dialog box.
![]() Tip
Tip
You can also change an existing deadline date by dragging the deadline indicator in the chart portion of a Gantt chart view.
To remove a deadline date
1. Select the task that has a deadline date applied.
2. On the Task tab, in the Properties group, click the Information button.
3. In the Task Information dialog box, click the Advanced tab.
4. Clear the Deadline field.
Enter fixed costs
For plans in which you must track a budget or financial costs, you might need to work with several different sources of costs. These include costs associated with resources, in addition to costs associated directly with specific tasks.
For many plans, financial costs are derived mainly from costs associated with work resources (people and equipment) or with material resources. To handle costs of similar types for which you want to track aggregate sums (travel is one example in many plans), Project supports cost resources. (If you need a refresher on cost resources, see Chapter 5, “Set up resources.”)
However, you might occasionally want to associate a cost with a task that is not tied to resources or work and is not something you want to aggregate across the plan as a cost resource. In such cases, apply a fixed cost to the task. A fixed cost is a specific monetary amount budgeted for a task. It remains the same regardless of the task’s duration and any costs of resources that could be assigned to it.
The following are common examples of fixed costs in plans:
![]() A setup fee, charged in addition to a per-day rental fee, for a piece of equipment
A setup fee, charged in addition to a per-day rental fee, for a piece of equipment
![]() A building permit
A building permit
If you assign resources with pay rates, assign cost resources, or add fixed costs to a task, Project adds all of these costs together to determine the task’s total cost. For example, consider a final review task whose total cost is the sum of a work resource assignment’s cost plus a fixed cost. The resource costs are derived from the resource pay rates times the resources’ assignments to the task.

The total cost breakdown is clearly shown in the Task Usage view with the Cost table displayed
You can specify when fixed costs should accrue, as follows:
![]() Start The entire fixed cost is scheduled for the start of the task. When you track progress, the entire fixed cost of the task is incurred as soon as the task starts.
Start The entire fixed cost is scheduled for the start of the task. When you track progress, the entire fixed cost of the task is incurred as soon as the task starts.
![]() End The entire fixed cost is scheduled for the end of the task. When you track progress, the entire fixed cost of the task is incurred only after the task is completed.
End The entire fixed cost is scheduled for the end of the task. When you track progress, the entire fixed cost of the task is incurred only after the task is completed.
![]() Prorated (default accrual method) The fixed cost is distributed evenly over the duration of the task. When you track progress, the plan incurs the cost of the task at the rate at which the task is completed. For example, if a task has a $100 fixed cost and is 75 percent complete, the plan has incurred $75 against that task.
Prorated (default accrual method) The fixed cost is distributed evenly over the duration of the task. When you track progress, the plan incurs the cost of the task at the rate at which the task is completed. For example, if a task has a $100 fixed cost and is 75 percent complete, the plan has incurred $75 against that task.
When you plan a project, the accrual method you choose for fixed costs determines how those costs are scheduled over time. This can be important in anticipating budget and cash-flow needs. By default, Project uses the prorated accrual method for fixed costs, but you can change that to match your organization’s cost accounting practices.
To enter a fixed cost amount and accrual method
1. On the View tab, in the Task Views group, select any task-centric view that includes a table, such as the Gantt Chart, Task Sheet, or Task Usage view.
2. On the View tab, in the Data group, click the Tables button, and then click Cost.
3. In the Fixed Cost field, enter the fixed cost amount you want.
4. In the Fixed Cost Accrual field, click the accrual method you want.
Create a recurring task
Many projects require repetitive tasks, such as attending team meetings, creating and publishing status reports, or running quality-control inspections. Although it is easy to overlook the scheduling of such events, you should consider accounting for them in your plan. After all, team meetings and similar events that indirectly support the project require time from resources, and such events take time away from your resources’ other assignments.
To help account for such events in your plan, create a recurring task. As the name suggests, a recurring task is repeated at a specified frequency such as daily, weekly, monthly, or yearly. When you create a recurring task, Project creates a series of tasks with Start No Earlier Than constraints, effort-driven scheduling turned off, and no task relationships defined.
Recurring tasks in Project are similar to recurring appointments in calendar programs such as Microsoft Outlook. When you set up a recurring task, you set its recurrence pattern (for example, daily or once per week) and the applicable timespan or number of occurrences.
Setting up a recurring task in Project is similar to setting up a recurring meeting in a calendar program
You also can assign resources and perform other task-centric activities with recurring tasks.
All occurrences of a recurring task are organized under a single summary recurring task. As with a regular summary task, the duration of a summary recurring task spans the earliest start to latest finish date of the individual occurrences of the recurring task. Each occurrence of the recurring task is sequentially numbered. Initially, the recurring task is displayed in expanded form.

Individual occurrences of a recurring task are sequentially numbered (you may need to widen the Task Name column to see the full task names)
You can collapse the summary recurring task to save screen space. When you do, the summary recurring task is presented a little differently than a regular summary task.

The summary recurring task shows each occurrence of the recurring task rather than a regular summary Gantt bar
Here are a few other things to keep in mind when working with recurring tasks:
![]() By default, Project schedules a recurring task to start at the plan’s default start time. If you want to schedule a recurring task to start at a different time, enter that time along with the start date in the Start box of the Recurring Task Information dialog box. For example, if you want the recurring staff meeting to be scheduled for 10:00 A.M. starting on April 16, 2018, you would enter 4/16/18 10 AM in the Start box.
By default, Project schedules a recurring task to start at the plan’s default start time. If you want to schedule a recurring task to start at a different time, enter that time along with the start date in the Start box of the Recurring Task Information dialog box. For example, if you want the recurring staff meeting to be scheduled for 10:00 A.M. starting on April 16, 2018, you would enter 4/16/18 10 AM in the Start box.
![]() You can set a recurring task to end either after the number of occurrences you specify or on a specific date. If you schedule a recurring task to end on a specific date, Project suggests the current project end date. If you use this date, be sure to change it manually if the project end date changes later.
You can set a recurring task to end either after the number of occurrences you specify or on a specific date. If you schedule a recurring task to end on a specific date, Project suggests the current project end date. If you use this date, be sure to change it manually if the project end date changes later.
![]() If you want to assign the same resources to all occurrences of a recurring task (or remove them from the recurring task), use the Assign Resources dialog box to assign them to the recurring summary task. Don’t enter resource names in the Resource Name field of the summary recurring task. Doing so assigns the resources to the summary recurring task only and not to the individual occurrences.
If you want to assign the same resources to all occurrences of a recurring task (or remove them from the recurring task), use the Assign Resources dialog box to assign them to the recurring summary task. Don’t enter resource names in the Resource Name field of the summary recurring task. Doing so assigns the resources to the summary recurring task only and not to the individual occurrences.
![]() You can assign resources to all occurrences of the summary recurring task, to a specific occurrence, or a combination.
You can assign resources to all occurrences of the summary recurring task, to a specific occurrence, or a combination.
To create a recurring task
1. Display a task-centric view, such as a Gantt chart.
2. Select the task above which you want to insert the recurring task.
3. On the Task tab, in the Insert group, click the Task arrow (not the button), and then click Recurring Task to open the Recurring Task Information dialog box.
4. In the Task Name field, enter the recurring task’s name.
5. In the Duration field, enter the duration of each occurrence of the recurring task.
6. Under Recurrence pattern, specify how often the task should repeat.
7. Under Range of recurrence, specify a start date. For the end date, you can specify either a specific number of occurrences or an end date.
8. Under Calendar for scheduling this task, if you want the recurring task to use a specific base calendar, select that calendar. If you want the selected calendar to override resource calendars so that assigned resources are scheduled to the recurring tasks at times they might not normally work, select the Scheduling ignores resource calendars check box.
9. Click OK.
![]() Tip
Tip
To edit a recurring task, double-click the summary recurring task’s name to open the Recurring Task Information dialog box. Then make your changes.
To assign resources to a recurring task
1. Select and expand the summary recurring task.
2. On the Resource tab, in the Assignments group, click the Assign Resources button.
3. In the Assign Resources dialog box, select the resources you want to assign to the recurring task. To select multiple resources, hold down the Ctrl key while selecting additional names.
4. Click OK.
To assign resources to a specific occurrence of a recurring task
1. Expand the summary recurring task to show its occurrences.
2. Select the specific occurrence to which you want to assign a resource.
3. On the Resource tab, in the Assignments group, click the Assign Resources button.
4. In the Assign Resources dialog box, select the resources you want to assign to the recurring task’s occurrence. To select multiple resources, hold down the Ctrl key while selecting additional names.
5. Click OK.
View the plan’s critical path
A critical path is the series of tasks that will push out the plan’s end date if any of those tasks are delayed. The word critical in this context has nothing to do with how important these tasks are to the overall plan. It refers only to how their scheduling will affect the plan’s finish date. However, the plan’s finish date is of great importance to most projects. If you want to shorten the duration of a plan to bring in the finish date, you must begin by shortening (also referred to as crashing) the critical path.
Over the life of a project, the plan’s critical path is likely to change from time to time as tasks are completed ahead of or behind schedule. Schedule changes, such as changing task relationships or durations, can also alter the critical path. In fact, Project automatically recalculates the critical path in response to schedule changes even if you never display the critical path.
One key to understanding the critical path is to understand slack, also known as float. There are two types of slack: free and total. The amount of time a task can be delayed before it delays another task is referred to as Free slack. Total slack is the amount of time a task can be delayed before it delays the completion of the plan. (Note that after a task on the critical path is completed, it is no longer critical because it cannot affect the plan’s finish date.)
A task is on the critical path if its total slack is less than or equal to a certain threshold—by default, if its slack is zero days (you can adjust this threshold if you want). In contrast, noncritical tasks have slack, meaning that they can start or finish earlier or later within their slack time without affecting the completion date of the plan.

As this Gantt chart view is formatted, both the tasks on the critical path (in red) and the free slack of noncritical tasks are displayed
![]() Tip
Tip
The Task Path feature introduced in Chapter 9, “Fine-tune task scheduling,” distinguishes between the selected task’s predecessor and successor relationships. The critical path, in contrast, applies to whatever sequence of linked tasks in a plan drives the plan’s finish date.
Working with the critical path is the most important way to manage a plan’s overall duration. Checking the critical path and, when necessary, shortening the overall duration are important project management skills.
Here are a couple of other things to keep in mind when working with the critical path:
![]() Critical tasks and free slack are represented in the chart portion of the Detail Gantt view, and you can also see the values of free and total slack in the Schedule table. You can apply the Schedule table to any Gantt chart or Task Sheet view.
Critical tasks and free slack are represented in the chart portion of the Detail Gantt view, and you can also see the values of free and total slack in the Schedule table. You can apply the Schedule table to any Gantt chart or Task Sheet view.
![]() Another way to identify the tasks on the critical path is to select Critical in the Highlight or Filter box on the View tab, in the Data group.
Another way to identify the tasks on the critical path is to select Critical in the Highlight or Filter box on the View tab, in the Data group.
![]() Tip
Tip
To learn more about the critical path, click the Tell Me box at the top of the Project window, and in the Search box, enter critical path.
To display the plan’s critical path
1. On the Format tab, in the Bar Styles group, select the Critical Tasks check box. Project applies red formatting to the critical tasks’ Gantt bars.
![]() Tip
Tip
You can adjust the Gantt chart’s timescale to see more or less of the plan by clicking the Zoom In or Zoom Out command in the lower-right corner of the screen.
To display slack for noncritical tasks
1. On the Format tab, in the Bar Styles group, select the Slack check box. Project draws slack lines from the finish dates of the Gantt bars of the noncritical tasks.
To change the slack threshold for a task to be considered critical
By default, Project defines a task as critical if it has zero slack. However, you can change the amount of slack required for a task to be considered critical. You might do this, for example, if you want to more easily identify tasks that are within one or two days of affecting the project’s finish date.
1. Click the File tab to display the Backstage view, and then click Options.
2. In the Project Options dialog box, click Advanced.
3. On the Advanced page, in the Tasks Are Critical If Slack Is Less Than Or Equal To box in the Calculation options of this project section, enter the number of days you want.
Schedule summary tasks manually
In Chapter 4, “Build a task list,” you worked with summary tasks and subtasks. Recall that the default behavior of Project is to automatically calculate a summary task’s duration as the span of time between the earliest start and latest finish dates of its subtasks. For this reason, Project sets summary tasks as automatically scheduled—their durations are automatically determined by their subtasks, regardless of whether those subtasks are manually or automatically scheduled (or are a mix of both).
There might be times, however, when you want to directly enter a duration value for a summary task that is independent of its calculated duration as determined by its subtasks. For example, a summary task might represent a phase of work for which you want to allocate 60 working days and compare that duration with the calculated duration determined by the subtasks (their durations, task relationships, and other factors). This is especially likely during the initial planning of a plan, when you might need to account for the gap between how long you’d like a phase of work to take and its duration as determined by its subtasks.
Fortunately, you can enter any duration you want for a summary task. When you do so, Project switches the summary task from automatic to manually scheduled and reflects both durations as separate parts of the summary task’s Gantt bar. The upper bar represents the duration of the manually scheduled task, and the lower bar represents the automatically scheduled duration.
It’s useful to compare the duration of a manually scheduled task and its new finish date with the automatically scheduled duration and finish date as determined by the subtasks of the summary task. You can also point to the summary task’s Gantt bars in the chart portion of a Gantt chart view. The ScreenTip that appears includes these and other values.

Use the ScreenTips for both parts of the Gantt bar of a manually scheduled summary task to view important scheduling details
When you enter a duration for a manually scheduled summary task, Project makes the following adjustments to the schedule:
![]() The summary task is switched from automatically scheduled (the default for summary tasks) to manually scheduled. Note the pin icon in the Task Mode column that reflects the task’s scheduling status.
The summary task is switched from automatically scheduled (the default for summary tasks) to manually scheduled. Note the pin icon in the Task Mode column that reflects the task’s scheduling status.
![]() Project draws two Gantt bars for the summary task. The upper bar represents the duration of the manually scheduled task, and the lower bar represents the automatically scheduled duration.
Project draws two Gantt bars for the summary task. The upper bar represents the duration of the manually scheduled task, and the lower bar represents the automatically scheduled duration.
![]() Project draws a red squiggly line under the new finish date to flag it if there is a potential scheduling conflict.
Project draws a red squiggly line under the new finish date to flag it if there is a potential scheduling conflict.
![]() Project reschedules the summary task’s successor tasks based on the summary task’s manually entered duration.
Project reschedules the summary task’s successor tasks based on the summary task’s manually entered duration.
Setting a manually scheduled duration for a summary task is a good way to apply a top-down focus to a plan. You can, for example, introduce some slack or buffer to a phase of work by entering a manually scheduled duration for the summary task that is longer than its calculated duration. Conversely, you can enter a preferred manually scheduled duration that is shorter than the scheduled duration of a summary task to give the assigned resources a more aggressive target to work toward.
To enter a manually scheduled duration on a summary task
1. In the Duration field of a summary task, enter the manually scheduled duration value you want.
To see the manually and automatically scheduled durations and other details on a summary task
1. Point to the upper or lower part of the summary task’s Gantt bar. Project displays different ScreenTips for each part of the Gantt bar: the lower bar, which represents the summary task as it is automatically scheduled; and the upper bar, which represents it as it is manually scheduled.
To convert a manually scheduled summary task back to an automatically scheduled summary task
1. Click the Task Mode field of the summary task, and then click the arrow that appears.
2. In the list, click Auto Scheduled.
Skills review
In this chapter, you learned how to:
![]() Schedule summary tasks manually
Schedule summary tasks manually
 Practice tasks
The FineTuneTasks practice file for these tasks is located in the Project2016SBSCh10 folder.
![]() Important
Important
If you are running Project Professional with Project Web App/Project Server, take care not to save any of the practice files you work with in this book to Project Web App (PWA). For more information, see Appendix C, “Collaborate: Project, SharePoint, and PWA.”
Enter deadline dates
The scenario: At Lucerne Publishing, the publisher has directed that the acquisition tasks for the new children’s book should not slip past a certain date. You’d like to flag this date without unduly restricting your scheduling flexibility in the plan. Open the FineTuneTasks plan in Project, and perform the following task:
1. Set a deadline date of 6/1/18 on task 5, Handoff to Editorial. This task is a milestone marking the end of the acquisition phase of the new book project.
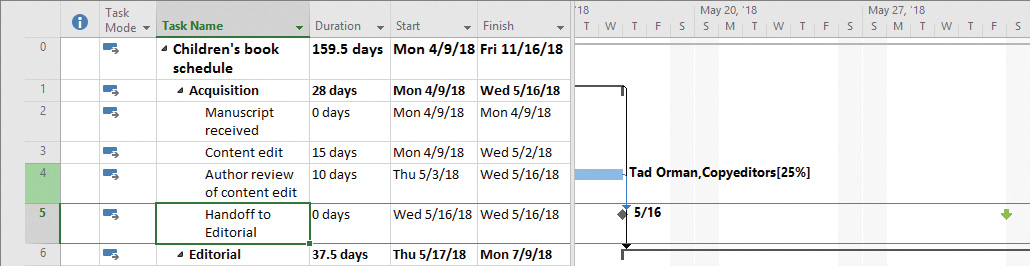
Task 5 is a milestone task that signifies the scheduled completion of a major phase of work—a good candidate for a deadline date
Enter fixed costs
The scenario: You’ve learned that the generating of page proofs by the color-setting services firm will cost $500. You’d like to schedule this expense to accrue when the color-setting services firm completes the task. Continuing in the FineTuneTasks plan, perform the following tasks:
1. Enter a fixed cost of $500 on task 30, Generate proofs.
2. Set the fixed cost to accrue at the end of the task.

The Cost table is a handy place to enter a fixed cost on a task
Create a recurring task
The scenario: The new children’s book project requires a weekly status meeting involving some, but not all, of the resources working on the project. You’d like this recurring status meeting to have visibility in the plan. Continuing in the FineTuneTasks plan, perform the following tasks:
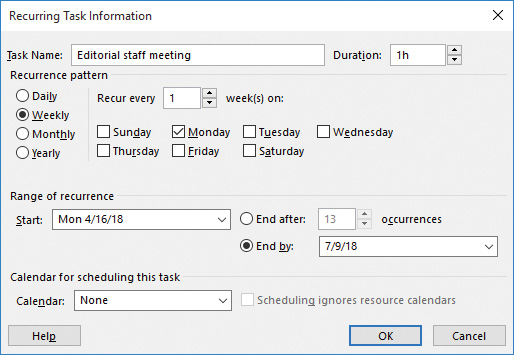
1. Insert a new recurring task named Editorial staff meeting so that it appears above task 1, Acquisition. The recurring task should have a one-hour duration every Monday, starting on April 16, 2018, and ending by July 9, 2018.
2. Assign the following resources to the summary recurring task:
• Carole Poland
• Hany Morcos
• Jun Cao

Although you assigned resources to the summary recurring task, their names appear next to each occurrence of the recurring task
3. Collapse the summary recurring task.

The summary recurring task’s Gantt bar shows each occurrence of the recurring task but hides the names of assigned resources; this is handy for seeing just when the recurring task will occur
View the plan’s critical path
The scenario: You are frequently asked when the new children’s book project will be completed. You can quickly see the project’s overall duration and finish date in Project, but occasionally you need to show a project stakeholder the project’s critical path, because that sequence of tasks drives the project’s duration. One way to see the critical path is to format critical tasks. Continuing in the FineTuneTasks plan, perform the following tasks:
1. Display critical tasks in the plan.

With critical path formatting applied, it’s easier to see the chain of tasks that is driving the plan’s finish date
2. Turn off the critical tasks formatting.
Schedule summary tasks manually
The scenario: The publisher has challenged the team to aim for a 30-working-day duration for the Editorial phase of the new children’s book project. You’ll enter a manual duration on the Editorial summary task and later compare that duration with the automatically scheduled duration provided by Project. Continuing in the FineTuneTasks plan, perform the following tasks:
1. Enter a 30-day duration on summary task 20, Editorial. Entering a duration value for the summary task switches it to be manually scheduled.
2. Check task 20’s updated schedule details in each of its Gantt bar’s ScreenTips.
