
4. Build a task list
In this chapter
![]() Enter task durations and dates
Enter task durations and dates
![]() Create summary tasks to outline the plan
Create summary tasks to outline the plan
![]() Link tasks to create dependencies
Link tasks to create dependencies
![]() Switch task scheduling from manual to automatic
Switch task scheduling from manual to automatic
![]() Check a plan’s duration and finish date
Check a plan’s duration and finish date
Practice files
For this chapter, use the SimpleBuildTaskList practice file from the Project2016SBSCh04 folder. For practice file download instructions, see the introduction.
Tasks are the most basic building blocks of any project’s plan. Tasks represent the work to be done to accomplish the goals of the project. Tasks describe work in terms of dependencies, duration, and resource requirements. In Project 2016, there are several kinds of tasks. These include summary tasks, subtasks, and milestones (all discussed in this chapter). More broadly, what are called tasks in Project are sometimes more generally called activities or work packages.
This chapter guides you through procedures related to creating tasks, entering task durations and dates, entering milestone tasks, creating summary tasks, linking tasks to create dependencies, switching task scheduling from manual to automatic, checking a plan’s duration and finish date, and documenting task information.
Create tasks
Tasks represent the work to be done to accomplish the goals of the project. Every task in a plan is given an ID number, but the number does not necessarily represent the order in which tasks occur.
Every task in Project has one of two scheduling modes that controls how the task is scheduled: manual (the default) or automatically scheduled. Think of a manually scheduled task as an initial placeholder you can create at any time without affecting the rest of the schedule. You might not know more than a task name to start with, and that’s OK. As you discover or decide more details about the task, such as when it should occur, you can add those details to the plan. You’ll work with automatic scheduling in “Switch task scheduling from manual to automatic” later in this chapter.
As you might suspect, naming the task is the first step in creating a task. For this reason, it’s worth developing good practices about how you name tasks in your plans.
Task names should be recognizable and make sense to the people who will perform the tasks and to other stakeholders who will read the task names. Here are some guidelines for creating good task names:
![]() Use short verb phrases that describe the work to be done, such as “Edit manuscript.”
Use short verb phrases that describe the work to be done, such as “Edit manuscript.”
![]() If tasks will be organized into an outline, don’t repeat details from the summary task name in the subtask name unless it adds clarity.
If tasks will be organized into an outline, don’t repeat details from the summary task name in the subtask name unless it adds clarity.
![]() If tasks will have resources assigned to them, don’t include resource names in the task names.
If tasks will have resources assigned to them, don’t include resource names in the task names.
Keep in mind that you can always edit task names later, so don’t worry about getting them exactly right when you’re initially entering them into a plan. Do aim to use concise, descriptive phrases that communicate the required work and make sense to you and others who will perform the work or review the plan. When necessary, you can also add more details in task notes, described later in this chapter.
To enter task names
1. Click an empty cell in the Task Name column.
2. Enter your task names, and then press the Enter key after each one.
To insert a new task within a task list
1. Click in the Task Name column where you want to insert the new task.
2. On the Task tab, in the Insert group, click Task.
Project inserts a row for a new task and renumbers the subsequent tasks. Project names the new task <New Task>.
3. With <New Task> selected, enter the task name, and then press Enter.
To delete a task
1. Right-click the task name, and then click Delete Task.
Enter task durations and dates
A task’s duration represents the amount of time you expect it will take to complete the task. Project can work with task durations that range from minutes to months. Depending on the scope of your plan, you’ll probably want to work with task durations on the scale of hours, days, and weeks. Giving your tasks duration values is one of the benefits of using a scheduling tool like Project over a simple checklist or to-do approach to organizing work.
Project uses standard values for minutes and hours for durations: 1 minute equals 60 seconds, and 1 hour equals 60 minutes. For the durations of days, weeks, and months, you can use Project’s defaults (for example, 20 days per month) or define your own values in the Project Options dialog box.
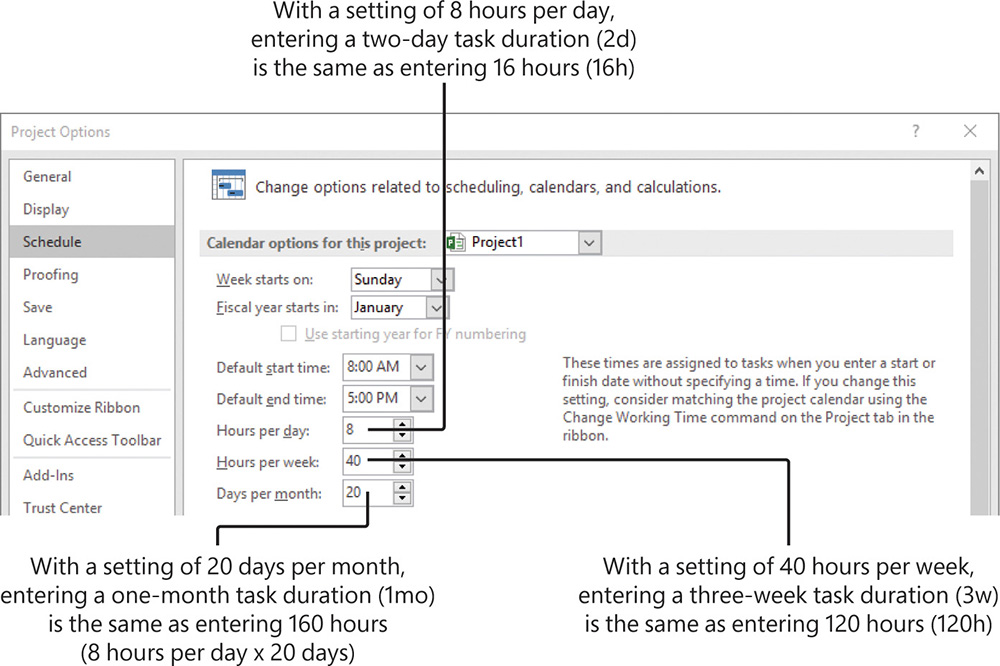
Manage time-related settings on the Schedule tab of the Project Options dialog box
Let’s explore task durations with an example. Assume that a plan has a project calendar with working time defined as 8:00 A.M. through 5:00 P.M., with one hour off for lunch breaks, Monday through Friday, leaving nonworking time defined as evenings (after 5:00 P.M.) and weekends. If you estimate that a task will take 16 hours of working time, you could enter its duration as 2d to schedule work over two 8-hour workdays. You should then expect that starting the task at 8:00 A.M. on a Friday means that it will not be completed until 5:00 P.M. on the following Monday. No work would be scheduled over the weekend because Saturday and Sunday have been defined as nonworking time.
The practice tasks in this chapter use Project’s default values: 8 hours per day, 40 hours per week, and 20 days per month. In fact, throughout this book we use Project’s default settings unless noted otherwise.
![]() See Also
See Also
For a refresher on the project calendar, see “Set nonworking days in the project calendar” in Chapter 3, “Start a new plan.”
You can use the following abbreviations when entering durations.
If you enter this abbreviation |
It appears like this |
And it means |
m (such as 30m) |
30 mins |
30 minutes |
h (such as 6h) |
6 hrs |
6 hours |
d (such as 4d) |
4 days |
4 days |
w (such as 3w) |
3 wks |
3 weeks |
mo (such as 2mo) |
2 mons |
2 months |
As noted earlier in the “Create tasks” topic, Project handles task scheduling in two ways. Automatically scheduled tasks always have a duration (one day by default). Manually scheduled tasks, however, do not initially have any duration. A task’s duration is essential for Project to schedule a task, so it makes sense that a manually scheduled task, which is not scheduled by Project, does not require a duration. You can, however, enter placeholder duration values for manually scheduled tasks—you’ll do so in this chapter.
With manually scheduled tasks, you can enter regular duration values by using the abbreviations shown in the preceding table—for example, 3d for three days. You can also enter text values, such as Check with Bob or Sometime next quarter. Such text values are replaced with the default one-day duration value when you convert a task from manual to automatic scheduling. Project will not allow you to enter a text value (such as Check with Bob) for an automatically scheduled task’s duration, start, or finish value.
When you create an automatically scheduled task, Project adds a question mark (?) after the one-day duration to indicate that the duration is an estimate. This is a handy reminder that you will need to determine the task’s correct duration at some point. In fact, you can flag any task as having an estimated duration. Select the task, and on the Task tab, in the Properties group, click Information, and then select the Estimated check box.
If needed, you can schedule tasks to occur during nonworking and working time. To do this, enter an elapsed duration to a task. You enter elapsed duration by preceding the duration abbreviation with an e.
You might use an elapsed duration for a task that goes on continuously rather than just during normal working hours. For instance, a construction project might have the tasks Pour foundation concrete and Remove foundation forms. If so, you might also want a task called Wait for concrete to cure, because you don’t want to remove the forms until the concrete has cured. The task Wait for concrete to cure should have an elapsed duration because the concrete will cure over a contiguous range of days, whether they are working or nonworking days. If the concrete takes 48 hours to cure, you can enter the duration for that task as 2ed, schedule the task to start on Friday at 9:00 A.M., and expect it to be complete by Sunday at 9:00 A.M. In most cases, however, you’ll work with non-elapsed durations in Project.
Project management focus: How do you come up with accurate task durations?
You should consider two general rules when estimating task durations:
![]() Overall project duration often correlates to task duration.
Overall project duration often correlates to task duration.
![]() Long projects tend to have tasks with longer durations than short projects have.
Long projects tend to have tasks with longer durations than short projects have.
If you track progress against your plan (as described in Chapter 8, “Track progress: Basic techniques,” and in Part 3, “Advanced scheduling techniques”), you need to consider the level of detail you want to apply to your plan’s tasks.
If you have a multiyear project, for example, it might not be practical or even possible to track tasks that are measured in minutes or hours. In general, you should measure task durations at the lowest level of detail or control that is important to you, but no lower.
For the plans you work on in the practice tasks sections of this book, the durations are supplied for you. For your projects, you will often have to estimate task durations. Good sources of task duration estimates include:
![]() Historical information from previous, similar projects.
Historical information from previous, similar projects.
![]() Estimates from the people who will complete the tasks.
Estimates from the people who will complete the tasks.
![]() The expert judgment of people who have managed similar projects.
The expert judgment of people who have managed similar projects.
![]() The standards of professional or industrial organizations that carry out projects similar to yours.
The standards of professional or industrial organizations that carry out projects similar to yours.
One principle to consider is called the 8/80 rule. This rule suggests that task durations between 8 hours (or 1 day) and 80 hours (10 working days, or two weeks) are generally sized about right. Tasks shorter than one day might be too granular, and tasks longer than two weeks might be too long to manage properly. There are many legitimate reasons to vary from this rule, but for most tasks in your projects, it’s worth considering.
For complex, long-duration projects or projects involving a large number of unknowns, you might be able to make detailed duration estimates only of tasks to be started and completed soon (for example, within two to four weeks). You then might have only very general duration estimates for tasks that will start later (for example, after two to four weeks). You could hold a recurring task-duration estimating session with the team according to a regular cadence as time progresses.
For complex projects, you probably would combine these and other strategies to estimate task durations. Because inaccurate task duration estimates are a major source of risk in any project, making good estimates is well worth the effort.
1. Click a cell in the Duration column for a task.
2. Enter a duration value.
![]() Tip
Tip
You can also click the up and down arrows in the cell to enter or change the value in the Duration field.
Project initially sets all new tasks that have a duration value to start at the project start date. This is true whether the tasks are manually or automatically scheduled.
For manually scheduled tasks, you can enter a duration as either a numeric value, such as 2d, or as placeholder text, such as Check with Marketing team. For any columns that are too narrow to display the full value, point to the cell; its full value will appear in a ScreenTip.
For both manually and automatically scheduled tasks, Project draws a Gantt bar in the chart portion of a Gantt chart view. The length of the bar represents the task’s duration.
To schedule a task to span nonworking and working times with an elapsed duration
1. When entering the task’s duration, precede the duration abbreviation with an e. For example, enter 1ed to indicate one full 24-hour day, or 1ew to equal seven 24-hour days, or 1emo to equal thirty 24-hour days.
To calculate the duration of a manually scheduled task
1. In the Start and Finish fields for the task, enter or select the start date and finish date values you want.
Project calculates the Duration value. Note that when the task gets switched to be automatically scheduled, the start and finish values might change based on predecessor relationships, the project start date, or other scheduling factors. The duration value, however, will be preserved.
Enter milestone tasks
In addition to entering tasks to be completed, you might want to account for an important event for your project’s plan, such as the end of a major phase of the project. To do this, you will create a milestone task.
Milestones are significant events that are either reached within the plan (such as the completion of a phase of work) or imposed upon the plan (such as a deadline by which to apply for funding). Because the milestone itself doesn’t normally include any work, milestones are normally represented as tasks with zero duration. To visually distinguish milestones, their Gantt chart symbol appears as a diamond rather than a bar. However, you can flag any task of any duration as a milestone.
To enter a milestone task
1. In the Task Name column, click where you want to insert the milestone.
2. On the Task tab, in the Insert group, click Milestone.
Project inserts a new row for the new task and renumbers subsequent tasks. Project names the new task <New Milestone> and gives it a zero-day duration.
![]() Tip
Tip
To convert a task of any duration to a zero-duration milestone task, set its Duration value to 0.
To mark a task of any duration as a milestone
1. Select a task name.
2. On the Task tab, in the Properties group, click Information.
3. In the Task Information dialog box, click Advanced.
4. Select the Mark Task As Milestone check box.
Create summary tasks to outline the plan
You’ll find it helpful to organize groups of closely related tasks into an outline by using summary tasks. A summary task is made up of and summarizes the subtasks indented below it in the plan’s outline. When the summary tasks are sequenced over time, the highest-level summary tasks are called phases.
When you are reviewing a project’s plan, seeing tasks organized in an outline helps you and your stakeholders think in terms of major work items or phases. For example, it is common to divide book publishing projects into Editorial, Design, and Production phases. With an outline applied, you can then expand or collapse the outline to show just the level of detail you want. You create an outline by indenting and outdenting tasks.
Summary tasks are automatically scheduled and not manually scheduled by default. The duration of an automatically scheduled summary task is calculated by Project as the span of working time from the earliest start date to the latest finish date of its subtasks. If you directly edit the duration of an automatically scheduled summary task, or its start or finish date, it will be switched to a manually scheduled task.
When a summary task is manually scheduled, its duration will be calculated based on its subtasks, just like the duration of an automatically scheduled summary task. However, you can edit the duration of a manually scheduled summary task, and Project will keep track of both the manual duration that you entered and the calculated duration. You will learn about summary tasks with both manual and automatically calculated durations in Chapter 10, “Fine-tune task details.”
The highest level of a plan’s outline is called the project summary task. Project automatically generates the project summary task but does not display it by default. Because the project summary task is at the highest level of the plan’s outline, it includes rolled-up details from all subtasks. It also represents the full duration of the plan, so it’s a handy way of seeing some essential details, such as the plan’s overall duration. You will learn about the plan’s duration and finish date later in this chapter.
Project management focus: Top-down and bottom-up planning
Two common approaches to developing tasks and phases are top-down and bottom-up planning:
![]() Top-down planning This approach identifies major phases or components of the project before filling in all the details required to complete those phases, which are represented in the plan as summary tasks. Complex plans can have several layers of nested summary tasks. This approach works from general to specific.
Top-down planning This approach identifies major phases or components of the project before filling in all the details required to complete those phases, which are represented in the plan as summary tasks. Complex plans can have several layers of nested summary tasks. This approach works from general to specific.
![]() Bottom-up planning This approach identifies as many of the bottom-level detailed tasks as possible before outlining them into phases or summary tasks. This approach works from specific to general.
Bottom-up planning This approach identifies as many of the bottom-level detailed tasks as possible before outlining them into phases or summary tasks. This approach works from specific to general.
Creating accurate tasks and phases for most complex plans requires a combination of top-down and bottom-up planning. Typically, a project manager begins with established, broad phases for a plan (top-down planning), and the resources who will execute the plan provide the detailed tasks that fill out each phase (bottom-up planning).
To promote a task to a summary task
1. Select the tasks directly below the task that you want to make a summary task.
2. On the Task tab, in the Schedule group, click the Indent Task button.

Project uses text and bar formatting to distinguish between summary tasks and subtasks
When you make a manually scheduled task a summary task, Project switches the new summary task to be automatically scheduled.
To insert a new summary task within a task list
1. Select the name of the tasks that will become subtasks.
2. On the Task tab, in the Insert group, click Summary.
Project inserts a row for a new task, indents all of the selected tasks directly below it, and renumbers the subsequent tasks. Project names the new task <New Summary Task>.
3. With <New Summary Task> selected, enter the summary task name.
To demote a summary task to a task
1. Select all subtasks below the summary task.
2. On the Task tab, in the Schedule group, click the Outdent Task button.
Link tasks to create dependencies
When you link tasks, you create scheduling relationships between the tasks. These task relationships are called dependencies, as in the start of this task is dependent upon the completion of a prior task. When you create task dependencies (also called links), Project can automatically adjust the scheduling of linked tasks as changes occur in your plan. Creating dependencies by linking tasks is crucial to getting the full benefit of the Project scheduling engine.
Let’s look at one type of dependency relationship you can create between two tasks. Most projects require tasks to be performed in a specific order. For example, the task of writing a chapter of a book must be completed before the task of editing the chapter can occur.
These two tasks have a finish-to-start relationship, which has two aspects:
![]() The second task must occur after the first task; this is a sequence.
The second task must occur after the first task; this is a sequence.
![]() The second task can occur only if the first task is completed; this is a dependency.
The second task can occur only if the first task is completed; this is a dependency.
In Project, the first task (Write the chapter) is called the predecessor because it precedes tasks that depend on it. The second task (Edit the chapter) is called the successor because it succeeds, or follows, tasks on which it is dependent. Any task can be a predecessor for one or more successor tasks. Likewise, any task can be a successor to one or more predecessor tasks.
Although this might sound complicated, two tasks can have one of only four types of task relationships, as described in the following table.
Task relationship |
Meaning |
Appearance in the Gantt chart |
Example |
Finish-to-start (FS) |
The finish date of the predecessor task determines the start date of the successor task. This is the default task relationship. |
|
A book chapter must be written before it can be edited. |
Start-to-start (SS) |
The start date of the predecessor task determines the start date of the successor task. |
|
The tasks Schedule Prepress Time and Order Paper are closely related, and they should start simultaneously. |
Finish-to-finish (FF) |
The finish date of the predecessor task determines the finish date of the successor task. |
|
Tasks that require specific equipment must end when the equipment rental period ends. |
Start-to-finish (SF) |
The start date of the predecessor task determines the finish date of the successor task. |
|
The time when the print run is scheduled to start determines when a binder selection task must end. |


For finish-to-start relationships (the default link type), the predecessor with the later finish date determines the start date of the successor task. This predecessor task is sometimes called the “driving predecessor” because it determines or drives the start date of its successor task. Project includes a feature that helps you identify driving predecessor and successor relationships more easily. The feature is called Task Path and is described in Chapter 9, “Fine-tune task scheduling.”
A task with two or more successor tasks might have different task relationships with each successor. For example, the predecessor task can have a finish-to-start relationship with one successor and a finish-to-finish relationship with another successor.
Representing task relationships and handling changes to scheduled start and finish dates are two areas where the use of a real scheduling tool such as Project really pays off. For example, you can change task durations or add or remove tasks from a chain of linked tasks, and Project will reschedule tasks accordingly.
Automatically scheduled tasks are dynamically rescheduled when their predecessor task details change. Manually scheduled tasks, however, are not rescheduled by schedule updates to their predecessor tasks, but you can force a manually scheduled task to respect its predecessor links whenever you want. You can, in effect, “nudge” a manually scheduled task to respect its links.
Task relationships appear in several ways in Project, including the following:
![]() In Gantt chart and Network Diagram views, task relationships appear as the lines connecting tasks.
In Gantt chart and Network Diagram views, task relationships appear as the lines connecting tasks.
![]() In tables, such as the Entry table, task ID numbers of predecessor tasks appear in the Predecessor fields of successor tasks. (In a Gantt chart view, you might need to drag the vertical divider bar to the right to display the Predecessor column.)
In tables, such as the Entry table, task ID numbers of predecessor tasks appear in the Predecessor fields of successor tasks. (In a Gantt chart view, you might need to drag the vertical divider bar to the right to display the Predecessor column.)
![]() Tip
Tip
You can adjust the schedule relationship between predecessor and successor tasks by adding lead and lag times. For example, you can set a two-day lag between the end of a predecessor task and the start of its successor task. For more information, see Chapter 9, “Fine-tune task scheduling.”
To link tasks
1. Select the names of the tasks you want to link. If the tasks are not adjacent, select the first task, hold down the Ctrl key, and then select the additional task or tasks.
2. On the Task tab, in the Schedule group, click the Link the Selected Tasks button (which looks like two chain links).
Project links the tasks with a finish-to-start relationship.

Create schedule dependencies between tasks by linking them
1. In the chart portion of a Gantt chart view, point to the predecessor task bar and then drag down to the task bar for the successor task.
Note that as you drag, the pointer changes to a link icon and pop-up window that updates with information as you point to other task bars.
This tooltip can help you link tasks by using the mouse. The pointer changes to indicate that you are linking tasks.
2. When the pointer is over the successor task bar, release the mouse button.

One way to link tasks is to drag the pointer from the predecessor’s Gantt bar to the successor’s Gantt bar
Or
1. In the Predecessors field for the successor task, enter the predecessor task’s ID.
You might have to scroll the table to the right to display the Predecessor column.
![]() Tip
Tip
When working with summary tasks, you can either link summary tasks directly or link the latest task in the first phase with the earliest task in the second phase. The scheduling result is the same in either situation. Under no circumstances, however, can you link a summary task to one of its own subtasks. Doing so creates a circular scheduling problem, so Project doesn’t allow it.
Or
1. Select the task for which you want to specify a predecessor task or multiple predecessor tasks.
2. On the Task tab, in the Properties group, click the Information button.
3. On the Predecessors tab of the Task Information dialog box, enter the ID value or select or enter the task name of the predecessor task you want, and then click OK.
![]() Tip
Tip
Adding predecessor tasks via the Task Information dialog box is a good way of specifying multiple predecessors for a single successor task.
To unlink tasks
1. Select the tasks you want to unlink.
2. On the Task tab, in the Schedule group, click the Unlink Tasks button (which looks like a broken chain link).
To force a manually scheduled task to respect its predecessor task’s scheduling result
1. Select the manually scheduled task you want to be rescheduled as determined by its predecessor task relationships.
2. On the Task tab, in the Schedule group, click the Respect Links button.
Switch task scheduling from manual to automatic
Project, by default, sets new tasks to be manually scheduled. In fact, so far in Part 2 of this book you’ve worked only with manually scheduled tasks. In Project, you control the scheduling of tasks in two different ways:
![]() Work with manually scheduled tasks to quickly capture some details but without scheduling the tasks. Think of a manually scheduled task as an initial placeholder you can create at any time without affecting the rest of the plan. You might not initially know more than a task’s name, and that’s OK. As you discover or decide more details about the task, such as when it should occur, you can add those details to the plan.
Work with manually scheduled tasks to quickly capture some details but without scheduling the tasks. Think of a manually scheduled task as an initial placeholder you can create at any time without affecting the rest of the plan. You might not initially know more than a task’s name, and that’s OK. As you discover or decide more details about the task, such as when it should occur, you can add those details to the plan.
![]() Work with automatically scheduled tasks to take full advantage of the powerful scheduling engine in Project.
Work with automatically scheduled tasks to take full advantage of the powerful scheduling engine in Project.

Switch individual tasks or the entire plan from manually to automatically scheduled
When you create automatically scheduled tasks, Project assigns a duration and start and finish date values to them. With automatic scheduling, Project updates calculated schedule values such as task durations, start dates, and finish dates automatically in response to changes in a plan. Changes to factors such as task relationships and calendars can also cause Project to recalculate affected tasks.
To switch a single task from manual to automatic task scheduling
1. Select the manually scheduled task you want to change.
2. Click in the Task Mode field of the selected task, and then click the arrow that appears.
3. In the list that appears, click Auto Scheduled.
To switch several tasks from manual to automatic task scheduling
1. Select the manually scheduled tasks you want to change.
2. On the Task tab, in the Tasks group, click the Auto Schedule button.
To switch the currently open plan from manual to automatic task scheduling
1. On the Task tab, in the Tasks group, click the Mode button, and then click Auto Schedule.
Or
1. Click the New Tasks status bar text.
2. Click the scheduling mode you want.

To make all new tasks automatically scheduled, you can use the command on the status bar
To change the default scheduling mode that Project applies to all new plans
1. On the File tab, click Options, and then in the Project Options dialog box, click the Schedule tab.
2. In the Scheduling Options For This Project box, click All New Projects, and then in the New Tasks Created box, click Auto Scheduled.
3. Click OK.
Check a plan’s duration and finish date
At any time in the planning or execution of a project, you and other project stakeholders will want to know how long the project is expected to take. You don’t directly enter a total project duration or finish date in a plan, and you don’t need to. Project calculates these values based on the task durations, dependencies, project calendar adjustments, and many other factors you have recorded in a plan.
Project calculates the plan’s finish date based on the span of working days required to complete the tasks, starting at the plan’s start date. Any change to the start date causes Project to recalculate the finish date.
Project determines the plan’s duration by counting the working days between the earliest start date and the latest finish date of the plan’s tasks. Because Project distinguishes between working and nonworking time, a task’s duration doesn’t necessarily correlate to elapsed time.
Some handy ways to view the plan’s duration and scheduled start and finish dates include the Timeline view, the project summary task, and the Project Statistics dialog box.
To check a plan’s finish date in the Timeline
1. In the Timeline view above the Gantt Chart view, note the plan’s current start and finish dates.
![]() Important
Important
If the Timeline view is not shown, on the View tab, in the Split View group, select the Timeline check box.
To check a plan’s duration, finish date, and more in the Statistics dialog box
1. On the Project tab, in the Properties group, click the Project Information button.
2. In the Project Statistics dialog box, click Statistics.

Check key indicators of the plan in the Project Statistics dialog box
To display the project summary task
1. Click anywhere in a Gantt chart view.
When the focus is on a Gantt chart view, the label of the Format tab is Gantt Chart Tools.
2. On the Format tab, in the Show/Hide group, select the Project Summary Task check box.
Project displays the project summary task at the top of the Gantt Chart view with an ID of 0.

Display the project summary task (task 0) to view the plan’s start and finish dates and its overall duration
Here you’ll find the same duration and start and finish values displayed in Project Statistics, and a Gantt bar that’s drawn from the start and finish dates of the overall plan.
Document task information
You can record additional information about a task in a note. For example, you might have detailed descriptions of a task but want to keep the task’s name succinct. You can add such details to a task note rather than to the task’s name. That way, the information resides in the plan and can be easily viewed or printed.
There are three types of notes: task notes, resource notes, and assignment notes. You can enter and review task notes on the Notes tab in the Task Information dialog box. Notes in Project support a wide range of text formatting options; you can even link to or store graphic images and other types of files in notes.
Notes appear in a ScreenTip when there’s a note icon in the Indicators column.

View task notes by pointing to the note icon in the Indicators column
For notes that are too long to appear in a ScreenTip, you can double-click the note icon to display the full text of the note.
The project summary task, mentioned earlier, also supports a task note. Because the project summary task spans the entire plan, it’s a great place to capture important information about the plan. Text entered in the Comments field of the Properties dialog box appears as a note on the project summary task. If you add or change a note on the project summary task, the change will appear in the Comments field in the Properties dialog box.
Sometimes you might want to associate a task in a plan with information stored in a different document or on a webpage. Hyperlinks allow you to connect a specific task, resource, or assignment to additional information that resides outside of the plan.
To add a note to a task
1. Select the name of the task to which you want to add a note.
2. On the Task tab, in the Properties group, click the Notes button.
Or
Right-click the task name, and then click Notes.
3. In the Notes box, enter the note text you want, and then click OK.
To add a hyperlink to a task
1. Right-click the task name, and then click Hyperlink to open the Insert Hyperlink dialog box.
2. In the Text to display box, enter the link text you want to display.
3. In the Address box, enter the URL of the destination address you want to link to.
4. Click OK.
![]() Tip
Tip
To open the webpage in your browser, either click the hyperlink icon or right-click the hyperlink icon and, in the shortcut menu that appears, point to Hyperlink, and then click Open Hyperlink.
To quickly remove notes, hyperlinks, or formatting from selected tasks
1. On the Task tab, in the Editing group, click the Clear button (which looks like an eraser), and then select the command you want.
Skills review
In this chapter, you learned how to:
![]() Enter task durations and dates
Enter task durations and dates
![]() Create summary tasks to outline the plan
Create summary tasks to outline the plan
![]() Link tasks to create dependencies
Link tasks to create dependencies
![]() Switch task scheduling from manual to automatic
Switch task scheduling from manual to automatic
![]() Check a plan’s duration and finish date
Check a plan’s duration and finish date
 Practice tasks
The SimpleBuildTaskList practice file for these tasks is located in the Project2016SBSCh04 folder.
![]() Important
Important
If you are running Project Professional with Project Web App/Project Server, take care not to save any of the practice files you work with in this book to Project Web App (PWA). For more information, see Appendix C, “Collaborate: Project, SharePoint, and PWA.”
Create tasks
The scenario: You are a project manager at Lucerne Publishing. You’ve collected the initial task names for a new book launch and are ready to start. Open the SimpleBuildTaskList plan in Project and perform the following tasks:
1. Enter the following task names:
• Assign launch team members
• Design and order marketing material
• Distribute advance copies
• Coordinate magazine feature articles
• Launch public web portal for book
While reviewing the tasks you entered, you realize that you missed a task. You’ll insert that task next.
2. Insert a new task named Public Launch Phase so that it will appear above the Distribute advance copies task.

Your initial task list should look like this
Enter task durations and dates
The scenario: You showed your initial task list to the resources who will perform the work and to other project stakeholders. They gave you their preliminary (although incomplete) feedback on some task durations and dates, which you’d like to record in the new book launch plan. Continuing in the SimpleBuildTaskList plan, perform the following tasks:
1. Enter a duration of one day for task 1, Assign launch team members.
2. Enter the following durations or text phrases for the other tasks.
Task ID |
Task name |
Duration |
2 |
Design and order marketing material |
Check with Marketing team |
3 |
Public Launch Phase |
(Leave blank) |
4 |
Distribute advance copies |
2d |
3. For task 5, Coordinate magazine feature articles, in the Start field enter 1/22/18 and in the Finish field enter 1/30/18.
Project calculates the duration as six days. Note that this is six working days: Monday through Wednesday, and Friday of the first week, and then Monday and Tuesday of the following week. Project also draws the Gantt bar for the task to span these working days plus the nonworking days (the Thursday, January 25 morale event you set up in Chapter 3, “Start a new plan,” plus the weekend) between them.
For task 6, Launch public web portal for book, you don’t know a duration or start or finish date yet, but you can still capture what you do know.
4. In the Start field for task 6, enter About two weeks before launch complete.

After entering durations and dates, your task list should look like this
Enter milestone tasks
The scenario: You just learned the date by which the new book launch’s planning activities need to be completed for the book launch to occur on time. You want this date to have visibility in the plan. Continuing in the SimpleBuildTaskList plan, perform the following task:
1. Insert a new milestone task named Planning complete so that it will appear above task 3, Public Launch Phase.

After adding a milestone task, the plan should look like this
Create summary tasks to outline the plan
The scenario: The new book launch plan is developed enough now to be organized into two phases. Continuing in the SimpleBuildTaskList plan, perform the following tasks:
1. Make the Public Launch Phase task the summary task of tasks 5, Distribute advance copies, through 7, Launch public web portal for book.
Notice the scheduling effect of creating the summary task. Because task 6 had specific start and finish dates already, Project set the start date of the summary task (and its other subtask with a duration) to the same date, January 22.
2. Insert a new summary task named Planning Phase that will include tasks 1 through 3, so they become its subtasks.

Link tasks to create dependencies
The scenario: The new book launch plan is coming together nicely. Tasks have been outlined under summary tasks, and you’re now ready to create task relationships. Continuing in the SimpleBuildTaskList plan, perform the following tasks:
1. Enter a task ID in the Predecessor field to link tasks 2 and 3 with a finish-to-start relationship.
Note that task 3 previously had no start or finish date, but by making it a successor of task 2, you gave Project enough information to give task 3 a start date: January 9th, the next working day following the end of task 2.
Next, you’ll link tasks 3 and 4 by using a different technique.
2. Make task 3, Design and order marketing material, a predecessor of task 4 by using the Task Information dialog box.
3. Link all subtasks under Public Launch Phase (tasks 6 through 8) all at once by using the Link the Selected Tasks command.
As you do so, keep an eye on task 8’s text value of About two weeks in the Start field. Notice that Project replaced the text value in the Start field of task 8 with a scheduled date and supplied the default one-day duration. Project did so because it required a date value for the task as soon as it was linked to another task. The question mark following the duration value indicates that this is an estimated duration; the question mark has no effect on the scheduling of the task.
4. Link task 1, Planning Phase, to task 5, Public Launch Phase, by using your mouse in the chart portion of the Gantt Chart view.
5. The Lucerne marketing team has reported that its estimate is that task 3 should have a two-week duration. Change the duration of task 3 from the placeholder text Check with Marketing to two weeks.
Notice that the new duration for task 3 caused the Planning Phase summary task’s duration to increase, but it did not affect the scheduling of the task 4 milestone. Why not? Remember that this task is still manually scheduled. In the next step, you will force Project to adjust the start and finish dates of this task to honor its predecessor task while leaving it as manually scheduled.
6. Adjust task 4, Planning Complete, so that it respects the predecessor link.

Link lines between Gantt bars and task IDs in the Predecessors column convey task relationships
Project reschedules task 4 to start following the completion of its predecessor, task 3.
You might have noticed that the start of the Public Launch Phase summary task does not respect its link to its predecessor, the Planning Phase summary task. Clicking the Respect Link button with the Public Launch Phase summary task selected will not cause it to be rescheduled, as it did for task 4. That’s because the start and finish dates of the summary task are driven by the earliest start and latest finish dates of its subtasks, which in this case are still manually scheduled.
Switch task scheduling from manual to automatic
The scenario: The new book launch plan has been reviewed by the resources who will carry out the work and by other project stakeholders. Although you expect the plan to change somewhat as you learn more about the book launch, you now have enough confidence in the plan overall to switch from manual to automatic task scheduling. Continuing in the SimpleBuildTaskList plan, perform the following tasks:
1. Switch tasks 2 through 4 to be automatically scheduled by using the Auto Schedule command on the Task tab.
Project changes the Task Mode icons and the formatting of the tasks’ Gantt bars to indicate that they are now automatically scheduled.
2. Use the Task Mode field of task 6 to change it to be automatically scheduled.
This time, task 6 was rescheduled to start later. Why did this happen? Recall the dependency between the two summary tasks. The dependency said, in effect, that the Public Launch Phase should start when the Planning Phase was finished. However, because task 6 and the other subtasks of the Public Launch Phase were manually scheduled, Project did not reschedule the subtasks to account for this dependency. As soon as you set task 6 to automatic scheduling, Project also adjusted the start date of its summary.
The remaining subtasks 7 and 8 are still manually scheduled, so Project did not reschedule them.
3. Switch tasks 7 and 8 to be automatically scheduled by using any method you prefer.
Project reschedules the remaining tasks. This extends the duration of the Public Launch Phase and of the overall project.
Right now, this plan is set to treat any new tasks you might enter as manually scheduled. You could leave this setting as is and then switch specific tasks to be automatically scheduled. However, this plan is developed enough now to switch to automatic scheduling. You can later set some specific tasks to manually scheduled as needed.
4. Switch the plan to make all new tasks automatically scheduled.
5. Enter a new task named Launch social media programs for book below task 8.
Project adds the new task to the plan. By default, it is not linked to any other task, is given a one-day duration, and is scheduled to start at its summary task’s start date.
6. Link tasks 8 and 9.

Now all tasks in the plan are automatically scheduled—note the icons in the Task Mode column
Project links the two tasks. Notice that the duration of the Public Launch Phase summary task was updated automatically from 9 to 10 days.
Check a plan’s duration and finish date
The scenario: Your plan for the new book launch is helping the team get organized for the upcoming work. You are frequently asked to provide the currently scheduled duration and finish date for the book launch. Continuing in the SimpleBuildTaskList plan, perform the following tasks:
1. In the Timeline view, note the plan’s current start and finish dates.

You can view the plan’s overall timeframe at a glance in the Timeline view
2. Find the plan’s finish date in the Project Information dialog box.
3. Next, look at the duration information in more detail in the Project Statistics dialog box.

You can check key indicators of the plan in the Project Statistics dialog box
4. Display the project summary task in the Gantt Chart view.
Document task information
You have some details about a few tasks in the new book launch plan that you’d like to record in the plan. This will help you later by keeping such details right in the plan, and it will also be valuable for any other project stakeholders who might work with the plan in the future. Continuing in the SimpleBuildTaskList plan, perform the following tasks:
1. Add the note Get recipient list from publicist to task 6, Distribute advance copies.
2. Point to the note icon for task 6.
The note appears in a ScreenTip.
You might notice a note icon for task 0, the project summary task. We’ll look at that next.
3. Point to the note icon for task 0.
You might recognize the note that appears in the ScreenTip from Chapter 3, “Start a new plan.” This text was entered in the Comments field of the Properties dialog box.
4. Add the hyperlink text Add to spring catalog here, with an address of http://www.lucernepublishing.com, to task 8, Launch public web portal for book.
A hyperlink icon appears in the Indicators column. Pointing to the icon displays the descriptive text you entered earlier.

The task notes and hyperlinks you have added to tasks are indicated by the icons in the Indicators column