
11. Fine-tune resource and assignment details
In this chapter
![]() Change resource availability over multiple date ranges
Change resource availability over multiple date ranges
![]() Work with multiple resource pay rates
Work with multiple resource pay rates
![]() Change resource pay rates over different date ranges
Change resource pay rates over different date ranges
![]() Delay the start of assignments
Delay the start of assignments
![]() Create and assign material resources
Create and assign material resources
![]() Adjust assignments in the Team Planner view (Project Professional only)
Adjust assignments in the Team Planner view (Project Professional only)
Practice files
For this chapter, use the practice files from the Project2016SBSCh11 folder. For practice file download instructions, see the introduction.
Because work resources (people and equipment) are often the most expensive part of a project, understanding how to make the best use of resources’ time is an important project management skill. In this chapter, you use a variety of advanced Project 2016 features relating to resources—their availability, assignments to tasks, and resulting costs. Project Professional users also use the Team Planner view to manage assignments (this feature is not available in Project Standard).
This chapter guides you through procedures related to changing resource availability over multiple date ranges, working with multiple resource pay rates, changing resource pay rates over different date ranges, delaying the start of assignments, applying contours to assignments, creating and assigning material resources, viewing resource capacity, and adjusting assignments in the Team Planner view (Project Professional only).
Change resource availability over multiple date ranges
One of the values that Project stores for each work resource is the resource’s maximum units value. This is the maximum capacity of a resource to accomplish tasks. A resource’s working-time settings (recorded in the individual resource’s calendar) determine when work assigned to a resource can be scheduled. However, the resource’s capacity to work (as defined by the resource’s maximum units value) determines the extent to which the resource can work within those hours without becoming overallocated. A resource’s maximum units value does not prevent a resource from becoming overallocated, but Project will indicate when the resource’s assignments exceed the resource’s maximum units capacity.
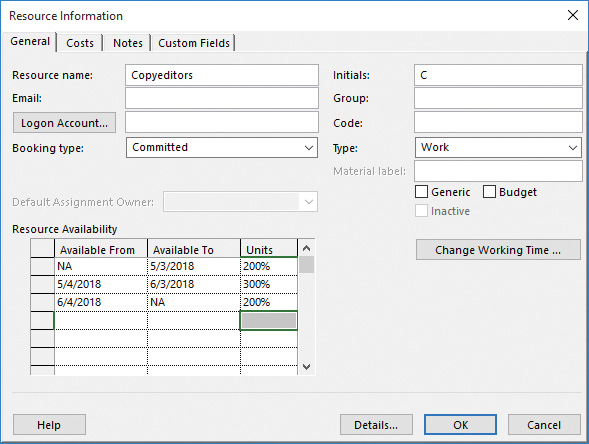
You can specify that a resource’s maximum units value be adjusted from one date range to another. Changing a resource’s availability over time enables you to control exactly what a resource’s maximum units value will be at any time. For example, you might have two copyeditors available for the first eight weeks of a project, three for the next six weeks, and then two for the remainder of the project. Or you might have a compositor who is normally available at 100 percent capacity reduced to just 50 percent capacity for six weeks, and then returned to full capacity.
You customize a resource’s availability in the Resource Information dialog box. You do so by specifying maximum units per date range in the Resource Availability table in the dialog box. When NA (for not applicable) appears at the beginning of the first date range, it means that the resource has no specific start date for their availability. When it is at the end of the final date range, it means that the resource has no specific end date. Every resource’s initial availability is unspecified, or NA.

Set up multiple date ranges for resource availability on the General tab of the Resource Information dialog box
Project shows the then-current maximum units value for the resource wherever maximum units are displayed (such as in the Resource Sheet view). Project uses the current date based on your computer’s system clock to identify the correct date range and its maximum units value.
To customize a resource’s availability over time
1. On the View tab, in the Resource Views group, click Resource Sheet. In the Resource Sheet view, you can see and edit resources’ maximum units values. The maximum units values displayed here normally apply to the full duration of the project.
2. In the Resource Name column, click the name of a resource whose maximum units value you want to vary at different times.
3. On the Resource tab, in the Properties group, click Information to display the Resource Information dialog box. If the General tab is not visible, click it.
![]() Tip
Tip
Here are a couple of shortcuts for quickly displaying the Resource Information dialog box. When you are in a resource-centric view such as the Resource Sheet, right-click the Resource Name and, on the shortcut menu, click Information. Or double-click a resource name. Double-clicking a resource name also works in the Assign Resources dialog box when you are in a task-centric view such as a Gantt chart.
4. Under Resource Availability, in the first row of the Available From column, leave NA (not applicable).
5. In the Available To cell in the first row, enter or select the end date of the first date range you want.
6. In the Units cell in the first row, enter a maximum units value for the first date range.
7. Enter the values for the second date range. In the Available From cell in the second row, enter or select the start date of the second date range.
8. Do either of the following:
• If you plan to set up a third or additional date range, in the Available To cell in the second row, enter or select the end date of the second date range you want. Then repeat steps 7 and 8 for subsequent date ranges.
• If the second date range is the last one you want to set up, leave the Available To cell in the second row blank. (Project will insert NA for you.)
You can later add additional date ranges with unique maximum units values. Just leave the final Available To field blank.
9. Click OK to close the Resource Information dialog box.
Work with multiple resource pay rates
Some resources might perform different tasks with different pay rates. You can set up different pay rates for the same resource, and then specify which rate to use per assignment (you’ll do so later in this chapter).
For example, in the new children’s book project, the project editor could also serve as a content editor. Because the costs for project editor and content editor are different, you can set up two cost rate tables for the resource (additionally, a cost rate table can include a standard pay rate and an optional overtime rate, and even a per-use cost). Then, after you assign the resource to tasks, you specify which pay rate should apply.
Each work or material resource can have up to five different pay rates, each recorded in a cost rate table. You set up pay rates in the cost rate tables on the Costs tab of the Resource Information dialog box. The default rate table (the rate Project applies unless you specify another one) is on tab A. If you completed the practice tasks in Chapter 5, “Set up resources,” you might recognize the pay rates you initially entered for resources. You can create up to four additional rate tables on tabs B through E.

Create up to five different cost rate tables (including standard and overtime rates, and per-use cost) on the Costs tab of the Resource Information dialog box
When you assign a resource with one or more pay rates to a task, Project initially uses cost rate table A by default. However, you can specify that another rate table should be used. You do so on the General tab of the Assignment Information dialog box.

After setting up multiple cost rate tables for a resource, you can pick which table to use for individual assignments
To create an additional cost rate table for a resource
1. On the View tab, in the Resource Views group, click Resource Sheet.
2. In the Resource Sheet view, click a resource name.
3. On the Resource tab, in the Properties group, click Information to open the Resource Information dialog box.
4. Click the Costs tab.
5. In the Cost rate tables area, click the B C, D, or E tab.
6. In the Standard Rate and Overtime Rate fields, enter the pay rate values you want. In addition to or instead of pay rates, you can also enter a value in the Per Use Cost field.
7. Click OK to close the Resource Information dialog box.
To change the cost rate table to be applied to an assignment
1. Do either of the following:
• On the View tab, in the Task Views group, click Task Usage.
• On the View tab, in the Resource Views group, click Resource Usage.
As with other assignment-level activities, you can perform this procedure in either view.
2. Select the assignment you want to edit.
3. On the Format tab, in the Assignment group, click Information to open the Assignment Information dialog box. Click the General tab if it is not already selected.
4. In the Cost Rate Table box, select a cost rate table, and then click OK to close the Assignment Information dialog box.
![]() Tip
Tip
If you frequently change cost rate tables for assignments, you will find it quicker to display the Cost Rate Table field directly in the Resource Usage or Task Usage view. To do so, display the right edge of the table portion of a usage view, click Add New Column, and then select Cost Rate Table.
Change resource pay rates over different date ranges
When you set up pay rates for a resource, Project uses those rates for the duration of the plan. However, you can change a resource’s rates to be effective as of the dates you choose. For example, you could initially set up a resource with a standard rate of $40 per hour, and plan to raise the resource’s standard rate to $44 per hour six months later.
You set up the effective date of each pay rate on the Costs tab of the Resource Information dialog box, which was introduced in the previous topic.

The Effective Date determines when a resource’s pay rate is applied to work the resource performs
Project uses pay rates when calculating resource costs based on when the resource’s work is scheduled. You can assign up to 25 pay rates to be applied at different times in each of a resource’s five cost rate tables.
You can use a couple of different formats to enter the additional pay rates; Project is flexible. You can:
![]() Enter a pay rate as a specific dollar value.
Enter a pay rate as a specific dollar value.
![]() Enter a percentage change from the previous rate. Enter a positive percentage value (for example 5%) for an increase. Enter a negative percentage (for example, –3%) for a decrease. Project calculates the new rate, and it replaces the percentage value you entered.
Enter a percentage change from the previous rate. Enter a positive percentage value (for example 5%) for an increase. Enter a negative percentage (for example, –3%) for a decrease. Project calculates the new rate, and it replaces the percentage value you entered.
For example, in the Resource Usage view, you might see the cost of a resource’s assignment change midway through the assignment when the effective date of a new pay rate applies.

The Effective Date for Jane Dow’s new pay rate occurred midway through her assignment to the Set Pages task; the resulting change in cost is shown.
To set up a different resource cost rate to apply later
1. On the View tab, in the Resource Views group, click Resource Sheet.
2. In the Resource Sheet view, click a resource name.
3. On the Resource tab, in the Properties group, click Information to open the Resource Information dialog box.
4. Click the Costs tab. If you’ve set up multiple cost rate tables, click the tab of the cost rate table you want to change. Leave the resource’s original pay rate as-is for the first row; you will enter the upcoming effective date and pay rate in the second row.
5. In the Effective date cell in the second row, enter or select a date, and then enter the new pay rates. The new rates can include standard or overtime rates and per-use cost value. If you want to add multiple future pay rate changes, enter them in chronological order on subsequent rows.
6. Click OK to close the Resource Information dialog box.
Delay the start of assignments
![]() Tip
Tip
So far in this chapter, we’ve focused on resource details. For the remainder of the chapter, the focus shifts to fine-tuning assignment details.
If more than one resource is assigned to a task, you might not want all the resources to start working on the task at the same time. You can delay the start of work for one or more resources assigned to a task.
Let’s look at a specific example. The new children’s book plan includes a task to which both a copyeditor and the book author, Tad Orman, are assigned. The intent of this task is that the author will review the edits made to his book manuscript, and shortly afterward, the copyeditor will begin to incorporate the author’s feedback.

Here’s what the assignments initially look like in the Task Usage view
Right now, both resources have work that is assigned to them throughout the duration of the task, but you’d like to delay the start of the copyeditor’s work by two working days. You do so in the assignment-level Start field.
After changing the start date of the copyeditor’s assignment, you can see the later start of the copyeditor’s work on the task accounted for in the timephased portion of the view.

Here’s what the assignments look like after the copyeditor’s start date for the assignment has been adjusted
The other resource assigned to the task is not affected. Note that the total work of this task did not change, but its duration did—the finish date moved out two working days.
To delay the start of a resource assignment on a task
1. On the View tab, in the Task Views group, click Task Usage. The Task Usage view groups the assigned resources below each task. It’s a useful view for this activity.
2. In the Start field of the resource assignment you want to delay, enter or select a new start date.
![]() Tip
Tip
If you want an assignment to start at a specific time in addition to on a specific date, you can specify the time in the Start field. For example, if you want the resource’s assignment to start at 1:00 P.M. on May 1, 2018, enter 5/1/18 1:00 PM. Otherwise, Project uses the default start time. To change the default start time, enter the value you want in the Default Start Time field on the Schedule page of the Project Options dialog box.
Apply contours to assignments
In the Resource Usage and Task Usage views, you can see exactly how each resource’s assigned work is distributed over time. In addition to viewing assignment details, you can change the amount of time a resource works on a task in any given time period. There are various ways to do this:
![]() Apply a predefined work contour to an assignment. Predefined contours generally describe how work is distributed over time in terms of graphical patterns. For example, the Bell predefined contour distributes less work to the beginning and end of the assignment and distributes more work toward the middle. If you were to graph the work over time, the graph’s shape would resemble a bell.
Apply a predefined work contour to an assignment. Predefined contours generally describe how work is distributed over time in terms of graphical patterns. For example, the Bell predefined contour distributes less work to the beginning and end of the assignment and distributes more work toward the middle. If you were to graph the work over time, the graph’s shape would resemble a bell.

This assignment has a bell-shaped contour applied; note the contour indicator in the Indicators column
![]() Edit the assignment details directly. For example, in the Resource Usage or Task Usage view, you can change the assigned work values directly in the timescaled grid.
Edit the assignment details directly. For example, in the Resource Usage or Task Usage view, you can change the assigned work values directly in the timescaled grid.

This assignment has been directly edited in the timephased portion of the Task Usage view; note the indicator
![]() Edit work values at the task level. When you change a work value at the task level, Project adjusts the resulting work value per assignment in accordance with each assigned resource’s units value. For example, assume that on a specific day, two resources were assigned four hours each to a task that had a total work value of eight hours. If you then change the total work on the task for that day to 12 hours, Project will increase the work per resource from four to six hours.
Edit work values at the task level. When you change a work value at the task level, Project adjusts the resulting work value per assignment in accordance with each assigned resource’s units value. For example, assume that on a specific day, two resources were assigned four hours each to a task that had a total work value of eight hours. If you then change the total work on the task for that day to 12 hours, Project will increase the work per resource from four to six hours.

The total work was edited for the task, and Project updated the assigned resources’ individual work values according to their assignment units values; note the indicators
How you contour or edit an assignment depends on what you need to accomplish. Predefined contours work best for assignments in which you can predict a likely pattern of effort—for example, a task that requires gradual ramp-up time might benefit from a back-loaded contour to reflect the likelihood that the resource will work the most toward the end of the assignment.
Here are a few more things to note about contouring assignments:
![]() Depending on the task type, applying a contour to an assignment might cause the overall duration of the task to be extended. Applying a contour to a fixed-duration task will not affect its duration. When you apply a contour to a fixed-duration task, Project recalculates the resource’s work value so that the resource works less in the same time period. For a fixed-work or fixed-unit task, however, the duration will be affected. If you do not want a contour to extend a task’s duration, change the task type (on the Advanced tab of the Task Information dialog box) to Fixed Duration before applying the contour.
Depending on the task type, applying a contour to an assignment might cause the overall duration of the task to be extended. Applying a contour to a fixed-duration task will not affect its duration. When you apply a contour to a fixed-duration task, Project recalculates the resource’s work value so that the resource works less in the same time period. For a fixed-work or fixed-unit task, however, the duration will be affected. If you do not want a contour to extend a task’s duration, change the task type (on the Advanced tab of the Task Information dialog box) to Fixed Duration before applying the contour.
![]() You can split a task in the Gantt Chart view to account for an interruption in the task, as you saw in Chapter 9, “Fine-tune task scheduling.” You can also split a task in the Task Usage view by entering 0 work values in the task’s row in the timephased grid for the date range that you want. To preserve the total work on the task, you should add the same amount of work to the end of the task that you subtracted with the split. For example, assume that a task starts on Monday and has eight hours of total work per day for four days. Its work pattern (in hours per day) is 8, 8, 8, and 8. You interrupt work on the task on Tuesday and then add those eight hours to the end of the task (in this case, on Friday). The new work pattern would be 8, 0, 8, 8, and 8.
You can split a task in the Gantt Chart view to account for an interruption in the task, as you saw in Chapter 9, “Fine-tune task scheduling.” You can also split a task in the Task Usage view by entering 0 work values in the task’s row in the timephased grid for the date range that you want. To preserve the total work on the task, you should add the same amount of work to the end of the task that you subtracted with the split. For example, assume that a task starts on Monday and has eight hours of total work per day for four days. Its work pattern (in hours per day) is 8, 8, 8, and 8. You interrupt work on the task on Tuesday and then add those eight hours to the end of the task (in this case, on Friday). The new work pattern would be 8, 0, 8, 8, and 8.
![]() When editing values in the timephased grid, you can work with the cells similar to how you might work in a Microsoft Excel worksheet—you can drag values and use the AutoFill handle to copy values to the right or down.
When editing values in the timephased grid, you can work with the cells similar to how you might work in a Microsoft Excel worksheet—you can drag values and use the AutoFill handle to copy values to the right or down.
To apply a predefined work contour to an assignment
1. Do either of the following:
• On the View tab, in the Task Views group, click Task Usage.
• On the View tab, in the Resource Views group, click Resource Usage.
Both of these views show assignment-level work values per time period, such as daily or weekly. The Task Usage view groups assignments per task, whereas the Resource Usage view groups assignments per resource.
2. Click the assignment to which you want to apply a predefined contour.
![]() Tip
Tip
The next two steps are not required, but they can help you see the result of applying a work contour.
3. On the View tab, in the Zoom group, click the arrow next to the Timescale box and click the smallest unit of time (such as Days) that you want displayed in the right side of the usage view.
4. On the Task tab, in the Editing group, click Scroll to Task.
5. On the Format tab, in the Assignment group, click Information. The Assignment Information dialog box opens.
6. Click the General tab if it is not already selected.
7. Click the arrow to display the options in the Work Contour box. These are all predefined work contours; some of the names of the contours are graphical representations of a resource’s work over time with that contour applied.
8. Select the contour pattern you want, and then click OK to close the Assignment Information dialog box. Project applies the contour to the selected assignment. If the timescaled work values are visible, you should see the updated work values per time period. You will also see a contour indicator in the Indicators column.
To manually edit work per time period for an assignment
1. Do either of the following:
• On the View tab, in the Task Views group, click Task Usage.
• On the View tab, in the Resource Views group, click Resource Usage.
2. If the assignment values you want to edit are not visible, select the resource’s name in the Task Name column.
3. On the Task tab, in the Editing group, click Scroll to Task.
4. On the View tab, in the Zoom group, click the arrow next to the Timescale box and click the smallest unit of time (such as Days) that you want displayed in the right side of the usage view.
5. In the timescaled grid in the right pane of the usage view, edit the assignment values you want. These appear in the details row labeled Work.
Create and assign material resources
Material resources are consumables that you use up as the project proceeds. For example, on a construction project, material resources might include nails, lumber, and concrete. You work with material resources in Project to track a fixed quantity or a rate of consumption of the material resource and its associated costs. Unlike with work resources, maximum units values do not apply to cost and material resources, because neither type performs work.
Although Project is not a complete system for tracking inventory, it can help you stay better informed about how quickly your project is consuming material resources, and at what cost. Let’s look at an example.

Note the unique value in the Material field for material resources
This example is of a material resource named Advance proofs. This resource has a Material label named copies. Copies are the unit of measure of this material resource; other types of material resources would have different labels. A liquid material resource might be labeled (and measured) in gallons or liters, for example. This material resource has a per-unit cost of $15. In other words, each copy of an advance proof used in the project costs the plan $15.
Assigning a material resource to a task is similar to assigning work resources, but with some important differences. When you assign a material resource to a task, you specify the unit quantity for the task. Project then calculates the cost of the material resource assignment as the per-unit cost you specified times the number of units on the assignment.
Recall that material resources are used up or “consumed” as a project progresses. Common material resources you might find on a construction project, for example, include lumber and concrete.

With material resource assignments, “units” refers to the quantity of the material resource assigned; this appears as the material resource label throughout Project
When assigning a material resource, you can handle consumption and cost in one of two ways:
![]() Assign a fixed consumption rate This means that, regardless of the duration of the task to which the material resource is assigned, an absolute quantity of the resource will be used. For example, pouring concrete for a house foundation requires a fixed amount of concrete no matter how long it takes to pour it. Project multiplies the unit cost of this resource by the number of units assigned to determine the total cost.
Assign a fixed consumption rate This means that, regardless of the duration of the task to which the material resource is assigned, an absolute quantity of the resource will be used. For example, pouring concrete for a house foundation requires a fixed amount of concrete no matter how long it takes to pour it. Project multiplies the unit cost of this resource by the number of units assigned to determine the total cost.
![]() Assign a variable-rate quantity Project adjusts the quantity and cost of the resource as the task’s duration changes. A variable consumption rate means that the quantity of the material resource consumed depends on the duration of the task. When operating a generator, for example, you will consume more fuel in four hours than in two, and you can determine an hourly rate at which you consume the fuel. You enter a variable consumption rate in units per time period; for example, you enter “2/h” to record the consumption of two gallons of fuel per hour. After you enter a variable consumption rate for a material resource’s assignment, Project calculates the total quantity of the material resource consumed based on the task’s duration.
Assign a variable-rate quantity Project adjusts the quantity and cost of the resource as the task’s duration changes. A variable consumption rate means that the quantity of the material resource consumed depends on the duration of the task. When operating a generator, for example, you will consume more fuel in four hours than in two, and you can determine an hourly rate at which you consume the fuel. You enter a variable consumption rate in units per time period; for example, you enter “2/h” to record the consumption of two gallons of fuel per hour. After you enter a variable consumption rate for a material resource’s assignment, Project calculates the total quantity of the material resource consumed based on the task’s duration.
The advantage of using a variable rate of consumption is that the rate is tied to the task’s duration. If the duration changes, the calculated quantity and cost of the material resource will also change. When you need this level of cost tracking for a material resource, use a variable consumption rate.
To set up a material resource
1. On the View tab, in the Resource Views group, click Resource Sheet.
2. In the Resource Sheet, click the row where you want to insert a new material resource.
3. On the Resource tab, in the Insert group, click Add Resources, and then click Material Resource. Project inserts a new row for the material resource.
4. Enter a name for the material resource.
5. In the Material Label field, enter the name of the unit of measure of the material resource.
6. In the Std. Rate field, enter the per-unit cost of the material resource, and then press Enter.
To assign a material resource to a task
1. In a task-centric view, such as the Gantt Chart, select the name of the task to which you want to assign the material resource.
2. On the Resource tab, in the Assignments group, click Assign Resources to open the Assign Resources dialog box.
3. Do either of the following:
• To assign a fixed consumption rate, in the Units field for the material resource, enter or select the quantity of the material resource you want to assign.
• To assign a variable consumption rate, in the Units field for the material resource, enter the variable consumption rate in units per time period. For example, enter 2/h to set a consumption rate of two units of the material resource per hour.
View resource capacity
Recall that the amount of time that a resource is able to work on tasks in a project is called the resource’s maximum capacity; in Project, this is measured in units. By default, such units are presented as a percentage value, with 0% meaning no capacity and 100% meaning the full or maximum capacity of a single resource with the normal working schedule of 40 hours per week. In Project, a resource’s maximum capacity to do work is tracked as the resource’s maximum units (labeled Max. Units) value.
Even experienced project managers have been known to overestimate resource capacity for the people allocated to work on a particular project. This can lead to unhappy resources and problems during the execution of a project, especially when the project manager has also underestimated the amount of work required to complete the tasks in the project. There are many legitimate reasons to expect some variability with task work estimates—especially in the initial planning stage of a project. This topic introduces some useful tools in Project that can help you better see and understand resource capacity.
Viewing the working capacity per resource gives you a better understanding of overall capacity for your project. This, in turn, can help inform you and the project’s stakeholders about any adjustments you might be able to make to the scope of the project to better match the capacity of the team (or adjustments you can make to the team’s capacity to better match project scope). Normally, you can expect one of the following conditions for resource capacity:
![]() Planned work is less than the working capacity of the team. You might be able to use some portion of your resources’ time for other projects or to do more work on this project.
Planned work is less than the working capacity of the team. You might be able to use some portion of your resources’ time for other projects or to do more work on this project.
![]() Planned work exceeds the working capacity of the team. You might need to reduce the scope of work or add more resources.
Planned work exceeds the working capacity of the team. You might need to reduce the scope of work or add more resources.
![]() Planned work is approximately equal to the working capacity of the team.
Planned work is approximately equal to the working capacity of the team.
![]() Tip
Tip
This approach to understanding project scope and resource capacity is explored further in Appendix A, “A short course in project management.”
A customized Resource Usage view is a great view in which to see resource capacity.

This customized Resource Usage view shows individual resource capacity and assigned allocation at a glance
In the Resource Usage view, the left pane organizes tasks under the resources to which the tasks are assigned. The right pane shows assignment and other values organized on the timeline. A handy customization is to show only the Remaining Availability and Percent Allocation details; hide resource assignments, and set the view’s zoom level to whatever incremental time period your team normally plans for, such as weekly or monthly.
![]() Tip
Tip
In this topic, we’ve focused on resource capacity as shown in the Resource Usage view. Other Project features that help you see and manage resource capacity include the Resource Graph view (available from the Other Views menu in the Resource Views group on the View tab) and the two resource-focused reports (available from the Resources menu in the View Reports group on the Report tab).
To view resource capacity per time period
1. On the View tab, in the Resource Views group, click Resource Usage.
2. On the Format tab, in the Details group, click Add Details to open the Detail Styles dialog box.
3. In the Available Fields list, select Percent Allocation, and then click Show.
4. Select Remaining Availability, click Show, and then click OK to close the dialog box. To further simplify the view, also perform the following steps.
5. On the Format tab, in the Details group, clear the Work check box. Project hides the Work details, leaving the Percent Allocation and Remaining Availability details visible.
6. Click the Resource Name column heading.
7. On the View tab, in the Data group, click Outline, and then click Hide Subtasks. Project hides assignments, leaving only the resource rows visible.
8. On the View tab, in the Zoom group, in the Timescale box, click the time period you want. Use whatever time period your team normally focuses on; daily or weekly might be a good level of focus for resource availability.
Adjust assignments in the Team Planner view (Project Professional only)
![]() Important
Important
The Team Planner view is available only in Project Professional, not in Project Standard. If you have Project Standard, you can skip this topic.
By now you’ve seen how to work in the Task Usage and Resource Usage views to accomplish detailed tasks like manually contouring resource assignments. Another view that can help give you insights into tasks, resources, and assignments is the Team Planner view.
In the Team Planner view, tasks are organized by the resource to which they are assigned (as in the Resource Usage view) and any unassigned tasks are also visible. Both assigned and unassigned tasks might be either:
![]() Scheduled tasks These tasks are scheduled for a specific time period and displayed in the Team Planner view at a specific point in time.
Scheduled tasks These tasks are scheduled for a specific time period and displayed in the Team Planner view at a specific point in time.
![]() Unscheduled tasks These tasks are manually scheduled.
Unscheduled tasks These tasks are manually scheduled.
The Team Planner view supports a simple drag-and-drop method of rescheduling or reassigning tasks.

When working in the Team Planner view, use the ScreenTips to see the full names and other details of visible tasks
What makes the Team Planner unique is its support for drag-and-drop scheduling and other means of handling assignments:
![]() Drag tasks to assign, reassign, reschedule, or unschedule them.
Drag tasks to assign, reassign, reschedule, or unschedule them.
![]() Right-click an assigned task and reassign it to another resource.
Right-click an assigned task and reassign it to another resource.
The Team Planner view supports many of the view adjustment and navigation techniques you use elsewhere in Project. These include:
![]() Using the Scroll To Task button (on the Task tab, in the Editing group) to horizontally scroll the timescale portion of the view to display task assignments (bars).
Using the Scroll To Task button (on the Task tab, in the Editing group) to horizontally scroll the timescale portion of the view to display task assignments (bars).
![]() Displaying ScreenTips to see the full name and other details for tasks that might not be fully visible in a Team Planner task bar.
Displaying ScreenTips to see the full name and other details for tasks that might not be fully visible in a Team Planner task bar.
![]() Making timescale adjustments by using the Timescale box (on the View tab, in the Zoom group).
Making timescale adjustments by using the Timescale box (on the View tab, in the Zoom group).
![]() Displaying overallocated resource names in red.
Displaying overallocated resource names in red.
![]() Important
Important
Dragging an automatically scheduled task horizontally will apply a Start No Earlier Than (SNET) constraint. The Team Planner describes the constraint in the task bar’s ScreenTip, and you will see the constraint’s indicator in Gantt chart views.
To assign and schedule unassigned tasks
1. On the View tab, in the Resource Views group, click Team Planner to display the Team Planner view.
![]() Tip
Tip
You can also click the Team Planner view shortcut on the status bar, in the lower-right corner of the Project window.
2. Drag a task and drop it into a resource’s row, at the start date you want. The task you drag can be from the unassigned and unscheduled tasks corner in the lower-left corner, or from the unassigned but scheduled corner in the lower-right. The task is assigned and scheduled but remains a manually scheduled task until you switch it to be automatically scheduled.
![]() Tip
Tip
You can also assign but not schedule a task by dragging it to a resource’s Unscheduled Tasks column.
To schedule assigned but unscheduled tasks
1. In the Team Planner view, drag a task from the Unscheduled Tasks column of the view and drop it into a resource’s row, at the start date you want. The task is assigned and scheduled but remains a manually scheduled task until you switch it to be automatically scheduled.
To reassign a task from one resource to another
1. In the Team Planner view, right-click the assigned task and, on the shortcut menu that appears, click Reassign To. Then select the resource to whom you want to assign the task.
![]() Tip
Tip
You can also reassign tasks by dragging them from one resource to another. To better control the scheduling of tasks when you reassign them this way, set the timescale to daily (to do this, click Days in the Timescale box in the Zoom group on the View tab).
Skills review
In this chapter, you learned how to:
![]() Change resource availability over multiple date ranges
Change resource availability over multiple date ranges
![]() Work with multiple resource pay rates
Work with multiple resource pay rates
![]() Change resource pay rates over different date ranges
Change resource pay rates over different date ranges
![]() Delay the start of assignments
Delay the start of assignments
![]() Create and assign material resources
Create and assign material resources
![]() Adjust assignments in the Team Planner view (Project Professional only)
Adjust assignments in the Team Planner view (Project Professional only)
 Practice tasks
The practice files for these tasks, FineTuneResources and FineTuneAssignments, are located in the Project2016SBSCh11 folder.
![]() Important
Important
If you are running Project Professional with Project Web App/Project Server, take care not to save any of the practice files you work with in this book to Project Web App (PWA). For more information, see Appendix C, “Collaborate: Project, SharePoint, and PWA.”
Change resource availability over multiple date ranges
The scenario: At Lucerne Publishing, you secured additional copyediting capacity for a portion of the duration of the new children’s book plan. You need to record this in the plan. Open the FineTuneResources plan in Project, and then perform the following task:
1. Customize the copyeditors’ resource availability. Set the time periods as follows:
• The first time period should end on 5/3/18 at 200% maximum units.
• The second period should start on 5/4/18 and end on 6/3/18 at 300% maximum units.
• The third period should start on 6/4/18 at 200% maximum units; keep NA for the end of the period.
Work with multiple resource pay rates
The scenario: Hany Morcos is currently assigned to task 36, Proof and review, as a content editor rather than in her default role of project editor. You will set up and apply a different pay rate to account for her content editor role on this task. Continuing in the FineTuneResources plan, perform the following tasks:
1. Create an additional cost rate for Hany Morcos by using cost rate table B. Set her additional standard pay rate to $45 per hour and her overtime rate to $60 per hour.

Enter Hany Morcos’s second cost rate in the table on tab B
2. Display the Cost table in the Task Usage view. You can more easily see the change in the assignment cost in this table.
3. Apply the cost rate table B to Hany Morcos’s assignment to task 36, Proof and review.

After you apply rate table B, Hany Morcos’s updated assignment cost should change from $1,550 to $1,800
Change resource pay rates over different date ranges
The scenario: You anticipate one of your resources who is working on the new children’s book plan to receive a pay raise during the book plan’s duration. To keep the plan’s cost calculations accurate, you need to account for this pay raise. Continuing in the FineTuneResources plan, perform the following task:
1. Enter a pay rate increase for Jane Dow in the default cost rate table A. The effective date is 7/2/18 and the standard rate increase is 15%.
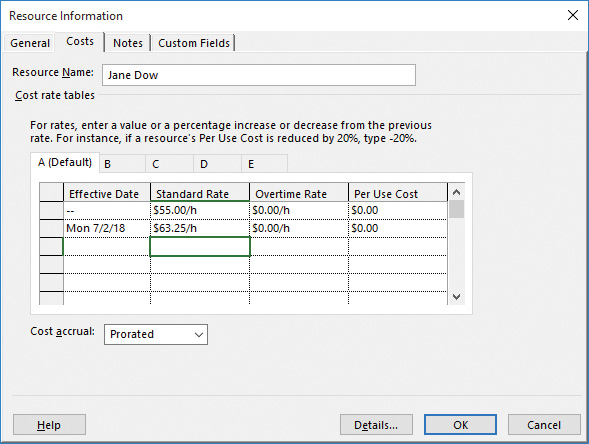
The additional cost rate values apply only after the Effective Date arrives
Delay the start of assignments
The scenario: The new children’s book plan includes a task to which both a copyeditor and the book author, Tad Orman, are assigned. Right now, both resources are assigned work throughout the duration of the task, but you’d like to delay the start of the copyeditor’s work by two working days. Open the FineTuneAssignments plan in Project, and then perform the following task:
1. In the Task Usage view, delay the start of the copyeditors’ assignment on task 18, Author review of content edit, to 5/7/18.

The copyeditors’ assignment to task 18 should look like this after editing
Apply contours to assignments
The scenario: One of the resources working on the new children’s book tells you that she knows from past experience that the daily work pattern she expects on one of her tasks doesn’t match the task as it is currently scheduled. You want to update the plan to more accurately model the expected work contour on this assignment. You also have another assignment that requires an adjustment. Continuing in the FineTune-Assignments plan, perform the following tasks:
1. In the Task Usage view, apply a back-loaded work contour to Carole Poland’s assignment to task 38, Final review.

After applying the back-loaded contour to this assignment, note the contour indicator in the Indicators column—point to it to see details about the contour in a ScreenTip
Because task 38 is a fixed-duration task, Project recalculated the assignment-level work but did not change the task’s duration.
2. Manually edit Hany Morcos’s assignment to task 38, Final review. Change her assignment on Wednesday and Thursday, September 5 and 6, 2018, from 4 hours to 8 hours each.

Hany Morcos’s edited assignment should look like this
Create and assign material resources
The scenario: The advance proofs of the new children’s book are the consumable resource that interests you most. These are high-fidelity mockups of the new book that are created before the book is commercially printed. Because the advance proofs are expensive to produce, you’d like to account for their costs in the plan. To do so, you need to create and assign a material resource. Continuing in the FineTuneAssignments plan, perform the following tasks:
1. Create a material resource named Advance proofs with the material label of copies, the initials AP, and a standard rate of $15 at the bottom of the resource list. This is the per-unit cost of this material resource; put another way, each copy of an advance proof costs $15.

The material resource you set up should look like this
2. In the Gantt Chart view, open the Assign Resources dialog box.
3. Assign the material resource Advance proofs to task 38, Final review. Specify 20 units.
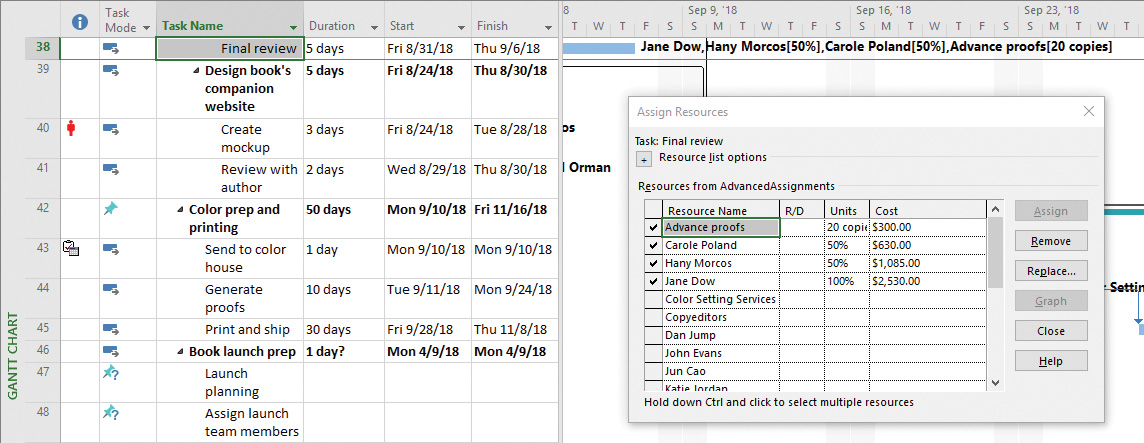
When assigning a material resource, note the Units and Cost values in the Assign Resources dialog box
View resource capacity
The scenario: At this point in the planning for the new children’s book project, you’ve set up an initial task list and initial resource details. Now you’ll examine resource capacity in detail. Continuing in the FineTuneAssignments plan, perform the following tasks:
1. In the Resource Usage view, show only the Percent Allocation and Remaining Availability details.
2. Hide the assignments under the resource names.
3. Zoom the timescale to days.

This customized Resource Usage view gives you at-a-glance insight into the workload and availability of each resource
Adjust assignments in the Team Planner view (Project Professional only)
The scenario: You have found the Team Planner view to be especially helpful when reviewing assignments with resources working on the new children’s book plan. You’ve identified some assignment issues you need to address, and you will do so in the Team Planner view. Continuing in the FineTuneAssignments plan, perform the following tasks:
1. Display the Team Planner view.
2. Drag Carole Poland’s unscheduled task, Launch planning, in Carole’s row so that the task start date is Monday, August 13, 2018.
3. Drag the name of Hany Morcos’s unscheduled task, Assign launch team members, to Carole Poland’s row so that the task start date is Tuesday, August 14, 2018.
4. Drag the first unassigned task, Complete author questionnaire, to Hany Morcos’s row so that the task start date is Monday, August 20, 2018.
