Fireworks Lesson 1: Adobe Fireworks Jumpstart

Fireworks is a unique hybrid of vector and bitmap graphics programs. It provides a user-friendly environment for prototyping websites and user interfaces, and creating and optimizing images for the Web. And because it’s part of Adobe’s Creative Cloud, Fireworks also offers time-saving integration with Photoshop, Illustrator, Dreamweaver, and Flash.
What you’ll learn in this lesson:
- • Working in the Fireworks interface
- • Creating and editing bitmap and vector images
- • Adding text, color, and layers
- • Using slices for interactivity
- • Optimizing graphics for the Web
- • Using the Master Page feature for HTML prototypes
Starting up
You will work with several files from the fw01lessons folder in this lesson. Make sure that you have loaded the CClessons folder onto your hard drive from www.digitalclassroombooks.com/CC/DesignTools. See “Loading lesson files” in the Starting up section of this book.
About Fireworks
Adobe Fireworks is a versatile graphics program that combines features found in image-editing, vector-drawing, web-optimizing and prototyping applications. Instead of jumping from one program to another to create graphics for your website, Fireworks lets you use one program from start to finish.
Working with vector and bitmap objects
Fireworks includes tools for working with both vector and bitmap graphics. You can draw an object and then use a wide array of tools, effects, and commands to enhance it. If you’ve created a graphic in another program, Fireworks also imports and edits graphics in JPEG, GIF, PNG, PSD, and many other file formats.
Making graphics interactive
In Fireworks, you can add interactive areas to a web graphic using slices. Slices divide an image into exportable areas, to which you can apply rollovers and other interactive behaviors.
Optimizing and exporting graphics
The optimization features of Fireworks help you find the right balance between file size and visual quality for your graphics. Once you’ve optimized your graphics, you can export them in a number of different file formats, including JPEG, GIF, animated GIF, and HTML tables containing sliced images.
Website and mobile application prototyping
Fireworks CS6 has a number of features designed to make prototyping a website easier than ever. In conjunction with the drawing tools and a built-in graphics library of user interface elements, you can use the Pages, States, and Layers panels to create interactive prototypes of a website or mobile application and even export your final prototype as a multipage HTML document.
Vector and bitmap graphics
Graphics on your computer are displayed in either vector or bitmap format. It’s important that you understand the difference between the two file types, because Fireworks is capable of opening and editing both formats.
About vector graphics
Vector graphics are drawn objects that use anchor points, lines, and vectors, or mathematical equations that contain color and position information. They are defined by a series of points that describe the outline of the graphic. The color of the graphic is composed of the color of its outline (or stroke) and the color of its interior (or fill).
Vector graphics are also described as resolution-independent. This means that a graphic’s appearance doesn’t change when you move, resize, or reshape it.

Vector graphics feature crisp edges and flat areas of color.
About bitmap graphics
Your computer screen is a large grid of pixels. Bitmap graphics are composed of dots (or pixels) arranged inside this grid. In a bitmap graphic, the image is defined by the location and color value of each pixel in the grid. When viewed at a certain distance, the dots create the illusion of continuous tone, as in a mosaic.
Bitmap graphics are resolution-dependent, which means that the image data is restricted to a grid of a certain, specified size. Enlarging or transforming a bitmap graphic changes the pixels in the grid, which can make the edges of the image appear jagged.
Bitmap graphics feature gradations in tone and softer edges.
The startup screen
When you start Fireworks without opening a document, the Fireworks startup screen appears in the work environment. The startup screen gives you quick access to Fireworks tutorials, recent files, and Fireworks Exchange, where you can add new capabilities to some Fireworks features.

The Start page appears by default when Fireworks is first opened.
1 Disable the startup screen by clicking the Don’t Show Again check box in the lower-left corner. Fireworks lets you re-access the startup screen if you need to later.
The startup screen can be re-accessed again at any time by choosing Edit > Preferences and selecting the Show startup screen check box.
Creating a new Fireworks document
As with most computer applications, your first step is to create a new document.
 New documents in Fireworks default to its native file format, Portable Network Graphic (PNG). This means that regardless of the optimization and export settings you select, the original Fireworks PNG file is preserved to allow easy editing later.
1 Select File > New. The New Document dialog box opens.
2 In the New Document dialog box, type 800 in the Width text field, 600 in the Height text field, and make sure that both drop-down menus are set to Pixels. Measurements are usually expressed in pixels in Fireworks, since you’re designing for a pixel-based monitor.
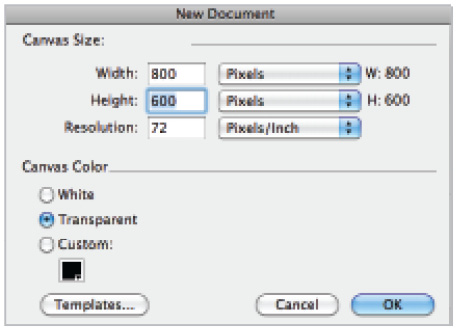
Use the New Document dialog box to set up your file.
3 Set the Resolution, or number of pixels per inch in your bitmap grid, to 72. Most computer monitors can only display graphics at between 72 and 100 pixels per inch.
4 Set the Canvas Color, or the background color to Transparent. You could also have used the default White or clicked on the Custom color swatch to select a custom canvas color.
5 Click OK to accept your new document settings.
Workspace basics
You create and manipulate your files using various elements, such as panels, bars, and windows. Any arrangement of these elements is called a workspace. The workspaces of the different applications in the Adobe Creative Cloud share the same basic appearance, so that you can easily move between the applications.
Fireworks workspace overview
When you open a new document in Fireworks, the document window appears in the center of the screen, and displays the file you’re working on. Document windows can be tabbed and, in certain cases, grouped and docked.

The document window displays the file you’re working on in the center of the screen.
The Fireworks workspace includes the Tools panel, Property Inspector, Application bar, and other panels.
The Application bar, across the top of your screen, contains a workspace button for switching workspaces, menus, and other application controls.

The Application bar (Mac OS) contains menus and other application controls.
The Property Inspector, at the bottom of the document window, initially displays document properties. It’s context-sensitive, however, and changes depending on which tool you’ve chosen, or what you’ve selected in the document.

The Property Inspector is context-sensitive and displays content relative to what you’ve selected.
The Tools panel, on the left side of the screen, contains bitmap, vector, and web tool groups. These tools are used for creating and editing elements of your graphic. Related tools are grouped, or nested.
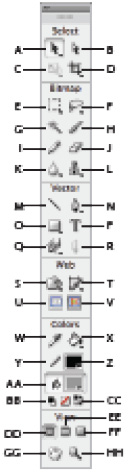
The Tools panel contains tools for creating and editing elements of your graphic.
Select category
A. Pointer tool. B. Subselection tool. C. Scale tool. D. Crop tool.
Bitmap category
E. Marquee tool. F. Lasso tool. G. Magic Wand tool. H. Brush tool. I. Pencil tool. J. Eraser tool. K. Blur tool. L. Rubber Stamp tool.
Vector Category
M. Line tool. N. Pen tool. O. Rectangle tool. P. Text tool. Q. Freeform tool. R. Knife tool.
Web Category
S. Rectangle Hotspot tool. T. Slice tool. U. Hide slices and hotspots. V. Show slices and hotspots.
Colors category
W. Eyedropper tool. X. Paint Bucket tool. Y. Stroke color. Z. Fill color. AA. Default Stroke and Fill colors. BB. No Stroke or Fill. CC. Swap Fill and Stroke.
View Category
DD. Standard screen mode. EE. Full screen with Menus. FF. Full Screen. GG. Hand tool. HH. Zoom tool.
Other Fireworks panels
Panels are floating windows that let you work with layers, paths, and colors, and otherwise edit the appearance or behavior of a selected object. Although they are docked to the right side of the workspace by default, each panel is draggable, allowing you to group panels into your own custom arrangements.
Panels let you edit the appearance or behavior of a selected object.
Working with bitmaps
Creating bitmaps
As mentioned earlier in this lesson, bitmap graphics are composed of small squares called pixels, which fit together like the tiles of a mosaic to create an image. Some examples of bitmap graphics are photographs captured with your digital camera, or graphics created in paint programs. They are sometimes referred to as raster, or pixel-based, images.
In Fireworks, you can create bitmap images by drawing and painting with bitmap tools, by converting vector objects to bitmap images, or by opening or importing images.
 Bitmap images cannot be converted to vector objects in Fireworks.
Importing a bitmap
In this exercise, you’ll import a JPEG file to use as a header graphic for a web page. Fireworks imports and edits graphics in JPEG, GIF, PNG, PSD, and many other file formats.
1 With your Fireworks document open, select File > Import. The Import File dialog box opens.
2 Navigate to the fw01lessons folder within the CClessons folder, and select the file BlueSky.jpg.
3 Click Open. The corner-shaped, import cursor indicates that the file is ready to be placed in your Fireworks document.
4 Click once in the upper-left corner of your canvas to place the image at its original size.
 You can also drag the import cursor to draw a rectangle that scales the image to fit.

Bitmap images are imported using the File > Import command.
Cropping a bitmap
The imported image fills your canvas, but you’ll want to crop its dimensions for use as a web page header.
1 From the Tools panel, choose the Crop tool (![]() ).
).
2 Choose View > Rulers, if you do not see the rulers in the document window. Position your cursor on the left edge of the canvas, at the 200-pixel mark on the vertical ruler.
3 Drag down to the 300-pixel mark on the vertical ruler, and across to the right edge of your canvas. You should end up with a crop selection box that is approximately 800 pixels wide and 100 pixels high.

Images can be cropped with the Crop tool.
4 Double-click inside the bounding box or press Enter to crop the selection.
 To cancel a crop selection, press the Esc key.

Double-click inside the bounding box to accept your crop.
Applying a filter
Next you’ll use a filter to lighten a portion of the image and complete the bitmap portion of your header graphic.
1 From the Tools panel, choose the Rectangular Marquee tool (![]() ).
).
2 Drag a rectangle over the bottom half of your header graphic. A flashing selection outline appears over the area, identifying those pixels as being currently selected for editing.

A selection flashes when the pixels inside are ready for editing.
3 Select Filters > Adjust Color > Hue/Saturation. The Hue/Saturation dialog box appears.
4 In the Hue/Saturation dialog box, slide the Lightness slider to 50, and (if not already selected) click the Preview check box to see the results of the lightening in your image.
5 Click OK to accept the Hue/Saturation filter setting and choose Select > Deselect to remove your selection.

Click OK to accept your filter setting.
6 Choose File > Save, and save this file as Header.png in the fw01lessons folder. Now you’ll work with the vector tools to add a navigation bar to your header.
Working with vector objects
As mentioned previously, a vector graphic’s shape is defined by a path, and by the anchor points that are plotted along it. A vector graphic’s stroke color follows the path, and its fill occupies the area inside the path.
Vector object shapes include basic shapes, free-form shapes, and Auto Shapes, or object groups that have special controls for adjusting them. You can use a variety of tools in Fireworks to draw and edit vector objects.
Drawing and editing basic shapes
You use the basic shape tools to draw rectangles, ellipses, and polygons.

Fireworks features both basic and auto shape tools.
Drawing a rectangle
The Rectangle tool draws rectangles as grouped objects. To move a rectangle corner point independently, you need to ungroup the rectangle or use the Subselection tool (![]() ).
).
1 From the Tools panel, select the Rectangle tool (![]() ).
).
 If you can’t see the Rectangle tool in the Tools panel, click and hold the tool to choose it from the list that appears.
2 Move the pointer to the canvas, positioning it on the left side of the lightened area of your header. The cursor changes to a plus sign (+), indicating that you can draw the rectangle.
3 Click and drag diagonally from upper left to lower right, creating a rectangle that is approximately 750 pixels wide and 25 pixels high, and leaving a small margin of the lightened sky around it.
The rectangle automatically fills with the default fill color (gray). Leave the fill at its default; you’ll change it later in this exercise.

Leave the rectangle’s fill at its default color (gray).
 While pressing and holding the mouse button, press and hold the spacebar to adjust the position of a basic shape as you draw it. Release the spacebar to continue drawing the object.
4 After you draw a shape, it remains selected and you can reposition it. Using the arrow keys on your keyboard move the rectangle as needed until it is approximately in the center of your lightened area.
Resizing a rectangle
If you have difficulty drawing your rectangle at the exact size by dragging, make sure your rectangle is selected and perform one of the following:
- • Enter new width (W) or height (H) values in the Property Inspector or the Info panel.
- • In the Select section of the Tools panel, select the Scale tool () and drag a corner transform handle.

- • Select Modify > Transform > Scale and drag a corner transform handle, or select Modify > Transform > Numeric Transform and enter new dimensions.
- • Drag a corner point on the rectangle.
Auto Shapes
Auto Shapes, unlike other object groups, have diamond-shaped control points in addition to the object group handles. Dragging a control point alters only its associated visual property. Most control points have tool tips that describe how they affect the Auto Shape.
Auto Shape tools create shapes in preset orientations. For example, the Arrow tool draws arrows horizontally.

Use the Auto Shape tools to create shapes with preset orientations.
The Auto Shape tools
Arrow: Simple arrows of any proportions, and straight or bent lines.
Arrow Line: Straight, thin arrow lines providing quick access to common arrowheads (press and hold Alt, then click either end of the line).
Beveled Rectangle: Rectangles with beveled corners.
Chamfer Rectangle: Rectangles with chamfers (corners that are rounded inside the rectangle).
Connector Line: Three-segment connector lines, such as those used to connect the elements of a flowchart or organizational chart.
Doughnut: Filled rings.
L-Shape: Right-angled corner shapes.
Measure Tool: Simple arrow lines that indicate dimensions for key design elements in pixels or inches.
Pie: Pie charts.
Rounded Rectangle: Rectangles with rounded corners.
Smart Polygon: Equilateral polygons with 3 to 25 sides.
Spiral: Open spirals.
Star: Stars with any number of points from 3 to 25.
Working with text
Now you’ll add some text to serve as navigation links for your header bar.
Fireworks has the ability to use a variety of fonts at different sizes as well as kerning, spacing, color, and leading controls.
Creating and moving text blocks
Text entered into a Fireworks document appears inside a text block (a rectangle with handles). Text blocks are either auto-sizing or fixed-width blocks.
- • An auto-sizing text block expands horizontally as you enter type, and shrinks when you remove text. When you click the canvas with the Text tool and start typing, auto-sizing text blocks are created by default.
- • Fixed-width text blocks are created by default when you drag to draw a text block using the Text tool. They allow you to control the width of wrapped text.
 When the text pointer is active within a text block, a hollow circle or hollow square appears in the upper-right corner of the text block. The circle indicates an auto-sizing text block; the square indicates a fixed-width text block. Double-click the corner to change from one text block to the other.
1 Select the Text tool (![]() ).
).
2 In the Property Inspector, set the following:
- • Arial Regular for the font and style.
- • 12 points for the font size.
- • White for the font color. Click the color swatch and choose white from the color palette.

Use the Property Inspector to set the attributes of the type you’ll enter.
3 Create a fixed-width text block by dragging to draw a text block inside the navigation bar. Leave a small margin, but extend the text block at least halfway across the navigation bar.
 To move the text block while you drag to create it, click and hold the mouse button, press and hold the spacebar, and drag the text block to another location.
4 Type Home and press the Tab key twice to add space. Now type About Us, Products, Services, and Contact Us making sure to press the Tab key twice to add the same amount of space between each link.
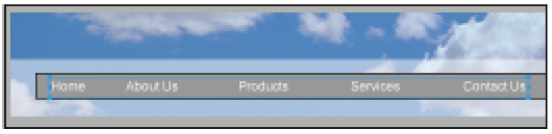
Type the navigation links as shown.
5 (Optional) Select text within the text block and reformat it.
Formatting and editing text
The quickest method of editing text in Fireworks is to use the Property Inspector. As an alternative to the Property Inspector, you can also use commands in the Text menu.
1 Do one of the following to select the text you want to change:
- • Click a text block with the Pointer tool () or Subselection tool (
 ) to select the entire block. To select multiple blocks simultaneously, press and hold Shift as you select each block.
- • Double-click a text block with the Pointer or Subselection tool, and then highlight a range of text.
- • Click inside a text block with the Text tool, and then highlight a range of text.
2 Change or reformat the text.
3 To exit the text block, do one of the following:
- • Click outside the text block.
- • Select another tool in the Tools panel.
- • Press Esc on your keyboard.
4 Select File > Save to save your file.
Applying color
Fireworks has a wide variety of features for creating, selecting, and applying colors. You’ll now use some of these features to add color to your navigation bar and text links.
Applying a sampled color
1 With the Pointer tool (![]() ), click the (gray) navigation bar to select it.
), click the (gray) navigation bar to select it.
2 Select the Eyedropper tool (![]() ) from the Tools panel.
) from the Tools panel.
3 Click in the blue sky at the top of your header graphic to sample that color.
4 The blue sky color is applied to the navigation bar.

The Eyedropper tool allows you to sample color from your image.
You can also apply color to image elements in other ways.
Applying a swatch color to text
1 With the Text tool, drag to select all your text links.
2 Click the Fill Color box icon (![]() ) in the Tools panel and a swatches panel appears.
) in the Tools panel and a swatches panel appears.
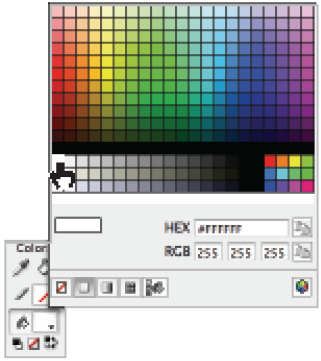
Use the Swatches panel to apply color to your text.
3 Click a dark-blue swatch (of your choice) to apply the color to the fill of your text.
Using the Color Mixer
You can use the Color Mixer by choosing Window > Color Mixer to view and change your current stroke and fill colors.

The Color Mixer allows you to view and change your current stroke and fill colors.
By default, the Color Mixer identifies RGB colors as hexadecimal, displaying hexadecimal color values for red (R), green (G), and blue (B) color components. Hexadecimal RGB values are calculated based on a range of values from 00 to FF.
You can select alternative color models from the Color Mixer panel menu. Although CMYK is a color model option, graphics exported directly from Fireworks are not typically intended for printing.
Using Layers
In Fireworks, you use layers to separate your document into discrete planes, as if the elements were created on separate overlays. A document can be made up of many layers, each in turn containing sublayers or objects. As a point of reference, Fireworks layers resemble layer sets in Adobe Photoshop, however in Photoshop you need to explicitly create a layer set. In Fireworks the layer set “behavior” is built in.
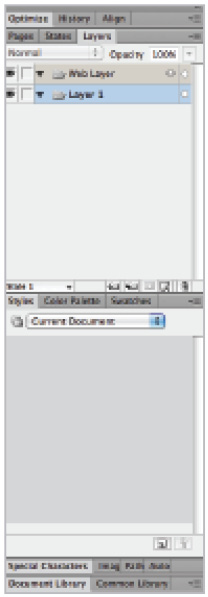
The Layers panel
Each element in a Fireworks document resides on a layer. You can either create layers before you begin adding elements or add layers as needed. Fireworks is unique in that if you create a new document two layers are actually created: the Web layer and a Default Layer. The Web layer will hold interactive elements such as image maps, and the Default layer contains standard elements such as text, vector shapes, and bitmap shapes. Here is the Layer panel of a new document with no content whatsoever.

Each element in a Fireworks document resides on a layer.
The Layers panel displays the current state of all layers in your image. The name of an active layer is always highlighted. The stacking order is the order in which objects appear in the document and determines how objects on one layer overlap objects on another. Fireworks places the most recently created layer on the top of the stack. You can easily rearrange the order of layers and of objects within layers.
Activating a layer
When you draw, paste, or import an object in your document, it is automatically placed at the top of the active layer.
To activate a layer, do one of the following:
- • Click a layer name in the Layers panel.
- • Select an object on a layer.
Organizing layers
In a Fireworks document, you organize layers and objects by naming them and rearranging their stacking order in the Layers panel.
Moving layers and objects in the Layers panel changes the order in which objects appear on the canvas. Objects at the top of a layer appear above other objects in that layer on the canvas. Objects on the topmost layer appear in front of objects on lower layers.
Naming layer objects
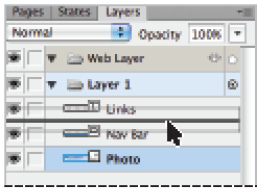
1 Open the Layers panel by choosing Window > Layers. Double-click the Bitmap object in the Layers panel to activate a text field.
2 Type the new name, Photo, for the object and press Enter.
3 Repeat the process to rename the Home layer to Links.

It’s a good idea to name your layers descriptively.
4 Repeat the process one more time and double-click the Rectangle object. Change the name to Nav Bar.
Moving a layer object
1 Click the Photo object in the Layers panel. Drag it above the Nav Bar object, releasing it when you see a double line appear between the Links and Nav Bar objects.
Dragging layers changes the order in which objects appear on the canvas.
2 The Nav Bar object disappears from your image; it is now last in the stacking order and is being hidden by the Photo object.
Protecting layer objects
Locking an individual object protects it by preventing it from being selected or edited. A Padlock icon (![]() ) indicates a locked item. You can also protect objects and layers by hiding them.
) indicates a locked item. You can also protect objects and layers by hiding them.
1 Lock the Links object by clicking the square in the column immediately to the left of the object name.
2 Lock the Photo object by clicking the square in the column immediately to the left of the object name.

Objects on locked layers can’t be selected.
3 Click with the Pointer tool (![]() ), noting that neither of these objects can now be selected. (You could still move the Nav Bar object; you just can’t see it.)
), noting that neither of these objects can now be selected. (You could still move the Nav Bar object; you just can’t see it.)
Showing or hiding objects and layers
Hiding an individual object protects it by preventing it from being viewed, selected, or edited. A Visibility icon (![]() ) indicates a visible item.
) indicates a visible item.
1 Hide the Links object by clicking the square in the far-left column next to the object name. The missing Visibility icon indicates that the object is invisible.

A missing Visibility icon indicates an invisible layer.
2 Show the Links object again by clicking the square in the far-left column next to the object name. The Visibility icon indicates that the object is now visible.
Merging objects in the Layers panel
To clean up your Layers panel, you can merge objects. Objects and bitmaps to be merged do not have to be adjacent in the Layers panel or reside on the same layer.
Merging down results in all selected vector and bitmap objects becoming flattened into the bitmap object that lies beneath. Vector objects and bitmap objects cannot be edited separately once merged.
1 Unlock the Links and Photo objects in the Layers panel, and click to select the Links object and only the Links object.
 Shift+click or Ctrl+click to select multiple objects.
2 To merge the Links and Photo objects, do one of the following:
- • Select Merge Down from the Layers panel menu.

Merging down results in all selected vector and bitmap objects becoming flattened.
- • Select Modify > Merge Down.
- • Right-click (Windows) or Ctrl+click (Mac OS) the selected layer and select Merge Down.
Deleting a layer object
Because you won’t be using it after all, you’ll now delete the Rectangle object.
1 Click the Nav Bar object to activate it.
2 Click the Delete Selection button (![]() ) at the bottom of the Layers panel.
) at the bottom of the Layers panel.

Unwanted layers are deleted using the Delete Selection button.
About the Web layer
The Web layer appears by default as the top layer in every Fireworks document. It contains Web objects, such as slices, used for adding interactivity to exported documents.
You can’t delete, duplicate, move, or rename the Web layer. You also can’t merge objects that reside on the Web layer.
Creating slices for interactivity
Slices are Web objects that are created using HTML code, and are an essential part of creating interactivity in a Fireworks document.
Slicing carves up a document into smaller pieces and exports each piece as a separate file. When it’s exported, Fireworks creates the HTML code that will reassemble the graphic in a web browser.
Although it’s also used for optimizing and updating, the biggest advantage of slicing is that it adds interactivity so that images can respond to user actions.
Creating rectangular slices
You can create rectangular slices by drawing with the Slice tool.
1 Select the Slice tool (![]() ) located in the Web section of the toolbar.
) located in the Web section of the toolbar.
2 Drag to draw a slice object over the Home portion of your header graphic. Be sure to make it cover the entire (lightened) area from top to bottom.
3 Repeat the process for the About Us, Products, Services, and Contact Us link areas.

Slicing adds interactivity so that images can respond to user actions.
 To adjust the position of a slice as you drag to draw it, click and hold the mouse button, press and hold the spacebar, and then drag the slice to another location on the canvas. Release the spacebar to continue drawing the slice.
Resizing one or more slices
You can edit the slice guides (the red borders around each slice) to define the boundaries of the split image files that are created when the document is exported.
1 Position the Pointer tool (![]() ) or Subselection tool (
) or Subselection tool (![]() ) over a slice guide such as the last slice in the list. The pointer changes to the guide movement pointer.
) over a slice guide such as the last slice in the list. The pointer changes to the guide movement pointer.

Drag a slice’s guides to resize it.
2 Drag the slice guide to the desired location. The slices and all adjacent slices are resized. Now go through each of your slice guides and readjust them as needed; you are trying to create equal amounts of space to the left and right of your link text. When you drag a slice guide to resize a slice, all adjacent rectangular slices are also resized. You can also use the Property Inspector to resize and transform slices.
 If multiple slice objects are aligned along a single slice guide, you can drag that slice guide to resize all the slice objects simultaneously.
Viewing and selecting slices
You can control the visibility of slices in your document by using the Layers panel and the Tools panel. When you turn slice visibility off for the whole document, slice guides are also hidden. The Web layer displays all the Web objects in the document.
1 In your toolbar, locate the two icons below your slice tool. These two buttons allow you to hide and show Slices.
2 Click the Hide Slices and Hotspots icon; your slices disappear from view.

Click the Hide Slices and Hotspots icon to hide your slices.
3 Click the icon immediately to the right to turn the slices back on.
These features are essentially visual aids. The slice user interface can get in your way of designing. These icons allow you an easy way to toggle the visibility off and on.
Naming slices
When you create slices, they also appear within the Web layer section of the Layers panel. Although not mandatory, it is a good idea to name your slices. This will help you identify them if you need to do more complex interactive work.
1 Locate the bottom slice in the Web layer and double-click it. This is the first slice you created; the additional slices were then added to the stacking order.
2 Type the new name, Home, for the slice and press Enter.
3 Repeat the process in the following order moving up one name at a time: About, Products, Services, and Contact_Us. (You are not allowed to have spaces in a slice name, so use an underscore or hyphen instead.)

It’s a good idea to name your slices descriptively.
Making slices interactive
So once you have slices, what can you do with them? Shortly, you’ll learn how to export the individual slices as graphics, but you can also take advantage of Firework’s unique Pages feature to add interactivity to these slices. In the following exercises, you’ll create the basic framework of a prototype for a website using this header image as a foundation.
Creating master pages
Using Fireworks, you can build navigational elements on a page and define that page as a master for all additional pages, thereby creating a working prototype. Your first step will be to convert this header into a larger web page.
1 Choose Modify > Canvas > Canvas Size. The Canvas Size window appears. Type 800 in the height field. To place the header at the top of the new page, click the top-center Anchor.
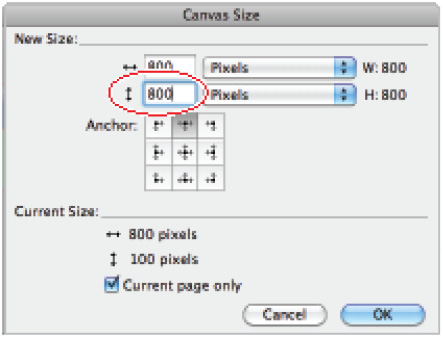
Set the vertical Canvas value to 800 and click the top-center anchor.
Click OK and the page is created with the header at the top and a transparent area below it.
2 Click the Pages panel (located two tabs to the left of the Layers panel). If it’s not visible, choose Window > Pages.
By default you are on page 1. Pages are used to create multipage documents, typically prototypes for mobile apps/websites and desktop websites. Although you could build each page individually, it is much more efficient to use the Master Page feature. With Master Pages you can define a basic look and feel (as well as interactivity) that you would like applied to multiple pages in your prototype or site.
3 Right-click (Windows) or Ctrl+click (Mac OS) on page 1 in the Pages panel, and from the menu that appears, choose Set as Master Page.

Convert your default page to a Master Page.
With this page set as the master, every new page you create will automatically have this header applied. Furthermore, any change you make to the master will be applied to the child pages.
4 Click the Add Page icon (![]() ) at the bottom of the Pages panel five times to create five new pages. Note how each page has the header at the top.
) at the bottom of the Pages panel five times to create five new pages. Note how each page has the header at the top.
5 Double-click the first page below the Master and rename it Home. Do the same thing for each of the following pages naming them About Us, Products, Services, and Contact Us respectively.

Rename your pages by double-clicking them and typing the new names.
You will be creating a simple prototype: one that does not require much content on the pages you are creating as part of the prototype. The pages you are creating require only a header that labels the page. The header will make it easy to identify the page being viewed.
6 In the Pages panel, click the Home page. Click the Type tool (![]() ) and in the Properties panel set the font size to 24 and type the word HOME immediately below the navigation bar.
) and in the Properties panel set the font size to 24 and type the word HOME immediately below the navigation bar.

Using the type tool, type the word HOME.
7 Using the Pointer tool (![]() ), click the text box to select it, then choose Edit > Copy. In the Pages panel, click the About Us page and choose Edit > Paste. This places the text box in the same location, but now you need to update it. Select the text and type ABOUT US.
), click the text box to select it, then choose Edit > Copy. In the Pages panel, click the About Us page and choose Edit > Paste. This places the text box in the same location, but now you need to update it. Select the text and type ABOUT US.
8 Repeat step 7 three more times, placing a text box on each of your additional pages and changing the text to PRODUCTS, SERVICES and CONTACT US, respectively. By the end you should have five different headings on each of your five pages.
9 Choose File > Save.
Linking the slices to your pages
Now you’ll link your slices to the new pages you created. Eventually you’ll export each page as an HTML document and the associated graphics.
1 In the Pages panel, click your Master page. This allows you to access the slices (otherwise they are inaccessible on the child pages).
2 Using the Pointer tool, click the first slice for the Home link. In the Properties inspector, locate the Link menu and click it to reveal five .htm pages. When you created your pages, Fireworks automatically generated the references to these documents.

Clicking the Link menu reveals the available HTML documents you can link your slice to.
Select the Home.htm option.
3 Repeat Step 2 for each of the four remaining slices and associate each slice with its named page. (So the link to the About Us slice is linked to About Us.htm, the Products slice is linked to Products.htm, etc.)
Now you’ll export these pages as HTML documents with optimized graphics.
Optimizing and exporting in Fireworks
Getting your graphics out of Fireworks is a two-step process. Before exporting, you have to optimize your graphics, which involves restricting the file size so that the graphics download quickly, while looking as good as possible.
Fireworks has unique optimizing features. Unlike other Adobe applications such as Photoshop or Illustrator, there is no Save for Web feature. There is a very similar feature called Image Preview, which you will be looking at shortly. What is unique about Fireworks is that it allows you to optimize images directly within the workspace. You’ll take a look at the Image Preview method first and then look at optimizing in the workspace.
Using Image Preview
1 Open the Image Preview by choosing File > Image Preview.
The preview area displays the document or graphic exactly as it is exported and estimates file size and download time with the current export settings, so you might not see anything except your transparent background.
2 Click and drag downward within the Image Preview window. Your cursor becomes the hand tool. Drag until you see the top navigation bar.

Drag inside the Image Preview until you see your header.
You have options for navigating within this window:
- • To zoom in, click the Zoom button () and click in the preview window.

- • To pan around the image, click the Pointer button () at the bottom of the dialog box and drag in the preview. Alternately, you can press and hold the spacebar when the Zoom pointer is active and drag in the preview.

- • To divide the preview area to compare settings, click a split-view button (). Each preview window can display a preview of the graphic with different export settings.

 When you zoom or pan while multiple views are open, all views zoom and pan simultaneously.
Setting export options
You can change the settings to reduce file size without sacrificing quality.
1 In the Options panel on the left side of the Image Preview window, change the format to JPEG if it is not already, and then set the JPEG Format to 80 percent quality if necessary. The Image Preview will show you the compression of your final image.
2 Leave the other settings at their defaults, and examine the download information being displayed at the top of the Image Preview window. By exporting this graphic as a JPEG, you’ll reduce the file size to 13.17K (although this could vary on your system), and it will only take two seconds to download from the Web using a 56 Kbps modem.

Use these settings to optimize your graphic as a JPEG.
3 Click Export; the Export dialog box opens.

Export directly from Image Preview using the Export dialog box.
4 In the Export dialog box, do the following:
- • Choose to Export HTML and Images to include your slices and rollovers.
- • Choose to Export HTML File in the HTML category.
- • For Slices, choose to Export Slices.
- • For Pages choose All Pages.
- • Make sure the check box labeled Include Areas without Slices is checked and also check the option “Put Images in Subfolder.”
5 Double-check that you chose the All Pages option in the last step or else only one HTML file will be created. In the Save As text field rename the file to index.htm.
6 If necessary, navigate to the fw01lessons folder, then click Save. If you see a message informing you that Home.gif is already created, click OK.
In order to test these files you will need to open them in a web browser.
7 Choose File > Save and then navigate to the location you are using to work with the lesson files for this exercise. You will see there are a number of HTML files as well as a new images folder. This image folder contains the sliced graphics for each of the pages.
8 Double-click the Home.htm file to open it in the browser. You will see your header as well as the HOME header. Click the various navigation links and you will move from page to page. You have just created a very basic five-page prototype of a website.
9 Close your browser and return to Fireworks.
Optimizing in the workspace
You also have the option of exporting graphics with no HTML pages involved. Fireworks provides optimization and export features in the workspace itself that give you control over how graphics are exported. You can use preset optimization options, or you can customize the optimization by choosing specific options such as file type and the color palette used.
In this example, assume that you wanted to export only the slices that you defined for your header bar. Perhaps you are planning on creating your own nav bar by hand, or for any reason wanted these images as graphic files.
The Optimize panel contains the most useful controls for optimizing. By default, the panel shows settings that refer to the active selection (a slice or the whole document).
Clicking the Preview button in the document window shows how the exported graphic would appear with the current optimization settings (as set in the Optimize panel).

Click the Preview button to see how the exported graphic will appear.
In addition to the Preview option, there are also the 2 Up and 4 Up buttons, which will split the screen into 2 sections and 4 sections, respectively. In this manner, you can compare the quality of the Optimized version to the original.
Saving optimization settings
By default, Fireworks remembers the last optimization settings you used after saving or exporting a file. You can then easily apply these settings to new documents.
Saved optimization settings appear at the bottom of the Settings pop-up menu in the Optimize panel and in the Property Inspector. When you save a preset, the file is saved in the Export Settings folder in the Fireworks configuration folder on your hard drive.
To save optimization settings:
1 In the Optimize Panel, click the Saved settings drop-down menu and choose the JPEG – Better Quality option.

Choose the JPEG – Better Quality option from the Optimize panel.
This is a standard preset in Fireworks, but if you change any of the settings, it becomes a custom setting, and you will need to save it if you want to reuse the options in the future.
2 Click the Quality slider and change the value to 65%. From the Optimize panel menu, select Save Settings and the Preset Name window appears.
3 Type Quality 65% for the optimization preset and click OK. You will now have this option available at all times.
Exporting selected slices
Fireworks is very flexible and there are times when you might want to export just one single slice from your page. This is accomplished by selecting the slice (or multiple slices) that you would like to export and then going through the Export process. In this exercise, let’s assume you want to export only the Home graphic.
1 In the Pages panel, click Page 1 (Master Page) if necessary. In the toolbar, click the Pointer tool (black arrow), and then click the Home slice.

Use settings in the Export dialog box to define the slices to export.
2 In the Optimize Panel, click the drop-down menu and choose the Quality 65% preset you created in the last exercise.
3 Select File > Export. Navigate to your fw01lessons folder.
4 From the Export drop-down menu, select Images Only.
5 In the Slices menu, make sure Export Slices is selected.
Also make sure that Selected Slices Only is checked and that Include Areas without Slices is not checked.
6 Click Save.
You have now completed your introduction to Adobe Fireworks. You can use the knowledge gained from creating a web page header graphic, complete with vector and bitmap elements, slices, and exported HTML prototype pages to inform your future use of Fireworks.
Self study
1 Create a new file, and choose File > Import to import a bitmap image into the workspace. Use the selection tools to select a portion of the graphic, and apply a filter to that selection, leaving the other pixels untouched.
2 Create a new file, and draw a pie chart using the Pie Auto Shape tool. Use the other drawing tools to edit the dimensions of the pie’s slices, and then experiment with applying color and text to the slices.
3 Use the Optimize panel in the workspace to optimize one of the graphics you’ve created, choosing the appropriate export settings for the content of the graphic. Save your optimization settings for future use with a similar graphic.
Review
Questions
1 How do vector graphics differ from bitmap graphics?
2 What is the default format for all new Fireworks files?
3 How can you tell whether a text block is auto-sizing or fixed-width?
4 What is the difference between the Web layer and other layers in your document?
5 When is it best to optimize a graphic as a JPEG? What images are best exported as GIFs?
Answers
1 The difference between vector graphics and bitmap graphics is that vector graphics are drawn objects that use anchor points, lines, and vectors, or mathematical equations that contain color and position information. Bitmap graphics are composed of dots (or pixels) arranged inside a grid, and the image is defined by the location and color value of each pixel in the grid.
2 New documents in Fireworks default to the native file format, Portable Network Graphic (PNG). This means that regardless of the optimization and export settings you select, the original Fireworks PNG file is preserved to allow easy editing later.
3 When the text pointer is active within a text block, a hollow circle or hollow square appears in the upper-right corner of the text block. The circle indicates an auto-sizing text block; the square indicates a fixed-width text block. Double-click the corner to change from one text block to the other.
4 The difference between the Web layer and other layers is that the Web layer appears by default as the top layer in every Fireworks document. It contains Web objects, such as slices, used for adding interactivity to exported documents. You can’t delete, duplicate, move, or rename the Web layer. You also can’t merge objects that reside on the Web layer.
5 The JPEG format is best for scanned photographs, images using textures, images with gradient color transitions, and any images that require more than 256 colors. Images with areas of solid color compress best when exported as GIF files, because they contain a maximum of 256 colors.