
Photoshop Lesson 3: Making Selective Changes in Photoshop CC

Creating a good selection in Photoshop is a critical skill. Selections allow you to isolate areas in an image for retouching, painting, copying, or pasting. If done correctly, selections are inconspicuous to the viewer; if not, images can look contrived, or over-manipulated. In this lesson, you will discover the fundamentals of making good selections.
What you’ll learn in this lesson:
- • Using the selection tools
- • Refining your selections
- • Transforming selections
- • Using the Pen tool
- • Saving selections
Starting up
Before starting, make sure that your tools and panels are consistent by resetting your preferences. See “Resetting the Photoshop workspace” in the Starting up section of this book. Keep in mind that if you do not reset your Photoshop preferences, you could have additional dialog boxes appear that reference mismatched color profiles and more.
You will work with several files from the ps03lessons folder in this lesson. Make sure that you have loaded the CClessons folder onto your hard drive from www.digitalclassroombooks.com/CC/DesignTools. See “Loading lesson files” in the Starting up section of this book.
The importance of a good selection
“You have to select it to affect it” is an old saying in the image-editing industry. To make changes to specific regions in your images, you must activate only those areas. To do this, you can use selection tools such as the Marquee, Lasso, and Quick Selection tools, or you can create a selection by painting a mask. For precise selections, you can use the Pen tool. In this lesson, you’ll learn how to select pixels in an image with both pixel and pen (vector) selection techniques.
You’ll start with some simple selection methods and then progress into more difficult selection techniques. Note that even if you are an experienced Photoshop user, you will want to follow the entire lesson; there are tips and tricks included that will help all levels of users achieve the best selections possible.
Using the Marquee tools
The first selection tools you’ll use are the Marquee tools, which include Rectangular, Elliptical, Single Row, and Single Column tools. Some of the many uses for the Rectangular and Elliptical Marquee tools are to isolate an area for cropping, to create a border around an image, or to use that area in the image for corrective or creative image adjustment.
1 In Photoshop, choose File > Browse in Bridge. Navigate to the ps03lessons folder and double-click ps0401_done.psd to open the image of a car. The completed image appears. You can leave the file open for reference, or choose File > Close to close it.

The completed selection file.
2 Return to Adobe Bridge by choosing File > Browse in Bridge. Navigate to the ps03lessons folder and double-click ps0401.psd to open the image. The start file for this lesson appears.
3 Choose File > Save As. When the Save As dialog box appears, navigate to the ps03lessons folder. In the File name text field, type ps0401_work. Choose Photoshop from the Format drop-down menu and click Save. If the Photoshop Format Options dialog box appears, click OK.
4 Select the Rectangular Marquee tool (![]() ), near the top of the Tools panel.
), near the top of the Tools panel.
5 Make sure that Snap is selected by choosing View > Snap. If the check box shows a checkmark, it is already active.
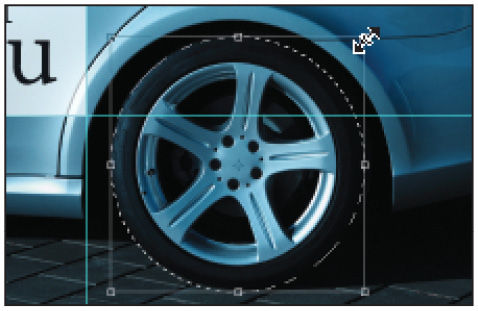
6 Position your cursor in the upper-left side of the guide in the car image, and drag a rectangular selection down toward the lower-right corner of the guide. A rectangular selection appears as you drag, and it stays active when you release the mouse.
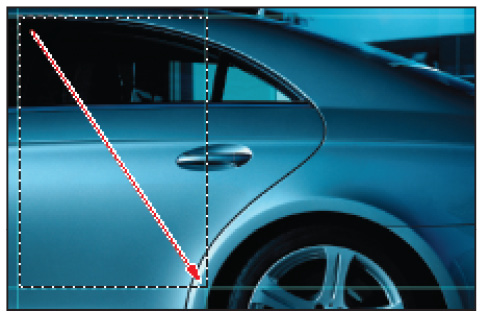
Creating a rectangular selection in the image.
You’ll now apply an adjustment layer to lighten just the selected area of the image. You are lightening this region so that a text overlay can be placed over that part of the image.
7 If the Adjustments panel is not visible, choose Window > Adjustments and click the Curves icon; the Properties panel appears.

Click the Curves button to create a new Curves adjustment layer.
8 To ensure consistent results, first click the panel menu (![]() ) in the upper-right corner of the Properties panel and choose Curves Display Options. In the Show Amount of section, select Pigment/Ink %. Choosing Pigment for corrections makes the curves adjustment more representative of ink on paper. Click OK to close the Curves Display Options dialog box.
) in the upper-right corner of the Properties panel and choose Curves Display Options. In the Show Amount of section, select Pigment/Ink %. Choosing Pigment for corrections makes the curves adjustment more representative of ink on paper. Click OK to close the Curves Display Options dialog box.
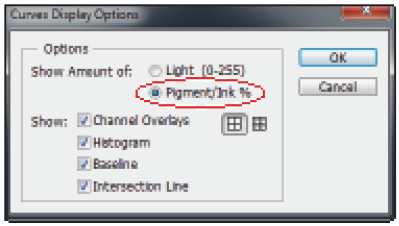
Select Pigment/Ink % in the Curve Display options.
9 Make sure that you can see additional options at the bottom of the Properties panel, such as Input and Output. If you do not see these options, click and drag the bottom of the Properties panel to expose them.

If necessary, expand the Properties panel to see additional options at the bottom.
10 Click and drag the upper-right anchor point (shadow) straight down, keeping it flush with the right side of the Properties window, until the Output text field reads approximately 20, or type 20 into the Output text field. The rectangular selection in the image is lightened to about 20% of its original value.
 Because you used an adjustment layer, you can double-click the Curves thumbnail in the Layers panel to re-open the Curves panel as often as you need to readjust the lightness in the rectangular selection.

Make a curve adjustment to the selection.
The result.
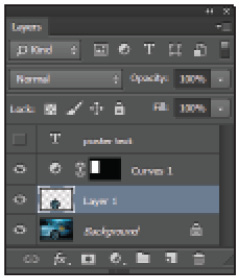
11 Now go back to the Layers panel, click the box to the left of the text layer named poster text; the Visibility icon (![]() ) appears, and the layer is now visible. The text appears over the lightened area.
) appears, and the layer is now visible. The text appears over the lightened area.
12 Choose File > Save to save this file. Keep the file open for the next part of this exercise.
Creating a square selection
In this section, you’ll learn how to create a square selection using the Rectangular Marquee tool.
1 Click the Background thumbnail in the Layers panel to select it.
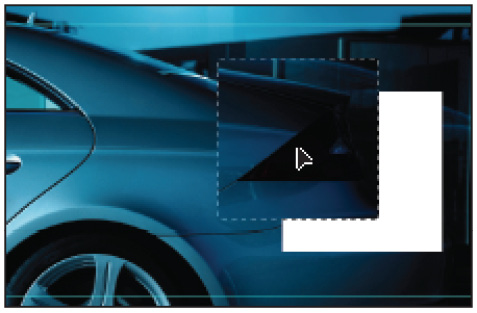
2 Select the Rectangular Marquee tool (![]() ) and position your cursor over the taillight of the car. Click and drag while holding the Shift key. Note that your selection is constrained, creating a square selection. When you have created a square (size doesn’t matter), first release the mouse and then the Shift key.
) and position your cursor over the taillight of the car. Click and drag while holding the Shift key. Note that your selection is constrained, creating a square selection. When you have created a square (size doesn’t matter), first release the mouse and then the Shift key.

Click and drag while holding the Shift key.
3 With the square selection still active, position your cursor over the selected region of the image. Notice that an arrow with a dashed box appears (![]() ). This indicates that the selection shape can be moved without moving any of the pixel information in the image.
). This indicates that the selection shape can be moved without moving any of the pixel information in the image.
4 Click and drag the selection to another location. Only the selection moves. Reposition the selection over the taillight.
5 Select the Move tool (![]() ) and position the cursor over the selected region. Notice that an icon with an arrow and scissors appears (
) and position the cursor over the selected region. Notice that an icon with an arrow and scissors appears (![]() ). This indicates that if you move the selection, you will cut, or move, the pixels with the selection.
). This indicates that if you move the selection, you will cut, or move, the pixels with the selection.
6 Click and drag the selection; the selected region of the image moves with the selection.
When the Move tool is selected, the pixels are moved with the selection.
7 Select Edit > Undo Move, or use the keyboard shortcut Ctrl+Z (Windows) or Command+Z (Mac OS) to undo your last step.
8 You’ll now alter that section of the image. Note that in this example you edit a region of an image without creating a layer; you are affecting the pixels of the image and cannot easily undo your edits after the image has been saved, closed, and reopened. You will discover more ways to take advantage of the Adjustments panel later in this lesson.
9 Choose Image > Adjustments > Hue/Saturation.
You will now adjust the hue, or color, of this region. Click and drag the Hue slider to change the color of the selected region. Select any color. In this example, the Hue slider is moved to –150. Click OK. The new hue is applied to the taillight region.

Changing the hue of the selected region.
The result.
10 Choose File > Save; keep the image open for the next part of this lesson.
Creating a selection from a center point
1 Select the Background layer in the Layers panel, then click and hold the Rectangular Marquee tool (![]() ) and select the hidden Elliptical Marquee tool (
) and select the hidden Elliptical Marquee tool (![]() ).
).
The selection technique you’re about to use requires you to press and hold two modifier keys as you drag.
2 You’ll now draw a circle selection from the center of the image. Place your cursor in the approximate center of the tire, and then press and hold the Alt (Windows) or Option (Mac OS) key and the Shift key. Click and drag to pull a circular selection from the center origin point. Release the mouse (before the modifier keys) when you have created a selection that is surrounding the tire. If necessary, you can click and drag the selection while you still have the Elliptical Marquee tool selected, or use your arrow keys to nudge the selection.
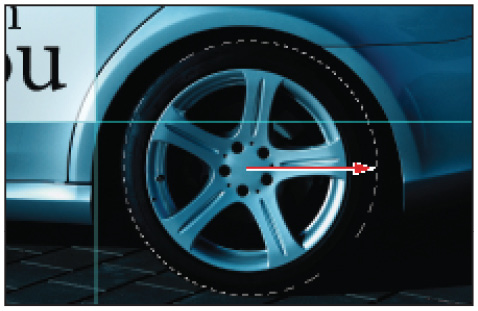
Press and hold Alt/Option when dragging to create a selection from the center.
 While pressing and holding the Alt (Windows) or Option (Mac OS) key and the Shift key, you can add the spacebar to reposition the selection as you are dragging with the Marquee tool. Release the spacebar to continue sizing the selection.
3 Choose Select > Transform Selection. A bounding box with anchor points appears around your selection. Use the bounding box’s anchor points to adjust the size and proportions of the selection. Note that you can scale proportionally by pressing and holding the Shift key when you transform the selection.
Transform your selection.
4 When you are finished with the transformation, click the check mark (![]() ) in the upper-right corner of the Options bar, press the Enter (Windows) or Return (Mac OS) key to confirm your transformation change, or press the Esc key in the upper-left corner of your keyboard to cancel the selection transformation.
) in the upper-right corner of the Options bar, press the Enter (Windows) or Return (Mac OS) key to confirm your transformation change, or press the Esc key in the upper-left corner of your keyboard to cancel the selection transformation.
5 Choose File > Save. Keep this file open for the next part of this lesson.
Changing a selection into a layer
You will now move your selection up to a new layer. By moving a selection to its own independent layer, you can have more control over the selected region while leaving the original image data intact. You’ll learn more about layers in Photoshop Lesson 6, “Introduction to Photoshop Layers.”
1 With the tire still selected, click the Background layer to make it active. Press Ctrl+J (Windows) or Command+J (Mac OS). Think of this as the Jump my selection to a new layer keyboard shortcut. Alternatively, to create a new layer for your selection, you can select Layer > New > Layer Via Copy. The selection marquee disappears and the selected region is moved and copied to a new layer called Layer 1.
A new layer created from the selection.
2 Now you will apply a filter to this new layer. Choose Filter > Blur > Motion Blur. The Motion Blur dialog box appears.
3 In the Motion Blur dialog box, type 0 (zero) in the Angle text field and 45 in the Distance text field; then click OK. A motion blur is applied to the tire.
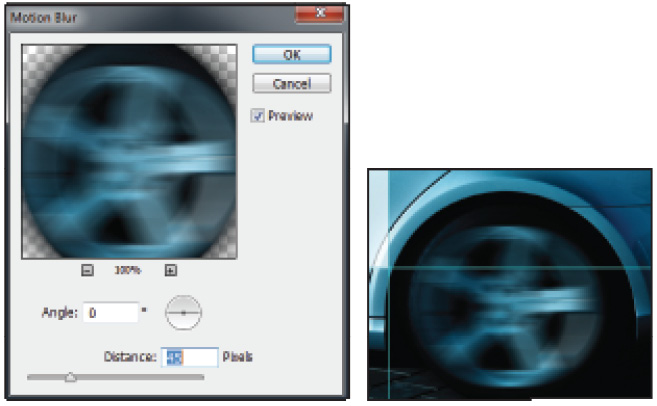
Applying the motion blur.
The result.
4 Select the Move tool (![]() ), move the tire slightly to the right, and type 5. By typing 5, you have changed the Opacity of this layer to 50 percent.
), move the tire slightly to the right, and type 5. By typing 5, you have changed the Opacity of this layer to 50 percent.
5 Choose File > Save, and then File > Close.
Working with the Magic Wand tool
The Magic Wand makes selections based on tonal similarities; it lets you select a consistently colored area, for example a blue sky, without having to trace its outline. You control the range it automatically selects by adjusting the tolerance.
1 Choose File > Browse in Bridge to bring Adobe Bridge forward. Then navigate to the ps03lessons folder and open the image ps0402.psd. An image of a kite appears.
2 Choose File > Save As; the Save As dialog box appears. Navigate to the ps03lessons folder and type ps0402_work into the File name text field. Make sure that Photoshop is selected from the Format drop-down menu, and click Save.
3 Click and hold the Quick Selection tool (![]() ) to locate and select the hidden Magic Wand tool (
) to locate and select the hidden Magic Wand tool (![]() ).
).
4 In the Options bar, make sure the tolerance is set to 32.
5 Position your cursor over the red portion of the kite and click once. Notice that similar tonal areas that are contiguous (touching) are selected. Place your cursor over different parts of the kite and click to see the different selections that are created. The selections pick up only similar tonal areas that are contiguous; in this case, this is not the most effective way to make a selection.
6 Choose Select > Deselect, or use the keyboard shortcut Ctrl+D (Windows) or Command+D (Mac OS).
7 Click once in the sky at the top center of the image. The sky becomes selected. Don’t worry if the sky is not entirely selected; it is because those areas are outside of the tolerance range of the area that you selected with the Magic Wand tool.
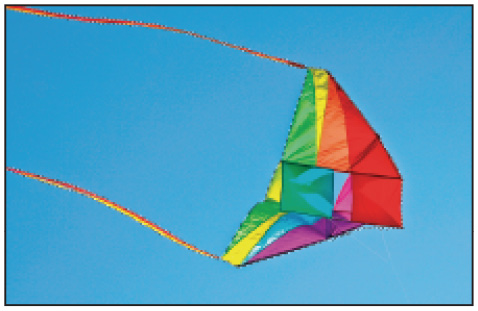
Image with the background selected.
 To see what is included in a selection, position any selection tool over the image. If the icon appears as a hollow arrow with a dotted box next to it, it is over an active selection. If the icon of the tool or crosshair appears, that area is not part of the active selection.
8 Press Ctrl+0 (zero) (Windows) or Command+0 (zero) (Mac OS) to fit the picture to the screen. Then press and hold the Shift key and click the area of sky that was left unselected. Those areas are added to the selection of the sky.
9 Choose Select > Inverse. Now the selection has been turned inside out, selecting the kite. Inversing a selection is a helpful technique when solid colors are part of an image, since you can make quick selections instead of focusing on the more diversely colored areas of an image.
 If you have control over the environment when you capture your images, it can be helpful to take a picture of an object against a solid background. That way, you can create quick selections using tools like Quick Selection and the Magic Wand.
10 Don’t worry if you accidentally deselect a region, since Photoshop remembers your last selection. With the selection of the kite still active, choose Select > Deselect, and the selection is deselected; then choose Select > Reselect to reselect the kite.
11 Now you will sharpen the kite without affecting the sky. Choose Filter > Sharpen > Smart Sharpen. The Smart Sharpen dialog box appears.
12 Drag the Amount slider to the right to about 200, or type 200 into the Amount text field. Leave the Radius text field at 1. Change the Reduce Noise slider to about 10%, or type 10 into the Reduce Noise text field. There are reasons that you have entered these settings; they are just not addressed in this lesson that is focused on selections. Read more about Sharpening in Photoshop Lesson 5, “Color Correcting an Image.”

Sharpening the selection only.
13 Click and drag in the preview pane to bring the kite into view. Notice that in the preview pane of the Smart Sharpen dialog box, only the kite is sharpened. Position your cursor over the kite in the preview pane, and then click and hold. This temporarily turns the preview off. Release the mouse to see the Smart Sharpen filter effect applied. Click OK.
14 Choose File > Save. Then choose File > Close to close this file.
The Lasso tool
The Lasso tool is a freeform selection tool. It is great for creating an initial rough selection, and even better for cleaning up an existing selection. The selection that you create is as accurate as your hand on the mouse or trackpad allows it to be, which is why it lends itself to general cleaning up of selections. The best advice when using this tool is not to worry about being too precise; you can modify the selection, as you will see later in this section.
1 Choose File > Browse in Bridge to bring Adobe Bridge forward. Navigate to the ps03lessons folder inside the CClessons folder you copied to your computer. Double-click ps0403.psd to open the image. An image of a snowboarder appears.
2 Choose File > Save As. When the Save As dialog box appears, navigate to the ps03lessons folder. In the File name text field, type ps0403_work. Choose Photoshop from the Format drop-down menu and click Save.
You will now create a selection using the Lasso tool.
3 Select the Lasso tool (![]() ) in the Tools panel.
) in the Tools panel.
4 Click slightly outside the snowboarder and drag the Lasso tool around him. The lasso selection that you are making does not have to be perfect, as you will have an opportunity to edit it shortly.

Click and drag around the snowboarder using the Lasso tool.
Adding to and subtracting from selections
You created a selection that surrounds the snowboarder. You’ll now use the Lasso tool to refine that selection.
Deleting from the selection
In this part of the exercise, you learn to subtract from your active selection.
1 Select the Lasso tool (![]() ) in the Tools panel.
) in the Tools panel.
2 Look at your image and determine the areas of your selection that you want to delete. This might include the area between the snowboarder and the selection of the sky surrounding him.
3 Press and hold the Alt (Windows) or Option (Mac OS) key and notice that the cursor turns into a Lasso with a minus sign. While holding the Alt/Option key, click and drag outside the selected area and into the active selection. Release the mouse when you have circled back to your original starting point. The new Lasso selection you made is deleted from the existing selection.
4 To practice this skill, press and hold the Alt/Option key, and click to start your lasso path on the edge of the snowboarder. Then, click and drag along the edge of the snowboarder for a short bit. When you want to end the lasso path, make sure to circle back around to the start point.

Carefully drag along the edge of the snowboarder, and then circle back to your starting point, enclosing the section that you want to delete from the active selection.
You do not have to delete the sky from all the edges of the snowboarder for this exercise. However, to prepare for the next section, you will delete the section between the snowboarder’s legs and the board.
5 With the Alt/Option key pressed, click anywhere on the inside edge of one of the snowboarder’s legs and drag all the way around the inner edge, over the mitten, and back to the starting point. Release the mouse when you are back at the initial clicking point.
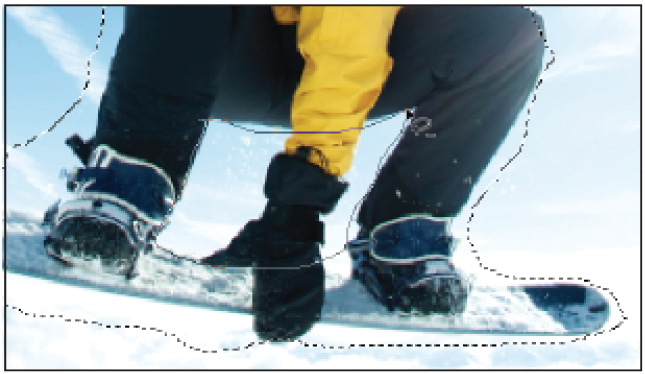
Delete the section between the snowboarder’s legs from the selection.
Adding to the selection
If you want to add to an active selection, press and hold the Shift key and create a closed area. Follow these steps to bring the mitten back into the active selection.
1 Press and hold the Shift key and click and drag along the edge of the mitten. Make sure you drag beyond the mitten and down into the active area at the top and bottom to create a fully encompassed area to add to the selection.
2 You can continue to Shift+drag to add areas that you missed, or Alt/Option+Drag to subtract areas that you might have selected in error.
 Using the Shift key to add to a selection and the Alt (Windows) or Option (Mac OS) key to delete from a selection, you can edit selections created with any of the selection tools.
Saving a selection
You should always save your selection because you might accidentally delete it or you might need to reactivate it at another time.
1 Choose Select > Save Selection; the Save Selection dialog box appears.
2 Type snowboarder into the File name text field, and then click OK. Anytime that you might need to reactivate the selection, choose Select > Load Selection, and then choose the Channel named snowboarder. Keep the other settings at the default and click OK.

You can save a selection and then reload it when needed.
3 Choose File > Save to save this file. Keep the file open for the next part of the lesson.
Feathering the selection
In this part of the lesson, you will feather your selection (don’t worry if your selection is less than perfect). Feathering is the term that Photoshop uses to describe a vignette, or fading of an image around the edges of a selection. There are many ways to feather a selection; in this section, you will learn the most visual method, which is the Refine Edge feature.
1 With the Lasso tool still selected, click Refine Edge in the Options bar. The Refine Edge dialog box appears.
2 Use the Feather slider to change the feather amount to about 5 pixels. By using the Refine Edge feature, you see a preview of the vignette immediately.
3 From the Output To drop-down menu, select Layer Mask and click OK. The image is faded, and a mask is added to the layer in the Layers panel.
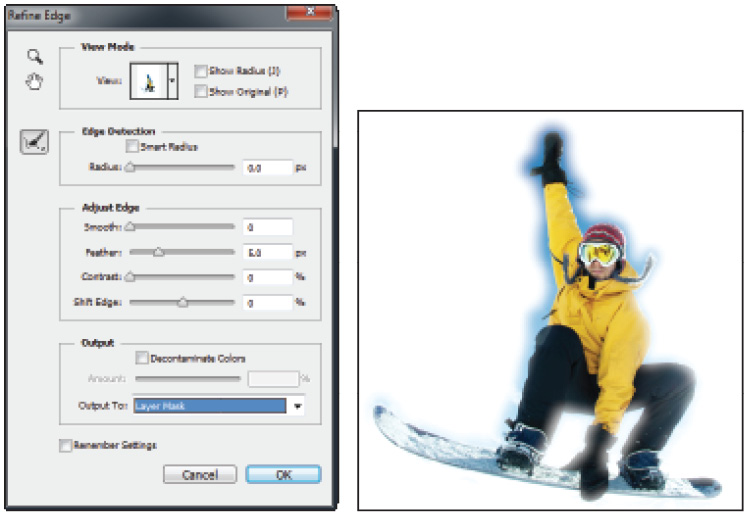
Change the Feather to 5 pixels.
The result.
Layer masks essentially cover any area that was not selected at the time the mask was created. Your selection is now in a state that can be reactivated, turned off, and turned on at any time. Layer Masks are discussed in more detail in Photoshop Lesson 6, “Introduction to Photoshop Layers.”
4 Press and hold the Shift key and click the Layer Mask in the Layers panel to turn off the mask; press and hold the Shift key and click the Layer Mask again to turn it on.

Press and hold the Shift Key and click the layer mask to turn it off and on.
5 Choose File > Save, and then File > Close.
Using the Quick Selection tool
The Quick Selection tool allows you to paint your selection on an image. As you drag, the selection expands outward and finds defined edges of contrast to use as boundaries for the selection. In this part of the lesson, you’ll re-open the original ps0403.psd image to make a selection using the Quick Selection tool.
1 Choose File > Browse in Bridge to open Adobe Bridge. Navigate to the ps03lessons folder inside the CClessons folder. Double-click ps0403.psd to open the image.
2 Choose File > Save As. When the Save As dialog box appears, navigate to the ps03lessons folder. In the File name text field, type ps0403_workv2. Choose Photoshop from the Format drop-down menu and click Save.
3 Choose View > Fit on Screen to see the entire image in your document window.
4 Choose the Quick Selection tool (![]() ) in the Tools panel. Keep in mind that this could be hidden underneath the Magic Wand (
) in the Tools panel. Keep in mind that this could be hidden underneath the Magic Wand (![]() ) tool.
) tool.
5 Position your cursor over the snowboarder. You see a circle with a small crosshair in the center (![]() ).
).
 Only the crosshair will appear if you have the Caps Lock key depressed.
6 From the Options bar, click the Brush drop-down menu, and either slide the size slider to the right to a value of 10, or enter 10 into the Size text field.
7 Now, click and drag to paint over the snowboarder. You can release the mouse and continue painting the snowboarder; notice that you are adding to the selection.
Adding to the Selection (![]() ) is the default action that you can expect, as you can see by the selected option in the Options bar.
) is the default action that you can expect, as you can see by the selected option in the Options bar.

Initial selection with the Quick Selection tool.
If you accidently grab a part of the image that you do not want to select, press and hold the Alt key (Windows) or Option key (Mac OS), and paint over the region to deselect it.
 Adjust the Quick Selection brush size by pressing the [ (left bracket) repeatedly to reduce the selection size, or the ] (right bracket) to increase the selection size.
8 Save your selection by choosing Select > Save Selection; the Save Selection dialog box appears.
9 In the File name text field, type Boarder, and then click OK, leaving the other settings at their defaults. Now you have a saved selection. Keep in mind that if you deselect your selection, or close your saved file, you can reload your selection by choosing Select > Load Selection.
10 Choose File > Save, and then File > Close to close the file.
Making difficult selections with the Refine Edge feature
Using the Refine Edge feature can help you improve your selection of difficult items, such as fur and hair. There is still no magic tool for making a perfect selection, but the Refine Edge improvements certainly help.
1 Choose File > Browse in Bridge and open the image named ps0404.psd. Choose File > Save As. When the Save As dialog box appears, navigate to the ps03lessons folder. In the File name text field, type ps0404_work. Choose Photoshop from the Format drop-down menu and click Save. If the Photoshop Format Options dialog box appears, click OK.
2 Click and hold the Quick Selection tool, and then select the hidden Magic Wand tool (![]() ).
).
3 Click the white area off to the right of the woman; the white area becomes selected.
4 Choose Select > Inverse to invert the selection. The woman is now selected.
5 Click the Refine Edge button in the Options bar; the Refine Edge dialog box appears.
6 To get a better view of the hair selection, choose the Black & White option from the View drop-down menu. Black & White is a viewing option that you can use to see your selection better.

Change the View to Black & White to better see the selection edges.
7 Using the Radius slider, in the Edge Detection section, change the Radius value to 100. This might seem like a drastic radius selection, but you can see that this masked the hair fairly well.
The issue you now have is that by increasing the radius to get a better selection of hair, you also degraded the edge selection of the shoulder beneath the hair. You will use the Erase Refinements tool to clean up your selection.
8 Click and hold the Refine Radius tool and select the Erase Refinements tool.
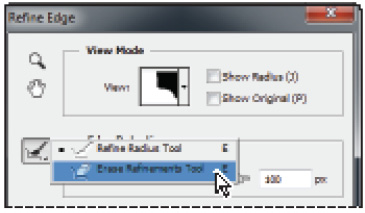
Clean up your selection using the Erase Refinements tool.
9 Position your cursor over an area in your image where you would like to clean up the selection. Note that you can increase or decrease your brush size by pressing the [ (left bracket) or ] (right bracket) keys.
10 Start painting over the areas that you do not want the refinements to take place. In this example, this is in the shoulder area, at the edge of the suit.

Refine edge went into the shoulder.
Use the Erase Refinements tool.
The result, a more accurate selection of the shoulder.
11 Select Layer Mask from the Output drop-down menu and click OK. Since you have applied a layer mask, your results are shown as a transparent selection. Save and close the file.

The completed selection.
Using Quick Mask
Earlier in this lesson, you learned how to add to and subtract from selections. Another method for modifying selections is to use Quick Mask. Rather than using selection tools to modify the selection, you’ll use the Paint Brush tool in the Quick Mask mode and paint to modify your selection. Note that when creating a mask, by default it is the inverse of a selection; it covers the unselected part of the image and protects it from any editing or manipulations you apply.
In this lesson, you will create a mask using the Quick Mask feature, save the selection, and then copy and paste the selection into another image.
1 To see the file in its completed stage, choose File > Browse in Bridge and navigate to the ps03lessons folder. Locate the file named ps0405_done.psd and double-click to open it in Photoshop. A picture with a duck and penguins appears. You can keep the file open for reference or choose File > Close now.

The completed exercise.
2 Choose File > Browse in Bridge to bring Adobe Bridge forward. Then navigate to the ps03lessons folder and open the image named ps0405.psd; an image of a duck appears.
Choose File > Save As. When the Save As dialog box appears, navigate to the ps03lessons folder. In the File name text field, type ps0405_work. Choose Photoshop from the Format drop-down menu and click Save. If the Photoshop Format Options dialog box appears, click OK.
3 Select the Lasso tool (![]() ) and make a quick (and rough) selection around the duck. Make sure that as you click and drag, creating a selection that encompasses the duck, the Lasso tool finishes where it started, creating a closed selection around the duck. Don’t worry about the accuracy of this selection, since you are going to paint the rest of the selection using Photoshop’s painting tools in the Quick Mask mode.
) and make a quick (and rough) selection around the duck. Make sure that as you click and drag, creating a selection that encompasses the duck, the Lasso tool finishes where it started, creating a closed selection around the duck. Don’t worry about the accuracy of this selection, since you are going to paint the rest of the selection using Photoshop’s painting tools in the Quick Mask mode.
4 Select the Quick Mask Mode button (![]() ) at the bottom of the Tools panel, or use the keyboard shortcut Q. Your image is now displayed with a red area (representing the mask) over areas of the image that are not part of the selection.
) at the bottom of the Tools panel, or use the keyboard shortcut Q. Your image is now displayed with a red area (representing the mask) over areas of the image that are not part of the selection.
5 Now you will use the painting tools to refine this selection. Select the Brush tool (![]() ) in the Tools panel.
) in the Tools panel.
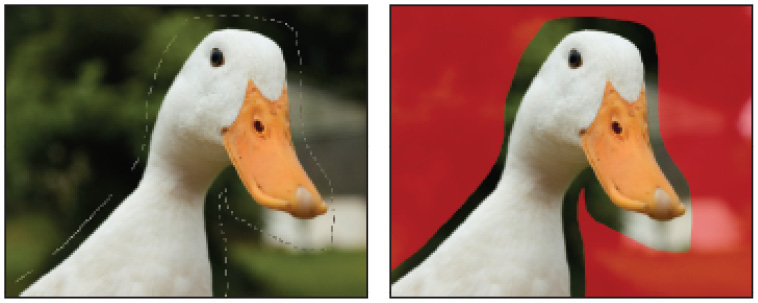
Create a rough selection using the Lasso tool.
The selection in the Quick Mask mode.
6 Click the Default Foreground and Background Colors button at the bottom of the Tools panel (![]() ), or press D on your keyboard, to return to the default foreground and background colors of black and white. Painting with black adds to the mask, essentially blocking that area of the image from any changes. Painting with white subtracts from the mask, essentially making that area of the image active and ready for changes.
), or press D on your keyboard, to return to the default foreground and background colors of black and white. Painting with black adds to the mask, essentially blocking that area of the image from any changes. Painting with white subtracts from the mask, essentially making that area of the image active and ready for changes.
As a default, the Quick Mask appears as red when you paint with black, and clear when you paint with white. The red indicates a masked area.
These tips will help you to make more accurate corrections on the mask.
|
Brush function |
Brush keyboard shortcuts |
|
Make brush size larger |
] (right bracket) |
|
Make brush size smaller |
[ (left bracket) |
|
Make brush harder |
Shift+] (right bracket) |
|
Make brush softer |
Shift+[ (left bracket) |
|
Return to default black and white colors |
D |
|
Switch foreground and background colors |
X |
7 Choose View > 100% to view the image at 100 percent. Zoom in further if necessary.
8 With black as your foreground color, start painting close to the duck, where there might be some green grass that you inadvertently included in the selection. Keep in mind that the areas where the red mask appears will not be part of the selection.

Paint the mask to make a more accurate selection.
9 If you accidentally paint into or select some of the duck, press X on your keyboard to swap the foreground and background colors, putting white in the foreground. Start painting with white, and you will see that this eliminates the mask, thereby making the regions that you paint with white part of the selection.
10 Continue painting until the selection is more accurate. When you are satisfied with your work, view the selection by clicking the Quick Mask Mode button (![]() ) at the bottom of the Tools panel, or by pressing Q on your keyboard. This exits the Quick Mask mode and displays the selection that you have created as a marquee. You can press Q to re-enter the Quick Mask mode to fine-tune the selection even further, if necessary. Keep the selection active for the next section.
) at the bottom of the Tools panel, or by pressing Q on your keyboard. This exits the Quick Mask mode and displays the selection that you have created as a marquee. You can press Q to re-enter the Quick Mask mode to fine-tune the selection even further, if necessary. Keep the selection active for the next section.
Saving selections
You spent quite some time editing the selection in the last part of this lesson. It would be a shame to lose that selection by closing your file or clicking somewhere else on your image. As mentioned earlier in this lesson, you should save your selections. In this part of the lesson, you’ll save a selection so you can close the file, reopen it, and retrieve the duck selection whenever you need it.
1 With your duck selection active, choose Select > Save Selection.
2 Type duck in the File name text field and click OK.
3 If you cannot see the Channels panel, choose Window > Channels to see that you have a saved channel (or selection) named duck. Selections that are saved with an image are known as alpha channels. Channels are not supported by all file formats. Only Photoshop, PDF, PICT, Pixar, TIFF, PSD, and Raw formats save alpha channels with the file.

Name your saved selection.
The Channels panel.
4 Choose Select > Deselect, or press Ctrl+D (Windows) or Command+D (Mac OS), to deselect the active selection.
5 Once a selection is saved, you can easily reselect it by choosing Select > Load Selection, or by Ctrl+clicking (Windows) or Command+clicking (Mac OS) on the channel in the Channels panel. The duck selection is reactivated.
 You can save multiple selections in an image, but take note: your file size will increase each time you save a new selection. When multiple selections are saved, you will need to click the Channel drop-down menu and choose which saved selection to display.
Copying and pasting a selection
There are many different methods for moving a selection from one image to another. In this lesson, you will simply copy a selection and paste it into another image.
1 Choose Edit > Copy, or use the keyboard shortcut Ctrl+C (Windows) or Command+C (Mac OS).
2 Choose File > Browse in Bridge, and navigate to the ps03lessons folder. Double-click the file named ps0406.psd to open it in Photoshop. A photograph of penguins appears.
3 Choose File > Save As. In the Save As dialog box, navigate to the ps03lessons folder and type ps0406_work in the File name text field. Leave the format set to Photoshop and click Save.
4 With the image of the penguins in front, select Edit > Paste, or use the keyboard shortcut Ctrl+V (Windows) or Command+V (Mac OS). The duck selection is placed in the penguin image on its own independent layer, making it easy to reposition.
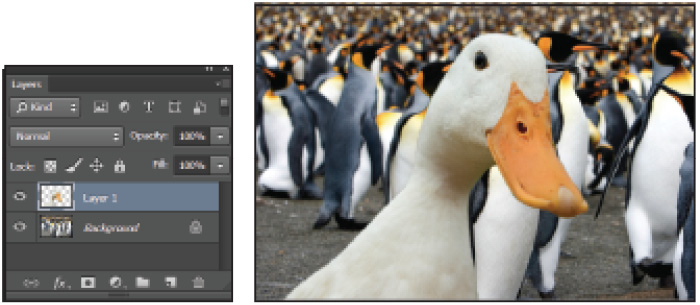
A new layer is created when the selection is pasted.
The result.
5 Select the Move Tool (![]() ) and reposition the duck so that it is flush with the bottom of the image.
) and reposition the duck so that it is flush with the bottom of the image.
6 Choose File > Save, then choose File > Close to close the file. Close any other open files without saving.
Using the Pen tool for selections
The Pen tool is the most accurate of all the selection tools in Photoshop. The selection that it creates is referred to as a path. A path utilizes points and segments to define a border. Paths are not only more accurate than other selection methods, but they are also more economical, as they do not increase file size, unlike saved channel selections. This is because paths don’t contain image data; they are simply outlines. In this section, you will learn how to make a basic path, and then use it to make a selection that you can use for adjusting an image’s tonal values.
1 Choose File > Browse in Bridge to bring Adobe Bridge forward. Then navigate to the ps03lessons folder and open image ps0407.psd.
2 Choose File > Save As. When the Save As dialog box appears, navigate to the ps03lessons folder. In the File name text field, type ps0407_work. Choose Photoshop from the Format drop-down menu and click Save. If the Photoshop Format Options dialog box appears, click OK.
This part of the exercise will guide you through the basics of using the Pen tool.
3 Select the Pen tool (![]() ) from the Tools panel.
) from the Tools panel.
4 Position the cursor over the image, and notice that an asterisk appears in the lower-right corner of the tool. This signifies that you are beginning a new path.
5 When the Pen tool is selected, the Options bar displays three path buttons in a drop-down menu: Shape layers, Paths, and Fill pixels. If the default is not already set to Paths, select it now.
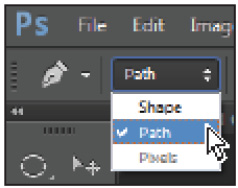
Select Paths in the Pen tool options.
6 Increase the zoom level by pressing the Ctrl+plus sign (Windows) or Command+plus sign (Mac OS) so that you can view the exercise file in the image window as large as possible. If you zoom too far in, zoom out by pressing Ctrl+minus sign (Windows) or Command+minus sign (Mac OS).
7 Place the pen tip at the first box in Example A, and click once to create the first anchor point of the path. Don’t worry if it’s not exactly on the corner; you can adjust the path later.
8 Place the pen tip at the second box on Example A and click once. Another anchor point is created, with a line connecting the first anchor point to the second.
9 Continue clicking each box in the exercise until you reach the last box on the path. If you’re having difficulties seeing the line segments between the points on your path, you can temporarily hide the Exercise layer by clicking the Visibility icon next to that layer.
10 Press and hold the Ctrl (Windows) or Command (Mac OS) key, and click the white background to deactivate the path that was just drawn to prepare for the next path.
In Example A, only straight line segments were used to draw a path; now you’ll use curved line segments.
11 Reposition the document in the window so that Example B is visible.
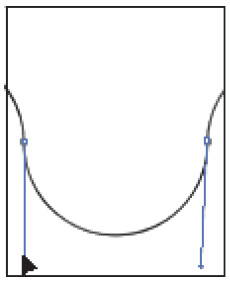
12 With the Pen tool selected, click and hold the small square (the first anchor point in the path) and drag upward to create directional handles. Directional handles control where the following path will go. Note that when you create directional handles, you should drag until the length is the same or slightly beyond the arch that you are creating.

Click and drag with the Pen tool to create directional handles.
13 Click and hold the second box in Example B, and drag the directional handle downward. Keep dragging until the path closely matches the curve of Example B. Don’t worry if it’s not exact for this part of the lesson.
14 Click the third box in Example B, and drag upward to create the next line segment. Continue this process to the end of the Example B diagram.
15 To edit the position of the points on the path, you’ll use the Direct Selection tool (![]() ). Click and hold the Path Selection tool (
). Click and hold the Path Selection tool (![]() ) and select the hidden Direct Selection tool.
) and select the hidden Direct Selection tool.
16 Position the Direct Selection tool over a path segment (the area between two anchor points) and click once; the directional handles that control that line segment are displayed. Click and drag any of the directional handles to fine-tune your line segments. You can also click directly on each anchor point to reposition them if necessary.
Adjusting the directional handles using the Direct Selection tool.
17 Choose File > Save, then choose File > Close to close the file.
Using the Pen tool to select an area of an image
1 Choose File > Browse in Bridge to bring Adobe Bridge forward. Then navigate to the ps03lessons folder and open image ps0408.psd.
2 Choose File > Save As. When the Save As dialog box appears, navigate to the ps03lessons folder. In the File name text field, type ps0408_work. Choose Photoshop PSD from the Format drop-down menu and click Save. If the Photoshop Format Options dialog box appears, click OK.
3 On the keyboard, press and hold the Ctrl (Windows) or Command (Mac OS) key; then press the plus sign (+) once to zoom in at 200 percent. You’ll see the zoom % in the lower-left corner of your workspace. Position the apple on the left side of the image that is in focus so that you can see the entire apple in the document window.
4 Select the Pen tool (![]() ) and begin drawing a path around the apple using the skills you learned in the previous exercise by clicking and dragging at the top edge of the apple and dragging a handle to the right.
) and begin drawing a path around the apple using the skills you learned in the previous exercise by clicking and dragging at the top edge of the apple and dragging a handle to the right.
5 Move the Pen tool further along the apple, and click and drag again, dragging out directional handles each time, creating curved line segments that match the shape of the apple.
6 When you get back to the area where you began the path, the Pen cursor will show a circle next to it, indicating that when you click back on that first anchor point, it will close the path.

Creating a path around the edge of the apple.
7 If the Paths panel is not visible, select Window > Paths. Path information is stored in the Paths panel. You see one path in the panel, named Work Path.
8 Double-click the name Work Path in the Paths panel. The Save Path dialog box appears. Type Apple in the File name text field and click OK.

The Paths panel with the renamed path.
9 In the Paths panel, click below the name of the path to deselect the path. To reselect the path, click the path name.
10 Now you’ll apply an adjustment to this path selection. If the Layers panel is not visible, choose Window > Layers.
11 Click and hold the Create new fill or adjustment layer button (![]() ) at the bottom of the Layers panel and select Hue/Saturation. The Properties panel becomes active and the Hue/Saturation adjustment is displayed.
) at the bottom of the Layers panel and select Hue/Saturation. The Properties panel becomes active and the Hue/Saturation adjustment is displayed.
12 Drag the Hue slider to +116 or type +116 into the Hue text field. You should see only the apple turn green.
13 A new adjustment layer is created, named Hue/Saturation 1. The pen path you created is visible to the right of the Hue/Saturation adjustment layer thumbnail and acts as a mask, blocking the adjustment from occurring outside of the path.
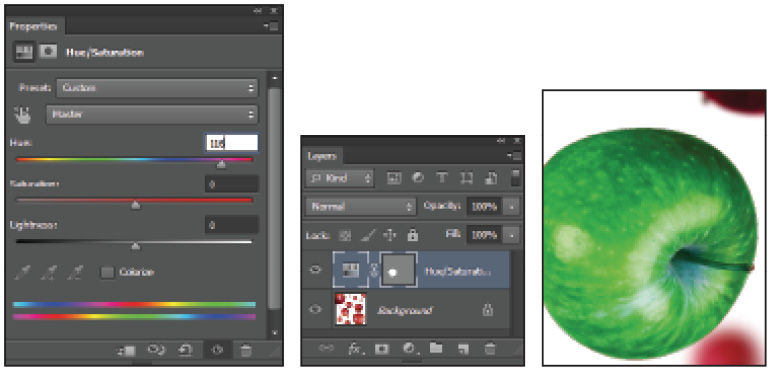
The Hue/Saturation adjustment layer.
Adjustment layer with a vector mask.
The result.
 If you want to have multiple paths in the Paths panel, deselect any active path before you begin drawing a new path. If you don’t deselect, the new path you create will be added to, and become part of, the currently active path.
14 Choose File > Save, then choose File > Close to close the file.
More Pen tool selection techniques
In the last exercise, you created a curved path. Now you’ll create a path with a combination of straight lines and curves.
1 Choose File > Browse in Bridge to bring Adobe Bridge forward. Then navigate to the ps03lessons folder and open image ps0409.psd.
Choose File > Save As. When the Save As dialog box appears, navigate to the ps03lessons folder. In the File name text field, type ps0409_work. Choose Photoshop PSD from the Format drop-down menu and click Save. If the Photoshop Format Options dialog box appears, click OK.
2 Choose View > Fit on Screen, or use the keyboard shortcut Ctrl+0 (zero) (Windows) or Command+0 (zero) (Mac OS).
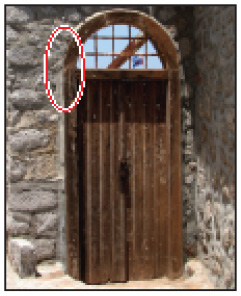
3 With the Pen tool (![]() ), create the first anchor point at the bottom-left side of the door by clicking once.
), create the first anchor point at the bottom-left side of the door by clicking once.
4 Staying on the left side of the door, click again at the location that is aligned with the top of the door frame’s crossbar.

The second path point.
5 Now, to set up the path for a curve segment around the arc of the door window, place the pen over the last anchor point. When you see a right slash next to the pen cursor, click and drag to pull a Bézier directional handle. Drag until the directional handle is even with the top horizontal bar inside the door window. The purpose of this handle is to set the direction of the curve segment that follows.
The Bézier handle.
6 To form the first curve segment, place the Pen tool cursor at the top of the arc of the door window, and then click, hold, and drag to the right until the curve forms around the left side of the window’s arc; then release the mouse button.
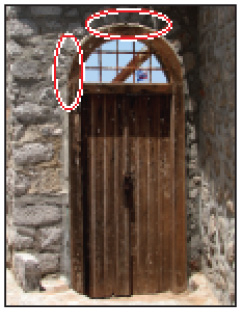
The curve and its anchor point.
7 To finish off the curve, place your cursor at the right side of the door, aligned with the top of the door frame’s crossbar. Click and drag straight down to form the remainder of the curve.
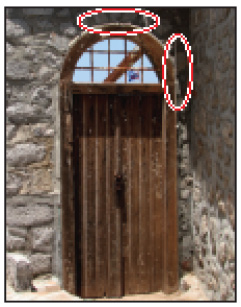
The completed curve.
8 Because the next segment is going to be a straight line and not a curve, you’ll need to remove the last handle. Position the cursor over the last anchor point; a left slash appears next to the Pen cursor. This indicates that you are positioned over an active anchor point. Click with the Alt (Windows) or Option (Mac OS) key depressed; the handle disappears.
9 Click the bottom-right side of the door to create a straight line segment.
10 To finish the path, continue to click straight line segments along the bottom of the door. If you need some help, look at the example.

The completed, closed path, selected with the Direct Selection tool.
11 Editing paths requires a different strategy when working with curved segments. With the Direct Selection tool (![]() ), select the path in the image to activate it, and then select the anchor point at the top of the door. Two direction handles appear next to the selected anchor point. You also see handles at the bottom of each respective curve segment to the left and the right. These are used for adjusting the curve.
), select the path in the image to activate it, and then select the anchor point at the top of the door. Two direction handles appear next to the selected anchor point. You also see handles at the bottom of each respective curve segment to the left and the right. These are used for adjusting the curve.
12 Select the end of one of the handles and drag it up and down to see how it affects the curve. Also drag the handle in toward and away from the anchor point. If you need to adjust any part of your path to make it more accurate, take the time to do so now.
13 Double-click the name Work Path in the Paths panel, and in the File name text field, type door. Keep the image open for the next section.
Converting a path to a selection
Paths don’t contain image data, so if you want to copy the contents of a path, you need to convert it to a selection.
1 Make sure that the file from the last exercise is still open.
2 Click the path named door in the Paths panel to make the path active.
3 At the bottom of the Paths panel, there are seven path icons next to the panel trash can:
- • Fill path with foreground color () fills the selected path with the current foreground color.

- • Stroke path with brush () is better used if you first Alt/Option+click the icon and choose the tool from the drop-down menu that includes the brush you want to stroke with.

- • Load path as a selection () makes a selection from the active path.

- • Make work path from selection () creates a path from an active selection.

- • Add a Mask () makes an active selection into a layer mask. If you have an active path, you can click this button twice to make a layer mask from the path.

- • Create new path (
 ) is used to start a new blank path when you want to create multiple paths in an image.
 - • Delete current path () deletes the selected path.

4 Choose Load path as a selection to create a selection from the door path, or press Ctrl+click (Windows) or Command+click (Mac OS) on the path in the Paths panel.
5 Choose Select > Deselect, or use the keyboard shortcut Ctrl+D (Windows) or Command+D (Mac OS), to deselect the selection.
6 Choose File > Close, without saving the document.
Self study
Take some time to work with the images in this lesson to strengthen your selection skills. For instance, you used ps0403.psd with the Lasso and Quick Selection tools. Try making different selections in the image as well as using the key commands to add and subtract from the selection border. Also experiment with Quick Mask.
Open the image named ps0410.psd Using what you have learned in this lesson, make a circular selection of the face of the clock. Use Select > Transform, if needed, to adjust the shape, and then change the Hue, or color, of the clock face to any other color.
Review
Questions
1 Which selection tool is best used when an image has areas of similar color?
2 Which key should you press and hold when adding to a selection?
3 What can you do to select the image data inside a path?
4 Which dialog box allows you to edit your selection using different masking options?
5 When does Refine Edge appear in the Options bar?
Answers
1 The Magic Wand is a good tool to use when you have areas of an image with similar colors. The Magic Wand tool selects similar colors based on the Tolerance setting in the Options bar.
2 Press and hold the Shift key to add to a selection. This works with any of the selection tools.
3 To select the pixels inside of a path, you can activate the path by Ctrl+clicking (Windows) or Command+clicking (Mac OS) on the path in the Paths panel or by clicking the Load Path as Selection button at the bottom of the Paths panel.
4 The Refine Selection dialog box allows you to select the best masking technique and to preview edge selection changes that you are making.
5 Refine Edge will only appear in the Options bar when a Selection tool is active.