Observing nature firsthand is a wonderful practice for an artist. Be sure to bring a sketchbook with you so you can make some field sketches on site—these quick studies can be invaluable reference tools when you return to your studio. If you bring your camera along, you have the option of observing and recording a subject from several different angles. You can also snap various shots of the entire setting, as well as some closeups of the details. Give yourself as much information to work with as you can. When you return to the studio, you can compile your photos—as well as drawings, magazine clippings, and other static references—into a permanent file for future use (also called an “artist’s morgue”). In this example, Debra Yaun portrays a colorful floral scene using a photo from her reference file.

Using Photos Many artists prefer to draw on location, but I almost always work from my own photographs. Working from photos allows me to study every detail of my subject closely and to render it as realistically as possible.

Step One I use a grid method to draw the bell and flowers to make sure I transfer the proportions correctly. I draw a grid onto a small piece of tracing paper and place it over the photo; then I draw a proportionate grid on my drawing paper and copy the lines from each square. I simplify the drawing by leaving out a few flowers and vines and omit the wire that wraps around the post. Then I apply black colored pencil to the darkest shadows of the bell and post and add a heavy layer of black to the center of the bell.

Step Two I apply a light layer of black to the background with small, circular strokes. Referring to my photo, I add a light layer of cobalt blue to the bell and the metal stand (over the black) to create a cool gray. I draw the blue out past the black onto the white paper here and there, leaving some white areas to indicate highlights. I apply blue to the darker areas of the post to “push” it back into shadows. I use vertical strokes to add a light layer of dark umber over the whole post, and then I lightly apply canary yellow to the bottom of the post.

Step Three I add cobalt blue over the center and upper portions of the background, using light, circular strokes. Then I add black to the lower part of the background and blend it in with a blending stump. I want to simplify this area of the background to focus the attention on the flowering vine. At the bottom of the paper, I add a layer of blue and then dark green to the background to vaguely represent foliage.
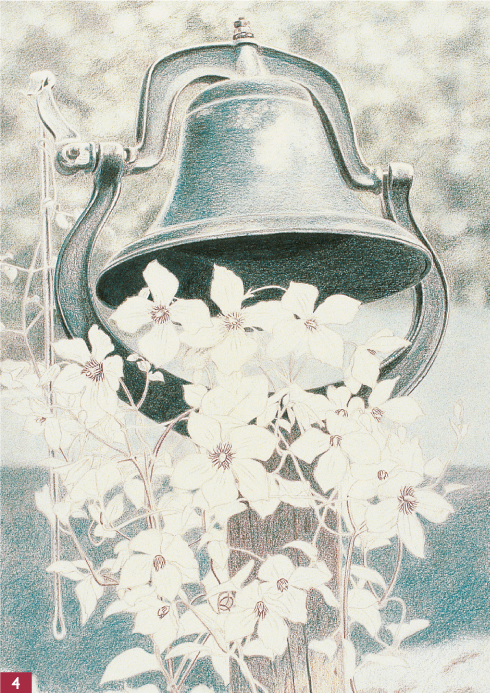
Step Four Next I layer dark umber in a few areas over the blue in the lower background, also outlining the centers of the flowers and the larger stems. Then I add a little cobalt blue shading to a few leaves and the rope, and I layer dark green over the background at the top. I apply dark umber to the nuts and bolts on top of the bell and handle and soften the light blue area in the middle of the bell with a blending stump. Pressing firmly, I give the bottom of the background a layer of blue and smooth it with a blending stump. Then I layer white over the blue in the middle background, and I layer canary yellow over the existing colors in the upper background to brighten the green values. I lightly add black to the flowers, indicating the lines in the petals and the shadows. Next I add dark green to the background at the bottom and blend it in with a blending stump. Then I layer blue over some areas of the background to build up more color.

Step Five I sharpen my dark green pencil and add some detail to the leaves. Using medium pressure, I apply dark umber to more stems and layer magenta over the black lines and the shading on the petals. I leave the petal highlights white, but I add a little black to a few of the petals to darken them. I don’t have the exact color of the petals in the limited palette I’m using here, but I can create it with layers of magenta, blue, and black. I use small circular strokes of black over the background at the bottom to darken it, and I add black to the bellpull to give it more dimension.

Step Six Next I add canary yellow to some of the leaves, and I darken parts of the background with small circular strokes of cobalt blue. As I add more blue to the magenta flowers, I create a darker purple on the petals. Then I darken some of the leaves with dark green, apply yellow to the center of the flowers, and add more magenta to the petals. I add another layer of black and one of blue to the background, pressing firmly to blend all the layers. I apply a little more black to the bell handle and stand for more contrast. Finally I use white to soften the edges on the petals and buds.