
Chapter 9
Pulling the Key
Solutions for Chroma Key on a Deadline and a Budget
On the Spot
The chroma key wall has come to be used for much more than just the weather. With improvements in both keying technology and cameras, it is possible to get professional results on tighter budgets. However, better tools don't mean much if you don't know how to use them!
This chapter offers tips on both the acquisition of footage as well as using Keylight and other plug-ins to achieve great keys inside of After Effects. Whether it’s for a broadcast spot or the latest promo, proper use of chroma key technology can significantly add to your graphics and design capabilities.
Green with DV

Everyone has his or her own beliefs when it comes to keying. Here’s one more… If shooting DV, then definitely go green. The DV compression noise is present more in the blue channel, making your edges harder to get clean, than with a blue-screen. In DV, the green channel also has nearly twice as much information as the blue channel, as it is carried in the luminance stream.
By Jayse Hansen, http://www.xeler8r.com
When Your Camera is Fighting You

Often cameras, especially prosumer rigs, will have auto features turned on that can make keying much more difficult. Be sure to turn off Auto exposure, auto-white balance and auto-focus. If any of these are left on, this means the green you’re trying to key will constantly be changing as your model moves. Even if you’ve hired a professional videographer, don’t make assumptions. Double check that he or she has turned these things off or you will spend hours trying to fix it.
While you’re in the setup menu, be sure to turn off Sharpening. Most consumer cameras have a sharpening filter that is turned on by default. This causes your edges to increase in contrast and destroys subtle edge detail. Turn this off.
By Jayse Hansen, http://www.xeler8r.com.
Chroma Smoothing DV Footage
By its nature, the DV format is heavily compressed. This compression introduces color artifacts, which can ruin the color in that carefully lit green screen. It can also cause major problems around the edges of your talent.
Solution #1:

Don’t shoot DV. Go for beta or even DVCPRO50 if at all possible to avoid DV artifacting.
Solution #2:
If you must use DV, you’ll need to do some chroma smoothing.
- Add an adjustment layer above your blue/ greenscreen footage.
- Add a slight Gaussian Blur to the adjustment layer (two to four pixels).
- Change the adjustment layer’s blending mode to Color.
- Pre-compose the footage and adjustment layers.
- Proceed with your key.
Background Check

When keying, it can be difficult to judge the quality of a key when it’s composited over a backdrop. Detail in the background might hide flaws in the key. You can view the key more accurately by temporarily replacing the background layer with a garishly colored solid. Make the solid color the opposite color from the original screen color. For example, if the original image was shot against a green screen, try laying it over a red solid. Be sure to check the key by moving the current time indicator to check the key at a few points in time.
The More Mattes the Merrier
Sometimes one keying effect isn’t enough. For instance, you might need one effect to deal with solid foreground objects and another effect for edge details. If this is the case, use your keying effects to generate grayscale mattes, not color images with missing backgrounds.

- Use multiple copies of the footage and generate the mattes (this can often be accomplished within the effect by changing what you view).
- Then combine all the mattes into a single matte, via a pre-compose.
- Combine separate mattes using layer-blending modes. Try the screen and multiply modes, which will combine blacks and whites respectively.
- Use the pre-comp as a track matte for the original color image.

Luminance "Keying"
If you’re trying to knock out a black or white background, there may be a better solution than keying: layer blend modes. If the background is black, try using the Screen mode. This will allow anything lighter from an underlying layer to show through the black. If the background is white, try the multiply mode, which will allow anything darker on an underlying layer to show through the white.
Magenta Reduces "Separation Anxiety"

If you’re going to be keying on green, consider adding a Magenta “rim” light. This is especially useful if you don’t have a lot of distance between your model and your screen. Add a rim light behind her. It can either be hidden directly behind her on a light stand or chair, or placed above and behind her. A default white light will suffice, but even better is one with a magenta gel over it. Why? Because the magenta is the exact opposite of the green you’re trying to key. Separation is greatly enhanced.
By Jayse Hansen, http://www.xeler8r.com
Getting the Best Key

When using any keyer, you really need to switch your layers to Best Quality. It’s also not a bad idea to view the comp window at Full resolution. Keying involves the finest detail of pixel manipulation. While it will slow you down a bit, you’ll get much better results and color samples when working with higher quality view settings.
Go Shallow when Shooting

When you're going to shoot chroma key, be sure to do so with shallow depth of field. There are a number of ways to do this. If you can change your aperture settings, an aperture of 2.Of is much better than 22f. This has to do with depth of field.
You want the background as blurry as you can get it so that wrinkles, seams and hot spots blend away. Also keep your model and your camera as far away from the screen as possible. Even if it means non-green edges are showing in the shot. You can crop these out later.
You can also ensure shallow depth of field by moving your camera away from your model and zooming in on him or her. Just make sure you only use your optical zoom and not your digital zoom. (The latter will be interpolated and result in horrible edge detail.)
By Jayse Hansen, http://www.xeler8r.com
More Shooting Tips
- Turn down exposure to reveal hotspots: We've heard lots of odd ways to reveal your hotspots when setting up your screen lighting. We've found the best way is to simply set the exposure of your camera down and look through the monitor. Your hotspots will be glaring at you.
- Light with two softboxes, or two fluorescent lights: These are lights for the screen only. These lights are separate from the lights you use for your model. You can fix a lot with even lighting by two identical soft boxes or even two or three long fluorescent light fixtures. Soft boxes are incredible, yet expensive. Shop-light fluorescent lighting fixtures are incredibly cheap; available at any hardware store, burn cool, and work great. Their only drawback is that they can sometimes cause a subtle hum in your audio.
- void fast movement: Quality keyers have gotten a lot better about handling motion blur. But if you can avoid it. Do so. This is typically where the "give-away" happens. This is where a good key can fall apart, especially in DV footage.
- o Progressive: Fields definitely get in the way of a good key. If your camera shoots progressive, take advantage of it.

Keylight: What the...?

What is Keylight? Keylight is The Foundry’s powerful chroma keying plug-in that comes free with the Production Bundle versions of After Effects 6. It won the Academy Award for Technical Excellence, and it’s a one-stop-shop for keying, despill and color correction.
When you apply Keylight to a layer and choose a color to key out, two things happen: Keylight erases all the pixels that match the key color and it also removes traces of that color (spill) from the other pixels. So if you key out green, all green (or near-green) pixels will turn invisible, and the rest of the pixels will have their greenness reduced.
By Marcus Geduld
Keylight: Where the...?

Okay, you’ve installed AE 6.0 or 6.5, imported a green screen shot, added it to the timeline and chosen Effect>Keying from the menu, only to find that you don’t have the Keylight plug-in installed. Unfortunately, this gem of a keyer doesn’t install automatically with After Effects. Not to worry, though. Just pop the AE6 installation CD back into your CD-drive and find Keylight in its own folder with its own installer. Also included in this folder is a Keylight manual in Adobe Acrobat format. While you are there, be sure to install the Digital Anarchy 3D Assistants as well.
By Marcus Geduld
Keylight: Pick Your Color Wisely

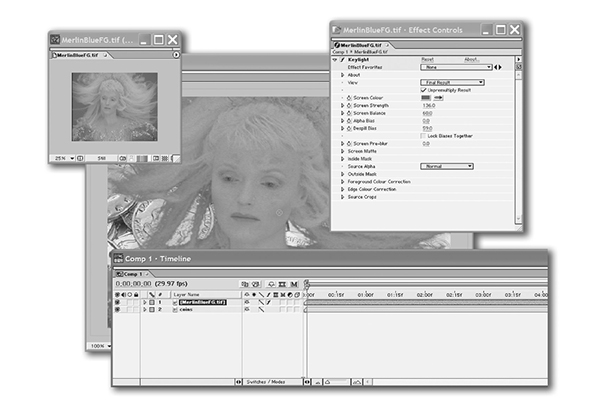
The first thing you should do after applying Keylight is to choose the Screen Color (the color that will be removed and despilled). To do so, click the eyedropper by Screen Color, and then click a background color in the image.
Note that you can’t add to the Screen Color by repeatedly clicking in different parts of the image, so just click once on a pixel that is representative of the general color in the background. If too much background is still visible (or too much is gone), adjust the Screen Strength parameter.
By Marcus Geduld
Keylight: Seeing in Black and White

If you switch the View to Status, all pixels will display as black, white or gray. Black pixels are completely transparent. White pixels are completely opaque. Gray pixels are see-through (partially transparent/partially opaque). This view allows you to easily see problems in the matte. In general, it's good to have some gray pixels around the edge of the foreground (so that hairs and other semi-transparent elements can blend into the background), but the background should be solid black and the foreground should be solid white.
By Marcus Geduld
Keylight: You Don't Need a PhD

With nearly 60 parameters, you could easily confuse Keylight with the cockpit of a 747. Not to worry, there are only a few main controls you’ll need to adjust. The rest are for fine-tuning.
After selecting the color to key out (Screen Color), adjust Screen Strength until all of the background is gone and foreground is completely visible.
To see the matte Keylight is creating, choose Screen Matte from the View parameter dropdown (when you’re finished looking at the Matte, remember to set the View parameter back to Final Result).
If there’s too much spill (too much of the background color in the foreground), increase Despill Bias until you’ve fixed the problem. You may notice that as you remove more spill, the foreground image starts to become transparent. This is because Despill Bias, which controls spill removal, and Alpha Bias, which controls the transparency of the foreground, are locked together by default. If you uncheck Lock Biases Together, you can despill without knocking out the foreground.
By Marcus Geduld
Keylight: Holey Matte!

If you twirl open the triangle by Screen Matte, you’ll find a slew of controls that will help you fix matte problems. While making adjustments, you may want to toggle back and forth between Screen Matte view and Final Result view.
Clip Black makes the blacks blacker; Clip White makes the whites whiter. Sometimes when you adjust these controls, you’ll find that you’ll ruin the edges of your foreground. If you do, use Clip Rollback (a sort of rewind function) to undo a little of the clipping and bring the edges back.
Screen Despot White removes tiny white specks that are inside the generally black background; Screen Despot Black removes tiny black specks that are inside the generally white foreground.
Your end goal, as you view the Screen Matte, should be to have an all black background and an all white foreground, with a little bit of gray around its edges. Wispy elements, like smoke, should be gray.
By Marcus Geduld
Keylight: Ring Around The Color

In addition to adjusting Saturation, Contrast and Brightness, you can also adjust Hues for both the Edge and the Foreground. You can either adjust hues numerically, by scrubbing the Hue slider (under Color Balancing), or you can twirl open Color Balance Wheel and click anywhere on the wheel to pick a new color. The foreground (or edge) will become tinted with the color you pick.
If you adjust the slider (rather than the color wheel), nothing will happen at first, because the Sat value is set to zero by default, meaning totally desaturated (no color). You’ll have to raise the Sat value before you can add a hue tint.
By Marcus Geduld
Keylight: Color Me Corrected

After you’ve knocked out the background, you’ll usually need to adjust the foreground’s colors so that they match the colors of the new background plate. Keylight has two groups of color-adjustment parameters: Foreground Color Correction and Edge Color Correction.
- “Foreground” means the majority of the person or object left behind after Keylight has removed the background.
- “Edge” refers a thin band of pixels running around the person or object. These edge pixels often require special treatment because (a) they will usually contain the majority of spill from the knocked out background, and (b) they are the pixels that will be touching the composited pixels in the new background, so they’re very important when you’re trying to create a believable blend between foreground and background images.
- To adjust how thick a band Keylight thinks of as the edge, adjust the Edge Grow parameter while displaying the Color Correction Edges view.
By Marcus Geduld
Keylight: Getting a Little Edgy

The Edge Hardness and Edge Softness parameters are not opposites. Edge Hardness controls how much the edge color correction merges into main foreground color correction, whereas Edge Softness blurs the edges.
By Marcus Geduld
Keylight: 90 Degrees of Separation

Most AE plug-ins view color as existing on a color wheel, with red at the top and green at the bottom. You can specify colors on this wheel in degrees: zero degrees = red, 180 degrees = green, and 360 degrees equals red, because on any circle, zero and 360 degrees are in the same spot.
The Hue sliders in Keylight work the same way. Since the default slider value is zero, the default hue is red. If you scrub the slider to 180, the hue will be green. (Remember to increase Sat if you want to see Hue having any effect).
If you use the color wheel, note that it’s been rotated 90 degrees clockwise. So red is facing East (at 90 degrees, whereas normally it would be North, at 0 degrees).
By Marcus Geduld
Click Close... Mask Far

When keying... remember, you don’t usually need to key the entire screen out. Instead, you only need to get the areas closest to your subjects. Always click as close to the hair as you can when trying to set your key color. Likewise, if your edges are falling off, you can always use a garbage matte or mask to get the further edges.
Don't Scrub So Hard!

When you adjust properties in keying plug-ins, you need an easy hand. Slight over-adjustments can destroy edge detail or tint the image an unrealistic color. But if you hold down the Command (Control key) while you scrub any property value, you'll be able to adjust that property in tiny, subtle increments. This trick works for any property value (in the Timeline or in Effect Controls), not just those on keying effects.
Keylight: Who Was That Masked Man?
To fix holes in the foreground and opaque patches in the background, you can either use the Clip Black and Clip White parameters, or you can use mask—the type of masks you draw with the pen tools. You should only use masks if your foreground is pretty static, or you’ll have to animate the mask shape.

If you use masks, make sure you change their blend modes to None in the Timeline, because you don’t want the masks to actually act as normal masks; you just want them to be used by the Keylight plug-in.
To fix holes in the foreground, draw a mask just within the boundaries of the foreground object. Then, assuming this is Mask 1, select Mask 1 for Keylight’s Inside Mask parameter.
You can eliminate opaque areas in the background (rigs or boom mics) by drawing a mask around them and selecting this mask in Keylight’s Outside Mask parameter.
By Marcus Geduld