Chapter 3 Importing Data
Your first step in using SAS to summarize and analyze data is to create a SAS data set. If your data is available electronically, SAS can almost certainly import it.
SAS provides many features for reading external data files, some of which differ based on your operating system. This chapter discusses a few basic features. If your data cannot be imported using the techniques in this chapter, then see SAS documentation or other references for more information. (See Appendix 1, “Further Reading,” for suggestions.)
If your data is in an electronic form, it’s worth the extra time to investigate ways to import it, instead of entering the data all over again. Importing data improves the overall data quality because quality control checks that were previously performed on the data do not need to be performed again.
This chapter discusses:
- opening an existing SAS data set
- reading data from an existing text file
- importing Microsoft Excel spreadsheets
- using the Import Wizard on a PC
Opening an Existing SAS Data Set
Reading Data from an Existing Text File
Importing Microsoft Excel Spreadsheets
Using the Import Wizard on a PC
Opening an Existing SAS Data Set
When you create a data set using the programs in this book, SAS creates a temporary data set and stores it in the Work library. To access this data set in a future SAS session, you would need to recreate it.
For your own data, you probably want to create a permanent data set that you can access in future SAS sessions. SAS stores your data set in a SAS library. This section discusses the simplest approach for accessing saved data sets.
When your data set is stored in a SAS library, you need to tell SAS where this library is located. This requirement is true for all operating systems. The easiest approach is to assign a SAS library reference (libref), and then associate the libref with the physical file location for the existing data set. The existing data set must be located in an existing directory. Also, you cannot use the LIBNAME statement to create file directories or SAS data sets. After assigning the libref, use the LIBNAME statement to access the existing SAS data set for any procedure.
The following statements access the saved bodyfat data, and then print it:
libname mydata 'c:My DocumentsSASdata';
proc print data=mydata.bodyfat;
run;
When you assign a libref, SAS prints a note to the log, but it does not create any printed output. When you access a permanent data set, you use a two-level name. The first part of the name provides the libref, and the second part of the name identifies the data set. SAS requires that the two parts of the name be separated with a period. Figure 3.1 shows the first few lines of the printed bodyfat data. (See Figure 1.2 for the full data set.)

The general form of the LIBNAME statement is shown below:
LIBNAME libref 'SAS-data-library-location';
libref is a nickname (library reference) for the SAS library. The libref can be up to eight characters long. SAS reserves some librefs, so do not use Sasuser, Work, Sasmsg, or Sashelp.
SAS-data-library-location identifies the physical file location for the saved SAS data sets. Enclose the SAS-data-library-location in single quotation marks. The text for the physical file location depends on your operating system.
To use the libref to access a data set with a SAS procedure:
PROC PRINT DATA=libref.data-set-name;
libref is defined above.
data-set-name is the name of a SAS data set.
The period between libref and data-set-name is required.
While this example uses PROC PRINT, you can use the same approach with every procedure in this book.
Similar to accessing an existing data set with a LIBNAME statement, you use a LIBNAME statement and a two-level name in a DATA step to create a permanent SAS data set. For example, suppose you use the LIBNAME statement previously shown. Then, the DATA statement below creates a data set named tickets in the libref mydata:
data mydata.tickets;
After completing the statements for the DATA step, SAS saves the tickets data set as a permanent data set.
Reading Data from an Existing Text File
Suppose your data lines—and only the data lines—are already stored in a plain text file. This type of file is sometimes referred to as an ASCII text file. On a PC, this type of file typically has a file extension of .txt. You can use the SAS INFILE statement to read the data.
If your text file also includes the variable names, then you can use PROC IMPORT (discussed in the next section). On a PC, you can also use the SAS Import Wizard (discussed later in this chapter).
The INFILE statement identifies the file that contains the data lines. Place the INFILE statement between the DATA statement (which names the data set) and the INPUT statement (which explains how to read the information in the file). Suppose the speeding ticket data is stored in the ticket.txt file in the c:example directory on your PC. Here is the DATA step:
data tickets;
infile 'c:example icket.txt';
input state $ amount @@ ;
run;
When you use the INFILE statement, then neither the DATALINES statement nor the null statement (which is a semicolon on a line by itself) is needed.
You can use the various forms of the INPUT statement with the INFILE statement. Be sure the information in the INPUT statement matches the appearance of the data in the external text file.
The list below shows sample INFILE statements for several operating systems:
PC
INFILE 'c:example icket.txt';
UNIX
INFILE 'usr/yourid/example/ticket.dat';
OpenVMS
INFILE '[yourid.data]ticket.dat';
z/OS
INFILE 'yourid.ticket.dat';
To complete the statements, the italic text should be replaced with your user ID.
The general form of the INFILE statement is shown below:
INFILE 'file-name';
file-name is the name of the file that contains the data. Enclose file-name in single quotation marks.
Importing Microsoft Excel Spreadsheets
SAS provides multiple features for importing external data such as Microsoft Excel spreadsheets. The simplest approach is to use PROC IMPORT, where you specify the location of the existing Excel file and the name of the SAS data set that you want to create. This procedure is available for Windows, UNIX, and OpenVMS systems. Suppose the speeding ticket data is stored in an Excel file. The statements below import the Excel file and create a temporary SAS data set:
proc import datafile="c:example icket.xls"
dbms=xls
out=tickets;
run;
The DATAFILE= option specifies the complete physical location for the Excel spreadsheet, which must be enclosed in double quotation marks. The DBMS=XLS option specifies the file type as an Excel file. The OUT= option specifies the name of the SAS data set. SAS creates the temporary data set and prints a note in the log. SAS automatically reads the variable names from the first row in the Excel spreadsheet.
To create a permanent SAS data set, you can use similar statements. First, use a LIBNAME statement to specify the location for the saved SAS data set. Second, use the two-level SAS name in the OUT= option in PROC IMPORT. The statements below show an example of creating a permanent SAS data set from an imported Excel file. SAS creates a permanent data set and prints a note in the log.
libname mydata 'c:My DocumentsSASdata';
proc import datafile="c:exampleicket.xls"
dbms=xls
out=mydata.tickets;
run;
When you create a permanent SAS data set, you use a two-level name. See “Opening an Existing SAS Data Set” earlier in the chapter for more discussion on data set names and the LIBNAME statement.
SAS provides many choices for the DBMS= option. With these other choices, you can import many other types of files using the same approach as shown above. The list below gives a partial set of values for the DBMS= option. See SAS documentation for a complete list.
CSV
Comma-separated-values files with a file extension of .csv.
TAB
Tab-delimited files with a file extension of .txt.
SAV
SPSS files
JMP
JMP files
XLS
Excel files with a file extension of .xls.
EXCEL
Most types of Excel files, including older versions of Excel and .xlsx files. Reading .xlsx files requires the second maintenance release after SAS 9.2, or later
The general form of importing from Excel and creating a temporary data set is shown below:
PROC IMPORT DATAFILE="data-location"
DBMS=XLS
OUT=data-set-name;
data-location identifies the location of the Excel file.
data-set-name is the name of the data set that you want to create.
To create a permanent SAS data set, use a LIBNAME statement, and then use a two-level name for the data-set-name.
Using the Import Wizard on a PC
On the PC, SAS includes an Import Wizard that guides you through the tasks for importing external files. You can use this wizard when you use SAS in the windowing environment. This section shows an example of importing the tickets data, which is saved in an Excel file.
1. Select File→Import Data from the menu bar. SAS shows the first page of the Import Wizard as shown below:

The wizard automatically selects Standard data source, and automatically chooses Microsoft Excel files. Select the drop-down menu to view other standard data sources as shown below:

If none of these data sources meets your needs, you can select User-defined formats. This selection starts the SAS External File Interface (EFI) feature, which this book does not discuss.
2. Click Next. On the next page, click Browse, and then select the location of your external data file. After navigating to the location, click Open. Or, you can simply type the location into the blank field. After you provide the location, SAS displays it in the field as shown below. Click OK.

The next page automatically selects the first sheet in the Excel workbook, shown in the display below as Sheet1$. If you named the spreadsheet in Excel, use the drop-down menu and select the name you want.
Click Options to see how SAS will import your data. The following display shows the options that are automatically selected by SAS. If you have a variable that contains characters for some observations and numbers for other observations, you should select the option for conversion. (This option is not selected below.) Otherwise, the observations with numeric values will convert to missing variables.
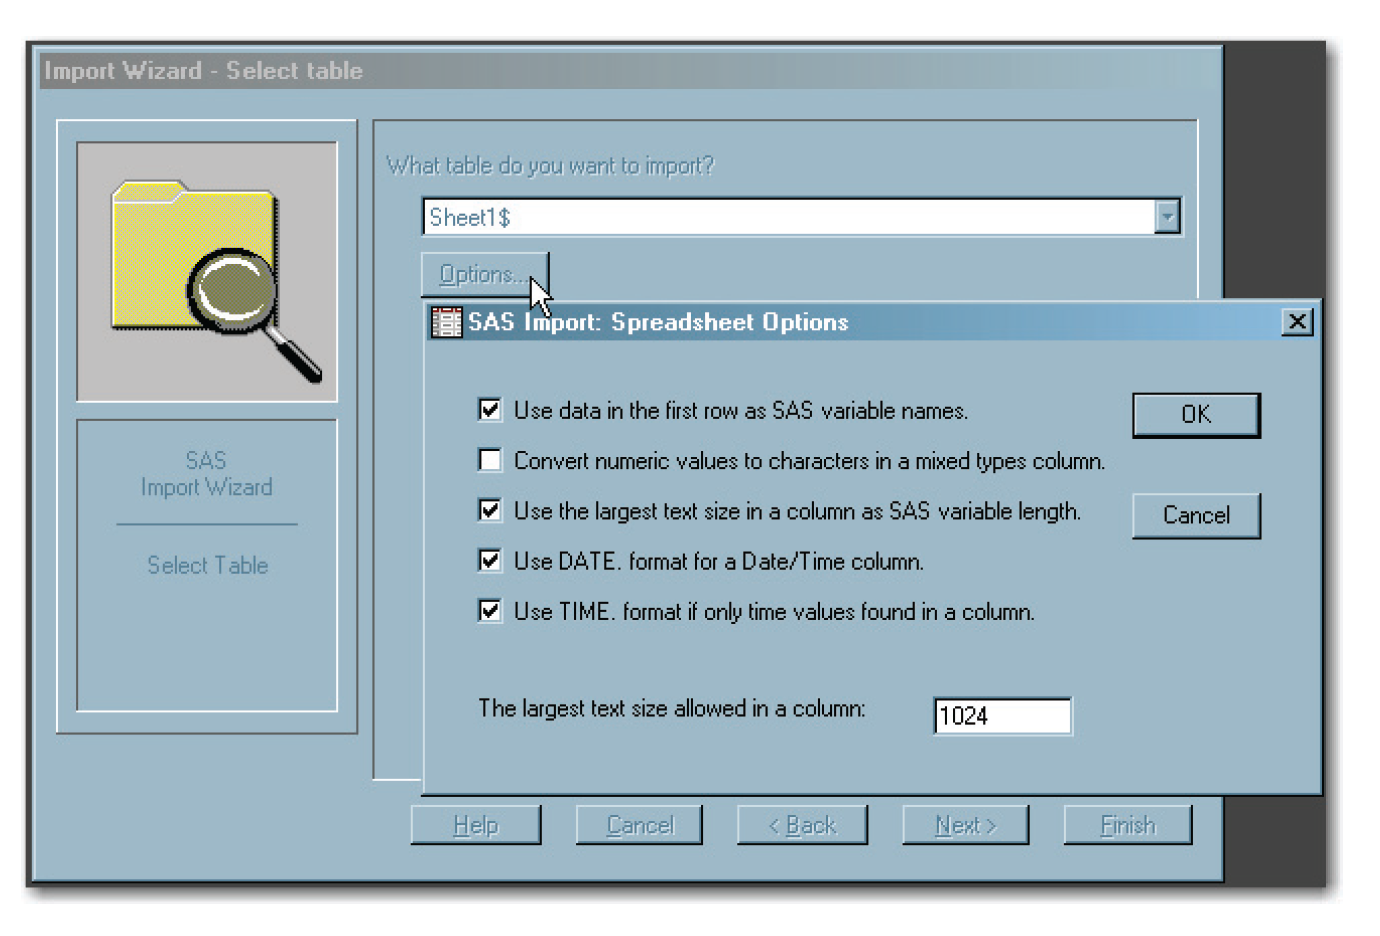
In general, accept the options that SAS automatically selects unless you know that these options will not work for your data. Click OK to close the Spreadsheet Options window.
3. Click Next.
4. The next page displays the SAS library and data set name for your new data set. SAS automatically chooses the WORK library. (See “Opening an Existing SAS Data Set” earlier in this chapter.) If you want to permanently save the new data set, then select the drop-down menu in the Library field and select a library. (To do this, you must have already defined the library with a LIBNAME statement.)
SAS does not automatically give your data set a name. Enter the name in the Member field. Although the drop-down menu lists available data sets (either in the WORK library or another library, whichever library is selected), using the menu to select a data set name will overwrite the existing data set. The safest approach is to enter a new name, such as TICKETS2, as shown below:

5. Click Next.
6. The next page provides you with an option to save the PROC IMPORT program that SAS creates behind the scenes. You can simply click Finish, and SAS imports the data.
However, if you do want to save the program, click Browse and navigate to the location where you want to save the program. Click Save. SAS displays the location as shown below:

Optionally, you can select the check box for Replace file if it exists. This approach can be useful if you previously tried to import the data and were unsuccessful. For example, you might not have selected the option for conversion (discussed in step 2), and you discover that you do need to select this option. By replacing the program if it exists, you do not need to keep the old, incorrect version of the program.
7. After importing has completed, check the SAS log. The log displays a note informing you that the data set was successfully created. You might want to print your data set to check it before performing any analyses.
While using the Import Wizard, you can click Back to return to the previous page, or you can click Cancel to exit the wizard.
As mentioned at the beginning of this chapter, SAS can read almost any data file from almost any source. This chapter discusses only the basics. Providing full details for every operating system would require a book by itself.
If the tools in this chapter do not help you read your data, see Appendix 1, “Further Reading,” for references. If you use a PC, you might want to start with the SAS documentation for DDE (Dynamic Data Exchange). If you use SAS in the windowing environment mode, you might want to start with documentation for EFI. The simplest way to access EFI is to select User-defined formats in the SAS Import Wizard. Then, you identify the external file location and the location of your new data set. SAS guides you through the tasks of identifying the variables, and specifying the type (character or numeric) and location for each variable.
- If your data exists in an electronic format, investigate ways to import it into SAS instead of entering the data all over again.
- To import an existing SAS data set, use a LIBNAME statement to identify the physical file location of the data set. Then, use the two-level name in SAS procedures.
- To read data from an existing text file, the simplest approach is to use an INFILE statement to identify the file location. Then, the INFILE statement replaces the DATALINES and null statements in the DATA step. You can also use PROC IMPORT if you use SAS on Windows, UNIX, or OpenVMS.
- To import a Microsoft Excel spreadsheet into SAS on Windows, UNIX, and OpenVMS, use PROC IMPORT.
- On a PC, you can use the SAS Import Wizard, which guides you through the tasks for importing external files.
To assign a library reference
LIBNAME libref 'SAS-data-library-location';
libref
is a nickname (library reference) for the SAS library. The libref can be up to eight characters long. SAS reserves some librefs, so do not use Sasuser, Work, Sasmsg, or Sashelp.
SAS-data-library-location
identifies the physical file location for the saved SAS data sets. Enclose the SAS-data-library-location in single quotation marks. The text for the physical file location depends on your operating system.
To use the libref to access a data set with a SAS procedure
PROC PRINT DATA=libref.data-set-name;
libref
is defined above.
data-set-name
is the name of a SAS data set.
The period between libref and data-set-name is required.
While this example uses PROC PRINT, you can use the same approach with every procedure in this book.
To create a permanent SAS data set
First, use a LIBNAME statement to identify the SAS library. Then, use a two-level name in the DATA statement as shown below:
DATA libref.data-set-name;
After completing the statements for the DATA step, SAS saves the data set as a permanent data set.
To identify an existing text file
INFILE 'file-name';
file-name
is the name of the file that contains the data. Enclose the file-name in single quotation marks.
To import from Excel and create a temporary data set
PROC IMPORT DATAFILE="data-location"
DBMS=XLS
OUT=data-set-name;
data-location
identifies the location of the Excel file.
data-set-name
is the name of the data set that you want to create.
To create a permanent SAS data set, use a LIBNAME statement, and then use a two-level name for the data-set-name.