

Chapter 10
SAS Information Delivery Portal
Bringing Everything Together
10.1 Getting Started
10.1.1 Quick Tour
10.1.2 Prerequisites
10.2 Understanding Portlets
10.2.1 Using Report Portlets
10.2.2 Using a Stored Process Portlet
10.2.3 Using a Collection Portlet
10.2.4 Using the URL Portlet
10.2.5 Using a Navigator Portlet
10.2.6 Using a Dashboard Portlet
10.2.7 Controlling Portlets
10.3 Creating Your First Portal Page
10.3.1 Adding a New Portal Page
10.3.2 Adding Previously Created Portlets
10.3.3 Adding a Report Portlet
10.4 Enhancing Your Portal
10.4.1 Changing the Layout
10.4.2 Adjusting the Portlet Size
10.4.3 Changing the Page Tab Order
10.5 Tips and Tricks
10.5.1 Adding New Content
10.5.2 Adding Bookmarks
10.6 SAS Administrator Tasks
10.6.1 Establishing Group Administrators
10.6.2 Accessing the Portal without Logging In
Chapter 10
SAS Information Delivery Portal
Bringing Everything Together
Every organization has its own focus and goals. As a result, one-size-fits-all reporting and data presentation tools do little to serve those organizations. The organization must decide what data is important, how data is reported, and how it is shared. Some organizations might have so many items to analyze that one single reporting technique will not suffice, while others might have a sole purpose but find it useful to understand all facets of the data via different techniques.
SAS Information Delivery Portal provides each organization with the flexibility to group, organize, and display the data and reporting in a single location. Using the portal, you can easily combine SAS reports, dashboards, stored process results, information maps, and even other Web-based applications in one location. Additionally, the security can also be addressed to ensure that the data is secure.
Many organizations define content administrators for each department to establish portal pages with specific reports and content access. Individuals might create personalized pages or portlets. These pages and portlets are then shared within the individuals’ group or the entire organization.
In this chapter, you will learn how to set up a portal, create portlets, create custom layouts, and add customer content to the portlets.
10.1 Getting Started
As you begin learning about this tool, the following sections contain a review of the tool and what you need to get started.
10.1.1 Quick Tour
The following figure contains an example portal and explains the key display elements.

Figure 10.1-1 SAS Information Delivery Portal overview
1 |
Use the toolbar to add and customize pages, manage portlets, and control the page appearance. |
2 |
Use the navigation bar to move between the portal pages. Each tab represents a portal page. Some content is preset by the content administrator. You can also build your own pages and add content based on your needs. |
3 |
Use the portal pages to review the portlet contents. Portlets allow you to display multiple items on a page. In this example, there are three different portlets that show various data views. |
10.1.2 Prerequisites
SAS Information Delivery Portal is Web-based and has a URL address similar to the following link. This link is case sensitive.
http://server name:port number/SASPortal
Your SAS administrator can give you the specific server address. If you are creating or viewing reports, you must have a user ID and password identified in the SAS system. Your profile determines which data you are allowed to view or use. If your organization needs to allow access to users who do not have access to the SAS system, refer to Section 10.6.2, “Accessing the Portal without Logging In.”
 The portal
supports only one user session per browser instance. Different portal users can
have different sessions in separate browser instances, but not in separate tabs
in the same browser instance.
The portal
supports only one user session per browser instance. Different portal users can
have different sessions in separate browser instances, but not in separate tabs
in the same browser instance.
10.2 Understanding Portlets
Each portal page contains one or more portlets. Each portlet allows you to add specific content to your page. Some portlets show a report from SAS Web Report Studio, while others might just be a list of information maps or external links. The following topics describe the more common portlets.
10.2.1 Using Report Portlets
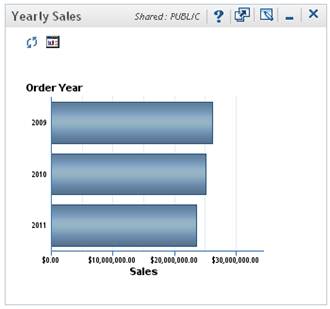
Report portlets provide a way to display SAS Web Report Studio reports directly on the portal page. While a Collection portlet provides a link, this portlet allows you to display the report.
In Figure 10.2-1, the report is a simple horizontal bar chart. You will build similar reports in Chapter 7, “SAS Web Report Studio.”
The two icons in the upper left of the window allow the user to control the data. The first icon refreshes the content. The second icon allows the user to view the report directly in SAS Web Report Studio.
Authorization access can limit what the user is able to view or change.
10.2.2 Using a Stored Process Portlet
One way to add a stored process to the portal is to use the Stored Process portlet. This portlet allows you to quickly display the output of a single stored process within the portal page. As shown in the following figure, the arrows allow you to navigate a large stored process and also refresh the data. This is useful when the report contains information that is updated on a regular basis.

Figure 10.2-2 Stored process portlet
10.2.3 Using a Collection Portlet
Collection portlets allow you to aggregate information. You might want to think of this portlet as a binder or a folder for various reports, links, documents, channels, and so on.
In Figure 10.2-3, a Collection portlet called Sales Reports is shown. This portlet contains SAS Web Report Studio reports, stored processes, an information map, a link to an intranet blog, and a publication channel. If you are interested in analyzing the quarterly candy sales, you do not have to search your e-mail, network drives, or the Internet. All data related to the topic has already been collected in one location.
After this content is created, it can be made available to users for their Home portal page or displayed in a portal page for the sales organization.

Figure 10.2-3 Collection portlet
10.2.4 Using the URL Portlet
Use the URL portlet when you want to display content such as external Web pages or even internal Web-based applications directly on the portal page.
You can link
directly to stored processes from this portlet; however, authentication is not
passed automatically from SAS Information Delivery Portal to SAS Stored Processes.
Check Section 10.5.1.1, “Steps Required To Display Other SAS Content,” for
more information.

Figure 10.2-4 URL portlet
10.2.5 Using a Navigator Portlet
Using a Navigator portlet, you can see folder and subfolder contents that are in the metadata server. This portlet allows easy access to reports, information maps, stored processes, and packages.
As shown in Figure 10.2-5, the folder can be expanded to show the subfolders. To view an item, click the name to display its contents.
This portlet type is similar to the Collection portlet; however, this portlet would display all content within the specific area of the metadata folder structure. For example, the administrator can determine the starting folder and what content can be viewed. This could be set up to only allow the end user to see content in My Folder.
Using the
Navigator portlet to display links to content that frequently change is better
than adding the step of maintaining the Collection portlet.

Figure 10.2-5 Navigator portlet
10.2.6 Using a Dashboard Portlet
Use the Dashboard portlet to share dashboards. Refer to Chapter 9, “SAS BI Dashboard,” for more information about creating dashboards.

Figure 10.2-6 Dashboard portlet
10.2.7 Controlling Portlets
Each portlet has common elements and controls. The portlet contains the title, the group that can view the portlet, and two icons to control the portlet. The first icon (has an arrow expanding) allows you to edit the contents of the portal. If it is a Report portlet, you can select a report to add to it. If it is a Collection portlet, you can choose which links are included. (Refer to Section 10.3.3, “Adding a Report Portlet,” to see how content is added.) The second icon (that has the pen and notepad) allows you to control the properties.
In the following figure, there are three different portlet banners so you can see how the sharing is handled. Two of the portlets are shared. The Collection portlet is shared with Sales Team –East, and the Sales Reports portlet is shared with the Public (everyone). The Stored Process 1 portlet does not have a shared assignment, which means the portlet is available only locally to the portal user and is not shared at all.

Figure 10.2-7 Sharing portlets
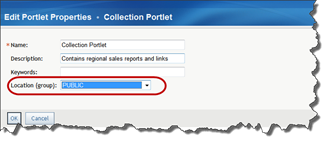
When the portlet is created, you can set the Location (group) option to share the portlet with other users. This can be changed later, so during the creation process, you might want to keep the portlet local until it is finished.
To update the sharing properties, do the following:
- Click the Edit Properties icon in the banner of the portlet you want to update.

- Select the group you want from the Location (group) drop-down menu. In the following figure, this portlet is set to PUBLIC, so it is now shared with everyone.
You can select only
one group to share a portlet or page with. If the portal groups are
combinations of other groups, you should define portal-specific groups in SAS
Management Console that are made up of these smaller groups.
10.3 Creating Your First Portal Page
Using SAS Information Delivery Portal, each portal page can address a specific organization need. In some cases, a new product release generates a large amount of attention. The entire organization might become focused on how the release is performing in the field and will be interested in all related data. One portal page that assembles all reporting and data would be beneficial and of high interest.
Other pages might be routine in nature, as in the case of a sales department manager who wants a page that allows her to track the sales performance. This is a simple page that contains two portlets. The first portlet is a predefined Collection portlet that one of your co-workers developed for the entire department. The second portlet is your manager’s favorite report from SAS Web Report Studio.
10.3.1 Adding a New Portal Page
To start the creation process, you need to add and customize a portal page for the portlets you plan to add. Use the following steps to create a new portal page:
- Open the SAS Portal window from your internet browser.
- From the toolbar, select Customize > Add page.

- In the Create tab, complete the fields as follows to add the page.
- In the Name field, add the page name. This page is what the user sees in the Navigation tab.
- In the Description field, add a brief description of the content. This field is not required, but it does help others understand whether they want to use the content.
- In the Keywords field, add words that assist users in finding the page.
- Use the Page rank field to order the tabs in the navigation window. By default, all new pages are assigned to rank 100, but if a specific order is required, the pages can be modified to follow a certain navigation order.
- The Location (group) drop-down list allows you to set the page permissions. This page is set to PUBLIC so that everyone can see it. Some pages might be limited to your group, in which case you might want to use another group, such as Sales Department.
- Select the Share type from the drop-down list.
Available Users search for this page. It can be added or removed from view. Default Page is automatically added and user can remove it. Persistent Page is automatically added and cannot be removed from view.

- Click the Add button and ensure that you see the system message. Then click the Done button.
Note: If you do not first click the Add button, the change is not implemented and the page is not added. You will have to repeat the step.
- Confirm that the new portal page exists by reviewing the navigation bar. Because it was just created, the portal page is the last one in the row, as shown in the following figure.

10.3.2 Adding Previously Created Portlets
There might be common portlets in your organization that others find useful. Instead of trying to re-create content, you can use an existing portlet. In this example, another team member created a Collection portlet that contains links to sales reports and other related content that you think your manager can use when she needs to review the data.
To add a predefined portlet, do the following:
- Go to the page you created in Section 10.3.1, “Adding a New Portal Page.”
- Select Customize > Edit Page > Edit Page Content.

- The Edit Page Content window allows you to control the general page appearance. You are adding two portlets to this page. The Collection portlet is not large and does not need as much space as the Report portlet.
Make the following changes to the page:- Layout is By column. This lets the portlets use as much room in each column as needed.
- Change the Number of columns to 2.
- Adjust the column width so Column 1 is 25% and Column 2 is 75%, as shown in the following figure.
As you can see, there are several other combinations you could use to further customize your page. Refer to Section 10.4.1, “Changing the Layout,” for more information about the layout.

- Click the Add Portlets button.
- This content is predefined, so you need to search for it. Click the Search pane.
- In the Keywords field, type a phrase to help you locate the portlet and click Search. The results are displayed in the right panel. Click the check box next to the portlet you want and click the Add button.

- Confirm that the portlet was added. A message is displayed above the search results to confirm it was added. Otherwise, the portlet is not added and you will have to repeat the step.

- Click the Done button to return to the Edit Page Content window. In the following figure, the portlet is displayed in the Column 1 box.

- Click OK to return to the portal page. Because there are no other portlets on the page, this portlet uses all of the space, as shown in the following figure.

10.3.3 Adding a Report Portlet
The Report portlet displays SAS Web Report Studio reports. For this example, suppose that you created a Daily Sales Summary report earlier. You need to add the portlet and then assign the report to the portlet.
To add the report portlet, do the following:
- Select Customize > Edit Page > Edit Page Content.
- Select Add Portlets from the Edit Page Content window.
- In the Add Portlets to Page window, complete the following fields to add the new portlet.
- In the Portlet type drop-down list, select SAS Report Portlet.
- In the Name field, type the portlet name. This is the name displayed to the user.
- In the Location (group) drop-down list, select PUBLIC.
- Select the Add button and confirm that the portlet was added.

- Select the Done button to return to the Edit Page Content window. The portlet defaults to the Column 1 box, as shown in the following figure. Use the arrows to control the order and placement of the portlets.

- Move the Daily Sales Summary Report portlet to Column 2. Select OK to return to the page.

- When the Report portlet is displayed initially, it does not have any content assigned to it. However, you can see that the SAS Portal window has two columns; Sales Reports is 25% of the display, while the Daily Sales Summary Reports has 75% of the display.

- Click the Edit Content icon in the toolbar to select a report.

- In the Edit Content window, navigate to the report you want and select it. For this example, you want the report is called Daily Sales Summary.srx, which is stored in the Products library. Click OK to add the report.

The report is available in the SAS Portal page.

10.4 Enhancing Your Portal
You can change the portal layout and the page layouts to further personalize the portal look and feel.
10.4.1 Changing the Layout
You can control the portal page layout using the Edit Page Content settings. Using the Column and Grid layout controls, you can dramatically change the page appearance.
10.4.1.1 Using Columns Layout
This example uses one column that uses a Report portlet, as shown in the following figure. If you drew the layout on graph paper, the layout would look like a large block, represented by the blue square labeled 1 in the following figure.
The SAS Web Report Studio report, shown in Figure 10.4-1, was created to look like there are two columns; however, as you can see in the Edit Page Content window, the Number of columns field is set to 1 and Report Portlet Used appears in the Column 1 box.

Figure 10.4-1 One-column layout
The next example uses three columns and multiple portlets. If you drew this layout on graph paper, it would look similar to the blue rectangles shown in the following figure. There would be three long columns, with the content stacked in each column.
In the following figure, the portlets are very different so you can more clearly see the layout. Each column is allotted 33% of the page. However, more likely content would be a stored process that showed a bar chart for each region.

Figure 10.4-2 Three-column layout
10.4.1.2 Using Grid Layouts
The Grid layout allows you to have rows that each have columns of different sizes. If you drew this layout on graph paper, the layout shows Row 1 with Column 1 as a single column and Columns 2 and 3 combined; in Row 2, Columns 1 and 2 are combined and Column 3 is single column; and in Row 3, all columns are combined. (See the blue layout arrangement in the figure.)
Portlet sizes
are influenced by their content. If a Report portlet has large content, then
it dictates how the other space in the portal is used. You might have to
re-arrange the portlets until you get the layout that works for your content.
When specifying this layout, assign the same portlet to consecutive columns in the row. For instance, in Row 1, the Bookmarks portlet was assigned to Columns 2 and 3.

Figure 10.4-3 Three-column layout in Grid
10.4.2 Adjusting the Portlet Size
Some of the Collection portlets allow you to adjust their height. Click the Edit Properties icon on the portlet toolbar. Type the pixel size you want in the Portlet height field.
Click the Reset to default check box to restore the default size.

Figure 10.4-4 Adjusting the portlet height
10.4.3 Changing the Page Tab Order
You can change the order of the page tabs and even the navigator bar location.
- Select Customize > Arrange Page Tabs.

- Change Navigation bar location to Side.
You can also change the tab order by moving the arrows at the bottom of the list box. If the pages are ranked, click the Use page rank check box to place the pages in order by rank.You can add new pages using the Add button. When multiple pages are available for users and the page rank options for each page is used, click the Use page rank check box to display the page tabs in this order.
The following figure shows how the portal has changed after the modifications. The navigation bar is on the left side of the screen.
Note: You can move the navigation bar from horizontal to vertical placement by selecting Preferences from the Options drop-down menu.

10.5 Tips and Tricks
Use the following tips and tricks to make your portal pages stand out.
10.5.1 Adding New Content
You can add new content to use in personal portal pages or to share with others in your organization. There are five different contents types that can be created:
Applications |
Add Web-based applications such as internal, homegrown applications or other applications, such as Microsoft Outlook Express. Point to other SAS content such as stored processes, and address pass-through authentication between different SAS Web tools. See Section 10.5.1.1, “Steps Required To Display Other SAS Content,” for more information. |
Link |
Add internal or external links to Web pages such as Google, CBS News, or blogs. |
Syndication Channel |
Add links to RSS feeds. |
Portlet |
Add a portlet. |
Page |
Add a page. |
Use the following steps to set up a link to an external blog that can be shared with others or added as a bookmark.
- Select Options > Create New Content.

- Select the Link radio button.

- Complete the display as shown in the following figure to add a new external link.
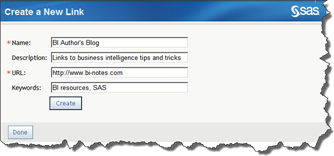
- Select the Create button.
- Select the Done button to exit the display. You can add the link to a collection portlet, to a URL portlet, or as a bookmark.
10.5.1.1 Steps Required To Display Other SAS Content
Authentication is not passed automatically between SAS components. If linking directly to stored processes, for example, the resulting window will show a second authentication screen prompting the user again for their user name and password. To remove this second authentication screen, you need to perform the steps described in Section 10.5.1, “Adding New Content.”
To display the stored process screen on the portal page, the following steps are required.
- Determine the full URL path from the SAS Stored Processes Web application.
- Create an application, following the steps described in Section 10.5.1, “Adding New Content.”
- Search for the application from the portal.
- Right-click on the application you just created and choose Copy Hyperlink.
- Create a URL Display portlet for display on your portal page.
- Edit the content of this URL Display portlet and paste the hyperlink you copied in step 4.
- Save and display the portlet within the portal page. The output should include the stored process, rather than a second authentication window.
10.5.2 Adding Bookmarks
Your default portal page might contain a portlet for bookmarks. If not, you can add the portlet by searching for it. The Bookmark portlet allows each individual user to collect often used items in one location. Using the Bookmark portlet, you can create a portlet from a selected link, e-mail the bookmark, or even remove it from view.
Use the following information to search for bookmarks to add to your portlet:
- Select the Search menu item.

- In the Keywords field, type an asterisk (*) to see all the content available to you. You might want to limit your search to specific content types. For instance, in Section 10.5.1, you created a link to the SAS BI authors’ blog. This link is the bookmark you want to locate.

- The results are displayed in a new window. When you find the link you want, click the arrow icon and select Bookmark from the pop-up menu.

- Confirm that the bookmark was added. Click Portal Page to return to the page.

The link is available in the portlet.

10.6 SAS Administrator Tasks
Using SAS Management Console, the SAS administrator can set responsibilities and make system-wide changes that assist all users.
10.6.1 Establishing Group Administrators
Group content administrators are responsible for managing portal pages shared with their group. These individuals are assigned to reduce the bottleneck that results when one SAS administrator completes all requests.
The following example creates the East Region Group and assigns a group administrator so that the team lead can manage the portal pages specific to this region.
- Create the East Region Portal Group in SAS Management Console User Manager. Contact your SAS administrator if you need help (or permissions) to complete this step.
- Add the team lead and all team members to this group.
- Restart your Web server, which is usually JBOSS. SAS Information Portal does not create permission trees for new groups until it is restarted.
- Within SAS Management Console, navigate to the permission tree and add the individual team lead to the Authorization tab.
The permission tree is located in the Authorization Manager Plug-in under Resource Management > By Type > Tree.
- Double-click the East Region Portal Group Permissions Tree. Click the Authorization tab and select Add. Select the individual who will be responsible for administering the group.

- Grant the team lead WriteMetadata permission by selecting the check box.

10.6.2 Accessing the Portal without Logging In
All users must first enter a user name and password to view portal pages and other content. In prior releases of SAS Information Delivery Portal, the Public Kiosk owned by internal SAS user SASGUEST was available to present users with a single screen that could include any content the organization wanted.
To allow users to view the content without logging in, you need to establish a new user account and enable it to act as the unchallenged user. Then portal users can directly view content through the following URL without logging into SAS.
<machine name>:<port number>/SASPortal/public
Remember that any users opening the application in this manner are accessing the system with this single new unchallenged account, which is called the Unchallenged Access User. Because of this, SAS administrators must be cognizant of not releasing secure content to the unchallenged user by mistake After they have implemented the unchallenged access, SAS administrators should complete an authentication audit of the SAS folder structure, the SAS Content Server, and SAS Information Delivery Portal content that is available but that links to other resources (such as dashboards or stored processes). You must ensure that only appropriate content is accessible by this new user.
- Create an external account for the unchallenged access user. This account will be used for creating and including content on the public portal page.
- Reconfigure SAS Information Delivery Portal through SAS Management Console to allow the unchallenged user.
Open the application properties from the configuration manager.
- In the Advanced tab, edit all four values for Unchallenged.Access choices according to your organization’s requirements. In the following example,
you want to hide the LogIn, Logoff,
and Search buttons for the unchallenged users.
- In the Unchallenged.Access.Enabled field, type
true. - In the Unchallenged.Access.Logoff.Behavior field, type
hide.
Additional options for Logoff.Behavior include:- logoff shows the term Logoff. Clicking Logoff forwards users to the Logoff message window.
- hide does not display Login or Logoff.
- In the Unchallenged.Access.Show.Search.Menu field, type
false.
If you leave this value astrue, which is the default, the Search link allows unchallenged users to search for other content to view.Typically, you will set the value to falseto ensure that content not intended for the unchallenged user remains unavailable. - In the Unchallenged.Access.UserID field, type the user account ID that you created in step 1.

- In the Unchallenged.Access.Enabled field, type
- Redeploy the SAS Information Delivery Portal web application by running Deployment Manager. Deployment Manager is located in the program files folder. In typical Windows installations, this is C:Program FilesSASSASDeploymentManager9.2config.exe.
- Select the Rebuild Web Applications button and follow the wizard through creating a new portal Web deployment.

- After the application is rebuilt, log into the SAS Information Delivery Portal
page with the unchallenged user account created in step 1. Create content for
the SASPortal/public page as you would for yourself.
Since you are
creating this as the end user that will view the content, you do not need to
change the Location option for this content.