

Chapter 3
SAS Stored Processes
Data and Reports—On Demand!
3.1 Getting Started
3.1.1 Quick Tour
3.1.2 Prerequisites
3.2 Running SAS Stored Processes
3.3 Creating SAS Stored Processes
3.3.1 Create a SAS Program
3.3.2 Add the Stored Process Codes
3.3.3 Choose the Appropriate Server
3.3.4 Register the Stored Process Metadata
3.3.5 Choose an Output Device
3.4 Creating Your First Stored Process
3.5 Enhancing Your Stored Process Output
3.5.1 Using Different SAS Styles
3.5.2 Using a Cascading Style Sheet
3.5.3 Publishing Results to Multiple Devices
3.6 Working with SAS Stored Processes
3.6.1 Understanding Macro Language Fundamentals
3.7 Tips and Tricks
3.7.1 Chaining SAS Stored Processes
3.7.2 Using HTML Code in SAS Stored Processes
3.7.3 Running a Stored Process in the Background
3.7.4 Custom Output in SAS Web Report Studio
3.7.5 Creating Custom Indicators in SAS BI Dashboard
3.7.6 Working with Metadata Libraries
3.8 SAS Administrator Tasks
3.8.1 Accessing Pre-Assigned Metadata Libraries
3.8.2 Setting Up a Source Code Repository
Chapter 3
SAS Stored Processes
Data and Reports—On Demand!
SAS Stored Processes are SAS programs stored in central location that can be run on demand. Stored processes can perform a variety of tasks, such as generating data sets, creating complex reports, and even building Web applications. Almost anything you can do in SAS programs, you can do with stored processes.
Because stored processes are kept in a central location and shared by many applications, it helps organizations consolidate programming silos into one, reducing duplication and improving efficiencies. You can access a stored process from the SAS BI clients (SAS Add-In for Microsoft Office, SAS Web Report Studio), from the Web applications (SAS BI Dashboard, SAS Information Delivery Portal), and from a Web browser. When you run a stored process from any of these locations, you are accessing consistent results. Because the stored process is run on demand, it can use the data that was made available most recently.
End users do not need to have SAS software installed on their computer or device to run the stored process or view the result; they only need permission to access the information. This provides additional security for your data, because the applications that access the data are stored in a central, secure location. Additionally, with the SAS program in a central location, you can make modifications to the code that flow through the entire system, allowing you to ensure that everyone is using a consistent report.
This chapter explains how to create a simple SAS program and convert it into a stored process with some complex functionality. While SAS programming experience is not required, the chapter assumes the reader has a minimum level of SAS programming skills. You can create stored processes using tasks in SAS Enterprise Guide, but without programming knowledge improving or extending the stored process capabilities can be difficult.
3.1 Getting Started
This topic helps you locate the stored process home page and understand the basic requirements needed to start creating SAS Stored Processes.
3.1.1 Quick Tour
SAS Intelligence Platform provides a Web page that lists the registered stored processes. Using a Web browser, go to the SAS Stored Process home page, which is in a location similar to the following address. Note that this address is case sensitive.
http://server name:port number/SASStoredProcess/do
The following figure shows the default stored process home page. Your organization might have already made changes to the page, so it might appear differently. The stored process samples are available as links.
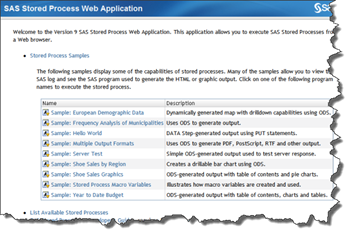
Figure 3.1-1 Quick tour
3.1.2 Prerequisites
To follow along with the examples in this chapter, you need the following:
- Your SAS administrator must provide proper permissions in the metadata and access to appropriate folders to save the stored process.
- SAS Enterprise Guide access to create and register the stored process.
- Basic understanding of the SAS programming language.
3.2 Running SAS Stored Processes
To run a stored process from the Web browser, navigate to the Web location and click the name of the stored process. In the following figure, a stored process called Query Regional Sales was selected from the left pane. The Query Regional Sales stored process appears in the right pane.
This is a straightforward stored process that prompts the user for the region, minimum sales amount, and a time period. The resulting report, Customer Sales by Region, appears in a new browser window. As requested in the prompts, the report shows the all sales greater than $6500 in the Central Region for the previous month. In the next example, you will learn how to create this stored process.
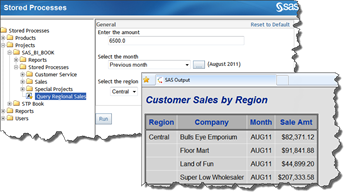
Figure 3.2-1 Example Query Regional Sales stored process
3.3 Creating SAS Stored Processes
A stored process consists of a SAS program file and is set to run on a specific SAS logical server. This information is defined within the SAS Metadata Server to allow the stored process to work. A stored process can be registered on only one logical server; however, the same SAS program file can be used in multiple stored process definitions.
There are three steps to creating a stored process: create a SAS program, choose the server, and chose the output method. This section provides a detailed discussion about how to create stored processes. If you want to create a stored process without this behind-the-scenes knowledge, refer to Section 3.4, “Creating Your First Stored Process.”
3.3.1 Create a SAS Program
You can create a SAS program or a task that can be used repeatedly. In the preceding example, the stored process created a simple report about regional sales for a selected time period.
The following program contains the SAS code that was used to create the stored process. The code has three input parameters that are used in the WHERE statement. The input parameters are defined by assigned values to macro variables with %LET statements. Before the code is executed, the SAS engine substitutes the macro variable with the assigned value. So &sale. becomes 5000, ®ion. becomes East, and &time_period becomes 01JUL2011.
Also, notice that the character macro variables use double quotation marks. This ensures that the variable is properly passed and decoded. The date variable is passed as a character variable, so it uses quotes and is appended with the letter “d” for SAS to interpret into a standard SAS date field.
In Section 3.6.1, “Understanding Macro Language Fundamentals,” there is more information about using macro variables.
/*======================================================*/ /*Macro variables used to query the dataset */ %let sale = 5000; %let region = East; %time_period=01JUL2011; libname mylib meta library="Candy"; title "Customer Sales by Region"; proc report data=mylib.sales_candy_history nowd; WHERE sale_amount gt &sale. /*Numeric variable*/ and salemonth = "&time_period."d /*Date variable*/ and region in ( "®ION." ) /*character variable*/ ; column region company salemonth sale_amount; define region/group; define company/group ; define salemonth/group format=monyy.; define sale_amount/format=dollar12.2; run; /*======================================================*/ |
Program 3.3-1 SAS code with %Let statements
3.3.2 Add the Stored Process Codes
To change the code to a stored process, you need to add the stored process special codes:
*ProcessBody |
This is a required comment. It indicates to SAS that stored process code is ahead. |
%STPBEGIN |
This macro variable generates the initial Output Delivery System (ODS) statements to publish content to the client. |
%STPEND |
This macro variable closes the ODS destination. |
 The SAS Stored
Process wizard in SAS Enterprise Guide includes these special codes by default within
the stored process.
The SAS Stored
Process wizard in SAS Enterprise Guide includes these special codes by default within
the stored process.
In the following program, you can see how a simple SAS program looks after applying the stored process codes. The %LET statements were changed to global macro variables. A global macro variable simply means that these macro variables are available for all parts of the stored process to use.
In this case, prompt values are returned to the stored process as macro variables. The %global statement ensures that the value is available for the entire stored process to use. Later, in Section 3.6.1, “Understanding Macro Language Fundamentals,” macro variables are discussed in detail. Right now, you just need to understand that a global macro variable is how the stored process works with the prompts to collect input information.
/*=== Start the Stored Process ============*/
*ProcessBody;
%global sale region time_period;
libname mylib meta library="Candy";
%STPBEGIN;
title "Customer Sales by Region";
proc report data=mylib.sales_candy_history nowd;
WHERE sale_amount gt &sale.
and salemonth = "&time_period."d
and region in ( "®ION." )
;
column region company salemonth sale_amount;
define region/group;
define company/group ;
define salemonth/group format=monyy.;
define sale_amount/format=dollar12.2;
run;
%STPEND;
/*=== End the Stored Process ============*/
Program 3.3-2 Sample stored process
3.3.3 Choose the Appropriate Server
While it is natural to think of a server as hardware or a physical location, when you are learning about these servers, it might be easier to think of these servers as applications that perform actions. There are two logical servers available for use.
Stored Process Server |
This server completes requests under one user identity, SASSRV. A group of sessions is always available and waiting for a user to start a stored process. Each time a stored process is run, a session is assigned to that process. If the user reruns the stored process, a different session is used. The server distributes or balances the requests across the sessions, thereby providing high performance and allowing for scalability. |
Workplace Server |
This server assigns a single session to each stored process and each user. Therefore, this server has an increased security advantage over the Stored Process Server. Output can be provided only as a package or through a component such as SAS Web Report Studio. |
Use the following table to determine the server that best meets your stored process code requirements.
Task |
Logical SAS Stored Process Server |
Logical SAS Workspace Server |
Run a stored process from a Web browser and output results to the Web browser |
X |
|
Run a stored process within an information map |
X |
|
Use sessions to reduce query processing for related stored processes |
X |
|
Access a stored process from SAS Web Report Studio, SAS Add-In for Microsoft Office, or SAS Enterprise Guide |
X |
X |
Table 3.3-1 Overview of SAS Stored Process Servers
The following figure is a quick reference for the features of each logical server.
SAS Stored Process Server |
SAS Workspace Server |
|
Figure 3.3-1 Quick reference for logical servers
3.3.4 Register the Stored Process Metadata
When you register a stored process, you need to provide a name, where the code is located, what parameters are used, and how the results or output should be treated. This is how the SAS Metadata Server knows the stored process exists.
The SAS administrator must define a place for your stored process code on the server. Refer to Section 3.8.2, “Setting Up a Source Code Repository,” for information on how to set up these physical paths.
3.3.5 Choose an Output Device
After the stored process is complete, the result is displayed. The result might be a Web page, a PDF or RTF file, or in some cases, a data set. Based on the output, you can use one of two different devices: streaming or package.
Streaming Output |
This output is a written as a data stream to the client, such as an HTML or XML file. These results are immediately available to view in a Web page. The SAS Stored Process Server uses this option. |
| Package Output | This output is written to a package that can be viewed immediately or later. A package can be any combination of data sets, images, and files. Both servers can use this method. There are two kinds of packages: transient and permanent.
|
3.4 Creating Your First Stored Process
You can use SAS Management Console or SAS Enterprise Guide to register your stored process. The advantage to using SAS Enterprise Guide is that you can develop, test, and create the stored process within the same application. This topic explains how to use the SAS Stored Process wizard in SAS Enterprise Guide. For more information about SAS Enterprise Guide, refer to Chapter 2, “SAS Enterprise Guide.”
For this example, you will create the stored process shown in Figure 3.2-1, based on the code in Program 3.3‑2. This report queries the user for the region, month, and order amount to display in a simple report. This stored process uses three prompts that have already been created. If you want to learn more about creating a prompt, refer to Chapter 4, “The Prompting Framework.”
Using the SAS Stored Process wizard, you can quickly register the stored process using the following steps:
- From SAS Enterprise Guide, you should already have created a program to
use. Right-click the program icon and select Create Stored Process. The Create New
SAS Stored Process Wizard window appears.

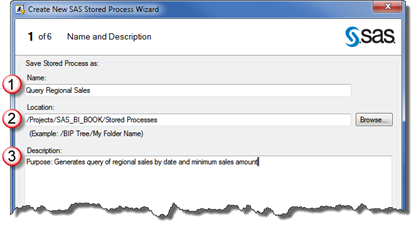
- In the Create New SAS Stored Process Wizard window, you start the first of six steps. The first step is to name and describe the stored process.
Field
Description
1
Name
Text used by the metadata. This text is displayed to the end users.
Select a name that describes what the process does so the users can quickly find their stored process. For example, Get Regional Furniture Sales by Month and Year is better than Furniture Sales. When your list of stored processes starts growing, even you might have trouble recalling the differences between them.
2
Location
Use the Browse button to navigate to the location where you want to save the stored process on the SAS Metadata Server.
3
Description
All the remaining fields are optional. However, as you create more stored processes, it is useful to provide additional details that assist with locating the stored process, remembering the requestor, and determining who is responsible for maintaining it.
- Because you selected the Create New SAS Stored Process wizard from an existing
code node, your SAS code is loaded automatically. You can edit the code in this
window. Because you started the stored process from the code, the link between
the code and the stored process is maintained. You might find that editing the
code outside of the wizard provides more editing features that assist with
maintaining the code.
Syncing code
from SAS Enterprise Guide to the SAS Stored Process provides a better coding
interface. To keep the links enabled between the initial code node and the
stored process, save and use this SAS Enterprise Guide project to make changes
in the future.
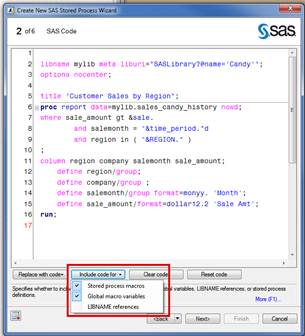
By default, the SAS Stored Process wizard adds all of the following codes:
Stored Process Macros
Adds the %STPBEGIN and %STPEND macro variables.
Global Macro Variables
Adds the %GLOBAL for any macro variables in your code.
LIBNAME References
Adds the LIBNAME statements to ensure that SAS understand where the source data is located. Use data in a library that is available to others to ensure that they can access and see your results.
In some cases, you might want to control what is used in the stored process code. On the Include code for button, you can select which code is added. As you explore the examples in this chapter, you will discover some instances where the codes are manually added.
For this simple code, the LIBNAME statement was kept, but all other special coding was removed. The SAS Stored Process wizard adds the necessary codes.
 Click the
notepad icon in the bottom left corner to see how the wizard modifies your
code.
Click the
notepad icon in the bottom left corner to see how the wizard modifies your
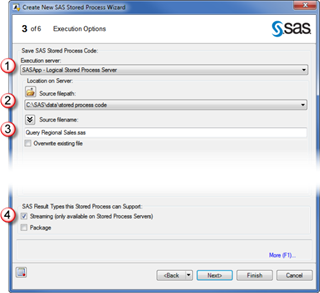
code. - In this step, you define where you want the stored process to run, where
the code is located, and how the output is created. Do the following to
complete this window:
Field
Description
1
Execution server
Select the server that executes the stored process.
Refer to Section 3.3.3, “Choosing the Appropriate Server,” for more information about the server types.
2
Source filepath
Select where the SAS code is stored. This is the physical program location. Click the Folder button to navigate to the area your SAS administrator has made available for storing code.
3
Source filename
Type a program name. SAS code is stored in a source code repository (listed in the Source filepath field). When you save the SAS code, use the .SAS extension.
4
SAS Result Type
Select the result type that you want. Refer to Section 3.3.5, “Choosing an Output Device,” for more details about the types.
If your stored process
creates only a data set and there is nothing for the user to view, you can
leave both check boxes empty. - In the next window, you can assign the prompts to your stored process.
You can add as many prompts as you need. For this example, you must have a prompt for every macro variable in the WHERE statement. Otherwise, the stored process generates an error and does not run.There are three different methods for using prompts with stored processes: using a project prompt, creating a prompt, and using a shared prompt. You can use one or more of these methods within the stored process. More information is available in Chapter 4, “The Prompting Framework.”
- If you created the project prompts in SAS Enterprise Guide, those
same prompts might be converted into the stored process. Select New > Project prompt copy to add the project prompt. In the following figure, the Create New SAS Stored
Process Wizard window lists the project prompt time_period as a choice.

- If you want to use a shared prompt, select Sharing > Add Shared.
Navigate to the area where the shared prompts are stored and select the desired
prompt. In this example, region is available as a shared prompt.

The code is currently set up to filter on only one selection of region; therefore, this shared prompt would not provide the expected results, as it would query on only one of the user’s selected values. Refer to Section 3.6.1.5, “Integrating Multiple Selection Prompts into a Stored Process,” for information on coding filters for multiple selection prompts.
- If you want to create the prompt, select New > Prompt from SAS Code for <macro variable>.
You are guided through the Prompt wizard to create the prompt. All macro
variables in the code are listed.
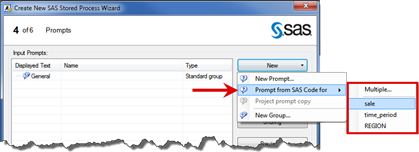
The following table provides the details on what prompt values and options to select if you are creating these three prompts for this example.
Prompt Name
Displayed Text
Prompt Type
Method for populating prompt
Default Value
Time_period
Select the month
Date
User enters value
Previous month
Region
Select the region
Text
Static List
Central
Sale
Enter the amount
Number
User enters value
6500
In the following figure, you can see that all of the prompts were added. The Name column contains the prompts, which match the macro variables used in the WHERE statements in the code.

- If you created the project prompts in SAS Enterprise Guide, those
same prompts might be converted into the stored process. Select New > Project prompt copy to add the project prompt. In the following figure, the Create New SAS Stored
Process Wizard window lists the project prompt time_period as a choice.
- In the next window, you can specify additional data sources or data targets that you can define. In some cases, the stored process needs to accept a range of cells within Microsoft Excel. By using these additional data source options within the stored process, code and prompts can offer significant value and usability.
- In the last window, you can review the stored process to ensure that everything
is set up correctly. In the following figure, the changes to the initial SAS
code are displayed. When you scroll through the SAS code, you can see that the
global macro variable, and the %STPBEGIN and %STPEND macros were added.
Click the Finish button to register and run the stored process.
The stored process prompts you for the values and creates your report. The results of this stored process are shown in Section 3.2, “Running SAS Stored Processes.”
3.5 Enhancing Your Stored Process Output
Once you have created a stored process, you might notice that the output uses SAS Default as the style. Unless you are using a client application, the output is always to a Web browser. You can control the appearance and the output location using the ODS options. ODS options are passed to the stored process prior to execution, based on the output.
ODS options control how results are handled, where results are sent, and even the image type and size. There are numerous ODS options available to assist with controlling the ODS output, but to control style and destination there are three to focus on: _ODSDEST, _ODSSTYLE, and _ODSOPTIONS.
There are
shared prompts available in default installations to use immediately for
ODSDEST and ODSSTYLE within the Samples folder.
3.5.1 Using Different SAS Styles
When you want to use a specific SAS style, you can change the _ODSSTYLE option. SAS provides a shared prompt to assist with changing the style.
In the following example, you are going to set a default style for the stored process you just created in the previous section.
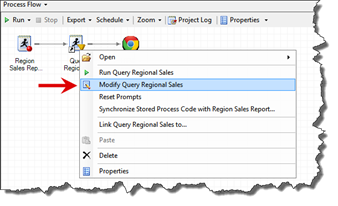
- Right-click the stored process you want to modify and select Modify <stored process name>,
where <stored process
name> is the name of your process.
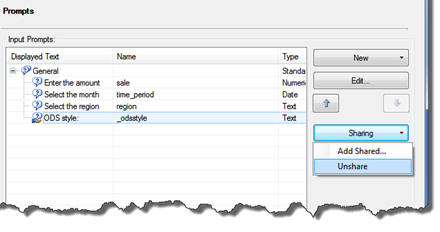
- Go to the Prompts pane. Select Sharing
> Add Shared.
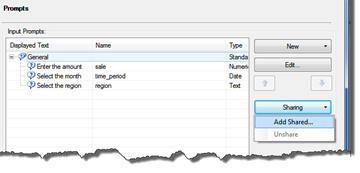
- Navigate to the default directory. There are a number of shared prompts
available. Select ODS
Styles – Static.

- The ODS Style is added to the Input
Prompts list. However, because the prompt is shared, you cannot
make modifications to it. Select the prompt and then select Sharing > Unshare.
A notice window appears with a warning about the prompt; you can ignore it.
- In the Edit Prompt window, change the prompt name to Style and select the Hide from user check box. This hides the prompt from view. If you want to allow the user to
change the style, then do not select this check box.
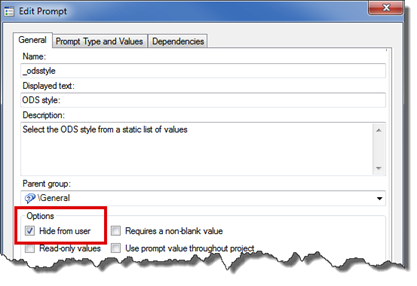
- On the Prompt
Type and Values tab, select a default style from the list. When
you have finished adding the prompt, run a test to see the results. In this
example, the font, text color, and background color are different.

3.5.2 Using a Cascading Style Sheet
Your organization might have a cascading style sheet (CSS) to ensure a consistent look to all Web sites. You can use that style sheet with your stored processes that output to HTML. To set the style sheet, create a prompt with the name _odsstylesheet and set the default value to equal something similar to:
(URL” "http://myserver/my_css_file.css");
The URL must be the Web location where your style sheet is stored. You need the complete path and complete filename.
In some cases,
a SAS BI client, such as SAS Web Report Studio, might not adopt any style
overrides and defaults to the user-defined style.
3.5.3 Publishing Results to Multiple Devices
SAS Business Intelligence supports multiple output destinations, such as PDF, HTML, Microsoft Excel, and RTF. Keep in mind that the client application must support the destination you define. For instance, if you specify PDF as the destination, the stored process might produce unexpected results when run from the SAS Add-In for Microsoft Office or even SAS Web Report Studio.
To set the device, use the following ODS option:
%let _odsdest=device-type;
Some common device types are: CSV, EXCEL, HTML, PDF, RTF, and XML. Refer to the SAS customer documentation for a complete list of supported devices for your SAS version.
You can use the same method to create a default device prompt as was used in Section 3.5.1, “Using Different SAS Styles.”
3.6 Working with SAS Stored Processes
So far, the stored process examples have been simple to help you understand the fundamentals. Stored processes can do more than display the output. In this topic, you will learn more about using macro variables and how to add more pizazz to your stored processes.
3.6.1 Understanding Macro Language Fundamentals
This topic introduces fundamentals of the SAS macro language as it applies to building stored processes. The macro language allows code to be re-useable, providing an increased amount of flexibility to programs. For complete information about the subject, see support.sas.com for SAS Press titles, SAS training, and other references.
3.6.1.1 Working with Macro Variables
A macro variable allows you to substitute a value in a SAS ess input parameters are supplied by the macro variables. To create a macro variable, you can use a prompt, %LET statement, PROC SQL, or CALL SYMPUT statement. In a SAS program, a macro variable has an ampersand (&) symbol in front of it when used in code.
LET statements and the resulting macro variables were demonstrated in Program 3.3-1: SAS Code with %Let statements.
3.6.1.2 Working with Global Macro Variables
In a stored process, you declare all input parameters as global. When you declare a global variable, an empty variable is created. If you do not declare the global variable manually within the code, or if it is not created automatically through the SAS Stored Process wizard, your stored process can generate warning messages and might contain other errors.
3.6.1.3 Double Quote the Variables
With the exception of numeric values, always use double quotation marks to resolve the macro variables values for use by stored processes. The quotes allow the values to translate successfully into the values selected by the end user or assigned by default. If you use single quotes, the macro values are not resolved and the stored process will not work as expected.
The following code demonstrates how to use a macro variable as a title in your stored process output. From our existing code, you can use the macro variables in the title so the users can see the selected values. When the user selects the variable from the input prompts, the values can be used multiple times in the code.
To add the existing macro variables to the title, insert a new TITLE2 statement and set the text in double quotation marks. Add the macro variables with any text you would like. In the following code, you can see that the TITLE2 statement was added and the global macro variables are used. When the quotes are added to the &SALE macro variable, it resolves as a character value.
/*=== Start the Stored Process ==*/
%STPBEGIN;
title "Customer Sales by Region"
title2 "Minimum order value $&sale.";
In Figure 3.6-1, the macro variable translated into the TITLE2 statement, based on the value that the user chose during the stored process execution, which was 6500.
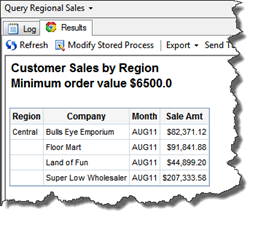
Figure 3.6-1 Title shows the macro variable
3.6.1.4 Understanding Macro Logic
When you combine macro variables with macro logic, the stored process can make decisions and take actions based on the decision. For instance, in the first stored process you created, the user was allowed to enter a minimum order value. What if the data does not contain any orders over 100,000, and the user enters 120,000? The stored process would run and not return anything. The user would wonder if there was an error or if the stored process was just extremely slow.
By using the %IF/%THEN/%ELSE macro statements, you can code stored processes to generate meaningful end messages to users based on the following scenario.
- To use these macro logic statements, you must add the macro start (%MACRO) and end (%MEND) statements so SAS knows you want to use the macro logic. In Program 3.6-1, the macro start and end statements are placed around the code, and the macro is named MakeReport. The macro name is how it is referenced later.
- The code generates a temporary data set using PROC SQL. When PROC SQL runs, it generates an automatic macro variable (&SQLOBS.) with the number of returned observations.
- Use this automatic variable for your test condition in the %IF/%THEN
logic.
If the &SQLOBS equals zero then use PROC PRINT to display a message to the user. Else, if the count is not zero then the data is available for the report. - In the final step, the %STPBEGIN/%STPEND stored process macros are placed around the macro name, MakeReport. The titles are placed before the macro because both apply to the output.
/*==================================================================*/
*ProcessBody;
%global region time_period sale;
libname mylib meta library="Candy";
%MACRO MakeReport; /*== START MARCO ==*/
/*=== Use PROC SQL to query the dataset and create a TEMP dataset */
proc sql;
create table TEMP as
select region, name, date, sale_amount
from mylib.candy_sales_summary
where date ge "&time_period."d
and sale_amount gt &sale.
and region in ("®ION");
quit;
/*=== The number of rows in the TEMP dataset is assigned to &SQLOBS. */
%IF &SQLOBS. le 0 %THEN %DO; /*Send error message to user */
data msg; MESSAGE="Values not found. Try again.";run;
proc print data=msg noobs; run;
%END;
%ELSE %DO; /*Rows were returned; output the report */
proc report data=temp nowd;
column region name Date sale_amount;
define region/group;
define Name/group;
define date/group format=monyy.;
run;
%END;
%MEND makereport; /*=== END MACRO ===*/
/*=== Start the stored process output and call the macro ===*/
%stpbegin;
title "Customer Sales by Region";
title2 "Order over $&sale.";
%MakeReport; /* Call the macro */
%stpend;
/*=============================================================================*/ |
Program 3.6-1 Using IF/THEN/ELSE logic
The user was searching for orders over $120,999. However, there were no sales over that amount for the month so the stored process then alerts the user.

Figure 3.6-2 SAS Stored Process output when no rows are returned
3.6.1.5 Integrating Multiple Selection Prompts into a Stored Process
Some of your stored processes might allow the user to make multiple selections. In the following sample stored process, the user can select only one region. It is easy to imagine that the user might want to see the report with more than one region.
You can update the Region prompt to present multiple values to the user, as shown in the following figure. However, the stored process code has to support this modification as well.

Figure 3.6-3 Allowing multiple selections for Region prompt
To understand how the change appears on the back end, you can review the stored process log. A log is produced with each stored process run. The log shows the values associated with each prompt, among other items. In the following program, the left log shows the results when the region prompt is set up for single values. There is only one REGION variable and it contains East. In the right log, the region prompt was set up to accept multiple values. Many more variables are created and passed to the stored process.
| One Selection | Multiple Selections with One Item Selected | Multiple Selections with Multiple Items Selected | ||
|---|---|---|---|---|
>>> SAS Macro Variables: REGION=East SALE=6500 TIME_PERIOD=01Jun2011 |
>>> SAS Macro Variables:

 REGION=East
 REGION_COUNT=1
 SALE=6500
TIME_PERIOD=01Jun2011 |
>>> SAS Macro Variables: REGION=East REGION0=2 REGION1=East REGION2=Central REGION_COUNT=2 SALE=6500 TIME_PERIOD=01Jun2011 |
Program 3.6-2 Partial log from three stored processes
The additional variables communicate not only the additional choices, but also the number of values. REGION_COUNT and REGION0 contain the number of user selections for this prompt. REGION1 and REGION2 contain the values the user chose.
You can accommodate these changes within the WHERE statement. Add some macro logic that allows the stored process to make a decision about what needs to be included based on the REGION_COUNT variable. When only one item is selected, as denoted in the center column above, the REGION_COUNT = 1 and there are no REGION1, REGION2 variables in existence. Therefore, code for this situation and use only the REGION variable. This code sends as many region values as it finds.
More information on automatic variables created through prompts is available in Chapter 4, “The Prompting Framework.”
When adding these values with a macro, you need to use double ampersands so that the variable resolves correctly. Using the double ampersand technique, as in the following example with &®ION&CTR, the macro is forced to resolve twice. First it resolves &®ION to ®ION and &CTR to 1. The IN operator takes the combined ®ION1 to resolve to East.
/* ========================================================= */
%macro MakeReport;
proc sql;
create table TEMP as
select region, name, salemonth, sale_amount
from mylib.candy_sales_summary
where sale_month = "&time_period."d
and sale_amount gt &sale.
and region in
( %if ®ION_COUNT. = 1 %then %do;
"®ION"
%end;
%else %do CTR = 1 %to ®ION_COUNT.;
"&®ION&CTR."
%end;
);
quit;
/* ========================================================= */
Program 3.6-3 Working with multiple values
The following figure shows the results from the stored process. Both the Central and East regions are populated.

Figure 3.6-4 Results from multiple regions
3.7 Tips and Tricks
SAS Stored Processes offer a lot of flexibility to report builders. For instance, a stored process can be used in other SAS BI clients, chained together to provide drill-down capabilities, modified to use HTML code, and to perform some other techniques that will be discussed in this section.
3.7.1 Chaining SAS Stored Processes
When developing reports, often data from a report leads users to want more details. The power of a stored process is easily having the information available. In the following figure, the summary report lists the top 10 orders for the year. The user clicks the order number to reveal the order details.

Figure 3.7-1 Chaining stored processes example
To create the link between the two stored processes, create a hyperlink in the parent stored processes and pass the variable information through the URL address to child stored process. You can get the URL address for the stored process by running it once in a Web browser.
Navigate from the starting point http://server name: portnumber/SASStoredProcess/do?_action=tree to quickly get the full URL path from the Internet browser
tool bar.
The following figure shows an example from the Order Detail Report stored process. Once you have the address and know the prompt names, you can create the hyperlink using HTML code. In Program 3.7-1, the hyperlink is added to a temporary data set that is created as the stored process is made.
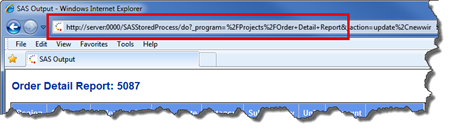
Figure 3.7-2 Capture the URL for a stored process
To create the hyperlink in the stored process, you can take advantage of the reserved macro variables (%_SRVNAME , %SRVPORT, and %_METAFOLDER) to recreate the stored process path. In Figure 3.7-2, the browser used %2F in place of the backslash (/) symbol. The URL address can contain only characters, so the PUT function is used to change the number to a character value.
The ORDER_URL is given a large length and format because the paths can become very long. This ensures that the hyperlink is not truncated, which causes the link to not work.
/* ========================================================================*/
%LET SP_NAME=Order_Detail_Report;
 libname mylib meta library="Candy";
proc sql outobs=10;
create table top10ords as
select saleyear
 , company
 , region
 , ‘"<a href=http://
&_srvname.:&_srvport./SASStoredProcess/do?_program="
||tranwrd(strip("&_METAFOLDER"), ' ',)||’+')||"&SP_NAME.”
                             ||'&orderid='||strip(put(orderid,8.))
                             ||" target=_blank>"
                             ||strip(put(orderid,8.))||"</a>"
                                    as order_url
               length=500 format=$500. label='Order Number'
       , sale_amount format=dollar12. label='Order Amount'
 from mylib.sales_candy_history
       where saleyear=&year.
 order by sale_amount desc;
quit;

Title "Summary - Top 10 Orders for &Year.";
proc print data=top10ords noobs label;
run;
/* ========================================================================*/ |
Program 3.7-1 Chaining stored processes code example
You might want to consider creating several stored processes that contain detailed information and adding the variable with the hyperlink to your data sets. Then, as you create other stored processes, the variable with the stored process link is already set up and ready to use. This is a time saver and makes creating reports with the chaining a snap.
3.7.2 Using HTML Code in SAS Stored Processes
Using HTML code for use in SAS Stored Processes provides developers with the ability to create an endless variety of forms and results, as well as the ability to create interactive content driven by SAS data. Included in this section is an example of printing a retrieved sales record from the sales transactions in a friendly HTML format. When using standard SAS code to print a single order, the layout is horizontal by default.
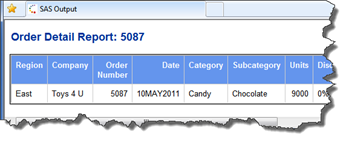
Figure 3.7-3 Default layout for SAS Stored Process
Using different SAS procedures such as PROC REPORT and using the ODS options can provide some layout options. However, Program 3.7-2 is an example of using the HTML code within a SAS Stored Process. Note that when using file _webout, the %STPBEGIN and %STPEND macros must be turned off and code for ODS HTML must be manually included. The ODS HTML statements must also include no_top_matter and no_bottom_matter ODS options.
/*=== Start the Stored Process ============*/ /*=== Define the library to the stored process ==========*/ libname mylib meta library="Candy"; /*=== Use ODS HTML Statements instead of %STPBEGIN and %STPEND to use html code within the _webout*/ /*=== no_bottom_matter = suppresses writing lower half of standard html code*/ ods html body=_webout(no_bottom_matter title='Order Detail Report') path=&_tmpcat (url=&_replay) style=sasweb; /*=== close the ods html output location to allow for writing to the _webout*/ ods html close; /*=== setting the order_number prompt value to global*/ %global order_number; /*=== use an empty data step to write out to the file _webout*/ data _null_; /*=== define the file _webout*/ file _webout; /*=== set the source dataset*/ set mylib.candy_sales_summary; /*=== filter the data table on the prompt value 'order_number'*/ where orderid = &order_number; /*=== create a custom measure to write out total sales $ with a format to dollar9.*/ format total dollar9.; total=retail_price*units; /*=== use HTML code within put ''; or put ""; statements*/ PUT "<p>"; PUT "<a href=http://www.sasbibooks.com>More Information</a>"; PUT "</p>"; PUT "<!--GENERAL AREA ============================================ -->"; PUT "<table border=0 cellpadding=2 cellspacing=2 width=95%>"; PUT "<tr valign=middle bgcolor=#B0B0B0 >"; PUT "<td align=left colspan=5>"; PUT "<a id=1><font size=2><b>Order Number: " orderid"</b></font></a>"; PUT "</td>"; PUT "</tr>"; PUT "<!-- ============================== -->"; PUT "<tr valign=middle bgcolor=#D3D3D3>"; PUT "<td><font size=2><b>Name</b></font></td>"; PUT "<td><font size=2><b>Region</b></font></td>"; PUT "<td><font size=2><b>Category</b></font></td>"; PUT "<td><font size=2><b>Product</b></font></td>"; PUT "<td><font size=2><b>Units</b></font></td>"; PUT "</tr>"; /*==There are three other rows created using the same code and format as above*/ size=2>" total"</font></td>"; PUT "</tr>"; PUT "</table>"; run; /*=== no_top_matter = used at the bottom of the process to suppress the writing of the top half of standard html*/ ods html body=_webout(no_top_matter title='Order Detail Report') path=&_tmpcat (url=&_replay) style=sasweb; ods html close; /*=== END OF CODE ===*/ |
Program 3.7-2 Using HTML code within a stored process
This is sample output from the stored process.

Figure 3.7-4 Using HTML Code in a stored process
When setting up the stored process, the %STPBEGIN and %STPEND statements must not be appended automatically by SAS Enterprise Guide. Always select the No button when you receive the following warning message.

Figure 3.7-5 Warning message about %STPBEGIN/% STPEND macros
Warning message for the appended macro codeThe %STPBEGIN and %STPEND macros option will always be turned on when modifying stored processes directly from SAS Enterprise Guide. It is important to double-check this option in the SAS Enterprise Guide wizard to ensure that it matches your stored process requirements.
Other examples for HTML code include using custom text and images within the graphical results, adding JavaScript functions, or implementing custom input forms.
3.7.3 Running a Stored Process in the Background
Some stored processes require more time to complete. However, the default behavior is for the processes to run in the foreground, which locks the open browser session from completing anything else. Moving the process to the background, the stored process disconnects from the browser session and allows the user to continue using the browser for other Web-based activities.
3.7.3.1 Modifying the Stored Process To Run in the Background
There are multiple mechanisms to run the process in the background. The simplest method is to modify the URL so that the &_action= parameter is set to BACKGROUND. For example, the following URL was &_action=update and after the change was &_action=BACKGROUND. You could click Enter to rerun the stored process.

Figure 3.7-6 Changing the &_action to BACKROUND
Another method is to create a hidden prompt for &_action that forces the stored process to always run in the background. This method requires that the stored process have at least one visible prompt and use only the package output.
After creating at least one other prompt, add a new prompt called _action. and hide the prompt from the user. Then set the default value to BACKGROUND as in the following sample.

Figure 3.7-7 Creating an _action prompt
3.7.3.2 Checking On the Stored Process Status
After submitting the stored process to run in the background, the Web browser provides a status message.
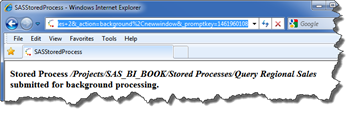
Figure 3.7-8 Message indicates background job submitted
Using the SAS Information Delivery Portal, you can check the stored process status through an Alert portlet. You can also access the stored process package results from the portal. Refer to Chapter 10, “SAS Information Delivery Portal,” for specific instructions on how to add portlets.
The Stored Process Alerts portlet displays all of the completed stored processes that ran in the background and that created package results. If you click on the stored process name, the result appears. Other actions are available, such a adding a bookmark, publishing, or e-mailing the result.
Alerts appear
when the stored process has finished executing and was set to generate a
transient or permanent package.

Figure 3.7-9 SAS Stored Process Alert portlet and results
3.7.3.3 Viewing the Stored Process Results
Packages generated from stored processes are typically stored in the SAS Content Server or WebDAV locations. In the SAS Information Delivery Portal, use the SAS Navigator portlet or the WebDAV Navigator portlet to view the results.
In the following example of the Personal Repository Navigator portlet, there are several packages available. These results are available in this path: WebDAV > Users > <user name> >PR >MyDocuments.

Figure 3.7-10 Storage location of stored process package results
3.7.4 Custom Output in SAS Web Report Studio
In SAS Web Report Studio, you cannot resize objects, such as graphs, that are generated from a stored process. Thus the stored process might require several printed pages, even if the output is displayed on one screen. When using SAS/GRAPH code, you can use GOPTIONS to control the size of the graphs.
In the following code sample, the GOPTIONS VSIZE and HSIZE have been added. With these options, you can control the graph size and how it prints on the page. Assuming that the margins are set to 1-inch on all four sides, the following program sets the values for VSIZE and HSIZE to 3 inches.
/* ====================================================================*/ *ProcessBody; %stpbegin; /* Add the GOPTIONS VSIZE and HSIZE */ goptions vsize=3 in hsize= 3 in; SYMBOL1INTERPOL=JOIN HEIGHT=8pt VALUE=DOT LINE=1 WIDTH=1; Axis1 STYLE=1 WIDTH=1 MAJOR=NONE MINOR=NONE; Axis2 STYLE=1 WIDTH=1 MAJOR=NONE MINOR=NONE; TITLE "Average Sales by Month"; proc gplot data=plotme; plot sale_amount*sale_month=region / vaxis=axis1 haxis=axis2; run; quit; %stpend; /* ====================================================================*/ |
Program 3.7-3 Controlling the chart size
You can adjust
the margins. The VSIZE and HSIZE values depend on how many graphs you want to
print on one page. You might need to try several different settings to achieve
the best results.
3.7.5 Creating Custom Indicators in SAS BI Dashboard
The following options must be included for the graphical results to properly display within the SAS BI Dashboard.
- Include the following GOPTIONS within the stored process code.
goptions gsfname=_webout gsfmode=replace device=png;
- Ensure that the %STPBEGIN and %STPEND macros are not included (automatically by SAS Enterprise Guide or manually) in the code.
- Set the Result Type to streaming.
- Get the full URL path from the Stored Process Web Application for the executed stored process.
- Use the Stored Process Web Application Tree view (http://server name: port number/SASStoredProcess/do?_action=tree) to quickly generate a full URL path.
- Within SAS BI Dashboard, create a Custom Graph Indicator. Copy the path generated above into the Image URL field.
3.7.6 Working with Metadata Libraries
The preferred method to define libraries for use by stored process code is to create META librefs. Using code similar to the following, modify the libref value with an appropriate name and replace value within the @name area to match the exact library name defined in your server list. Refer to Chapter 3, “SAS Enterprise Guide,” for more information about metadata libraries.
libname libref meta library="value";
For example, to indicate the Candy metadata library, add the following to your stored process code.
libname mylib meta library="Candy";
3.8 SAS Administrator Tasks
The SAS administrator ensures that data and libraries are available for the stored process and sets up the source code repository. The following sections explain how this is accomplished.
3.8.1 Accessing Pre-Assigned Metadata Libraries
There are several strategies for making data available to stored processes. The preferred method is for developers to include META LIBREFs as described in Section 3.7.6, “Working with Metadata Libraries.”
Another option available is to pre-assigning libraries. When libraries are pre-assigned, the SAS server environment initializes the connection using the identity that runs the spawner service. In typical installations, the SASSRV account performs this action; therefore, the SASSRV account must have READMETADATA access authorization on the libraries in SAS Management Console.
This can be accomplished by two methods:
- Add the LIBREF code to the AUTOEXEC file. Saved as autoexec.sas within the root SAS program folder, this program is automatically run when SAS is started.
- In SAS Management Console, modify the library options and then update the server startup script or the configuration file using SET commands.
Do not pre-assign a library that requires user information to authenticate, such as with a RDBMS data source.
At a minimum, users must be granted READMETADATA and READ access to the library and associated data tables. In the following figure, access for the Candy organization’s DATA folder is granted to the user group Category Group for Candy. This access is then inherited by all libraries stored in the DATA folder.

Figure 3.8-1 Set permissions in SAS Management Console
3.8.2 Setting Up a Source Code Repository
SAS Stored Processes exist as SAS programs (.SAS) in a physical folder location that must be accessible by the SAS server environment. For stored process developers to write and modify these programs, a storage location must be defined and maintained. Developers must have Write/Read/Modify access to the physical folder path.
If multiple organizations have groups generating stored processes, create multiple source code locations.
Once the folder is created on the server, the location must be defined within the metadata for the developers using SAS Enterprise Guide. Use the following steps to add a location.
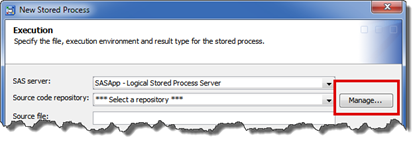
- From SAS Management Console, select the icon for New Stored Process.

- In the New Stored Process window, do the following:
- Because you are not going to create a new stored process, type a single letter in the Name field to move past the window.
- In the Execution window, select the appropriate server and click the Manage button.
- Use the Add button to add all of the necessary code repositories. Click OK to continue.
Any libraries that you have added are now available from the Source code repository drop-down list, as shown in the following figure. For this example, the C:SASdataCandy folder was defined.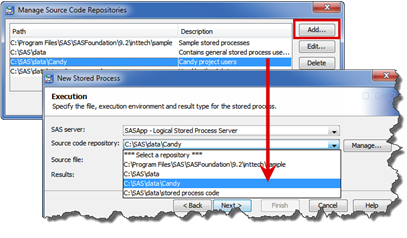
- Click the Cancel button to exit the New Stored Process wizard.