
Chapter 3. Working with templates
This chapter covers
- Creating templates
- Using Meteor’s default templating syntax
- Organizing JavaScript and HTML
- Using event maps to make templates interactive
- Understanding the template life cycle
Everything your web browser renders is HTML eventually. If you open any website in source view you’ll find that each page has hundreds of lines of HTML. Not only is writing everything by hand tedious, error-prone, and highly inefficient, it’s also impossible when you’re working with web applications because much of the content is dynamic and you can’t know in advance what exact code needs to be rendered.
Templates allow you to define blocks of HTML that can be reused as often as you like. As a result, you have to write less code, and your code is easier to read and much simpler to maintain.
In this chapter, you’ll learn how to write templates and what you can do with them. We’ll first take a look at Blaze, Meteor’s reactive UI library, and Spacebars, its default templating language.
3.1. Introduction to templates
Templates are the building blocks for our UI. Templates are snippets of HTML that contain placeholders, which can be filled by content returned by the application logic. They can be reused to ensure the same look and feel on all sites and all elements.
Another important aspect of templates is separation of concerns. This means a template is intended only for the representation of data and is ultimately rendered as HTML to the DOM. A template should have as little programming logic inside it as possible. Everything that needs computation and creates a specific output shouldn’t be inside a template but separated into a JavaScript file. This approach helps to increase the readability, and it’s basically the same concept of separating the styling of HTML into its own Cascading Style Sheets (CSS) files instead of cluttering the HTML with styling definitions.
Think about a simple list of users, as shown in figure 3.1. For each person you’re going to display the name along with a phone number. Because you don’t know how many people need to be shown in this list, you’ll use a dynamic template to generate the necessary HTML code.
Figure 3.1. A list of people and their phone numbers

In this example, you use an <h5> element that wraps around the name and you put the phone number inside a <p> element. To tell the template processor where you want the content to go, you use placeholders that include double curly brackets. Using pseudocode, the required template would look like this:
<h5>{{NAME}}</h5>
<p>Phone: {{PHONE}}</p>
Because the placeholders may contain multiple elements, you need the template to be able to create any number of list items. Just like in JavaScript code, you can use a loop that takes an array as input and iterates over each of the array contents, taking care of filling the placeholders for name and phone with information about the person. In this example, you’ll create a list of people that reuses the profile template. For each person, it should contain the following:
<ul>
    <!-- for every user render this: -->
    <li>{{ LOOP_THROUGH_PERSON_LIST_USING_TEMPLATE }} </li>
</ul>
Hooking up the templates with the back-end logic will return the HTML code shown in the following listing.
Listing 3.1. Rendered HTML from template
<ul>
    <li>
        <h5>Christina</h5>
        <p>Phone: 1234-567</p>
    </li>
    <li>
        <h5>Stephan</h5>
        <p>Phone: 666-999-321</p>
    </li>
    <li>
        <h5>Manuel</h5>
        <p>Phone: 987-654-321</p>
    </li>
</ul>
The advantage of using templates is you write them only once and use them for an infinite amount of data (in our case, people) you want to render. Having a single place to manage the appearance of an element is also convenient. Think about what you need to do if you don’t want the <h5> element but only a normal <p> element for a person’s name. You only have to change it in a single template, and it instantly updates for any person that you render with the help of the profile template.
3.2. Working with templates
Unless you’re writing a server-only application, every web application written in Meteor should have at least one template. Displaying content in a browser without using a template isn’t possible. This section discusses the foundations of working with templates.
3.2.1. The Blaze engine
Behind the scenes, Meteor uses a reactive UI library called Blaze. It’s responsible for processing templates and is an important part of what’s often referred to as the magic of Meteor. As you can see in figure 3.2, Blaze consists of two major components:
Figure 3.2. The Blaze components

- A runtime API
- A build-time compiler
The runtime API renders elements, keeps track of their dependencies, and updates them through their complete life cycle as those dependencies change. That means if the phone number of a person is changed in the database and a user currently views a page listing this person’s information, the number gets automatically updated on the screen. This is because the placeholder depends on the actual value stored in the database, which is a reactive data source.
The runtime API works with JavaScript in order to apply reactivity; it can’t deal with HTML directly, which is why the second component of Blaze is a build-time compiler. Meteor ships with a compiler that translates HTML into JavaScript (HTMLJS to be precise). By default, it processes templates using Spacebars. Optionally, it’s possible to use packages to switch the compiler to a different templating language such as Jade.
Both components work separately, so it’s entirely possible to bypass the build-time compiler and not use any templates but instead write code that directly targets the runtime API. Because this isn’t very practical for most users, we won’t worry about the runtime API itself but concentrate on using Spacebars.
Note
Meteor’s templating language is called Spacebars. It’s a direct descendant of Handlebars, with which it shares most of its syntax and functionality.
Blaze uses live page updating, so whenever a template-related file is changed on the server (HTML, CSS, or JavaScript), it gets updated instantly in the browser. How does Blaze find templates inside a project?
3.2.2. Organizing template files
When working with templates, you usually have four types of files to deal with, though only one is technically required for a template:
- The actual template stored in an HTML file
- Optional JavaScript code in a JS file that runs inside the client context and provides functionality to templates
- Optional styles in one or more CSS files[1]Also, Less, Sass, and other styling languages can be used; CSS is just an example.
- Optional static resources such as images or fonts inside the public folder
Without a JavaScript counterpart, templates may only be static and can’t be filled with dynamic content, which is why in most cases you’ll need at least two files for working with templates. To keep everything organized, it’s best to keep each template in a dedicated HTML file. Meteor will find them anywhere in your project folders.[2] All the front-end code can be stored in a single JS file, or you can use HTML/JS pairs so that each template consists of two files, which we recommend if your projects grow more complex:
There are exceptions to this rule, which we’ll explore in depth in chapter 10.
<template name>.js
<template name>.html
In this chapter we won’t worry about styling elements because this works just like in any other web application. We covered the public folder in the previous chapter, so let’s focus solely on the first two elements: HTML and JavaScript files.
3.3. Creating dynamic HTML templates
Meteor comes with its own templating language called Spacebars. If you’re familiar with Handlebars or Mustache, you already know enough to start using it immediately. Even if you haven’t used any of these languages, you’ll find that the general syntax is fairly simple to work with.
Templates written using Spacebars look almost like regular HTML. Template tags are easily spotted because they’re always enclosed in multiple curly braces. The four major types of template tags are
- Double-braced tags {{ ... }}
- Triple-braced tags {{{ ... }}}
- Inclusion tags {{> ... }}
- Block tags {{#directive}} ... {{/directive}}
3.3.1. Double and triple-braced tags (expressions)
Template tags that can enhance static HTML code by being replaced with dynamically generated content are also called expressions. They depend on a data source or some kind of application logic that returns a value.
Template tags can only be used inside a template context. A basic template tag is shown in the following listing.
Listing 3.2. Double-braced template tags
<template name="expressions">
    {{ name }}
</template>
As you can see, every template has an opening and closing <template> tag and a mandatory name attribute. The name attribute has to be a unique identifier for a template inside the application. Using the name of a template, you’re able to access it from a JavaScript file, which we’ll do later on.
Double-braced tags
Double-braced template tags are used to insert strings into the HTML. No matter what return value they’re dealing with—an array, an object, or a string—it’s always rendered as a string. Let’s assume you have a template named expressions from listing 3.2 and you want to replace the template tag {{ name }} with <strong>Michael</strong>.
The accompanying JavaScript code must return the substitute string as shown in listing 3.3. Remember that the code must be wrapped in a Meteor.isClient environment—it can’t be run on the server side because templates aren’t available inside the server scope.
Listing 3.3. JavaScript code for a helper called name
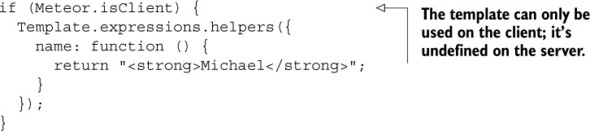
Together the HTML and JavaScript code will render as shown in figure 3.3.
Figure 3.3. Tags in double curly braces always render strings and escape HTML and script tags.

As you can see, double braces process the string and escape all possibly unsafe characters. This is useful if you want to avoid return values being accidentally interpreted as HTML or even JavaScript. Sometimes, though, you may want to avoid any processing of the string. In that case, you need to use triple brackets.
Triple-braced tags
If your template tag starts and ends with three curly braces {{{ ... }}}, its contents will be rendered exactly as you passed them to the template tag. Extending the example from listing 3.3, let’s now use {{{ name }}} instead of {{ name }}. Meteor won’t escape any characters or tags and will pass the output to the browser unaltered (see figure 3.4).
Figure 3.4. Strings in triple curly braced tags are rendered as HTML.

As you can see, the HTML tags are rendered as HTML into the DOM and not as simple strings.
Warning
If you use triple curly braces to display data entered by a user, you must ensure that it’s been sanitized first (that is, check for potential malicious scripting content). If you don’t, your website is vulnerable to cross-site scripting attacks. The simplest way to deal with user-generated data is to let Meteor sanitize it for you before it gets displayed and stick with double curly brackets whenever possible.
Blaze uses its runtime API to transform HTML code from a Spacebars template into JavaScript. Each compiled template file can be found in the directory .meteor/local/build/programs/web.browser/app.
The template in listing 3.2 produces the following code:

This HTMLJS code enables Meteor to reactively update templates and even just parts of them. Every template is accessible through the global Template object by its name attribute.
Although it’s possible to call Blaze.View directly from inside a template helper, there’s rarely a need to do so. Only when you decide to build your own runtime API for Blaze, replacing Spacebars with something else such as Jade or Markdown, will you need to familiarize yourself with the internal processing structures.
Until an API documentation for this becomes available, you can find out more by looking at the contents of the blaze and spacebars packages, which are part of Meteor’s core.
3.3.2. Inclusion tags (partials)
In addition to inserting strings or HTML, you can insert a template into another template. Because they represent only a part of the whole template, these subtemplates are also known as partials. Inserting a template into another is achieved using the > sign enclosed within two curly braces like this:
{{> anotherTemplate }}
Inclusion tags are an important tool to keep templates small and let them represent only one thing. If you want to render a complex UI, we advise you to split everything the user can see into smaller, logically encapsulated templates and subtemplates.
Monolithic templates
For example, say you need a profile page that displays not only an avatar image and the name of a person but also a news stream. You could put everything into one template, as shown in the following listing.
Listing 3.4. Full profile page template

If your UI gets more complex, you can imagine that your profile template could become big. This is bad for readability and code maintainability. It’s better to separate everything with its own logical function into a dedicated template and combine them in a main template. That way, your templates stay small and are easier to read and maintain. Two developers could split up the profile and news stream work and make independent changes much more easily.
Modular templates
Listing 3.5 shows our first template, partialsSplit. This is the main template that represents the site and contains two smaller templates. Two small templates represent the actual user profile (partialsUserProfile) and the news stream (partialsNewsStream). Also note that the layout is contained in the main partialsSplit template—in this case, the simple <div class="left"></div> and <div class= "right"></div>.
Listing 3.5. Splitting the profile page template

Tip
Avoid putting layout information into subtemplates. Let the parent template define the look and feel as well as the size of the elements they include.
Not having layout definitions buried inside subtemplates greatly improves reusability. Because there are no layout definitions in the partialsUserProfile template, you can easily reuse it on another page template and put it onto the right side into a <div class="right">{{> partialsUserProfile }}</div>.
Dynamically included templates
In addition to using static texts to include subtemplates, you can dynamically include a template based on the return value from a helper (see listing 3.6). That way, you can reactively switch templates without having to maintain complex if/else structures inside templates. In combination with reactive data sources like a session variable, they can be quite powerful.
Listing 3.6. Inserting subtemplates dynamically with helpers

3.3.3. Block tags
In contrast to expressions or partials, which are essentially placeholders, block tags change the behavior of the enclosed block of HTML. They start with double curly braces and a #. A sample block template tag may look like this:

Block tags are used not only to display content but also to have control over the processing of a template. You can either define your own block tags or use Spacebars:
- #if— Executes a content block if a condition is true or the else block if not
- #unless— Executes a block if a condition is false or the else block if not
- #with— Sets the data context of a block
- #each— Loops through multiple elements
The if/unless tag
One of the built-in tags is the #if block tag. It works like a normal if block in JavaScript. It checks a condition, and if it evaluates to true, the contents of the block are processed—that is, they’re rendered. Any value that’s considered to be true in a regular JavaScript context is also considered to be true by the #if tag. If a common falsey[3] JavaScript value like null, undefined, 0, "" (empty string), or false is passed to #if, the following block won’t be rendered (see table 3.1). Listing 3.7 shows an image tag only if there’s an image helper and it evaluates to true.
Anything that evaluates to false is considered falsey, even if the actual value is not false. Values that evaluate to true are considered truthy.
Table 3.1. Input values and their interpretation by #if
|
Input value |
Evaluates to |
|---|---|
| false, 0 (zero), "" (empty string), null, undefined, NaN, [] (empty array) | false |
| Strings (including “0”), arrays, objects (including empty objects) | true |
Listing 3.7. Using an if block

The counterpart to an #if block tag is the #unless block tag. It processes the block contents only if the condition evaluates to false (see the following listing).
Listing 3.8. Using an unless block

Both #if and #unless can be combined with an else tag in order to render one thing if the condition is true and another if it’s false. Listing 3.9 uses #if but it works just the same with #unless.
Listing 3.9. Using else in an if block

Note
There’s no tag {{elseif}}. To deal with more cases than true and false, you’ll either need to use nested if-else structures inside your template or, preferably, adjust your JavaScript code so that it can do the processing instead of the template.
Block tags and template tags always have to include valid HTML; otherwise Meteor will run into an error. That means you have to take care that tags that are opened are closed as well. Also, every element that opens inside a block must also be closed inside that block. You can’t, for example, include an opening <div> tag in an #if block tag and close after the {{else}} because this would result in invalid HTML for your page upon rendering. If you have errors in your templates, the application will crash and produce an error message. Figure 3.5 shows the resulting error message for the following code block:
Figure 3.5. Output for invalid HTML in templates


It’s perfectly all right, though, to use a block tag inside of an HTML attribute value:

The each/with tag
If you wish to pass multiple values to a template, the most common way is to use an array. When an array is passed to a template, you can iterate over its contents using an #each tag. #each takes an array as its argument and renders its block content for every item inside the array. In listing 3.10 skills is passed as an argument. This defines the so-called data context of the block. Without a data context, #each doesn’t render anything.
Listing 3.10. Using the #each tag

Whereas #each requires the template to have a data context, #with allows you to define a data context. The data context is the actual association between a template and any data.
Setting the data context using the #with tag requires a single attribute that will become the data context for the following block. Listing 3.11 shows an example where the data context for the template withBlock is explicitly set to profileJim.
Listing 3.11. Using the #with tag

There’s no need to explicitly specify a data context; using a helper automatically provides a context. Some more advanced use cases require you to do so. We’ll look at them when we talk about reactive data sources in the next chapter.
Technically, all built-in block tags are helpers. Let’s have a look at how you can create your own template helpers.
3.3.4. Helpers
When dealing with templates, you may often find it necessary to apply the same functionality again, such as formatting seconds into the HH:mm:ss format or applying control structures. This is when helpers are needed.
Helpers are JavaScript functions that can perform any kind of processing. They can either be limited to a single template or be made available globally. Global template helpers may be reused in all available templates, and it’s good practice to define them in a dedicated JavaScript file instead of the individual template JS files.
Local template helpers
A local template helper is used to extend one specific template only. It can’t be shared between other templates and exists only within the namespace of a template. In their simplest form, local template helpers look similar to expressions.
Every Template object has a helpers function, which takes an object that can contain multiple key-value objects. Typically the key represents the placeholder name that can be used inside a template, whereas the value is a function that returns something. The function’s return value doesn’t have to be a string, but it can be any static value like a number, an array, an object, or even a function that returns another value.
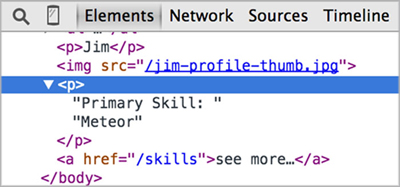
To simplify things, we’ve shown both the contents from the HTML file as well as the JavaScript file in listing 3.12. Some of the helpers return only a static value (name); others return an array (skills), an object (image), and even a function (hasMoreSkills). The rendered HTML code can be seen in figure 3.6.
Figure 3.6. Resulting code from local helpers
Listing 3.12. A profile template using different local helpers


To pass parameters to a helper function, simply write the parameters you want to pass after the helper function (separated by a whitespace). The order in which you pass the parameters will be the same as defined in the function itself.
Have a look at listing 3.12 again. The built-in helper #if evaluates the following expression to determine whether it is true or false:
{{#if hasMoreSkills skills}}
In this case it checks hasMoreSkills, which is a function that itself requires an input value. Therefore, instead of the standard behavior of using if followed by a single expression, a second placeholder is passed: skills. The content of the skills object is passed to the function represented by hasMoreSkills. If a person has multiple skills it’ll return true, so the if condition passes.
Global helpers
Oftentimes you have some helper that you need in more than just one template but you want to write it only once. Let’s say you want to create a helper that returns true if an array has more than n items. Let’s call this helper gt (as in greater than). This helper should be used in multiple templates, so create a globalHelpers.js file and put the helper code in there. Remember to wrap it in an if(Meteor.isClient){...} block because helpers—just like templates—are only available in the client scope.
You want the new helper to be available in all templates, so you can’t use Template .<templateName> to define it. Instead, use Template.registerHelper; the following listing shows how local and global helpers are combined.
Listing 3.13. Using global helpers to determine array length


Custom block helpers
Also globally available and very useful are custom block helpers. They allow you to build reusable UI components or widgets. Note that the actual helpers may be used even without any JavaScript.
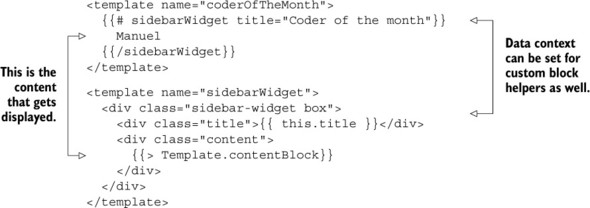
Suppose you define a new block helper named #sidebarWidget; you also need to define a template of the same name. The template will be injected where the block helper is called. Inside the template you use the partials syntax to include the output of Template.contentBlock. You can also access any other elements from the data context that may be passed to the block helper. This example will produce a sidebar widget with a title and some content.
When #sidebarWidget is called from within a template, it places its own contents between the {{#sidebarWidget }} and {{/sidebarWidget }} tags by including Template.contentBlock. Listing 3.14 shows how sidebarWidget can be used to wrap block contents in any template. The fact that it’s reusable makes it ideal for building UI components or widgets.
Adding {{> coderOfTheMonth }} to the body of an application creates the output shown in figure 3.7.
Figure 3.7. Reusable UI components or widgets can wrap any content using custom block helpers.

Listing 3.14. Custom block helpers with Template.contentBlock
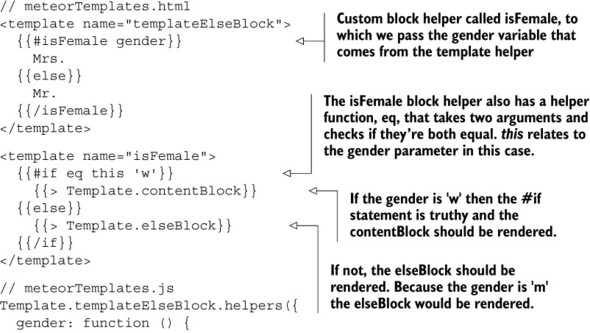
Besides the Template.contentBlock there’s a Template.elseBlock (see listing 3.15) that relates to the content block after an {{else}} template tag. This way, you can enhance block helpers with simple control structures.
Listing 3.15. Using Template.elseBlock
Moving logic into helpers
Using helpers to return a value that should be rendered is generally the better way to dynamically display content. The less logic exists within a template, the easier it is to troubleshoot and extend an application.
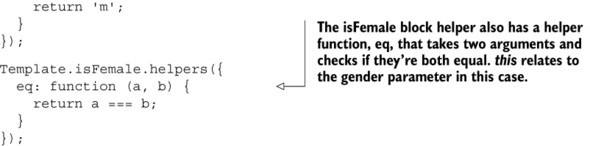
If you don’t require different HTML code for different cases, it’s best to define a helper that calculates the correct content to be displayed. This way, you can avoid using #if and #unless in your templates. Listing 3.16 uses a template, logicByHelper, that displays the correct salutation based on a single-character gender value that may be stored in a database. All processing is done by the helper function, not the template itself.
Listing 3.16. Moving template logic into a JavaScript helper

As you can see, you can define lots of different helpers for a template that can be static values or even functions that return some computed value.
You’ve learned how to use Spacebars to create and extend templates so that it’s easy to generate some HTML at the end. Now that you know how to create the HTML code of an application, let’s enable the user to interact with the rendered HTML using events.
3.4. Handling events
One of the main differences between a static site and an application is that applications allow for user interaction. They need to handle events such as button clicks and react to them. The response most of the time is basically the modification of the DOM in order to show users something that’s useful to them. To achieve this, there must be a way to do two things:
- Define the events the application listens to
- Define the actions that are triggered by an event
Meteor uses event maps to define events and their actions. DOM events are used in conjunction with CSS selectors to specify which elements and which events should be watched. Although you may use any DOM event for an event map, their behavior might differ between various browsers, but the events in table 3.2 should behave the same across all major browsers.
Table 3.2. Event types that work alike across all major browsers
|
Event type |
Use |
|---|---|
| click | Mouse click on any element, including links, buttons, or divs. |
| dblclick | Double-clicks using the mouse. |
| focus, blur | Text input or other form control fields that gain or lose focus. Any element with a tabindex property is considered focusable. |
| change | Check boxes or radio buttons that change state. |
| mouseenter, mouseleave | Entering or leaving an element with the mouse pointer. |
| mousedown, mouseup | Pressing and releasing the mouse button. |
| keydown, keypress, keyup | Pressing and releasing keys on a keyboard; keydown and keyup are mostly used for modifier keys such as Shift. |
3.4.1. Template event maps
Every template has its own event map. It’s defined inside a JavaScript file similar to the following listing.
Listing 3.17. Event map for layout template

Meteor uses jQuery to call the actual event handler functions. In this example, if the user clicks any button within the layout template, the corresponding event handler is called and the background color of the body is set to red. Clicking any button outside of the layout template wouldn’t trigger an action because the associated event map is only relevant for anything inside the layout template. But what happens if we use a child template and send an event to it? Change the code according to listing 3.18 and click either button to see.
Listing 3.18. Listening for events in a subtemplate
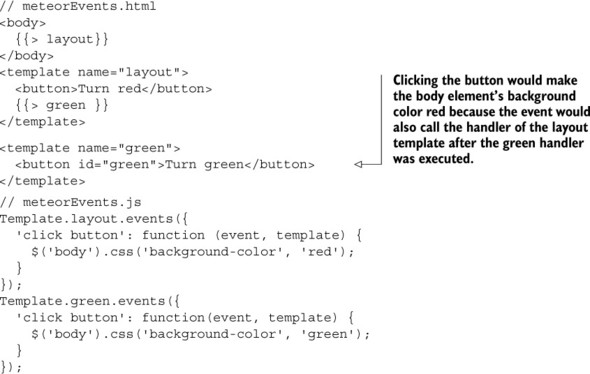
Even though we have two distinct event maps and two buttons, any click on a button in the updated code will turn the background to red, even clicking the Turn Green button. Why is that?
3.4.2. Event propagation
The phenomenon you can see at work here is called event propagation, or event bubbling. That means every event is first processed where it occurs and then passed upward in the DOM tree. There it may trigger another action.
In a best-case scenario, you’d cleverly use this as chaining; in the worst case—which this example shows—you’ll end up overwriting the action you wanted to take place with another.
Note
Event propagation may have unexpected side effects when working with event maps. Remember to stop it; otherwise, it’ll bubble up the DOM tree.
As you can see in figure 3.8, there are three template instances: the body, a layout template, and a green template. If the user clicks <button>Turn green</button> the event listener of the green template is called, because it listens for clicks on buttons inside its template scope. The first action that takes place sets the background-color attribute of body to green. But the event propagation isn’t done yet.
Figure 3.8. Action sequence for a click in the green template

The event is passed upward to the layout template, which also acts on click events. It calls its own event handler. Now a second action takes place, which sets the background-color attribute to red.
Technically the background color was green for a brief moment in time, but only as long as it took the event to propagate up. Therefore, the event handler of the green template has no visible effect.
Finally, the event is passed to the body element, and if it had an event map defined, it might even trigger a third action.
If you don’t want an event to be handled by multiple templates you can—and should—always stop the event propagation. Add stopImmediatePropagation() to your template’s event map to prevent events from bubbling up the DOM. Fix the event map for the green template by updating your code to the following listing.
Listing 3.19. Stopping event propagation within an event map

Now clicking the button turns the background color to green, regardless of whether the layout template also listens to button clicks. If you want to have even more control over event handling, you can also call evt.stopPropagation(). Doing so doesn’t prevent other event handlers from being executed, but if you prefer you can call evt.isPropagationStopped() to check whether stopPropagation() was called somewhere in the event chain. Using this technique, you can add an event handler to the body and react to the click event in the green template as well as in the body but not trigger the layout event handler.
3.4.3. Preventing the browser’s default behavior
Something you also want to prevent in many circumstances is the browser’s default event handling. For example, if you click a normal link (<a href="url">Go To</a>), the browser would open the URL specified in the <a> element’s href attribute and reload the page. Of course, in an application you build with Meteor you don’t want the browser to reload the page at any time. To prevent this, you can call event.preventDefault() (see listing 3.20) and the browser’s default behavior is prevented.
Listing 3.20. Preventing the browser’s default behavior

Before we move on to see how to integrate data into a template, the last topic we need to cover is the template life cycle.
3.5. The template life cycle
Putting a template inside the DOM and making it visible for the user is only part of its life cycle. Each template goes through three steps (figure 3.9) in order to get rendered in the browser. Each stage has an associated callback, which is useful to add custom behavior.
Figure 3.9. The template life cycle
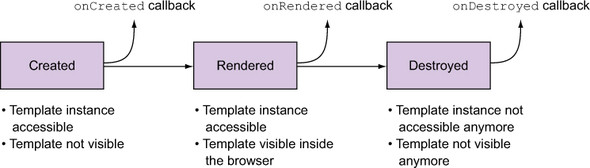
The first step when inserting a template into the DOM is called created. Although the actual template isn’t visible yet, the template instance is already accessible. The associated callback onCreated is especially useful if you want to initially create some properties for the template instance before it’s rendered and visible to the user. All properties that you set in the onCreated callback are available in the other life-cycle callbacks as well. You can even use them in your helpers and event handlers. To access a template instance from within a helper or event handler, use Template .instance().
Note
As you saw in chapter 2, jQuery’s scope can be limited to the current template instance and its subtemplates using template.$() or template.find().
The second state for a template is called rendered. The associated onRendered callback is used to initiate objects that are inside the DOM already. Typical examples are jQuery plug-ins like datepickers, calendars, or datetables. They require a rendered DOM element, so they’re initiated in the onRendered callback as shown in listing 3.21. Here we extend all elements inside the formTemplate that have a .dateinput class with a datepicker.[4]
To actually use a datepicker, you also need to add the required datepicker libraries to your project.
Listing 3.21. Initializing a jQuery plug-in to create a datepicker on an input element
Template.formTemplate.onRendered(function() {
  var templateInstance = this;

  templateInstance.$('.dateinput').datepicker({
    // additional options
  });
});
The third callback, onDestroyed, is used to clean up anything that you set up during the lifetime of a template. After it executes, the template instance is neither visible nor accessible anymore.
All three callbacks are just executed once and won’t be repeated, even if data on the page changes.
Let’s consider a simple scenario with a single placeholder expression:

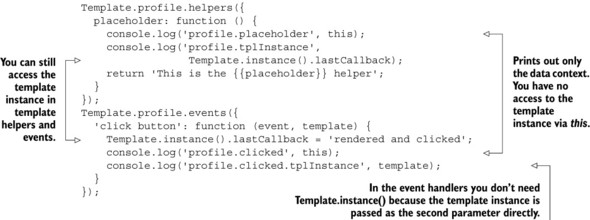
Listing 3.22 adds an explicit callback to each stage in a template’s life cycle. When the profile template is created, you attach a property lastCallback to the template object, set it to created, and print the object in the JavaScript console. This is also the place where you could already read the data context of a template. Inside the onRendered callback, you change the value for lastCallback to rendered. Using Template.instance(), the helper can read the value for lastCallback and the button click is able to update its value. The onDestroyed callback can’t be observed inside the browser console. All console messages are shown in figure 3.10.
Figure 3.10. Console messages for template callbacks

Listing 3.22. The template life-cycle callbacks

3.6. Summary
In this chapter, you’ve learned that
- Meteor uses its own reactive UI library called Blaze.
- Spacebars is Meteor’s default templating language and is an extended variation of Handlebars.
- Spacebars uses expressions, partials, blocks, and helpers to create small and modular templates.
- Helpers may be limited to a single template or available globally.
- Event maps are used to associate actions to events and elements.
- Each template goes through three steps—create, render, and destroy—in order to get rendered in the browser. Each stage has an associated callback, which is useful to add custom behavior.