
Chapter 10. Advanced server methods
- Understanding the difference between synchronous and asynchronous functions
- Using asynchronous functions
- Integrating external APIs
- Uploading files
Even though Meteor is an isomorphic platform, some things can only be done in certain environments. This chapter introduces you to some advanced concepts on the server. With Node.js running in the background, it’s time to take a closer look at the event loop and the right way to work with asynchronous code. This is especially useful if you plan to have your application communicate with external APIs.
While we’re looking into server specifics, we’ll also discuss a simple way to upload files to the server. The code in this chapter should run on the server unless stated otherwise.
10.1. Reintroducing Node.js
The foundation of the Meteor stack is Node.js (see figure 10.1). Technically, it’s a server implementation of the V8 JavaScript engine that can also be found in the Google Chrome browser. Therefore, it comes as no surprise that Node.js shows the same characteristics as a browser. It’s because of two reasons:
Figure 10.1. Node.js is the server engine for all Meteor applications.

- Node.js is event driven.
- Node.js uses nonblocking I/O.
These two characteristics make Node.js stand out from other server technology such as PHP or Rails that typically execute code in a linear or synchronous way. But even if Node.js is by nature nonblocking, you can still write blocking code.
JavaScript was designed for an environment where actions could take a long time—like querying additional data from a server over a 56k modem connection. It doesn’t block the execution of all other actions just because it waits for a return value. Imagine phoning a call center and being put on hold. Would you wait and listen to the music playing or would you do other things like rearranging your desk, walking around, or browsing the web? If you do anything else while waiting, then your call doesn’t block other activities and can be considered asynchronous.
Callbacks are usually used in JavaScript to get back to a task once a result is available. If call centers were powered by JavaScript, instead of making you wait they’d offer you a callback once an agent was free to talk to you. Most of the time they don’t, though, probably because it’s hard to keep track of large numbers of callbacks.
10.1.1. Synchronous code
Even though Meteor builds on top of the Node.js single-threaded event loop architecture (remember the pizza example from chapter 1?), the general programming style in its methods is synchronous rather than the asynchronous callback style typical of Node.js. The linear execution model is easier to follow and understand, especially on the server. This means that one function is processed after another and then the return value is returned. Meteor retains the scalability of Node.js and combines it with a simplified way of writing code (see following listing).
Listing 10.1. Blocking synchronous code in methods

Listing 10.1 uses a simple method that processes two synchronous functions and returns the result value. The way the blockFor3s function is called requires the server’s full attention until it completes, effectively blocking the CPU for all other requests. They have to wait until the blocking function completes. You can test this easily if you open two browsers and call the method in both via the console using the following:
Meteor.call('blockingMethod', 1);
You’ll notice that the first browser causes the method to run and the console.log is printed out in the terminal. If you call the method within 3 seconds on the second browser, it’s not called immediately. There’s no console message printed out to the terminal. Once the first method call is finished, the second method call is executed and the console.log is finally printed out to the console. If you call the method four times as quickly as you can and pass values from 1 to 4, the result will be the same as shown in figure 10.2. The method pauses for 3 seconds between each request.
Figure 10.2. Calling the nonBlocking method will result in a pause of 3 seconds between each response.

Now imagine hundreds of users making requests to an application that needs to run a method that can’t be run in parallel. Like a traffic jam, these requests would pile up and leave the app unresponsive and users unhappy. As long as you’re inside the event loop you need to allow methods to give way to others in order to avoid having a single user lock the entire application with a long-running request. The answer lies in using asynchronous code.
10.1.2. Asynchronous code
To prevent single operations from blocking the execution of all other activities, you should offload long-running tasks into another process. Processing-intense tasks could be executed on another CPU of the same machine or on a remote server. To accomplish this, Node.js typically uses callbacks. This means you call a function and register another function that should be executed once the long-running and blocking function is done. That second function is the callback. That way, the CPU isn’t blocked and it can continue processing other requests while waiting for the result of the long-running function (see figure 10.3).
Figure 10.3. While request 1 is waiting for another process to finish, two other requests are handled.

Simply adding a callback to the Meteor method from the blocking method in listing 10.1 won’t change the observed behavior, because methods don’t wait on callbacks before they finish. Instead, methods are processed from top to bottom and return their result to the caller of the method. Listing 10.2 shows an updated function, setTimeoutFor3s, that delays its own execution by 3 seconds using setTimeout.
Listing 10.2. Nonblocking method with simulated delay

At first the method call itself is added to the event loop and gets processed. The setTimeout function adds itself to the event loop as well, but it’ll be delayed and can be processed only after the original method has already finished. This explains why the return value of the method is 0 and only after 3 seconds the correct result, 3, will be printed out (figure 10.4). Because the method has already finished execution it can’t be returned, though. Therefore, the method can’t do anything based on the return value.
Figure 10.4. The callback function setTimeout is a new function on the event loop.

Now you’ve seen what won’t work. The next section introduces different ways to use asynchronous functions on the server side. Oftentimes you’ll need to be able to perform an asynchronous task inside a method call and be able to process the result and send it to the client. With Meteor there are different approaches to implementing asynchronous code that all share their dependency on fibers.
10.2. Asynchronous functions using fibers
Every method runs within a fiber (see section 10.2.1 for a definition) in Meteor, and the reason for that is to have a more synchronous coding style than you normally have if you’re programming with Node.js. One problem with Node.js is that you often end up with the so-called pyramid of doom or callback hell. This happens because you have the event loop where every function call is registered as an asynchronous callback. If you, for example, create a connection to a database, perform a query, make a call to an external API, and then save the result and return a value, in the end you wind up having five callbacks. Let’s look at the pseudocode in the following listing.
Listing 10.3. The pyramid of doom
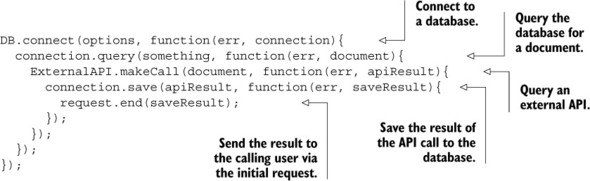
First you create a connection to a database; then you query the database for a document. This will possibly return the user’s Twitter handle. Next comes an API lookup; let’s say you retrieve the number of followers. This number will be stored in the database and the result will be returned to the user who initiated this flow of actions. Now imagine what listing 10.3 would look like with additional code that performs processing—it would be a nightmare to maintain. Luckily Meteor prevents you from using such complex structures.
10.2.1. Introducing multitasking to the event loop
By nature Node.js uses a single thread for everything it does. That’s great because this avoids all the ugly aspects of multithreaded environments, but it creates a need for a solution to do things in parallel. A Zen-like approach of doing one thing after another is great as a personal life choice, but servers usually need to deal with multiple requests at the same time, especially when there are multiple CPU cores waiting for something to do.
Fibers are one possibility for introducing lightweight threading characteristics to Node.js with low overhead. There are several concepts that deal with long-running or parallel tasks like futures, promises, or the callbacks we looked at earlier. Because Meteor heavily relies on fibers, we’ll limit our discussion to just them. In fact, fibers are one of the main reasons for Meteor’s popularity. To explain how they work, we’ll first look at the two main flavors of multitasking.
Preemptive and cooperative multitasking
To coordinate multitasking, you usually use a central scheduler to assign CPU cycles to threads. Schedulers have the power to suspend and resume threads whenever they see fit. With this preemptive approach to multitasking, resources may be evenly spread between processes. Unfortunately, the scheduler doesn’t know when it’s a good time to pause one task and resume another. If one thread requires a lot of CPU resources but the scheduler switches over to another that still needs to wait for an I/O operation to finish, it’s not very efficient.
Inside the context of a process, it’s much simpler to determine whether a task is currently waiting for the result from another operation (for example, calling a remote API or writing to the database) and handing over the CPU to another task that can use it. This is called cooperative multitasking. Each cooperative thread may yield (that is, give resources) to others while they need to wait. This is different from the commonly used preemptive multitasking (for example, when the operating system’s scheduler decides that one thread must give resources to another thread).
Fibers and the event loop
Fibers introduce cooperative multitasking to the event loop. They’re exclusive to the server and can’t be used in the browser. Fibers are sometimes referred to as green threads, because unlike regular threads that are scheduled by the operating system, fibers are managed by the single-threaded Node.js server.
You’ll hardly ever need to create a fiber yourself in a Meteor application because they’re built into the platform so that fibers are used automatically. By default, Meteor creates a dedicated fiber for each DDP connection. Because each client uses a single DDP connection, you can say it creates one fiber per client.
Listing 10.3 showed how for every callback the pyramid gets bigger and bigger. To avoid that, you can wrap all functions inside a fiber (see following listing).
Listing 10.4. Using fibers to avoid the pyramid of doom
Fiber(function(){
  var connection, document, apiResult, saveResult = null;

  DB.connect(options, function(err, con){
      connection = con;
  });

  connection.query(something, function(err, doc){
    document = doc;
  });

  ExternalAPI.makeCall(document, function(err, res){
    apiResult = res;
  });

  connection.save(apiResult, function(err, res){
    saveResult = res;
  });

  request.end(saveResult);

}).run()
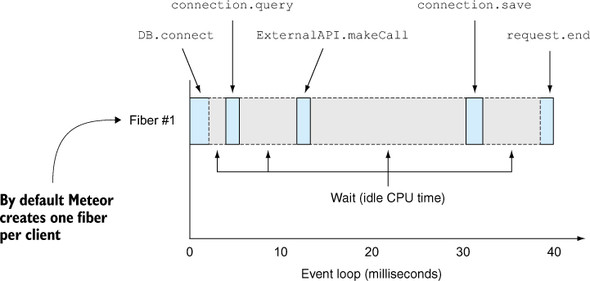
The code in listing 10.4 looks a lot easier to follow. Even though you’re using asynchronous functions, within a fiber the execution is synchronized. The synchronous execution doesn’t affect or even block other fibers (see figure 10.5)—no more pyramid is visible. Meteor uses exactly the same approach behind the scenes.
Figure 10.5. Meteor uses a fiber inside the event loop for each DDP connection.
Even if you weren’t aware of it, every time you use find() on a collection within a server method, you actually execute a nonblocking database query:
var user = Meteor.users.findOne({name: 'Michael'});
return user.name;
To access the database and return a result, Meteor automatically wraps the instructions in a fiber. The downside of this is that it becomes more complicated to use asynchronous external APIs. In section 10.1.2 we looked at a simple example where we used setTimeout to simulate an asynchronous function call. Unfortunately, the method finished and returned a value before the asynchronous call did. To change that, you can use fibers.
You interact with Meteor’s internally used fibers via three commands (see figure 10.6):
Figure 10.6. Making asynchronous calls using fibers

- wrapAsync— Attaches a callback back to the current fiber
- unblock— Enables multiple operations to execute in parallel within a single fiber
- bindEnvironment— Creates a new fiber to maintain the current environment (for example, global variable values)
10.2.2. Binding callbacks to a fiber with wrapAsync
Meteor creates a new fiber per client request, so you could assume that all code is already executed within a fiber. But callbacks break out of a given fiber and return their result without the previous context (such as which user made a request in the first place). Hence, a common error message in Meteor is “Meteor code must always run within a fiber.” When dealing with callbacks, you can use the Meteor.wrapAsync function to ensure that the result from the callback stays within a certain fiber. You can wrap any other function in a fiber using wrapAsync. Without passing a callback as an argument, it calls a function synchronously; otherwise, it actually is asynchronous. Only when a callback is provided will Meteor be able to restore the environment captured when the original function was called, effectively putting the result into the same fiber.
Listing 10.5 shows an updated method named wrapAsyncMethod we’re going to call. In this method, an asynchronous function with a callback is invoked. With the help of a fiber, it’s possible to wait for the asynchronous function to complete and only then the execute the method, returning the correct value. This helper function automatically runs the async function in the current fiber (see figure 10.7).
Figure 10.7. Using wrapAsync in order to wait for a callback to provide a method’s return value

Listing 10.5. Calling a function using wrapAsync

Note
wrapAsync takes a standard callback function as the last parameter with an error and response parameter: callbackFunction( err, result ){}.
10.2.3. Unblocking method calls for a single client
If you call a method, it may perform several tasks. On the other hand, there are times when multiple tasks are performed by different methods and you want to call multiple methods in parallel for the same client. As you know, each client has an associated fiber and every method runs in it in a synchronous fashion, one at a time. If a client calls methodA and methodB afterward, the default behavior is to wait for methodA to finish before invoking methodB.
Let’s assume you call a method two times, one after the other (from the same browser) and the method called is a long-running method that’s blocking, as in the following listing.
Listing 10.6. Sequentially executing methods
block = function(value, cb) {
  Meteor.setTimeout(function(){
    cb(null, true);
  }, 3000);
}

Meteor.methods({
'sequential': function (value) {
    console.log('Method.sequential', value);
    Meteor.wrapAsync(block)(value);
    console.log('Method.sequential returns', value);
    return true;
  }
});
In a browser console you can now issue both method calls like this:
Meteor.call('sequential', 'first', function(err,res){
  console.log('done first'),
});

Meteor.call('sequential', 'second', function(err,res){
  console.log('done second'),
});
Did you notice anything? In this example the methods are called sequentially. The first callback function is executed after 3 seconds and the second callback 3 seconds after that. To execute the methods immediately and in parallel, you can use this.unblock() in the method, as shown in listing 10.7. If a method is still waiting for a result, using unblock allows Meteor to create a new fiber if the same client makes additional method calls.
Listing 10.7. Using unblock to let other functions continue

In this case, both methods run immediately and both callbacks will be executed after 3 seconds. Neither method has to wait for the other. Test it by calling the method from the browser using Meteor.call.
As you can see in figure 10.8, calling the sequential method will execute the first request and 3 seconds later the second, whereas the unblock method executes both requests at once.
Figure 10.8. Running methods sequentially and using unblock

10.2.4. Creating fibers with bindEnvironment
For certain operations, it’s important to access the environment from which you made an asynchronous function call. Let’s assume you have the accounts package added and you want to access the current userId in a simple method. As long as you do so asynchronously, you can do it easily like this:
Meteor.userId()
In the scope of a method, you can read the value for userId just fine because Meteor automatically attaches various variables to the fiber. Methods allow you to access the given environment at the time it was called via this. Through this invocation object, you can access different attributes and functions such as this.userId, which relates to the user that called the method. If you call a function that’s executed outside the current fiber, you’ll lose access to these environmental variables.
When calling an asynchronous function (setTimeoutFor3sCb) that takes 3 seconds to return its result, the original environment gets lost inside the callback. Suddenly this has lost access to userId because it relates to the global object instead of the invocation object.[1] That’s the reason the first console.log can print out the current user ID to the terminal and the second attempt to log causes an error: “Meteor.userId can only be invoked in method calls.” To illustrate the problem, take a look at the following listing.
For a more in-depth explanation of the this keyword in JavaScript, take a look at http://stackoverflow.com/questions/133973/how-does-this-keyword-work-within-a-javascript-object-literal.
Listing 10.8. Using Meteor.userId() in a callback for a method

When using asynchronous functions in a method that needs to be able to access the current environment, you can use Meteor’s bindEnvironment function. bindEnvironment creates a fiber and attaches the correct environment automatically. In our example, it’s sufficient to change the method as shown in listing 10.9. The entire callback function is wrapped in a Meteor.bindEnvironment() block.
Listing 10.9. Using Meteor.userId() in a bound callback for a method

Figure 10.9 shows a call to both an unbound and a bound environment. Because the value for Meteor.userId gets lost in the callback, the unbound example throws an error message whereas the second call to the bound method succeeds.
Figure 10.9. Callbacks in an unbound environment return an error when accessing Meteor.userId.

Most of the time, it’s sufficient to use wrapAsync for calling asynchronous functions. Only when you need to access the given environment and can’t pass all required variables to a function call should you use bindEnvironment. Most of the time, using wrapAsync is fine.
Look back at chapter 7, where we discussed the publication of aggregated data to the client. In this scenario, we also had to use bindEnvironment to make sure that the publication isn’t blocked by waiting for the result from MongoDB.
10.3. Integrating external APIs
Many applications rely on external APIs to retrieve data. Getting information regarding your friends from Facebook, looking up the current weather in your area, or simply retrieving an avatar image from another website—there are endless uses for integrating additional data. They all share a common challenge: if APIs must be called from the server, calling the API usually takes longer than executing the method itself. You saw in the previous section how to deal with this theoretically—now we’ll integrate an external API via HTTP.
Based on the IP address of your visitors, you can determine various information about their current location, such as coordinates, city, or time zone. There’s a simple API that takes an IPv4 address and returns all these tidbits as a JSON object, and it’s called Telize (www.telize.com).
10.3.1. Making RESTful calls with the http package
To communicate with RESTful external APIs such as Telize, you need to add the http package:
$ meteor add http
Although the http package allows you to make HTTP calls from both the client and the server, the API call in this example will be performed from the server only. Many APIs require you to provide an ID as well as a secret key to identify the application that makes an API request. Even though you won’t need any credentials for this example, in many other cases you will, and then you should run your requests from the server. That way, you never have to share secret keys with clients. Figure 10.10 explains the basic concept. A user requests location information for an IP address (step 1). The client application calls a server method called geoJsonforIp (step 2) that makes an asynchronous call to the external API using the HTTP.get() method (step 3). The response (step 4) is a JSON object with information regarding the geographic location associated with an IP address, which gets sent back to the client via a callback (step 5).
Figure 10.10. Data flow when making external API calls

10.3.2. Using a synchronous method to query an API
Let’s add a method that queries telize.com for a given IP address, as shown in listing 10.10. This example includes only the bare essentials for querying an API.
Listing 10.10. Querying an external API using a synchronous method

Once the method is available on the server, querying the location of an IP works by calling the method with a callback from the client:
Meteor.call('geoJsonForIp', '8.8.8.8', function(err,res){
  console.log(res);
});
Although this solution appears to be working fine, there are two major flaws to this approach:
- If the API is slow to respond, requests will start queuing up.
- Should the API return an error, there’s no way to return it back to the UI.
To address the issue of queuing, you can add an unblock() statement to the method:
this.unblock();
As you know from the previous sections, calling an external API should always be done asynchronously. That way, you can also return possible error values back to the browser, which will solve the second issue. Let’s create a dedicated function for calling the API asynchronously to keep the method itself clean.
10.3.3. Using an asynchronous method to call an API
Listing 10.11 shows how to issue an HTTP.get call and return the result via a callback. It also includes error handling that can be shown on the client.
Listing 10.11. Dedicated function for asynchronous API calls

Inside a try...catch block you can differentiate between a successful API call (the try block) and an error case (the catch block). A successful call may return null for the error object of the callback; an error will return only an error object and null for the actual response.
There are various types of errors and you want to differentiate between a problem with accessing the API and an API call that got an error inside the returned response. This is what the if statement checks for: in case the error object has a response property both code and message for the error should be taken from it; otherwise you can display a generic error 500 that the API couldn’t be accessed.
Each case, success and failure, returns a callback that can be passed back to the UI. To make the API call asynchronous, you need to update the method as shown in listing 10.12. The improved code unblocks the method and wraps the API call in a wrapAsync function.
Listing 10.12. Updated method for making asynchronous API calls

Finally, to allow requests from the browser and to show error messages, you should add a template similar to the following listing.
Listing 10.13. Template for making API calls and displaying errors

The JavaScript required to connect the template with the method call is shown in listing 10.14. A Session variable called location is used to store the results from the API call. Clicking the button takes the content of the input box and sends it as a parameter to the geoJsonForIp method. The Session variable is set to the value of the callback.
Listing 10.14. Template helpers for making API calls

10.4. Uploading files to a collection
Although uploading files is one of the most common functions used on the web, implementing this functionality isn’t trivial. You can store uploaded content in various places (see figure 10.11), and each option has its pros and cons:
Figure 10.11. File storage and upload options for Meteor applications

- The local filesystem
- Remote storage
- The application’s database
Most developers find that the local filesystem is the natural solution for storing files (Option A). It’s already there, it’s reasonably fast, and it can hold as much content as space is available. Many hosting providers don’t offer access to the local filesystem due to both security and performance reasons. Imagine a malicious script starting to write hundreds of megabytes to fill up disk space, effectively causing a denial of service for all applications hosted on this instance. In practice this means that when deploying your application to a service such as meteor.com you won’t be able to store data on the local disks; you need to upload files to a different location. A better solution for applications on the web is a separation of applications and data storage.
These days, cloud storage providers (Option B) are common because they offer a lot of advantages: they’re fast and highly available, and redundant storage will keep your files safe. At the same time, setting up your application with them is a bit complicated and they can be costly. Cloud storage providers are a great option for scaling out production applications, but if you want quick results, you might consider another option.
A third possibility is to store files in the application’s database (Option C). Unlike the filesystem you always have access to it, and having all data in a single place makes backups a breeze. Unfortunately, using the database for storing files is highly inefficient because it’s slow and takes significantly more space than saving directly to the filesystem. MongoDB is designed to store files, but they’re limited to the maximum document size of 16 MB. Storing files within collections requires some overhead, so the actual maximum file size is around 12 MB. MongoDB can be configured to use the GridFS filesystem, which allows you to use files of any size. Either way, it remains an inefficient yet convenient way to store files.
For small files such as avatar images or building prototypes, the database is a viable option, and it gives developers the most portable and simplest solution to implement. In the next section, you’ll implement Option C (see the accompanying sidebar for other ways to implement uploads).
Although storing files in the database is convenient and easy to implement, it’s hardly advisable for most production scenarios. For better performance and scalability, both the local filesystem and cloud storage providers are a much better fit.
tomi:upload-server allows users to upload files to the local filesystem, and when used in combination with tomi:upload-jquery, it also enables a full UI that also works well on mobile devices (this package implements Option A).
CollectionFS comes with various storage adapters that allow you to store files in the local filesystem (cfs:filesystem), in a MongoDB using the GridFS filesystem (cfs:gridfs), or in an S3 bucket (cfs:s3) (CollectionFS can be used to implement any of the three options).
When uploading files to a cloud provider, you might not want to first upload to your server and then forward to the actual storage. The client can also upload directly to Google Cloud, Rackspace, or others. The edgee:slingshot package implements the required functionality and works in combination with Option B.
10.4.1. Uploading files to the database
In this example you’ll create a template to select a file, which will be uploaded directly to a MongoDB collection. Files can then be published and subscribed to just like any other database content. Image data will be stored in a Base64-encoded format so that it’s simple to display images in the browser.
Each file document will have a name property and the file contents in a field called base64.
Requirements and limitations
There are no additional requirements for uploading files to the database except from the usual Meteor components: an application and a database. You’ll be using the HTML5 FileReader API in the browser to upload files, so not all browsers are supported, namely Internet Explorer 8 and 9.[2]
You can check which browsers support the FileReader API at http://caniuse.com/#feat=filereader.
Templates
All that’s needed for uploading files is an input element. You don’t even need a button because the upload can start immediately when a file has been selected (listing 10.15).
For displaying images normally, you’d pass a URL to the src attribute of the img tag. Because this image isn’t accessible from a URL, you can also pass the Base64-encoded content directly to the src attribute. For displaying multiple images from a collection, you can use an {{#each}} block—again, just as you do for any other database content.
Listing 10.15. Template code for uploading files
<template name="upload">
  <h2>Upload a file</h2>
  <input type="file" id="file-upload" />
</template>

<template name="file">
  {{#with file}}
    <h2>{{name}}</h2>
    <img src="{{base64}}" />
  {{/with}}
</template>
Limiting publications to a single file
The first step is to create a new collection that will be used to store files:
FilesCollection = new Mongo.Collection('files'),
This collection should be available on both client and server. Perform a meteor remove autopublish to avoid sending all files to all clients. This collection will become extremely big!
Note
When publishing files from collections, take care to limit the publication to a single file to avoid sending hundreds of megabytes to each connected client.
The required code to set up a publication for a single file only is shown in listing 10.16. The requested filename is passed to the publication via a Session variable. This means that only a single image can be displayed at a time. If you need to display multiple images from the FilesCollection, you must adjust the function to take an array of names.
Listing 10.16. Code for publishing and subscribing to a single file

Now that files from the database can be sent to the client, it’s time to implement the upload process.
Using the FileReader API to upload images to a collection
By taking advantage of HTML5’s native capabilities, you won’t need any Meteor-specific code for uploading files in the client. Selecting a file will trigger the upload and hand the file’s contents to a server-side method to store it in the database. As you can see in the following listing, the code looks a bit complicated, so we’ll go through it line by line.
Listing 10.17. Using FileReader to upload a file
if (Meteor.isClient) {
  Template.upload.events({
    'change #file-upload': function (event, template) {
      var file = event.target.files[0];
      var name = event.target.files[0].name;

      var reader = new FileReader();
      reader.onload = function (file) {
        var result = reader.result;
        Meteor.call('saveFile', name, result);
      }
      reader.readAsDataURL(file);
    }
  });
}
The code listens for changes to an input field with the ID file-upload in the uploads template. Although the FileReader API allows multiple files to be uploaded at one time, this code supports only a single file at a time. The actual file is accessible via the current event: event.target.files[0]. You can access the filename via the name property of the object; this gets assigned to a variable. An instance of FileReader is created (reader). The onload event is triggered when the file was successfully read, which is when you can send the file contents to the server method saveFile. The method takes two arguments: the filename and a Base64 string that holds the file contents (result).
To tell FileReader to load the file, you use the readAsDataURL() function. This function reads binary data and automatically encodes it into Base64. When this action finishes successfully, the onload() event is triggered.
If you want, you can perform additional validations before calling the server method, such as validating that the file in question is indeed an image:
if (!file.type.match('image.*')) {
  alert('Only image files are allowed'),
  return;
}
The corresponding server method, saveFile (listing 10.18), should look quite familiar to you; the only difference from the examples you saw earlier is that buffer holds a lot more data and is Base64 encoded. All data is sent via DDP to methods, and this is no exception. The upload is done completely via WebSockets and doesn’t use traditional HTTP.
Listing 10.18. saveFile method for storing files in a collection
if (Meteor.isServer) {
  Meteor.methods({
    'saveFile': function (name, buffer) {
      FilesCollection.insert({
        name: name,
        base64: buffer
      })
    }
  });
}
All that’s left to do is display image content.
Displaying images stored in a collection
At this point the remaining code is simple enough. The image will be returned like any other collection document:
if (Meteor.isClient) {
  Template.file.helpers({
    'file': function () {
      return FilesCollection.findOne();
    }
  });
}
You added the template earlier, so you can test your new upload functionality now.
Remember that this easy solution isn’t suitable for large files and high-traffic environments, but it’s quite useful for implementing quick and portable upload functionalities.
10.5. Summary
In this chapter, you’ve learned that
- Even though Node.js is nonblocking by design, it’s possible to write blocking code in Meteor applications.
- Meteor uses fibers to make it easier to write asynchronous code.
- When writing asynchronous code on the server, you’ll probably use unblock() and wrapAsync. There are only rare cases where you should use bindEnvironment.
- Calls to external APIs using the http package should be made asynchronously to avoid blocking.
- Asynchronous server functions may return errors back to the client via callbacks.
- There are various options for handling file uploads. Without using community packages, the easiest way is to use the application’s database.