The last issue on our to-do list is the invoicing process. For this, we use a part of the standard application.
As explained in Chapter 1, Introduction to Microsoft Dynamics NAV, invoicing is done using a document structure with a header and a line table. This has a posting routine that will start the journal transactions.
For our application, we need to create the invoice document and make sure that when posted, it updates our sub administration.
The sales invoice documents in Microsoft Dynamics NAV are stored in the Sales Header (36) and Sales Line (37) tables. We will create a report that will combine the outstanding reservation entries into invoices allowing the user to filter on a specific entry or any other field value in the squash ledger entry table.
Reports in Microsoft Dynamics NAV are not just for printing documents; we can also use its dataset capabilities to start batch jobs.
To enable this, our batch job needs to have a special property, ProcessingOnly, so let's start a blank report and do this.

The report will browse through the squash ledger entries filtered on entry type Reservation and open Yes. The sorting is Open, Entry Type, Bill-to Customer No., and Reservation Date. To use sorting, the fields must be defined together as a key in the table definition.

As Bill-to Customer No. is the first non-filtered value in the sorting, we can assume that if this value changes, we need a new sales header.
For every squash ledger entry, we will generate a sales line as follows:
Squash Ledger Entry - OnAfterGetRecord()
IF "Bill-to Customer No." <> SalesHdr."Bill-to Customer No."
THEN
  CreateSalesHdr;

CreateLn;The code to create a sales header is as follows:
CreateSalesHdr()
CLEAR(SalesHdr);
SalesHdr.SetHideValidationDialog(TRUE);
SalesHdr."Document Type" := SalesHdr."Document Type"::Invoice;
SalesHdr."Document Date" := WORKDATE;
SalesHdr."Posting Date" := WORKDATE;
SalesHdr.VALIDATE("Sell-to Customer No.",
  "Squash Ledger Entry"."Bill-to Customer No.");
SalesHdr.INSERT(TRUE);

NextLineNo := 10000;
CounterOK := CounterOK + 1;
The SetHideValidationDialog function makes sure we don't get pop-up messages while validating values. This is a standard function in Microsoft Dynamics NAV, which is designed for this purpose.
The TRUE parameter to the INSERT statement makes sure that the Number Series are triggered.
To create a sales line, we need a minimum of the following code. Please note that we added the field Applies-to Squash Entry No. to the sales line table.
CreateLn()
WITH "Squash Ledger Entry" DO BEGIN
  GenPstSetup.GET("Gen. Bus. Posting Group",
    "Gen. Prod. Posting Group");
  GenPstSetup.TESTFIELD("Sales Account");

  SalesLn.INIT;
  SalesLn."Document Type" := SalesHdr."Document Type";
  SalesLn."Document No." := SalesHdr."No.";
  SalesLn."Line No." := NextLineNo;
  SalesLn."Dimension Set ID" := "Dimension Set ID";

  SalesLn."System-Created Entry" := TRUE;

  SalesLn.Type := SalesLn.Type::"G/L Account";
  SalesLn.VALIDATE("No.", GenPstSetup."Sales Account");
  SalesLn.Description := Description;

  SalesLn.VALIDATE(Quantity, Quantity);
  SalesLn.VALIDATE("Unit Price", "Unit Price");
  SalesLn.VALIDATE("Unit Cost (LCY)", "Unit Cost");

  SalesLn."Applies-to Squash Entry No." := "Entry No.";
  SalesLn.INSERT(TRUE);

END;
NextLineNo := NextLineNo + 10000;
Tip
When you add fields to the sales and purchase document tables, make sure to also add these to the posted equivalents of these tables with the same number. This way you make sure that the information is copied to the historic data. This is done using the TRANSFERFIELDS command. We will discuss these tables in Chapter 6, Trade.
If the combined invoicing takes some time, it might be good to show the user a process bar. For this, Microsoft Dynamics NAV has a standard structure.
The window shows the bill-to customer no. it is currently processing and a bar going from 1 percent to 100 percent. This is calculated by keeping a counter.
At the end of the process, we show a message telling the user how many invoices were created out of the number of squash ledger entries.
Squash Ledger Entry - OnPreDataItem()
CounterTotal := COUNT;
Window.OPEN(Text000);

Squash Ledger Entry - OnAfterGetRecord()
Counter := Counter + 1;
Window.UPDATE(1,"Bill-to Customer No.");
Window.UPDATE(2,ROUND(Counter / CounterTotal * 10000,1));

...

Squash Ledger Entry - OnPostDataItem()
Window.CLOSE;
MESSAGE(Text001,CounterOK,CounterTotal);
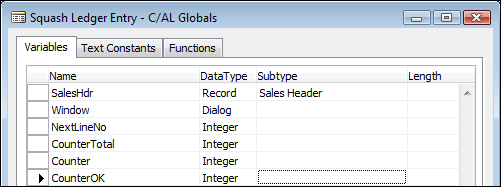
To do this, we need some variables. The Window variable is of type Dialog whilst Counter, CounterTotal, and CounterOK are integers, as shown in the following screenshot:
The constant Text000 has the special values #1########## and @2@@@@@@@@@@@@@. The first allows us to show and update some text; the latter is used to create the process bar.

The result will look like what is shown in the following screenshot:

Note
There is a best practice document about using progress bars in combination with the impact on performance at http://www.mibuso.com/howtoinfo.asp?FileID=17.
Now, our Sales Invoice is ready so we can start making the necessary changes to the posting process. Posting a sales document is done using a single posting codeunit and some helper objects.
- Report 297: This report can be used to post more than one document at the same time with a filter.
- Codeunit 80: This is the actual posting routine we are going to change.
- Codeunit 81: This codeunit is called from the user interface and has a dialog if the user wants to ship, invoice, or both if the document is an order and a yes/no if the document is an invoice or credit memo.
- Codeunit 82: When the user chooses post and print, this codeunit is executed, which does the same as Codeunit 81 plus printing a report.
So we will make a change to Codeunit 80. This codeunit has a specific structure that we need to understand before we go in and make the change.
The codeunit also has the Test Near, Test Far, Do it, and Clean up strategy so the first step is to make sure everything is in place before the actual posting starts. Let's have a look at how this codeunit is structured.
This first part does the test near step and a part of the test far step. The Ship, Invoice, and Receive fields are set in codeunit 81 and 82 but checked and completed to make sure.
Code()
...
WITH SalesHeader DO BEGIN
  TESTFIELD("Document Type");
  TESTFIELD("Sell-to Customer No.");
  TESTFIELD("Bill-to Customer No.");
  TESTFIELD("Posting Date");
  TESTFIELD("Document Date");
  IF GenJnlCheckLine.DateNotAllowed("Posting Date") THEN
    FIELDERROR("Posting Date",Text045);
  CASE "Document Type" OF
    "Document Type"::Order:
      Receive := FALSE;
    "Document Type"::Invoice:
      BEGIN
        Ship := TRUE;
        Invoice := TRUE;
        Receive := FALSE;
      END;
    "Document Type"::"Return Order":
      Ship := FALSE;
    "Document Type"::"Credit Memo":
      BEGIN
        Ship := FALSE;
        Invoice := TRUE;
        Receive := TRUE;
      END;
  END;

  IF NOT (Ship OR Invoice OR Receive) THEN
    ERROR(...);

  WhseReference := "Posting from Whse. Ref.";
  "Posting from Whse. Ref." := 0;

  IF Invoice THEN
    CreatePrepaymentLines(...);
  CheckDim;
The next step is moving the sales header information to the history tables for shipment, invoice, credit memo, or return receipt header. These sections are commented like this:
  // Insert invoice header or credit memo header
  IF Invoice THEN
    IF "Document Type" IN ["Document Type"::Order,
      "Document Type"::Invoice]
    THEN BEGIN
      SalesInvHeader.INIT;
      SalesInvHeader.TRANSFERFIELDS(SalesHeader);
Note
We will discuss the relation between a sales header and the sales shipment, sales invoice, sales credit memo, and return receipt in Chapter 6, Trade.
When this is done, the sales lines are processed. They are also moved to the various posted line tables. This is all part of the Do it section of the posting routine.
  // Lines
  InvPostingBuffer[1].DELETEALL;
  DropShipPostBuffer.DELETEALL;
  EverythingInvoiced := TRUE;

  SalesLine.RESET;
  SalesLine.SETRANGE("Document Type","Document Type");
  SalesLine.SETRANGE("Document No.","No.");
  LineCount := 0;
  RoundingLineInserted := FALSE;
  MergeSaleslines(...);
If there is a drop shipment in a purchase order, this is handled here. We will discuss drop shipments in Chapter 6, Trade.
  // Post drop shipment of purchase order
  PurchSetup.GET;
  IF DropShipPostBuffer.FIND('-') THEN
    REPEAT
      PurchOrderHeader.GET(
        PurchOrderHeader."Document Type"::Order,
        DropShipPostBuffer."Order No.");
Then there is a section that creates the financial information in the general journal. We will go deeper into this section in Chapter 3, Financial Management.
  IF Invoice THEN BEGIN
    // Post sales and VAT to G/L entries from posting buffer
    LineCount := 0;
    IF InvPostingBuffer[1].FIND('+') THEN
      REPEAT
        LineCount := LineCount + 1;
        Window.UPDATE(3,LineCount);

        GenJnlLine.INIT;
        GenJnlLine."Posting Date" := "Posting Date";
        GenJnlLine."Document Date" := "Document Date";
Then the Clean up section starts by calculating remaining quantities, VAT, and deleting the sales header and sales lines if possible.
IF ("Document Type" IN ["Document Type"::Order,
  "Document Type"::"Return Order"]) AND
   (NOT EverythingInvoiced)
THEN BEGIN
  MODIFY;
  // Insert T336 records
  InsertTrackingSpecification;

  IF SalesLine.FINDSET THEN
    REPEAT
      IF SalesLine.Quantity <> 0 THEN BEGIN
        IF Ship THEN BEGIN
          SalesLine."Quantity Shipped" :=
            SalesLine."Quantity Shipped" +
            SalesLine."Qty. to Ship";
          SalesLine."Qty. Shipped (Base)" :=
            SalesLine."Qty. Shipped (Base)" +
            SalesLine."Qty. to Ship (Base)";
        END;
The Clean up section ends by deleting the sales document and related information and clearing the variables used.
IF HASLINKS THEN DELETELINKS;
DELETE;
...

SalesLine.DELETEALL;
DeleteItemChargeAssgnt;
...

CLEAR(WhsePostRcpt);
CLEAR(WhsePostShpt);
...
CLEAR(WhseJnlPostLine);
CLEAR(InvtAdjmt);
Window.CLOSE;
The change we are going to make is in the section where the lines are handled:
// Squash Journal Line
IF SalesLine."Applies-to Squash Entry No." <> 0 THEN
  PostSquashJnlLn;

IF (SalesLine.Type >= SalesLine.Type::"G/L Account") AND
  (SalesLine."Qty. to Invoice" <> 0)
THEN BEGIN
  // Copy sales to buffer
We will create a new function, PostSquashJnlLn. This way we minimize the impact on standard code and when we upgrade to a newer version, we can easily copy and paste our function and only need to change the calling place if required.
PostSquashJnlLn()
WITH SalesHeader DO BEGIN
  OldSquashLedEnt.GET(
    SalesLine."Applies-to Squash Entry No.");
  OldSquashLedEnt.TESTFIELD(Open);
  OldSquashLedEnt.TESTFIELD("Bill-to Customer No.",
    "Bill-to Customer No.");

  SquashJnlLn.INIT;
  SquashJnlLn."Posting Date" := "Posting Date";
  SquashJnlLn."Reason Code" := "Reason Code";
  ...
  SquashJnlLn."Document No." := GenJnlLineDocNo;
  SquashJnlLn."External Document No." := GenJnlLineExtDocNo;
  SquashJnlLn.Quantity := -SalesLine."Qty. to Invoice";
  SquashJnlLn."Source Code" := SrcCode;
  SquashJnlLn."Dimension Set ID" :=
    SalesLine."Dimension Set ID";
  SquashJnlLn.Chargeable := TRUE;
  SquashJnlLn."Posting No. Series" := "Posting No. Series";
  SquashJnlPostLine.RunWithCheck(SquashJnlLn);
END;
Our new function first gets the squash ledger entry it applies to and tests if it's still open and the bill-to customer no. has not changed. Then, we populate the squash journal line with the help of the sales line and the old squash ledger entry. Then dimensions are handled and the squash journal line is posted.
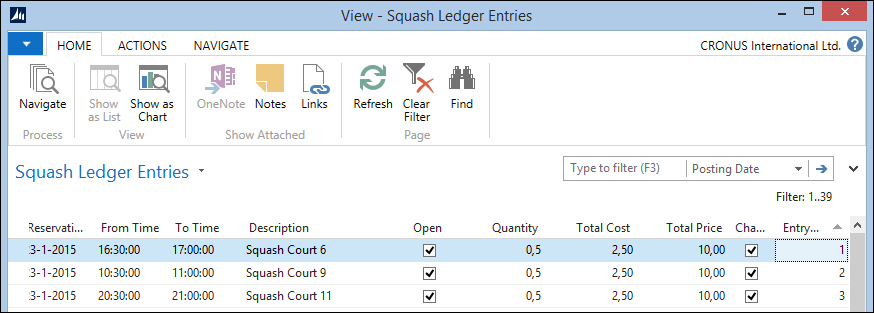
Now when we post an invoice, we can see that the invoice entries are created: