
We discussed all the available interface technologies for Microsoft Dynamics NAV. Let's have a look at how this has been implemented in the standard product.
In this book, we will not explore each interface in depth since that would almost require another book. We will just briefly discuss where to find all technologies we discussed in the standard application and indicate where a white paper or website can be found.
An example of flat file is Exporting Contacts. Microsoft Dynamics NAV allows us to export our contacts using an XMLPort.
The XMLPort for this functionality has number (5050) and uses the Format Variable Text. Other options are Xml and Fixed Text, as shown in the following screenshot:

XMLPorts have a node structure like pages. The XMLPort starts with integer table as the first data type followed by the Contact table fields.
Microsoft Dynamics NAV and Microsoft Office are integrated to use with Word, Excel, and Outlook. We will first discuss the standard Word and Excel integration and discuss alternatives later. Lastly, we will briefly discuss the possibilities for Outlook integration.
In Microsoft Dynamics NAV, each form or page can be exported to Word and Excel. This built-in technology is automatically provided by the user interface and requires no effort from developers.

Default presence of Excel and Word
To be more flexible in the layout, Microsoft has released a style sheet tool for Microsoft Dynamics NAV and Word. This tool allows users to easily generate style sheets.
Note
The style sheet tool Version 3.0 can be downloaded from http://www.mibuso.com/dlinfo.asp?FileID=1543.

The manual provided with the style sheet tool gives a good description about how to create the style sheets.

Add the action to the action designer (under the appropriate group) with the following properties:
Expanded    Type    SubType    Name                Caption
0           Action             <Action680>         Style Sheets
The OnAction trigger should contain the following line:
StyleSheetDataMgt.LoadStylesheetDataRTC(GETPOSITION,
  CURRENTKEY,PAGE::"<<PageName>>");
Here, StyleSheetDataMgt is a variable of type codeunit, 682 (Style Sheet Data Management).
When exporting information to Excel that needs to be combined from different parts of the application, using style sheets is not the ideal way.
To support this, the Excel Buffer table (370) can be used. This table can be populated with data and then sent to Excel using a simple C/AL command.
This is used in several parts of the application, for example, to import and export the budgets we discussed in Chapter 3, Financial Management.
Let's create a sample codeunit that exports data to Excel using the Excel Buffer table:
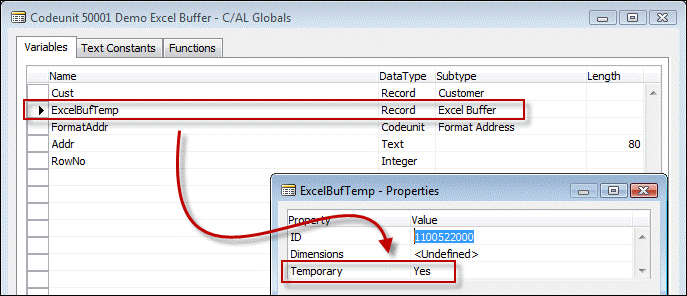
- Create a new codeunit and define a global variable of type record Excel buffer. This needs to be a temporary variable. Also, define the other variables as displayed in the following screenshot:
- Create a new
EnterCellfunction with the parameters displayed in the following screenshot: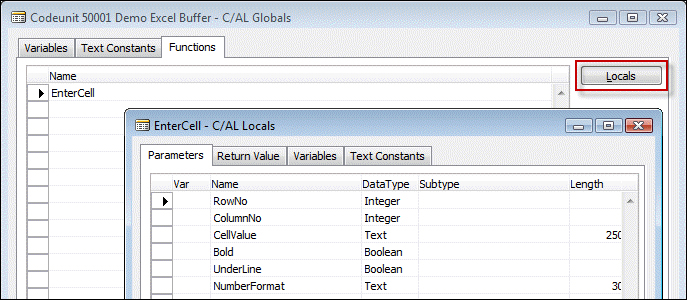
- Put the C/AL code in place that will handle the interface:
OnRun()
ExcelBufTemp.CreateBook(Cust.TABLECAPTION);

Cust.FIND('-'),
REPEAT
  RowNo := RowNo + 1;
  EnterCell(RowNo, 1, Cust."No.", FALSE, FALSE, ''),

  FormAddr.Customer(Addr, Cust);
  EnterCell(RowNo, 2, Addr[1], FALSE, FALSE, ''),
  EnterCell(RowNo, 3, Addr[2], FALSE, FALSE, ''),
  EnterCell(RowNo, 4, Addr[3], FALSE, FALSE, ''),
  EnterCell(RowNo, 5, Addr[4], FALSE, FALSE, ''),
  EnterCell(RowNo, 6, Addr[5], FALSE, FALSE, ''),
  EnterCell(RowNo, 7, Addr[6], FALSE, FALSE, ''),
  EnterCell(RowNo, 8, Addr[7], FALSE, FALSE, ''),
  EnterCell(RowNo, 9, Addr[8], FALSE, FALSE, ''),

UNTIL Cust.NEXT = 0;

ExcelBufTemp.WriteSheet(Cust.TABLECAPTION,COMPANYNAME,USERID);
ExcelBufTemp.CloseBook;
ExcelBufTemp.OpenExcel;
ExcelBufTemp.GiveUserControl;
EnterCell()
ExcelBufTemp.INIT;
ExcelBufTemp.VALIDATE("Row No.",RowNo);
ExcelBufTemp.VALIDATE("Column No.",ColumnNo);
ExcelBufTemp."Cell Value as Text" := CellValue;
ExcelBufTemp.Formula := '';
ExcelBufTemp.Bold := Bold;
ExcelBufTemp.Underline := UnderLine;
ExcelBufTemp.NumberFormat := NumberFormat;
ExcelBufTemp.INSERT;
This C/AL code will browse the customers in the database and format the addresses using the Address Format (365) codeunit.
The Customer No. field and the result array Addr[] are saved in the Excel buffer table. Lastly, we start the C/AL functions to generate the Excel spreadsheet based on the data.

C/AL functions result
Microsoft Dynamics NAV 2013 allows different levels of interfacing with Microsoft Outlook:
- The Outlook part on the Role Center.
- Sending e-mails from pages using the
ExtendedDatatypeproperty. - Using the Mail (397) or SMTP Mail (400) codeunits to send e-mails.
- Synchronize contacts and to-do's using the Outlook integration web service.
- Reading e-mail from exchange using the E-Mail – Logging functionality.
- Microsoft Dynamics NAV 2013 R2 can be connected to Office 365.
On a Role Center it is possible to activate the Outlook System Part. This allows users to see their e-mail, agenda, and tasks directly on the Role Center.

This functionality is built in the Windows client and cannot be changed using C/AL Code.
When a Text field in a table uses the ExtendedDatatype property, E-Mail the Windows client will automatically allow the users to directly send an e-mail to the address specified in the field.
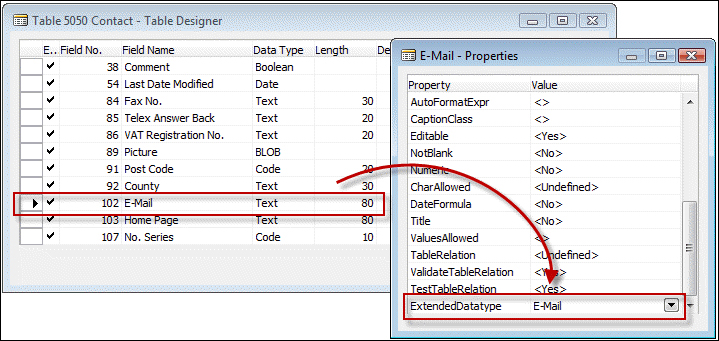
This is also built-in functionality in the Windows client that cannot be influenced by C/AL code.

Before the introduction of the ExtendedDatatype property, the e-mails from Microsoft Dynamics NAV were sent using an Automation Control wrapper DLL to Microsoft Outlook. This is handled in codeunit 397 and can still be used to send e-mails directly From C/AL code.
Codeunit SMTP Mail (400) allows us to send e-mails directly to an SMTP server.
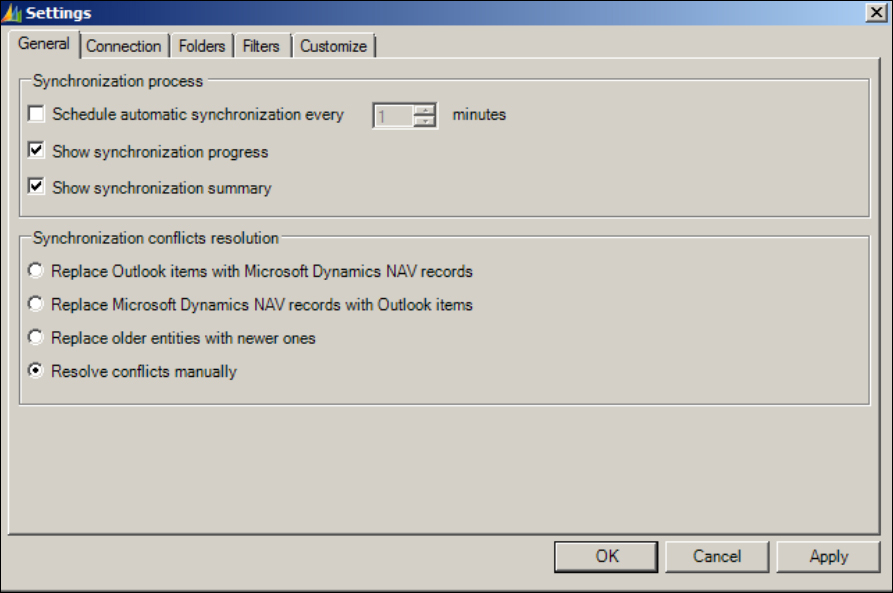
Microsoft Outlook can be used as an offline client for Microsoft Dynamics NAV. Every table can be synchronized to Microsoft Outlook when a connection with both systems is available. Using the Offline functionality in Outlook, users can view the data when they are on the road and even change the information or create new data.
This is done using the Outlook Synchronization web service that we discussed earlier this chapter.
The functionality is well documented by Microsoft.
To read incoming e-mails, Microsoft Dynamics NAV offers integration with Exchange Public folders. Information in these mailboxes can be read and used in Microsoft Dynamics NAV.
The handling of the interface is done using the Job Queue and the Application Server (NAS).
In the Marketing Setup, which we discussed in Chapter 4, Relationship Management, we can set up the parameters for the exchange integration.

Starting from version 2013 R2, Microsoft Dynamics NAV can be integrated into Office 365. This is a cosmetic integration, which means from an end-user perspective the applications are one and the same; however, the applications do not share data.
Microsoft Dynamics NAV can be set up to accept the Office 365 credentials, which makes it very easy for users to log in only once and use both platforms.
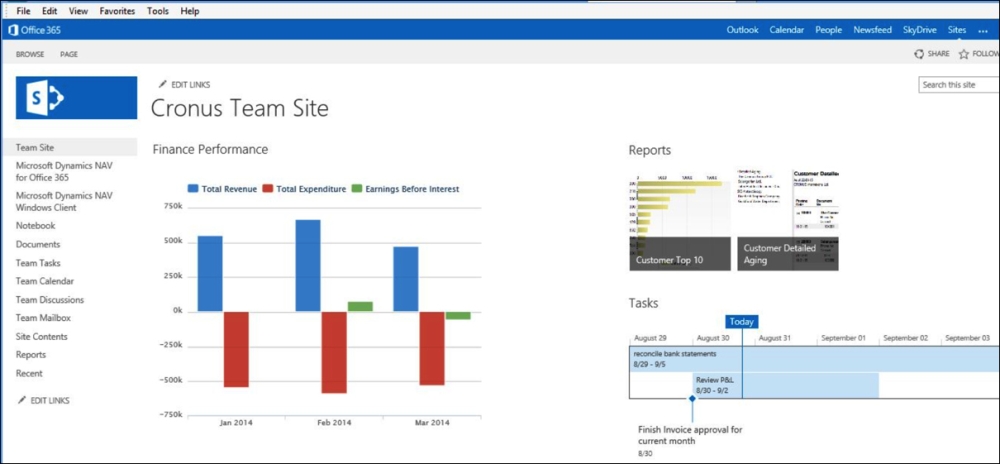
Login with the Office 365 credentials
Microsoft Dynamics NAV 2013 RTM was shipped with a special SharePoint client. However, since this was directly discontinued in R2 we will not discuss this.
In Microsoft Dynamics NAV 2013 R2, the web client is SharePoint-compliant. To use Microsoft Dynamics NAV 2013 R2 in combination with SharePoint, it is possible to add web parts that connect to the web client.
It is possible to connect to both the on premise version of SharePoint and SharePoint Online.
Microsoft Dynamics NAV 2013 ships with one client add-in for Microsoft Connect. An example page object that uses the Connect control is Connect (9175).
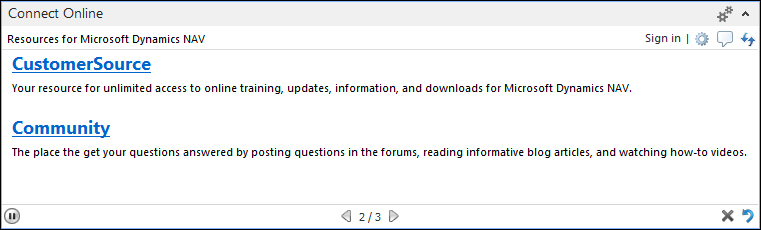
Let's have a look at how this done.

The page type of this page is CardPart and it has no source table. The only control on the page is Parameters, which is a function with a Text (350) return value.
The ControlAddIn property points to the add-in that will be used when this page is started. This add-in will replace the original control on the page.
In the Parameters function, a string is created to feed information into the connect add-in enabling it to show information that is interesting for the current role. This is done using a combination of other C/AL functions:
Parameters()
InitCurrentRoleValues;

EXIT(Add(Version) + Add(Locale) + Add(Role) + Add(RoleID) +
  Add(Serial));

Add()
EXIT(Parameter + Separator);

Version()
EXIT('version=' + FORMAT(ApplicationManagement.ApplicationVersion + ':' +
  ApplicationManagement.ApplicationBuild,0,XMLFormat));

Locale()
// Windows Language ID
EXIT('locale=' + FORMAT(CurrentLanguageID,0,XMLFormat));

Role()
// Profile ID (Any text entered in Profile ID)
EXIT('role=' + FORMAT(DELCHR(CurrentRole,'=',Separator),0,
  XMLFormat));

RoleID()
// Role Center ID (Page ID)
EXIT('roleid=' + FORMAT(CurrentRoleID,0,XMLFormat));

Serial()
// License ID
EXIT('serial=' + FORMAT(SERIALNUMBER,0,XMLFormat));

Separator()
EXIT(';'),

XMLFormat()
EXIT(9);

InitCurrentRoleValues()
CurrentLanguageID := GLOBALLANGUAGE;
CurrentRoleID := ApplicationManagement.DefaultRoleCenter;
CurrentRole := FORMAT(CurrentRoleID);
...
In Chapter 7, Storage and Logistics, Client Extensibility and Bing Maps are used to show the stops of a route on a map.
The available libraries are stored in the client add-in table (2000000069).