
When we open a general journal, we can start making transactions. Let's discuss the possibilities.

The most important fields of a general journal are the Posting Date and the Document No. The total of amounts for each combination of these fields should always be in balance. In other words, all journal lines for any particular combination of Posting Date and Document No. should always add up to zero.
There are different account types we can post to. When we post directly to a G/L Account, it is clear what will happen; a new G/L Entry will be created for that amount. When we choose another Account Type, the sub administrations will start to work. For example, when we choose Customer, a Customer Ledger Entry will be created as well as a G/L Entry. Which G/L account is used is determined by the posting group, which we will discuss later in this chapter.
Here, we also see the Gen. Posting Type, General Business and Product Posting groups and VAT Business and Product Posting groups come back. These are inherited from the G/L Account we discussed earlier, but you can choose a different one if you want.
The VAT options determine the VAT calculation that is done automatically. A VAT entry is created with the VAT amount and additional G/L Entries are created.
There are two ways of balancing a general ledger. We can create two lines with the same debit and credit amount or we can use the balance fields.
Let's see some of this in an example. We have made a purchase somewhere at an irregular vendor. All we have is a small cash receipt with the amount and the VAT, which we want to bring into our company.
The amount is 440 including 10 percent VAT, so we want to create the following transaction:
|
Cost |
VAT |
Current account |
|---|---|---|
|
400,00 |
40,00 |
440,00 |
The transaction can also be seen in the following screenshot:

We can see that Microsoft Dynamics NAV calculates the VAT Amount and by populating the balance account, we only need one line, which is always in balance.
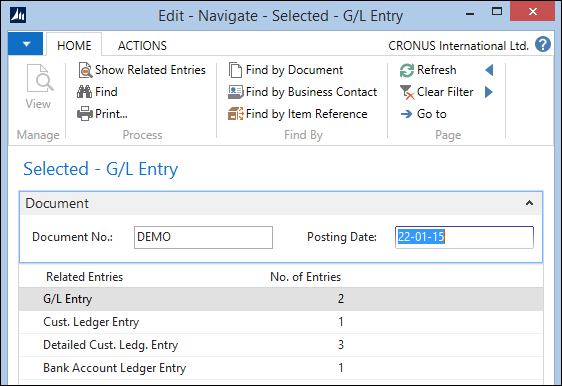
When we Navigate this transaction, we see that we have three G/L Entries and one VAT Entry.

Opening the G/L Entries shows the correct amounts.

In another example, we'll create a customer payment via the bank journal.
A bank journal is a general journal with a specific page ID. This allows the application to have a different user interface based on the same business logic. A specific feature of a bank journal is the possibility to easily apply payments to invoices.
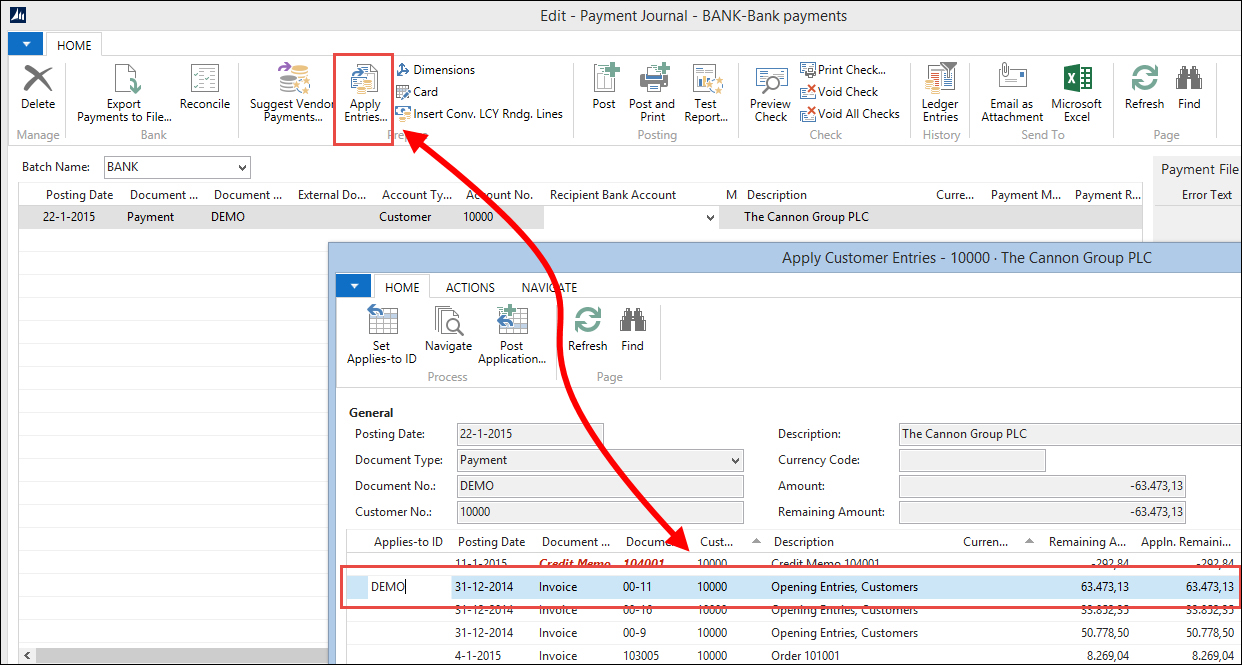
The bank journal does not directly post to a G/L Account but uses other account types. In this case, the Account Type is Customer and the Balance Account Type is Bank Account. Instead of a list with G/L Accounts, the Account No. field now refers to the Customers and the Balance Account No. fields refer to the Bank Account. The latter is automatically populated from the Journal Batch definition.
We'll use the Apply Entries feature to determine which invoice this payment applies to. If we did not do this, the system would not know which invoice is paid.
Another option would be to automatically apply entries, but when a customer decides to skip a payment, the system might get confused, so it is highly recommended to apply entries manually.
When we post this journal and navigate the entries, we see that all necessary sub administrations are updated:
In the previous section, we talked about using customer numbers and bank account numbers as an account number in the general journal. The system can then figure out what G/L Account numbers to use. But how does that work?
This is done using the various posting group matrices. Most application parts that post to the general ledger have their own posting group table. There are two types of posting groups: single layer and matrix layer.
The single layer has direct G/L Account columns and the matrix layer has an additional setup table:
|
Single layer |
Matrix layer |
|---|---|
|
Customer posting group Vendor posting group Inventory posting group Job posting group Bank account posting group FA posting group |
Gen. business posting group Gen. product posting group VAT business posting group VAT product posting group Inventory posting setup |
Let's have a look at Customer Posting Groups:

We see three different codes with their own accounts. So where is this code used? Let's open Customer Card:
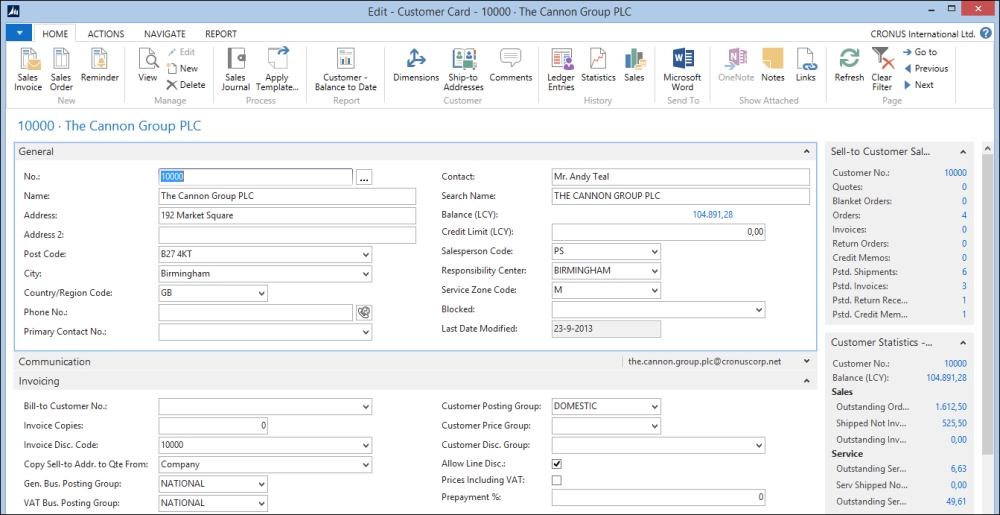
On the Invoicing tab, we see the customer posting group. So this is what determines the customer G/L Accounts.
We also see other posting groups on Customer Card. There is a Gen. Bus. Posting Group and a VAT Bus. Posting Group.
In our list, they are matrix layers. So they don't directly point to a G/L Account. When we open Gen. Bus. Posting Group, we see this:

Just a simple table connecting it to a Default VAT Business Posting Group. To see where the G/L Accounts are defined, we need to go to the General Posting Setup.

Here we can see that, when combined with a Gen. Prod. Posting Group, the G/L Accounts can be determined. So where does the Gen. Prod. Posting Group come from? To find out, we need to go to Item Card:
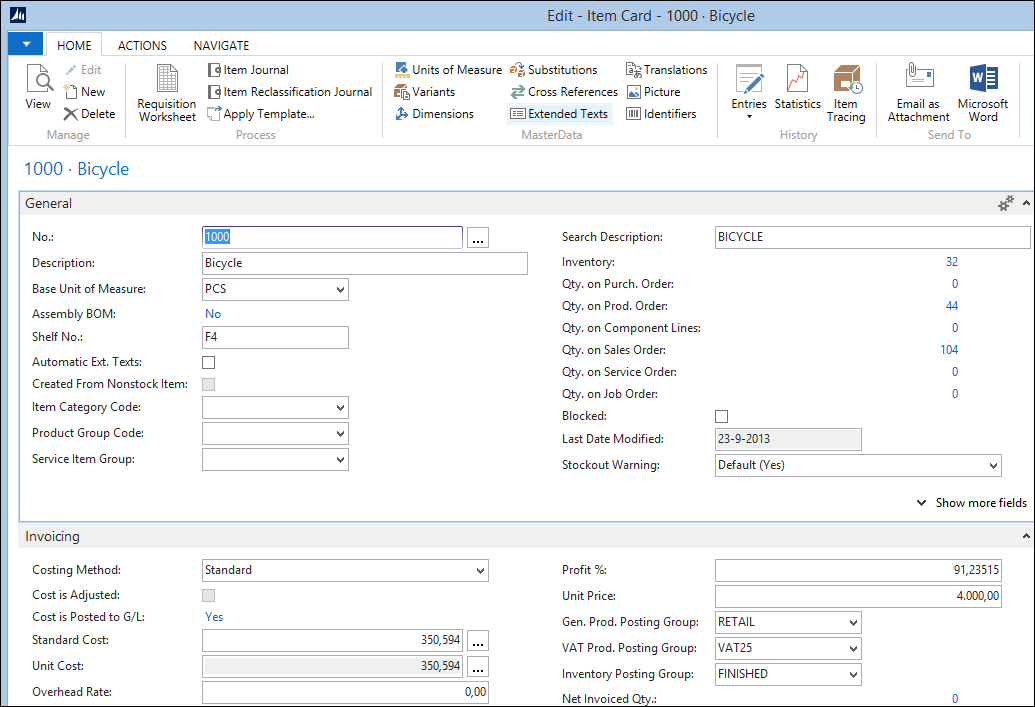
Here we can see the same tab, Invoicing, with the product posting groups.
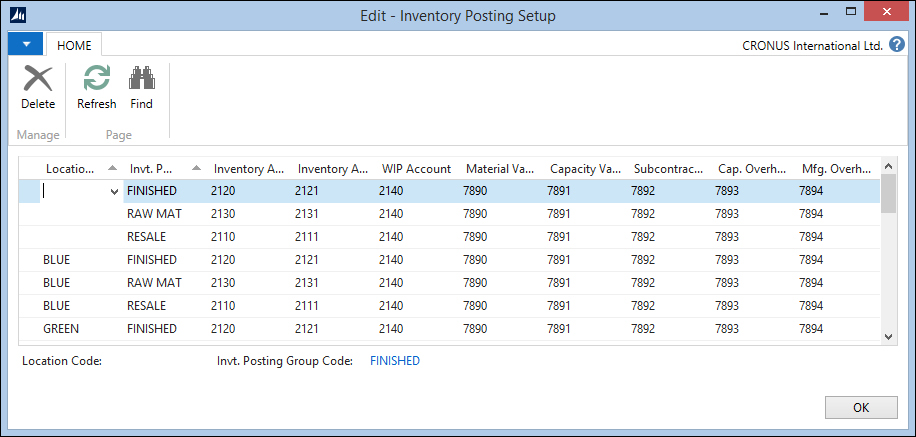
Our journey ends here, as we can see the last matrix posting group, Inventory. When we open this setup, we see that it is determined by the combination of Inventory Posting Group and Location Code:
Apart from the general ledger and sub administrations, Microsoft Dynamics NAV allows a third level of posting. An unlimited number of dimensions can be attached to every posting and used to cross-analyze the system.
Dimensions originated from the old project code and department code functionality, allowing you to consolidate or differentiate costs and profits. The dimensions are determined via a filtering mechanism. Every master data record can have dimension definitions.
Let's look at the sample dimension codes and values:
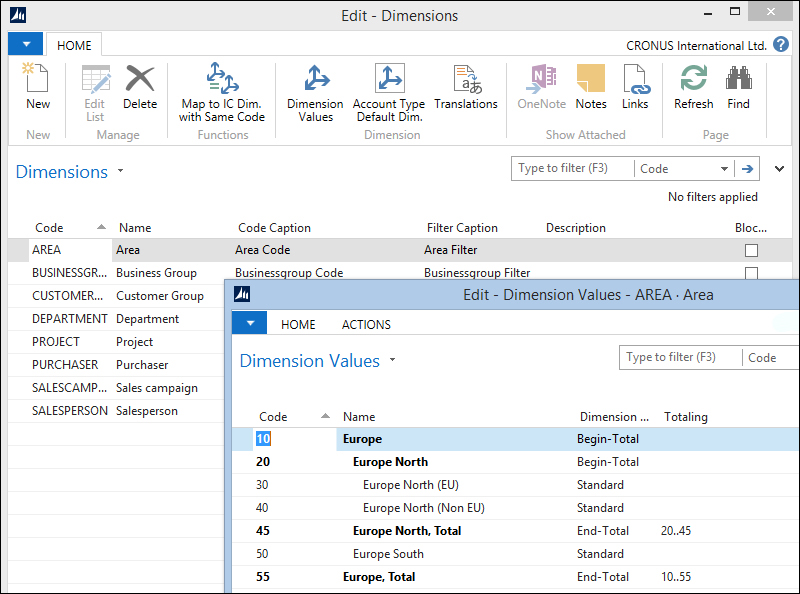
The Dimension Code Area has several Dimension Values. Here, you can also have total records, just as in the general ledger.
When more than one master data record has the same dimension code with different values, it is able to set priorities. It is also possible to block combination of dimensions to be posted.
Dimensions are a powerful tool for analyzing data and structuring the system to avoid incorrect entries. However, it requires a lot of time and special skills to determine these combinations and maintain the setup.
We'll see more of dimensions as we discuss the reporting possibilities.
Microsoft Dynamics NAV allows budgeting as well. We can create our own budgeting codes. A budgeting code can be a year, or a department, or just some budget we want to try and throw away later.
Budgeting can be done on G/L Accounts but also on any dimension.
The decision of budgeting periods is very important. If you want to compare monthly budgets with real figures, it does not make sense to create a yearly budget. Most companies use monthly budgets. It is also most likely that we want to create budgets for income statement accounts, not for balance sheets.
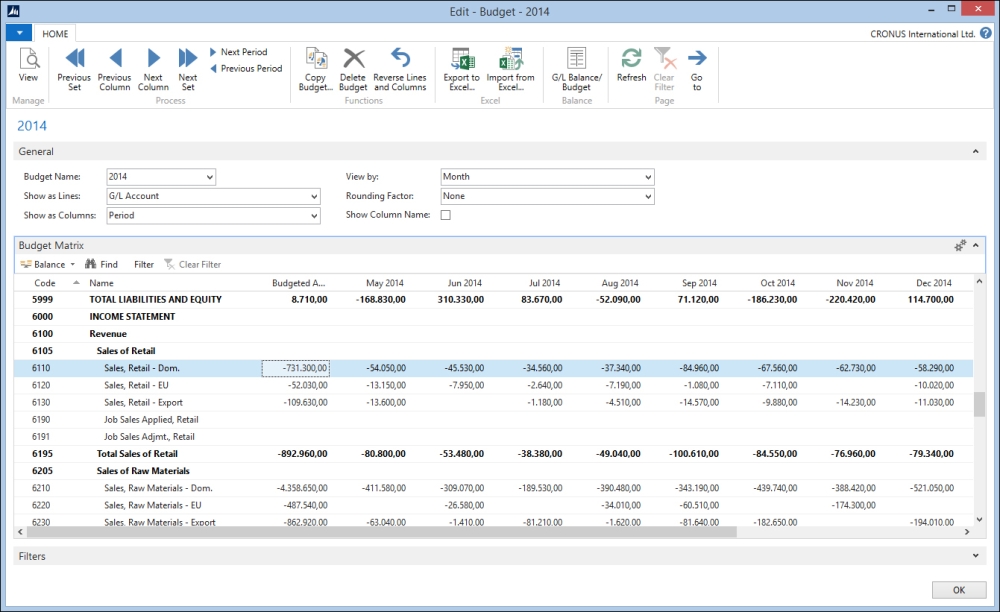
Importing and exporting budgets to Excel is a very important feature. Here, we can easily copy and paste and, for example, automatically have the same values each month.
Budget entries are created by simply entering new amounts in the columns. In previous versions of Microsoft Dynamics NAV, a built-in mechanism would handle the creation of the entry based on deltas between the previous value and the newly entered value.
In Microsoft Dynamics NAV 2009, this was changed from the Role Tailored Client to C/AL Code. The matrix page object that handles the amount is Budget Matrix (9203). This page uses the Matrix Management Codeunit (9200) to simulate the classic built-in algorithms.
While most companies have accounting periods from January 1 to December 31 divided into months, there can be exceptions to this.
This is supported by Microsoft Dynamics NAV and set up in Accounting Periods:
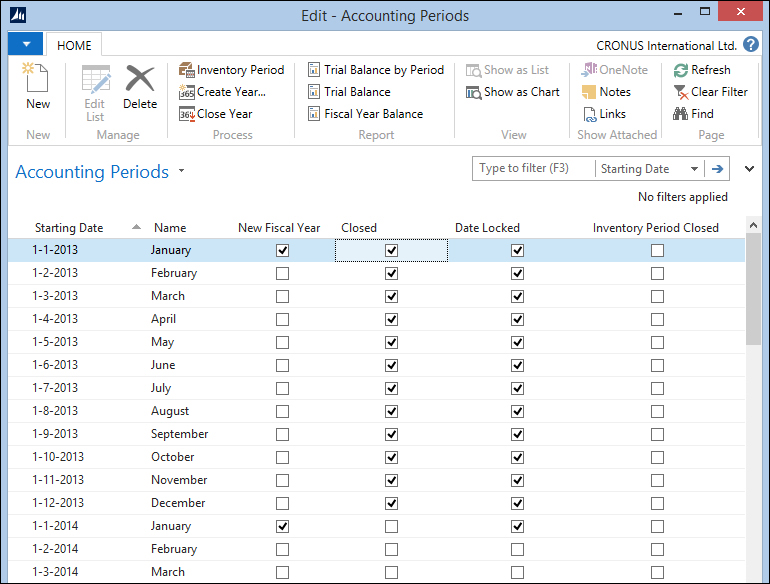
We are completely free to set up our own desired posting periods as long as there is a date algorithm.

A posting period should also be closed when appropriate. When closing a posting period, all Income Statement G/L Accounts are set to zero and the profit/loss is posted to a balance account.
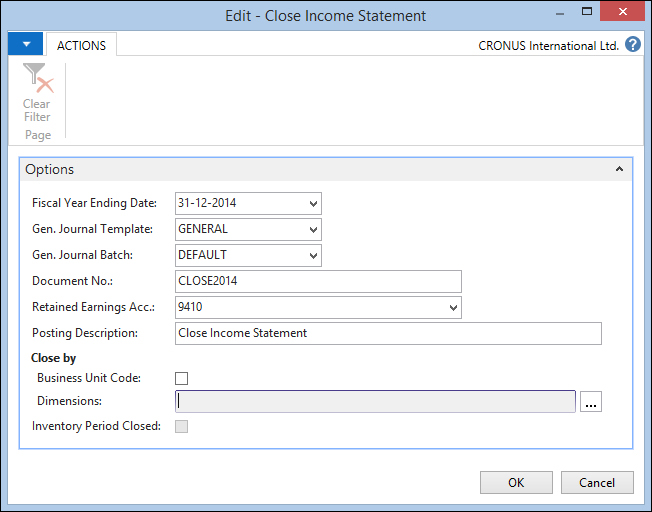
When we run this batch, a general journal is populated with the postings. It is not recommended to make changes here.
After closing the income statement, it is still possible to make transactions but with special posting dates called closing dates. When putting a C character in front of the posting date, the system will accept this as a special transaction and allow you to post it.
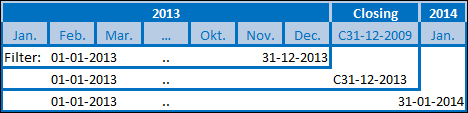
When filtering on 01-01-2013..31-12-2013, the system will not include the entries on the closing dates. Filtering on 01-01-2013..C31-12-2013 and 01-01-2013..31-01-2014 will include the entries on the closing dates.
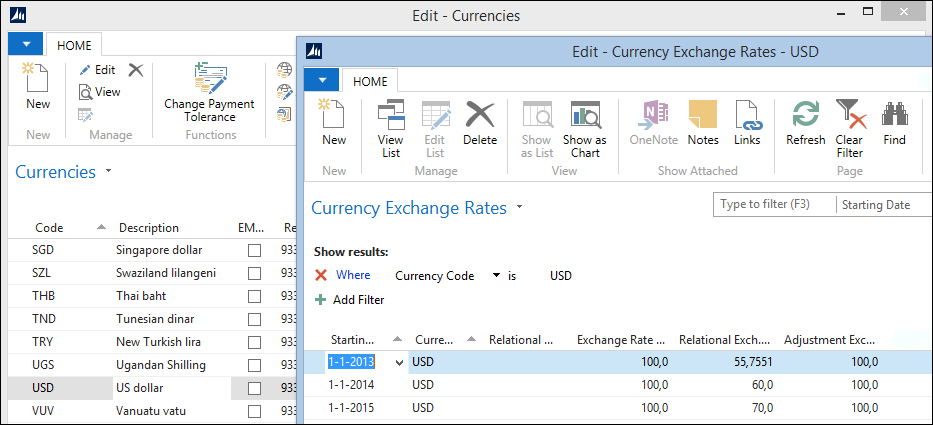
Besides having the possibility of the extra reporting currency, every transaction in Microsoft Dynamics NAV can have its own currency. The transaction is transformed into Local Currency (LCY) with the current currency exchange rates.
Handling currency is simple, as long as the exchange rates do not change. After that, it can get complex. The exchange rate can change as often as you want but with a maximum of one per day. Before you consider implementing a daily change of exchange rates, you should look at the consequences.
When you change the currency exchange rate, everything in the system gets adjusted, which can lead to a huge number of transactions in your system. Changing the currency exchange rate requires the following two steps:
- Enter new values. In our case, the new USD rate in 2010 is 60:
- Implement the value and generate the entries.

Consolidation means taking (part of) the general ledger of two or more companies together in one consolidated company. To handle consolidation in Microsoft Dynamics NAV, first the consolidation accounts have to be populated in the G/L Accounts. These consolidation accounts have to be valid accounts in the consolidation company.
A consolidation company is a "dummy" company in the database that just exists for consolidation purposes. The consolidation company has a business unit for each consolidated company.
The data can be exported out of the database via an XML or TXT format.

The data is imported via the Business Unit list in the consolidation company.
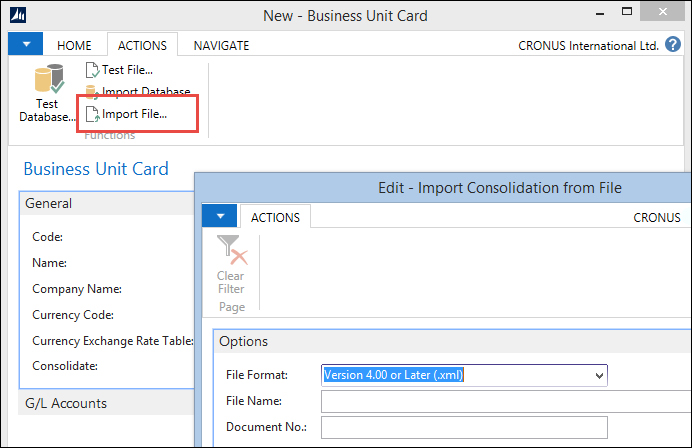
The other option is to import it from within the database with the Import Database function.
Most companies can issue VAT statements to get back the VAT they paid to vendors and pay the VAT they've received from customers. This is done in the VAT statement. This is a straightforward list where we can filter on the VAT entries.

Every country has its own VAT statement and many countries have localizations in this application area.
Some companies do bookkeeping because it is mandatory and do very little with the generated information, but there is a lot you can do with the information the system creates.
In bigger companies, using analysis tools is often the only way to get a clear view on the company's assets.
The chart of accounts is a reporting tool. The total accounts give a lot of information and by applying limit totals (flow filters), we can narrow down this information.

This example filters on G/L Account no. larger than or equal to 6000 and limits totals to 2014 and Department PROD.
For advanced reporting requirements, we can use the account schedules. Like the VAT statement, it allows us to filter on the G/L Entries in this case. We can filter on individual G/L Accounts or use the total filter. If the filter gets complex, we can sum individual rows and hide the source rows. We can also apply up to four dimensions to each account schedule.

The account schedules also let you define your column layout. You can use multiple column layouts per schedule and reuse Column Layouts across other schedules.
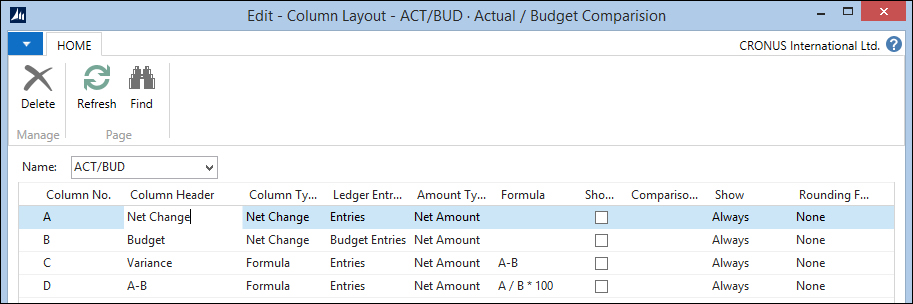
The column layout can contain formulas and date filters. We can show either the budget or G/L Entries per column.

Note
For very valuable information on how to use account schedules, refer to http://dynamicsnavfinancials.com/
As discussed earlier in this chapter, Microsoft Dynamics NAV allows an unlimited number of dimensions to be posted in the general ledger. To analyze this information, we need to tell the system what to compare. This is done in analysis by dimensions.
Each analysis view gets a unique code. An analysis view can be generated for an ad hoc requirement and thrown away afterwards or be in the system permanently for periodical reporting. Analysis views generate redundant information that can always be discarded and regenerated.

When updated, the analysis view contains all data within the filters in the analysis view entries. When not properly maintained, this can be a gigantic table with data.
The result of an analysis view can be viewed in a matrix where all values can be used as rows, columns, and filters.

In this example, we view the results of a sales campaign per area and sales person.
Financial management has a single general ledger setup table, which is important as many of these setup fields will determine how the core of Microsoft Dynamics NAV behaves.
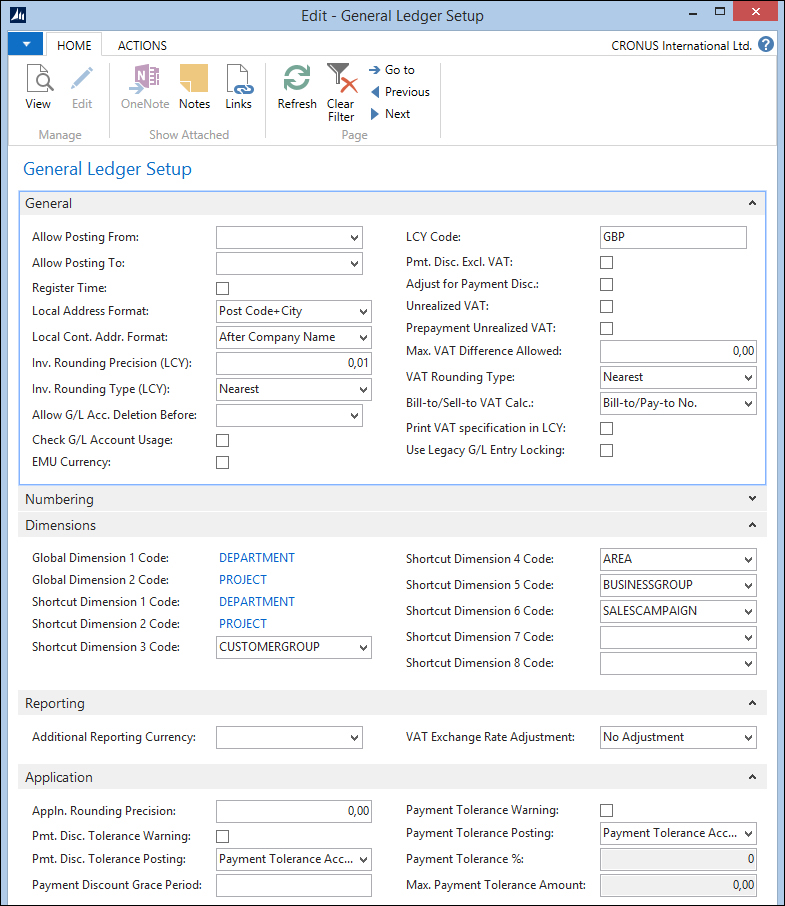
We will discuss the setup options to find out what they do and to explore the possibilities of creating a flexible setup for an application:
- Allow Posting From and Allow Posting To: These limit the freedom of people to choose posting dates while posting to the general ledger. It is highly recommended to enable this feature to avoid posting dates like 01012090 instead of 01012009.
- Register Time: This allows you to create an entry in the time register each time a user logs in and out.
- Local Address Format and Local Cont. Addr. Format: This refers to how the address should be printed for the local country. In Microsoft Dynamics NAV, it is best practice to leave Country Code and Currency Code blank for local values.
- Inv. Rounding Precision (LCY) and Inv. Rounding Type (LCY): These define how the rounding on your invoices is calculated. Nearest is a best practice and allows your customers to easily register your invoice in their system.
- Allow G/L Acc Deletion Before: This allows you to clean up closed fiscal years. It is hardly ever used and you should consult your partner before using this feature.
- Check G/L Account Usage: This checks whether the G/L Account is used in setup tables before it is deleted.
- EMU Currency: This is the currency that has a fixed conversion rate to the Euro in the European Union. The LCY Code field is used when printing reports to indicate the companies' local currency.
- Pmt. Disc. Excl. VAT: This indicates whether or not VAT is calculated when you apply payment discounts. When you check this field, you need to think about the Adjust for Payment Disc. field, as this will recalculate the VAT.
- Unrealized VAT: This should only be checked if your company has to deal with this issue. Otherwise, it will lead to unnecessary postings. This is VAT that is only valid when the customer pays the invoice rather than when the invoice is issued.
- Prepayment Unrealized VAT: This should only be checked if your company handles Unrealized VAT and if you want to implement this for the prepayment features.
- Max. VAT Difference Allowed: This field determines the maximum amount of VAT differences. Most of the time, the VAT difference will be not more than 0, 01.
- VAT Rounding Type: This determines how the VAT remainder is calculated. It recommended Nearest.
- Bill-to/Sell-to VAT Calc.: This allows you to change what the source for the VAT business posting group is, whether it is the Bill-to Customer or Sell-to Customer and Pay-to Vendor or Buy-from Vendor.
- Print VAT specification: This field allows VAT on your invoices to always be in your local currency.
- Bank Account Nos.: This is almost always number series that is manually determined. Most companies have up to 10 bank accounts.
- Global Dimensions: This determines which dimensions are posted directly to the G/L Entries and sub administrations. These you can most often use when limiting totals and should be considered carefully.
- Shortcut Dimensions: These are easier to access when you enter journals and documents. They can easily be switched later.
- Additional Reporting Currency: This is a useful feature for international companies. Remember that it requires extra effort if the exchange rates change. You can change this later but a batch job will start, which might take a long time if you have a large database.
- VAT Exchange Rate Adjustment: This makes it possible to recalculate VAT if the reporting currency exchange rates changes. Think about this thoroughly before you activate it. It is most likely to generate information that is difficult to analyze and use.
- Appln Rounding Precision: This can be used to allow rounding differences when applying different currencies.
- Pmt. Disc. Tolerance Warning: This field when checked, a warning will appear whenever a difference is posted.
- Pmt. Disc. Tolerance Posting: This determines if the payment tolerance amount is posted to a special account or to the normal discount account.
- Payment Discount Grace Period: This can be used whether you want to be tolerant when people are one or two days late with their payment and still deduct the discount amount.
- Payment Tolerance Warning: This option will show a warning whenever there is a tolerance amount posted to the general ledger.
- Payment Tolerance Posting: This determines if a special G/L Account is used to post this amount.
- Payment Tolerance %: This determines the tolerance percentage. To change this, a batch function is used that updates open entries.
- Max. Payment Tolerance Amount: This field sets a maximum value to the amount so an invoice that is issued for 100.000 cannot have a tolerance amount of more than 5.000 if the percentage is set to 5 percent.