Relationship management software is typically a result of what ERP applications have achieved.
In earlier days, everyone had a rolodex on their desk with phone numbers and addresses and salespeople would always know by heart who was a good customer and which customers were always late paying or had bad margins.
The introduction of RM software completely changed that, allowing us to maintain all companies' contacts in a single place and analyze sales data very easily.
Relationship management has been part of Microsoft Dynamics since Version 2.0 and was dramatically changed and improved in Version 3.0. The current Microsoft Dynamics NAV RM software is mostly the same as in that version, except for the Microsoft Outlook integration that keeps changing in every version.
In this chapter, we will deep dive into this module, which is very complete. After reading this chapter, you will have a good understanding of the concepts and how to maintain master data and analyze transaction data.
We will also perform some application changes in the relationship management part.
In traditional accounting software, we differentiate customers and vendors as business relations for invoices, but companies have many more relations we would like to register in our system.
Also, a company or person can have multiple relations with our company. The best example is my relationship with Microsoft. As everyone, I use the software so I am a customer, both in my business and personal life. On the other hand, Microsoft hires me to teach workshops and do presentations, which makes me a vendor. As an MVP, I have a totally different relationship with them. They give me an award and invite me to special events and allow me to access the company store. They also ask for my advice in future versions, so to them, I am their consultant.
So one person or company can have different roles in RM. Microsoft Dynamics NAV is able to handle all that while maintaining a single point of data entry and maintenance.
Unlike financial applications, RM is much more flexible. The functionality and rules of financial applications are defined by government regulations and are mandatory for companies to comply with. Companies are not forced to use RM but once implemented, everyone understands the benefits and never want to do without it.
The starting point of the RM application is the Contact table. This is where we store the address, phone numbers, e-mail addresses, and so on of everyone we know.
When we open the Contact list, we see that companies and persons are grouped for an easy overview.

The cut-off text is not important for reference in this screenshot
As we learned in the previous chapters, a page in Microsoft Dynamics NAV is based on a single table, so that must mean that companies and persons are stored in the same table.
When we open the contact card, we can clearly see that this is the case. The Type field indicates whether the contact is a business or a person and whether the person belongs to a company. The Company No. field refers to a contact with type Company. This is a one-to-many relationship meaning that if a physical person has a relationship with more than one company, he or she needs to be maintained for each company with a relation.
The following screenshot is from the contact card in Microsoft Dynamics NAV:
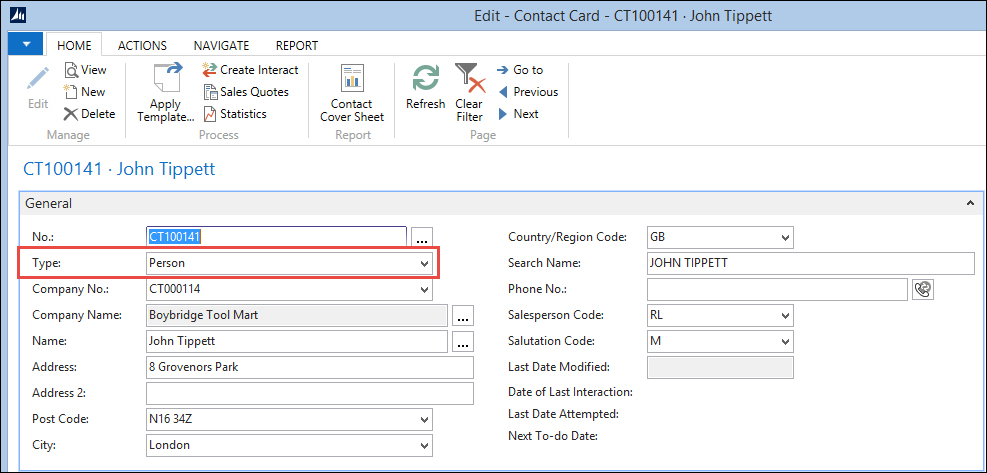
Let's step through the tabs and look at some important fields:
- No.: This is a unique key value determined by a Number Series. Companies and persons have the same numbering.
- Type: This indicates whether this contact is a person or a company.
- Company Name: When the contact is a person and connected to a company, it is automatically populated with that company's name.
- Name: This is the name of the contact. If the contact is a person, we can click on the AssistEdit button next to the name to open the name details. The name is automatically broken down in to first, middle, and last name depending on the number of words we enter. However, if our contact has a more complex name like "Walter van den Broek", which is typical for Dutch people, the system is unable to break it down.

- Address: Enter the street where the contact lives or has an office.
- Post Code & City: These fields are connected via the Post Code table and one can populate the other if that table is maintained, which is an optional feature.
- Search Name: This is automatically populated with the Name field and lets you search for contacts faster, as you can enter this field instead of the No. field when referencing to a contact.
- (Mobile) Phone, Fax, and Telex No.: This is a reference to the phone and fax numbers of this company. The (mobile) phone field also allows you to start an interaction with this contact.
- Sales Person: This is the main salesperson for this contact. If this contact is promoted to a customer, the salespersons' name will be printed on the order form and invoices.
- Salutation Code: This special field refers to how this contact should be addressed. The salutation code table allows you to build phrases such as "Dear Mrs. Brown". We'll see more about salutation codes in segments.
- E-Mail: This field contains the e-mail address of the contact. By pressing the E-Mail button [
 ], we can send an e-mail directly.
- Homepage: Here is where the URL of the contacts website goes. We can access the website by clicking on the URL button [
 ].
].
- Correspondence Type: This field is used when we create a Microsoft Word document in an interaction. It indicates whether we send a hardcopy, e-mail, or fax.
- Currency Code & VAT Registration No.: When this contact is promoted to a customer or vendor, the currency code and VAT registration no. are inherited from here.
- Territory Code: This field can be used in segments to filter on geographic regions.
When we perform mail merge, we want the letters to start nicely with "Dear Harry" or dear "Mrs. Brown". This can be done using salutation codes.
We can create as many codes as we like but a contact can only use one. This is the list in the CRONUS demo database.

There is one salutation code for companies but most are for persons. When we look at the formulas for Female Married or Unmarried, we see this screen:
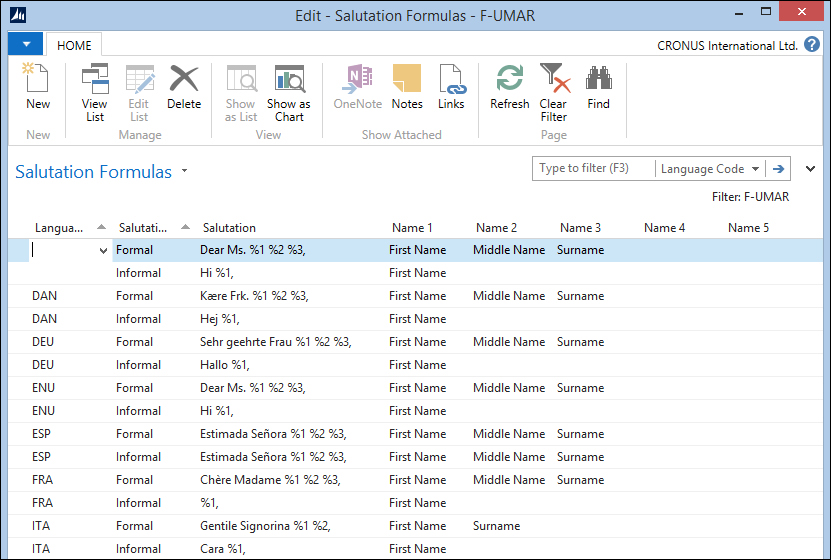
We can enter a formal and informal code. The salutation can have up to five variables pointing to Job Title, First Name, Middle Name, Surname, Initials, and Company Name.
When we look at the result for Karen Friske, it will be "Dear Ms. Karen Friske" or "Hi Karen".
At the end of this chapter, we will look at how to create extra salutation types.
Like we said earlier in this chapter, it is best practice to use the address fields in the contact table for the postal address since this will be printed on all documents.
In the Contact Alt. Address Card table, we can add as many other addresses to a contact as we want.
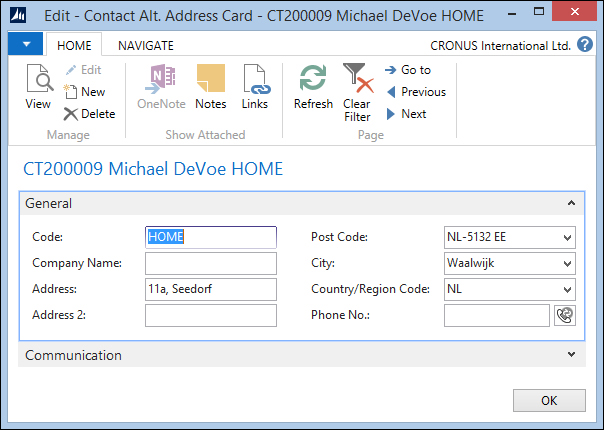
An alternative address can also have a valid to and valid end date to control which alternative address is currently active.
In Chapter 2, A Sample Application, you saw that the contact table is the umbrella data of the customer, vendor, and bank account master data tables.
Each contact of the type Company can be promoted as one of these tables. The benefit is that all address information fields have a single place of maintenance and are inherited. It also allows us to analyze sales data into relationship management as we will see later in this chapter when discussing segments.
When we create master data, a different Number Series is used. At the end of this chapter, we will look at how to change that in the code.
A contact of Type: Person cannot be created as the Customer, Vendor, or Bank Account.
When entering new contacts, the system can search for duplicate contacts. In the Duplicate Search String Setup table, we can enable the filtering on eight fields: Name, Name2, Address, Address2, Post Code, City, Phone No., and VAT Registration No.
For each field, we can set up which part should be used when searching for a duplicate. We can use the option First and Last and a length, which is useful for the Name, Address, and City fields. Using First with the full length of the field will search for an exact match, which is useful for Post Code, Phone No., and VAT Registration No.
In the Marketing Setup table, we can specify the percentage of matching criteria that should result in a warning, as shown in the following screenshot:

For each contact, the system will save these values in Cont. Duplicate Search String table (5086).
When we enter a new contact, the system will also generate the same strings and compare these to the ones in the database. When there is a match, the system will show a warning with the duplicate contacts.
The contact table has a very limited number of fields and does not allow much creativity for us to add flexible information. This is where profiles are used.
Profiles allow the users to create an unlimited number of extra information sources that can be manually or automatically populated.
Let's have a look at an example profile:
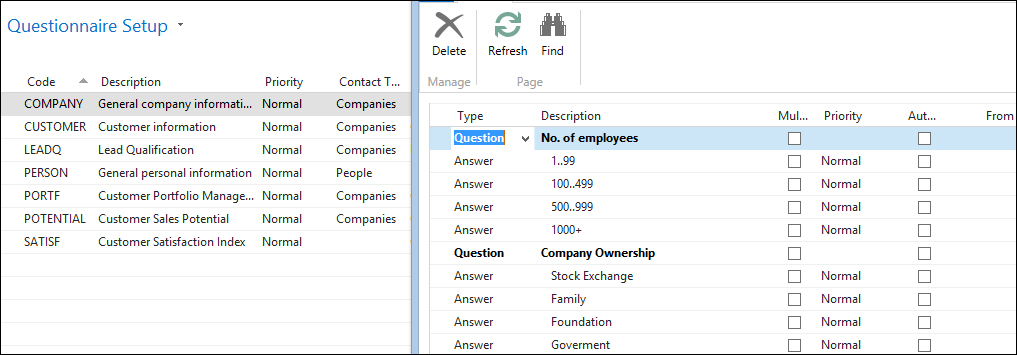
This profile is for contacts of type Company. It has Question and Answer lines. A question can have one or multiple answers and we can define as many questions and answers as we want. The last column shows how many contacts have this profile answer.
A profile is used from the Contact Card.
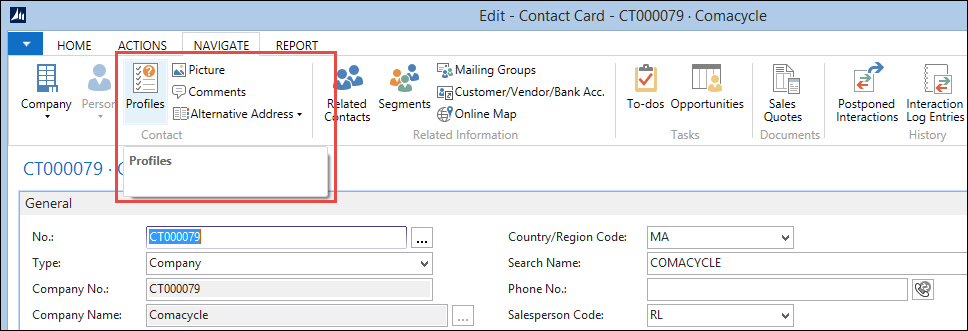
When we click on this, a new page opens where we can select the required profile and answer the questions.

The answers are displayed in the Lines subpage of the Contact Card window.
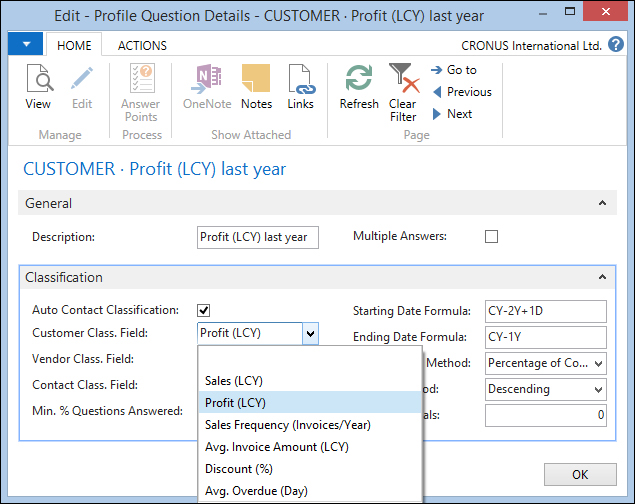
Profiles can also be automatically answered based on formulas. This is done using the Auto Contact Classification option and setting up the Question Details.
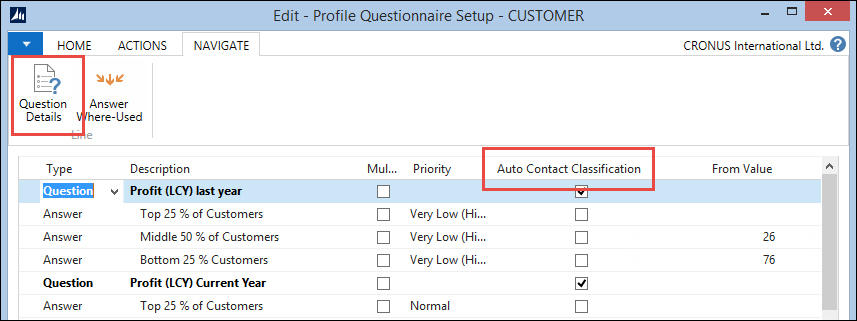
The Profile Question Details are fixed and hardcoded. They depend on the relationship between a contact and a customer or vendor as discussed earlier in this chapter.
We will not describe all the possibilities as this is very well covered in the online help.
When the questions are set up, the answers should have a From Value and To Value to allow the system to pick the right one.
To generate the answers, a batch job is used called Update Contact Classification where we can filter on a profile.

We have all kinds of interaction moments with our contacts. Whether they are phone calls, mailings, or sending an invoice, we can register them in Microsoft Dynamics NAV.
As with profiles, there are interactions that are generated automatically and manually. Manual interactions are created using a wizard.
All interactions relate to an Interaction Template Code. The system allows an unlimited amount of code we can define ourselves. The interaction code will also determine how the rest of wizard will behave.

Interactions can be Inbound or Outbound and initiated by us or them. These are informative fields.
The Wizard Action field determines whether the wizard will generate a mail merge document, allow us to attach a previously created document, or do nothing. Mail merge allows us to create a Word document with all fields from the contact table.
Let's create an interaction and look at how that is done. To create an interaction, we choose Create Interaction on the contact card or list and click on the Create Interaction button from the Process Actions. This will open the following wizard:

The first page asks us what type of interaction we would like to start. Let's make a memo:

This is the next step as our interaction code defines that we will generate a mail merge:

We can now create the memo in Microsoft Word with all necessary fields already filled in.

After closing Microsoft Word, we move on to the next step and when we populate all fields, we can finish the wizard. This will save the interaction in the database and print the memo since we choose Hard Copy as Correspondence Type.
Some interactions can also be automatically generated, for example, each time we print an invoice or shipment.
Which interaction code is used for each transaction is defined in the Interaction Template Setup. For every print, we want an interaction log entry to be generated and we need to set up a code.

Tip
Be careful when printing a lot of documents, as the interaction log entry table can be locked for a longer period forcing other users in the database to wait until the process is completed. To avoid this, enable auto-increment on this table as described in this blog at http://markbrummel.wordpress.com/2014/05/25/tip-14-autoincrement-interaction-log-entries/.
Other automatically created interaction log entries are created by segments, which we will look at later in the chapter.
The To-do's are the lowest level of activities in the relationship management model. They are best compared to Masks or Meetings in Microsoft Outlook.
To-do's can be created directly in the system or from another event. We can create a To-do from the interaction we just created. Let's do this.

The reference here is the tab, Create To-do, and hence the cut-off text at the side is fine
When we click on Create To-do form the Interaction Log Entries, the system shows us a wizard that will guide us through the process, just like the Interaction wizard.

There are three types of To-do's, Standard (blank), Meeting, and Phone Call. The steps in the wizard depend on the type we select. Let's select a Meeting.
The next step asks the attendees for the meeting and allows a template for the invitation, which then again will create an Interaction Log Entry.
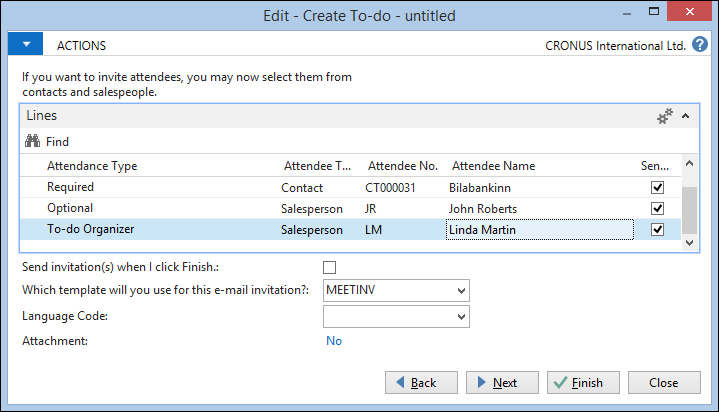
The next step only asks for a location so we will click on Finish.
When we now open the To-do's from the Sales & Marketing Department, we can open the Sales Person per day matrix, which shows us the meeting we just created.

The cut-off text is not a part of the referenced section in the screenshot
We'll see more of To-do's when we discuss Opportunities and Outlook Integration.
When we discussed profiles, we could already see that relationship management is tightly integrated with the ERP part of the application. This is also the case for opportunities.
Opportunities allow us to manage all the quote requests we get from our prospects, creating a workflow that will guide us to a deal that is won or lost. This then allows us to analyze the win and lose deals and change our business based on this information.
We can analyze the sales pipeline and make a proper judgement of our future order position allowing us to schedule capacity in time.
Each opportunity we create will follow a sales cycle in the system. This will guide us step by step though the process.
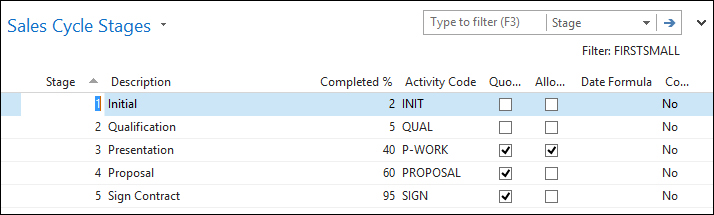
Let's have a look at the sales cycles in the CRONUS database.
There are four sales cycles defined. The most important field is the Probability Calculation formula. This will determine how the system calculates the current value of all opportunities with this code. We can see the Calculated Current Value by opening the Statistics window of a sales cycle, as shown in the following screenshot:

There are four options to choose from: Multiply, Add, Chances of Success %, and Completed %. The function UpdateEstimates in the Opportunity Entry (5093) table calculates this:
UpdateEstimates()
IF SalesCycleStage.GET("Sales Cycle Code","Sales Cycle Stage")
THEN BEGIN
  SalesCycle.GET("Sales Cycle Code");
  CASE SalesCycle."Probability Calculation" OF
    SalesCycle."Probability Calculation"::Multiply:
      BEGIN
        "Probability %" := "Chances of Success %" *
                      SalesCycleStage."Completed %" / 100;
      END;
    SalesCycle."Probability Calculation"::Add:
      BEGIN
        "Probability %" := ("Chances of Success %" +
                      SalesCycleStage."Completed %") / 2;
      END;
    SalesCycle."Probability Calculation"::"Chances of Success %":
      BEGIN
        "Probability %" := "Chances of Success %";
      END;
    SalesCycle."Probability Calculation"::"Completed %":
      BEGIN
        "Probability %" := SalesCycleStage."Completed %";
      END;
  END;
  "Completed %" := SalesCycleStage."Completed %";
  "Calcd. Current Value (LCY)" := "Estimated Value (LCY)" *
                           "Probability %" / 100;
END;
The Probability Calculation first calculates a Probability % field, which will then lead to the required Calculated Current Value.
Each sales cycle has different stages that will guide us through the sales process.

The current sales stage of an opportunity defines the Completed % field. We can decide with Allow Skip option whether a sales stage is mandatory. The quote required will force us to assign a sales quote to this opportunity as we will see later when we create an opportunity.

An opportunity starts by selecting an existing contact or creating a new one. From the Contact Card, we can navigate to Related Information | Contact | Opportunities | List.
This leads us to a filtered lists of opportunities linked to this contact.
- Here we can select Create Opportunity.
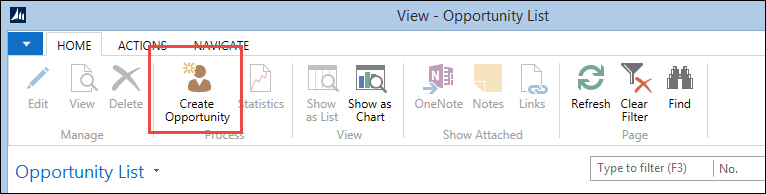
- This opens the wizard that will guide us though the process. In the first window, we enter the description
Sell Chairsand click on Next to take us to the second step.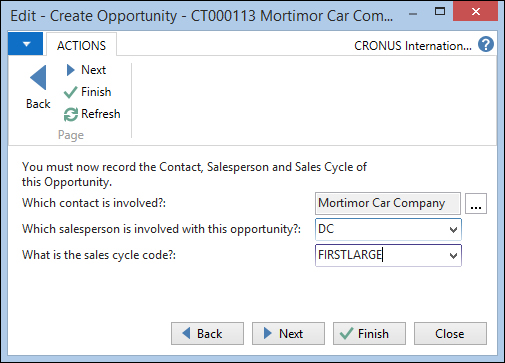
- In this step, we choose Sales Cycle code FIRSTSMALL and select Finish.
- Selecting Next will allow us to enter additional information, such as assigning a sales campaign, and activating the first stage. We will skip that now and discuss campaigns later in this chapter.
When we now open the created opportunity, the information should look like the following screenshot. There are no activity lines as we have not yet activated the first stage.
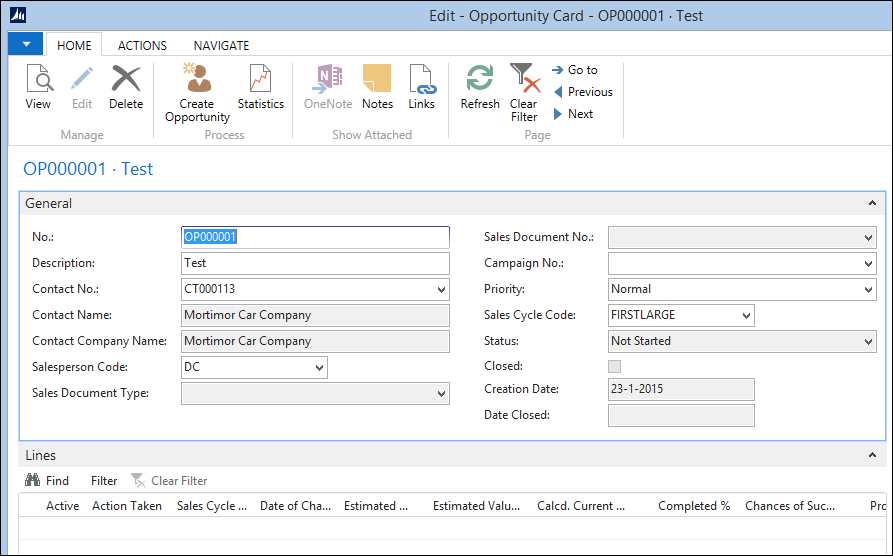
The cut-off text is not a part of the reference in this screenshot
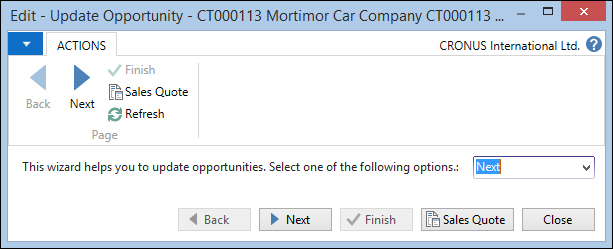
- Let's activate the first stage and see what happens. We do that by navigating to Actions | Functions | Update. We enter a wizard where we select First.

- We'll click on Next twice and enter step three of the wizard.
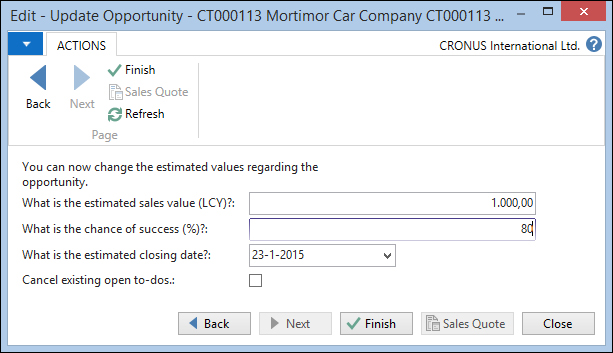
- In this step, we should enter the estimated sales value and chance of success (%) of getting this deal. This is important to calculate the calculated estimated value we discussed earlier.

- When we click on Finish, we come back to the Opportunity page and see that the current value is 260,00.

The cut-off text is not a part of the reference in this screenshot
Since the probability calculation of this sales cycle is Add, the formula is:
"Probability %" := ("Chances of Success %" +
  SalesCycleStage."Completed %") / 2;

"Calcd. Current Value (LCY)" := "Estimated Value (LCY)" *
  "Probability %" / 100;
This will lead to
(50 + 2) / 2 = 26 and 1000 * 26 / 100 = 260. - Now we navigate to Related Information | Opportunity | To-Dos and see that the system has created two To-do's for us that we have to complete.

The cut-off text is not a part of the reference in this screenshot
- This will help us remember our daily tasks and allow management to see nothing is forgotten. The next stages in this sales cycle are Qualification and Presentation.
- We can enter these stages by entering the wizard again and selecting Next.
- After selecting the Next button twice, we hit step three. Since one of our To-do's was verifying the quality of the opportunity, we can now say for example that the chance of success is 80 percent.
- We'll select the Cancel existing open to-dos Checkbox to make sure our workflow is updated. You will see that the Calculated Current Value has increased to 425,00:

- When we enter the next stage, we will get the following error message telling us that assigning a quote is mandatory to enter the next step:

To assign a sales quote to an opportunity, we navigate to Actions | Functions | Assign Sales Quote from the Opportunity Card. This will open a new sales quote with all fields populated from the opportunity.
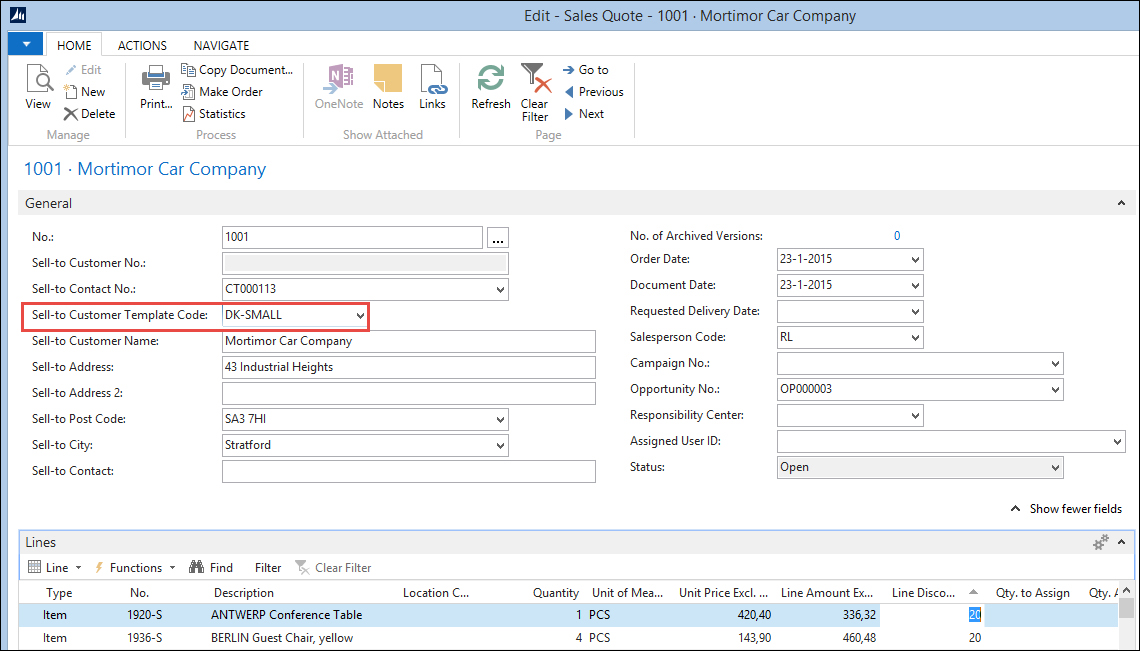
We will select two furniture items and populate the Quantity and Line Discount % fields.
When we now update the opportunity, we can use the quote amount of 796,80 which will lead to a Calculated Current Value of 478,08 in step three and 557,76 in step four.
Step five is the final step in the sales cycle stages we used in our example. Now we need to tell the system whether the deal is won or lost. To do this, we navigate to Actions | Functions | Close from the Opportunity Card. We will select Won and click on Next.

After selecting a valid reason and the sales amount, we can close the deal.

The system now creates a customer for this contact and updates the quote with this number. We need to promote the quote to an order manually.
Segments allow us to slice and dice the data in our system to create a filtered list of contacts. This information can then be used to create an interaction such as a mailing or start a sales campaign.
Since Microsoft Dynamics NAV relationship management is integrated with the ERP system, we can filter on both RM and ERP data.
Let's create a new segment and look at the possibilities:

The segment has a No. and Description field. The no. can be defined using the Number Series.
On the Interaction tab, we select Interaction Template Code. We will select an interaction that generates a Word document so we can use the mail merge capabilities of segments.
The Unit Cost (LCY) is important to determine the total cost of this segment especially when we use it with campaigns, as we will see later in the chapter.
With our segment defined, we can now start filtering the system for contact information by navigating to Actions | Functions | Contacts | Add Contacts.

This opens a selection window, allowing us to filter on different parts of the application:
- Options: This is further divided into four categories:
- Allow Existing Contacts: If you run multiple selections and check this option, the system will create new segment lines each time a contact is within the selection.
- Expand Companies: When you select this option, the system will add the persons related to the companies in the selection.
- Allow Related Companies: When Expand Companies is selected, this option will delete the company record if a company has one or more persons in the filter.
- Ignore Exclusion: A contact can be ignored on segments. Checking this flag will ignore this field.
- Contact: Here we can filter directly on all fields in the contact table. For example, all contacts in the country NL.
- Profile: This allows us to filter on any profile answer. When we use automatic profile answers, we can for example filter on customers with a specific turnover or profit value.
- Mailing Group: We can save any segment to a mailing group allowing easy reuse of previously generated filters.
- Interaction Log Entry: We can filter on contacts who have had specific interaction codes. For example, everyone who had a sales invoice in the last year.
- Job Responsibility: If we want to send out a mail to all managers, we select the matching job responsibility code.
- Industry Group: This allows us to filter out companies in specific industries.
- Business Relation: This is by default used to integrate with customers, vendors, and bank accounts but can also be expanded with extra information.
- Value Entry: This is probably the most powerful filter where we can filter on specific item numbers and posting dates from the related contact.
After adding all contacts from The Netherlands, we might want to refine or reduce this, which can be done with the same filtering as adding contacts. Refining will check whether the contacts in the segments match the specific filter criteria and reducing will remove all contacts in the segment that match the criteria.
We will reduce the segment with City Waalwijk.
We can now ask the system what criteria we used by navigating to Related Information | Segments | Criteria.

This allows us to see what we did, but also to undo the last actions or save the criteria.

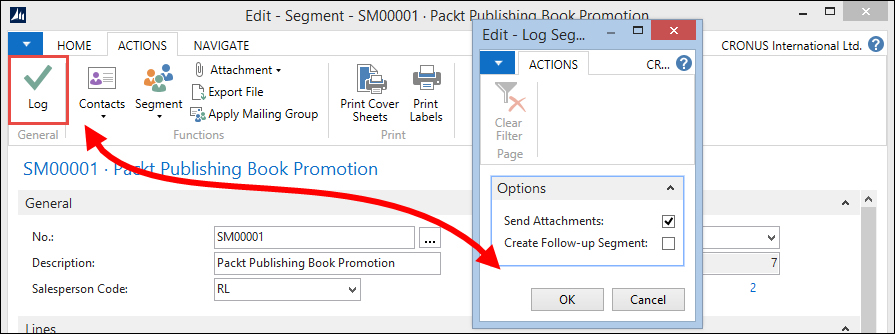
Another option to reuse a segment is to apply a mailing group to all contacts in a segment. To start this, we click on Apply Mailing Group in the ACTIONS tab from the Segment Card.

This will create a record in the Contact Mailing Group table for each contact in the segment.
Most big companies with marketing departments have sales campaigns to improve their sales. These are typically periods where some items are more interesting for customers to buy.
With the campaigns in Microsoft Dynamics NAV, we can manage the sales prices and see the results of a specific campaign both from a cost and profit viewpoint.
Let's open a campaign and see what information it contains:

Each campaign has a unique No. field that can be created using Number Series and Description. The No. field should be carefully chosen since it will be used throughout the application where this campaign is used.
The Status Code options can be custom defined but do not impact business logic. The Starting Date and Ending Date fields are important for the pricing information. The special price and discounts will only be valid within these periods.
Via the Invoicing tab, we can see that campaigns are integrated with dimensions. This gives us the powerful option to define a dimension code for each campaign and create an analysis view to analyze the results in the financial part of Microsoft Dynamics NAV, like we discussed in the previous chapter.
Microsoft Dynamics NAV allows special item pricing for campaigns. If a sales order is generated from a campaign, the system will use the special price automatically.
By navigating to Related Information | Campaign | Sales Prices, we can enter the pricing information for this campaign.

This price table is filtered exactly the same way as discussed in our example application in Chapter 2, A Sample Application.
To select customers or prospects for a campaign, we need to create one or more segments. These segments should be connected to the campaign using the Campaign No. field. Everyone related to these segments will get the specific prices and discounts.
The segments are also used to create the interaction log entries and To-do's for this campaign. We need to make our target group aware that this campaign exists by sending them a letter, fax, e-mail, or even a phone call.
By activating the campaign, the system will add all contacts to the campaign group and create interaction log entries.
The interaction log entries will be used to calculate the cost of a campaign. Each interaction has a specific cost and all costs add up to the total amount on the campaign.
When an opportunity comes in, we can point this to a specific campaign. The value of this opportunity is also used in estimating the success of the campaign.
The campaign is also copied into the sales documents using the dimensions attached to the campaign. This allows us to further analyze the results.
Salespeople are often on the road without online access to the ERP system, and Microsoft Dynamics NAV does not have an offline mode. To solve this problem, Microsoft Dynamics NAV is integrated with Microsoft Outlook. This allows salespeople to view contacts and tasks offline and replicate with the back office system when possible.
If salespeople use a Windows Mobile phone with Microsoft Outlook, they can even have all their Microsoft Dynamics NAV information on their device.
Using user-defined views will also enable us to synchronize other Microsoft Dynamics NAV data to Microsoft Outlook, for example, the customer table with the current value of the Balance field or the item table with the current inventory.
We will discuss the possibilities of interfacing with Microsoft Outlook in Chapter 9, Interfacing.
Before implementing relationship management, we should properly set up the options. This can be done in the Marketing Setup.
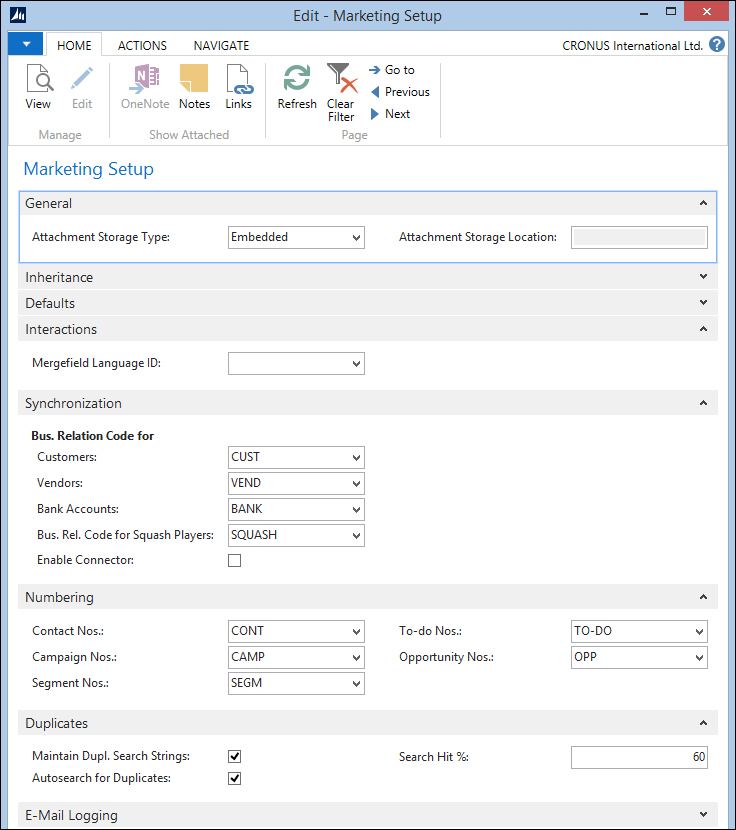
Let's take a look at all the fields:
- Attachment Storage Type: The attachments in the interaction log entries can either be stored in the database (embedded) or on the filesystem (disk file). It is highly recommended to store them on the filesystem.
- Attachment Storage Location: If we chose to store the attachments on file system, this is where we specify the path.
- Index Mode: When using a contact search, this should be set to Auto. It might have a small drawback on performance and cause the database to become bigger.
- Inheritance: When entering a person's profile, it can inherit the salesperson code, territory code, country/region code, language code, address details, and communication details from the company it belongs to.
- Defaults: A new contact can get a default salesperson code, territory code, country/region code, language code, or correspondence type. There is a different default salutation code for companies and persons.
- Default Sales Cycle Code: Every new opportunity will automatically get this code.
- Mergefield Language ID: This defines if the Word merge fields are in the local language or in English.
- Synchronization: Here, we enter the default business relation code for customers, vendors, and bank accounts.
- Maintain Dupl. Search strings: Check this field if duplicate contact functions are used.
- Autosearch for Duplicates: Use this option if the system should automatically search when entering new contacts.
- Search Hit %: This determines the percentage of matching lines from the duplicate search string setup should have to qualify as a duplicate contact.