
Before we start creating any new jobs, we should have a look at the following data and posting model of the Microsoft Dynamics NAV Jobs module:
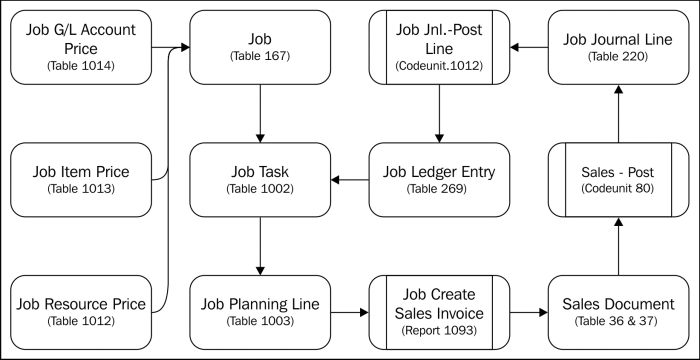
The starting point is the job table that has Job Tasks and Job Planning Lines that we can use for budgeting and planning. Each job can have its own prices.
The Job Planning Lines get invoiced through the standard Microsoft Dynamics NAV Sales functionality, which then creates Job Ledger Entries.
The first step is setting up a new job. There can be different angles on setting up jobs. This depends on how we want to work with the system. The minimum requirement is to have at least one job per bill to customer. This enables us to do the invoicing. Some companies use jobs this way to use it as a pre-invoice engine.
Another angle can be to set up new jobs nicely for each project that we do for the customer. In our case, this starts with the basic Dynamics NAV implementation. When this is finished, we close the job. If the customer has any new requirements, we need to start a new job. This way we can keep better track of what issues we have outstanding with each customer. The downside of this methodology is that it requires some work to set up a new job every time.
Most companies end up with a solution in the middle. It is common to set up a new job for larger jobs and to have a job for support issues. This also allows us to set up different invoicing strategies for each job. We will use this strategy.
Let's have a look at the Job Card and the important fields there:

Let's see these fields in more detail:
- No.: This is the unique number of a job. We can use different Number Series strategies for this, from simple sequential numbering to linked Number Series for different job types or manual numbering.
- Description: This field should contain a logical description of the job for internal use. Most people will search in this field so make sure to have certain rules for naming. This will make searching for old jobs easier in the future.
- Bill-to Customer No.: Each job has one bill-to customer. If we want to invoice multiple customers for one job, we need to customize the application.
- Search Description: By default, this will be populated with the value of the description field but can be changed to another value if required.
- Person Responsible: This is an informative field indicating who is responsible for this job.
- Blocked: If this field is checked, it is not possible to make new entries for this job. We use this for closed jobs.
- Job Posting Group: This refers to the G/L Accounts that are used for the Work In Progress (WIP) postings. There can be different G/L Accounts for different types of Jobs or WIP methods.
- WIP Method: Each job can have one WIP method. We will discuss this briefly later in this chapter.
- Status: The jobs have a limited set of status fields. The only available status values are Planning, Quote, Order, and Completed.
- Allow Schedule/Contract Lines: If this field is not checked, it is not possible to create planning lines that have the options Both Schedule and Contract. When planning lines are created they will be split into a schedule and a contract line.
- Starting Date and Ending Date: These are informative fields that are only used to calculate the currency exchange rates for the job.
- Foreign Trade: In the Jobs module, it is possible to send calculate and create invoices in another currency than the local currency. This will multiply the complexity of the implementation and should be used carefully.
When the job is created, the next step is to create Job Tasks and Planning Lines. These can be used in different ways.
Using Job Task lines, we can divide the job into smaller pieces, which we can then schedule and invoice. The more detailed the Job Tasks, the better we can measure the progress of the job. But the amount of work required to maintain them would also be more. Balance is a keyword for success here.
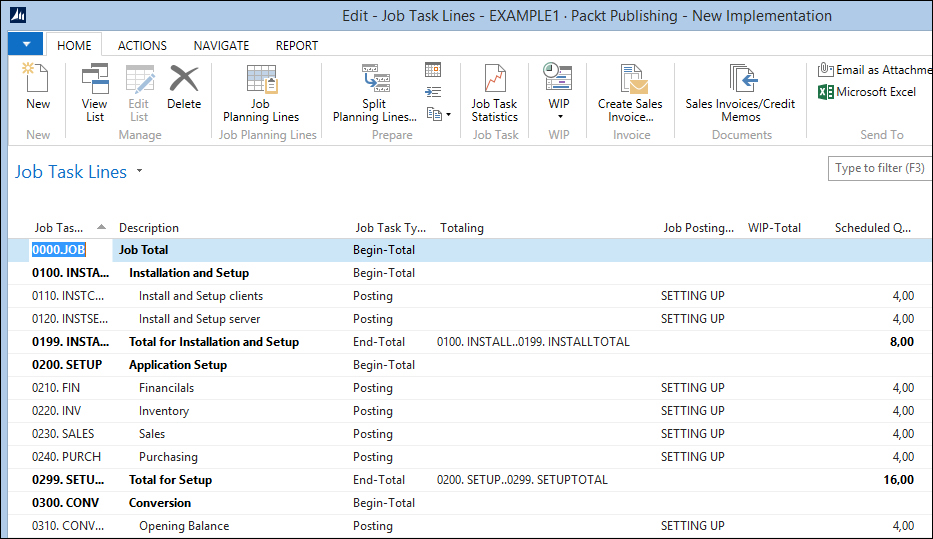
Creating Job Tasks and Planning Lines
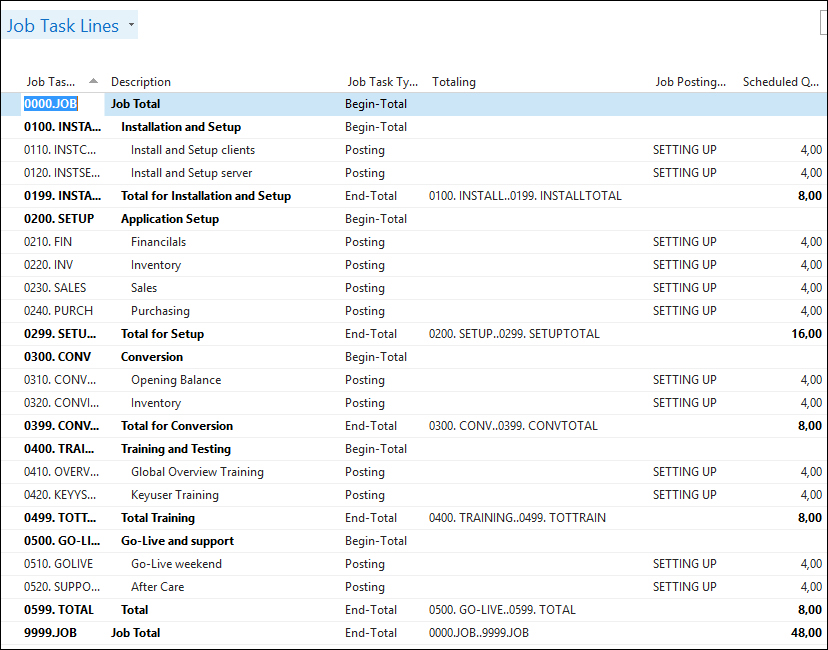
The Job Tasks can be created with the same structure as the Chart of Accounts, meaning the actual Task Lines can be grouped using Begin and End Total lines. Each level can be indented for better readability.
The Job Planning Lines are the detail lines of each Job Task. This defines what we will do and how this will be invoiced. A Job Planning Line can be linked to the master data types Resource, Item, G/L Account, or Text.
The Line Type in the Job Planning Line defines how it will be invoiced. There are three types:
- Schedule: The amounts on this line will only be used for budgeting purposes. When invoicing, we need to post one or more job journal lines that will be invoiced or we can create another Job Planning Line with the invoice amount. Schedule lines should be used when billing for time and materials.
- Contract: This line will be invoiced with the exact amounts. However, the amounts do not show up in the budget. This can be used when invoicing fixed price jobs in a schedule, for example, 50 percent when signing the contract and 50 percent on job completion.
- Both Schedule and Contract: This line will be invoiced in exactly the same way as the contract lines but the amount will also show up in the budget.
When the Job Tasks and Job Planning Lines are set up, we can start the job. During the job, we will consume resources and items from our company. This should be registered using the Job journal. The Job Journal is the lowest level of the Journal Posting diagram we drafted in Chapter 1, Introduction to Microsoft Dynamics NAV, and uses the other journals to create the resource, item, and general ledger entries.
When creating a Job Journal Line, the following few fields are particularly important for the process:
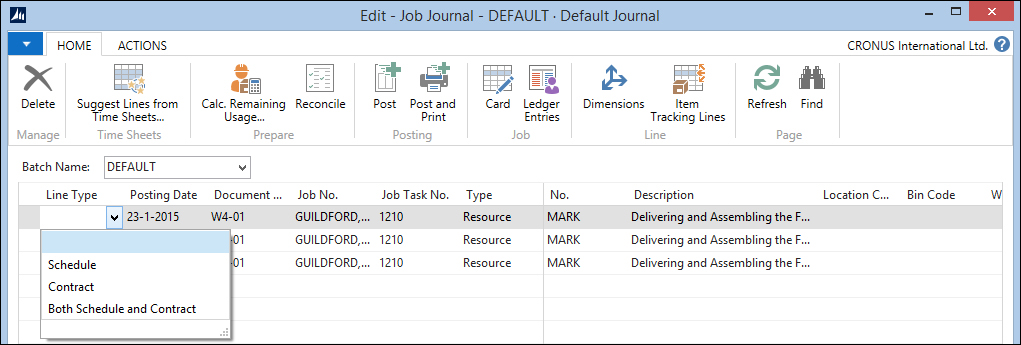
Let's have a look at the fields in more detail:
- Line Type: This has the same options as the Job Planning Line, Schedule, Contract, and Both Schedule and Contract. When the job journal line should be invoiced, the type should be Contract. When the job journal line is part of a fixed price, the Line Type should be left blank. Then the Line Type is Schedule, the system will create additional Job Planning Lines of this type, which may corrupt our budget for the customer since they are already created.
- Unit Cost and Unit Price: These fields will determine the cost of the job and price that will be invoiced to the customer if the Line Type is Contract. This information is also used in the calculation of the work in progress.
Let's go through some different job scenarios to see how we can use this functionality.
The chapter objects contain both the changes that we will discuss in this chapter as well as the example jobs we will use. After importing chapter8.fob as described in Appendix, Installation Guide, run page 123.456.700 Jobs Add-on Setup and run Initialise Application.
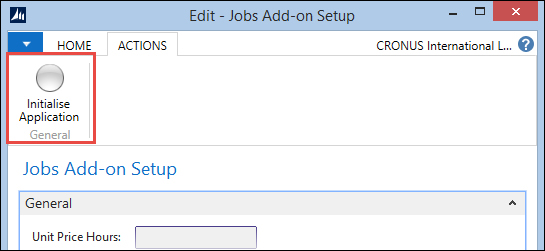
When this completes, restart the Role Tailored Client. You should now see the Project Manager Role Center.
Implementing Microsoft Dynamics NAV 2013 is not an easy task and many things need to be taken care of before we can use the product. We will implement Microsoft Dynamics NAV for Packt Publishing. The Job for this example is EXAMPLE1.
For the implementation, we will create various Job Task groups. Each part of the implementation gets a code. As the sorting is done on this field, we will create code using numbers and a logical name, for example, 0200. SETUP and 0210. FIN.
Our consultants will help the customer to install the system, help with the setup, and convert the data from the old system. When this is done we will help them with testing and train them using Microsoft Dynamics NAV. The consultants will be set up in the system as Resources, which are in turn entered into the Job Planning Lines.
When everything is working as expected, we can schedule a go-live weekend and help them in the first period using the system.
Invoicing a job like this is done using a budget. We will make a precalculation of the number of hours we think are necessary and start with that. During the job we need to measure the used budget and compare it with the progress.
The budget is created using the Job Planning Lines. During this phase of the job, we do not yet know which resource will be used for the Job Tasks and it might even be done by more than one resource. This is why we want to use Resource Groups in our budget.
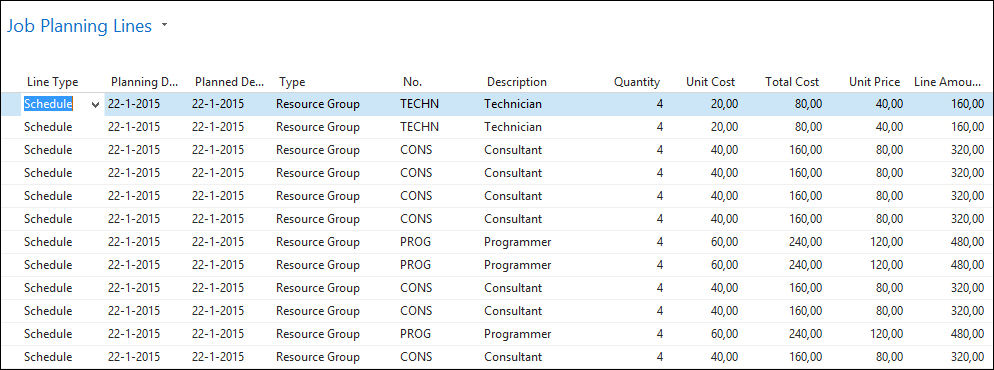
The Line Type of these Job Planning Lines is Schedule. This means that these lines are just for budgeting and schedule purposes. The system will invoice the actual consumption posted in the Job Journal.
To use Microsoft Dynamics NAV 2013, Packt Publishing needs a new infrastructure. Their current systems do not meet the requirements for Microsoft Dynamics NAV 2013.
For this job, we could create new Job Task Lines in the implementation job, but for a clearer overview, we will create a new job, EXAMPLE2.
Our company builds and sells its own computer systems. We can build both servers and desktop systems. As none of the systems are exactly the same and available components switch regularly, we do not want to create an item and a bill of materials for each system. Instead we use a calculation system, which we add as a customization to Dynamics NAV that allows us to determine a price for a system. For other products like switches, routers, printers, and laptops, we use items that we purchase from vendors.
The Job Tasks and Job Planning Lines for this job look like this:
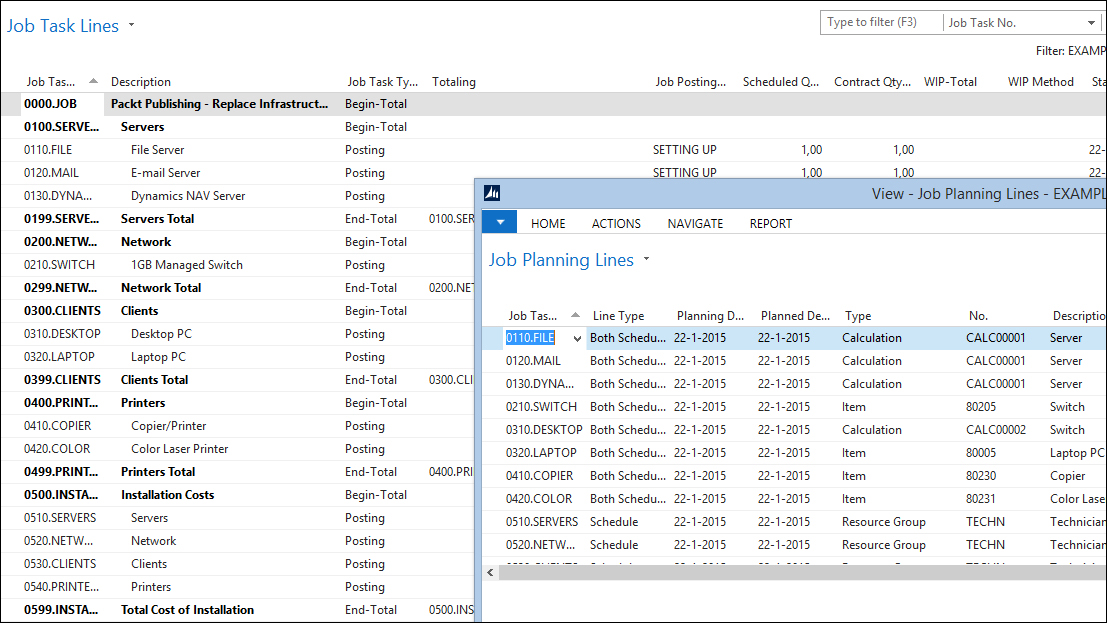
Job Tasks and Job Planning Lines
The installation costs in this job are Resource Groups with Line Type Schedule, just as in the previous job, so we invoice actual hours spent on the Job.
The other lines are of type Both Schedule and Contract. This means we will invoice exactly what is in the budget. The Job Journal Lines for these tasks should be posted with a blank Line Type.
Our customer requests an upgrade from Navision Version 3.70 to Microsoft Dynamics NAV 2013. We can do this for a fixed price but we require a fee to analyze the system.
For the EXAMPLE3 job, we can start with a limited number of Job Task Lines, just for the quote. When the customer agrees to do the upgrade, we can add new Job Task Lines.
Both the quote and the upgrade are a fixed price and posted directly to the general ledger. This does not mean we cannot have our resources register the actual hours using the Job Journal but the Line Type should be blank.
Another part of the upgrade is not done at a fixed price. The system needs a redesign, a conversion to SQL Server 2014, and the customer wants additional training and support.

Upgrading for re-design
The fixed price part of the upgrade is invoiced in three phases. When the job starts, we invoice 50 percent, and when we deliver the test system, we invoice 40 percent, and finally 10 percent is invoiced three months after go-live.
This is done using lines of Both Schedule and Contract Line Type.
For the support team, our policy is to create one job per fiscal year per customer. We will use this job, EXAMPLE4, to invoice the maintenance of the license and all support issues.
The support issues can be both little questions customers call us for, like changing a report or a page, or implementing new features that requires only a few days' work.
Each issue and new feature will be created as a Job Task Line. The new features will be created by the account manager who sells the feature. We can then decide if the invoicing is done at a fixed price, using contract lines, or on time and materials using schedule lines.
Our support team also needs to use the job system, but we do not want them to manually create a new Job Task Line for each support call and we also want them to view all outstanding issues for all customers easily. For this, we have created a new issue registration system, which we will discuss at the end of this chapter.
Each issue in the system is linked to a Job Task. When support engineers create a new issue, the Job Task Line is automatically generated for them and they can use it in our time and billing system.
For all the jobs in our examples, it is critical to have a solid registration of resource hours. In the standard Microsoft Dynamics NAV Job application resources need either to post a Job Journal for each combination of job, Job Task and Posting Date or we can use the new Time Sheet application introduced in Version 2013.
Tip
On the MSDN page at http://msdn.microsoft.com/en-us/library/hh175112(v=nav.71).aspx, you can find more information on how to set up and use Time Sheets in Microsoft Dynamics NAV.
The Time Sheet application is layered above the Resource Journal Line and is created using Resources and Job Tasks.
There is an approval process for the person responsible for the job allowing them to make corrections.

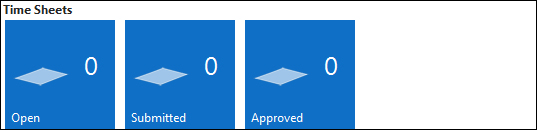
The time sheet is designed to be created for each week. The time sheets are generated using a process, not by the user. After that the resource can create Time Sheet Line for each Job Task Line and populate the number of hours each day of the week.
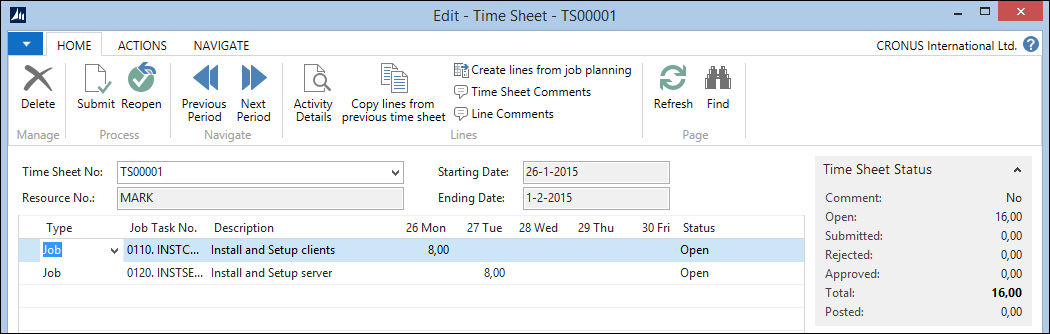
If we look at the preceding time sheet, we can see after it updated that Wednesday is missing 2 hours.
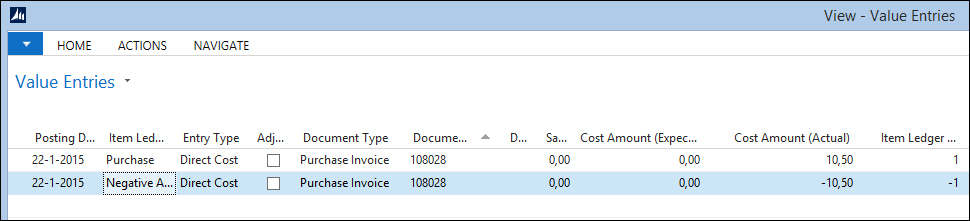
For some jobs, it might be necessary to purchase items specifically for that job. In Microsoft Dynamics NAV 2013, the Jobs module was integrated with the Requisition Worksheet we looked at in Chapter 5, Production and Chapter 6, Trade. However, in this example, we will create the purchase orders manually like this:

When purchasing for a job, the Job No. and Job Task No. fields should be used. If we set the Job Line Type to contract this item will be invoiced to the customer. Usually, this is not required since it should have been in the Job Planning Lines already.
When everything in our jobs is set up as required and the Job Journal is used to post the usage, creating the invoices is a simple task.
In the Job Manager Role Center, we can see if a job is due to be invoiced. This is done using a flow filter on the Planning Date field of the Job Planning Lines.

Each Job Planning Line has a planning date. This can be used to schedule our resources but is far more useful for invoice scheduling. Each Job Planning Line that is ready to be invoiced should get the invoice date in the Planning Date field.
The invoices can then be created using the batch report Job Create Sales Invoice (1093) but we can also preview the invoice by using the report Job Suggested Billing (1011). This report can be started from each job.

Job-Suggested Billing
The sales invoice lines are created using the same description as the Job Planning Lines. To clarify information for the customer on the invoice we can use extra text lines.
When the invoice is created and posted, the Job Task is updated with the actual invoicing information.
Since most jobs are not completed in a day or a week, it is important to know the status of each job in time. This can be measured in quantity and financially. In quantities, we can see how much of the budget is being used by looking at the Job Task page. For financial progress, we can calculate the WIP.
WIP calculates the cost we made and the sales we invoiced on the job and creates Job WIP Entries for this. This can then be posted to the general ledger if required. The WIP amounts depend on the WIP method.
In Microsoft Dynamics NAV, WIP is calculated based on a combination of costs and sales as set up in the Job WIP method table.
Let's create an example and calculate the WIP for five example methods.
|
Code |
Recognized costs |
Recognized sales |
|---|---|---|
|
|
At completion |
At completion |
|
|
Cost of sales |
Contract (invoiced price) |
|
|
Cost value |
Contract (invoiced price) |
|
|
Usage (total cost) |
Percentage of completion |
|
|
Usage (total cost) |
Sales value |
We created a job with a total price of 1000 and total cost of 500. We used 4 resource hours' worth 500 and cost 250. We invoiced nothing.
|
Recog. cost |
Recog. sales |
WIP cost |
WIP sales | |
|---|---|---|---|---|
|
Cost value |
125 |
0 |
125 |
0 |
|
Sales value |
250 |
250 |
0 |
250 |
|
Cost of sales |
250 | |||
|
Percentage of completion |
250 |
250 |
0 |
250 |
|
Completed contract |
250 |
Now, we send an invoice to the customer for the hours spent. We invoice 500.
|
Recog. cost |
Recog. sales |
WIP cost |
WIP sales | |
|---|---|---|---|---|
|
Cost value |
375 |
500 |
-125 |
0 |
|
Sales value |
250 |
250 |
0 |
-250 |
|
Cost of sales |
500 |
500 |
-250 | |
|
Percentage of completion |
250 |
250 |
0 |
-250 |
|
Completed contract |
250 |
-500 |
In the last example, we will use an item that costs 250 that we cannot invoice. We now have 500 costs and 500 sales.
|
Recog. cost |
Recog. sales |
WIP cost |
WIP sales | |
|---|---|---|---|---|
|
Cost value |
500 |
500 |
0 |
0 |
|
Sales value |
250 |
250 |
0 |
-250 |
|
Cost of sales |
500 |
500 |
0 | |
|
Percentage of completion |
500 |
500 |
0 |
0 |
|
Completed contract |
500 |
-500 |
When the WIP is positive, it means that we have done more than we invoiced. When the WIP is negative, we have invoiced more than we have done.
Each company that uses Microsoft Dynamics NAV should make their own decision about what WIP method to use. WIP methods can change for each job and even change during a job.
Some accountants want to post the WIP amounts to the general ledger. The benefit of doing this is to have all the financial information in one place for easier reporting.
The G/L Accounts for the WIP posting are set up in the Job Posting Group. When posting WIP to the general ledger, there is always a reversal posting. When a company does monthly reporting, the WIP is posted on the last day of the month and reversed on the first day of the next month.