RM is a complete module that is not often highly customized or verticalized. However, we will describe some possible changes and how to integrate an add-on, in our case the squash application with relationship management.
All examples in this chapter are part of the objects downloaded for Chapter 2, A Sample Application.
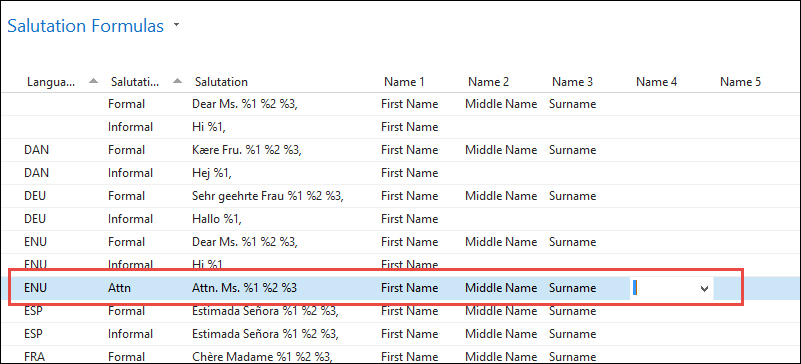
By default, the system has two salutation formula types, formal and informal, allowing us to print Dear Mrs. Brown, or Dear Angela, but what if we want to print Attn. Mrs. Brown?
For this, we need to first add an option to the Salutation Type field in the Salutation Formula table.

Next, we want to use the formula when printing a Contact Cover Sheet. This uses the Format Address functionality from codeunit 365.
This codeunit is the single point in Dynamics NAV where all the address formatting is done.
The formatting of contact persons is done in the ContactAddrAlt function. We should make the following change:
ContactAddrAlt()
...
  ContIdenticalAddress:
    WITH ContAltAddr DO BEGIN
      GET(Cont."Company No.",CompanyAltAddressCode);
      FormatAddr(
        AddrArray,"Company Name","Company Name 2",
        Cont.Name,Address,"Address 2",
        City,"Post Code",County,"Country/Region Code");
    END;
  (Cont.Type=Cont.Type::Person) AND
  (Cont."Company No." <> ''):
    WITH Cont DO
      FormatAddr(
//        AddrArray,ContCompany.Name,ContCompany."Name 2",
//        Name,Address,"Address 2",
        AddrArray,ContCompany.Name,ContCompany."Name 2",
        GetSalutation(5, Cont."Language Code"),Address,
        "Address 2",City,"Post Code",County,
        "Country/Region Code")
Tip
Always comment out the original line of code before you make a change. This will enable you to always go back to standard code and help when upgrading this solution to a newer version.
Most NAV partners and developers have their own way of documenting and commenting. The example in here is the minimum comment requirement. We will discuss versioning objects in Chapter 10, Application Design.
In our modification, we use the GetSalutation function in Contact table (5050) instead of the Name field. Let's have a look at that function and analyze what it does:
GetSalutation()
IF NOT SalutationFormula.GET("Salutation Code",LanguageCode,
  SalutationType)
THEN
  ERROR(Text021,LanguageCode,"No.");

SalutationFormula.TESTFIELD(Salutation);

CASE SalutationFormula."Name 1" OF
  SalutationFormula."Name 1"::"Job Title":
    NamePart[1] := "Job Title";
  SalutationFormula."Name 1"::"First Name":
    NamePart[1] := "First Name";
  SalutationFormula."Name 1"::"Middle Name":
    NamePart[1] := "Middle Name";
  SalutationFormula."Name 1"::Surname:
    NamePart[1] := Surname;
  SalutationFormula."Name 1"::Initials:
    NamePart[1] := Initials;
  SalutationFormula."Name 1"::"Company Name":
    NamePart[1] := "Company Name";
END;

CASE SalutationFormula."Name 2" OF
  ...
END;
...
FOR i := 1 TO 5 DO
  IF NamePart[i] = '' THEN BEGIN
    SubStr := '%' + FORMAT(i) + ' ';
    IF STRPOS(SalutationFormula.Salutation,SubStr) > 0 THEN
      SalutationFormula.Salutation :=
        DELSTR(SalutationFormula.Salutation,STRPOS(SalutationFormula.Salutation,SubStr),3);
  END;

EXIT(STRSUBSTNO(SalutationFormula.Salutation,NamePart[1],
  NamePart[2],NamePart[3],NamePart[4],NamePart[5]))
The function
uses two parameters: SalutationType and LanguageCode. With these values and the salutation code of the contact, it checks whether there is a valid formula. Since we only added a new option, the code still works because at database level, the Option field is translated to an Integer.
Depending on the order of the formula, the necessary name fields are combined and used as the return value of the function.

Another common requirement from end users is to maintain the same number when creating a customer or vendor from a contact.
This can be done by adding one line of code to the CreateCustomer function in the contact table:
CreateCustomer()
...

CLEAR(Cust);
Cust.SetInsertFromContact(TRUE);
//* Maintain Contact No. >>>
Cust."No." := "No.";
//* Maintain Contact No. <<<
Cust.INSERT(TRUE);
Cust.SetInsertFromContact(FALSE);
This works because by populating the No. field, the Number Series functionality in the OnInsert trigger does not start:
OnInsert()
IF "No." = '' THEN BEGIN
  SalesSetup.GET;
  SalesSetup.TESTFIELD("Customer Nos.");
  NoSeriesMgt.InitSeries(SalesSetup."Customer Nos.",
    xRec."No. Series",0D,"No.","No. Series");
END;
...When more companies have their administration in Microsoft Dynamics NAV, they most often have the same owner or group of owners that want their contact data to span across their companies.
This can be achieved by sharing some tables across all companies and changing some business logic.
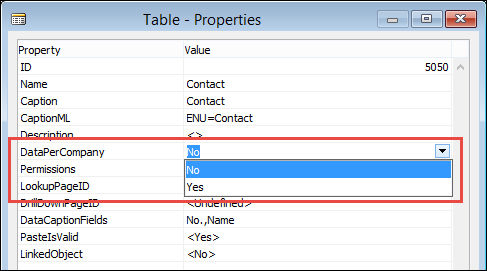
By default, Microsoft Dynamics NAV will create a separate instance of each table for each company. This can be changed with the DataPerCompany property in the table designer.
The following lists should be shared across the database since they contain the main contact information and the link to the customer and vendor data:
- 5050 - Contact
- 5051 - Contact Alt. Address
- 5052 - Contact Alt. Addr. Date Range
- 5053 - Business Relation
- 5054 - Contact Business Relation
This will allow us to reuse contact data in all companies. Other tables are optional to share but might be useful.
By sharing the Contact Profile Answer table, other companies can see how a customer is doing within the group.
The segment tables could be shared in order to slice and dice information across the company. This also requires the criteria tables to be shared.
Campaigns and opportunities should not be shared since that interfaces with the ERP system. Never share financial tables such as the value entry or document tables.
Interaction log entries could be shared but we should realize that most table relations to sales and purchase documents will not work when we are in the wrong company.
When sharing the contacts across the companies, we are interested to see in which company contacts are customer and vendor. We also want to maintain those tables when the contact information changes.
This means that besides sharing the Contact Business Relation table, we should also add a field indicating the company and add this field to the primary key.

To make this customization work, we need the C/AL code to understand what we want to do. It needs to understand that we added the company. Let's go through all the functions we need to change to make this work.
The functions that create the customer and vendor records we saw in Chapter 2, A Sample Application, should also be checked, for example, the function CreateCustomer in the contact table.
CreateCustomer()
...

ContBusRel.RESET;
ContBusRel.SETRANGE("Contact No.","No.");
ContBusRel.SETRANGE("Link to Table",ContBusRel."Link to Table"::Customer);
//* Company Sharing >>>
ContBusRel.SETRANGE(Company, COMPANYNAME);
//* Company Sharing <<<
IF ContBusRel.FIND('-') THEN
  ERROR(
    Text019,

...
And a little bit further up in the C/AL code:
ContBusRel."Contact No." := ContComp."No.";
ContBusRel."Business Relation Code" := RMSetup."Bus. Rel. Code for Customers";
ContBusRel."Link to Table" := ContBusRel."Link to Table"::Customer;
//* Company Sharing >>>
ContBusRel.Company := COMPANYNAME;
//* Company Sharing <<<
ContBusRel."No." := Cust."No.";
ContBusRel.INSERT(TRUE);
We should also check the code that maintains data integrity, which is the CustVendBank-Update Codeunit (5055) that we discussed in Chapter 2, A Sample Application:
UpdateCustomer()
WITH Cust DO BEGIN
//* Company Sharing >>>
  CHANGECOMPANY(COMPANYNAME);
//* Company Sharing <<<
  GET(ContBusRel."No.");
  ...
END;
Here, we use the CHANGECOMPANY C/AL command to change the company for a specific instance of a variable.
The last change we should do for a properly working system is create a new instance of the Number Series functionality.
This can be achieved relatively easily since the Number Series are an isolated set of objects.
In the object designer, we should filter on this set of objects and export them to a .txt file.
- Table (308): No. Series
- Table (309): No. Series Line
- Table (310): No. Series Relationship
- Report (21): No. Series
- Report (22): No. Series Check
- Codeunit (396): NoSeriesManagement
- Page (456): No. Series
- Page (457): No. Series Lines
- Page (458): No. Series Relationships
In this file, we can renumber them and rename them so we get something like this:
- Table (123456721): No. Series (Shared)
- Table (123456722): No. Series Line (Shared)
- Table (123456723): No. Series Rel. (Shared)
- Report (123456721): No. Series (Shared)
- Report (123456722): No. Series Check (Shared)
- Codeunit (123456721): NoSeriesManagement (Shared)
- Page (123456721): No. Series (Shared)
- Page (123456722): No. Series Lines (Shared)
- Page (123456723): No. Series Rel. (Shared)
Where, the tables should be DataPerCompany No.
When we have shared Number Series functionality, we can implement this in the existing objects.
- The Contact Nos. field in the marketing setup table should change the table relation to the Shared No. Series table as well as the No. Series field in the contact table.
- The
NoSeriesMgtvariable in the contact table should move fromNoSeriesManagementtoSharedNoSeriesMgt.
Sharing the contact information across companies is a change that has been implemented by many companies and can be considered safe. Other tables in Microsoft Dynamics NAV are more difficult to share because of financial or operational information.
A typical example in the standard application is Item table (27). This contains a field Cost is Adjusted (29), which is used when running cost adjustment. If this table will be shared across all companies, it would create a major issue with running this function. We will discuss cost adjustment in Chapter 5, Production.
For this issue, there are two commonly implemented solutions:
- Shared Master Items: We can create a new table called master item. This table is shared across all companies and contains the information we share like descriptions and pricing. When the data in this table is changed, it should enable a mechanism comparable to the
CustVendBank-Update Codeunit (5055), which updates the items in the other companies using theCHANGECOMPANYC/AL function. - External Synchronization: We could implement something that will export the changes done in one company into an XML file. An Application Server can run in the background and read this xml file and implement these changes to other companies in the database or even other databases.
The first solution with master items looks a lot like the way contacts work in the standard application and is a perfect example of look, learn, and love using proven data structures in customized solutions.
The last change we are implementing in relationship management is adding a table to the Add Contacts functionality in segments.
We have seen that it is already complete but a vertical solution might want to integrate its ledger entry tables here.
For this example, we will make it possible to filter in the squash ledger entries from the example application in Chapter 2, A Sample Application.
The first step is to add the squash ledger entries as DataItem to the Add Contacts report (5198). We will copy the functionality from the Value Entries as this is comparable functionality.

We cannot copy and paste the table relation from the other contact business relation DataItem since squash players are contact persons, not companies. Our table relation should be Contact No.=FIELD(No.).
The code in our Contact Business Relation table tells us that we need two new variables or the type Boolean, SquashFilters and SkipSquashLedgerEntry:
ContactBusinessRelation2 - OnPreDataItem()
IF ContactOK AND ((GETFILTERS<>'') OR SquashFilters) THEN
  ContactOK := FALSE
ELSE
  CurrReport.BREAK;

ContactBusinessRelation2 - OnAfterGetRecord()
SkipSquashLedgerEntry := FALSE;
IF NOT SquashFilters THEN BEGIN
  ContactOK := TRUE;
  SkipSquashLedgerEntry := TRUE;
  CurrReport.BREAK;
END;
The SquashFilters is determined in the OnPreReport trigger:
Report - OnPreReport()
ItemFilters := "Value Entry".HASFILTER;

//* Squash >>>
SquashFilters := "Squash Ledger Entry".HASFILTER;
//* Squash <<<
...
The code in the Squash Ledger Entry DataItem should look like this:
Squash Ledger Entry - OnPreDataItem()
IF SkipSquashLedgerEntry THEN
  CurrReport.BREAK;

CASE ContactBusinessRelation2."Link to Table" OF
  ContactBusinessRelation2."Link to Table"::"Squash Player":
  BEGIN
    SETRANGE("Squash Player No.",
      ContactBusinessRelation2."No.");
  END;
  ELSE
    CurrReport.BREAK;
END;
Squash Ledger Entry - OnAfterGetRecord()
ContactOK := TRUE;

IF ContactOK THEN
  CurrReport.BREAK;
Make sure we filter on our instance of Contact Business Relation and that we filter on our link to the squash player table.
The ContactOK indicates that all contact persons connected to this squash ledger entry will be inserted.
To support the criteria filter functionality, we need to make two changes, one to the Add Contacts report and the other to the SegCriteriaManagement codeunit.
In the Add Contacts report, we add this C/AL code to the OnPreReport trigger. This will make a call to the SegCriteriaManagement Codeunit (5062):
OnPreReport()
...
SegCriteriaManagement.InsertCriteriaFilter(
  "Segment Header".GETFILTER("No."),DATABASE::"Value Entry",
  "Value Entry".GETFILTERS,"Value Entry".GETVIEW(FALSE));
//* Squash >>>
SegCriteriaManagement.InsertCriteriaFilter(
  "Segment Header".GETFILTER("No."),
    DATABASE::"Squash Ledger Entry",
    "Squash Ledger Entry".GETFILTERS,
    "Squash Ledger Entry".GETVIEW(FALSE));
//* Squash <<<
In the SegCriteriaManagement codeunit, we add this code to the SegCriteriaFilter function, which will require a new local variable for Squash Ledger Entry:
SegCriteriaFilter()
...

CASE TableNo OF
   ...
//* Squash Ledger Entry >>>
  DATABASE::"Squash Ledger Entry":
    BEGIN
      SquashLedgEntry.SETVIEW(View);
      EXIT(SquashLedgEntry.GETFILTERS);
    END;
//* Squash Ledger Entry <<<
END;
